1
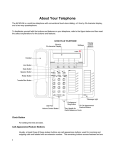
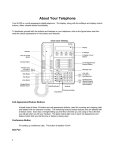
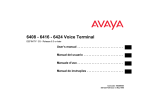
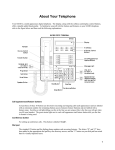
DEFINITY Enterprise Communications Server
Telephone User's Guide
Prepared for: FEDERAL AVIATION ADMINISTRATION, CASPER, WYOMING
Copyright ©1999 Avaya Communications
All Rights Reserved
Printed in USA
Notice
While reasonable efforts were made to ensure that the information contained in the database used to create
this document was complete and accurate, Avaya Communications cannot assume responsibility for any
errors. Changes and/or corrections to the information contained in the Guide Builder software may be
incorporated into the data of future issues.
Security Alert: Your Responsibility For Your System's Security
Toll fraud is the unauthorized use of your telecommunications system by an unauthorized party, for example,
persons other than your company's employees, agents, subcontractors, or persons working on your
company's behalf. Note that there may be a risk of toll fraud associated with your telecommunications
system, and if toll fraud occurs, it can result in substantial additional charges for your telecommunications
services.
You and your System Manager are responsible for the security of your system, such as programming and
configuring your equipment to prevent unauthorized use. The System Manager is also responsible for
reading all installation, instruction, and system administration documents provided with this product in order
to fully understand the features that can introduce risk of toll fraud and the steps that can be taken to reduce
that risk. Avaya Communications does not warrant that this product is immune from or will prevent
unauthorized use of common-carrier telecommunication services or facilities accessed through or connected
to it. Avaya Communications will not be responsible for any charges that result from such unauthorized use.
Avaya Communications Fraud Intervention
If you suspect you are being victimized by toll fraud and you need technical support or assistance, call the
National Service Assistance Center at 1 800 628-2888.
Federal Communications Commission (FCC) Statement
This equipment generates, uses, and can radiate radio-frequency energy and, if not installed and used in
accordance with the instruction manual, may cause interference to radio communications. It has been tested
and found to comply with the limits for a Class A computing device pursuant to Subpart J of Part 15 of FCC
Rules, which are designed to provide reasonable protection against such interference when operated in a
commercial environment.
Operation of this equipment in a residential area is likely to cause interference, in which case the user at
his/her own expense will be required to take whatever measures may be required to correct the interference.
Trademark Information
Guide Builder and DEFINITY are trademarks of Avaya Communications. AUDIX and DEFINITY are
registered trademarks of Avaya Communications.
Page 1
About Your Telephone
The 6408, 6416, and 6424 are multi-line telephones with conventional touch-tone dialing, and a two-way
speakerphone.
To familiarize yourself with the buttons and features on your telephone, refer to the figure below and then
read the explanations for the buttons and features.
6408 model telephone:
Call Appearance/Feature Buttons
Usually, at least three of these buttons are call appearance buttons; used for incoming and outgoing
calls. The remaining buttons access features and are labeled with a feature name. Each has a red
light telling you that this is the line you are using or this is the line you will get when you lift your
handset. The green status light next to each call appearance and feature button tells you that the
line or feature is being used.
Conf/Ring Button
For setting up conference calls. (Use this feature while off-hook.) "Ring" is printed below Conf to
remind you that by pressing Conf while on-hook, you can select a personalized ringing pattern for
your telephone. You can choose from among eight possible ringing patterns.
Page 2
Dial Pad
The standard 12-button pad for dialing phone numbers and accessing features. The letters "Q" and
"Z" have been added to the appropriate dial pad keys for directory access, and the "5" button on your
dial pad has raised bars for visually impaired users.
Display
A built-in 2-line by 24-character display.
Display Control Buttons
The softkeys are the four keys labeled with arrows located directly below the display. The four
display control buttons, labeled Menu, Exit, Prev, and Next are located under the softkeys.
Handset
A handset is provided for placing and answering calls. In some cases, you must lift the handset (go
off-hook) before you can use a feature.
Headsets
Headsets for your telephone allow one-touch hands-free operation. To answer a call, press Headset
(if administered on your telephone). Press the button again to disconnect. (The Headset feature
must be administered for your telephone.) Headsets consist of a headpiece and modular base unit.
The base unit plugs into the Handset Jack.
Hold
A red button for putting a call on hold.
Message Light
A red light that goes on when a message has been left for you. This light is labeled with a picture of
an envelope.
Mute Button
For turning off the microphone associated with the handset or the speaker, whichever is active, so
the other person on the call cannot hear you.
Redial Button
For redialing the last number that you dialed using the dial pad.
Softkeys
The four round unlabeled buttons located directly below the display correspond to words on the
display screen. You can use the softkeys along with display control keys to access up to 12 features
on your telephone in addition to those features administered on the call appearance/feature buttons.
Page 3
Speaker Button
For accessing the one-way, listen-only speaker or the built-in two-way Speakerphone feature.
Note:
Your telephone can be set for either the Speaker (listen-only) feature or the
Speakerphone (listen and speak) feature. Check with your system manager to see how
your Speaker button is to be used.
Transfer/Test Button
For transferring a call to another telephone. (Use this feature while off-hook.) "Test" is printed below
Trnsfr to remind you that by pressing Trnsfr while on-hook, you can test the button lights.
Volume Control Button
For adjusting the volume of:
• The speaker while the speaker is on
• The handset while a call is in progress using the handset
• The ringer while the telephone is on-hook or ringing, and the speaker is off
Page 4
Tones and Their Meanings
Ringing tones are produced by an incoming call. Feedback tones are those which you hear through the
handset or the speaker.
Ringing Tones
• 1 ring - A call from another extension.
• 2 rings - A call from outside or from the attendant.
• 3 rings - A priority call from another extension, or from an Automatic Callback call you
placed.
• ring-ping (half ring) - A call redirected from your telephone to another because Send All
Calls or Call Forwarding All Calls is active.
Feedback Tones
• busy signal - A low-pitched tone repeated 60 times a minute; indicates the number dialed is
in use.
• call waiting ringback tone - A ringback tone with lower-pitched signal at the end; indicates
the extension call is busy, and the called party has been given a call waiting tone. If you hear
this tone, you may wish to activate Automatic Callback.
• confirmation tone - Three short bursts of tone; indicates a feature activation or cancellation
has been accepted.
• coverage tone - One short burst of tone; indicates your call will be sent to another extension
to be answered by a covering user.
• dial tone - A continuous tone; indicates dialing can begin.
• intercept/time-out tone - An alternating high and low tone; indicates a dialing error, a denial
of the service requested, or a failure to dial within a preset interval (usually 10 seconds) after
lifting the handset or dialing the previous digit.
• recall dial tone - Three short bursts of tone followed by a steady dial tone; indicates the
feature request has been accepted and dialing can begin.
• reorder tone - A fast busy tone repeated 120 times a minute; indicates all trunks are busy.
• ringback tone - A low-pitched tone repeated 15 times a minute; indicates the telephone
dialed is being rung.
Page 5
Troubleshooting
Problem
A feature does not work as noted in
the book.
There is no dial tone.
The telephone does not ring.
Page 6
Solution
1.
Re-read the procedure and try again.
2.
For some features you must lift the handset before you can
use the feature.
3.
Check with your system manager to be sure this feature is
administered on your telephone.
1.
Check with your system manager to be sure your telephone
is administered correctly.
2.
Make sure the handset and line cords at your telephone are
securely connected at both ends.
3.
Find a working telephone of the same type as your own.
Unplug this telephone from its modular wall jack. Plug your
telephone into that jack and check if it gets dial tone.
4.
If your telephone still does not work, plug the working
telephone (of the same type) into your modular wall jack. If
the working telephone has dial tone, your own telephone is
faulty. See your system manager.
1.
Set the ringer volume to a higher level.
2.
Place a test call from another extension to your extension.
3.
Check the line cord to make certain it is securely connected
at both ends.
4.
If there is still a problem, see your system manager.
FEATURE USE AND DESCRIPTION
Abbreviated Dialing
To program or reprogram an Abbreviated Dialing (AD) button:
Note: The system manager must first program a call appearance/feature button as an AD button
before you can program a number on it.
Note: There is a 10-second time limit between your entering the Program Mode and entering first
digit of an AD button, and then a 10-second time limit between each digit. If you hear intercept tone
while you are programming the button, you have exceeded the tine limit and you must begin again.
1. Locate the Program button.
There are several possibilities.
- Press the Menu button and, if necessary, the Next or Prev button until Prog appears (if available
on your display).
- or use an Abbreviated Dialing-code *00.
2. Pick up the handset or press Spkr.
3. Press the Prog button or, Dial the Program code *00.
4. Press the AD button to be programmed.
5. Dial the phone number, extension, or feature access code you want to store.
6. Press #.
7. If you want to program another button, repeat Steps 4 through 6 (within 10 seconds).
8. Hang up or press Spkr to end programming.
To place an AD call:
1. Press the selected AD button. The call is automatically dialed.
Note: The system manager must first program a call list before you can program a number in it.
To program a number into a personal list:
1. On a separate sheet of paper, write down the outside numbers, extensions, and/or
Feature-access codes you want to store.
Note: Each phone number or feature access code is stored as a separate-item.
2. Pick up the handset or press Spkr.
3. Press the Menu button and then the softkey below Prog (if available on your display).
or, Dial the Program code *00.
4. Dial the Personal List number (2, or 3).
Page 7
5. Dial the list item (1, 2, 3...9).
6. Dial the number you want to store up to 24 digits.
7. Press # - The number is stored.
8. If you want to store additional items on the same list, repeat Steps 5 through 7. lf you want to store on
another list, hang up and return to Step 1.
9. Hang up to end programming.
To place a call using a personal AD list:
1. Dial the Abbreviated Dialing List code: #7.
2. Dial the desired list number (2, 3).
3. Dial the desired list item (1, 2, 3… 9).
The call is automatically dialed.
To place a call using the system AD list:
1. Dial the Abbreviated Dialing List code: #71.
2. Dial the desired list item (01, 02, 03… 99).
The call is automatically dialed.
Automatic Callback
To automatically place another call to a busy or unanswered extension:
1. Press the Menu button and then the softkey below AutCB (if available on your display) during the call
attempt
or, Press AutoCallBk (if administered) during the call attempt.
Note: If you send your calls to coverage after activating Automatic Callback, your callback calls will
still ring at your extension and will not be redirected to coverage.
2. Hang-up.
You hear a priority ring when both you and the called extension are idle. When you answer, regular ringing is
sent to the called party.
1. Lift the handset when you hear a priority ring
Note: Automatic Callback is automatically canceled after 30 minutes.
To cancel Automatic Callback:
1. Press the Menu button and then the softkey below AutCb again (if available one your display) while onhook.
Page 8
Call Forwarding all Calls
To temporarily redirect all calls:
1. Press the Menu button and then the softkey below CFrwd (if available on your display) while on-hook or
off-hook.
or press Call Fwd (if administered) while on-hook or off-hook.
or, dial the Call Forward code *22 while off-hook.
2. Dial the extension or phone number where calls are to be sent. Be sure to include the “9”for numbers
outside your office.
3. Hang-up.
You may hear a ring-ping tone from your telephone as each call is forwarded.
To cancel Call Forwarding:
1. Press the Menu button and then the softkey below CFrwd (if available on your display) while on-hook.
or, Press Call Fwd while on-hook.
or, Dial the Call Forward Cancel code #22 while off-hook.
Your calls will now ring at your own telephone.
Call Park
To park a call for retrieval from any extension:
Note: Call Park has been assigned to your telephone, press Call Park and hang up. Otherwise, follow the
instructions below.
1. Press Trnsfr.
2. Dial the Call Park code *66.
3. Press Trnsfr again. The call is parked at your extension.
4. Hang-up.
To retrieve a parked call at any extension:
Note: If Call Park Pickup has been assigned to your telephone, press Park Pickup then dial the extension
where the call is parked. Otherwise, follow the instructions below.
1. Pick up the handset or press Spkr.
2. Dial the Park Pickup code #66.
3. Dial the extension where the call is parked. If you are retrieving a call parked at your telephone, dial your
own extension.
Note: If you receive intercept tone the parked call has been disconnected or retrieved by someone
else.
Page 9
Call Pickup and Directed Call Pickup
To answer a call placed to your pickup group when your phone is idle:
1. Press the Menu button and then the softkey below CPkUp (if available on your display).
or, Press Call Pickup (if administered).
or, Dial the Call Pickup code *77.
- The called telephone stops ringing.
- You are connected to the ringing call.
To pick up a call directly for someone in your office:
Note: Again the Directed Call Pickup feature is designed for covering calls for someone while they
are away from their desk. In this case, you do not have to be a member of the same pickup group.
1. Press DirCPkUp.
or, Dial the Directed Call Pickup code *88.
2. Dial the extension of the ringing telephone.
- The called telephone stops ringing.
- You are connected to the ringing call.
Conference
To add another party to a call:
Note: Your conference call can include up to six parties, including yourself.
1. Press Conf. The present call is put on hold. You are given a new call appearance button and dial tone.
2. Dial the number of the new party and wait for an answer.
3. When you are ready to add the new person to the conference call, press Conf again.
4. To establish additional conference connections repeat Steps 1 through 3.
Add the call on hold to another call to which you are connected:
1. Press Conf. The hold light flutters. The current call appearance light flutters.
2. Press the call appearance button of the call on hold
3. Press Conf again. All parties are now connected.
To drop the last party added to a conference call:
1. Press the Menu button and then the softkey below Drop (if available on your display).
or, Press Drop (if administered).
Page 10
Directory
To search the directory for a name:
1. Press the Menu button and then the softkey below Dir (if available on your Display).
or, Press Directory (if administered).
2. Key in the selected name using the dial pad: last name, comma (use *), first name or initial. Only a few
letters are needed.
3. Press the Next button for each successive directory name you wish to see.
4. To search for a new name, press the softkey below Dir or press Directory and go through the above
sequence again.
5. When you are ready to exit the directory, press the Exit button.
To place a call to the name displayed in the directory:
1. Pick up the handset.
2. While the name is shown, press Call Display (if administered).
or, Press the Exit button and then dial the number using the dial pad.
Display, Softkeys, and Control Buttons
To enter softkey mode:
The softkeys are the four unlabeled round keys located directly below the display. The four round display
control buttons, labeled Menu, Exit, Prev, and Next are located under the softkeys. There are three
separate feature option screens. Each of these screens allows you to select from four different features. You
can enter Softkey Mode by pressing the Display Control button labeled Menu. The following is an example of
a softkey feature menu screen, your actual menus may be different.
Dir
Drop
HFAns
Timer
The top line of each softkey feature menu screen shows you the status of each feature. An arrow appears
above the feature name or abbreviation if that feature is active. If there is no arrow above the feature, the
feature is not active.
The second line on each softkey feature menu screen shows the features you can access. To use any of
these features, you must press the softkey below the feature name or abbreviation.
For example, on the feature option screen shown above, you can access the System Directory by pressing
the softkey below Dir (the System Directory feature). If you want to drop the last person added to a
conference call, press the softkey below Drop. To see the next set of four features, press the display control
button labeled Next; to move back a screen, press the display control button labeled Prev. Press the Next or
Prev button until the feature you want to use appears on the second line.
Abbreviation
Acct
AD
CFrwd
CPark
Page 11
Feature
Account Code Entry
Abbreviated Dialing buttons, (can be multiple buttons)
Call Forwarding All Calls
Call Park
CPkUp
CnLWC
Cnslt
Count
Dpkup
Excl
GrpPg
IAuto
lDial
Inspt
Mark
Park
SAC
SFunc
Spres
Stats
Stop
Wait
Call PickUp
Cancel Leave Word Calling
Consult
ACD Stroke Count (can be up to 10 buttons)
Directed Call Pickup
Manual Exclusion
Group Paging
Automatic intercom
Dial Intercom
Inspect
AD Special Function Mark
Call Park to other Extensions
Send AII Calls
Abbreviated Dialed Special Function
Abbreviated Dialing Suppress
ACD Cogent Statistics
Abbreviation Dialing Stop/indefinite Walt
AD Special Function Wait
To activate features using the softkeys:
Note: Priority Calling is used in this example
1. Press the Menu button. The display shows the initial softkey feature menu screen:
Dir
Drop
HFAns
Timer
2. Press the Next button. The display shows the second softkey feature menu screen:
Pcall
AutCB
Prog
Pause
3. To use the Priority Calling feature, press the softkey below PCall and then dial the extension.
Note: When the feature is activated, after the Display screen shows you the digits you are an arrow
appears above the feature. If there is not an arrow above the feature, the feature is off.
Note: When both parties hang up from the call, the arrow above PCall (showing feature status
indication) disappears.
Exit
To exit any display feature:
1. Press the Exit button. The display shows the time and date or, when applicable, the call/caller information.
Hands-Free Answer (Internal calls only)
To automatically answer incoming internal calls:
1. Press the Menu button and then the softkey below HFAns (if available on your display).
or, Press HFAns (if administered).
Page 12
You hear a 3-tone warble before your telephone goes off-hook on each internal call.
2. When you no longer want to have internal calls answered automatically, press the softkey below HFAns (it
may be necessary to press Menu again first).
or, Press HFAns.
Hold
To put a call on hold:
1. Press Hold. The green light blinks. The call is put on hold.
To return to the call on hold:
1. Press the call appearance button of the call on hold.
To answer a new call while active on another:
1. Press Hold. The green light blinks. The present call is put on hold.
2. Press the call appearance button of the incoming call. You are connected to the incoming call.
Note: Calls placed on hold cannot be retrieved from another telephone. Use Call Park if the call will
need to be retrieved at a different extension.
Last Number Dialed (Redial)
To automatically redial the last number dialed:
1. Press Redial.
The last number that you dialed is automatically redialed.
Note: The redialed number can be an outside number up to 24 digits, an extension, or a trunk or
feature access Code.
Priority Calling
To place a priority call:
1. Press Menu and then the softkey below PCall (if available on your display).
or, Press Priority (if administered).
or, Dial the Priority Calling code *11.
2. Dial the extension. Wait for the called party to answer.
Note: If your call is not answered and you wish to redirect it to coverage, press Go to Cvr (if
administered) while the call is ringing.
Page 13
Select Ring
To select a personalized ringing pattern:
1. Press Conf while on-hook.
The current ringing pattern plays and repeats every three seconds,
2. Continue to press (and then release) Conf to cycle through all eight ringing patterns.
If you want to save the ringing pattern currently being played, do not press Conf anymore.
You hear the selected ringing pattern two more times, then it is automatically saved.
Your new ringing pattern is set.
Note: If you go off-hook, receive a call, or lose power during selection, the process is interrupted and
you must start again.
Send All Calls (SAC)
To send all calls (except priority calls) to coverage:
1. Press the Menu button and then the softkey below SAC (if available on your display) while on-hook.
or, Press Send All Calls while on-hook.
or, Dial the Send All Calls code *33 while on-hook.
Note: You may hear a ring-ping tone from your telephone as each call is forwarded
To cancel Send All Calls:
1. Press the Menu button and then the softkey below SAC again (if available on your display) while on-hook.
or, Press Send All Calls again while on-hook.
or, Dial the Send All Calls Cancel code #33 while off-hook.
Speakerphone
To place or answer a call using the speakerphone:
Note: It is not necessary to activate the speaker to dial an extension or outside call (9+number). The
speakerphone is automatically activated when you begin to dial.
1. Press Spkr The red light next to Spkr goes on.
2. Place or answer a call, or access the selected feature.
3. Adjust the speakerphone volume if necessary.
To raise the volume, press the right half of the Volume control button labeled ^.
To lower the volume, press the left half of the Volume control button labeled v.
Page 14
To change from the speakerphone to the handset:
1. Pick up the handset and talk. The red light next to Spkr goes oft.
To change from the handset to the speakerphone:
1. Press Spkr. The red light next to Spkr goes on.
2. Hang up the handset within 10 seconds.
To prevent the other party from hearing you:
1. Press Mute. The red light next to Mute) goes on. The other person cannot hear you. Press Mute again to
resume speaking to the other person. The red light next to Mute goes off. The other person can hear you
again.
To end a call when using the speakerphone:
1. Press Spkr again. - The red light next to Spkr goes off.
To use the handset and speakerphone simultaneously:
1. While you are active on the handset, press Spkr. The red light next to Spkr goes on. People in your office
can hear the conversation on the speakerphone, but you must use the handset in order to speak to the other
person.
Note: If you hang up the handset within 10 seconds after pressing Spkr, the call remains active on
the speaker. If you hang up the handset more than 10 seconds after pressing Spkr the speaker will
also turn off, and the call is disconnected.
Stored Number
To view the number or feature on a button, or the last number dialed:
1. Press the Menu button and then the softkey below View (if available on your display).
or, press View (if administered).
2. Press the selected feature button
Note: To view the last number that you dialed, press Redial, or to view the number stored on an AD
button, press the selected AD button. The feature assignment on the button, or the phone number is
shown.
3. To return to the Normal Mode display, press the Exit button or return to Step 2 to see another stored
number.
Test
To test the lights and display:
1. Press and hold Trnsfr while on-hook. The lights go on in columns and all the display segments fill in.
Page 15
2. To end the test, release Trnsfr. The lights return to normal operation.
Note: If the lights or the display segments do not respond during the test, see your system manager.
Timer
To view the elapsed time:
1. Press the Menu button and then the softkey below Timer (if available on your display). This exits you from
Softkey Mode.
or, Press Timer (if administered).
The display shows the elapsed time.
To stop the timer and clear the display:
1. Press the Menu button and then the softkey below Timer again (if available on your display).
or, Press Timer again.
The elapsed time is displayed for about three seconds and then disappears.
Transfer
To send the present call to another number:
1. Press Trnsfr while on a call. The present call is put on hold. The green light blinks. You are given a new
call appearance button and dial tone.
2. Dial the number to which the call is to be transferred.
3. Remain on the line and announce the call. If the line is busy of there is no answer, return to the call on
hold by pressing its call appearance button.
4. Press Trnsfr again. The call is sent to the dialed number.
Note: If you hang up before pressing Trnsfr again, the caller will not be transferred. Press the
flashing line and start the transfer process again from step 1.
5. Hang up
Page 16