1
VPNremote for the 4600 Series
IP Telephones
Release 2.0
Administrator Guide
19-600753
Issue 2
July 2006
© 2006 Avaya Inc.
All Rights Reserved.
Notice
While reasonable efforts were made to ensure that the information in this
document was complete and accurate at the time of printing, Avaya Inc. can
assume no liability for any errors. Changes and corrections to the information
in this document may be incorporated in future releases.
Documentation disclaimer
Avaya Inc. is not responsible for any modifications, additions, or deletions to
the original published version of this documentation unless such modifications,
additions, or deletions were performed by Avaya. Customer and/or End User
agree to indemnify and hold harmless Avaya, Avaya's agents, servants and
employees against all claims, lawsuits, demands and judgments arising out of,
or in connection with, subsequent modifications, additions or deletions to this
documentation to the extent made by the Customer or End User.
Link disclaimer
Avaya Inc. is not responsible for the contents or reliability of any linked Web
sites and does not necessarily endorse the products, services, or information
described or offered within them. We cannot guarantee that these links will
work all of the time and we have no control over the availability of the linked
pages.
Warranty
Avaya Inc. provides a limited warranty on this product. Refer to your sales
agreement to establish the terms of the limited warranty. In addition, Avaya’s
standard warranty language, as well as information regarding support for this
product, while under warranty, is available through the following Web site:
Preventing toll fraud
"Toll fraud" is the unauthorized use of your telecommunications system by an
unauthorized party (for example, anyone who is not a corporate employee,
agent, subcontractor, or person working on your company's behalf). Be aware
that there may be a risk of toll fraud associated with your system and that, if toll
fraud occurs, it can result in substantial additional charges for your
telecommunications services.
Avaya fraud intervention
If you suspect that you are being victimized by toll fraud and you need technical
assistance or support, call Technical Service Center Toll Fraud Intervention
Hotline at +1-800-643-2353 for the United States and Canada. For additional
support telephone numbers, see the Avaya Web site:
Providing telecommunications security
Telecommunications security (of voice, data, and video communications) is the
prevention of any type of intrusion to (that is, either unauthorized or malicious
access to or use of) your company's telecommunications equipment by some
party.
Your company's "telecommunications equipment" includes both this Avaya
product and any other voice/data/video equipment that could be accessed via
this Avaya product (that is, "networked equipment").
An "outside party" is anyone who is not a corporate employee, agent,
subcontractor, or person working on your company's behalf. Whereas, a
"malicious party" is anyone (including someone who may be otherwise
authorized) who accesses your telecommunications equipment with either
malicious or mischievous intent.
Such intrusions may be either to/through synchronous (time-multiplexed and/or
circuit-based) or asynchronous (character-, message-, or packet-based)
equipment or interfaces for reasons of:
•
Use (of capabilities special to the accessed equipment)
•
Theft (such as, of intellectual property, financial assets, or
toll-facility access)
•
Eavesdropping (privacy invasions to humans)
•
Mischief (troubling, but apparently innocuous, tampering)
•
Harm (such as harmful tampering, data loss or alteration,
regardless of motive or intent)
Be aware that there may be a risk of unauthorized intrusions associated with
your system and/or its networked equipment. Also realize that, if such an
intrusion should occur, it could result in a variety of losses to your company
(including, but not limited to, human and data privacy, intellectual property,
material assets, financial resources, labor costs, and legal costs).
Your responsibility for your company's telecommunications security
The final responsibility for securing both this system and its networked
equipment rests with you, an Avaya customer's system administrator, your
telecommunications peers, and your managers. Base the fulfillment of your
responsibility on acquired knowledge and resources from a variety of sources,
including, but not limited to:
•
Installation documents
•
System administration documents
•
Security documents
•
Hardware-/software-based security tools
•
Shared information between you and your peers
•
Telecommunications security experts
To prevent intrusions to your telecommunications equipment, you and your
peers should carefully program and configure:
•
Your Avaya-provided telecommunications systems and their
interfaces
•
Your Avaya-provided software applications, as well as their
underlying hardware/software platforms and interfaces
•
Any other equipment networked to your Avaya products.
Trademarks
Avaya is a trademark of Avaya Inc.
All non-Avaya trademarks are the property of their respective owners.
Avaya support
Avaya provides a telephone number for you to use to report problems or to ask
questions about your contact center. The support telephone number
is 1-800-242-2121 in the United States. For additional support telephone
numbers, see the Avaya Web site:
Contents
About this book . . . . . . . . . . . . . . . . . . . . . . . . . . . . . . .
5
What products are covered . . . . . . . . . . . . . . . . . . . . . . . . . . . .
Online Documentation. . . . . . . . . . . . . . . . . . . . . . . . . . . . . . .
Related Documentation . . . . . . . . . . . . . . . . . . . . . . . . . . . . . .
5
5
6
Chapter 1: Introduction . . . . . . . . . . . . . . . . . . . . . . . . . . .
9
VPNremote Phone overview . . . . . . . . . . . . . . . . . . . . . . . . . . .
VPNremote Phone features in Release 2 . . . . . . . . . . . . . . . . . . . . .
VPNremote Phone features in Release 1 . . . . . . . . . . . . . . . . . . . . .
9
10
11
Chapter 2: Configuration . . . . . . . . . . . . . . . . . . . . . . . . . .
13
Configuration preparation. . . . . . . . . . . . . . . . . . . . . . . . . . . . . . .
Preparing Communication Manager for the VPNremote Phone . . . . . . . .
VPNremote Phone as a single extension on Communication Manager . .
VPNremote Phone as a bridged appearance on Communication Manager
Installing the VPNremote Phone in the enterprise network. . . . . . . . . . .
Preparing the Avaya Security Gateway for the VPNremote Phone. . . . . . .
Configuring VPNremote Phone system parameters on the devices . . . . . .
Converting an IP Telephone to VPN IP Telephone . . . . . . . . . . . . . . .
Downloading the VPN firmware. . . . . . . . . . . . . . . . . . . . . . . . . .
Configuring the VPN Settings. . . . . . . . . . . . . . . . . . . . . . . . . . .
Deploying the VPNremote Phone . . . . . . . . . . . . . . . . . . . . . . . . .
13
14
14
14
14
15
15
17
17
18
19
Appendix A: Avaya VPNremote for 4600 Series IP Telephones Installation
Checklist . . . . . . . . . . . . . . . . . . . . . . . . . . . . . . . . . .
21
Appendix B: Troubleshooting . . . . . . . . . . . . . . . . . . . . . . .
Error Conditions . . . . . . . . . . . . . .
Authentication Failures . . . . . . . .
TCP/IP Connection Failure . . . . . .
SSL Connection Failure . . . . . . . .
General Phone Errors and Behaviors
IKE and IPSec Negotiation Failures .
Phone fails to register . . . . . . . . .
Error and Status Messages . . . . . . . .
Syslog . . . . . . . . . . . . . . . . . . .
.
.
.
.
.
.
.
.
.
.
.
.
.
.
.
.
.
.
.
.
.
.
.
.
.
.
.
.
.
.
.
.
.
.
.
.
.
.
.
.
.
.
.
.
.
.
.
.
.
.
.
.
.
.
.
.
.
.
.
.
.
.
.
.
.
.
.
.
.
.
.
.
.
.
.
.
.
.
.
.
.
.
.
.
.
.
.
.
.
.
.
.
.
.
.
.
.
.
.
.
.
.
.
.
.
.
.
.
.
.
.
.
.
.
.
.
.
.
.
.
.
.
.
.
.
.
.
.
.
.
.
.
.
.
.
.
.
.
.
.
.
.
.
.
.
.
.
.
.
.
.
.
.
.
.
.
.
.
.
.
.
.
.
.
.
.
.
.
.
.
.
23
.
.
.
.
.
.
.
.
.
23
23
23
24
24
24
24
25
29
Appendix C: System Parameters Customization . . . . . . . . . . . . .
31
Index
55
. . . . . . . . . . . . . . . . . . . . . . . . . . . . . . . . . .
Issue 2 July 2006
3
Contents
4 Administrator Guide
About this book
The guide provides network administrator and end-user configuration information for the Avaya
VPNremote for the 4600 Series IP Telephones. This document is to be used in conjunction with
the Avaya 4600 Series IP Telephone LAN Administrator Guide.
In the following pages, information is provided describing configuration of the Avaya VPNremote
for the 4600 Series IP Telephones (VPNremote Phone) from the Administrator’s perspective,
including items that should be noted as part of installation. For more information regarding
Administrator configuration, see Chapter 2: Configuration.
In addition, end-user configuration information is provided to assist the end user in installing and
configuring the VPNremote Phone in their small office home office (SOHO) environment with
minimal assistance from corporate IT or Telephony groups. For more information regarding
end-user installation and configuration, see VPNremote for 4600 Series IP Telephone User
Installation and Configuration Quick Start, document number 19-601608.
What products are covered
The following products is covered in this manual:
●
Avaya VPNremote for the 4600 Series IP Telephones
The Avaya 4600 Series IP Telephones that support the VPNremote Phone firmware
includes the following devices:
- Avaya 4610SW IP Telephone
- Avaya 4620SW IP Telephone
- Avaya 4621SW IP Telephone
- Avaya 4622SW IP Telephone
- Avaya 4625SW IP Telephone
Online Documentation
The online documentation for the Avaya VPNremote for the 4600 Series IP Telephones is
located at the following URL:
Issue 2 July 2006
5
About this book
Related Documentation
●
Request For Comments (RFC)
The following RFCs have been implemented: 2401, 2407, 2408, 2409, 3715, 3947, 3948,
2406, 2411.
The following documents are available on the Web site under Find Documentation and
Downloads by Name:
●
Avaya VPNremote for the 4600 Series IP Telephones User Installation and Configuration
Quick Start (19-601608).
This document provides instructions for the end user to install the VPNremote Phone in
their SOHO. This document also provides information on how to enter their user name and
password using the telephone keypad.
●
Avaya Administrator Guide for Communication Manager (03-300509)
This document provides an overall reference for planning, operating, and administering
your Communication Manager solution.
●
Avaya 4600 IP Series Telephone, Release 2.4, LAN Administrator Guide (555-233-207)
This document provides a description of Voice over IP and describes how to administer the
DHCP, TFTP, and HTTP servers. This guide also covers how to troubleshoot operational
problems with the 4600 Series IP Telephones and the servers.
●
Avaya 4600 Series IP Telephone, Release 2.2.1, Installation Guide (555-223-128)
This document provides detailed information on how to install the 4600 Series IP Telephone
product line and troubleshoot problems with the telephones.
●
Avaya VPNremote Client 4.1 Administrator Guide (June 2002)
This document provides a description of the VPNremote Client software and describes how
to administer the software.
●
Avaya Security Gateway Configuration Guide for VPNos 4.6 (670-100-602)
This document provides configuration and administration information for the Avaya SG5,
SG5X, SG200, SG203, and SG208 Security Gateway that are upgraded to VPNos 4.6 and
Avaya VSU devices that are upgraded to VPNos 3.X.
●
Avaya Remote Feature Acitivation (RFA) User Guide (03-300149)
The guide provides general remote feature activation (RFA) information as well as step by
step processes on how to create, modify and install a license and/or an authentication file.
6 Administrator Guide
●
Remote Feature Activation (RFA) Getting Started with Remote Feature Activation
(03-300484)
The Getting Started With Remote Feature Activation (RFA) guide has been developed to
provide information about products as they pertain to RFA. It is not intended to replace
high-level technical information that is available from various documentation guides.
Issue 2 July 2006
7
About this book
8 Administrator Guide
Chapter 1: Introduction
The Avaya VPNremote for 4600 Series IP Telephones (VPNremote Phone) is an Avaya H.323
IP Telephone with an integrated virtual private network (VPN) client and an advanced
web-enabled graphical display.
VPNremote Phone overview
The VPNremote Phone provides enterprise telephony services at a remote or small office home
office (SOHO) location through a secure VPN connection to the user’s Enterprise
Communication Manager infrastructure. The VPNremote Phone uses a high-speed connection
to the Internet and then to the VPN solution in the enterprise network.
The Avaya VPNremote for 4600 Series IP Telephones provides a significant improvement on
communications capabilities of SOHO users. The VPNremote Phone provides users with an
extension on an enterprise PBX over a secure VPN connection in a single-box solution.
For additional information regarding the 4600 Series IP Telephones, see the Avaya 4600 Series
IP Telephone, Release 2.4, LAN Administrator Guide.
Beginning with Release 2, the VPNremote Phone is capable of implementation in Enterprise
networks with third-party devices. For more information regarding supported third-party devices,
see VPNremote Phone features in Release 2.
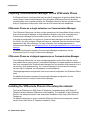
The VPNremote Phone is targeted to work with most SOHO network configurations. Figure 1
illustrates a possible corporate network configuration with an Avaya SG203 at the headend
device with three VPNremote Phones connected through secure VPN connections.
Figure 1: VPNphone in a corporate network with an Avaya SG203 as the headend device
Issue 2 July 2006
9
Introduction
VPNremote Phone features in Release 2
The following summarizes a number of significant feature, performance, and usability
enhancements provided by VPNremote Phone, Release 2.
●
Third-party devices– Beginning in this release, the VPNremote Phone supports the
following third-party devices:
Supported Device
Minimum Software
Requirement
Cisco VPN 3000 Series Concentrators
Any
Cisco PIX 500 Series Security Appliances
Any
Juniper Networks NetScreen series VPN
devices
Screen OS 5.1.0 and higher
Juniper Networks Secure Services Gateway
500 Series devices
Screen OS 5.1.0 and higher
Juniper Networks Integrated Security Gateway
(ISG) Series devices
Screen OS 5.1.0 and higher
●
Automatic discovery of UDP encapsulation method– The VPNremote Phone will
automatically select the correct UDP encapsulation mode during the connection process.
●
SNMP and syslog support through the VPN tunnel– The VPNremote Phone can be
SNMP polled through the VPN tunnel, and syslog messages can be securely sent through
the VPN tunnel.
●
Copy TOS– Allows TOS to be copied to ESP header packets.
●
Selectable connectivity test– The VPNremote Phone tests connectivity to the known
hosts. This test can be set to first time, always, or never.
●
Quality test (Qtest)– The VPNremote Phone tests the connection quality.
●
Remote Feature Activation (RFA)–The VPNremote Phone license file is generated by
the Remote Feature Activation (RFA) process and is managed by the Web Licence
Manager (WebLM) process. The license file must be installed for full functionality. The
VPNremote Phone can function without a license file, but only for a 30-day period. When
this time period expires, the VPNremote Phone is non-operational and the user must
download the previous software for any functionality.
You must contact your Avaya sales representative or business partner to get your license
file.
10 Administrator Guide
VPNremote Phone features in Release 1
The following summarizes a number of significant feature, performance, and usability
enhancements provided by VPNremote Phone, Release 1.
●
H.323 IP Telephone – The VPNremote Phone is a fully featured Avaya H.323 IP
Telephone. The H.323 IP Telephone includes the following features:
- A large display area that allows up to 12 application-specific buttons to be presented and
labeled at one time.
- Twelve line/feature buttons
- Four softkeys
- Fixed buttons that provide access to powerful capabilities such as: local telephone and
call server-based features, speed dialing, a Call Log, and a Wireless Markup Language
(WML) browser.
●
Integrated IPSec Client – The VPNremote Phone contains an integrated IPSec VPN
Client that supports the following IPSec protocols:
- Internet Protocol Security (IPSec)
VPNremote Phone supports IPSec. VPNremote Phone supports IPSec when
implemented under an existing implementation of an IP protocol. For additional
information regarding IPSec protocol support, see the Avaya Security Gateway
Configuration Guide for VPNos 4.6.
- Internet Key Exchange (IKE)
VPNremote Phone supports the standard IKE key management protocol for IPSec. For
additional information regarding IKE protocol support, see the Avaya Security Gateway
Configuration Guide for VPNos 4.6.
- Internet Security Association and Key Management (ISAKMP)
VPNremote Phone supports the standard IISAKMP protocol for IPSec. For additional
information regarding IS AK MP protocol support, see the Avaya Security Gateway
Configuration Guide for VPNos 4.6.
Issue 2 July 2006
11
Introduction
12 Administrator Guide
Chapter 2: Configuration
This section provides administrators with information on how to configure the Avaya
VPNremote for 4600 Series IP Telephone as a VPNremote Phone.
It is recommended that administrators configure the Avaya VPNremote for 4600 Series IP
Telephone (VPNremote Phone) for the end user. Administrators should load the VPNremote
Phone with the latest software, configure the VPNremote Phone to connect to the Enterprise
Communication Manager infrastructure, and provide the end users with information for
configuration in their small office home office (SOHO) environment.
the security device through the internet, and must allow telephony traffic between the security
device and Communication Manager.
Configuration preparation
To insure that the end user is able to configure VPNremote Phone in their SOHO environment
and to connect to the enterprise network, administrators must preconfigure the IP telephone
prior to deployment.
The initial configuration is to be completed by the administrator while the IP telephone is
connected to the enterprise network, and prior to deployment to the end user. By using this
method, the administrator maximizes their configuration time; and minimizes end user
configuration requirements that are entered using the telephone keypad. This preconfiguration
method also protects the end user’s login ID and password.
Following is the recommended preconfiguration method, including the sequence and
procedures:
1. Create and administer a new extension with Communication Manager, Release 2.3 or
higher. For additional information see Preparing Communication Manager for the
VPNremote Phone.
2. Install and test the IP telephone on the enterprise network. For additional information, see
the Avaya 4600 Series IP Telephone Installation Guide.
3. Allow access into and out of the corporate firewall through VPN tunnels, see Preparing the
Avaya Security Gateway for the VPNremote Phone.
4. Convert the 4600 Series IP Telephone, see Converting an IP Telephone to VPN IP
Telephone.
5. Download the VPN firmware from the TFTP server, see Downloading the VPN firmware.
6. Configure the VPN settings to meet the configuration parameters for each VPNremote
Phone site, see Configuring the VPN Settings.
7. Ship preconfigured device to the end user.
Issue 2 July 2006
13
Configuration
Preparing Communication Manager for the VPNremote Phone
A VPNremote Phone is configured the same as other IP telephones on the Avaya Media Server
running Avaya Communication Manager. Even though the VPNremote Phone is physically
located outside of the corporate network, the VPNremote Phone will behave the same as other
Avaya IP telephones located on the LAN once the VPN tunnel has been established.
VPNremote Phone as a single extension on Communication Manager
The VPNremote Phone user can have a single extension on the Avaya Media Server running
Avaya Communication Manager. A single extension allows the user to be connected to the
Communication Manager from one location at a time - either the office or the SOHO.
If the desired configuration is to connect to Communication Manager from both the office and
the SOHO, you must configure VPNremote Phone as a separate extension that has a bridged
appearance of the office extension. For more information on a bridged appearance on
Communication Manager, see VPNremote Phone as a bridged appearance on Communication
Manager.
For additional information regarding Communication Manager configuration, see the
Administrator Guide for Avaya Communication Manager.
VPNremote Phone as a bridged appearance on Communication Manager
The VPNremote Phone user can have a bridged appearance of the office extension on the
Avaya Media Server running Avaya Communication Manager. A bridged appearance allows the
user to be connected to the Communication Manager from two locations at the same time. As a
call comes in, both telephones ring. If a voicemail message is received and the message
indicator light is configured, the light appears on both telephones.
The bridged appearance configuration is the most common configuration for VPNremote Phone
users.
For additional information regarding Communication Manager configuration, see the
Administrator Guide for Avaya Communication Manager.
Installing the VPNremote Phone in the enterprise network
The Avaya VPNremote for 4600 Series IP Telephone is a standard Avaya 4600 Series IP
Telephone with an additional VPNremote Client capability. The installation of the VPNremote
Phone in the enterprise network is the same as the installation of any Avaya 4600 Series IP
Telephones.
For detailed instructions on how to install the VPNremote Phone into the enterprise network,
see the Avaya 4600 Series IP Telephone Installation Guide.
14 Administrator Guide
Configuration preparation
Preparing the Avaya Security Gateway for the VPNremote Phone
VPNremote Phone users who login to the VPN through the Avaya security gateway must have
their user authentication configured on that security gateway. The user authentication
configuration allows VPN traffic to flow through the corporate firewalls to the security gateway.
VPN traffic is remote traffic that has traversed the VPN tunnel.
As a minimum, you must configure a user name and the password for each remote user. User
names can be up to 128 characters long and can contain any character except a comma (,).
Note that once you add a user name, you cannot change the name.
For additional information regarding configuring the security gateway for the VPNremote Phone,
see the Avaya Security Gateway Configuration Guide for VPNos 4.6.
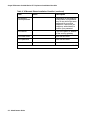
Configuring VPNremote Phone system parameters on the devices
Table 1 lists the configurable system parameters for the supported devices. For more
information regarding system parameters, see Appendix C: System Parameters Customization.
Table 1: Supported devices system parameters
Supported Device
Avaya Security Gateway
System Parameter Values
Set the following values:
NVVPNCFGPROF(1)
NVCERTUNK(2)
NVIKECONFIGMODE(2)
Cisco VPN 3000 Series Concentrators
Set the following values:
NVVPNCFGPROF(3)
NVVPNSVENDOR(2)
NVVPNAUTHTYPE(4)
NVIKEXCHGMODE(1)
NVIKEIDTYPE(11)
NVIKECONFIGMODE(1)
Cisco PIX 500 Series Security Appliances
Set the following values:
NVVPNCFGPROF(3)
NVVPNSVENDOR(2)
NVVPNAUTHTYPE(4)
NVIKEXCHGMODE(1)
NVIKEIDTYPE(11)
NVIKECONFIGMODE(1)
1 of 2
Issue 2 July 2006
15
Configuration
Table 1: Supported devices system parameters (continued)
Supported Device
System Parameter Values
Juniper Networks NetScreen series VPN
devices
Set the following values:
Juniper Networks Secure Services Gateway
500 Series devices
Set the following values:
Juniper Networks Integrated Security Gateway
(ISG) Series devices
Set the following values:
Any Security Device (Generic) with Preshared
Key (PSK)
Set the following values:
Any Security Device (Generic) with IKE
Extended Authentication (Xauth)
Set the following values:
NVVPNCFGPROF(5)
NVVPNSVENDOR(1)
NVVPNAUTHTYPE(4)
NVIKEIDTYPE(3)
NVIKEXCHGMODE(1)
NVIKECONFIGMODE(1)
NVVPNCFGPROF(5)
NVVPNSVENDOR(1)
NVVPNAUTHTYPE(4)
NVIKEIDTYPE(3)
NVIKEXCHGMODE(1)
NVIKECONFIGMODE(1)
NVVPNCFGPROF(5)
NVVPNSVENDOR(1)
NVVPNAUTHTYPE(4)
NVIKEIDTYPE(3)
NVIKEXCHGMODE(1)
NVIKECONFIGMODE(1)
NVVPNCFGPROF(6)
NVVPNSVENDOR(4)
NVVPNAUTHTYPE(3)
NVIKECONFIGMODE(2)
NVIKEXCHGMODE(1)
NVIKEIDTYPE(3)
NVVPNCFGPROF(7)
NVVPNSVENDOR(4)
NVVPNAUTHTYPE(4)
NVIKEIDTYPE(3)
NVIKEXCHGMODE(1)
NVIKECONFIGMODE(1)
2 of 2
16 Administrator Guide
Configuration preparation
Converting an IP Telephone to VPN IP Telephone
Use the following procedure and the telephone key pad to convert a non-VPNremote IP
telephone into a VPNremote telephone:
1. Allow the telephone to initialize and register with Communication Manager.
2. After the phone is registered, set the GROUP for each phone you want to upgrade to a VPN
IP telephone to 876. To initiate the GROUP command from the telephone key pad, press:
Mute 4-7-6-8-7 #
3. After the GROUP command is initiated, enter 8-7-6 # (V-P-N #) for the New value. Use
Page LEFT key to erase any errors.
4. Press # to save the new value.
Save new value?
* = no #=yes
Downloading the VPN firmware
Prior to configuring the VPNremote Phone, you must first install the VPNremote Phone firmware
on an existing internal TFTP server. Install the VPNremote Phone firmware files on the same
TFTP server that the existing IP telephones 2.3 firmware or higher.
Note:
Note:
The TFTP server should not be accessible from outside the enterprise network
without a VPN connection.
To download the firmware:
1. Verify that the file server is configured to upgrade the telephone firmware.
2. Copy the VPNremote Phone software files to the TFTP server. The VPNremote Phone
firmware files must be on the same TFTP server as the existing IP telephones firmware.
3. Create a new 46xxupgrade.scr file.
4. Add the following lines to the beginning of the new 46XXupgrade.scr file:
IF $GROUP SEQ 876 goto DEFVPN
GOTO NOVPN
# DEFVPN
GET 46xxvpn.scr
GOTO END
# NOVPN
Issue 2 July 2006
17
Configuration
5. Upon completion of the download, the telephone will restart. Upon restart, the telephone will
attempt to establish a VPN connection. To complete the configuration, you must configure
the user VPN settings.
Configuring the VPN Settings
Once the firmware has successfully downloaded to the IP Telephone, you are now ready to
configure the VPN settings. The 46XXvpnsettings.txt file is populated with the settings that are
used by the VPNremote Phone to create the VPN tunnels. It is recommended that the
administrator edit the VPN settings files to set the configuration parameters for VPNremote
Phone users.
Note:
Note:
For a detailed list of VPN settings in the 46XXvpnsetting.txt file, see Appendix
C: System Parameters Customization.
At startup, the phone will attempt to establish a VPN connection using the configured VPN
parameters. The user is given the option to change the VPN parameters. To change the VPN
parameters, the user can press the Edit button indicated on the VPN startup screen. The Edit
button gives the user a screen that can be used to change the VPN parameters.
If the phone is up and registered with Communication Manager, the user may also edit the VPN
parameters by entering the VPNMOD command as detailed below.
Use the following procedure and the telephone key pad to configure or edit the VPN Settings:
1. To initiate the VPNMOD command from the telephone key pad, press:
Mute V-P-N-M-O-D # or Mute 8-7-6-6-6-3 #
VPN Start Mode: BOOT
* = Modify # = OK
2. Press * to modify your VPN settings.
3. Select the VPN option to change by using the gray buttons on the left of the display. Press
the Server button, or the first gray button, to change the VPN server IP address.
4. Enter the IP address of the SOHO network. Press the Done button at the lower left corner
of the display to return to the configuration options. The IP address of the SOHO network
must be provided by the end user.
5. Select the VPN option to change by using the gray buttons on the left of the display. Press
the User Name button, or second gray button, to change the VPN user name.
The user name is the same name used to login to the enterprise network using remote
client software.
18 Administrator Guide
Configuration preparation
6. Enter the user name using the telephone key pad. Press the alpha-numeric keys until the
desired letter appears. Use the Case button, or fifth gray button, to switch between
upper-case letters and lower-case letters. Use the left and right arrow keys at the bottom of
the display to move left or right in the user name. Press the Done button at the lower left
corner of the display to return to the configuration options.
7. Select the VPN option to change by using the gray buttons on the left of the display. Press
the Password button, or third gray button, to change the VPN password.
The password is the same password used to login to the enterprise network using
VPNremote Client.
8. Enter the password using the telephone key pad. Press the alpha-numeric keys until the
desired letter appears. Use the Case button, or fifth gray button, to switch between
upper-case letters and lower-case letters. Use the left and right arrow keys at the bottom of
the display to move left or right in the user name. Press the Done button at the lower left
corner of the display to return to the configuration options.
9. Select the VPN option to change by using the gray buttons on the left of the display. Press
the Authentication mode button, or forth gray button, to change the authentication mode.
10. Select the VPN option to change by using the gray buttons on the left of the display. Press
the Password Type button, or fifth gray button, to change the password type.
11. Press the fifth button on the right side of the display to scroll through the password type
options.
12. Select the VPN option to change by using the gray buttons on the left of the display. Press
the VPN Start Mode button, or sixth gray button, to change the VPN start mode.
13. Press the sixth button on the right side of the display to scroll through the VPN start mode
options. Select Boot and press #.
14. Press the right arrow key to move to the next display.
15. Select the VPN option to change by using the gray buttons on the left of the display. Press
the Encapsulation button, or the first gray button, to change the encapsulation option.
16. Press the first button on the right side of the display to scroll through the encapsulation
options. Select Disable and press #.
17. The Syslog Server option is not configured.
18. Press Done to complete the configuration.
Deploying the VPNremote Phone
Deploy the VPNremote Phone to the end user. When the end user installs the VPNremote
Phone in their home network, the telephone will initialize and display a user ID and password
error. The end user must enter their user name and password that they use to login to their
enterprise network using remote client software.
Issue 2 July 2006
19
Configuration
20 Administrator Guide
Appendix A: Avaya VPNremote for 4600 Series IP
Telephones Installation Checklist
The checklist on the following page is provided for your convenience for supplying your users
with essential installation information.
Table 2: VPNremote Phone Installation Checklist
Item
Value
Description
VPNremote
Phone IP Address
The default value is 0.0.0.0
when using DHCP.
In the SOHO network uses
DHCP, set this value to
0.0.0.0 # (default value).
Otherwise, enter the IP
address used by the
VPNremote Phone in the
SOHO network.
Call Server Port
Address
The default value is 1719
unless otherwise stated by
your administrator.
This IP address is the IP
address of the CLAN inside
the enterprise.
Gateway IP
Address
If DHCP is being used, press
# to accept the default values.
Otherwise end user will
confirm address.
This IP address is the IP
address of the SOHO router.
Network Mask
If DHCP is being used, press
# to accept the default values.
Otherwise end user will
confirm address.
This IP address is the
network mask for SOHO
network.
TFTP File Server
This IP address is the TFTP
file server inside the
enterprise that contains the
configuration and update
files.
Extension of your
VPNremote
Phone
Depending on the telephony
configuration, this extension
may or may not be the same
extension as your office
telephone. Check with you
telephony administrator to
confirm your extension.
1 of 2
Issue 2 July 2006
21
Avaya VPNremote for 4600 Series IP Telephones Installation Checklist
Table 2: VPNremote Phone Installation Checklist (continued)
Item
Value
Description
VPNremote
Phone password
Depending on the telephony
configuration, this password
may or may not be the same
password as your office
telephone. Check with you
telephony administrator to
confirm your password.
VPN server
This is the public IP address
of the security gateway.
VPN user name
End user will enter.
VPN password
End user will enter.
2 of 2
22 Administrator Guide
Appendix B: Troubleshooting
This chapter describes problems that might occur during installation and configuration of the
Avaya VPNremote for 4600 Series IP Telephones and possible ways of resolving these
problems.
This chapter contains the following sections:
●
Descriptions of error conditions and methods for resolving them.
●
Error and status messages, and methods for resolving them.
●
Syslog
Error Conditions
The following information describes some of the most common issues that may be seen and
how to trouble shoot them.
Authentication Failures
●
Check User ID and password configured on phone
●
Check Event log on Security gateway
●
Check Configured User ID and password on Gateway
●
If external authentication is used such as Radius, check connectivity between SG and
Radius and Radius User configuration
TCP/IP Connection Failure
●
Confirm VPN server address is correct.
●
Confirm the Gateway is available
●
Confirm VPNPhone has internet connectivity
●
Confirm TCP port 1443 is not blocked by any external device between phone and the
security gateway.
The SOHO router may be configured to allow only outgoing TCP connection on port 80 for
HTTP and port 443 for HTTPS. There may also be a firewall in front of security gateway that
may not be configured to allow an incoming TCP connection on port 1443.
Issue 2 July 2006
23
Troubleshooting
SSL Connection Failure
●
Confirm security device is accepting SSL connections
This requires access to the device’s Web interface or SSH access.
General Phone Errors and Behaviors
●
Contact DHCP/TFTP administrator, L2Q parms in option 43/176 or xxx.SCR script file.
The VPNremote Phone is experiencing a looping condition. This condition is caused by the
gateway IP address being set to 0.0.0.0. Change the device IP address to the static security
device IP address or DHCP.
●
Loading ……. is not seen during startup and mute light flashes.
Check the bootcode version. Older version such as 1.9x is not compatible with the latest
software version.
IKE and IPSec Negotiation Failures
●
Enable IKE Logging on the security device
●
Perform TCP dumps from the security device console/SSH connection.
Phone fails to register
●
Confirm the VPN tunnel was built
1. Check if the security associations (SA) are built on security device under Monitor/VPN
from the Web interface.
2. When the VPN Phone starts, does it access the TFTP server through the VPN tunnel. If it
does then the tunnel is up to that network. Check to see if the call server is on the same
subnet as the TFTP server. If configured IP group in SG covers both address, then
access should be available.
●
Perform a tTCP dump on interfaces of the central security device. Check to see if the esp
packets are arriving from the phone during the time it should be registering.
1. If not Check the L3 Audio and Signaling values. If set to 46/34, change to zero and restart
phone and check tcpdump.
2. If TOS bits are being copied to esp packet on the security device side, Communication
Manager configuration may need to be changed. The above may be require when ISPs
block TOS marked packets.
24 Administrator Guide
Error and Status Messages
The 4600 Series IP Telephones issue messages in English only. The IP telephones also display
messages from the switch, which can issue messages in the local language outside the United
States.
Note:
Note:
The following error messages are for the VPNremote Phone only. For additional
information on the 4600 Series IP Telephone error messages, see the 4600
Series IP Telephone, Release 2.2.1, Installation Guide.
Most of the messages in following tables display only for about 30 seconds, and then the
telephone resets.
Table 3 describes the list of all error messages that pertain to the VPN tunnel setup failures that
the VPNremote Phone might display.
Table 3: VPN Tunnel Setup Failures
Error Message
Avaya
Profile
Third-Party
Profile
Possible Cause
Possible Solution
TCP Connection
timed out.
Yes
N/A
Security gateway
not accessible or
unresponsive to
TCP connection.
Verify end-user
login ID and
password, and that
the network is up.
SSL Handshake
failed
Yes
N/A
SSL 1443
connection failed.
Verify end-user
login ID and
password.
Invalid server
certificate
Yes
N/A
Security device
certificate issue.
Verify that the
security device
certificate is valid.
Unknown
certificate issuer
Yes
N/A
SSL handshake
during VPN setup
failed because the
server certificate
provided by the
gateway is not
signed by the
appropriate.
Verify that the
VPNremote Phone
is connecting to an
Avaya device.
1 of 4
Issue 2 July 2006
25
Troubleshooting
Table 3: VPN Tunnel Setup Failures (continued)
Error Message
Avaya
Profile
Third-Party
Profile
Possible Cause
Possible Solution
Server
authentication
mechanism
failing
Yes
N/A
An externally
configured
authentication
source (Radius
Server) and
Security Gateway
cannot
communicate.
Verify
communication
with external
authentication
source.
IKE Phase 1 no
response
Yes
Yes
Security device is
busy.
For all Profiles:
For all Profiles:
Security device
cannot be reached
because the
firewall is blocking
incoming UDP
packets on port
500. This is on the
security device
side or home
router is blocking
outgoing UDP
packets on port
500.
Verify that the
firewall accepts
UDP packets on
port 500.
Verify that the
security device
allows outgoing
UDP packets on
port 500.
For third-party
profile:
For third-party
profiles:
Group Name (IKE
ID) is incorrect.
Verify group name.
IKE ID type is
incorrect.
Verify IKE IK type.
Phase 1 proposal
mismatch.
Verify phase 1
proposal.
2 of 4
26 Administrator Guide
Table 3: VPN Tunnel Setup Failures (continued)
Error Message
Avaya
Profile
Third-Party
Profile
Possible Cause
Possible Solution
IKE Phase 2 no
response.
No
Yes
Security device is
busy.
Verify IKE proposal
is correct, disable
vendor-specific
features, and/or
verify protected IP
groups.
IKE phase 2
proposal is
mismatched.
Vendor-specific
features are
enabled.
List of protected IP
groups do not
match.
Failed to reach
known host.
IKE Preshared
key (PSK)
mismatch.
Yes
No
N/A
Yes
VPNphone was
unable to reach
known host such
as the TFTP
server or call
server address.
Verify that the
TFTP server
address is correct.
PKS (Group
password) is
incorrect.
Verify that the IKE
PSK is correct.
Verify that the call
server address is
correct.
3 of 4
Issue 2 July 2006
27
Troubleshooting
Table 3: VPN Tunnel Setup Failures (continued)
Error Message
Avaya
Profile
Third-Party
Profile
Possible Cause
Possible Solution
DNS needed for
resolving security
device name.
Yes
Yes
The system could
not resolve the
security device
fully qualified
domain name
(FQDN).
Check the DNS
server connection.
Verify that the
FQDN is correct.
DNS query sent to
resolve security
device FQDN
failed or has timed
out.
Security device
name resolution
failed.
Yes
Yes
The system could
not resolve the
security device
fully qualified
domain name
(FQDN).
Check the DNS
server connection.
Verify that the
FQDN is correct.
DNS query sent to
resolve security
device FQDN
failed or has timed
out.
4 of 4
28 Administrator Guide
Table 4 describes the list of all error messages that pertain to the VPN tunnel setup failures that
the VPNremote Phone might display.
Table 4: Authentication Errors
Note:
Error Message
Possible Cause
Authentication failure, User
Blocked
User is blocked for “x” minutes
from “x” number of incorrect
logins.
Invalid password OR user name
Incorrect user name or password
entered.
Phone brand rejected by SG
Incorrect phone brand configured
on gateway.
VPN Topology not supported
Multiple central site devices
configured which is not a
supported configuration.
Empty Gate Keeper
No call server addresses
configured.
Note:
All error messages will provide the option to display more information or edit the
configuration.
Syslog
Adding the IP address of the SYSLOG server will enable Sysloging of VPN module. This
SYSLOG server is meant to catch log messages while tunnel setup is in progress hence the
syslog server must be accessible without the tunnel.
Issue 2 July 2006
29
Troubleshooting
30 Administrator Guide
Appendix C: System Parameters Customization
For additional definitions and information on how to change IP telephone parameters, see the
Avaya 4600 Series IP Telephone, Release 2.3, LAN Administrator Guide, Server Administration
chapter, Administering Options for the 4600 Series IP Telephones.
The parameters in Table 5 are configurable to desired values in the Script File. For additional
information on the Script File, see the Avaya 4600 Series IP Telephone, Release 2.4, LAN
Administrator Guide, Server Administration chapter, Contents of the Upgrade Script section. We
recommend that you administer options on the 4600 Series IP Telephones using script files.
Table 5: VPNremote for 4600 Series IP Telephones Customizable System
Parameters
Parameter Name
Default
Value
Description and Value Range
Example
NVVPNMODE
2
This parameter controls when
VPN Client is started. Valid value
is one ASCII numeric digit, 0 to 2.
Values are:
0 = VPN is disabled.
1 = VPN will start after TCP/IP
initialization and before
downloading the script file.
2 = VPN will start after
downloading and processing the
script file.
To set the VPN mode to start the
VPN Client at initialization (boot),
use the following command:
SET NVVPNMODE 1
NVVPNSVENDOR
0
This parameter controls the
vendor of the security device.
Valid value is one ASCII numeric
digit, 0 to 4. Values are:
0 AVAYA
1 NETSCREEN
2 CISCO
3 CHECKPOINT
4 ANY
This system initialization
parameter cannot be modified by
a local procedure.
To set the VPN device vendor to
Any, use the following command:
SET NVVPNSVENDOR 4
1 of 15
Issue 2 July 2006
31
System Parameters Customization
Table 5: VPNremote for 4600 Series IP Telephones Customizable System
Parameters (continued)
Parameter Name
Default
Value
Description and Value Range
Example
NVVPNCFGPROF
NONE
This parameter controls the VPN
configuration profile for the device
vendor and device type. Valid
value is one ASCII numeric digit,
1, 3, 5, 6 and NONE. Values are:
1 = Avaya Security Gateway
3 = Cisco Xauth with PSK
5 = Juniper/Netscreen Xauth with
PSK
6 = Generic PSK
To set the device VPN
configuration profile to the Avaya
security gateway, use the
following command:
SET NVVPNCFGPROF 1
Description:
● Set this parameter to 1 if
Security Gateway vendor is
Avaya.
● Set this parameter to 3 if
the device vendor is Cisco
and Xauth is used for
authenticating phone user.
● Set this parameter to 5 if
device vendor is Juniper,
Xauth is used for
authenticating phone user.
● Set this parameter to 6 if
the device vendor does not
support Xauth.
The following parameters must be
set to specified values.
● If NVVPNCFGPROF=1
then
NVIKECONFIGMODE=2
● If NVVPNCFGPROF=3
then
NVIKECONFIGMODE=1
NVIKEIDTYPE =11
NVIKEXCHGMODE=1
● If NVVPNCFGPROF=5
then
NVIKECONFIGMODE=1
NVIKEIDTYPE=3
NVIKEXCHGMODE=1
● NVVPNCFGPROF=6
then
NVIKECONFIGMODE=2
NVIKEIDTYPE=3
NVIKEXCHGMODE=1
2 of 15
32 Administrator Guide
Table 5: VPNremote for 4600 Series IP Telephones Customizable System
Parameters (continued)
Parameter Name
Default
Value
Description and Value Range
Example
NVVPNAUTTYPE
2
This parameter is valid when
NVVPNCFGPROF is set to 1
(Avaya security gateway). If the
Avaya security gateway software
version is 4.0 or higher, the
default value does not need to be
changed.
Controls user authentication
mode. Valid value is one ASCII
numeric digit, 1 and 2. Values are:
1 = CHAP
2 = PAP
To set the device authentication
type to CHAP, use the following
command:
SET NVVPNAUTHTYPE 1
The method chosen is
dependent on the type of
authentication used by the
security device.
NVSGIP
“” (Null)
This parameter controls the
primary IP address or the fully
qualified domain name of the
security device.
To set the device primary IP
address to 10.1.1.1, use the
following command:
SET NVSGIP 10.1.1.1
Valid values are zero or more IP
Addresses in dotted-decimal or
fully qualified domain name
format, separated by commas
without any intervening spaces
(0 to 255 ASCII characters,
including commas). Null (“”) is a
valid value, but the value may
not contain spaces.
To set the device fully qualified
domain name to
primarysg.mycompany.com, use
the following command”
SET NVSGIP
primarysg.mycompany.com
This value cannot be more than
30 characters.
3 of 15
Issue 2 July 2006
33
System Parameters Customization
Table 5: VPNremote for 4600 Series IP Telephones Customizable System
Parameters (continued)
Parameter Name
Default
Value
Description and Value Range
NVSECSGIP
“” (Null)
This is the secondary IP address
or the secondary fully qualified
domain name of the Avaya
Security Gateway (SG).
Example
Valid values are zero or more IP
Addresses in dotted-decimal or
fully qualified domain name
format, separated by commas
without any intervening spaces
(0 to 255 ASCII characters,
including commas). Null (“”) is a
valid value, but the value may
not contain spaces.
The VPN server IP address
cannot be more than 24
characters.
4 of 15
34 Administrator Guide
Table 5: VPNremote for 4600 Series IP Telephones Customizable System
Parameters (continued)
Parameter Name
Default
Value
Description and Value Range
Example
NVBACKUPSGIP
“” (Null)
This parameter controls the back
up IP address or the back up
fully qualified domain name of
the security device. If the VPN
Client could not connect to the
primary security device, VPN
Client attempts to connect to the
security devices in this list.
To set the device backup IP
address to 10.1.1.2,
bk1sg.mycompany.com, and
bk2.mycompany.com as backup
security devices, use the following
command:
SET NVBACKUPSGIP
10.1.1.2,bk1sg.mycompay.
com,bk2.mycompany.com
A maximum of 4 back-up
security gateways can be
configured.
Enter the value in dotted decimal
format or DNS name format.
Valid values are zero or more IP
Addresses in dotted-decimal or
DNS name format, separated by
commas without any intervening
spaces (0 to 255 ASCII
characters, including commas).
Null (“”) is a valid value, but the
value may not contain spaces.
This value cannot be more than
30 characters.
5 of 15
Issue 2 July 2006
35
System Parameters Customization
Table 5: VPNremote for 4600 Series IP Telephones Customizable System
Parameters (continued)
Parameter Name
Default
Value
Description and Value Range
Example
NVVPNUSER
“” (Null)
This parameter controls the user
name to be used during
authentication and VPN tunnel
setup.
To set the user name as the
device mac address, use the
following command:
Each VPNremote Phone should
be configured with a unique user
name. A unique user name can
be configured during the initial
VPN setup.
To set the user name as the
device serial number, use the
following command:
SET NVVPNUSER %MACADDR%
SET NVVPNUSER
%SERIALNUM%
The VPNremote Phone is
capable of using the phone's
mac address or serial number as
user name. This capability
eliminates the need to enter the
user name by the phone user
using the phone keypad. In
these cases you must add each
device mac address or serial
number to your authentication
database.
This value range is up to 30
ASCII characters.
6 of 15
36 Administrator Guide
Table 5: VPNremote for 4600 Series IP Telephones Customizable System
Parameters (continued)
Parameter Name
Default
Value
Description and Value Range
Example
NVVPNPSWDTYPE
1
This parameter controls the type To set the password type to 2, use
of VPN passwords. Valid value is the following command:
one ASCII numeric digit, 1 to 4.
SET NVVPNPSWDTYPE 2
Values are:
1 = The password is saved in
non-volatile memory.
2 = The password is erased when
you turn off power to the
telephone.
3 = The password is all numeric
and is for one-time-use only.
4 = The password is
alpha-numeric and is for
one-time-use only.
You must set this parameter to 3
or 4 if using one-time passwords
such as SecureID from RSA.
NOTE: Setting the password type
to 3 will not let the user select
“Alpahbets” while entering
password. This might look like an
obvious choice when using RSA
secure ID tokens. However, under
some conditions the user may
need to respond back by entering
y or n in the password field.
7 of 15
Issue 2 July 2006
37
System Parameters Customization
Table 5: VPNremote for 4600 Series IP Telephones Customizable System
Parameters (continued)
Parameter Name
Default
Value
Description and Value Range
Example
NVVPNFILESRVR
Null ("")
This parameter contains the URL
of the file server. A file server URL
consist of following components:
1=Download Method
(HTTP,HTTPS,TFTP)
2=FQDN or actual IP address of
the file server
3=Service port (80 for HTTP and
443 for HTTPS)
4=Path (NONE)
To set the download method to
HTTP, use the following
command:
SET NVVPNFILESERVER
http://10.1.1.1:8080/
phone
All the components specfied
above, except for the FQDN/IP
Address, have a default value. If
download method is omitted from
the URL, the VPNremote Phone
attempts to download the script
file using all the methods.
8 of 15
38 Administrator Guide
Table 5: VPNremote for 4600 Series IP Telephones Customizable System
Parameters (continued)
Parameter Name
Default
Value
Description and Value Range
Example
NVVPNCOPYTOS
2
This parameter contains whether
TOS bits should be copied from
the inner header to the outer
header, or not copied at all.
Values are:
1=YES
2= NO
To set the copy TOS value to 1,
use the following command:
SET NVVPNCOPYTOS 1
Avaya recommends that this value
is not changed when the
telephone phone is downloading
the script over the VPN tunnel.
This recommendation avoids
Description:
overriding end-user settings that
If the value is 1, TOS bits are
can occur due to ISP specific
copied. By default, TOS bits are
issues.
not copied from the inner header For example you can set this
to the outer header. Some
value to 1 while provisioning the
Internet Service Provider do not
telephone with the VPNremote
route the IP packets properly if
Phone software so that the
TOS bits are set to anything other telephone can take advantage of
than 0.
the QOS service provided by the
home router. However, if the
telephone's ISP does not properly
handle the packets with non-zero
TOS bits in IP header, the
telephone user needs to change
this value back to 2.
Due to specific ISP limitations,
Avaya recommends that the
user's choice are not overwritten
each time the script file is
downloaded.
To set the copy TOS value to 1
when the script file is not
downloaded over the VPN, use
the following command:
IF $VPNACTIVE SEQ 1 goto
skipcopytos
SET NVVPNCOPYTOS 1 #
skipcopytos
9 of 15
Issue 2 July 2006
39
System Parameters Customization
Table 5: VPNremote for 4600 Series IP Telephones Customizable System
Parameters (continued)
Parameter Name
Default
Value
Description and Value Range
Example
NVWEBLMURL
http://
XX.XX.X
X.XX:80
80/
WebLM/
License
Server
This parameter contains the Web To set the Web LM value, use the
LM licensing server URL
following command:
information.
SET NVWEBLMURL http://
XX.XX.XX.XX:8080/WebLM/
Multiple WebLM licensing server LicenseServer
URLs are separated by commas.
The length of the individual URL Where XX.XX.XX.XX is the IP
cannot be more than 128
address (or FQDN) of the WebLM
characters. The combined length server.
of all the URLs cannot be more
than 252 characters.
10 of 15
40 Administrator Guide
Table 5: VPNremote for 4600 Series IP Telephones Customizable System
Parameters (continued)
Parameter Name
Default
Value
Description and Value Range
Example
NVVPNENCAPS
0
This parameter contains the
method of UDP encapsulation.
Values are:
0=4500-4500
1=Disable
2=2070-500
4= RFC (3947 and 3948)
To set the UDP encapsulation
value to 1 when the script file is
not downloaded through the VPN
tunnel, use the following
command:
IF $VPNACTIVE SEQ 1 goto
skipencaps
SET NVVPNENCAPS 1 #
skipencaps
.
Description:
The type of UDP encapsulation
method to use when there is a
NAT device between the
VPNremote Phone and the
security device.
● Set this parameter to 0 for
IKE negotiation to start with
source port 2070 and
destination port 500.
Negotiation switches to port
source port 4500 and
destination port 4500 if
peer supports port floating
(Ref RFC 3947,3948). Set
this parameter to 1 to
disable IKE NAT traversal.
● Set this parameter to 2to
disable port floating during
IKE NAT traversal.
● Set this parameter to 4 for
IKE negotiation to start with
source port 500 and
destination port 500.
Negotiation switches to port
source port 4500 and
destination port 4500 if
peer supports port floating
(Ref RFC 3947 and 3948).
Finally IPsec traffic is sent inside
UDP packets from and to port
4500 if supported by peer or port
2070<->500 if port floating is not
supported, and UDP
encapsulation is supported as
published in the initial draft
versions of RFC 3947 and 3948.
11 of 15
Issue 2 July 2006
41
System Parameters Customization
Table 5: VPNremote for 4600 Series IP Telephones Customizable System
Parameters (continued)
Parameter Name
Default
Value
Description and Value Range
Example
NVVPNCONCHECK
1
This parameter decides if the
connectivity check should be
performed after establishing the
VPN tunnel, and how it should
behave in the event of
connectivity check failure. Values
are:
1=First time
2= Never
3= Always
To set the connectivity check
value to 2, use the following
command:
SET NVVPNCONCHECK 2
Description:
The tunnel connectivity check is
performed after the VPN tunnel is
established. If connectivity check
fails, the tunnel is established with
a different encapsulation method
until all the available
encapsulation method are
attempted or connectivity check is
successful.
12 of 15
42 Administrator Guide
Table 5: VPNremote for 4600 Series IP Telephones Customizable System
Parameters (continued)
Parameter Name
Default
Value
Description and Value Range
Example
VPNMONFRQ
0
This value contains the
frequency of VPN monitoring
syslog message in minutes.
To set the VPN monitoring
frequency, use the following
command:
SET VPNMONFRQ 20
If a syslog server IP address is
specified (LOGSRVR) and
VPNMONFRQ contains a valid
value, VPNremote Phone sends
a syslog message every
VPNMONFRQ minutes. This
message contains following data
points:
●
●
●
●
DROPCLEAR
1
Duration for which phone
has been up in minutes.
Number of times phone lost
contact with the Security
Gateway but successfully
recovered without
rebooting.
IP Address of the Security
Gateway to which the
phone is connected.
Cumulative IPsec stats
(Packets sent, received,
errors encountered)
Controls the policy that defines
the handling on incoming and
outgoing clear packets. Valid
value is one ASCII numeric digit,
0 and 1. Values are:
0 =All clear traffic is accepted.
1 = All clear traffic will be
dropped except for traffic to and
from the security gateway and
the DHCP server.
13 of 15
Issue 2 July 2006
43
System Parameters Customization
Table 5: VPNremote for 4600 Series IP Telephones Customizable System
Parameters (continued)
Parameter Name
Default
Value
Description and Value Range
ALWCLRNOTIFY
0
This parameter contains the
policy that defines ISAKMP
NOTIFICATION messages.
These message can be in the
clear or encrypted. If this value is
0, any notification sent in the clear
should be ignored by ISAKNMP.
FAILOVERDELAYON 300
HOOK
This parameter contains the
policy that defines the duration in
seconds the VPNremote Phone
attempts to re-establish a tunnel
with the currently connected
security device. This value, in
seconds, must be set before
VPNremote Phone attempts to
connect to a different security
device if the VPNremote Phone is
in ON hook.
FAILOVERDELAYOF
FHOOK
This parameter contains the
policy that defines the duration in
seconds the VPNremote Phone
attempts to re-establish a tunnel
with the currently connected
security device. This value, in
seconds, must be set before
VPNremote Phone attempts to
connect to a different security
device if the VPNremote Phone is
in OFF hook.
ACTIVATEVPN
0
This value is ignored if
NVVPNMode is set to 1 or 0.
If the value is set to 1, the VPN
tunnel setup procedure is invoked
prior to starting the system
specific procedures.
ALWSTOPVPN
0
This value contains the policy that
defines if user is allowed to stop
VPN while connected to the call
server. If this value is 1, the user
is allowed to stop the VPN
connection.
Example
14 of 15
44 Administrator Guide
Table 5: VPNremote for 4600 Series IP Telephones Customizable System
Parameters (continued)
Parameter Name
Default
Value
Description and Value Range
ALWSTOPVPN
1
This parameter contains the
policy that defines if the user is
allowed to stop VPN while
connected to the call server.
Values are:
1=enable
2=disable
EXTVPNS
Null ("")
This parameter contains the list of
security device IP addresses.
These addresses are used to
connect to the Enterprise network
from an external source.
Enter the value in dotted decimal
format or DNS name format. Valid
values are zero or more IP
addresses separated by commas
without any intervening spaces (0
to 255 ASCII characters, including
commas), or null ("").
The length of individual VPN
server IP address cannot be
exceed 16 characters.
If the IP address or DNS name of
the VPN server to which
client is currently connected is
included in this list then value
of ALWSTOPVPN will be treated
as 0 even if it was SET as 1
through SET command in the
script file.
VPNACTIVE
The VPNACTIVE value is 1
when the VPN tunnel is active
and 0 when the VPN tunnel is
not active.
Example
This value is read-only.
15 of 15
Issue 2 July 2006
45
System Parameters Customization
The parameters in Table 6 are configurable in the Script File when the parameter
NVVPNCFGPROF is set to 1. For additional information on the Script File, see the Avaya 4600
Series IP Telephone, Release 2.4, LAN Administrator Guide, Server Administration chapter,
Contents of the Upgrade Script section. We recommend that you administer options on the
4600 Series IP Telephones using script files.
Table 6: VPNremote for 4600 Series IP Telephones Specific Customizable System
Parameters
Parameter Name
Default
Value
Description and Value Range
Example
NVIKEPSK
2
This value controls the
preshared key (PSK). The
preshared key is used during
phase 1 negotiation. The length
of the preshared key string
cannot exceed 30 characters.
To set the preshared key as
abc1234, use the following
command:
SET NVIKEPSK abc1234
Avaya recommends that the user
enter the preshared key using
the telephone keypad. However,
if you do not want to share PSK
with the end user because it is
common for multiple users, you
can use this parameter to push
the PSK (Group password) to
each telephone. If you are
pushing the PSK to the
telephone, make sure that the
file server is on an isolated
network and is used only for
provision in VPN parameters to
the telephones.
1 of 8
46 Administrator Guide
Table 6: VPNremote for 4600 Series IP Telephones Specific Customizable System
Parameters (continued)
Parameter Name
Default
Value
Description and Value Range
Example
NVIKEID
VPNPH
ONE
This parameter controls the IKE
identifier. The IKE identifier is
used during phase 1 negotiation.
Length of the string cannot
exceed 30 characters.
To set the IKE identifier as
[email protected], use the
following command:
The XAuth documentation refer
to this parameter as Group
Name because IKE Id is shared
among a group of user and
individual user authentication is
done using XAuth after
establishing IKE phase 1
security association.
SET NVIKEID
[email protected]
If this parameter is left
uninitialized, the VPNremote
Phone uses "VPNPHONE" as
the IKE Identifier.
2 of 8
Issue 2 July 2006
47
System Parameters Customization
Table 6: VPNremote for 4600 Series IP Telephones Specific Customizable System
Parameters (continued)
Parameter Name
Default
Value
Description and Value Range
Example
NVIPSECSUBNET
2
This parameter contains the IP
subnet and masks that are
protected by the security device.
Multiple subnet and masks are
separated by commas. The
length of the individual URL
cannot be more than 128
characters. The combined length
of all the subnet and masks
strings cannot be more than 5.
To set the IP subnet and mask
that are protected by the security
device, use the following
command:
Description:
SET NVIPSECSUBNET
10.1.12.0/
255.255.255.0,172.16.0.0
/255.255.0.0
By default phone assumes that
all the network resources are
behind the security gateway
hence it negotiates for a
security association between
the IP address (or Virtual IP if
delivered through the IKE
Config mode) and 0.0.0.0 with
the security device. If your
security device is configured to
allow building security
association for selected
subnets, you can specify them
here.
NVVPNSYSLOG
0.0.0.0
SET NVIPSECSUBNET
10.1.12.0/24,172.16.0.0/
16
OR
This parameter allows the
VPNremote Phone to send
operational information to a
syslog server that is specified by
the respective IP address.
3 of 8
48 Administrator Guide
Table 6: VPNremote for 4600 Series IP Telephones Specific Customizable System
Parameters (continued)
Parameter Name
Default
Value
Description and Value Range
Example
NVIKEDHGRP
2
This parameter contains the
value of Diffe-Hellman (DH)
group. The DH group is used
during phase 1 negotiation.
Values are:
To set the DH group to group 1,
use the following command:
SET NVIKEDHGRP 1
1= DH group 1
2=DH group 2
5=DH group 5
14=DH group 14
15=DH group 15
NVPFSDHGRP
0
This parameter contains the
value of Diffe-Hellman (DH)
group. The DH group is used
during phase 2 negotiation for
establishing IPsec security
associations also known as
perfect forward secrecy (PFS).
Values are:
To set the DH group to group 2 for
phase PFS, use the following
command"
SET NVPFSDHGRP
0=No PFS
1=DH group 1
2=DH group 2
5=DH group 5
NVIKEIDTYPE
The
default
value
depend
s on
the
value
of
NVVP
NCFG
PROF.
This parameter contains the
IKE Identifier type for the IKE ID
specified in the NVIKEID
parameter. Values are:
To set the IKE identifier type to
FQDN, use the following
command:
SET NVIKEIDTYPE 2
1=IP address
2= FQDN
3=User FQDN (E-Mail)
9=Directory name
11=KEY-ID (Opaque)
4 of 8
Issue 2 July 2006
49
System Parameters Customization
Table 6: VPNremote for 4600 Series IP Telephones Specific Customizable System
Parameters (continued)
Parameter Name
Default
Value
Description and Value Range
Example
NVIKEP1ENCALG
0
This parameter contains the
encryption algorithms to propose
for IKE phase 1 security
association. Values are:
0=ANY
1=AES 128
2=3DES
3=DES
4 =AES 192
5=AES 256
To set the encryption algorithm to
AES 128, use the following
command:
SET NVIKEP1ENCALG 1
The security device selects the
algorithm mandated by the
administrator. Priority order of
algorithms proposed by the
VPNremote Phone is
AES-128,3DES,DES,AES-192.A
ES-256.
In very rare circumstances, the
security device may not be able
to handle multiple proposals. In
this cases, only try overriding the
default behavior.
5 of 8
50 Administrator Guide
Table 6: VPNremote for 4600 Series IP Telephones Specific Customizable System
Parameters (continued)
Parameter Name
Default
Value
Description and Value Range
Example
NVIKEP2ENCALG
0
This parameter contains the
encryption algorithms to propose
for IKE phase 2 security
association. Values are:
0=ANY
1=AES 128
2=3DES
3=DES
4 =AES 192
5=AES 256
To set the encryption algorithm to
AES 128, use the following
command:
SET NVIKEP2ENCALG 1
The security device selects the
algorithm mandated by the
administrator. Priority order of
algorithms proposed by the
VPNremote Phone is
AES-128,3DES,DES,AES-192.A
ES-256.
In very rare circumstances, the
security device may not be able
to handle multiple proposals. In
this cases, only try overriding the
default behavior.
NVIKECONFIGMODE
1
This parameter enables ISAKMP
configuration mode. Values are:
1=enable
2=disable.
NVIKEXCHGMODE
1
This parameter enables the IKE
Phase 1 Security Association
(SA) mode. Values are:
1=Aggressive mode.
2=Identity Protection mode.
6 of 8
Issue 2 July 2006
51
System Parameters Customization
Table 6: VPNremote for 4600 Series IP Telephones Specific Customizable System
Parameters (continued)
Parameter Name
Default
Value
Description and Value Range
Example
NVIKEP1AUTHALG
0
This parameter contains the
authentication algorithms to
propose for IKE phase 1 security
association. Values are:
0=ANY
1=MD5
2=SHA1
The security device selects the
algorithm mandated by the
administrator. Priority order of
algorithms proposed by the
VPNremote Phone is
MD5,SHA1.
In very rare circumstances, the
security device may not be able
to handle multiple proposals. In
this cases, only try overriding the
default behavior.
To set the authentication
algorithm to SHA 1, use the
following command:
SET NVIKEP1AUTHALG 1
NVIKEP2AUTHALG
0
This parameter contains the
authentication algorithms) to
propose for IKE phase 2 security
association. Values are:
0=ANY
1=MD5
2=SHA1
The security device selects the
algorithm mandated by the
administrator. Priority order of
algorithms proposed by the
VPNremote Phone is
MD5,SHA1.
In very rare circumstances, the
security device may not be able
to handle multiple proposals. In
this cases, only try overriding the
default behavior.
To set the authentication
algorithm to SHA 1, use the
following command:
SET NVIKEP2AUTHALG 1
7 of 8
52 Administrator Guide
Table 6: VPNremote for 4600 Series IP Telephones Specific Customizable System
Parameters (continued)
Parameter Name
Default
Value
Description and Value Range
Example
NVVPNENCAPS
0
This parameter contains the
method of UDP encapsulation.
Values are:
0=4500-4500
1=Disable
2=2070-500
4= RFC (3947 and 3948)
To set the UDP encapsulation
value to 1 when the script file is
not downloaded through the VPN
tunnel, use the following
command:
IF $VPNACTIVE SEQ 1 goto
skipencaps
SET NVVPNENCAPS 1 #
skipencaps
.
Description:
The type of UDP encapsulation
method to use when there is a
NAT device between the
VPNremote Phone and the
security device.
● Set this parameter to 0 for
IKE negotiation to start
with source port 2070 and
destination port 500.
Negotiation switches to
port source port 4500 and
destination port 4500 if
peer supports port floating
(Ref RFC 3947,3948). Set
this parameter to 1 to
disable IKE NAT traversal.
● Set this parameter to 2to
disable port floating during
IKE NAT traversal.
● Set this parameter to 4 for
IKE negotiation to start
with source port 500 and
destination port 500.
Negotiation switches to
port source port 4500 and
destination port 4500 if
peer supports port floating
(Ref RFC 3947 and 3948).
Finally IPsec traffic is sent inside
UDP packets from and to port
4500 if supported by peer or port
2070<->500 if port floating is not
supported, and UDP
encapsulation is supported as
published in the initial draft
versions of RFC 3947 and 3948.
8 of 8
Issue 2 July 2006
53
System Parameters Customization
54 Administrator Guide
Index
Index
A
S
About this book . . . . . . . . . . . . . . . . . . . 5
Avaya VPNremote for 4600 Series IP Telephones
installation checklist . . . . . . . . . . . . . . . 21
Syslog . . . . . . . . .
System Parameter
NVIKEP1AUTHALG .
NVIKEP2AUTHALG .
NVIKEP2ENCALG .
System parameters . . .
ACTIVATEVPN . . .
ALWSTOPVPN . . .
DROPCLEAR . . . .
NVBACKUPSGIP . .
NVIKEDHGRP . . .
NVIKEID . . . . . .
NVIKEIDTYPE . . .
NVIKEP1ENCALG .
NVIKESK . . . . . .
NVIPSECSUBNET .
NVPFSDHGRP . . .
NVSECSGIP . . . .
NVSGIP . . . . . .
NVVPNAUTTYPE . .
NVVPNMODE . . .
NVVPNPSWDTYPE .
NVVPNUSER . . . .
VPNACTIVE . . . .
VPNMONFRQ . . .
C
Configuration preparation. . . . . . . . . . . . .
Configuring the VPN settings . . . . . . . . . . .
Converting an IP Telephone to VPN IP Telephone .
Coverting an IP Telephone to a VPN IP Telephone .
.
.
.
.
13
18
17
17
D
Deployment . . . . . . . . . . . . . . . . . . . . 19
Downloading the VPN firmware . . . . . . . . . . . 17
E
Error and status messages . . . . . . . . . . . . . 25
Error conditions . . . . . . . . . . . . . . . . . . 23
I
Installation
checklist . . . . . . . . . . . . . . . . . . . . 21
Installation checklist . . . . . . . . . . . . . . . . 21
O
Online Documentation . . . . . . . . . . . . . . . . 5
P
Preparing Avaya Security Gateway
configuring VPNremote Phone users . . . . . . . 15
Problem solving
troubleshooting . . . . . . . . . . . . . . . . . 23
R
. . . . . . . . . . . . . . 29
.
.
.
.
.
.
.
.
.
.
.
.
.
.
.
.
.
.
.
.
.
.
.
.
.
.
.
.
.
.
.
.
.
.
.
.
.
.
.
.
.
.
.
.
.
.
.
.
.
.
.
.
.
.
.
.
.
.
.
.
.
.
.
.
.
.
.
.
.
.
.
.
.
.
.
.
.
.
.
.
.
.
.
.
.
.
.
.
.
.
.
.
.
.
.
.
.
.
.
.
.
.
.
.
.
.
.
.
.
.
.
.
.
.
.
.
.
.
.
.
.
.
.
.
.
.
.
.
.
.
.
.
.
.
.
.
.
.
.
.
.
.
.
.
.
.
.
.
.
.
.
.
.
.
.
.
.
.
.
.
.
.
.
.
.
.
.
.
.
.
.
.
.
.
.
.
.
.
.
.
.
.
.
.
.
.
.
.
.
.
.
.
.
.
.
.
.
.
.
.
.
.
.
.
.
.
.
.
.
.
.
.
.
.
.
.
.
.
.
.
.
.
.
.
.
.
.
.
.
.
.
.
.
.
.
.
.
.
.
.
.
.
.
.
.
.
.
.
.
.
.
.
.
.
.
.
.
.
.
.
.
.
.
.
.
.
.
.
.
.
.
.
.
.
.
.
.
.
.
.
.
.
.
.
.
.
.
.
.
.
.
.
.
.
.
.
.
.
.
.
.
.
.
.
.
.
.
.
.
.
.
.
.
.
.
.
.
.
.
.
.
.
52
52
51
31
44
44
43
35
49
47
49
50
46
48
49
34
33
33
31
37
36
45
43
TOS
copy . . . . . . . . . . .
Troubleshooting . . . . . . .
error and status messages .
error conditions . . . . . .
problem solving . . . . . .
syslog . . . . . . . . . .
.
.
.
.
.
.
.
.
.
.
.
.
.
.
.
.
.
.
.
.
.
.
.
.
.
.
.
.
.
.
.
.
.
.
.
.
.
.
.
.
.
.
.
.
.
.
.
.
.
.
.
.
.
.
.
.
.
.
.
.
.
.
.
.
.
.
10
23
25
23
23
29
T
U
UDP encapsulation
automatic discovery . . . . . . . . . . . . . . . 10
Related Documentation . . . . . . . . . . . . . . . 6
Issue 2 July 2006
55
Index
V
VPNremote Phone features. . . . . . . . .
automatic discovery of UDP encapsulation
method . . . . . . . . . . . . . . . .
Copy TOS . . . . . . . . . . . . . . .
H.323 IP Telephone. . . . . . . . . . .
Integrated IPSec Client . . . . . . . . .
Quality test (Qtest) . . . . . . . . . . .
Remote Feature Activation (RFA) . . . .
selectable connectivity test . . . . . . .
SNMP support, syslog support . . . . . .
third-party security devices . . . . . . .
56 Administrator Guide
. . . . .11
.
.
.
.
.
.
.
.
.
.
.
.
.
.
.
.
.
.
.
.
.
.
.
.
.
.
.
.
.
.
.
.
.
.
.
.
10
10
.11
.11
10
10
10
10
10