1
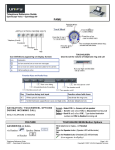
OPENSTAGE 40 (US) TELEPHONE USER GUIDE
1) Incoming Call Status Indicator
(red)
2)
3)
4)
5)
6)
7)
8)
Programmable Sensor Keys
Display
Handset / Disconnect Sensor
Conference Button
Transfer / Consult Button
Hold Button
Headset Answer / Disconnect
Button
9) Mute On / Off Button
10) Messages Button
(for call log & voicemail)
11) Services / Applications Button
(menu for programming features)
12) Speaker On / Off Button
13) Volume Control Buttons (- / +)
14) TouchWheel / 5-Way Navigator
for Menu prompts
15) Keypad
(hot/live keypad for handset-free dialing)
OpenStage 40 (US) Telephone User Guide
Provided by: InfoTel 6-16-14
Page 1 of 5
FEATURE
PL AC ING A C ALL
NOTE: All telephones have a “hot” keypad that allows
immediate dialing without lifting receiver.
This will
automatically activate the SPEAKER option on each
telephone. To move a call from speaker to handset, simply lift
handset.
TOUCHWHEEL MENU/Button Options
EXTERNAL CALLS
• Dial the 10-digit telephone number and press OK
INTERNAL CALLS
• Dial Internal Extension number only and press OK
NOTE: It is not necessary to dial a "9" before placing a call, but the system will accept it.
INT ERCO M C ALL (CO M GRO UP)
Place an intercom call to a member of your “group” using the
telephone speakers.
H ANDSET FREE DIAL ING
•
•
•
•
•
Press the COM SPEAK button
Dial the 2-digit intercom code for the individual you wish to “intercom”
Wait for confirmation tone and then begin speaking.
With the handset in the cradle, dial the desired telephone number
Lift receiver to place call via Handset
OR
• Press OK to place call via Speakerphone
N AV IG AT IO N / T OUC H WHEEL
OPT IONS D UR ING INCO MING
C ALL Answering your telephone via display
Accept – Select OK to answer call via speaker
prompts and TouchWheel (Select = press OK)
Deflect – Scroll
and select OK. Type desired destination
number and press OK to Redirect incoming call
ANS WER ING A C AL L
While telephone is ringing – Lift HANDSET
OR
Lift Handset or press Headset press Speaker button
Press the HEADSET button (Headset LED will illuminate)
OR
Press the SPEAKER button (Speaker LED will illuminate)
- (minus icon appears in display when connected to caller)
ANS WER ING A SECOND L INE
ON YO UR T ELEPHO NE ( k e y se t s)
INT ERCO M C ALL (CO M GRO UP)
Place an intercom call to a member of your “group” using the
telephone speakers.
DISCO NNECT ING A C ALL
To terminate the connection
• Lightly press the flashing extension SENSOR key (this places your current
•
•
•
•
call on HOLD)
You are connected to the caller
Press the COM SPEAK button
Dial the 2-digit intercom code for the individual you wish to “intercom”
Wait for confirmation tone and then begin speaking.
While connected to the caller
• Via HANDSET replace handset in cradle or touch light sensor in
earpiece portion of telephone cradle
• Via HEADSET, press the HEADSET button
• Via SPEAKER, press the SPEAKER button
While the caller is on hold
• Scroll
and select Disconnect from menu options
MUT E
To temporarily deactivate the microphone on the handset or
speakerphone
• While connected to the caller, press the MUTE button
(The LED on the MUTE button will illuminate to ensure feature is activated)
• To deactivate mute, press the lit MUTE button
(The LED on the MUTE button will deactivate)
L AST NUMBER RED I AL
Enables user to REDIAL the last number dialed
(internal or external)
RINGER C UT OFF
To disable the RINGER but allow incoming calls
HANDSET-FREE
• Press the OK button twice (call defaults to Speakerphone)
OR
• Lift the handset
• Press OK on Redial menu option (number displays in field)
To DEACTIVATE ringer
• Press and hold the ASTERISK * button located on the keypad for
approx. 3 seconds
(A BELL ICON with a slash through it will appear in display indicating ringer is
deactivated)
To ACTIVATE ringer
• Press and hold the ASTERISK * button for approx. 3 seconds
OpenStage 40 (US) Telephone User Guide
Provided by: InfoTel 6-16-14
Page 2 of 5
FEATURE
DO NOT DIST URB ( D ND)
Disables ringer and sends callers directly to voicemail
All calls that arrive to your telephone while in DND will be
pegged in your CALL LOG under the FORWARDED tab
HOLD
Place a caller on hold at your extension, retrievable only by
user
The HOLD ICON will appear in the display and the HOLD
button LED will stay illuminated as the call is holding
NO NKEYSETS – Ex t e n s i on num b e r
a ppe a r s on t he t e l e phone di s pl a y
TOUCHWHEEL MENU/Button Options
To ACTIVATE DND
• While the telephone is idle, scroll
to bring up menu, scroll
and
select Do Not Disturb On from menu options (DND icon will display when
activated)
To CANCEL DND
• Scroll
to bring up menu, scroll
and select Do Not Disturb Off
from menu options
NONKEYSETS
• While connected to the caller, press the HOLD button
(The HOLD LED will illuminate and the HOLD ICON will appear on the display next to
the held caller's telephone number indicating held call)
NOTE: If using handset, place the handset on the desk, not in the
cradle during hold.
To take the call OFF of HOLD
• Press the lit HOLD button
OR
• Replace handset in cradle. This will create a “ring-back” (caller does not
hear ring-back)
• Lift receiver to reconnect to held call
KEYSETS – Ex t e n s i on n um b e r
a ppe a r s on a s e ns or k e y
KEYSETS
• While connected to the caller, press the EXTENSION SENSOR key
(Extension will blink to indicate HELD CALL)
T R ANSFER
Transfer a call to another party
Warm T ran sfer – An n o u n ced Cal l
To take the call OFF of HOLD
• Press the blinking EXTENSION SENSOR key
WARM TRANSFER
• During a call, press the TRANSFER button (caller is placed on hold)
• Dial the extension number, press OK
• Announce the call
• Hang up (this completes the transfer)
If the party does not answer or does not want the call:
• Scroll
and select Disconnect & Return from menu options
Bl i n d T ran sfer – Un an n ou n ced
Cal l
BLIND TRANSFER
• Scroll
and select Blind Transfer from menu options
• Enter the extension number, press OK
• Call is immediately transferred
CONFERE NCE
• During a call, press the CONFERENCE button (caller is placed on hold)
Create a quick Conference call
(maximum of 3 OR 10 parties as per configured)
CONS ULT
To place a second call from your extension and consult
privately with party while first party is on hold
• Dial the extension or external number, press OK
• Announce the conference call
• Press the CONFERENCE button to join all callers
If the party does not answer or does not want to join the conference:
• Scroll
and select Disconnect & Return from menu options
• During a call, press the TRANSFER button OR select Consult from
menu options (caller is placed on hold)
• Dial the second party, press OK
• Once party answers, you may use the below menu options to handle the
call
• Scroll and select
o Alternate (toggles between the two calls)
o Complete Xfer (joins current call with held call)
o Conference (joins all callers)
o Blind Transfer (allows transfer of current connection)
o Hold (places current connection on Hold)
o Disconnect & Return (disconnects current connection and
returns to held call)
OpenStage 40 (US) Telephone User Guide
Provided by: InfoTel 6-16-14
Page 3 of 5
FEATURE
DIRECT ED PIC K UP
To answer a ringing extension other than your own
C ALL WAIT ING
To accept a second incoming call while on the telephone
NOTE:
TOUCHWHEEL MENU/Button Options
•
•
•
•
Lift handset, scroll
and select Directed pickup from menu
Enter the extension of ringing telephone
Press OK (you are connected to the caller)
During a call, if a second party is calling, a beep tone is heard, the Caller
ID of second party is displayed and the options to Accept or Ignore are
presented.
• To answer the second call, press OK on the Accept menu option (first
call is automatically placed on HOLD)
- The minus symbol next to number indicates
CONNECTED party
The hold symbol next to number indicates
HELD party
C ALL LOG
• To end the second call and return to the first, select Disconnect &
Return from menu options
OR
• Hang up from current call. The second call will ring through with
Recalling on display
• Answer telephone
TO ACCESS A NUMBER FROM YOUR CALL LOG
• From Idle Menu, press the MESSAGES button (If you have missed calls, the
envelope button will be illuminated along with the call log display notification)
The CALL LOG icon will appear in the telephone display if a
call is MISSED. Once the list is viewed, the icon will disappear
from screen.
Multiple calls from the same number are only listed once. The
number of call attempts is logged in the “Details” context
menu.
Each call list folder may contain up to 30 entries. Once this
limit is reached, the oldest entry in the log is deleted.
SHIFT ( pr ogr a m m e d se ns or k e y )
When shift is programmed in a sensor key it allows each
sensor key to have two programmable sides.
SENSOR KEYS
Programmable - located to the right of caller ID display
• Scroll
and select a number from the list to call OR simply view the
Missed Calls list to clear the call log notification from your display
• Press the illuminated ENVELOPE button to return to main screen
• To select from: MISSED, DIALED, RECEIVED or FORWARDED
folders, while in the CALL LOG FOLDER press the ESCAPE
arrow
on the TouchWheel until all folders are showing on the telephone
display. Select the desired folder to open
• Press the SHIFT SENSOR key to see / utilize the shifted side of a sensor
key
NOTE: There are two sides to a sensor key - Normal and Shifted
• When lightly pressed and held, user is taken to the Program Key
screen to change the feature of that key
• To exit programming screen, select Cancel (or press escape icon)
PROGR AMMING A FE AT URE ON
A SE NSOR KEY
To customize the telephone with features helpful to the user
TI P: Th e # s i g n wi l l c h a n g e t h e m o d e
o f t h e k ey p a d wh en l a b el i n g k ey .
NO TE:
If a 1 - t o u c h Sp e e d Dia l k e y is d e s ir e d ,
s e le c t SEL E CT ED D IAL ING a s t h e
f e a t u r e in t h e No r ma l o r Sh if t e d f ie ld .
If a M u lt i- f u n c t io n k e y is n e e d e d , s e le c t
REPDI AL a s t h e f e a t u r e in t h e No r ma l
o r Sh if t e d f ie ld .
• Press and hold the SENSOR key to be programmed
• Select OK on Program Key menu option
• Once Program Screen appears, scroll
to Normal OR Shifted field
and press OK
• Scroll
and select desired feature for key
• Scroll
to Label field and press OK
• Using keypad, type desired label for key (if applicable)
• Press OK
• Scroll
to Settings and press OK
• Type number for the system to dial
• Press OK
• Scroll and select Save & Exit from Options field
Changes Saved Successfully will display on telephone
• Press the SERVICES button (illuminated) to return to main screen
OpenStage 40 (US) Telephone User Guide
Provided by: InfoTel 6-16-14
Page 4 of 5
FEATURE
VOLUME CO NT ROLS
AUD IO SETT INGS
♫
To customize the ring tone of your telephone
TOUCHWHEEL MENU/Button Options
• Utilize the plus (+) key to INCREASE & minus (-) to DECREASE
- Volume of Ringer as telephone is ringing
- Volume of Handset while on the telephone
- Volume of Speaker while utilize the speakerphone
•
•
•
•
•
•
Press the Services button
Scroll
to Settings folder and press OK
Press OK on the USER folder (if prompted for password, enter 123456)
Scroll
to the Audio folder and press OK
Select Volumes (to preset volumes)
Scroll
and select the volume to adjust (loudspeaker, ringer, handset or
headset - these volumes can also be adjusted while the telephone is in use)
• Once a selection is made, use the TouchWheel to adjust volume
= decrease volume,
= increase volume
OR
• Settings (to change ringer pitch)
• Scroll
to Ringer and press the
on TouchWheel
For a standard ring tone, select Pattern. Scroll
Pattern Melody and select a pitch (1 thru 8)
For a melody ring tone, scroll
Ringer .WAV file
to
and select 1 - 6 of a
NOTE: As each option is highlighted, the telephone will
demonstrate the ring tone.
• Scroll to Save & Exit from the Options screen and press OK
• Press the SERVICES button to return to main screen
OpenStage 40 (US) Telephone User Guide
Provided by: InfoTel 6-16-14
Page 5 of 5