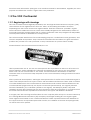
1
USER’S MANUAL
Version 1.0
ARTURIA VOX Continental V User's Manual
-1-
1 INTRODUCTION
Project management
Glen Darcey
Theo Niessink
Product management
Glen Darcey
Programming
Adrien Courdavault
Pierre-Lin Laneyrie
Theo Niessink
Shaun Ellwood
(decoderdesign.com)
Morgan Perrier
Design
Glen Darcey
Sound design
Glen Darcey
Theo Niessink
Luca Torre
Stephane Schott
Manual
Randy Lee
1st edition, May 2014
© ARTURIA S.A. – 1999-2014 – All rights reserved.
30, chemin du Vieux Chêne
38240 Meylan
ARTURIA VOX Continental V User's Manual
-2-
1 INTRODUCTION
FRANCE
http://www.arturia.com
Table of contents
Table of Contents Project management ................................................................................................................................... 2 Table of contents .......................................................................................................................................... 3 1.1 The electronic organ .............................................................................................................................. 5 1.1.1 Introduction....................................................................................................................................... 5 1.1.2 The spark that started the fire: the Telharmonium ........................................................................ 5 1.1.3 Technological innovations .............................................................................................................. 6 1.2 The VOX Continental .............................................................................................................................. 7 1.2.1 Beginnings with Jennings................................................................................................................. 7 1.2.2 Physical features: what a looker!.................................................................................................... 8 1.2.3 The sound of renown ....................................................................................................................... 8 1.2.4 Maintenance .................................................................................................................................... 9 1.2.5 The VOX rocks: a selected discography ....................................................................................... 9 1.3 Physical modeling synthesis ................................................................................................................. 10 1.3.1 Music and math: yet another link................................................................................................. 10 1.3.2 A computational conundrum....................................................................................................... 10 1.3.3 The endless revolution.................................................................................................................... 11 2.1 Installation for Windows 7 or 8 ............................................................................................................. 12 2.2 Installation for Mac OS X ...................................................................................................................... 13 3.1 Registration ............................................................................................................................................ 15 3.2 License download ................................................................................................................................ 16 3.3 Launch the application........................................................................................................................ 18 4.1 Virtual keyboards and pedals ............................................................................................................. 19 4.2 The tool bar: introduction and initial setup ........................................................................................ 19 4.2.1 Audio and MIDI settings................................................................................................................. 20 4.2.2 Choose the organ color ................................................................................................................ 21 4.3 Managing presets ................................................................................................................................. 22 4.3.1 Select a bank, type, or preset ...................................................................................................... 22 4.3.2 Saving an edited preset ................................................................................................................ 24 4.3.3 Import / Export a bank of presets ................................................................................................. 25 4.4 Advanced features .............................................................................................................................. 25 4.4.1 Extended mode.............................................................................................................................. 25 4.4.2 Open mode .................................................................................................................................... 26 4.4.3 The pedals ....................................................................................................................................... 28 4.4.4 Output mode .................................................................................................................................. 29 ARTURIA VOX Continental V User's Manual
-3-
1 INTRODUCTION
4.4.5 The Swell pedal............................................................................................................................... 31 4.4.6 FX Slot ............................................................................................................................................... 32 4.4.7 The Panic button: “Stuck” happens............................................................................................. 32 4.4.8 CPU meter ....................................................................................................................................... 32 4.4.9 Global MIDI channel ...................................................................................................................... 33 4.4.10 MIDI control configurations ......................................................................................................... 33 4.4.11 MIDI preferences: the PREF button............................................................................................. 36 4.4.12 The MIDI Mode tabs ..................................................................................................................... 38 4.5 Types of controls.................................................................................................................................... 39 4.5.1 Potentiometers................................................................................................................................ 39 4.5.2 Switches ........................................................................................................................................... 40 4.6 The effects.............................................................................................................................................. 40 4.6.1 Flanger ......................................................................................................................................... 41 4.6.2 Phaser........................................................................................................................................... 42 4.6.3 Chorus .......................................................................................................................................... 43 4.6.4 Delay ............................................................................................................................................ 43 4.6.5 Overdrive ..................................................................................................................................... 44 4.6.6 Wah .............................................................................................................................................. 45 4.6.7 Leslie speaker model .................................................................................................................. 45 4.6.8 Guitar amp model ...................................................................................................................... 46 END USER LICENSE AGREEMENT................................................................................................................. 48 1. Software Ownership................................................................................................................................ 48 2. Grant of License ...................................................................................................................................... 48 3. Activation of the Software ..................................................................................................................... 49 4. Support, Upgrades and Updates after Product Registration............................................................. 49 5. License module (eLicenser Key and/or Soft eLicenser) ..................................................................... 49 6. Defect and loss of the eLicenser dongle ............................................................................................. 50 7. No unbundling......................................................................................................................................... 50 8. Assignment of rights ................................................................................................................................ 50 9. Upgrades and updates.......................................................................................................................... 50 10. Limited warranty.................................................................................................................................... 51 11. Remedies ............................................................................................................................................... 51 12. No other warranties .............................................................................................................................. 51 13. No liability for consequential damages ............................................................................................. 51 ARTURIA VOX Continental V User's Manual
-4-
1 INTRODUCTION
1 INTRODUCTION
1.1 The electronic organ
1.1.1 Introduction
The term “organ” is quite versatile, representing a number of constructions ranging from the
biological to the electromechanical. Its Greek root is the word “organon”, which when
translated literally means “that with which one works.” And many generations of musicians
stretching back further than Johann Sebastian Bach and forward past Joey DeFrancesco would
agree! The organ, in all its forms, has been at the heart of some of the greatest music ever
produced.
Even within the musical realm the history of the organ has many parallel branches. But prior to
the late 19th century AD the method of tone production always depended on the flow of air
through a pipe or past a reed, with the airflow provided courtesy of one or more humans:
pumping bellows with their arms, pushing pedals with their feet, or exhaling into some device
belonging to the harmonica family.
So imagine the rejoicing when someone had the idea to involve electricity! Not only did this
allow the players to focus more on the music than on their heart rate; it opened up a range of
technological innovations that led to a nearly infinite number of timbral possibilities. And the
organ still arguably reigns supreme as the musical instrument capable of the widest diversity in
both pitch and timbre. Perhaps this is why it is also found in nearly every style of music known to
humankind.
There is much information available elsewhere regarding the history of the organ leading up to
the 20th century. Our focus here will be on the development of the electronic organ.
1.1.2 The spark that started the fire: the Telharmonium
The very first electronic organ was the Telharmonium, invented in 1897 by Thaddeus Cahill. Only
three were made, with the final model weighing almost 200 tons!
ARTURIA VOX Continental V User's Manual
-5-
1 INTRODUCTION
A Telharmonium console by Thaddeus Cahill, circa 1897
The Telharmonium (a.k.a. the “Dynamophone”) was originally heard by most people through
means of electrical wires attached to “paper cones”, the forerunners of today’s loudspeakers.
The music was transmitted to various locations in New York City over the burgeoning telephone
system! Crosstalk from the Telharmonium sometimes interfered with telephone conversations, so
that idea didn’t last long.
Between 1906 and 1908 there were a number of well-received public performances in a concert
hall setting as well. “Build it and they will come…” (Well, they had to, didn’t they? The
Telharmonium wasn’t exactly portable.)
Sadly, there are no surviving recordings of the Telharmonium. But there are many web sites
containing a wealth of information about this fascinating and groundbreaking instrument.
1.1.3 Technological innovations
Another thing that made the Telharmonium different from other electrically-powered organs of
the day was the use of an electromechanical device to generate the tones, rather than simply
using electricity to blow air into a pipe or past a reed. These devices came to be known as
tonewheels, and they were the progenitors of the technology later employed by the Hammond
Organ Company in its legendary instruments. The resultant sound finally enabled the electronic
organ to distinguish itself from the pipe organ and reed organ, and also allowed musicians to
sculpt the tone of the instrument through the use of additive synthesis! We owe much to these
innovations.
Another form of tone generation became available with the advent of the transistor, and with it
an increase in portability and reliability. When combined with the frequency dividing technology
that had been developed roughly 10 years earlier, electronic (or “combo”) organs became
even more affordable and easier to maintain. For example, rather than tuning hundreds of
individual oscillation circuits, the technician only needed to set the fundamental frequency of 12
circuits. The rest of the pitches and their overtones were derived through the combined use of
frequency dividers and phase-locked loop (PLL) frequency synthesizers. You tune one, you tune
them all (times 12).
ARTURIA VOX Continental V User's Manual
-6-
1 INTRODUCTION
And from these discoveries sprang the VOX Continental and its descendants, arguably the most
popular and influential “combo” organ series ever produced.
1.2 The VOX Continental
1.2.1 Beginnings with Jennings
The VOX Continental was originally created by the Jennings Musical Instrument company (JMI).
JMI had been in the organ business since the 1950s, at first making accordions and then
expanding into the home and church organ markets. Their first somewhat “portable” organs
were instruments called the UniVOX, which were initially designed to be attached by means of
metal clips beneath the right-hand side of a piano keyboard. Later they designed an adjustable,
chrome-plated stand to streamline the setup process.
The UniVOX models had buttons for sound-shaping purposes, a tube-based tone generator, and
a built-in amplifier and speaker. They somewhat resembled an accordion, but given their fixed
position they couldn’t be “arm powered” so they needed an AC power source nearby.
Pictured below is the second UniVOX model, the J10:
Like its predecessor the J6, the J10 was monophonic. But it provided an extra row of buttons for
preset selection, which multiplied its usefulness and appeal. It was used on the song Telstar,
which was a #1 hit on both sides of “the Pond” for The Tornados in December of 1962. The
Tornados went on to become early adopters of the VOX Continental, scoring several more hits in
the process.
After a period of development, JMI began mass-production of the first VOX Continental organ in
1962. It was later produced as a joint venture with an Italian manufacturer. There were a number
of models all based on the Continental that were released with various feature differences: the
Continental itself (single-manual), the Super Continental (dual-manual), the Jaguar (switches
instead of drawbars), the Corinthian (similar to the Jaguar), the Baroque (built-in amp and
speakers) and the 300. The 300 was the most advanced, with the equivalent of a Continental on
the lower manual and an expanded Continental on the upper with different drawbars.
In roughly 1967 Tom Jennings was fired from his own company after a buyout. He then started up
the Jennings Electronic Instruments (JEI) company and began making his own organs again.
These organs were based on the Continental 300 but further expanded with more drawbars on
the upper manual, an expanded percussion section, the addition of tremolo and spring reverb,
as well as some tone presets.
ARTURIA VOX Continental V User's Manual
-7-
1 INTRODUCTION
The sound of the VOX organs caught on fast and they became a staple of the British invasion
sound used by the Animals, The Beatles, The Zombies, and more.
1.2.2 Physical features: what a looker!
Few keyboards have a design as immediately recognized as the VOX Continental. Its distinctive
shape and unique color schemes set it apart from any other portable organ.
Two views of the VOX Continental I
The chrome legs would store within the detachable lid, making the unit much easier to transport
than its behemoth rival, the Hammond. The sturdy, flat, and red/orange top was a perfect place
for a second keyboard, such as the Fender Rhodes Piano Bass often used by Ray Manzarek of
The Doors. The inverse coloring of the keys, previously only seen on harpsichords, was the final
stroke of aesthetic genius. It was an irresistible combination (or “combo”, if you will).
1.2.3 The sound of renown
The VOX Continental has a sound that is quite distinct from a Hammond organ. It is actually more
flexible sonically because it does not rely merely on sine waves; it also gives the user the ability to
add or substitute triangle waveforms (which were actually filtered square waves), greatly
expanding the sonic palette.
ARTURIA VOX Continental V User's Manual
-8-
1 INTRODUCTION
Because of this flexibility its timbre has been described alternately as “bright”, “airy”, “edgy”,
“smooth” and “mellow”. Where its rivals might struggle to be heard in certain settings, the VOX
Continental had no trouble cutting through a guitar-heavy mix. And when a more subtle tone
was required the simpler sine waveforms could be used instead, or used in combination with the
triangle waveforms as “sweeteners”.
And of course, the VOX Continental V software instrument makes all of those options yours!
1.2.4 Maintenance
As much as the tuning of a VOX Continental was simplified by the frequency divider
components, the electromechanical aspects of the keyboard were still of concern. For each key
there was an independent contact for each drawbar stop, and as the organ aged in proportion
to how much it was used, these individual contacts would begin to age as well…and often at
different rates. A very old, poorly maintained VOX Continental would likely give a very different
sound from key to key. The overall output can be quite unpredictable when this is the case.
Call us crazy, but we really are serious about faithfully recreating the experience of these classic
instruments. So one of the interesting things we did with our VOX Continental V emulation is give
you the ability to add that “unpredictability” back in! You’ll find a control in Open mode labeled
Key Contact Age. Give that a twist and see what happens! It might inject the right amount of
personality into a preset you are creating.
1.2.5 The VOX rocks: a selected discography
There have been many, many albums made using the various VOX models, but here is a brief list
of recordings bearing its unmistakable sound
96 Tears – Question Mark & the Mysterians
House Of The Rising Sun – The Animals
I’m Down – The Beatles
Light My Fire – The Doors
Watching the Detectives – Elvis Costello
Do You Love Me – The Dave Clark Five
I’m a Believer – The Monkees
In-A-Gadda-Da-Vida – Iron Butterfly
One Step Beyond – Madness
Working My Way Back To You – The Four Seasons
This is only a small sample, and yet it represents huge hits spanning several decades! Clearly this is
a musical instrument with serious staying power and broad audience appeal.
Still a classic and in great demand, the prices of VOX organs have climbed in response to their
limited availability. Thankfully, Arturia’s VOX Continental V software brings this iconic instrument
back to life, placing it within the reach of the modern musician with even the most modest
budget.
ARTURIA VOX Continental V User's Manual
-9-
1 INTRODUCTION
1.3 Physical modeling synthesis
When you want to create a sound, there are many methods of synthesis from which to choose:
•
•
•
•
•
•
•
Additive, which creates a timbre by adding various waveforms together
Subtractive, in which partials of an audio signal are attenuated by a filter to reduce the
original harmonic content of the sound
Frequency Modulation (FM), where waveforms are used in carrier/modulator relationships
and tuned according to the harmonic series to produce overtones in the carrier waves
Wavetable, which offers a wide selection of digital waveforms and then allows them to
be layered, filtered, and/or used as the crossfade targets of an X/Y controller or a looping
envelope
Sample Playback, where recordings of a sound are triggered by a playback device, and
can be transposed by increasing the playback speed when different pitches are required
Granular, which splits samples into very short “grains” and allows them to be manipulated
through a myriad of playback options, and
Physical modeling. In this method the output waveform is calculated according to a set
of equations and algorithms derived through extensive analysis of a physical sound
source.
1.3.1 Music and math: yet another link
A physical model attempts to codify the laws of physics that govern a particular form of sound
generation. A model typically will have multiple parameters, some of which are constants that
describe the physical materials and dimensions of the instrument, while others are timedependent components representing the player´s interaction with the instrument, such as
plucking a string, pressing a valve, or reducing the pressure of his embouchure, etc.
This idea has been around for a long time, but development has been hindered until recently
because processors that were powerful enough to handle the computational complexity of the
physical models either didn’t exist or were too expensive.
But if you’ve been watching the technological trajectories, you know those days are in the past.
And we’re just as happy about that as you are.
1.3.2 A computational conundrum
Here’s an example of what must be taken into account while developing a physical model. To
recreate the sound of a drum, for instance, a formula must be in place to represent all of the
ways the collision between a drum stick and a drum head sends shockwaves through a twodimensional membrane. Among other things, the formula must incorporate:
•
•
•
•
The properties of the striker: its rigidity, the velocity of the hit, the material, and how/where
the strike happens
The membrane: its mass density, elasticity, woven fabric vs. plastic vs. skin, etc.
The sympathetic resonances of the membrane and the body of the drum
The conditions at the membrane boundaries: is there a rigid termination to the drum´s
body, or are there multiple, independently adjustable pressure points?
ARTURIA VOX Continental V User's Manual
-10-
1 INTRODUCTION
•
The ancillary and perhaps lingering response of additional components, such as the
snares under a snare drum.
Similar complexities can be found in instruments such as an acoustic guitar. A few years ago, a
French scientist finally completed a comprehensive modeling of all acoustic guitar parameters.
The calculations to produce the sound took three days!
The second-biggest challenge of physical modeling synthesis is to simplify the algorithms
wherever possible without sacrificing the essential nature of the instrument being modeled. The
goal is to achieve an efficient model which can be used interactively, in real time, without
limiting the spontaneous paths a musician may take during a rush of creativity.
1.3.3 The endless revolution
There are several methods of physical modeling synthesis, including Karplus-Strong algorithms,
digital waveguide synthesis, and formant synthesis. Each one uses a different paradigm to bring
a modeled sound to its musical fruition.
The salient point here is that physical modeling synthesis is capable of recreating the character of
a “real” instrument during performance, including its subtle nuances of expression, while using a
thousand times less hard drive space than the “sampling” method would take to produce an
inferior result.
Not to rub it in, but we really should mention the ability of physical modeling algorithms to
combine parameters into instruments that have never existed. There is no limit to the types of
sounds physical modeling synthesis can produce!
And when you gather a bunch of music fanatics who also possess a knowledge of the pertinent
laws of physics and an in-depth understanding of the characteristics of electronic circuits, you
wind up with Arturia. And Arturia now offers you our latest brainchild, the VOX Continental V.
May it light the fires of creativity for you!
ARTURIA VOX Continental V User's Manual
-11-
1 INTRODUCTION
2 INSTALLATION
VOX Continental V works on computers equipped with Windows 7 or 8 and MAC OS X 10.7 or
later. You can use the stand-alone version or use VOX Continental V as a VST, Audio Units or AAX
instrument.
2.1 Installation for Windows 7 or 8
Insert the CD-ROM into the drive. Explore the contents of the CD-ROM, then double click on the
file named VOX_V_Setup.exe, and follow the on-screen instructions.
First, you can choose the item(s) to install:
•
Standalone application: This checkbox gives you the option to install VOX Continental V as
a plug-in only, if you think you will never want to run it on its own without the use of a DAW.
•
VST 2.4 plug-in is the Steinberg standard interface for plug-ins, and is supported by a large
number of audio applications.
•
VST 3 plug-in is the newest version of VST, so if the DAWs you use are VST 3 compatible you
won´t need to install the older version of VST. You can safely uncheck the “VST 2.4 plug-in”.
•
VST 3 plug-in (64 bits) is for the 64-bit version of Windows and 64-bit DAWs.
ARTURIA WURLITZER V User's Manual
-12-
2 INSTALLATION
•
AAX plug-in (32 bits) is for use with the 32-bit version of Pro Tools.
•
AAX plug-in (64 bits) is for the 64-bit versions of Windows and Pro Tools.
If you have any doubt, just select all of the items. They do not require much disk space.
Second, confirm the locations of the shared VST folders. They will probably be selected already,
but if not you can navigate to the paths shown below or change the destinations to the folders of
your choice.
The installer now has enough information to complete the installation. When the installation
process is complete, please proceed to the Authorization instructions in Chapter 3.
2.2 Installation for Mac OS X
Insert the CD-ROM into the drive. Explore the contents of the CD-ROM, then double click on the
icon named “VOX Continental V.mpkg” and follow the on-screen instructions.
First, read and accept the End User License Agreement.
After that you’ll be taken to a screen where you can choose the item(s) to install:
•
Standalone installs the full version of the VOX Continental V application so you can use it
without a Digital Audio Workstation (DAW).
•
VST is the Steinberg standard interface for plug-ins, and is supported by a large number of
audio applications. VST 2 is used by some applications and VST 3 is used by others. If you are
ARTURIA WURLITZER V User's Manual
-13-
2 INSTALLATION
certain none of your applications use one or the other of the VST versions, then you can
uncheck that one. But in the long run it probably makes more sense to install them both,
since they don’t take up much space and you might buy a different application someday
that needs that one.
•
AAX needs to be installed if you use Pro Tools.
•
AudioUnit is the audio interface developed by Apple.
If you have any doubts, just select all of the items. They don’t require much disk space.
Last, when prompted enter the administrator name and password of your computer in the
authentication window.
The installer now has enough information to complete the installation. When the installation
process is complete, please proceed to the Authorization instructions on the next page.
ARTURIA WURLITZER V User's Manual
-14-
2 INSTALLATION
3 AUTHORIZATION
Now that VOX Continental V has been installed on your computer, you will need to register and
authorize it before you will be able to take full advantage of the features, such as the ability to
save your edits.
The authorization process is done in two steps: Registration and License download.
3.1 Registration
The first step is to register your software in order to obtain the activation code that will enable you
to use the software as intended.
As you go through the following steps make sure you have the license serial number of your VOX
Continental V software and the unlock code with you. These were emailed to you after the online
purchase.
Connect your computer to the internet and go to this web page: http://www.arturia.com/login
•
If you already have an Arturia account set up, simply log in:
•
If you don´t have an Arturia account yet, please create one now:
Once you are logged into your account you can register your VOX Continental V software and
obtain your activation code.
Go to the “My Registered Products” section of your account and click on the “Add” button. In
the form that appears, select “VOX Continental V” from the drop-down menu and enter your
serial number and unlock code exactly as they appear on the registration card. If you received
these numbers in an email, you should be able to copy and paste them into the appropriate
locations:
After confirmation you will see a screen from which you can copy the eLicenser activation code.
This information will be sent to you by email also as a backup.
ARTURIA WURLITZER V User's Manual
-15-
3 AUTHORIZATION
3.2 License download
Now that you have retrieved the activation code, launch the eLicenser Control Center on your
computer. This application has been automatically installed on your computer during the
installation of your VOX Continental V software, and is accessible here:
•
Windows 7 or 8: Start > Programs > eLicenser > eLicenser Control Center
•
Windows 8 (alternate): C:\Program Files (x86)\eLicenser\eLCC.exe
•
Mac OS X: (Macintosh HD) > Applications > eLicenser Control Center
The following screenshots have been taken on a computer running Mac OS X, but the process is
identical on a machine running Windows 7 or 8. The same functions apply; only the graphical
user interface differs, and possibly the language used.
In the eLicenser Control Center main window you should see a “SeL” (Soft-eLicenser) virtual
dongle installed into your computer.
In the eLicenser Control Center menu, click on the “Enter Activation Code” button and enter the
code when prompted. Simply paste in the 32-digit code you just copied from your account on
the Arturia website:
ARTURIA WURLITZER V User's Manual
-16-
3 AUTHORIZATION
Select the destination for your license. The default destination is the Soft-eLicenser virtual dongle,
but you can also use an optional USB-eLicenser hardware dongle if available:
The eLicenser Control Center is now ready to download the license software that will allow you to
use the VOX Continental V.
To transfer your license to another computer, or simply use the VOX Continental V on several
computers (one instance at a time), you will need:
•
a USB-eLicenser hardware dongle (the “Steinberg Key”, sold separately, and also used by
many other software applications)
•
in the eLicenser Control Center, to drag-and-drop your license from the Soft-eLicenser to
the USB-eLicenser.
This transfer, which requires a valid Internet connection, can be done both ways:
•
from Soft-eLicenser to USB-eLicenser.
ARTURIA WURLITZER V User's Manual
-17-
3 AUTHORIZATION
•
From USB-eLicenser to Soft-eLicenser.
Please check the eLicenser documentation installed on your computer for any further technical
details.
Click on Start, and the progress bar should advance until downloading is complete. A pop-up
window will confirm completion; just click “Close” once it has finished.
The main eLicenser Control Center window should now show your VOX Continental V license
installed and activated:
VOX Continental V
AL
And now it´s time to launch the VOX Continental V!
3.3 Launch the application
To launch the VOX Continental V application:
•
Windows 7 or 8: navigate to Start > Programs > Arturia > VOX V and choose “VOX V”
•
Windows 8 (alternate): navigate to C:\Program Files (x86)\Arturia\VOX V and double-click
VOX V.exe
•
Macintosh: open the finder > Applications > Arturia and double-click the VOX V application
icon.
ARTURIA WURLITZER V User's Manual
-18-
3 AUTHORIZATION
4 USER INTERFACE
In this chapter we will describe the many features available to you with VOX Continental V. As
with every Arturia product, we have gone to great lengths to make the use of this software
instrument as simple and as much fun as possible.
4.1 Virtual keyboards and pedals
The virtual keyboards and pedal board in the main VOX Continental V window allow you to play
a sound without the need for an external MIDI device. Just click on a virtual key or pedal to hear
the corresponding sound. Drag the cursor across the keys or pedals to hear a glissando.
4.2 The tool bar: introduction and initial setup
Across the top of the main VOX V window is a narrow strip known as the tool bar. It houses the
preferences and MIDI settings, various sound selection and output options, and gives access to
advanced editing functions, among other things.
ARTURIA WURLITZER V User's Manual
-19-
4 USER INTERFACE
4.2.1 Audio and MIDI settings
Windows: Click on the Setup > Audio MIDI Settings menu:
[insert picture of Windows Setup/Audio MIDI Settings menu]
This is the same dialog box that appears when starting the software for the first time. Here you can:
•
Select the audio interface
•
Set the audio output port
•
Set the buffer size
•
Set the sample rate
•
Select which MIDI input port(s) will be recognized
Mac OS X: Select Preferences from the VOX V pull-down menu:
Another window will open that shows your options for connection audio and MIDI interfaces:
ARTURIA WURLITZER V User's Manual
-20-
4 USER INTERFACE
Mac OS X Audio MIDI Settings window
The above window illustrates one of several configuration options. The settings indicate the
selection of two Arturia controllers as MIDI sources, while the setting “Built-in Output” means the
user will hear the sound of the VOX Continental V through the computer’s speakers as opposed to
the external USB audio interface. If a different configuration is desired, all you need to do is select
a different audio device in the drop-down menu and then check and uncheck the various MIDI
Devices until you have exactly what you need.
Other options enable you to:
•
choose the memory buffer size (a smaller size will increase the CPU load but will reduce
latency, and vice versa)
•
choose a sample rate between 44100 Hz and 96000 Hz.
You can also play a test tone to make sure the audio interface responds properly. Just click the
“Play Test Tone” button and a simple, clear tone will play. It shuts itself off after one second, so if
you need to hear it again just click the button a second time.
4.2.2 Choose the organ color
“VOX Continental” normally conjures up mental images of “the organ with the orange/red top.”
But the family history actually includes quite a few gray tops, which were mostly dual-manual units
made in the UK by VOX and (later) JMI.
Again, being sticklers for authenticity we have given you the option to select whichever of the two
colors you prefer. The choice you make is stored with the preset, so you can have gray for one
preset and red/orange for the next.
To make this selection, click the
button in the upper right corner of the VOX V window. This
will open another window, which has a field toward the bottom labeled Organ Color:
ARTURIA WURLITZER V User's Manual
-21-
4 USER INTERFACE
Click the pull-down menu window and you will be able to select between the two options.
4.3 Managing presets
Presets preserve the settings for any sounds you create with VOX Continental V. When saving a
preset you will designate the “bank” and “type” to which it belongs. Each bank contains a
certain number of types, which are there to help you categorize the presets into groups such as
“FX”. Each type contains within itself a certain number of presets.
VOX Continental V ships with several banks of factory presets, but it is possible to create your own
“user” banks, each containing a number of types and presets. The factory banks, types and
presets cannot be overwritten, but they are great starting points for creating new presets. Then
you can use the SAVE AS feature to save the changes as your own presets.
4.3.1 Select a bank, type, or preset
The bank, type and preset selections are permanently displayed in the plug-in tool bar.
ARTURIA WURLITZER V User's Manual
-22-
4 USER INTERFACE
To choose a new preset in the current Bank and Type, click on the Preset Name field. A dropdown menu will appear with a list of the available presets in that category. Or if you know which
preset you want inside that category and don’t need to look at the list, simply use the blue
arrows to move up and down through the choices. Either way, as soon as the preset has been
chosen the new sound will be available for your MIDI controller or your sequencer.
Selecting a new preset
To choose a different type of preset in the same bank, click on the Preset Type button (the
middle one of the three). A drop-down menu will appear with a list of the types of presets
contained in the same bank (Classic, Distorted, etc.). Each type listed in the menu contains a
sub-menu with its own list of preset names. Follow the arrows to choose the desired preset from
within these sub-menus.
Selecting a new preset inside the Preset Type menu
To choose a preset in another bank, click on the Preset Bank button (the left-most of the three). A
drop-down menu will appear with a list of the available banks, within which sub-menus exist for
the preset type and preset name. Navigate to the preset name level to choose a new preset.
ARTURIA WURLITZER V User's Manual
-23-
4 USER INTERFACE
Selecting a new preset inside the Preset Bank menu
In the Preset Bank menu the “All Banks” option allows you to navigate directly to any preset type
or any preset in any bank. This gives you direct access to all of the presets of a given type, such
as the FX presets, no matter which bank they are in.
Selecting a new preset through the All Banks > All Types menus
One more important thing to know: When a preset has been modified, an asterisk appears next to
its name in the tool bar.
4.3.2 Saving an edited preset
To save the changes you’ve made to the current preset, click on the “Save” button in the tool
bar. It has the icon of a single floppy disk:
If you want to keep the original program you’ll need to give the edited one a new name. So
click on the “Save as” button in the tool bar, which looks like two floppy disks on top of each
other. A drop-down menu will appear and let you choose a new name and location for the
edited preset.
ARTURIA WURLITZER V User's Manual
-24-
4 USER INTERFACE
Note: Factory presets can’t be overwritten. So If that’s what you started with, clicking the “Save”
button will automatically open the “Save as” menu so you can save the edited preset as a user
preset.
4.3.3 Import / Export a bank of presets
It is possible to import or export entire banks of VOX Continental V presets. To import a bank, click
on the bank import button on the tool bar:
After clicking this button a window will appear so you can choose the bank to import (look for
the “.VOX” extension). Choose the desired bank and click “Open”. The new bank of presets will
automatically appear among the available banks.
You can also export your own sounds as a means of backing them up, using them on another
computer, or sharing them with other users. And while you can only import an entire bank at
once, it’s possible to export a single preset, a Preset Type (a specific category of presets), or an
entire Preset bank.
To do this, click on the preset bank export button in the tool bar of the program, which looks like
this:
Select the type of export you want to perform (bank, type or preset) and a window will appear,
allowing you to choose a destination folder and name for the item(s) you are exporting.
4.4 Advanced features
4.4.1 Extended mode
When you click the EXT button you will notice immediately that Extended mode adds extra
drawbars for each of the VOX Continental V organ manuals, and one more drawbar for the
pedals. But it does more than that: it also adds an extra effect switch on the left side of the upper
manual (TREM, for tremolo) and changes the “percussion” switches to the right of the lower
manual, adding one more button overall but also altering which percussion stops are available for
the preset.
The best way to illustrate this is to compare the two modes side-by-side:
4.4.1.1 Upper manual drawbars
Standard
Extended
16’
16’
8’
8’
4’
5-1/3'
II
4’
III
2-2/3’
2’
1-3/5’
1’
~
~
M
M
S
Note: See the next page for definitions of II, III, ~, M and S.
ARTURIA WURLITZER V User's Manual
-25-
4 USER INTERFACE
4.4.1.2 Lower manual drawbars
Standard
Extended
16’
16’
8’
8’
4’
5-1/3'
IV
4’
2-2/3’
2’
1-3/5’
1’
~
~
M
M
S
Note: See below for definitions of IV, ~, M and S.
4.4.1.3 Pedal drawbars
Standard
Extended
~
~
M
M
S
Note: See below for definitions of ~, M and S.
Definitions:
II = a mix of 5-1/3' and 1-3/5'
III = a mix of 2-2/3', 2' and 1'
IV = a mix of 2-2/3', 2', 1-3/5', & 1'
~ = sine wave output per drawbar, also known as the “Flute” stop
M = filtered square wave output per drawbar; this is labeled the “Reed” stop
S = triangle wave output per drawbar; only in Extended mode, and called the “String” stop.
4.4.1.4 Bass / Effect switches
Standard
Extended
8’ / 16’
8’ / 16’
Rev
Rev
Vib
Trem
Vib
There are some important things to remember about the Bass / Effect switches:
•
•
•
The 8’ / 16’ switch selects the octave range for the pedals
The Vib switch adds vibrato to both organ manuals and the pedals
The Trem switch adds tremolo only to the upper manual
Note also that the amount of reverb is controlled by the Reverb slider next to the Bass / Effect
switches. The Bass Decay slider specifies the amount of time the bass note will continue to sound
after the pedal is released.
4.4.1.5 Percussion switches
Standard
Extended
8’
8’
4’
4’
Mix
2-2/3’
Short / Long
1’
Short / Long
There are two important things to remember about the Percussion feature:
•
•
Mix provides a percussive element with two pitches: 5-1/3' and 1-3/5'
The Percussion only affects the upper manual.
4.4.2 Open mode
Open mode offers a slew of parameters “under the hood” that further expand the capabilities of
VOX Continental V. This is where you select the engine type (VOX or Jennings), the reverb type,
ARTURIA WURLITZER V User's Manual
-26-
4 USER INTERFACE
set the vibrato/tremolo rates and depths, add or remove background noise, fine-tune the octave
dividers, and turn the instrument into an “antique” with the Key Contact Age control.
Here’s a list of the Open mode features, from left to right and top to bottom:
Vibrato Depth This allows you to control how deep the vibrato will be for the preset. You’ll
only hear vibrato if the Vib button is toggled to On, though.
Note: Vibrato is a global effect; it affects the upper/lower organ manuals and the pedal equally.
Vibrato Rate
Tremolo Depth
Sets the speed of the vibrato.
This allows you to control how deep the tremolo will be for the preset. You’ll
only hear tremolo if the Trem button is set to On, though.
Note: Tremolo only affects the upper manual. It has no effect on the lower manual or the pedal.
Tremolo Rate
Rev (Reverb)
Sets the speed of the tremolo.
New to VOX Continental V is the inclusion of a convolution reverb, derived
from the impulse responses of three different spring reverb models: the
Spring King, the RV-1 and the RV-2. Use this parameter to select the one
that best fits the preset you are creating:
Tuning controls The VOX Continental utilizes “octave divider” circuits to generate the
pitches in each octave. These controls allow you to fine-tune the notes in
the chromatic scale. So if you’d like to create a preset using altered
intonation, for example, these are the controls to use.
ARTURIA WURLITZER V User's Manual
-27-
4 USER INTERFACE
The range of each “potentiometer” is +/- 50 cents in 0.4 cent
increments. But if you need finer resolution, right-click on your mouse
and then click and drag the tuning potentiometer (a.k.a “pot”). This
allows tuning to be done in increments as small as 0.025 cents.
Engine The large switch toggles the engine mode between two choices: VOX and
Jennings. A few minor differences exist in the circuitry between the two
organ lines, resulting in a subtle distinction in the overall tone quality. You
may find you prefer one over the other, but functionally they are identical.
Background Noise As analog circuits age a certain amount of instability in various components
can give rise to a higher noise floor. VOX Continental V models even this
“undesirable” condition, but allows you to control the amount of the
background noise with this rotary knob. The range is from -90 dB
(completely sterile) to -30 dB (positively bristling with “maturity”).
Key Contact Age The design of the organ keyboards gives them a fair amount of character.
Each key has a separate contact for each drawbar stop, and as these
connections age the contacts age as well…and often at different rates.
This knob allows you to dial in as much of this unpredictability as you would
like, from none (0.00%) to “desperately in need of service” (100.0%). The
overall output can be very different from key to key, which could be quite
interesting in its own right or in conjunction with the effects VOX Continental
V provides.
Another good thing to know is that you can enter Open mode simply by clicking on the top of the
organ. You can close it with a click, too, but since the top is not available you must click on the
back edge inside “the hood,” just beyond the tuning controls and the other knobs.
4.4.3 The pedals
Sometimes the keyboard player needs to hold down the low end during a song. Knowing this,
the people at VOX were kind enough to offer a pedal board as an optional accessory. But the
good folks at Arturia have included it for free in VOX Continental V.
And our pedals are a lot easier to set up: Just click the Pedal button and a one-octave set of
pedals will appear. They have a dedicated set of drawbars, an octave range switch to the left
of the upper manual, and a slider called Bass Decay that controls the release time of the pedal
sound. They can be set to respond to their own MIDI channel, too, just like the upper and lower
organ manuals.
ARTURIA WURLITZER V User's Manual
-28-
4 USER INTERFACE
You can also click on the top of the pedals, or on the floor where they should be, and the pedals
will appear or be stowed away.
Note: when the pedals have been retracted their MIDI channel will no longer respond to
incoming data. The lowest octave of the lower manual will play the bass sound instead on its
MIDI channel.
4.4.4 Output mode
There are three output options, which are placed in the signal path after the FX unit. Click on the
“Direct” button and you will see the following options:
•
Direct: The VOX Continental V and the FX unit are connected directly to the output,
bypassing the Guitar and Leslie cabinet models. You can still use the built-in convolution
reverb that resides in the VOX Continental V if you like.
•
Guitar amp: The output from the VOX Continental V and the FX unit pass through a
modeled guitar amp with multiple speaker and mic placement options. The reverb is a
simple spring reverb, exactly like what amplifiers would’ve had “back in the day”.
ARTURIA WURLITZER V User's Manual
-29-
4 USER INTERFACE
To select a different speaker output model, click the label in the upper portion of the amplifier’s
face:
To select a different microphone model, click on the label in the lower-left corner of the amplifier’s
face:
ARTURIA WURLITZER V User's Manual
-30-
4 USER INTERFACE
•
Leslie: The Leslie speaker is normally associated with Hammond organs, but we think it works
great with a VOX Continental! It adds that unbeatable Doppler effect to the sound along
with a bit of “crunch” at higher output levels.
4.4.5 The Swell pedal
ARTURIA WURLITZER V User's Manual
-31-
4 USER INTERFACE
Whether you’re using the pedal board, an amplifier or an FX pedal, the Swell pedal is always
there in the middle of the floor under the organ. You can click and drag the top of the pedal to
set the overall level, or you can assign the Swell pedal to the MIDI controller of your choice.
4.4.6 FX Slot
Next to the Swell pedal is a “jump-up” menu labeled “FX Slot”. Click the arrow next to the label
and a list of available effects will appear:
There’s nothing complicated about using the various FX, but for a description of each effect and
its parameters, please refer to chapter 4.6 (The effects).
4.4.7 The Panic button: “Stuck” happens
If there is an interruption to the MIDI data being received by your computer, you can end up
with notes that become “stuck”. This means they have not yet received a Note Off message. The
wizards at Arturia have outfitted the VOX Continental V software with a button that will solve this
problem: just calmly click the PANIC button and all will be well.
4.4.8 CPU meter
The CPU meter gives real-time feedback as to the amount of processing power is being used by
VOX Continental V at any given moment. In addition to the numerical value there is a level meter
that lights up as the load increases.
Note: The CPU meter only reports the processing load related to VOX Continental V, not the
combined system load of all programs and plug-ins that may running at the same time.
ARTURIA WURLITZER V User's Manual
-32-
4 USER INTERFACE
4.4.9 Global MIDI channel
You can choose which MIDI channel will be used to access VOX Continental V. If you select ALL,
the software can respond to data from any of the 16 MIDI channels (you can specify which ones
using the MIDI preference settings).
If you select a channel here, only data arriving on that MIDI channel will be received. So when the
Global channel matches the MIDI channel for one of the three instruments (Upper, Lower, or Bass)
that sound will be able to receive MIDI data. When it lands on a channel outside of those
assignments, the sound of the Upper instrument will be available to incoming MIDI data.
While we’re talking about it, there’s a window under the PREF button where you can specify the
MIDI channels for each manual and the pedals. See section 4.4.11 for a description.
4.4.10 MIDI control configurations
All knobs, sliders and switches on the VOX Continental V can be assigned to external MIDI
controllers. But before trying any of this, make sure the MIDI control device you want to use is
connected to your computer, and that your DAW and/or the VOX Continental V software are
correctly configured to receive MIDI events from that controller. (See section 4.2.1 for information
about the Arturia side of that equation.)
4.4.10.1 MIDI menu
The MIDI menu on the right side of the tool bar provides access to sets of definable MIDI controller
assignments known as configs (configurations). Click on the arrow to the right of the word “MIDI”
and a drop-down menu will appear.
This menu is composed of two main areas:
ARTURIA WURLITZER V User's Manual
-33-
4 USER INTERFACE
The first section of the MIDI menu (MIDI controller configs) is split in two, and provides four features:
•
Copy Current Config…: This duplicates the current config, allows you to give it a new name,
and places it at the bottom of the config list. Changes made to this config can be exported
to your computer or a memory stick for transfer to another computer.
•
Delete Current Config: The current config is indicated by a check mark in the bottom
portion of the MIDI menu. If you select “Delete Current Config” a confirmation box will open
in the middle of the VOX V main window. Either click “Cancel” to abort the process or click
“OK” to proceed. The deleted config will be removed from the list in the MIDI menu, but it
will still exist in the folder to which it was exported previously. It can be imported later if
needed.
•
Import Config: A config which has been exported can be loaded into VOX Continental V
through this process. You can import configs from another user who has already mapped
the controls for a particular MIDI controller, for example.
•
Export Current Config: Use this feature to export your configs one by one to a folder on your
computer or to an external memory device (USB stick, hard drive, etc.). This can serve two
purposes: as a backup in case a config is accidentally deleted, and as a way to share your
configs with other users.
The second and lowest section of the MIDI menu contains the list of existing configurations. The
one with the check mark to the left of its name is the current config. To select a new one, click on
its name and it will become the current config.
4.4.10.2 Assigning MIDI controls
Every control in VOX Continental V is available for external MIDI control: drawbars, switches,
buttons, knobs, tuning pots, the swell pedal, and each FX parameter, right down to the “stomp
box” on/off switch. The Guitar Amp Cab and Mic settings are fair game, too. You can even assign
a MIDI controller to handle the job of switching between the convolution reverb models.
If you’re ready to give this a try, click the MIDI button in the tool bar (not the arrow to its right; the
actual button). It will remain highlighted to indicate that the VOX Continental V software has
entered “learn mode”.
ARTURIA WURLITZER V User's Manual
-34-
4 USER INTERFACE
At this point all of the assignable controls will be highlighted in purple. VOX V has so many of these
that we’ve split them into two pictures:
MIDI-assignable controls in the top half of the VOX Continental V
MIDI-assignable controls in the lower half of the VOX Continental V
In the picture above one of the controls has been selected (the Chorus Type switch on the FX
unit). A MIDI Control Setup window for that switch now shows the parameter name, its Min/Max
range, and whether the control has already been assigned to a MIDI Continuous Controller
number (CC#).
In this case the control has not yet been assigned; it is waiting for a controller on an external
device to be activated so it can “learn” the MIDI CC# and establish a relationship between the
two. You’ll notice that as soon as a new assignment is made, the control being edited will turn red.
A controller assignment can be removed by clicking the UNASSIGN button. The word
“UNASSIGNED” will then be shown in the MIDI Control Setup window for that control.
ARTURIA WURLITZER V User's Manual
-35-
4 USER INTERFACE
Here’s another example. Looking closely you’ll see a black rectangle around the drawbar being
edited. It has been assigned to a MIDI CC# and will respond to those messages when received.
A black rectangle outlines the edited drawbar. Note the inverted Min / Max values in the MCS window.
Once you have finished linking the controls to your controller, you have completed making a
new config. Be sure to use the Export function described in section 4.4.10.1 to back it up.
To close the MIDI Control Setup window and exit learn mode, click the MIDI button again.
4.4.10.3 Minimum / maximum controller ranges
Values for minimum and maximum operational range can be set for each assignable control.
After this the control will still receive the full range of its assigned MIDI CC#, but will scale its
response so these values are spread out within the min / max range of the control.
In other words, if the Min value is set to 50 and the Max value is set to 100:
•
a MIDI CC value of 0 will result in a value of 50 for the selected VOX V parameter
•
a MIDI CC value of 127 will result in a value of 100 for the VOX V parameter
•
a MIDI CC value that falls between 1 and 126 will result in a value somewhere between 50
and 100 on the VOX V parameter.
Note that a “squashed” range such as in the example above means there won’t be a 1:1
correlation between the motion of the MIDI controller and the response of the VOX V parameter;
it may take two or more adjacent values of the controller before the VOX V parameter will
change.
It is also possible to invert the Min and Max values so the parameter responds “backward,” as in
the picture on the previous page. This comes in handy when dealing with drawbars, if the external
MIDI controller doesn’t have a “drawbar” mode.
4.4.11 MIDI preferences: the PREF button
With a fully decked-out VOX Continental organ the organist could play three parts at the same
time: the upper manual, the lower manual, and the pedal board. So naturally, the VOX
Continental V software can respond to three separate MIDI channels simultaneously.
ARTURIA WURLITZER V User's Manual
-36-
4 USER INTERFACE
But Arturia didn’t stop there. We allowed for other possibilities, such as those times when you just
want to plug a keyboard controller into your computer and jam. So it’s also possible to access all
three instruments (Upper, Lower, and Bass) from a single incoming MIDI channel, shift their octave
ranges to spread them across the controller’s keys, and then specify the split points between
them.
For details on how to switch instantly between multi-channel and single-channel performance,
see section 4.4.12.
Notice that we used the word “Bass” instead of “pedals” in the second paragraph of this section.
That’s because the part the pedals would otherwise play is made available to the master
controller keyboard in that scenario, and the left hand is then able to play the bass part on the
keys. The pedals still have an impact on MIDI reception, though, depending on whether they are
deployed. More about this later.
To access these great features, press the “PREF” button in the tool bar:
The MIDI Preferences menu will appear in the middle of the VOX Continental V window. From here
you can set all of the parameters we’ve discussed in this section so far, plus choose the organ
color (Red or Grey).
The MIDI Preferences window
To change any of the parameters you see in this window, click in the value field next to its name
and make a selection from the drop-down menu that appears.
Here’s a description of what these parameters do:
•
MIDI Channels: Multi mode only. Set the Upper, Lower and Bass to independent channels,
or set one or more to “All” for an interesting form of Omni mode response (see section
4.4.11.1 for an explanation).
•
Split Points: Determines the boundaries between each instrument when in Split mode.
ARTURIA WURLITZER V User's Manual
-37-
4 USER INTERFACE
•
Octave Shift: Places the selected instrument in a different range of MIDI notes without
affecting the pitches it will play. For example, in Multi mode with the pedals deployed,
when Octave Shift = 0 for the Bass it will respond to MIDI notes from C1 to C2. When
Octave Shift = -1, the same pitches of the Bass sound will respond to MIDI notes C2 to C3.
(See section 4.4.12 for a description of the MIDI Modes.)
It’s important to remember that the note range of each instrument cannot exceed the limits of
their physical counterparts: 4 octaves per keyboard, 1 octave for the pedals (13 notes total).
To close the MIDI Preferences window, click on the small ‘x’ in the upper right-hand corner.
4.4.11.1 Omni mode vs. “MIDI Channel = All”
Technically, Omni mode means “listens to all 16 MIDI channels.” So in the interest of accuracy we
gave our “most inclusive” MIDI Channel setting the label “All”. This reflects the hierarchy of MIDI
channel assignments in VOX Continental V, starting with the Global MIDI channel and working its
way through the available instruments to the Bass channel.
Here’s how it works:
•
The Global MIDI channel setting acts as a filter, either passing all channels down the chain
of command or allowing only one specific channel to pass to the instruments.
•
Next come the Upper/Lower/Bass MIDI channels, in that order. If any one of those
instruments is set to All, its channel receives any data transmitted to the remaining MIDI
channels, leaving nothing for the next in line.
•
If one or more of the instruments are set to the same MIDI channel, then a similar thing
happens. For example, if both the Upper and Lower instruments are set to receive on MIDI
channel 1, then the Lower instrument will not receive anything. The Bass could, though, as
long as it is set to any other MIDI channel.
That makes perfect sense to us, but perhaps an example using some actual MIDI channel numbers
would be useful. We’ll assume the Global MIDI channel is set to “All” for this example:
•
When Upper is set to All it receives data on all 16 MIDI channels. This crowds out the Lower
and Bass instruments; they cannot be accessed on any MIDI channel.
•
When the Upper is set to 1 and Lower is set to All, the Lower instrument allows Upper to be
on channel 1 but intercepts any data it finds on MIDI channels 2-16. This crowds out the
Bass instrument; it cannot be accessed on any MIDI channel.
•
When Upper is set to 1, Lower is set to 2 and Bass is set to All, the Bass instrument allows
Upper to be on channel 1, Lower to be on channel 2, and the Bass responds to all other
channels (3-16).
Armed with that knowledge, experiment with these settings and see what they do. We think they’ll
prove themselves useful.
4.4.12 The MIDI Mode tabs
There’s a really quick way to switch between multi-channel and single-channel performance
when using an external MIDI keyboard controller: the MIDI Mode tabs.
ARTURIA WURLITZER V User's Manual
-38-
4 USER INTERFACE
The MIDI Mode tabs
Note: For the following examples we will assume the Global MIDI channel is set to All.
Simply select the MIDI Mode tab that corresponds to the configuration you need:
•
Multi: This places the Upper and Lower manuals and pedals on independent MIDI
channels. If the pedals have been retracted they share a MIDI channel with the Lower
manual. The MIDI channel values are set inside the MIDI Preferences menu.
•
Split: No matter which MIDI channel is received, all three instruments will be available to the
external MIDI device on that channel. They will be spread across the MIDI note range
according to the Split Point settings as defined in the MIDI Preferences menu.
•
Bass: No matter which MIDI channel receives the note data, the Bass sound will be the only
one to respond. The organ keyboards will only be available to the cursor.
•
Lower: Any incoming data will trigger the Lower manual, regardless of its MIDI channel
setting. The other two instruments can only be played by the cursor, unless the pedals have
been retracted; in this case the Bass sound will be triggered below the split point by
incoming MIDI data.
•
Upper: Data received on any MIDI channel will trigger only the Upper manual; the other
instruments will respond only to the cursor as noted above, depending on the status of the
pedal board.
So there’s an important point to emphasize about the first two MIDI Mode tab settings: when the
pedals have been retracted their MIDI channel will no longer respond to incoming data. The
lowest octave of the lower manual will play the bass sound instead on its MIDI channel.
Also, keep in mind the MIDI Mode tabs only determine the way VOX Continental V responds to
incoming MIDI data. They make no difference in what happens when notes are triggered by the
cursor. The presence or absence of the pedal board is the only factor that affects the way the
lower manual responds to the cursor.
4.5 Types of controls
The VOX Continental V has two basic types of controls: potentiometers and switches. Let´s take a
look at each.
4.5.1 Potentiometers
A potentiometer determines the value of a parameter when it is moved from one position to
another. There are two types of potentiometers:
•
Faders: these are called “drawbars” in VOX Continental V
•
Rotary: also known as “knobs”, “pots” or “encoders”.
To edit a drawbar, click on it and drag it up and down. This will increase or decrease the value of
the selected item, while displaying the new values in a small window near the drawbar.
ARTURIA WURLITZER V User's Manual
-39-
4 USER INTERFACE
A similar action is used to edit a rotary control: click on it and drag the cursor up and down. This
will rotate the knob graphic and display the new values in a small window nearby.
4.5.1.1 Coarse vs. Fine adjustments
Normally controls will make coarse adjustments to parameter values. However, they can also
make fine adjustments, allowing for greater precision. This is possible by dragging the cursor while
holding the Control key, or by using the right click first and then dragging the cursor.
To reset the parameter value to its default setting, double click on the knob. This will set it to the
center position immediately (works only on some parameters).
4.5.2 Switches
VOX Continental V has two types of switches. Simply click on these switches to change their state.
Some are the “on/off” style, such as the Bass 8’ – 16’ switch:
Others allow several choices, such as the Chorus Type switch in the FX:
4.6 The effects
To add one of the effects to the VOX Continental V output, click the arrow to the right of the
words “FX SLOT” at the bottom of the main window.
ARTURIA WURLITZER V User's Manual
-40-
4 USER INTERFACE
A pop-up menu will show you the available FX choices:
When you select an effect it will appear on the virtual floor below the VOX Continental.
We’ll take each of the FX Slot menu choices one at a time, starting from the top.
The first one is labeled Empty. Selecting this option will close the FX pedal and the FX Slot menu,
removing the FX device from the signal path.
But Empty isn’t the only option if you just want to hear the sound without the FX unit temporarily.
You’ll notice that almost every FX device also has a bypass button, which when clicked will
cause the FX mix to become 100% dry. A red LED indicates when the FX device is on, so when
you bypass the effect the LED will turn off.
The only FX device without a bypass switch is the Wah pedal. That unit is basically a filter, so the
way to remove it from the signal path is to push the pedal all the way forward by clicking the
pedal top and dragging the cursor all the way up. When you reach a value of 100% the pedal is
wide open (bypassed).
One more thing: All FX parameters are MIDI-assignable, which means they “learn” the controllers
on your external USB MIDI device. For information about this process, refer to the section on
“configs”.
What follows is a description of each available FX device.
4.6.1 Flanger
ARTURIA WURLITZER V User's Manual
-41-
4 USER INTERFACE
Delay
Sets the delay time, which changes the harmonic content.
Depth
Sets the modulation depth. This is set to “max out” at less than 100% to
limit runaway feedback.
Rate
Sets the modulation rate for the delay time.
Res.
Short for “Resonance.” This control adds positive or negative feedback
for a harsher or "ringing" sound. Set this straight up for zero feedback.
A flanging effect is created by combining two identical signals, delaying one of the signals by a
small amount, and then modulating the delay time. The recombined output produces a sound
that sweeps up through the harmonics of the original signal and back down.
Flanging can create both subtle and extreme effects, depending on the Rate and Depth of the
modulation. With higher Depth settings you will begin to hear changes to the pitch of the sound.
This is how the circuits in an analog flanger work, and we have taken care to recreate these
conditions.
4.6.2 Phaser
Rate
Sets the speed of the phaser
Depth
Sets the depth of the phaser activity
Feedback Controls the amount of phaser resonance
Stereo
Determines the stereo width of the overall effect
The phase shifter was one of the most popular effects used with electric instruments in the 1970s.
It works by splitting the incoming signal, changing the phase of one side, and recombining it with
the unaffected signal. This creates a notch-comb filter sweeps through the frequency spectrum.
You can then modulate the phase of the affected half with an oscillator, with the frequency
determined by the Rate control. The Depth knob sets the amplitude for the action of the filtering,
while Feedback amplifies certain harmonics. Phase shifting is easily identified by a characteristic
“whooshing” sound that sweeps through the frequency spectrum.
ARTURIA WURLITZER V User's Manual
-42-
4 USER INTERFACE
4.6.3 Chorus
Type
Select one of three chorus types
Rate
Adjusts the speed of the chorus
Delay
Sets the amount of delay applied to the input signal
Amount
Controls the depth of the chorus
Mix
Changes the balance between the input signal and processed signal
Stereo Rate
Sets the speed of the stereo effect
Stereo Width Controls the width of the stereo effect
A chorus module recreates the sound of multiple takes of an instrument being combined in a mix.
Even with the best of performances there are always differences in tuning or timing, and when
taken to either extreme the results can range from slow and lush to a wobbling, quick vibrato.
The speed of the effect is set by the Rate knob, while its depth and width are controlled by the
Amount and Delay knobs, respectively. The resulting “frequency blur” is different for the left and
right halves of the signal, which allows us to derive a stereo signal from a mono signal. The
difference between the two halves then can be set with the Stereo width, with the speed of the
left-right rotation under the control of the Stereo rate knob.
The Mix control sets the ratio between the input signal and the treated signal, while the Type
switch selects between three different chorus models: simple, medium, and complex.
4.6.4 Delay
ARTURIA WURLITZER V User's Manual
-43-
4 USER INTERFACE
Delay
Sets the delay time. (The delay is mono for authenticity.)
LFO rate
Controls the modulation rate
Feedback Adjusts Feedback
FB Tone
Changes feedback filtering
Mix
Alters wet/dry mix
LFO Depth Sets the amount of delay time modulation (which follows a sine wave)
A delay repeats a sound, like an echo, giving it more space and depth. This analog delay
reproduces the sound of the old solid state units that used analog bucket brigade circuits. The
Delay knob allows you to select a time between 12ms and 1000ms for the delay. The Feedback
knob sets the feedback level. The FB Tone knob controls a feedback filtering effect: low-pass to
the left, high-pass to the right. You can set the delay modulation by changing the LFO rate and
LFO depth values. The Mix potentiometer sets the ratio between the original and modified signals.
4.6.5 Overdrive
Drive
Controls the amount of distortion
Output
Sets the output trim level
Tone
Sweeps the low-pass filter
An overdrive effect “saturates” and distorts a sound by increasing the volume of a signal then
clipping the excess. The Drive knob sets the amount of the saturated sound. The Tone knob
controls the distortion filtering. You can adjust the output level by setting the Output knob.
ARTURIA WURLITZER V User's Manual
-44-
4 USER INTERFACE
4.6.6 Wah
This FX device emulates a standard “wah-wah” pedal. By default it is assigned to MIDI CC #11
(Expression). You can also click and drag on the top of the pedal to change the filter frequency
of the “wah” effect.
4.6.7 Leslie speaker model
Speed Selects rotor speed: stop/slow/fast
High Depth Adjusts high rotor frequency modulation (Doppler effect)
High Width Sets modulation amount of stereo panning for high rotor
High Shape Controls variable high rotor amplitude modulation
Low Width Adjusts depth of low rotor panning modulation
Low Shape Sets low rotor amplitude modulation amount
Rate Fine control adjustment for rotor speed
Level Controls output level
ARTURIA WURLITZER V User's Manual
-45-
4 USER INTERFACE
The Leslie speaker, most commonly associated with Hammond organs, takes advantage of the
Doppler effect by using an electric motor to rotate an acoustic horn around a loudspeaker,
sending its sound in a 360-degree circle. This results in a modulating pitch effect on the audio
source. The speed of the modulation itself can be modulated, allowing for an unparalleled level
of expressiveness during a performance. And using a Leslie with a VOX Continental organ takes
the instrument to a completely different world.
The High Shape and High Width set the parameters of the high rotor (amplitude and pan of the
treble sounds).
The Low Shape and Low Width set the parameters of the low rotor (amplitude and pan of the
lower-frequency sounds).
Speed and Rate adjust the rotor speed or stop it altogether.
High Depth controls the famous Doppler effect of the Leslie speaker
Level sets the output audio gain.
4.6.8 Guitar amp model
Volume Controls the output level
Drive Adjusts the amount of “crunch”
Reverb Increases or decreases the amount of spring reverb
Low Boost or cut of low-frequency EQ
Mid Boost or cut of midrange EQ
High Boost or cut of high-frequency EQ
Amp Type Select one of four amplifier models
Mic Type Select one of four classic microphone models
ARTURIA WURLITZER V User's Manual
-46-
4 USER INTERFACE
This output option faithfully recreates the characteristics of a physical guitar amplifier. In the early
years of the British Invasion dedicated keyboard amplifiers other than a Leslie did not exist. So in
most cases, the original “band” experience with a VOX Continental organ was plugging the VOX
into a guitar amp. These models are reminiscent of everything from the garage to the main
stage.
Low, Mid and Hi knobs offer tone-sculpting options. They boost or cut the levels of specific
frequency bands.
The Drive knob sets the amount of saturation, and the Reverb knob sets the level for a simple, builtin spring reverb.
The Cabinet pull-down menu allows you to select between four types of guitar amp cabinets
(1x12” Blackface, 2x12” Blackface, 4x10” Tweed or 4x12” HalfStack). Each of these classic
cabinets have different tonal characteristics. You can select the type of cabinet by clicking the
cabinet name.
The Microphone menu gives you a choice of four types of microphones and positions (SM57 Off
Axis, SM57 On Axis, “421” Front or U87 Front. This is a simulation of the most common ways to use a
microphone on a guitar amplifier. You can select the type of microphone by clicking the
microphone label on the bottom left corner of the cabinet.
ARTURIA WURLITZER V User's Manual
-47-
4 USER INTERFACE
5 END USER LICENSE AGREEMENT
In consideration of payment of the Licensee fee, which is a portion of the price you paid, Arturia,
as Licensor, grants to you (hereinafter termed "Licensee") a nonexclusive right to use this copy of
the VOX Continental V program (hereinafter the “SOFTWARE”).
All intellectual property rights in the software belong to Arturia SA (hereinafter: "Arturia"). Arturia
permits you only to copy, download, install and use the software in accordance with the terms
and conditions of this Agreement.
The product contains product activation for protection against unlawful copying. This system is
known as eLicenser and permits a permanent use of the software only after the activation
process has been totally completed. The software can be used only together with the eLicenser
dongle (dongle) and/or the Soft-eLicenser; the OEM software can be used only following
registration.
Internet access is required for the activation process. The terms and conditions for use of the
software by you, the end user appear below. By installing the software on your computer you
agree to these terms and conditions. Please read the following text carefully in its entirety. If you
do not approve these terms and conditions, you must not install this software. In this event give
the product back to where you have purchased it (including all written material, the complete
undamaged packing as well as the enclosed hardware) within 30 days in return for a refund of
the purchase price.
1. Software Ownership
Arturia shall retain full and complete title to the SOFTWARE recorded on the enclosed disks and
all subsequent copies of the SOFTWARE, regardless of the media or form on or in which the
original disks or copies may exist. The License is not a sale of the original SOFTWARE.
2. Grant of License
•
Arturia grants you a non-exclusive license for the use of the software according to the terms
and conditions of this Agreement. You may not lease, loan or sublicense the software.
•
If the software is protected by the eLicenser dongle alone, you may install a license for the
software on one or at most 3 computers which are in your possession. The software may be
used only on one of the computers at the same time by using the Arturia key.
•
If the software is protected by the Soft eLicenser (alone or together with the Arturia key) or
has been sold to the first end user together with other software and/or hardware
(hereinafter: "OEM software"), you may install and use a license for the software only on one
computer which is in your possession. Purchasing an eLicenser dongle makes it easily
possible to use the software on three computers if needs occur.
•
The use of the software within a network is illegal where there is the possibility of a
contemporaneous multiple use of the program.
•
You are entitled to prepare a backup copy of the software which will not be used for
purposes other than storage purposes.
•
You shall have no further right or interest to use the software other than the limited rights as
specified in this Agreement. Arturia reserves all rights not expressly granted.
ARTURIA WURLITZER V User's Manual
-48-
6 END USER LICENSE AGREEMENT
3. Activation of the Software
•
Arturia may use a compulsory activation of the software and a compulsory registration of
the OEM software for license control to protect the software against unlawful copying. If
you do not accept the terms and conditions of this Agreement, the software will not work.
•
In such a case the product including the software may only be returned within 30 days
following acquisition of the product. Upon return a claim according to §11 shall not apply.
4. Support, Upgrades and Updates after Product Registration
•
You can only receive support, upgrades and updates following the personal product
registration. Support is provided only for the current version and for the previous version
during one year after publication of the new version. Arturia can modify and partly or
completely adjust the nature of the support (hotline, forum on the website etc.), upgrades
and updates at any time.
•
The product registration is possible during the activation process or at any time later through
the Internet. In such a process you are asked to agree to the storage and use of your
personal data (name, address, contact, email-address, and license data) for the purposes
specified above. Arturia may also forward these data to engaged third parties, in particular
distributors, for support purposes and for the verification of the upgrade or update right.
5. License module (eLicenser Key and/or Soft eLicenser)
•
Arturia uses a hardware device connected through the USB connection of a computer, the
"eLicenser dongle" and/or a protection scheme, the "Soft eLicenser" for license control
(hardware and/or virtual dongle). The eLicenser dongle and/or Soft eLicenser permanently
saves the license information and regulates access to the software. If a eLicenser dongle is
required for the use of the software, then the eLicenser dongle must be connected
physically to the computer through the USB interface.
•
For the activation of the software, updates or upgrades of the software the computer
which is connected to the Arturia key and/or using the Soft eLicenser or using the OEM
software must be connected to the server of SIA eLicenser through the Internet. If the
product was delivered with the eLicenser dongle, the license information was already
transferred to the eLicenser dongle. If the product was delivered with a product card
(without the eLicenser dongle), the activation codes of the enclosed product card must be
entered manually by the user upon installation and the license information must be
exchanged with the server of SIA eLicenser.
•
In the event of OEM software, the activation codes will be send to an email-address
submitted by you during a registration and must be entered manually by the user upon
installation and the license information must be exchanged with the server of SIA eLicenser.
•
The reinstallation of the software -on the same or another computer -is permitted only in
case the already installed software cannot be used any more (e.g. following deinstallation).
If the software does not use an eLicenser dongle, the new activation codes may be
obtained from the users online account for support created during the personal product
registration. Further, the activation codes must be entered manually by the user upon
installation and the license information must be exchanged with the server of SIA Steinberg.
Arturia may require for the provision of further activation codes e.g. your proof of purchase
(invoice, receipt) and a signed assurance by fax or letter stating your name, address and
that the already installed software cannot be used any more.
ARTURIA WURLITZER V User's Manual
-49-
6 END USER LICENSE AGREEMENT
•
You can also use another computer other than the one on which the software is to be
installed for the activation and transfer of license data to the eLicenser dongle, if the
software is using an eLicenser dongle. However, in such a case a corresponding access
software (eLicenser Control Center, "eLC") must be installed on the computer connected to
the Internet, which is subject to a separate licensing agreement.
6. Defect and loss of the eLicenser dongle
•
In the case of a defect or damage to the eLicenser dongle Arturia or a third party engaged
by Arturia will check the eLicenser dongle. In the case of a legitimate claim the eLicenser
dongle and the licenses included shall be replaced in return for a handling fee. The licenses
will only be replaced provided that they are licenses issued by Arturia. Further claims
against Arturia are excluded.
•
Arturia assumes no liability or obligation if the eLicenser dongle is mislaid as a result of loss,
theft or otherwise. Arturia reserves the right to block the licenses saved on the eLicenser
dongle upon being notified by the registered user of the loss. The licenses saved on the
eLicenser dongle cannot be replaced.
7. No unbundling
•
The software usually contains a variety of different files which in its configuration ensure the
complete functionality of the software. The software may be used as one product only. It is
not required that you use or install all components of the software. You must not arrange
components of the software in a new way and develop a modified version of the software
or a new product as a result. The configuration of the software may not be modified for the
purpose of distribution, assignment or resale.
•
You may also not sell the eLicenser dongle separately as a license; the usage rights always
remain with the software, in particular with the original software data carrier (e.g. CD).
8. Assignment of rights
•
You may assign all your rights to use the software to another person subject to the
conditions that (a) you assign to this other person (i) this Agreement and (ii) the software or
hardware provided with the software, packed or preinstalled thereon, including all copies,
upgrades, updates, backup copies and previous versions, which granted a right to an
update or upgrade on this software, (b) you do not retain upgrades, updates, backup
copies und previous versions of this software and (c) the recipient accepts the terms and
conditions of this Agreement as well as other regulations pursuant to which you acquired a
valid software license.
•
A return of the product due to a failure to accept the terms and conditions of this
Agreement, e.g. the product activation, shall not be possible following the assignment of
rights.
9. Upgrades and updates
•
You must have a valid license for the previous or more inferior version of the software in
order to be allowed to use an upgrade or update for the software. Upon transferring this
previous or more inferior version of the software to third parties the right to use the upgrade
or update of the software shall expire.
•
The acquisition of an upgrade or update does not in itself confer any right to use the
software.
ARTURIA WURLITZER V User's Manual
-50-
6 END USER LICENSE AGREEMENT
•
The right of support for the previous or inferior version of the software expires upon the
installation of an upgrade or update.
10. Limited warranty
Arturia warrants that the disks on which the software is furnished to be free from defects in
materials and workmanship under normal use for a period of thirty (30) days from the date of
purchase. Your receipt shall be evidence of the date of purchase. Any implied warranties on the
software are limited to thirty (30) days from the date of purchase. Some states do not allow
limitations on duration of an implied warranty, so the above limitation may not apply to you. All
programs and accompanying materials are provided “as is” without warranty of any kind. The
complete risk as to the quality and performance of the programs is with you. Should the program
prove defective, you assume the entire cost of all necessary servicing, repair or correction.
11. Remedies
Arturia's entire liability and your exclusive remedy shall be at Arturia's option either (a) return of
the purchase price or (b) replacement of the disk that does not meet the Limited Warranty and
which is returned to Arturia with a copy of your receipt. This limited Warranty is void if failure of
the software has resulted from accident, abuse, modification, or misapplication. Any
replacement software will be warranted for the remainder of the original warranty period or thirty
(30) days, whichever is longer.
12. No other warranties
The above warranties are in lieu of all other warranties, expressed or implied, including but not
limited to, the implied warranties of merchantability and fitness for a particular purpose. No oral
or written information or advice given by Arturia, its dealers, distributors, agents or employees
shall create a warranty or in any way increase the scope of this limited warranty.
13. No liability for consequential damages
Neither Arturia nor anyone else involved in the creation, production, or delivery of this product
shall be liable for any direct, indirect, consequential, or incidental damages arising out of the use
of, or inability to use this product (including without limitation, damages for loss of business profits,
business interruption, loss of business information and the like) even if Arturia was previously
advised of the possibility of such damages. Some states do not allow limitations on the length of
an implied warranty or the exclusion or limitation of incidental or consequential damages, so the
above limitation or exclusions may not apply to you. This warranty gives you specific legal rights,
and you may also have other rights which vary from state to state.
ARTURIA WURLITZER V User's Manual
-51-
6 END USER LICENSE AGREEMENT