1
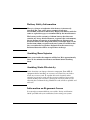
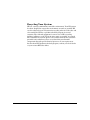
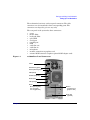
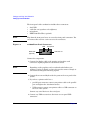
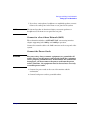
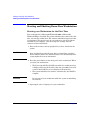
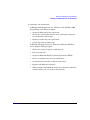
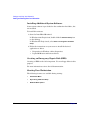
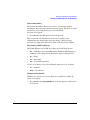
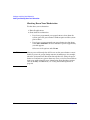
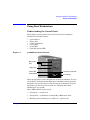
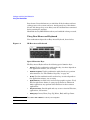
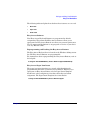
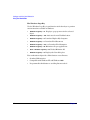
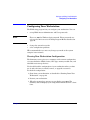
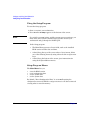
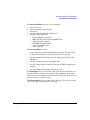
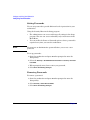
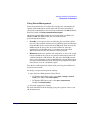
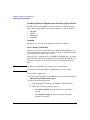
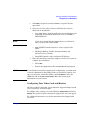
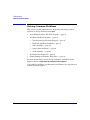
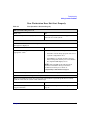
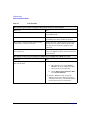
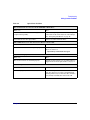
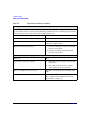
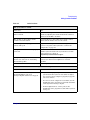
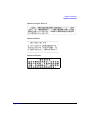
Getting Started Guide
HP Workstation xw5000
Manufacturing Part Number: 308303-001
Edition E1102
© Copyright 2002 Hewlett-Packard Company.
Legal Notices
The information contained in this document is subject to change without
notice.
Hewlett-Packard makes no warranty of any kind with regard to this
material, including, but not limited to, the implied warranties of
merchantability and fitness for a particular purpose.
Hewlett-Packard shall not be liable for errors contained herein or for
incidental or consequential damages in connection with the furnishing,
performance, or use of this material.
Hewlett-Packard assumes no responsibility for the use or reliability of its
software on equipment that is not furnished by Hewlett-Packard.
This document contains proprietary information that is protected by
copyright. All rights are reserved. No part of this document may be
photocopied, reproduced, or translated to another language without the
prior written consent of Hewlett-Packard Company.
Intel® and Itanium® 2 are trademarks or registered trademarks of Intel
Corporation or its subsidiaries in the United States and other countries.
Fire GL™ is a trademark of ATI.
Microsoft®, Windows®, Windows® 2000 and Windows® XP are
registered trademarks of the Microsoft Corporation.
Pentium® and AGPset™ are trademarks of Intel Corporation.
FireWire® is a registered trademark of Apple Computer, Inc.
UNIX is a registered trademark in the United States of America and
other countries, licensed exclusively through X/Open Company Limited.
1980, 1984 AT&T, Inc.
1979, 1980, 1983 The Regents of the University of California.
This software and documentation is based in part on the Fourth Berkeley
Software Distribution under license from the Regents of University of
California.
Printing History
The manual printing date and part number indicate its current edition.
The printing date will change when a new edition is printed. Minor
changes may be made at reprint without changing the printing date. The
manual part number will change when extensive changes are made.
Printed manual updates may be issued between editions to correct errors
or document product changes. Manuals that are published on the HP
Support web site (ZZZKSFRPJRZRUNVWDWLRQVXSSRUW) are updated often,
please visit this web site periodically for the most recent versions. To
ensure that you receive the updated or new editions, you should also
subscribe to the appropriate HP product support service. See your HP
Sales Representative for details.
First Edition: November 2002
Printing Division:
Hewlett-Packard Co.
Workstations Division
3404 E. Harmony Rd.
Fort Collins, CO 80525
Printed in the U.S.A.
Table of Contents
1. Setting up and Using Your Workstation
Setting Up Your Workstation . . . . . . . . . . . . . . . . . . . . . . . . . . . .
Prepare Your Workspace . . . . . . . . . . . . . . . . . . . . . . . . . . . . . .
Install Your Graphics Card . . . . . . . . . . . . . . . . . . . . . . . . . . . .
Connect the Components . . . . . . . . . . . . . . . . . . . . . . . . . . . . . .
Connect to a Local Area Network (LAN) . . . . . . . . . . . . . . . . .
Connect the Power Cords . . . . . . . . . . . . . . . . . . . . . . . . . . . . . .
Starting and Shutting Down Your Workstation . . . . . . . . . . . . .
Starting your Workstation for the First Time . . . . . . . . . . . . .
Installing Additional System Software . . . . . . . . . . . . . . . . . . .
Creating an Emergency Repair Disk (ERD) . . . . . . . . . . . . . . .
Starting Your Workstation . . . . . . . . . . . . . . . . . . . . . . . . . . . .
Shutting Down Your Workstation . . . . . . . . . . . . . . . . . . . . . . .
Using Your Workstation . . . . . . . . . . . . . . . . . . . . . . . . . . . . . . . .
Understanding the Control Panel . . . . . . . . . . . . . . . . . . . . . . .
Using Your Mouse and Keyboard . . . . . . . . . . . . . . . . . . . . . . .
Configuring Your Workstation . . . . . . . . . . . . . . . . . . . . . . . . . . .
Viewing Your Workstation Configuration . . . . . . . . . . . . . . . . .
Using the Setup Program . . . . . . . . . . . . . . . . . . . . . . . . . . . . .
Setup Program Menus . . . . . . . . . . . . . . . . . . . . . . . . . . . . . . . .
Setting Passwords . . . . . . . . . . . . . . . . . . . . . . . . . . . . . . . . . . .
Removing Passwords . . . . . . . . . . . . . . . . . . . . . . . . . . . . . . . . .
Using Power Management. . . . . . . . . . . . . . . . . . . . . . . . . . . . .
Loading Software Applications for Your Optical Drive . . . . . .
Configuring Your Video Card and Monitor . . . . . . . . . . . . . . . .
12
12
12
12
15
15
16
16
18
18
18
20
21
21
22
25
25
26
26
28
28
29
30
31
2. Troubleshooting
Solving Common Problems . . . . . . . . . . . . . . . . . . . . . . . . . . . . . .
Your Workstation Does Not Start Properly . . . . . . . . . . . . . . .
You Find a Hardware Problem . . . . . . . . . . . . . . . . . . . . . . . . .
You Forgot Your Password . . . . . . . . . . . . . . . . . . . . . . . . . . . . .
Understanding the E-buzzer Beep Codes . . . . . . . . . . . . . . . . .
34
35
37
42
43
Using Diagnostics for Windows . . . . . . . . . . . . . . . . . . . . . . . . . .
Installing Diagnostics for Windows. . . . . . . . . . . . . . . . . . . . . .
Running Diagnostics for Windows . . . . . . . . . . . . . . . . . . . . . .
Generating Diagnostics Test Information. . . . . . . . . . . . . . . . .
Restoring Your OS and Software from CD . . . . . . . . . . . . . . . . . .
Workstation Technical Characteristics . . . . . . . . . . . . . . . . . . . .
Where to Get Help . . . . . . . . . . . . . . . . . . . . . . . . . . . . . . . . . . . . .
Additional Documentation. . . . . . . . . . . . . . . . . . . . . . . . . . . . .
45
46
46
47
48
49
50
50
A. Regulatory Information
Regulatory Information. . . . . . . . . . . . . . . . . . . . . . . . . . . . . . . . . 53
Federal Communications Commission Radio
Frequency Interference Statement (for USA only). . . . . . . . . . 53
Index . . . . . . . . . . . . . . . . . . . . . . . . . . . . . . . . . . . . . . . . . . . . 57
Important Safety Warnings
Avoiding Electrical Shocks
:$51,1*
To avoid electrical shock, do not open the power supplies. There
are no user-serviceable parts inside.
To avoid electrical shock and harm to your eyes by laser light, do
not open the CD/DVD laser module. The laser module should be
serviced by service personnel only. Do not attempt to make any
adjustment to the laser unit. Refer to the label on the CD/DVD
for power requirements and wavelength. This product is a class I
laser product.
Removing and Replacing the Cover
:$51,1*
For your safety, never remove the system side cover without first
disconnecting the power cord from the power outlet and
removing any connection to a telecommunications network. If a
Power Protection Device is fitted to your system, you must shut
down your computer using its on/off switch, then remove the
power cord before removing the system’s side cover. Remove the
Power Protection Device cables before any servicing operation.
Always replace the side cover before switching the system on
again.
Battery Safety Information
:$51,1*
There is a danger of explosion if the battery is incorrectly
installed. For your safety, never attempt to recharge,
disassemble, or burn an old battery. Replace the battery with the
same or equivalent type, as recommended by the manufacturer.
The battery in this system is a lithium battery that does not
contain any heavy metals. However, to protect the environment,
do not dispose of batteries in household waste. Return used
batteries either to the shop from which you bought them, to the
dealer from whom you purchased your system, or to HP so that
they can either be recycled or disposed of in the correct way.
Returned batteries will be accepted free of charge.
Avoiding Burn Injuries
:$51,1*
Some parts inside the computer will be hot. Wait approximately
three to five minutes for them to cool down before touching
them.
Avoiding Static Electricity
&$87,21
Static electricity can damage electronic components. Turn OFF all
equipment before installing an accessory card. Don’t let your clothes
touch any accessory card. To equalize the static electricity when
replacing an accessory card, rest the accessory card bag on top of the
system, making sure it touches a metal part of chassis, while you are
removing the card from the bag. Handle the card as little as possible and
with care.
Information on Ergonomic Issues
It is strongly recommended that you read the “Safety and Comfort
Guide” provided with your workstation, before using your system.
Recycling Your System
HP has a strong commitment toward the environment. Your HP system
has been designed to respect the environment as much as possible. HP
can also take back your old system for recycling when it reaches the end
of its useful life. HP has a product take-back program in several
countries. The collected equipment is sent to one of HP’s recycling
facilities in Europe or the U.S.A. As many parts as possible are reused.
The remainder is recycled. Special care is taken for batteries and other
potential toxic substances, these are reduced into non-harmful
components through special chemical processes. If you require more
details about HP’s product take-back program, contact your local dealer
or your nearest HP Sales Office.
1
&KDSWHU
Setting up and Using Your
Workstation
6HWWLQJXSDQG8VLQJ<RXU:RUNVWDWLRQ
6HWWLQJ8S<RXU:RUNVWDWLRQ
Setting Up Your Workstation
:$51,1*
If you have any doubt that you can lift the workstation and
monitor safely, do not move them without help.
Prepare Your Workspace
1. Unpack all components.
2. Place your monitor on a sturdy desk with easily accessible power
outlets and enough space for the keyboard, mouse, and any other
accessories.
3. Position the workstation on a sturdy desk or the floor with the front
and rear connectors easily accessible. The workstation must be close
enough to the peripherals so that the cables can be connected.
Installation Tools
No tools are required for basic setup.
Install Your Graphics Card
The HP workstation is available with a range of graphics cards. For a
complete and current list of supported cards, see:
KWWSZZZKSFRPZRUNVWDWLRQVSURGXFWVZLQQWOHDGHUVKLSBJUDSKLFV
Some video cards are pre-installed in the system, whereas others are
packaged separately and shipped with the system.
If your workstation did not ship with a pre-installed graphics card, you
must install the card and load the drivers. Refer to the documentation
included with your graphics card for instructions.
Connect the Components
Before you connect any cords or cables to your workstation, read
“Important Safety Warnings” on page 7.
&KDSWHU
6HWWLQJXSDQG8VLQJ<RXU:RUNVWDWLRQ
6HWWLQJ8S<RXU:RUNVWDWLRQ
The workstation has front- and rear-panel connectors. The cable
connectors are color-matched to their corresponding ports. The
connectors are shaped to go in one way only.
The rear panel of the system has these connectors:
•
•
•
•
•
•
•
•
•
•
•
•
Figure 1-1
power
mouse (PS2)
keyboard (PS2)
quad USB
serial port
parallel port
LAN
audio line out
audio line in
microphone
monitor connection on graphics card
external SCSI connector (requires optional SCSI adapter card)
xw5000 Rear Panel Connectors
3RZHU
360RXVHJUHHQ
36.H\ERDUGSXUSOH
86%EODFN
3DUDOOHOEXUJXQG\
6HULDOWHDO
/$1RUDQJH
$XGLR
0LFURSKRQHSLQN
/LQHRXWOLPH
/LQHLQOLJKWEOXH
0RQLWRU
FRQQHFWLRQRQ
JUDSKLFVFDUG
6&6,FDUG
RSWLRQDO
&KDSWHU
6HWWLQJXSDQG8VLQJ<RXU:RUNVWDWLRQ
6HWWLQJ8S<RXU:RUNVWDWLRQ
The front panel of the workstation includes these connectors:
•
•
•
•
dual USB
audio line out (speakers or headphones)
microphone
IEEE-1394 (FireWire) (optional)
127(
Flip down the front panel cover to access the front panel connectors. You
can remove this cover for easier access to the connectors.
Figure 1-2
xw5000 Front Panel Connectors
86%
PLFURSKRQH
,(((
RSWLRQDO
DXGLROLQHRXW
Connect the components:
1. Connect the display cable to the monitor and graphics card
connectors. Lightly tighten the attachment screws.
127(
Depending on the graphics card you ordered and whether your
monitor is analog or digital, you may also need to connect a dongle to
convert between digital and analog signals.
2. Connect the mouse and keyboard to the ports on the rear panel of the
system.
3. If you have a printer and it has a:
•
parallel port connector, connect your printer cable to the parallel
port and tighten the attachment screws.
•
USB connector, connect your printer cable to a USB connector on
the rear of the system.
Connect any serial devices to the serial port.
4. Connect any USB accessories to the front- or rear-panel USB
connectors.
&KDSWHU
6HWWLQJXSDQG8VLQJ<RXU:RUNVWDWLRQ
6HWWLQJ8S<RXU:RUNVWDWLRQ
5. If you have a microphone, headphones or amplified speakers, connect
them to the audio ports on the front or rear panel of the system.
127(
The internal speaker is deactivated after you connect speakers or
headphones to the front or rear-panel line out jack.
Connect to a Local Area Network (LAN)
The workstation includes a 10BT/100TX LAN auto-sensing interface
adapter supporting both 10Mbps and 100Mbps operation.
Connect the network cable to the LAN connector on the rear panel of the
system.
Connect the Power Cords
:$51,1*
For your safety, always connect equipment to a grounded wall
outlet. Always use the power cord provided with the equipment
with a properly grounded outlet. To disconnect the workstation
from power, you must remove the power cord from the power
outlet. Therefore, the equipment must be located near an easily
accessible power outlet.
1. Connect the power cords to the rear of the monitor and the
workstation.
2. Connect both power cords to grounded outlets.
&KDSWHU
6HWWLQJXSDQG8VLQJ<RXU:RUNVWDWLRQ
6WDUWLQJDQG6KXWWLQJ'RZQ<RXU:RUNVWDWLRQ
Starting and Shutting Down Your Workstation
Starting your Workstation for the First Time
Your workstation has Microsoft® Windows® 2000 or Microsoft®
Windows® XP pre-installed. The system initializes the software the first
time you start the workstation. The software-initialization process takes
a few minutes. This process sets up your software to use the hardware
installed in your computer. (You can change the settings after the
software has been initialized.)
1. Turn on the monitor and any peripherals you have attached to the
system.
&$87,21
Some peripherals specifically state that you should not attach the
device until the drivers are installed. Refer to the documentation for
your peripherals for more information.
2. Press the power button on the front panel of the workstation. When
you start your workstation:
&$87,21
•
The Power-On-Self-Test (POST) runs while the workstation logo
is displayed. To view the details of this test, press (VF. If an error
occurs in the POST, the error is displayed automatically.
•
The system initializes the software automatically after POST is
complete.
Do not turn off your workstation while the system is initializing
the software.
3. If prompted, select a language for your workstation.
&KDSWHU
6HWWLQJXSDQG8VLQJ<RXU:RUNVWDWLRQ
6WDUWLQJDQG6KXWWLQJ'RZQ<RXU:RUNVWDWLRQ
4. Customize your workstation.
In Windows 2000 Professional, the “Welcome to the Windows 2000
Setup Wizard” runs. When prompted:
•
Accept the Microsoft license agreement.
•
Choose the correct keyboard, time zone, and region settings for
your workstation and location.
•
Identify yourself and your organization.
•
Set the date, time and time zone.
In Windows XP Professional, the “Welcome to Microsoft Windows”
screen displays. When prompted:
&KDSWHU
•
Choose your region, language, and keyboard.
•
Pick your time zone.
•
Accept the Microsoft End User License Agreement (EULA).
•
Choose a computer name for your workstation.
•
Set up Internet connection or skip to next section.
•
Register with Microsoft (optional).
•
When prompted, click )LQLVK to restart the workstation. After the
system restarts, you can log in for the first time.
6HWWLQJXSDQG8VLQJ<RXU:RUNVWDWLRQ
6WDUWLQJDQG6KXWWLQJ'RZQ<RXU:RUNVWDWLRQ
Installing Additional System Software
Some system software is pre-loaded on the workstation hard drive, but
not installed.
To install this software:
1. Start the InstallShield® wizard:
In Windows 2000 Professional, double-click the 6RIWZDUH6HWXS icon
on the desktop.
In Windows XP Professional, select 6WDUW!$OO3URJUDPV!6RIWZDUH
6HWXS.
2. Follow the instructions on your screen to install the desired
application or driver:
•
Diagnostics for Windows (online diagnostics)
•
Logitech® Mouseware® (mouse driver)
Creating an Emergency Repair Disk (ERD)
Creating an ERD for the OS is important. Use new floppy disks for this
purpose.
For more information, refer to the OS documentation.
Starting Your Workstation
The following features are available during startup:
•
,QVWDQW%RRW0HQX
•
.H\V'XULQJ3267DQG6HWXS
•
:LQGRZV%RRW2SWLRQV
&KDSWHU
6HWWLQJXSDQG8VLQJ<RXU:RUNVWDWLRQ
6WDUWLQJDQG6KXWWLQJ'RZQ<RXU:RUNVWDWLRQ
Instant Boot Menu
The Instant Boot Menu allows you to choose a boot device without
running the Setup program and rebooting the system. The choice is valid
for this boot only; setup preferences are not modified.
To select a boot option:
•
Press ) when the HP splash screen is displayed.
This screen lists only allowed boot devices. For example, if the
administrator has disabled the “boot from floppy” option in Setup
program, the floppy drive will not be listed in the Instant Boot Menu.
Keys During POST and Setup
The POST Welcome screen (HP logo) displays the following choices:
•
Esc — Summary. If you press Esc during POST, the BIOS displays a
summary of the configuration information before loading the OS.
•
F2 — Setup
•
F8 — Boot Order
•
F12 — Forced Network Boot
In case of a warning or error, the following options are also available:
•
F1 — Continue
•
Enter — View Errors
Windows Boot Options
Windows also allows you to choose between available boot modes. To
select a boot option:
•
&KDSWHU
Press F8 when the Starting Windows… message appears at the bottom
of the screen.
Setting up and Using Your Workstation
Starting and Shutting Down Your Workstation
Shutting Down Your Workstation
To shut down your workstation:
1. Exit all applications.
2. Shut down the workstation:
•
If you have programmed your power button to shut down the
system, press the power button. Windows quits and the system
powers down.
•
If you have not programmed your power button for shut-down,
select Start > Shut Down. A list of shutdown options supported by
your OS appears.
Select one of the options and click OK.
CAUTION
20
Always power off through the OS. Do not use the power button or reset
button to power off, except during extreme circumstances (for example,
when the system will not shut down through the OS). Using the power
button or reset button to power down may cause you to lose unsaved data
from open applications. For more information about shutdown options
such as Standby and Hibernate, see “Using Power Management” on
page 29.
Chapter 1
Setting up and Using Your Workstation
Using Your Workstation
Using Your Workstation
Understanding the Control Panel
The hardware control panel located on the front of the workstation
includes the following features:
•
•
•
•
•
•
Figure 1-3
optical drive(s)
floppy drive
power on/off button
reset button
power LED
hard disk activity LED
xw5000 Front Panel Controls
Optical drive
bays
Floppy drive
Power LED
Hard disk activity LED
Power button
Reset button
Power On/Off button. Press this button to start the workstation. You can
also wake the workstation from Hibernate or Standby mode by pressing
this button for less than four seconds. To turn the workstation off, press
this button for more than four seconds (see “Shutting Down Your
Workstation” on page 20).
Power LED indicates system status:
Chapter 1
•
Solid green — system is on.
•
Solid yellow — workstation is in Standby or Hibernate mode.
•
Flashing yellow, flashing red, or solid red — system error.
21
Setting up and Using Your Workstation
Using Your Workstation
Reset button. Press this button to re-initialize all the hardware without
cycling power to the system (soft boot). Avoid general use of this button
because file damage may occur. Always use the OS Shut Down command
before resetting the machine.
Hard Disk Activity LED. Flickers when your hard disk is being accessed.
Using Your Mouse and Keyboard
Your workstation ships with an Easy Access Keyboard, shown below.
Figure 1-4
HP Easy Access Keyboard
Special Function Keys
The Easy Access Keyboard has the following special function keys:
•
Ctrl key. Used in combination with another key; its effect depends on
the application software you are using.
•
Windows Logo key. Used in combination with other keys to perform
other functions (see “The Windows Logo Key” on page 24).
•
Alt key. Used in combination with another key; its effect depends on
the application software you are using.
•
Application key (available only in selected geographic regions). Used,
like the right mouse button, to open pop-up menus in a Microsoft
Office application; may perform other functions in other software
applications.
NOTE
22
•
Easy Access keys. Provide quick and easy access to favorite Web sites,
applications, and services.
•
Editing keys. Insert, Home, Page Up, Delete, End, and Page Down.
Press Ctrl + Alt + Delete to restart your computer.
Chapter 1
Setting up and Using Your Workstation
Using Your Workstation
The following indicator lights show whether these features are on or off:
•
Num Lock
•
Caps Lock
•
Scroll Lock
Easy Access Software
Your Easy Access Keyboard Buttons are programmed to default
assignments. The preinstalled Easy Access Software allows you to
reprogram the Easy Access Buttons to reflect your personal preferences.
You can reprogram the buttons to any program or service of your choice
or to any Web site (URL).
Reprogramming and Locking the Easy Access Buttons
The Easy Access Keyboard icon is located on the Windows desktop status
bar. The Easy Access Buttons are programmable.
For instructions about reprogramming the Easy Access Buttons, refer to
the help file:
C:\Program Files\COMPAQ\Easy Access Button Support\CPQEAUI.hlp
Easy Access Paper Icon Insert
The paper icon insert functions as a visual aid in identifying the
programmed destination of each Easy Access Button. Whenever you
reprogram an Easy Access Button, use the Paper Insert Template
document to select and print an icon that reflects the new button
assignment. The Paper Insert Template.doc is installed in:
C:\Program Files\COMPAQ\Easy Access Button Support
Chapter 1
23
Setting up and Using Your Workstation
Using Your Workstation
The Windows Logo Key
Use the Windows Logo Key in combination with other keys to perform
certain functions available in Windows.
•
Windows Logo Key + F1. Displays a pop-up menu for the selected
object.
•
Windows Logo Key + Tab. Activates the next Taskbar button.
•
Windows Logo Key + E. Launches Explore My Computer.
•
Windows Logo Key + F. Launches Find Document.
•
Windows Logo Key + Ctrl + F. Launches Find Computer.
•
Windows Logo Key + M. Minimizes all open applications.
•
Shift + Windows Logo Key + M. Undoes Minimize All.
•
Windows Logo Key + R. Displays the Run dialog box.
Your workstation ships with a PS2 3-button or scroll mouse:
24
•
Standard PS2 interface
•
Compatible with Windows XP and Windows 2000
•
Programmable third button or scrolling Internet wheel
Chapter 1
Setting up and Using Your Workstation
Configuring Your Workstation
Configuring Your Workstation
The BIOS setup program lets you configure your workstation. You can:
•
set up BIOS-Access Administrator and User passwords
These are not the Windows login password. These passwords are
only used to limit access to the Setup Program Menus described on
page 26.
NOTE
•
change the system boot order
•
solve configuration problems
HP recommends that you note any changes you make to the system
setup for later reference.
Viewing Your Workstation Configuration
The Summary screen gives you a summary of the current configuration
of your workstation (BIOS version, CPU type, memory module size, and
installed mass storage devices).
You should check the configuration of your workstation when you first
use it and each time you install, remove, or upgrade accessories.
To check the configuration:
1. Shut down your workstation as described in “Shutting Down Your
Workstation” on page 20.
2. Restart your workstation.
3. When the startup logo appears on your display, press Esc. The
Summary Screen displays your configuration information for a short
time.
Chapter 1
25
Setting up and Using Your Workstation
Configuring Your Workstation
Using the Setup Program
To start the Setup program:
1. Start (or restart) your workstation.
2. Press F2 when F2 Setup appears at the bottom of the screen.
If you fail to press F2 in time and the startup process continues, you
must allow your system to finish booting up, then restart your
workstation and go through the POST again.
NOTE
In the Setup program:
•
The Main Menu presents a list of fields, such as the installed
BIOS version and the date and time.
•
A band along the top of the screen offers a list of menus. Select
one of the following menus by using either the left or right arrow
keys.
•
A band along the bottom of the screen gives instructions for
using the keyboard-driven menus.
Setup Program Menus
The Main Menu lets you:
•
•
•
•
view the BIOS version
reset configuration data
set the system time
set the system date
By default, “Reset Configuration Data” is set to No. Resetting the
configuration causes the BIOS to assign resources to all devices instead
of using what is stored in memory.
26
Chapter 1
Setting up and Using Your Workstation
Configuring Your Workstation
The Advanced Menu lets you view or configure:
•
•
•
•
•
processor speed
advanced features of the chip set
PCI cards
the Advanced Graphics Port video card
settings for the integrated:
—
—
—
—
—
—
floppy disk drive controller
IDE controller and for attached IDE devices
SCSI controller (optional)
10/100BT network interface
serial and parallel ports
audio controller
The Security Menu lets you:
•
change or set the System Administrator Password, User Password,
or Power-on Password (see “Setting Passwords” on page 28)
•
prevent unauthorized startup from the floppy, optical drives, and
IDE drives
•
prevent unauthorized use of the floppy drive
•
prevent a Plug-and-Play OS from changing the BIOS configuration
settings
•
prevent unauthorized changes to the boot sector
The Boot Menu lets you select the order of the devices from which you
want the BIOS to attempt to start the OS. The Quickboot mode option
allows the system to skip certain tests while booting. This decreases the
time necessary to start the system.
The Power Menu lets you enable remote power-on. You can also set the
mode of operation if an AC power loss occurs.
Chapter 1
27
Setting up and Using Your Workstation
Configuring Your Workstation
Setting Passwords
You can set passwords to provide different levels of protection for your
workstation.
Using the Security Menu in the Setup program:
NOTE
•
The administrator can access and change all settings in the Setup
program. The user can access and modify only certain items in the
Main Menu.
•
You can enable the Power-on Password option so that a password is
required every time you start the workstation.
You must set an administrative password before you can set a user
password.
To set up passwords:
1. Start the workstation and press F2 when prompted to enter the
Setup utility.
2. Select the Security > Set Administrator Password or Security > Set User
Password.
3. When prompted, enter, then re-enter your password.
4. Select Exit > Exit Saving Changes.
Removing Passwords
To remove a password:
1. Start the workstation and press F2 when prompted to enter the
Setup utility.
2. Select Security > Clear All Passwords.
3. Select Exit > Exit Saving Changes.
28
Chapter 1
Setting up and Using Your Workstation
Configuring Your Workstation
Using Power Management
Power management lets you reduce the overall power consumption by
slowing down workstation activity when idle. For more information
about power consumption, refer to the hp workstation xw5000 Technical
Reference Guide at www.hp.com/workstations/support.
Operating systems differ in their power-management capabilities. In
Windows 2000 and Windows XP, you can select from two
power-management modes:
•
Standby is a low-power state in which the processor shuts off but
the rest of the machine remains powered. Waking up the workstation
from Standby mode is faster than from Hibernate mode because the
RAM contents do not need to be restored. However, when the
workstation is in Standby mode, it consumes more power than
Hibernate mode because the memory remains powered.
•
Hibernate makes the machine look and behave as if it is off, except
that it remembers the state it was in before hibernation and can be
awakened without a full OS boot. The OS copies the RAM contents
out to a special location on the hard disk before entering hibernation.
You must enable Hibernate mode through Power Options in Control
Panel before it can be a shutdown option.
To wake the workstation from either mode, press the power button for
less than four seconds.
To change your power-management settings:
1. Open the Power Management Control Panel:
•
In Windows 2000 Professional, select Start > Settings > Control
Panel, then double-click Power Options.
•
In Windows XP Professional, select Start > Control Panel.
Double-click Power Options.
2. Select the appropriate settings.
For more information about changing your power options, refer to your
OS documentation.
Chapter 1
29
Setting up and Using Your Workstation
Configuring Your Workstation
Loading Software Applications for Your Optical Drive
The HP workstation xw5000 is available with several different optical
drives. Each requires different software or drivers to operate properly:
•
•
•
•
CD-ROM
CD-RW
DVD-ROM
DVD+RW
CD-ROM
All drivers are pre-loaded. No additional software is required.
DVD, CD-RW and DVD+RW
Playing movies: If your workstation has a DVD or DVD+RW drive, you
must install the HP applications and drivers from the CD included with
your system before you can play movies.
Writing to discs: workstation has a CD-RW or DVD+RW drive, you must
install the HP applications and drivers from the CD included with your
workstation before you can use the write/rewrite functionality of the
drive.
NOTE
No drivers are required for read-only access to these drives.
You cannot install a CD-RW and a DVD+RW in the same system.
To install these applications:
1. Download and install the latest IDE driver for your workstation from
http://www.hp.com/workstations/support.
2. Run the installation program:
a. Put the Applications CD in your CD-RW or DVD+RW drive.
b. When the installation window appears:
30
•
Click Start Installation to begin the software installation
wizard.
•
Click Change Language to select a language other than
English, if necessary.
Chapter 1
Setting up and Using Your Workstation
Configuring Your Workstation
c.
Click Next to begin the wizard and Yes to accept the License
Agreement.
d. Select one or more of these choices and follow the onscreen
directions for installation:
•
If you do not install the Core Applications, you will not be
able to write to CD or DVD media.
NOTE
e.
NOTE
Core Applications. Installs applications for creating data and
music CDs and providing drive letter access to CD-RW or
DVD+RW drives.
•
Sonic MyDVD. Installs software to create original video
DVDs.
•
HP Simple Backup. Installs automated backup and
disaster-recovery software.
•
PowerDVD. Installs a video and movie DVD player.
When the installation wizard is complete, restart your system to
complete the installation:
•
Select Exit.
•
Remove the Applications CD and click Yes when prompted.
If your Internet connection requires proxy configuration, you must make
a manual adjustment to RecordNow. After you install the software and
reboot your system, launch RecordNow and click Options. Select the
CDDB tab and check Use a Proxy Server. Enter the correct proxy
information for your location.
Configuring Your Video Card and Monitor
All video cards that ship with your workstation support multiple refresh
rates, resolutions, and color depths.
To configure video settings, access the Windows Control Panel and select
Display. The specific features and options supported by your card appear.
For additional information, see the documentation that shipped with
your card.
Chapter 1
31
Setting up and Using Your Workstation
Configuring Your Workstation
32
Chapter 1
2
Troubleshooting
This chapter contains basic information to help you get your workstation
up and running in the unlikely event that you experience a problem.
Chapter 2
33
Troubleshooting
Solving Common Problems
Solving Common Problems
This section contains information for diagnosing and solving common
problems on the hp workstation xw5000.
•
Your Workstation Does Not Start Properly — page 35
•
You Find a Hardware Problem — page 37
— Your System Does Not Start Properly — page 35
— Keyboard and Mouse Problems — page 37
— Video Problems — page 38
— Optical Drive Problems — page 39
— Audio Problems — page 41
•
You Forgot Your Password — page 42
•
Understanding the E-buzzer Beep Codes — page 43
For more detailed help, refer to the hp workstation xw5000 Technical
Reference Guide at http://www.hp.com/workstations/support/.
If you still have problems, run Diagnostics for Windows (see page 46) and
contact Customer Support.
34
Chapter 2
Troubleshooting
Solving Common Problems
Your Workstation Does Not Start Properly
Table 2-1
Your System Does Not Start Properly
The system doesn’t power on.
Make sure...
How
The system’s power cord is properly connected.
Connect the power cord to a working power outlet
and to the rear of the system.
There is a POST error.
The POST can detect errors and changes to the configuration. In either case, a code and short
description is displayed.
Make sure...
How
You read the message and select the
appropriate action.
•
Press F1 to ignore the message and continue.
•
Press F2 to run the Setup program and correct
a system configuration error.
•
Press Enter to see details about the message.
After viewing these details, you are returned to
the original POST display screen.
NOTE: A list of POST errors with suggested
solutions is included in the hp workstation
xw5000 Technical Reference Guide at:
http://www.hp.com/workstations/support/
If you still have a problem, see “Running Diagnostics for Windows” on page 46.
There are one or more beeps and the system does not boot.
When your workstation starts, the system tests your hardware for possible problems. If a critical
problem is detected, the system emits audible beeps.
Make sure...
How
You count the beeps to determine the error and
suggested solution.
See “Understanding the E-buzzer Beep Codes” on
page 43.
Chapter 2
35
Troubleshooting
Solving Common Problems
Table 2-1
Your System Does Not Start Properly (Continued)
The display is blank.
Make sure...
How
Both the workstation and monitor power cords
are firmly connected and plugged in.
Connect the power cords to a working power outlet
and to the rear of the workstation and the display.
The outlet power is functioning.
Turn on any light switches, power strips, or surge
protectors connected to the outlet.
The workstation and monitor are turned on.
(The power light should be illuminated.)
Turn on the workstation and display using the
power button. Make sure any power strips are
turned on.
36
Chapter 2
Troubleshooting
Solving Common Problems
You Find a Hardware Problem
Table 2-2
Keyboard and Mouse Problems
The keyboard doesn’t work.
Make sure...
How
The keyboard cable is correctly
connected.
Ensure that the keyboard is connected to the keyboard
connector rather than the mouse connector on the rear
panel of the workstation.
The keyboard is free of debris.
Check all keys are at the same height, and none are stuck
down.
The keyboard itself is not defective.
Either replace the keyboard with a known working unit or
try the keyboard with another system.
The mouse doesn’t work.
Make sure...
How
The mouse cable is correctly connected.
Ensure that the mouse is connected to the mouse
connector rather than the keyboard connector on the rear
panel of your workstation.
You are using the correct driver.
Download the latest driver from
http://www.hp.com/workstations/support/
The mouse is clean.
Clean the mouse ball as shown below.
The mouse itself is not defective.
Replace the mouse with unit that is known to work or try
the mouse with another system.
If the system starts but you still have a problem, see “Running Diagnostics for Windows” on page 46.
Chapter 2
37
Troubleshooting
Solving Common Problems
Table 2-3
Video Problems
The system’s power indicator light works but the monitor remains blank.
Make sure...
How
The monitor is switched ON (LED is on).
Refer to the monitor manual for an explanation
of the LED signals.
The monitor’s power cord is correctly connected.
Ensure the power cord is plugged into a working
grounded power outlet and into the monitor.
The graphics card is installed and the monitor
(video) cable is correctly connected.
Ensure the video cable is properly connected to
both the system and the monitor. Ensure that
the cable is connected to the graphics card’s
connector.
The monitor’s brightness and contrast settings
are correctly set.
Check the settings using the monitor’s OSD
(on-screen display) or using controls on the front
of the monitor.
The display works properly during the POST but goes blank when Windows starts.
Make sure...
The display settings in Windows are compatible
with your monitor.
How
1. Restart your workstation in VGA mode:
a. After POST, as soon as the Starting
Windows… message is displayed at the
bottom of the screen, press F8.
b. On the Windows Advanced Options Menu,
select Enable VGA Mode.
2. After the Windows starts, change the
display settings in the display properties
control panel. Refer to your OS and monitor
documentation for more information.
38
Chapter 2
Troubleshooting
Solving Common Problems
Table 2-4
Optical Drive Problems
The workstation does not boot from CD-ROM or DVD drive.
Make sure...
How
The CD or DVD boot is enabled through the
Computer Setup utility.
Run the Setup Program and enable booting to
removable media and verify boot order settings.
See “Setup Program Menus” on page 26.
A bootable CD is in the optical drive.
Insert a bootable CD in the drive.
CD or DVD devices are not detected or driver is not loaded.
Make sure...
How
The drive is connected and configured properly.
See the hp workstation xw5000 Technical
Reference Guide at:
http://www.hp.com/workstations/support
Movie will not play in the DVD drive.
Make sure...
How
The decoder software is installed properly.
Install decoder software. See “Loading Software
Applications for Your Optical Drive” on page 30.
You can’t eject a CD.
Make sure...
How
The disc is properly seated in the drive.
Turn off computer and insert a thin metal rod
into the emergency eject hole and push firmly.
Slowly pull the tray out from the drive until the
tray is fully extended, then remove the CD.
Chapter 2
39
Troubleshooting
Solving Common Problems
Table 2-4
Optical Drive Problems (Continued)
The optical drive cannot read a disc or takes too long to start.
DVD drives take longer to start because they must determine the type of media played, such as audio
or video. Wait at least 30 seconds to let the DVD drive determine the type of media being played. If the
CD still does not start, read the other solutions listed for this topic.
Make sure...
How
The disc has been inserted right-side up.
Re-insert the CD with the label facing up.
The disc is clean and has not been scratched.
Clean CD or DVD with a cleaning kit, available
from most computer stores.
1. Use Device Manager to remove or uninstall
Windows detects the optical drive.
the device in question.
2. Restart your computer and let Windows
detect the optical drive.
You can’t record to a CD.
Make sure...
How
You have the correct type of media.
•
Verify that you are using the correct media
for the drive.
•
Try a different brand of media. Quality
varies widely among manufacturers.
You are recording at the correct speed.
Try using a slower speed when recording audio
CDs.
You have the correct software installed.
Install the software from the Applications CD.
See “Loading Software Applications for Your
Optical Drive” on page 30.
40
Chapter 2
Troubleshooting
Solving Common Problems
Table 2-5
Audio Problems
The system has no sound.
Check that...
How
Software volume control is not turned
down or muted.
Double-click the Speaker icon on the taskbar, then set
volume by adjusting the volume slider. If the volume is
muted, clear the Mute check box.
The speaker or optical drive volume
control is not turned down.
If your speakers or optical drive have volume control
knobs, turn the knob to increase the volume.
External speakers are plugged into the
correct audio jack.
Plug the external speakers into the correct port on the
front- or rear-panel of the system. See “Connect the
Components” on page 12.
The optical drive audio cable is properly
connected.
Connect the audio cable between CD or DVD-ROM drive
and the system board. See the hp workstation xw5000
Technical Reference Guide at
http://www.hp.com/workstations/support.
Headphones or speakers connected to
the line out connector are not muting
the internal speaker.
Turn on and use headphones or external speakers, if
connected, or disconnect headphones or external
speakers.
The workstation is not in Standby mode.
Press the power button to resume from Standby mode.
Noise or no sound comes out of the speakers or headphones.
Make sure...
How
The workstation is detecting the correct
speaker/headphone type and
analog-to-digital auto-sense is engaged.
•
If you are using digital speakers that have a stereo
jack and want the system to auto-switch to digital,
use a stereo-to-mono adapter to properly engage the
auto-sense feature.
•
If a stereo-to-mono adapter is not available, use the
multimedia device properties to manually switch the
audio signal from analog to digital.
•
If the headphones have a mono jack, use the
multimedia device properties to switch the system to
analog out.
Chapter 2
41
Troubleshooting
Solving Common Problems
You Forgot Your Password
If you forget the BIOS passwords for the workstation, you must clear
them before you can set new passwords.
NOTE
This is not the Windows login password. This password is only used to
limit access to the Setup Program menus described in Chapter 1. If you
forget the Windows login password for the workstation, see your OS
documentation for instructions.
Clearing the BIOS User Password
If you forgot your User password and remember the Administrator
password, you can clear the User password through the Setup Menu.
To clear the User password:
1. Start the Setup Program (page 26).
2. Enter the Administrator password when prompted.
3. Select Security Menu > Clear all Passwords.
4. Enter and confirm a new User password if needed.
5. Press Esc to leave the Security Menu.
6. Select Exit > Exit Saving Changes to save your changes.
Clearing the BIOS Administrator Password
To clear the Administrator password:
1. Turn off the workstation and remove the left side panel (see the hp
workstation xw5000 Technical Reference Guide for additional
information).
2. Set switch 1 on the system board switch block to On (see the label on
the inside of the left side panel for switch location).
3. Replace the workstation cover.
4. Turn on the workstation and press Esc when prompted to see the
summary page.
5. When a message appears indicating that the passwords have been
cleared, turn off the workstation and remove the cover.
42
Chapter 2
Troubleshooting
Solving Common Problems
6. Set switch 1 on the system board block back to Off.
7. Replace the side panel.
8. If you want to set new passwords, follow the instructions given in
“Setting Passwords” on page 28.
Understanding the E-buzzer Beep Codes
When your workstation starts, the system tests your hardware for
possible problems. If a problem is detected, the e-buzzer will emit audible
beeps and an encoded error signal that can be sent through a telephone
line to an authorized Help desk or HP Support. This signal can be
decoded by Help desk equipment to extract the workstation model, serial
number, and details about any faults. To send this signal to HP Support,
hold your telephone next to the speaker on the system front bezel when
the system is booting.
Table 2-6
No.
Beeps
E-buzzer Beep Codes
Component
Error
Solution
1
Processor
Processor absent, not
correctly connected.
Contact HP Customer Care. See
“Where to Get Help” on page 50.
2
Power
Supply
Power supply is in
protected mode.
Contact HP Customer Care. See
“Where to Get Help” on page 50.
3
Memory
No memory, bad
memory modules, or
incompatible memory
module.
1. Remove any newly installed RAM
and reseat it. Ensure that memory
is loaded in the correct order.
2. If the problem persists, contact HP
Customer Care or replace the
system RAM.
See “Where to Get Help” on page 50 or
the hp workstation xw5000 Technical
Reference Guide at
http://www.hp.com/workstations/ support.
Chapter 2
43
Troubleshooting
Solving Common Problems
Table 2-6
No.
Beeps
4
E-buzzer Beep Codes (Continued)
Component
Video Card
Error
Graphics card failure.
Solution
1. Remove the graphics card and
reseat it.
2. If the problem persists, remove the
graphics card and replace it with a
good card.
5
PCI Card
PCI card
initialization
problem.
1. Remove PCI cards until you find
the one causing the failure.
2. Reseat the offending PCI card.
3. If the problem persists, replace the
defective PCI card.
6
BIOS
Corrupted BIOS.
Perform a bios Boot Block Recovery.
See the hp workstation xw5000
Technical Reference Guide at
http://www.hp.com/workstations/ support.
7
44
System
Board
Defective
motherboard.
Contact HP Customer Care. See
“Where to Get Help” on page 50.
Chapter 2
Troubleshooting
Using Diagnostics for Windows
Using Diagnostics for Windows
Diagnostics for Windows is a system information and diagnostic utility
used in Windows to:
NOTE
•
Display system information
•
Test system components
•
Troubleshoot a device configuration problem
Run Diagnostics for Windows before contacting HP for warranty service.
Diagnostics for Windows gives you information your support agent
needs.
The Diagnostics utility includes two system scans:
•
Configuration Record compares the notebook configuration at the time
Diagnostics was installed to interim or current configurations.
•
Diagnostics provides more complete information about your current
configuration as well as options for testing components. You can
display more or less information from anywhere in Diagnostics by
selecting Level on the menu bar.
NOTE
Chapter 2
Both Diagnostics scans are designed to report on HP components. If
non-HP components are scanned, the results may be inconclusive.
45
Troubleshooting
Using Diagnostics for Windows
Installing Diagnostics for Windows
To install Diagnostics for Windows:
1. Close any Windows applications.
2. Follow the installation instructions for your OS:
In Windows XP Professional:
a. Select Start > All Programs > Software Setup. Click Next.
b. Follow the instructions on the screen.
In Windows 2000 Professional:
a. Double-click the Setup HP Software icon on the desktop.
b. Click Next and follow the instructions on the screen.
3. You must restart the workstation to complete the installation. You
may be prompted to restart the workstation, or it may restart
automatically.
Running Diagnostics for Windows
1. Start Diagnostics for Windows:
•
In Windows 2000 Professional, select Start > Settings > Control
Panel > Diagnostics for Windows.
•
In Windows XP Professional, select Start > Control Panel
Performance and Maintenance > Diagnostics for Windows.
2. From the Categories Menu, select the area you want to review.
•
Select File > Save As to save the information.
•
Select File > Print to print the information.
3. To close Diagnostics, select File > Exit.
46
Chapter 2
Troubleshooting
Using Diagnostics for Windows
Generating Diagnostics Test Information
To generate, save and print Diagnostics test information:
1. Start Diagnostics for Windows and select the Test tab.
2. Select the category or device you want to test.
3. Define the test(s) to be run:
a. Select a test type:
•
Quick Test runs a quick, general test on each device in a
selected category.
•
Complete Test performs maximum testing on all devices in a
selected category.
•
Custom Test performs maximum testing on a selected device.
b. Select a test mode:
•
Interactive Mode provides maximum control over the testing
process. You determine whether the test passed or failed and
you may be prompted to insert or remove devices.
•
Unattended Mode does not display prompts. If errors are
found, they are displayed when testing is complete.
4. To run the selected test(s), click Begin Testing.
5. To display, save or print the test results, select a tab and click the
Save or Print button:
•
Status Tab summarizes the tests run, passed, and failed during
the current testing session.
•
Log Tab lists tests run on the system, the numbers of times each
test has run, the number of errors found on each test, and the
total run time of each test.
The Log Tab does not have a print button. Save the log, then
print the file from Windows Explorer.
NOTE
•
Error Tab lists all errors found on the computer with their error
codes.
Chapter 2
47
Troubleshooting
Restoring Your OS and Software from CD
Restoring Your OS and Software from CD
Restore the original OS and factory-installed software by using the CDs
provided with your workstation. Carefully read and follow the
instructions that came with the CDs. For questions about problems with
these CDs, contact HP Customer Care (see “Where to Get Help” on
page 50).
WARNING
48
The operations you perform using the recovery CDs
permanently erase the contents of your hard disk. Always back
up your data and personal files before using the recovery CDs.
Chapter 2
Troubleshooting
Workstation Technical Characteristics
Workstation Technical Characteristics
NOTE
Operating temperature and humidity ranges may vary depending on the
mass storage devices installed. High humidity levels can cause improper
operation of disk drives. Low humidity ranges can aggravate static
electricity problems and cause excessive wear of the disk surface.
When you turn off your workstation with the power button on the front
panel, the power consumption falls below 10W, but is not zero. To reach
zero power consumption when the computer is off, either unplug the
workstation from the power outlet or use a power strip with a switch.
Table 2-7
Workstation Technical Characteristics
Weight
17-20 kg (37-44 lb.), depending on configuration
Dimensions:
Tower
449 mm (17.7 in.) tall, 210 mm (8.3 in.) wide,
515 mm (20.3 in) deep
Rackmount (with
cosmetic foot removed)
210 mm (8.3 in.) tall, 440 mm (17.3 in.) wide,
515 mm (17.3 in.) deep
Footprint
108150 mm2 (168.5 in.2)
Power Supply:
Input voltage
Input frequency
Min efficiency
Max input power
Max output power
Auto-ranging, 100-250V
50-60 Hz
65%
492W
320W
Operating Humidity
15% to 80% (relative, non-condensing) at 35° C (95° F)
Storage Temperature
-40° C (-40° F) to 70° C (158° F)
Operating Temperature
10° C (50° F) to 35° C (95° F)
Altitude
Operating: 0 ft. to 10,000 ft. (3100 m)
Non-operating: 0 ft. to 15,000 ft. (4600 m)
Chapter 2
49
Troubleshooting
Where to Get Help
Where to Get Help
HP Customer Care Centers can help you solve problems related to HP
products and, if necessary, initiate appropriate service procedures.
Support is available on the web and by phone.
For information on contacting HP Customer Care, see the Warranty and
Support Guide or go to http://www.hp.com/workstations/support/.
Additional Documentation
The following documentation is available:
•
Installation Poster — basic information on setting up your new
workstation.
•
Getting Started Guide (this document) — information on setting up
and configuring your new workstation, along with basic
troubleshooting information.
•
Technical Reference Guide — detailed information on installing and
replacing parts, troubleshooting, and configuring the workstation.
•
Illustrated Parts Map — list of supported parts and accessories and a
table of basic BIOS settings and menus.
•
Safety and Comfort Guide — information on using your workstation
safely and avoiding injury or discomfort.
•
Warranty and Support — warranty for your workstation and
information on contacting HP Customer Care.
•
Recovery CD Instructions — detailed instructions on restoring your
OS if you need to restore the workstation to the original shipping
configuration.
These documents and additional online support information, firmware
upgrades, and drivers are available from the HP web site at:
http://www.hp.com/workstations/support
After accessing the site, select the appropriate hardware. Selected
publications are also available as printed books.
50
Chapter 2
A
Appendix A
Regulatory Information
51
Regulatory Information
Declaration of Conformity
according to ISO/IEC Guide 22 and EN 45014
Manufacturer:
Hewlett-Packard Company
3404 East Harmony Rd.
Fort Collins, CO 80528
USA
Declares that the:
Product Type:
Computer Workstation/Server
Marketing Designation(s): xw5000 and xw8000
Regulatory Model Number: fclsa-0203
Product Options:
all
conforms to the following specifications:
Safety
IEC 60950:1991+A1+A2+A3+A4/EN 60950:1992+A1+A2+A3+A4
IEC 60825-1:1993/EN60825-1:1994+A11 Class 1 for LED’s and Lasers
U.S.A 21CFR Subpart J – for FC Laser module
China GB4943-1995
Russia GOST R 50377-92
EMC
CISPR 22: 1997 / EN 55022: 1998 Class A
CISPR 24: 1997 / EN 55024: 1998
Also compliant with...
EN 61000-3-2: 1998
EN 61000-3-3: 1995
EN 61000-4-2: 1999 - 4 kV CD, 8 kV AD
EN 61000-4-3: 1996 - 10 V/m
EN 61000-4-4: 1995 - 2 kV Signal, 4 kV Power Lines
EN 61000-4-5: 1995 - 1 kV Differential mode, 2 kV Common mode
EN 61000-4-8: 1993 - 3 A/m
EN 61000-4-11: 1994
U.S.A FCC Part 15, Class A
Japan VCCI Class A
Australia/New Zealand AS/NZS 2046:1997, AS/NZS 3548:1995
China GB9254-1988
Region of Taiwan CNS 13438:1997 Class A
Russia GOST R 29216-94
and is certified or verified by:
UL Listed to UL1950, 3nd edition, File E146385
cUL Listed to CSA 22.2 No. 950-M93
TUV Certified to EN60950 2nd edition with A1+A2+A3+A4
HP Fort Collins CCQD HTC
Supplementary information:
The product herewith complies with the requirements of the following Directives: Low Voltage Directive
73/23/EEC and the EMC directive 89/336/EEC and carries the CE marking accordingly.
This product was tested in a typical Hewlett-Packard system configuration.
For Compliance Information ONLY, contact: European Contact: Hewlett-Packard, HQ-TRE,
Herrenberger Strasse 140, D-71034 Boeblingen (FAX: +49-7031-14-3143)
Americas Contact: Hewlett-Packard, WGBU Quality Manager., 3404 E. Harmony Road, Fort Collins, CO
80528, U.S.A. (FAX: (970) 898-4556)
52
Appendix A
Regulatory Information
Regulatory Information
Regulatory Information
Federal Communications Commission Radio
Frequency Interference Statement (for USA only)
This equipment has been tested and found to comply with the limits for a
Class A digital device, pursuant to Part 15 of the FCC Rules and the
Canadian Department of Communications. These limits are designed to
provide reasonable protection against harmful interference when the
equipment is operated in a commercial environment. This equipment
generates, uses, and can radiate radio frequency energy and, if not
installed and used in accordance with the instruction manual, may cause
harmful interference to radio communications. Operation of this
equipment in a residential area is likely to cause harmful interference in
which case the user will be required to correct the interference at his own
expense.
Hewlett-Packard’s FCC Compliance Tests were conducted with
HP-supported peripheral devices and HP shielded cables, such as those
you receive with your system. Changes or modifications not expressly
approved by Hewlett-Packard could void the user’s authority to operate
the equipment.
Notice for Canada
This Class A digital apparatus meets all requirements of the Canadian
Interference-Causing Equipment Regulations.
Cet appareil numérique de la Class A respecte toutes les exigences du
Règlement sur le matériel brouilleur du Canada.
Safety Warning for the USA and Canada
If the power cord is not supplied with the computer, select the proper
power cord according to your local national electric code.
USA: use a UL listed type SVT detachable power cord.
Canada: use a CSA certified detachable power cord.
For your safety, never remove the system’s cover without first removing
the power cord and any connection to a telecommunication network.
Always replace the cover before switching on again.
Appendix A
53
Regulatory Information
Regulatory Information
Si le cordon secteur n’est pas livré avec votre ordinateur, utiliser un
cordon secteur en accord avec votre code electrique national.
USA: utiliser un cordon secteur “UL listed,” de type SVT.
Canada: utiliser un cordon secteur certifié CSA.
Pour votre sécurité, ne jamais retirer le capot de l’ordinateur sans avoir
préalablement débranché le cordon secteur et toute connection à un
réseau de télecommunication. N’oubliez pas de replacer le capot avant de
rebrancher le cordon secteur.
Notice for France
Il y a danger ïexplosion s’il y a remplacement incorrect de la batterie.
Remplacer uniquement avec une batterie du même type ou ïun type
equivalent recommandé par le constructer. Mettre au rebut les batteries
usagées conformément aux instructions du fabricant.
Notice for the Netherlands
Bij dit apparaat zijn batterijen geleverd. Wanneer deze leeg zijn, moet U
ze niet weggooien maar inleveren als KCA.
Notice for Germany
Wenn die Batterie nicht korrekt eingebaut wird, besteht
Explosionsgefahr. Zu ihrer eigenen Sicherheit sollten Sie nicht
versuchen, die Batterie wiederaufzuladen, zu zerlegen oder die alte
Batterie zu verbrennen. Tauschen Sie die Batterie nur gegen den
gleichen oder ähnlichen Typ aus, der vom Hersteller empfohlen wird. Bei
der in diesem PC intergrierten Batterie handelts sich um eine
Lithium-Batterie, die keine Schwermetalle enthält. Batterien und
Akkumulatoren gehören nicht in den Hausmüll. Sie verden vom
Hersteller, Händler oder deren Beauftragten kostenlos
zurückgenommen, um sie einer Verwertung bzw. Entsorgung
zuzuführen.
Noise Declaration for Germany
Lärmangabe nach Maschinenlärmverordnung - 3 GSGV (Deutschland)
LpA < 70 db am Arbeitsplatz normaler Betrieb nach EN27779: 11.92.
54
Appendix A
Regulatory Information
Regulatory Information
Notice for Japan (Class A)
Notice for Korea
Notice for Taiwan
Appendix A
55
Regulatory Information
Regulatory Information
56
Appendix A
Index
A
Alt key, 22
Application key, 22
Audio, 13, 14, 15, 39, 40, 41
B
Battery, 8
Beeps, 35, 43
BIOS, 25, 42, 44
BIOS Setup Program, 26
BIOS version, 26
Boot, 25
Boot option settings, 39
Boot order settings, 25, 27
Burn, 8
C
CD, 21, 30, 39
CD-RW, 30
Common problems, 34
Configuration, 25, 26, 30, 31
Connect the Components, 12
Connectors, 12, 13, 14
Control panel, 21
Cover, 7
Ctrl key, 22
Customer Care, 50
D
Diagnostics, 45
Diagnostics for Windows, 45
Documentation, 50
Drivers, 18
DVD, 21, 30, 39
DVD movies, 30, 39
DVD+RW, 30
E
Easy Access keyboard, 22, 23
Easy Access keys, 22
E-buzzer codes, 43
Electrical, 7
Emergency Repair Disk (ERD), 18
Environmental, 49
ERD, 18
Ergonomic, 8
Error beeps, 35, 43
F
F2, 26
FireWire, 14
Floppy drive, 21
Footprint, 49
Front-panel Connectors, 14
Function keys, 22, 26
G
Graphics, 38
Graphics Card, 12
Graphics card, 13, 14, 31, 44
H
Hard drive, 22
Headphones, 13, 14, 15, 41
Help, 50
Hibernate, 29
Humidity, 49
I
IEEE-1394, 14
Installing software, 18, 30, 45, 46
Internet connection, 31
K
Keyboard, 13, 22, 37
Keys, 22
L
LAN, 13, 15
LEDs, 21, 22
M
Manuals, 50
Memory, 43
57
Index
Microphone, 13, 14, 15, 41
Monitor, 13, 14, 31, 36, 38
Motherboard, 44
Mouse, 13, 22, 37
Movies, 30, 39
N
Network port, 13, 15
O
Optical drives, 21, 30, 39
P
Parallel port, 13, 14
Passwords, 25, 27, 28, 42
PCI card, 44
Playing DVD movies, 30
POST, 19, 26, 35
Power, 13, 15, 20, 21, 27, 29, 35, 36, 38
Power cord, 35
Power Management, 20, 29
Power On Self Test (POST), 19, 26, 35
Power supply, 43, 49
Printer port, 13, 14
Problems, 34
Processor, 43
Proxy server, 31
PS2, 13
R
Rear-panel Connectors, 13
Recovery CD, 48
Recycling, 9
Regulatory, 51
Reset, 21
Reset button, 22
Restoring the OS, 48
S
Safety, 7, 12, 15
SCSI port, 13
Security, 28
Serial port, 13, 14
Setup, 11, 12, 18, 19, 25, 26, 30, 31
Shut down, 20
Shutting down your workstation, 20
Software, 18, 23, 30, 45
Sound, 13, 14, 15, 39, 40, 41
Speaker, 13
Speakers, 14, 15, 41
Specifications, 49
Standby, 29
Starting your workstation, 16, 18
Static Electricity, 8
Support, 50
Support web site, 50
System board, 44
T
Technical characteristics, 49
Technical Support, 50
Temperature, 49
Tools, 12
Troubleshooting, 33, 34
U
USB, 13, 14, 37
V
Video, 38
Video Card, 12
Video card, 13, 14, 31, 44
Volume, 41
W
Weight, 49
Windows Logo key, 22, 24
Workstation does not start properly, 35
Writing to CD-RW and DVD+RW media, 30
Writing to CD-RW or DVD+RW media, 40