1
Getting Started Guide
HP Integrity rx2600 server and
HP workstation zx6000
Document Part Number: A9664-90020
June 2003
7KLVJXLGHSURYLGHVDQRYHUYLHZRIWKHV\VWHPIURQWDQGUHDUSDQHO
FRQQHFWRUVLQVWUXFWLRQVRQKRZWRVHWXSDQGFRQILJXUH\RXUV\VWHP
DQGWURXEOHVKRRWLQJWLSV7KHDSSHQGLFHVLQFOXGHZDUUDQW\VWDWHPHQWV
DQGUHJXODWRU\QRWLFHV
Contents
+HZOHWW3DFNDUG&RPSDQ\
0LFURVRIW:LQGRZV:LQGRZVDQG:LQGRZV;3DUHUHJLVWHUHG
WUDGHPDUNVRI0LFURVRIW&RUSRUDWLRQLQWKH86DQGRWKHUFRXQWULHV
,QWHODQG,WDQLXPDUHUHJLVWHUHGWUDGHPDUNVRI,QWHO&RUSRUDWLRQLQWKH86
DQGRWKHUFRXQWULHV
$OORWKHUSURGXFWQDPHVPHQWLRQHGKHUHLQPD\EHWUDGHPDUNVRIWKHLUUHVSHFWLYH
FRPSDQLHV
+HZOHWW3DFNDUG&RPSDQ\VKDOOQRWEHOLDEOHIRUWHFKQLFDORUHGLWRULDOHUURUVRU
RPLVVLRQVFRQWDLQHGKHUHLQRUIRULQFLGHQWDORUFRQVHTXHQWLDOGDPDJHVLQ
FRQQHFWLRQZLWKWKHIXUQLVKLQJSHUIRUPDQFHRUXVHRIWKLVPDWHULDO7KH
LQIRUPDWLRQLQWKLVGRFXPHQWLVSURYLGHG¦DVLV§ZLWKRXWZDUUDQW\RIDQ\NLQG
LQFOXGLQJEXWQRWOLPLWHGWRWKHLPSOLHGZDUUDQWLHVRIPHUFKDQWDELOLW\DQG
ILWQHVVIRUDSDUWLFXODUSXUSRVHDQGLVVXEMHFWWRFKDQJHZLWKRXWQRWLFH7KH
ZDUUDQWLHVIRU+3SURGXFWVDUHVHWIRUWKLQWKHH[SUHVVOLPLWHGZDUUDQW\
VWDWHPHQWVDFFRPSDQ\LQJVXFKSURGXFWV1RWKLQJKHUHLQVKRXOGEHFRQVWUXHGDV
FRQVWLWXWLQJDQDGGLWLRQDOZDUUDQW\
7KLVGRFXPHQWFRQWDLQVSURSULHWDU\LQIRUPDWLRQWKDWLVSURWHFWHGE\FRS\ULJKW
1RSDUWRIWKLVGRFXPHQWPD\EHSKRWRFRSLHGUHSURGXFHGRUWUDQVODWHGWR
DQRWKHUODQJXDJHZLWKRXWWKHSULRUZULWWHQFRQVHQWRI+HZOHWW3DFNDUG
&RPSDQ\
Å
WARNING: Text set off in this manner indicates that failure to follow
directions could result in bodily harm or loss of life.
Ä
CAUTION: Text set off in this manner indicates that failure to follow
directions could result in damage to equipment or loss of information.
Getting Started Guide
HP Integrity rx2600 server and HP workstation zx6000
Second Edition (June 2003)
Document Part Number: A9664-90020
ii
HP Integrity rx2600 server and HP workstation zx6000 Getting Started Guide
Contents
Important Safety Warnings
Å
WARNING: Avoiding Electrical Shocks. To avoid electrical shock, do not
open the power supplies. There are no user-serviceable parts inside.
To avoid electrical shock and harm to your eyes by laser light, do not
open the DVD laser module. The laser module should be serviced by
service personnel only. Do not attempt to make any adjustment to the laser
unit. Refer to the label on the DVD for power requirements and
wavelength. This product is a class I laser product.
Å
WARNING: Removing and Replacing the Cover. For your safety, never
remove the system side cover without first disconnecting the power cord
from the power outlet and removing any connection to a
telecommunications network. If a Power Protection Device is fitted to your
system, you must shut down your computer using its on/off switch, then
remove the power cord before removing the system’s side cover. Remove
the Power Protection Device cables before any servicing operation. Always
replace the side cover before switching the system on again.
Å
WARNING: Battery Safety Information. There is a danger of explosion if
the battery is incorrectly installed. For your safety, never attempt to
recharge, disassemble, or burn an old battery. Replace the battery with
the same or equivalent type, as recommended by the manufacturer.
The battery in this system is a lithium battery that does not contain any
heavy metals. However, to protect the environment, do not dispose of
batteries in household waste. Return used batteries either to the shop from
which you bought them, to the dealer from whom you purchased your
system, or to HP so that they can either be recycled or disposed of in the
correct way. Returned batteries are accepted free of charge.
Å
WARNING: Avoiding Burn Injuries. Some parts inside the computer will
be hot. Wait approximately three to five minutes for them to cool down
before touching them.
HP Integrity rx2600 server and HP workstation zx6000 Getting Started Guide
iii
Contents
Ä
CAUTION: Avoiding Static Electricity. Static electricity can damage
electronic components. Turn OFF all equipment before installing an
accessory card. Don’t let your clothes touch any accessory card. To
equalize the static electricity when replacing an accessory card, rest the
accessory card bag on top of the system unit while you are removing the
card from the bag. Handle the card as little as possible and with care.
Ä
CAUTION: Information on Ergonomic Issues. It is strongly recommended
that you read the ergonomics information, available in the “Working In
Comfort” section of this manual, before using your system. You can access
more extensive ergonomics information at: ZZZKSFRPHUJR.
127(5HF\FOLQJ<RXU6\VWHP+3KDVDVWURQJFRPPLWPHQWWRZDUG
WKHHQYLURQPHQW<RXU+3V\VWHPKDVEHHQGHVLJQHGWRUHVSHFWWKH
HQYLURQPHQWDVPXFKDVSRVVLEOH+3FDQDOVRWDNHEDFN\RXUROG
V\VWHPIRUUHF\FOLQJZKHQLWUHDFKHVWKHHQGRILWVXVHIXOOLIH+3KDV
DSURGXFWWDNHEDFNSURJUDPLQVHYHUDOFRXQWULHV7KHFROOHFWHG
HTXLSPHQWLVVHQWWRDQ+3UHF\FOLQJIDFLOLWLHVLQ(XURSHRUWKH86$
$VPDQ\SDUWVDVSRVVLEOHDUHUHXVHG7KHUHPDLQGHULVUHF\FOHG
6SHFLDOFDUHLVWDNHQIRUEDWWHULHVDQGRWKHUSRWHQWLDOWR[LFVXEVWDQFHV
WKHVHDUHUHGXFHGLQWRQRQKDUPIXOFRPSRQHQWVWKURXJKVSHFLDO
FKHPLFDOSURFHVVHV,I\RXUHTXLUHPRUHGHWDLOVDERXWWKH+3SURGXFW
WDNHEDFNSURJUDPFRQWDFW\RXUORFDOGHDOHURU\RXUQHDUHVW+36DOHV
2IILFH
iv
HP Integrity rx2600 server and HP workstation zx6000 Getting Started Guide
Contents
1 Setting Up and Using Your System
6\VWHP&RQILJXUDWLRQV ¤
)URQW3DQHO ¤
5HDU3DQHO ¤
6HWWLQJ8S<RXU6\VWHP ¤
7RROV ¤
&RQQHFWLQJ'HYLFHV ¤
6WDUWLQJDQG6WRSSLQJ<RXU6\VWHP ¤
6WDUWLQJ<RXU6\VWHP ¤
WXUQLQJRII<RXU6\VWHP ¤
,QVWDOOLQJ+DUGZDUH&RPSRQHQWV ¤
)LUPZDUHDQG'ULYHUV ¤
&RQILJXULQJ<RXU6\VWHP ¤
([WHQVLEOH)LUPZDUH,QWHUIDFH ¤
0DQDJHPHQW3URFHVVRU ¤
%DVHERDUG0DQDJHPHQW&RQWUROOHU ¤
2 Troubleshooting
<RXU6\VWHP'RHV1RW6WDUW3URSHUO\ ¤
<RX)LQGD+DUGZDUH3UREOHP ¤
<RX)RUJRWWKH(),3DVVZRUGV ¤
7URXEOHVKRRWLQJZLWKWKH/('V ¤
7URXEOHVKRRWLQJZLWKWKHHEX]]HU ¤
WKH6\VWHP(YHQW/RJ ¤
6RIWZDUH'LDJQRVWLFV7RROV ¤
+3H'LDJ7RROV+DUGZDUH'LDJQRVWLFV ¤
5HVWRULQJWKH26 ¤
HP Integrity rx2600 server and HP workstation zx6000 Getting Started Guide
v
Contents
:KHUHWR*HW+HOS ¤
,QIRUPDWLRQWR&ROOHFW%HIRUH<RX&RQWDFW6XSSRUW ¤
2QOLQH6XSSRUW ¤
3KRQH6XSSRUW ¤
$GGLWLRQDO'RFXPHQWDWLRQ ¤
A Regulatory Information
'HFODUDWLRQRI&RQIRUPLW\ $¤
)HGHUDO&RPPXQLFDWLRQV&RPPLVVLRQ5DGLR)UHTXHQF\,QWHUIHUHQFH6WDWHPHQW
IRU86$RQO\ $¤
1RWLFHIRU&DQDGD $¤
6DIHW\:DUQLQJIRUWKH86$DQG&DQDGD $¤
1RWLFHIRU)UDQFH $¤
1RWLFHIRUWKH1HWKHUODQGV $¤
1RWLFHIRU*HUPDQ\ $¤
1RLVH'HFODUDWLRQIRU*HUPDQ\ $¤
1RWLFHIRU-DSDQ&ODVV$ $¤
1RWLFHIRU.RUHD $¤
1RWLFHIRU7DLZDQ $¤
B Warranty Statements
+DUGZDUHDQG6RIWZDUH:DUUDQWLHV %¤
:DUUDQW\/LPLWDWLRQV %¤
/LPLWDWLRQRI/LDELOLW\DQG5HPHGLHV %¤
7KLUG3DUW\3URGXFWV %¤
&XVWRPHU5HVSRQVLELOLWLHV %¤
2EWDLQLQJ2QVLWH:DUUDQW\6HUYLFH%¤
2EWDLQLQJ3DUWV:DUUDQW\6HUYLFH %¤
6RIWZDUH/LPLWHG:DUUDQW\ %¤
+37HOHSKRQH6XSSRUW6HUYLFHV %¤
6XSSOHPHQWDO:DUUDQW\DQG6HUYLFH6XSSRUW %¤
&RQWDFWLQJ+3IRU:DUUDQW\6HUYLFH %¤
Index
vi
HP Integrity rx2600 server and HP workstation zx6000 Getting Started Guide
1
setting up and using your system
7KLVFKDSWHULQFOXGHV
■
GHVFULSWLRQVRIWKHV\VWHPIURQWDQGUHDUSDQHOV
■
LQIRUPDWLRQRQKRZWRVHWXS\RXUV\VWHP
■
LQVWUXFWLRQVIRUVWDUWLQJDQGVWRSSLQJ\RXUV\VWHP
■
EDVLFV\VWHPFRQILJXUDWLRQLQIRUPDWLRQ
system configurations
7KH+3,QWHJULW\U[VHUYHUDQG+3ZRUNVWDWLRQ][DUH
DYDLODEOHLQWRZHUDQGUDFNPRXQWFRQILJXUDWLRQV
Accessory
Slots
Fan Type/
Speed
Management
Processor
Redundant
Hot-swap
Power
Supply
zx6000 workstation
tower
3 PCI
1 AGP
Quiet/
Low
No
No
zx6000 workstation
rack-mount
3 PCI
1 AGP
Hi Capacity/
High
Optional
Optional
Integrity rx2600 server
tower
4 PCI
Hi Capacity/
High
Yes
Yes
Integrity rx2600 server
rack-mount
4 PCI
Hi Capacity/
High
Yes
Yes
Configuration
HP Integrity rx2600 server and HP workstation zx6000 Getting Started Guide
1–1
Setting Up and Using Your System
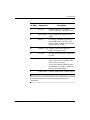
front panel
7KHIURQWSDQHOVRIWKHU[DQG][KDYHWKHIROORZLQJ
IHDWXUHV
1–2
■
3RZHU/('LVJUHHQZKHQWKHSRZHULVRQRUWKHSRZHUEXWWRQLV
SXVKHGLQ,IWKHSRZHULVRQDQGWKHEXWWRQLVSXVKHGLQWKHOLJKW
VWD\VRQHYHQDIWHUWKHV\VWHPLVSRZHUHGGRZQ:KHQWKHEXWWRQ
LVUHOHDVHGWKHJUHHQOLJKWWXUQVRII
■
3RZHU%XWWRQWXUQVWKHV\VWHPSRZHURQDQGRII
■
/$1/('LQGLFDWHVWKHV\VWHPLVFRPPXQLFDWLQJRYHUWKH
*LJDELWRU6\VWHP0DQDJHPHQW/$1
■
6\VWHPDQG'LDJQRVWLF/('VLGHQWLI\V\VWHPHUURUVRQ][
ZRUNVWDWLRQVZLWKQR03FDUGLQVWDOOHG
■
/RFDWRU/('DQG%XWWRQUDFNPRXQWFRQILJXUDWLRQRQO\
LGHQWLI\WKHUDFNSRVLWLRQRIWKHV\VWHP
■
'LVN$FWLYLW\/('VRQHDFKKDUGGULYHWXUQJUHHQZKHQWKHGLVN
LVDFFHVVHG
■
HEX]]HULFRQLQGLFDWHVWKHSRVLWLRQRIWKHLQWHUQDOVSHDNHU
HP Integrity rx2600 server and HP workstation zx6000 Getting Started Guide
Setting Up and Using Your System
7
6
5
4
3
1
Front Panel, Tower Configuration
1
2
3
4 5
6 7
Front Panel, Rack-mounted Configuration
1 e-buzzer Icon
5 System LED
2 Locator LED and Button
(rack-mounted system only)
6 Power Button
3 Diagnostic LEDs 1-4
7 Power LED
(active only on zx6000 workstations
with no MP card installed)
4 LAN LED
HP Integrity rx2600 server and HP workstation zx6000 Getting Started Guide
1–3
Setting Up and Using Your System
rear panel
7KHUHDUSDQHOKDVWKHIROORZLQJIHDWXUHV
1–4
■
&RQQHFWRUVDUHVKDSHGWRJRLQRQHZD\RQO\WRSUHYHQW
LPSURSHUFDEOHDWWDFKPHQW
■
3RUWVDUHODEHOHGIRUHDV\LGHQWLILFDWLRQ
■
0DQDJHPHQW3URFHVVRU03SRUWVDUHSRVLWLRQHGDERYH
UDFNPRXQWRUWRWKHULJKWRIWRZHUVWDQGDUGFRQQHFWRUV
RSWLRQDORQ][ZRUNVWDWLRQ
■
/$1/('VSURYLGHDGGLWLRQDOLQIRUPDWLRQ
❏
)RXU*LJDELW/$1/('V
❏
7ZR6\VWHP0DQDJHPHQW/$1/('V
❏
)RXU03/$1/('VRSWLRQDORQ][ZRUNVWDWLRQ
■
0RQLWRU&RQQHFWRURQJUDSKLFVFDUG][ZRUNVWDWLRQV
PD\LQFOXGHJUDSKLFVFDUGVZLWKVLQJOHRUPXOWLSOHPRQLWRU
VXSSRUW
■
/RFDWRU/('UDFNPRXQWFRQILJXUDWLRQRQO\LGHQWLILHVWKHUDFN
SRVLWLRQRIWKHV\VWHP
HP Integrity rx2600 server and HP workstation zx6000 Getting Started Guide
Setting Up and Using Your System
1
2
14
3
4
13 12 11 10 9
56
7
8
Rear Panel Connectors
1 Power (PWR2)
8 USB ports
(mouse and keyboard
ports labelled)
2 Power (PWR1)
9 TOC button
3 MP VGA, serial, LAN, reset
(optional on zx6000 workstation)
10 Locator LED and button
4 System lock
11 10/100 LAN
5 Serial port A (console)
12 LAN LEDs
6 Serial port B
13 10/100/1000 LAN
7 Monitor connector(s)
(zx6000 workstation only)
14 LVD/SE SCSI
HP Integrity rx2600 server and HP workstation zx6000 Getting Started Guide
1–5
Setting Up and Using Your System
setting up your system
Å
WARNING: If you have any doubt that you can lift the system or monitor
safely, do not try to move them without help.
&KHFNWKHPDWHULDOVOLVWVKLSSHGZLWK\RXUV\VWHPWRYHULI\WKDW
\RXKDYHDOORIWKHFRPSRQHQWV
3RVLWLRQWKHV\VWHPVRWKDWLWVUHDUFRQQHFWRUVDUHHDVLO\
DFFHVVLEOH
1–6
❏
,IWKHV\VWHPLVDWRZHUFRQILJXUDWLRQSODFHWKHV\VWHPLQDQ
DUHDZLWKHDVLO\DFFHVVLEOHSRZHURXWOHWVDQGHQRXJKVSDFH
IRUWKHNH\ERDUGPRXVHDQGDQ\RWKHUDFFHVVRULHV
❏
,IWKHV\VWHPLVWREHUDFNPRXQWHGUHIHUWRWKHPRXQWLQJ
LQVWUXFWLRQVSURYLGHGZLWK\RXUV\VWHP
HP Integrity rx2600 server and HP workstation zx6000 Getting Started Guide
Setting Up and Using Your System
tools
<RXGRQRWQHHGDQ\WRROVWRVHWXS\RXUV\VWHP,I\RXSODQWRLQVWDOO
DGGLWLRQDOKDUGZDUHFRPSRQHQWV\RXQHHG
Å
■
)ODWEODGHVFUHZGULYHU
■
77RU[GULYHU
■
6SHFLDOSURFHVVRUWRROSURYLGHGZLWKSURFHVVRU
■
6WDWLFIUHHPDW
■
6WDWLFVWUDS
WARNING: Metallic particulates can be especially harmful around electronic
equipment. This type of contamination may enter the data center environment
from a variety of sources, including, but not limited to, raised floor tiles, worn
air conditioning parts, heating ducts, rotor brushes in vacuum cleaners or
printer component wear. Because metallic particulates conduct electricity, they
have an increased potential for creating short circuits in electronic equipment.
This problem is exaggerated by the increasingly dense circuitry of any
electronic equipment.
Over time, very fine whiskers of pure metal can form on electroplated zinc,
cadmium, or tin surfaces. If these whiskers are disturbed, they may break off
and become airborne, possibly causing failures or operational interruptions. For
over 50 years, the electronics industry has been aware of the relatively rare, but
possible, threat posed by metallic particulate contamination. During recent
years, a growing concern has developed in computer rooms where these
conductive contaminants are formed on the bottom of some raised floor tiles.
Although this problem is relatively rare, it may be an issue within your computer
room. Since metallic contamination can cause permanent or intermittent failures
on your electronic equipment, Hewlett-Packard strongly recommends that your
site be evaluated for metallic particulate contamination before installation of
electronic equipment.
HP Integrity rx2600 server and HP workstation zx6000 Getting Started Guide
1–7
Setting Up and Using Your System
connecting devices
%HIRUHFRQQHFWLQJDQ\FRUGVRUFDEOHVWR\RXUV\VWHPSOHDVHUHDGWKH
:DUQLQJ1RWLFHVLQWKHIURQWRIWKLVPDQXDO
keyboard, mouse and power
7KHU[DQG][V\VWHPVVKLSZLWKD86%NH\ERDUGDQG
PRXVH
3OXJWKHNH\ERDUGDQGPRXVHLQWR86%FRQQHFWRUVRQWKHUHDU
SDQHORIWKHFRPSXWHU3RUWVDUHODEHOOHG
7KHUHDUHWZRSRZHUUHFHSWDFOHVRQWKHUHDUSDQHORIWKHV\VWHP
Å
1–8
,I\RXSXUFKDVHG\RXUV\VWHPZLWKRXWDVHFRQGSRZHUVXSSO\
FRYHUWKHVHFRQGUHFHSWDFOH3:5ZLWKDSODVWLFFDS
WARNING: For your safety always connect equipment to a grounded wall
outlet. Always use a power cord with a properly grounded plug, such as the
one provided with the system, or one in compliance with your national safety
standards. This equipment can be disconnected from the power by removing
the power cord from the power outlet. The equipment must be located close to
an easily accessible power outlet.
HP Integrity rx2600 server and HP workstation zx6000 Getting Started Guide
Setting Up and Using Your System
graphics cards and monitors
,QWHJULW\U[VHUYHUVDQG][ZRUNVWDWLRQVZLWK0DQDJHPHQW
3URFHVVRU03FDUGVVXSSRUWD9*$PRQLWRUFRQQHFWHGWRWKH9*$
SRUWRQWKH03FDUG
][ZRUNVWDWLRQVZLWKQR03FDUGVDUHDYDLODEOHZLWKDUDQJHRI
$*3JUDSKLFVFDUGV
■
*UDSKLFVFDUGVPD\LQFOXGHDQSLQFRQQHFWRUDQSLQ
FRQQHFWRURUERWK2QO\RQHFRQQHFWLQJFDEOHLVQHHGHGIRUHDFK
PRQLWRU
■
6RPHYLGHRFDUGVDUHSUHLQVWDOOHGLQWKHV\VWHPZKLOHRWKHUVDUH
SDFNDJHGVHSDUDWHO\DQGVKLSSHGZLWKWKHV\VWHP,I\RXU
ZRUNVWDWLRQGLGQRWVKLSZLWKDSUHLQVWDOOHGJUDSKLFVFDUG\RX
PXVWLQVWDOOWKHFDUGDQGORDGWKHGULYHUV5HIHUWRWKH
GRFXPHQWDWLRQLQFOXGHGZLWK\RXUJUDSKLFVFDUGIRULQVWUXFWLRQV
■
)UHTXHQFLHVRI+]DQGKLJKHUSURYLGHIOLFNHUIUHHYLHZLQJ
■
,IWKHPRQLWRU\RXVHOHFWLV''&%RU''&%FRPSOLDQWWKH
JUDSKLFVFDUGDXWRPDWLFDOO\OLPLWVLWVHOIWRWKRVHUHVROXWLRQVDQG
IUHTXHQFLHVVXSSRUWHGE\WKDWPRQLWRU,QWKLVFDVH\RXGRQRW
QHHGWRXVHWKHWDEOHVWRVHOHFW\RXUPRQLWRU
■
)RUDFRPSOHWHDQGFXUUHQWOLVWRIVXSSRUWHGFDUGVZLWKVXSSRUWHG
GLVSOD\UHVROXWLRQVDQGIUHTXHQFLHVVHH
❏
Ä
http://partsurfer.hp.com
CAUTION: To prevent possible damage to your monitor, make sure you select
a monitor that supports the resolutions and frequencies you wish to use.
■
)RUPRUHGHWDLOHGLQIRUPDWLRQDERXW\RXUJUDSKLFVFDUGVHHWKH
PDQXIDFWXUHU©VZHEVLWH
❏
$7,www.ati.com
❏
19,',$www.NVIDIA.com
HP Integrity rx2600 server and HP workstation zx6000 Getting Started Guide
1–9
Setting Up and Using Your System
starting and stopping your system
+3,QWHJULW\U[VHUYHUVDQG][ZRUNVWDWLRQVFRPHLQPDQ\
GLIIHUHQWFRQILJXUDWLRQV3D\FDUHIXODWWHQWLRQWRWKHGLUHFWLRQVEHORZ
DQGFKRRVHWKHRSWLRQVWKDWPDWFKWKH26DQGSDFNDJLQJ\RX
SXUFKDVHG
starting your system
7RVWDUW\RXUV\VWHP
7XUQRQWKHPRQLWRUEHIRUH\RXVWDUW\RXUV\VWHP
3UHVVWKHSRZHUEXWWRQRQWKHIURQWSDQHO7KHV\VWHPVWDUWV
'XULQJV\VWHPVWDUWXSWKHGLVSOD\PD\UHPDLQEODQNIRUXSWR
RQHPLQXWH7KLVLVQRUPDO
,IWKHV\VWHPKDVDQ03FDUGWKHV\VWHPOLJKWEOLQNV
,IWKHV\VWHPGRHVQRWKDYHDQ03FDUGWKHIROORZLQJVKRXOG
RFFXU
❏
3RZHU/('WXUQVRQ
❏
6\VWHP/('EOLQNVRQDQGRII
❏
2Q][ZRUNVWDWLRQVZLWKQR03FDUGLQVWDOOHG
GLDJQRVWLF/('VFUHDWHVFUROOLQJSDWWHUQ
,I\RXDUHSURPSWHGIRUDSDVVZRUGW\SHLWDQGSUHVV(QWHU
7KHSURPSWGLVSOD\VRQO\LI\RXKDYHVHWDSDVVZRUGXVLQJWKH
([WHQVLEOH)LUPZDUH,QWHUIDFH(),6HH¦0DQDJHPHQW
3URFHVVRU§RQSDJH
1–10
HP Integrity rx2600 server and HP workstation zx6000 Getting Started Guide
Setting Up and Using Your System
initializing your software
7KHU[DQG][FDQEHFRQILJXUHGZLWKWKH2SHUDWLQJ6\VWHP
26SUHLQVWDOOHGRUSDFNDJHGVHSDUDWHO\
■
,I\RXSXUFKDVHGDV\VWHPZLWKWKH26SUHLQVWDOOHGWKH
LQLWLDOL]DWLRQSURFHVVVWDUWVZKHQ\RXVWDUWWKHZRUNVWDWLRQIRUWKH
ILUVWWLPH
7KHVRIWZDUHLQLWLDOL]DWLRQSURFHVVWDNHVDIHZPLQXWHV<RXFDQ
FKDQJHWKHVHWWLQJVDIWHUWKHVRIWZDUHKDVEHHQLQLWLDOL]HG
Ä
CAUTION: Do NOT switch OFF the system while the software is being
initialized — this could cause unexpected results.
7KHLQLWLDOL]DWLRQSURFHVV
■
❏
'LVSOD\VWKHOLFHQVHDJUHHPHQW
❏
$VNVTXHVWLRQVDERXWWKHV\VWHP
,I\RXSXUFKDVHGDV\VWHPDQGWKH26LVQRWSUHLQVWDOOHGLQVWDOO
WKH26QRZ
❏
+38;)ROORZWKHLQVWUXFWLRQVRQWKH+38;&'HQYHORSH
❏
/LQX[8VHWKH+3(QDEOHPHQW.LWIRU/LQX[&'DQGIROORZ
WKHLQVWUXFWLRQVLQLWVDFFRPSDQ\LQJERRNOHW
❏
:LQGRZV:LQGRZVLVDOZD\VSUHLQVWDOOHGRQ][
ZRUNVWDWLRQV8VHWKH+36PDUW6HWXS'9'WREHJLQWKH
VRIWZDUHVHWXSSURFHVVRQ,QWHJULW\U[VHUYHUV
turning off your system
7RWXUQRIIWKHV\VWHP
([LWDOODSSOLFDWLRQV
([HFXWHWKH6KXW'RZQFRPPDQGSURYLGHGE\\RXU26
:KHQSURPSWHGSUHVVWKHSRZHUEXWWRQRQ\RXUV\VWHP
127(<RXFDQDOVRVKXWGRZQXVLQJWKHSRZHUEXWWRQRQWKH
V\VWHP:KHQ\RXSUHVVWKHSRZHUEXWWRQWKH2:VKXWVGRZQDQG
WKHSRZHUWXUQVRII
HP Integrity rx2600 server and HP workstation zx6000 Getting Started Guide
1–11
Setting Up and Using Your System
installing hardware components
,I\RXSXUFKDVHGDQDFFHVVRU\FDUGDJUDSKLFVFDUGRURWKHU
KDUGZDUHFRPSRQHQWVWKDWZHUHQRWLQVWDOOHGLQ\RXUV\VWHPDWWKH
IDFWRU\\RXPXVWLQVWDOOWKRVHFRPSRQHQWVQRZ
Å
WARNING: For most hardware installation procedures, you must power off
the system and unplug the power cord from the outlet.
127(7RPDLQWDLQ)&&(0,(OHFWURPDJQHWLF,QWHUIHUHQFH
FRPSOLDQFHUHSODFHDOOFRYHUVDQGPDNHVXUHDOOVFUHZVDUHSURSHUO\
VHDWHGDIWHU\RXUHSODFHFRPSRQHQWV
,I\RXKDYHDOUHDG\FRQQHFWHGDQGWXUQHGRQWKHV\VWHPWXUQRII
WKHV\VWHPDQGGLVFRQQHFWDOOFDEOHVIURPWKHUHDUSDQHO
5HPRYHWKHV\VWHPDFFHVVFRYHUV
,QVWDOOWKHQHZFRPSRQHQWV
❏
6HHWKH,QVWDOODWLRQ3RVWHUSURYLGHGZLWK\RXUV\VWHPIRUWKH
ORFDWLRQRILQWHUQDOFRPSRQHQWV
❏
)RUGHWDLOHGLQVWUXFWLRQVRQLQVWDOOLQJKDUGZDUHFRPSRQHQWV
VHHWKHKSU[][2SHUDWLRQDQG0DLQWHQDQFH*XLGH
5HSODFHWKHV\VWHPDFFHVVFRYHUV
&RQQHFWWKHV\VWHP
1–12
HP Integrity rx2600 server and HP workstation zx6000 Getting Started Guide
Setting Up and Using Your System
firmware and drivers
7RGRZQORDGWKHODWHVWGULYHUVDQGILUPZDUHIRU\RXU
*RWRhttp://www.hp.com/go/bizsupport
)ROORZWKHPHQXSURPSWVWRQDYLJDWHWRWKHVXSSRUWSDJH
◆
6HOHFW download drivers/software
◆
(QWHUWKHSURGXFWQDPHLQWKHVHDUFKILHOGrx2600 RU
zx6000
◆
6HOHFWWKHVHDUFKUHVXOW
◆
&KRRVHWKHGULYHURUILUPZDUHXSJUDGH\RXQHHGWR
GRZQORDG
◆
&OLFNWKHi LQIRUPDWLRQLFRQIRULQVWUXFWLRQVRQKRZWR
GRZQORDGXQSDFNDQGLQVWDOOWKHGULYHURUILUPZDUH
XSJUDGH
7KHVHZHEVLWHVFRQWDLQDZLGHUDQJHRIIUHHLQIRUPDWLRQLQFOXGLQJ
GRZQORDGDEOHGRFXPHQWDWLRQVHUYLFHDQGVXSSRUWRSWLRQVDQGWKH
ODWHVWYHUVLRQVRIGULYHUVDQGXWLOLWLHV<RXDOVRFDQREWDLQLQVWUXFWLRQV
RQKRZWRXSJUDGHILUPZDUHDQGUHJLVWHUWRDXWRPDWLFDOO\UHFHLYH
LQIRUPDWLRQRQQHZGULYHUDYDLODELOLW\
HP Integrity rx2600 server and HP workstation zx6000 Getting Started Guide
1–13
Setting Up and Using Your System
configuring your system
7KUHHWRROVDUHDYDLODEOHWRFRQILJXUH\RXUV\VWHP
■
([WHQVLEOH)LUPZDUH,QWHUIDFH(),SDJH
■
0DQDJHPHQW3URFHVVRU03RSWLRQDORQ][ZRUNVWDWLRQV
SDJH
■
%DVHERDUG0DQDJHPHQW&RQWUROOHU%0&SDJH
7KLVVHFWLRQSURYLGHVDEULHILQWURGXFWLRQWRWKHVHWRROV)RUFRPSOHWH
LQIRUPDWLRQUHIHUWR¦6\VWHP&RQILJXUDWLRQ§LQWKHKSU[][
2SHUDWLRQDQG0DLQWHQDQFH*XLGH
extensible firmware interface
7KH([WHQVLEOH)LUPZDUH,QWHUIDFH(),LVDQLQWHUIDFHWKDWDOORZV
\RXWRFRQILJXUHWKH,WDQLXP3URFHVVRU)DPLO\,3)ILUPZDUH7KH
(),PHQXLQFOXGHVWKHIROORZLQJRSWLRQV
1–14
■
7KHEFI Shell [Built-in]LVDFRPPDQGOLQHLQWHUIDFHWKDWDOORZV
\RXWRRSHUDWHWKH(),FRPPDQGVRUFUHDWHDQGUXQDXWRPDWHG
VFULSWV6HHSDJH
■
Boot Option Maintenance MenuDOORZV\RXWRVHOHFWWKH
RUGHURIWKHGHYLFHVIURPZKLFK\RXZDQWWKHILUPZDUHWRDWWHPSW
WRERRWWKH26<RXFDQDOVRFRQILJXUHWKHV\VWHPWRERRWIURPD
FRQILJXUDWLRQILOH6HHSDJH
■
2QV\VWHPVZLWK(),ILUPZDUHYHUVLRQRUKLJKHUWKHSystem
Configuration Menu OHWV\RXYLHZWKHV\VWHPFRQILJXUDWLRQ
DQGFKDQJHRUGHOHWHDGPLQLVWUDWRUDQGXVHUSDVVZRUGV6HH
SDJH
■
2QV\VWHPVZLWK(),ILUPZDUHYHUVLRQRUORZHUWKH
Security/Password MenuOHWV\RXDGGFKDQJHDQGGHOHWH
V\VWHPDGPLQLVWUDWRUDQGXVHUSDVVZRUGV6HHSDJH
HP Integrity rx2600 server and HP workstation zx6000 Getting Started Guide
Setting Up and Using Your System
<RXFDQDFFHVVWKH(),GLUHFWO\ZKHQ\RXERRWWKHV\VWHPRUE\
UHPRWHDFFHVV
:KHQ\RXWXUQRQ\RXUV\VWHPDQGLWEHJLQVWRVWDUWXS\RXUV\VWHP
SDXVHVDWWKHboot optionVFUHHQ
EFI Boot Manager ver x.xx [xx.xx]
Please select a boot option
[\RXU26]
EFI Shell [Built-in]
Boot option maintenance menu
Security/Password Menu
Use up and down arrows to change option(s).
Use Enter to select an option.
127(7KHV\VWHPSDXVHVIRUVHYHQVHFRQGVWRDOORZ\RXWRFKDQJH
WKHERRWRSWLRQEHIRUHERRWLQJWRWKHGHIDXOW267RFKDQJHWKHSDXVH
GXUDWLRQVHOHFWSet Auto Boot TimeOutIURPWKHBoot Options
Maintenance MenuSDJH
8VHWKHXSRUGRZQDUURZNH\VWRKLJKOLJKWDQRSWLRQWKHQSUHVV
EnterWRDFWLYDWHDVHOHFWLRQ
HP Integrity rx2600 server and HP workstation zx6000 Getting Started Guide
1–15
Setting Up and Using Your System
7RDFFHVVWKH(),UHPRWHO\
:LWKWKHZRUNVWDWLRQWXUQHGRIIFRQQHFWWKHVHULDOFDEOHSURYLGHG
ZLWK\RXUV\VWHP+3SDUWQXPEHURUDFRPSDWLEOH
FDEOHWR6HULDO3RUW$RQWKHUHDUSDQHORIWKHZRUNVWDWLRQDQGWR
\RXUUHPRWHGHYLFH
&RQILJXUHWKHWHUPLQDOHPXODWLRQVRIWZDUHZLWKWKHVHVHWWLQJV
❏
%DXGUDWH
❏
%LWV
❏
3DULW\1RQH
❏
6WRS%LWVRQH
❏
)ORZ&RQWURO;21;2))
8VLQJWKHWHUPLQDOHPXODWLRQVRIWZDUHFRQQHFWWRWKH
ZRUNVWDWLRQZLWKDGLUHFWFRQQHFWLRQ
127(7KHGHIDXOWWHUPLQDOHPXODWLRQW\SHLV977KLVVHWWLQJ
FDQEHFKDQJHGIURPWKH(),Boot Options Maintenance Menu
7XUQRQWKHZRUNVWDWLRQDQGIROORZWKHVWHSVEHORZWRDFFHVV
WKH(),
1–16
HP Integrity rx2600 server and HP workstation zx6000 Getting Started Guide
Setting Up and Using Your System
using the EFI shell
7RDFFHVVWKH(),VKHOO
:KHQWKH(),ERRWRSWLRQVFUHHQGLVSOD\VXVHWKHDUURZNH\VWR
KLJKOLJKW(),6KHOOWKHQSUHVV(QWHU
$OLVWRIILOHV\VWHPVGULYHVDQGSDUWLWLRQVDQGEORFNGHYLFHVRQ
KDUGGULYHVLVGLVSOD\HG)RUH[DPSOH
Device mapping table
fs0: Acpi(HWP0002,100)/Pci(1|0)/Scsi(Pun0,Lun0)/HD(Part1,Sig00112233)
blk0: Acpi(HWP0002,0)/Pci(2|0)/Ata(Primary,Master)
blk1: Acpi(HWP0002,100)/Pci(1|0)/Scsi(Pun0,Lun0)
7KH(),VKHOOILUVWVHDUFKHVIRUDQRSWLRQDOVFULSWILOHQDPHG
startup.nsh
❏
,IWKLVILOHLVIRXQGLWLVH[HFXWHGDXWRPDWLFDOO\
❏
,IWKHVFULSWGRHVQRWDXWRPDWLFDOO\VWDUWDQ26RURWKHU
DSSOLFDWLRQWKHVKHOOWKHQZDLWVIRUFRPPDQGVWREHHQWHUHG
DWWKHFRPPDQGSURPSW
HP Integrity rx2600 server and HP workstation zx6000 Getting Started Guide
1–17
Setting Up and Using Your System
<RXFDQQRZHQWHUFRPPDQGV
7RUXQDQLQGLYLGXDOFRPPDQG
D 7\SHWKHFRPPDQGDWWKHVKHOOSURPSW)RUH[DPSOHWRFOHDU
WKHGLVSOD\RQWKHPRQLWRU
Shell:\> cls
E 3UHVV(QWHUWRH[HFXWHWKHFRPPDQG
◆
6RPHFRPPDQGVUHTXLUHDGGLWLRQDODUJXPHQWVWRIXUWKHU
GHILQHWKHLUDFWLRQ)RUH[DPSOHWRGLVSOD\LQIRUPDWLRQ
DERXWWKHV\VWHPPHPRU\\RXPXVWW\SHWKHFRPPDQG
QDPHSOXVWKHGHVLUHGFDWHJRU\RILQIRUPDWLRQWRGLVSOD\
fs0:\> info mem
◆
:KHQ\RXHQWHULQGLYLGXDOFRPPDQGVDWWKHFRPPDQG
SURPSWWKHVKHOOSHUIRUPVYDULDEOHVXEVWLWXWLRQWKHQ
H[SDQGVZLOGFDUGVEHIRUHWKHFRPPDQGLVH[HFXWHG
◆
7RVZLWFKWRDGLIIHUHQWILOHV\VWHPH[HFXWHWKH
IROORZLQJZKHUHfsxLVWKHVHOHFWHGILOHV\VWHPDVOLVWHG
RQWKHVFUHHQVHHVWHS)RUH[DPSOH
Shell> fs0:
<RXVHHWKLVSURPSW
fs0:\> _
◆
<RXFDQDOVRUXQ(),DSSOLFDWLRQVILOHVHQGLQJZLWK
.efi7ROLVWDSSOLFDWLRQVLQWKHFXUUHQWILOHV\VWHPUXQ
WKHlsFRPPDQG)RUH[DPSOH
fs0:> ls
<RXVHHDOLVWRIDSSOLFDWLRQVRQWKHfs0ILOHV\VWHP
1–18
HP Integrity rx2600 server and HP workstation zx6000 Getting Started Guide
Setting Up and Using Your System
7KHIROORZLQJVHFWLRQSURYLGHVDOLVWRI(),FRPPDQGFDWHJRULHV)RU
PRUHLQIRUPDWLRQVHHWKHKSU[][2SHUDWLRQDQG
0DLQWHQDQFH*XLGHRUXVHWKH(),VKHOOKHOSV\VWHP
7RDFFHVVD
■
/LVWRI(),FRPPDQGFODVVHVH[HFXWHhelpDWWKH(),VKHOO
SURPSW
■
'HWDLOHGGHVFULSWLRQRIDFRPPDQGH[HFXWHhelpDQGWKH
FRPPDQGQDPHDWWKH(),VKHOOSURPSW)RUH[DPSOH
fs0:\> help date
(),FRPPDQGVDUHRUJDQL]HGLQWRGLIIHUHQWFODVVHVEDVHGRQWKHLU
IXQFWLRQV7KHFODVVHVLQFOXGH
■
boot¥%RRWRSWLRQVDQGGLVNUHODWHGFRPPDQGV
■
configuration¥&KDQJHDQGUHWULHYHV\VWHPLQIRUPDWLRQ
■
device¥*HWGHYLFHGULYHUDQGKDQGOHLQIRUPDWLRQ
■
memory¥0HPRU\UHODWHGFRPPDQGV
■
shell¥%DVLFVKHOOQDYLJDWLRQDQGFXVWRPL]DWLRQ
■
scripts¥(),VKHOOVFULSWFRPPDQGV
HP Integrity rx2600 server and HP workstation zx6000 Getting Started Guide
1–19
Setting Up and Using Your System
using the boot option maintenance menu
7KLVPHQXDOORZV\RXWRVHOHFWFRQVROHRXWSXWDQGLQSXWGHYLFHVDV
ZHOODVYDULRXVERRWRSWLRQV7R
■
GLVSOD\WKHKHOSDYDLODEOHIRUWKHFRPPDQGVHOHFW+HOS
■
UHWXUQWRWKHPDLQ%RRW2SWLRQV0DLQWHQDQFHPHQXVHOHFW([LW
■
KLJKOLJKWDQLWHPXVLQJWKHDUURZNH\VWKHQSUHVV(QWHU
■
VDYH\RXUFKDQJHVVHOHFW6DYH6HWWLQJVWR195$0
127(,I\RXDUHXVLQJWKH(),6KHOO\RXPXVWH[LWWKHVKHOODQG
UHWXUQWRWKH(),%RRW0DQDJHUWRDFFHVVWKH%RRW2SWLRQV
0DLQWHQDQFH0HQX
7KHBoot Option Maintenance MenuFRQWDLQVWKHVHRSWLRQV
■
Boot from a File OHWV\RXPDQXDOO\UXQDVSHFLILFDSSOLFDWLRQRU
GULYHU
■
Add a Boot Option OHWV\RXDGGLWHPVWRWKH(),ERRWPHQX
■
Delete Boot Option(s) OHWV\RXUHPRYHRSWLRQVIURPWKH(),
ERRWPHQX
■
Change Boot Order OHWV\RXFKDQJHWKHRUGHURIERRWRSWLRQV
7KHRUGHULQZKLFKRSWLRQVDUHOLVWHGLQWKH(),ERRWPHQXDOVR
UHIOHFWVWKHRUGHULQZKLFKWKHV\VWHPDWWHPSWVWRERRW
■
Manage BootNext Setting OHWV\RXVHOHFWDERRWRSWLRQWREH
H[HFXWHGRQWKHQH[WV\VWHPERRW7KLVGRHVQRWFKDQJHWKH
SHUPDQHQWV\VWHPERRWVHWWLQJV
■
Set Auto Boot TimeOut VHWVWKHDPRXQWRIWLPHWKHV\VWHP
SDXVHVEHIRUHDWWHPSWLQJWRODXQFKWKHILUVWLWHPLQWKH%RRW
2SWLRQVOLVW
1–20
HP Integrity rx2600 server and HP workstation zx6000 Getting Started Guide
Setting Up and Using Your System
■
Select Active Console Output Devices OHWV\RXGHILQH
GHYLFHVWRGLVSOD\RXWSXWIURPWKHV\VWHPFRQVROH
❏
7RVHOHFWDPRQLWRUFRQQHFWHGWRWKH039*$SRUWFKRRVH
Acpi (HWP0002, 700)/Pci(2|0).
❏
7RVHOHFWDPRQLWRUFRQQHFWHGWRDQ$*3JUDSKLFVFDUG
FKRRVHAcpi (HWP0003, 0)/Pci(0|0).
127(6RPHRSHUDWLQJV\VWHPVVXSSRUWPXOWLSOHFRQVROHVVXFKDVD
VLPXOWDQHRXVVHULDODQG9*$RXWSXW6HH\RXU26GRFXPHQWDWLRQ
WRGHWHUPLQHKRZPDQ\FRQVROHVDUHVXSSRUWHGZLWK\RXUV\VWHP
0XOWLSOHFRQVROHVDUHQRWVXSSRUWHGIRU+38;RU:LQGRZVXVHWKH
6PDUW6HWXS&'WRVZLWFKEHWZHHQ&20$DQGWKH03RQ:LQGRZV
V\VWHPV
■
Select Active Console Input Devices OHWV\RXGHILQHGHYLFHV
WRSURYLGHLQSXWWRWKHV\VWHPFRQVROH
■
Select Active Standard Error Devices OHWV\RXGHILQHWKH
GHYLFHVWKDWGLVSOD\HUURUPHVVDJHVIURPWKHV\VWHPFRQVROH
■
Cold Reset VKXWVGRZQDQGUHVWDUWVWKHV\VWHP
■
Exit UHWXUQVWRWKH(),VWDUWXSPHQX
HP Integrity rx2600 server and HP workstation zx6000 Getting Started Guide
1–21
Setting Up and Using Your System
using the system configuration menu
7KH System Configuration Menu DYDLODEOHRQV\VWHPVZLWK(),
ILUPZDUHYHUVLRQRUKLJKHULQFOXGHVWKHIROORZLQJRSWLRQV
7KHSecurity/Password MenuOHWV\RXFKDQJHWKH
DGPLQLVWUDWRUDQGXVHUSDVVZRUGV
■ 7KHAdvanced System Information Menu GLVSOD\V
LQIRUPDWLRQDERXWV\VWHPDQGFRPSRQHQWFRQILJXUDWLRQ
■
1–22
■
Set System DateOHWV\RXPRGLI\WKHV\VWHPGDWH
■
Set System Time OHWV\RXPRGLI\WKHV\VWHPWLPH
■
Reset Configuration to Default OHWV\RXUHVWRUHV\VWHP
VHWWLQJVWRWKHLURULJLQDOFRQILJXUDWLRQ
■
HelpGLVSOD\VDGGLWLRQDOLQIRUPDWLRQDERXWWKHDYDLODEOHRSWLRQV
■
Exit UHWXUQVWRWKH(),VWDUWXSPHQX
HP Integrity rx2600 server and HP workstation zx6000 Getting Started Guide
Setting Up and Using Your System
security/password menu
<RXFDQVHWDGPLQLVWUDWRUDQGXVHUSDVVZRUGVWRSURYLGHGLIIHUHQW
OHYHOVRIDFFHVVWRWKHV\VWHPILUPZDUH
■
7KH$GPLQLVWUDWRUFDQDFFHVVDQGFKDQJHDOOVHWWLQJVLQWKH(),
%RRW0DQDJHUSURJUDPDQGFDQUXQWKH(),VKHOO
■
7KH8VHUFDQDFFHVVEDVLFIXQFWLRQVLQWKH(),%RRW0DQDJHU
127(7KHVHDUHQRW26SDVVZRUGV7KHVHSDVVZRUGVOLPLWDFFHVV
WRWKHILUPZDUHLQWHUIDFHRQO\)RULQIRUPDWLRQRQVHWWLQJ26
SDVVZRUGVVHH\RXU26XVHUJXLGH
7RDGGFKDQJHRUGHOHWHSDVVZRUGV
6HOHFW Security/Password Menu
6HOHFWHLWKHU
❏
❏
Set Administrator Options
Set User Options
6HOHFW
❏
Set Administrator Password RUSet User PasswordWR
VHWDQHZSDVVZRUG
❏
Enable/disable PasswordWRVSHFLI\ZKHWKHUDSDVVZRUG
LVUHTXLUHG
❏
HelpIRUDVVLVWDQFH
4. :KHQ\RXDUHILQLVKHGVHOHFWExit
HP Integrity rx2600 server and HP workstation zx6000 Getting Started Guide
1–23
Setting Up and Using Your System
advanced system configuration menu
7KHAdvanced System Configuration MenuGLVSOD\V
■
DOOV\VWHPLQIRUPDWLRQ
■
V\VWHPLQIRUPDWLRQ
■
SURFHVVRULQIRUPDWLRQ
■
FDFKHLQIRUPDWLRQ
■
PHPRU\LQIRUPDWLRQ
■
ERRWDEOHGHYLFHVLQIRUPDWLRQ
■
ERRWLQIRUPDWLRQ
■
ILUPZDUHLQIRUPDWLRQ
■
ZDUQLQJDQGVWRSERRWLQIRUPDWLRQ
■
FKLSUHYLVLRQLQIRUPDWLRQ
using the security/password menu
7KHSecurity/Password MenuRQV\VWHPVZLWK(),ILUPZDUH
YHUVLRQRUORZHULVLGHQWLFDOWRWKHVHFXULW\SDVVZRUGVXEPHQXRI
WKHSystem Configuration Menu6HHSDJH
1–24
HP Integrity rx2600 server and HP workstation zx6000 Getting Started Guide
Setting Up and Using Your System
management processor
7KH0DQDJHPHQW3URFHVVRU03LVDQLQGHSHQGHQWVXSSRUW
SURFHVVRUIRUWKHV\VWHPFRQVROH03SURYLGHVVHUYLFHVWKDWIDFLOLWDWH
WKHPDQDJHPHQWRIWKHKRVWV\VWHP
127(1RWDOOV\VWHPVLQFOXGHD03FDUG7RGHWHUPLQHLIWKHFDUGLV
LQVWDOOHGORRNDWWKHEDFNSDQHORI\RXUV\VWHP,IWKH03FDUGLV
LQVWDOOHG\RXZLOOVHHDSLQ6HULDO3RUW
Feature
Description
Always on
capability
The MP is alive as long as the power cord is
plugged in.
User/password
access control
The users supported are both operators and
administrator.
Multiple access
methods
The MP console can be accessed by direct
monitor connection, using a terminal or laptop
with a direct serial connection, by modem, or by
telnet or web browser on the LAN.
Mirrored console
The system console output stream is reflected to
all of the connected console users. Any user can
provide input provided the right console is
selected and the serial console is deselected.
Console display
and event logs
The system console, system event logs (chassis
codes), Virtual Front Panel (VFP) and system
power and configuration status provide
information for the user.
An independent,
non-mirrored
session
This is available from local and modem ports for
MP connection (CSP), or OS login (SE).
Additional features Additional features include: power control, system
reset, and Transfer of Control (TOC).
)RUPRUHLQIRUPDWLRQVHH¦6\VWHP&RQILJXUDWLRQ§LQWKHKS
U[][2SHUDWLRQDQG0DLQWHQDQFH*XLGH
HP Integrity rx2600 server and HP workstation zx6000 Getting Started Guide
1–25
Setting Up and Using Your System
baseboard management controller
7KH%DVHERDUG0DQDJHPHQW&RQWUROOHU%0&VXSSRUWVWKH
LQGXVWU\VWDQGDUG,QWHOOLJHQW3ODWIRUP0DQDJHPHQW,QWHUIDFH,30,
VSHFLILFDWLRQ7KLVVSHFLILFDWLRQGHVFULEHVWKHPDQDJHPHQWIHDWXUHV
WKDWKDYHEHHQEXLOWLQWRWKHV\VWHPERDUG7KHVHIHDWXUHVLQFOXGH
■
ORFDODQGUHPRWHGLDJQRVWLFV
■
FRQVROHVXSSRUW
■
FRQILJXUDWLRQPDQDJHPHQW
■
KDUGZDUHPDQDJHPHQW
■
WURXEOHVKRRWLQJ
)RUDFRPSOHWHOLVWLQJRI%0&&RPPDQGVVHHWKH6\VWHP
&RQILJXUDWLRQVHFWLRQLQWKHKSU[][2SHUDWLRQDQG
0DLQWHQDQFH*XLGH
1–26
HP Integrity rx2600 server and HP workstation zx6000 Getting Started Guide
2
troubleshooting
7KLVFKDSWHUFRQWDLQVEDVLFLQIRUPDWLRQWRKHOS\RXJHW\RXU+3
,QWHJULW\U[VHUYHUDQG+3ZRUNVWDWLRQ][XSDQGUXQQLQJLQ
WKHXQOLNHO\HYHQWWKDW\RXH[SHULHQFHDSUREOHP7RSLFVLQFOXGH
■
<RXU6\VWHP'RHV1RW6WDUW3URSHUO\
■
<RX)LQGD+DUGZDUH3UREOHP
❏
.H\ERDUGDQG0RXVH3UREOHPV
❏
*UDSKLFVDQG0RQLWRU3UREOHPV
■
8QGHUVWDQGLQJWKH/('DQGHEX]]HU&RGHV
■
6RIWZDUH'LDJQRVWLFV7RROV
■
5HFRYHULQJWKH26
■
:KHUHWR*HW+HOS
127(,I\RXQHHGWHFKQLFDODVVLVWDQFHFDOOKSDW
86$RUJRWRwww.hp.com/country/us/eng/contact_us.html WR
FRQWDFWKSLQ\RXUUHJLRQ
HP Integrity rx2600 server and HP workstation zx6000 Getting Started Guide
2–1
Troubleshooting
your system does not start properly
The system doesn’t power on.
Make sure...
How
The system’s power cord is properly
connected.
Connect the power cord to a working power
outlet and to the rear of the system.
There is a buzzing noise.
A beep code when the system starts up means that there is a configuration problem. Many of the
e-buzzer codes relate to the LED diagnostic codes. See section “Using the LEDs and e-buzzer to
Troubleshoot Your System.”
Make sure...
How
You identify the error message correctly.
Count the number of beeps after the buzzer (see
“Troubleshooting with the e-buzzer” on
page 2-10). Contact HP Support (see
page 2-19).
If you still have a problem, see “Software Diagnostics Tools” on page 2-13.
2–2
HP Integrity rx2600 server and HP workstation zx6000 Getting Started Guide
Troubleshooting
you find a hardware problem
keyboard problems
The keyboard doesn’t work.
Make sure...
How
The keyboard cable is correctly
connected.
Plug the cable into the correct connector on the back of the
system. (Keyboard port is labelled.)
The keyboard is free of debris.
Check all keys are at the same height, and none are stuck
down.
The keyboard itself is not
defective.
Either replace the keyboard by a known working unit or try
the keyboard with another system.
You are using the correct driver.
Download and install the latest driver.
• For workstations: go to the “Software and Drivers”
section of the HP support site:
www.hp.com/go/bizsupport
• For servers: go to
www.hp.com/support/itaniumservers
• Refer to your OS documentation for instructions on
installing drivers.
You are using the latest firmware.
Download and install the latest firmware.
• For workstations: go to the “Software and Drivers”
section of the HP support site:
www.hp.com/go/bizsupport
• For servers: go to
www.hp.com/support/itaniumservers
HP Integrity rx2600 server and HP workstation zx6000 Getting Started Guide
2–3
Troubleshooting
mouse problems
The mouse doesn’t work.
Make sure...
How
The mouse cable is correctly
connected and the driver has
loaded properly.
Plug the cable into a USB port on the rear panel of the
system. (Mouse port is labelled.)
Reboot the system to reload the mouse driver during startup.
Download and install the latest driver.
You are using the correct driver.
If you are using HP’s enhanced
• For workstations: go to the “Software and Drivers”
mouse, ensure that the correct
section of the HP support site:
driver is installed. This driver is
www.hp.com/go/bizsupport
provided with all Linux preloaded
• For servers: go to
systems.
www.hp.com/support/itaniumservers
• Refer to your OS documentation for instructions on
installing drivers.
You are using the latest firmware.
Download and install the latest firmware.
• For workstations: go to the “Software and Drivers”
section of the HP support site:
www.hp.com/go/bizsupport
• For servers: go to
www.hp.com/support/itaniumservers
The mouse is clean.
Clean the mouse ball as shown below.
The mouse itself is not defective.
Replace the mouse with unit that is known to work or try the
mouse with another system.
If the system starts but you still have a problem, see “Software Diagnostics Tools” on page 2-13.
2–4
HP Integrity rx2600 server and HP workstation zx6000 Getting Started Guide
Troubleshooting
graphics and monitor problems
The monitor doesn’t work.
The system’s power indicator light works but the monitor remains blank.
Make sure...
How
The monitor power cord is correctly
connected.
Ensure the power cord is plugged into a
working grounded power outlet and into the
monitor.
The monitor is switched ON (LED is on).
Refer to the monitor manual for an
explanation of the LED signals.
The graphics card is installed and the video
cable is correctly connected.
Ensure the monitor (video) cable is properly
connected to both the system and the
monitor. Ensure that the cable is connected
to the graphics card connector.
The monitor’s brightness and contrast settings
are correctly set.
Check the settings using the on-screen
display or the controls on the front of the
monitor. See your monitor documentation for
instructions.
The EFI console output settings are correct.
Check and correct the settings using the EFI
Boot Options Maintenance Menu. For
instructions, see page 1-20.
If the system starts and you still have a problem, see “Software Diagnostics Tools” on
page 2-13.
you forgot the EFI password(s)
,I\RXIRUJHW\RXUSDVVZRUGVWKH\FDQEHUHVHWXVLQJDMXPSHURQWKH
V\VWHPERDUG6HHWKHKSU[][2SHUDWLRQDQG0DLQWHQDQFH
*XLGH
HP Integrity rx2600 server and HP workstation zx6000 Getting Started Guide
2–5
Troubleshooting
troubleshooting with the LEDs
6HYHUDO/('VDUHRQWKHIURQWSDQHORIWKHV\VWHP7KHIROORZLQJ
VHFWLRQVGHVFULEHWKHLUIXQFWLRQV
power and system LEDs
7KH3RZHUDQG6\VWHP/('VLQGLFDWHWKHVWDWHRIWKHV\VWHP
Power LED
System LED
State
Off
Off
Off
On (green)
Solid green
Running
On (green)
Blinking green
Booting
On (green)
Blinking orange (1/sec.)
Attention
On (green)
Blinking red (2/sec.)
Fault
locator LED and button
<RXPD\ILQGLWGLIILFXOWWRLGHQWLI\DVSHFLILFFRPSXWHUUHTXLULQJ
PDLQWHQDQFHLI\RXKDYHVHYHUDOVLPLODUV\VWHPVRQRQHUDFN7KH
ORFDWRU/('LVGHVLJQHGWRKHOSLGHQWLI\WKHV\VWHPLQDUDFN
7RDFWLYDWHWKHORFDWRU/('SUHVVWKHORFDWRUEXWWRQRQWKHIURQW
EH]HORIWKHV\VWHPUDFNPRXQWHGV\VWHPVRQO\
127(<RXDOVRFDQOLJKWWKHORFDWRU/('XVLQJ%0&RU03
FRPPDQGV6HHWKHKSU[][2SHUDWLRQDQG0DLQWHQDQFH
*XLGH
:KHQWKHORFDWRUEXWWRQLVSUHVVHGLQWKHORFDWRU/('EHJLQVWRIODVK
EOXHDWDIUHTXHQF\RIRQHEOLQNSHUVHFRQGERWKRQWKHIURQWRIWKH
V\VWHPDQGWKHEDFNPDNLQJLWHDV\WRORFDWHWKHV\VWHP
2–6
HP Integrity rx2600 server and HP workstation zx6000 Getting Started Guide
Troubleshooting
diagnostic LEDs
,IWKHV\VWHPKDVQR0DQDJHPHQW3URFHVVRUFDUGLQVWDOOHGWKHIRXU
GLDJQRVWLF/('VRQWKHIURQWSDQHOZDUQRILPSHQGLQJIDLOXUHVDQG
DOORZ\RXWRWDNHSUHYHQWLYHDFWLRQ)RUH[DPSOH\RXPD\ZDQWWR
EDFNXS\RXUGDWDRUUHSODFHDFRPSRQHQWEHIRUHLWIDLOV
■
,IQR03FDUGLVLQVWDOOHGWKHERRWSURJUHVVLVPRQLWRUHGE\
'LDJQRVWLF/('V'XULQJWKHERRWXSWKH/('VWXUQRQLQ
VHTXHQFHXQWLOWKH(),SURPSWLVUHDFKHG
■
,IDQ03FDUGLVLQVWDOOHGWKHERRWSURFHVVLVPRQLWRUHGE\WKH
03FDUG7KH/('VDUHRII
7KHKSU[][2SHUDWLRQDQG0DLQWHQDQFH*XLGHOLVWVWKH
VSHFLILFIDXOWVDVVRFLDWHGZLWKHDFK/('OLJKWLQJVHTXHQFH
HP Integrity rx2600 server and HP workstation zx6000 Getting Started Guide
2–7
Troubleshooting
LAN LEDs
7KHIURQWSDQHO/$1/('LQGLFDWHVWKHV\VWHPLVFRPPXQLFDWLQJ
RYHUWKH*LJDELWRU6\VWHP0DQDJHPHQW/$1
■
EOLQNLQJJUHHQWKHV\VWHPLVFRPPXQLFDWLQJRYHUWKH/$1
■
VROLGJUHHQ/$1OLQNLVHVWDEOLVKHGQRFXUUHQW/$1DFWLYLW\
■
QRWJUHHQWKHV\VWHPLVRII
)RXU*LJDELW/$1/('VDUHRQWKHUHDUSDQHO
LAN LED
Location
Color
State
1. Gbit
Tower: Right
Off
No 1000 Mbps link
Rack-mounted: Top
Green
Port linked at 1000 Mbps
Tower: 2nd from right
Off
No 100 Mbps link
Rack-mounted: 2nd from top
Green
Port linked at 100 Mbps
Tower: 2nd from left
Off
No 10 Mbps link
2. 100mb
3. Link
4. Activity
2–8
Rack-mounted: 2nd from bottom Green
Port linked at 10 Mbps
Tower: Left
Off
No LAN activity
Rack-mounted: Bottom
Green
Flashing or solid green LED indicates
activity on LAN port
HP Integrity rx2600 server and HP workstation zx6000 Getting Started Guide
Troubleshooting
7ZR6\VWHP0DQDJHPHQW/$1/('VDUHRQWKHUHDUSDQHO
LAN LED
Location
Color
State
1. Speed
Tower: Right
On
Port linked at 100 Mb/s
Rack-mounted: Top
Off
Port linked at 10 Mb/s
Tower: Left
On
Port linked
Rack-mounted: Bottom
Off
No link established
2. Activity
)RXU03/$1/('VDUHDOVRRQWKHUHDUSDQHOLIWKHV\VWHPKDVD
03FDUGLQVWDOOHG
LAN LED
Location
Color
State
1. Self-test
Tower: Right
Yellow
MP running self test or error
Rack-mounted: Top
Off
MP has booted
Tower: 2nd from right
Green
10BT link established
Rack-mounted: 2nd from top
Blinking Green
10BT activity
Off
No link or 100BT link
Green
100BT link established
2. 10BT
3. 100BT
Tower: 2nd from left
Rack-mounted: 2nd from bottom Blinking Green
4. Standby
Power
100BT activity
Off
No link or 10BT link
Tower: Left
Green
Standby Power on
Rack-mounted: Bottom
Off
Standby Power off
HP Integrity rx2600 server and HP workstation zx6000 Getting Started Guide
2–9
Troubleshooting
troubleshooting with the e-buzzer
:KHQ\RXUV\VWHPVWDUWVXSWKHV\VWHPILUPZDUHSHUIRUPVSUHERRW
GLDJQRVWLFVWRWHVW\RXUKDUGZDUHFRQILJXUDWLRQIRUDQ\SUREOHPV,ID
SUREOHPLVGHWHFWHGGXULQJSUHERRWWKHHEX]]HUHPLWVDXGLEOHEHHSV
DQGDQHQFRGHGHUURUPHVVDJH
7KHHEX]]HUHPLWVDGLIIHUHQWQXPEHURIEHHSVIRUHDFKW\SHRIHUURU
,I\RXPLVVWKHEHHSFRGHVHQGWKHVLJQDODJDLQE\SUHVVLQJWKHSRZHU
VXSSO\EXWWRQIRUVHFRQGVDQGUHOHDVHLWRQFHWKHVRXQGEHJLQV
7KHHEX]]HUDOVRHPLWVDQHOHFWURQLFVLJQDOWKDWFDQEHVHQWWKURXJKD
WHOHSKRQHOLQHWRDQDXWKRUL]HGKHOSGHVNRU+36XSSRUW7KLVVLJQDO
FDQEHGHFRGHGE\KHOSGHVNHTXLSPHQWWRLGHQWLI\WKHZRUNVWDWLRQ
PRGHODQGVHULDOQXPEHUDVZHOODVGHWDLOVDERXWDQ\IDXOWV7RVHQG
WKLVVLJQDOWR+36XSSRUWKROG\RXUWHOHSKRQHQH[WWRWKHHEX]]HU
LFRQRQWKHV\VWHPIURQWEH]HOZKHQWKHV\VWHPLVERRWLQJ
2–10
HP Integrity rx2600 server and HP workstation zx6000 Getting Started Guide
Troubleshooting
Number
of Beeps
Component
Description
1
Processor
Processor absent or not correctly
connected. Reseat or replace processor.
2
Power Supply
Power supply failure. Replace power
supply.
3
Memory
No memory, bad memory modules or
incompatible memory module. Check
memory module loading order. Reseat or
replace memory modules.
4
Graphics Card Graphics card problem. Reseat or
replace the graphics card.
5
PCI Card
6
General Failure Possible problems include: System board
failure, CPU connection problem, CPU
failure, CPU power failure.
See the hp rx2600/zx6000 Operation
and Maintenance Guide for additional
details and recommendations.
7
System Board
PCI card problem. Reseat or replace the
PCI card.
Defective system board. Contact support.
127(6HHWKHKSU[][2SHUDWLRQDQG0DLQWHQDQFH*XLGH
IRUGHWDLOHGLQVWUXFWLRQVRQUHPRYLQJDQGUHSODFLQJV\VWHP
FRPSRQHQWV
HP Integrity rx2600 server and HP workstation zx6000 Getting Started Guide
2–11
Troubleshooting
the system event log
7KHV\VWHP/('VDQGHEX]]HUGRQRWUHSRUWDOOSUREOHPVRQO\WKH
SUREOHPVOLVWHGEHORZ,IWKHHEX]]HULQGLFDWHVDQHUURUWKHV\VWHP
HYHQWORJ6(/ZLOOSURYLGHDPRUHGHWDLOHGH[SODQDWLRQRIWKH
IDLOXUH
)RUDGGLWLRQDOLQIRUPDWLRQRQDFFHVVLQJDQGUHDGLQJWKH6(/VHHWKH
KSU[][2SHUDWLRQDQG0DLQWHQDQFH*XLGH
2–12
HP Integrity rx2600 server and HP workstation zx6000 Getting Started Guide
Troubleshooting
software diagnostics tools
7KLVVHFWLRQLQFOXGHVLQIRUPDWLRQRQWKH+3H'LDJ7RROV+DUGZDUH
'LDJQRVWLFV
%HIRUH\RXUXQWKH+3GLDJQRVWLFVRIWZDUHWDNHQRWHRIDQ\HEX]]HU
DQG/('HUURUPHVVDJHV7RILQGRXWPRUHDERXWWKHHUURUQRWHDQ\
HYHQWPHVVDJHVDQGXVHWKHWRRODSSURSULDWHIRU\RXUV\VWHPWR
GHWHUPLQHZKDWIDLOHG
127((YHQWPHVVDJHVDUHOLVWHGLQ$SSHQGL['RIWKHKS
U[][2SHUDWLRQDQG0DLQWHQDQFH*XLGH
hp e-diagtools hardware diagnostics
<RXUV\VWHPFDPHZLWKDQ+3,3)2IIOLQH'LDJQRVWLFVDQG8WLOLWLHV
&'ZLWK+3H'LDJ7RROV+DUGZDUH'LDJQRVWLFV7KHVHWRROVPD\EH
XVHGWRGLDJQRVHKDUGZDUHUHODWHGSUREOHPVRQ\RXU+3V\VWHP
%HIRUHFRQWDFWLQJ+3IRU:DUUDQW\VHUYLFHUXQH'LDJ7RROVWRREWDLQ
LQIRUPDWLRQWKDWZLOOEHUHTXHVWHGE\D6XSSRUW$JHQW
:LWKWKLVXWLOLW\\RXFDQ
■
&KHFNWKHKDUGZDUHFRQILJXUDWLRQDQGYHULI\WKDWLWLVIXQFWLRQLQJ
FRUUHFWO\
■
7HVWLQGLYLGXDOKDUGZDUHFRPSRQHQWV
■
'LDJQRVHKDUGZDUHUHODWHGSUREOHPV
■
2EWDLQDFRPSOHWHKDUGZDUHFRQILJXUDWLRQ
■
3URYLGHSUHFLVHLQIRUPDWLRQWRDQ+3VXSSRUWDJHQWVRWKH\FDQ
VROYHSUREOHPVTXLFNO\DQGHIIHFWLYHO\
+3H'LDJ7RROVSURYLGHVDXVHUIULHQGO\LQWHUIDFHWRWKH2IIOLQH
'LDJQRVWLFV(QYLURQPHQW2'(WKDWHQDEOHV\RXWRWURXEOHVKRRWD
V\VWHPWKDWLVUXQQLQJZLWKRXWDQ26RUFDQQRWEHWHVWHGXVLQJWKH
RQOLQHWRROV2'(FDQDOVREHUXQVHSDUDWHO\XVLQJDFRPPDQGOLQH
LQWHUIDFHZKLFKDOORZVWKHXVHUWRVHOHFWVSHFLILFWHVWVDQGRUXWLOLWLHV
WRH[HFXWHRQDVSHFLILFKDUGZDUHPRGXOH6HHWKHKSU[][
2SHUDWLRQDQG0DLQWHQDQFH*XLGHIRUPRUHLQIRUPDWLRQ
HP Integrity rx2600 server and HP workstation zx6000 Getting Started Guide
2–13
Troubleshooting
starting hp e-diagtools
,QVHUWWKH+3,3)2IIOLQH'LDJQRVWLFVDQG8WLOLWLHV&'LQWKH&'
RU'9'GULYH
)URPWKH(),VKHOOSDJHVHOHFWWKH&''9'GULYH
D 8VHWKHmapFRPPDQGWROLVWWKHGULYHVRQ\RXUV\VWHP)RU
H[DPSOH
Shell> map
Device mapping table
fs0:Acpi(HWP0002,0)/Pci(2|0)/Ata(Primary,Master)/CDROM...
fs1:Acpi(HWP0002,100)/Pci(1|0)/Scsi(Pun0,Lun0)/HD(Part...
blk0:Acpi(HWP0002,0)/Pci(2|0)/Ata(Primary,Master)...
blk1:Acpi(HWP0002,0)/Pci(2|0)/Ata(Primary,Master)/CDROM...
127(/LQHVDUHWUXQFDWHGWRILW
E &KDQJHWRWKH&''9'GULYH
Shell> fs0:
fs0:>
1DYLJDWHWRWKH(),?%227GLUHFWRU\RQWKH&'
D &KDQJHWRWKH(),GLUHFWRU\RQWKHGLDJQRVWLFV&'
fs0:> cd EFI
fs0\EFI:>
E ([HFXWHWKHlsFRPPDQGWROLVWWKHFRQWHQWVRIWKHGLUHFWRU\
fs0:\EFI> ls
Directory of: fs1:\EFI
11/07/02 04:41p <DIR> 1,024 .
11/07/02 04:41p <DIR> 0 ..
11/07/02 04:41p <DIR> 1,024 HP
11/07/02 04:45p <DIR> 1,024 BOOT
0 File(s) 0 bytes
4 Dir(s)
2–14
HP Integrity rx2600 server and HP workstation zx6000 Getting Started Guide
Troubleshooting
D &KDQJHWRWKH%227VXEGLUHFWRU\
fs0\EFI:> cd BOOT
fs0\EFI\BOOT:>
E ([HFXWHWKHlsFRPPDQGWROLVWWKHFRQWHQWVRIWKHGLUHFWRU\
fs0:\EFI\BOOT> ls
Directory of: fs1:\EFI\BOOT
11/07/02 04:45p <DIR>
1,024
11/07/02 04:45p <DIR>
1,024
11/07/02 01:54p
731,136
11/07/02 01:54p
2,763
11/07/02 01:54p
731,136
11/07/02 01:54p
2,995
11/07/02 01:54p
3,977
5 File(s)
1,472,007 bytes
2 Dir(s)
.
..
LaunchMenu.efi
IO.ini
BOOTIA64.EFI
LaunchMenu.ini
View_Doc.ini
([HFXWHWKHLaunchMenuFRPPDQGWRUHERRWIURPWKH&'DQG
ODXQFKH'LDJ7RROV
fs0:\BOOT> launchmenu
,I\RXDUHQRWIDPLOLDUZLWKH'LDJ7RROVUHYLHZWKH
GRFXPHQWDWLRQ)URPWKHPDLQPHQX
D 6HOHFW View Release Notes and Documentation
Menu WRYLHZDOLVWRIDYDLODEOHGRFXPHQWDWLRQ
E 6HOHFWView e-DiagTools InfoWRRSHQWKHRYHUYLHZ
GRFXPHQW
,I\RXDUHDOUHDG\IDPLOLDUZLWKH'LDJ7RROVVHOHFW Run
e-DiagTools for IPFIURPWKHPDLQPHQX
HP Integrity rx2600 server and HP workstation zx6000 Getting Started Guide
2–15
Troubleshooting
producing a support ticket
7RSURGXFHDFRPSOHWHUHFRUGRI\RXUV\VWHP©VFRQILJXUDWLRQDQGWHVW
UHVXOWV\RXPXVWFUHDWHD6XSSRUW7LFNHW7KLVLVDVLPSOHWH[WILOH
WKDWFRQWDLQVHVVHQWLDOLQIRUPDWLRQDQGLVGHVLJQHGWRDVVLVW\RXUORFDO
RU+36XSSRUW$JHQW
7RSURGXFHD6XSSRUW7LFNHWIURPWKHWelcome to e-DiagTools
0HQX
6WDUWH'LDJ7RROVDQGVHOHFWRun eDiagTools for IPFIURPWKH
PDLQPHQX
6HOHFW 2 - Run e-DiagTools Basic System Test (BST)WR
UXQWKHEDVLFGLDJQRVWLFVRQ\RXUV\VWHPLI\RXKDYHQRWDOUHDG\
GRQHVR
H'LDJ7RROVVFDQV\RXUV\VWHP7KH&RQILJXUDWLRQ'HVFULSWLRQ
GLVSOD\VRQWKHVFUHHQZKHQWKHFRQILJXUDWLRQGHWHFWLRQSKDVH
LVFRPSOHWH
6HOHFW2 - Continue TestWRUXQWKHUHVWRIWKHEDVLFGLDJQRVWLFV
WHVW7KHUHVXOWVZLOOGLVSOD\RQWKHVFUHHQ)RUH[DPSOH
**********************************************
e-Diagtools for IPF
rev. A.01.39
(c)
Hewlett-Packard Company, 2002
Test Results
Tests passed. No errors found.
If you still experience problems with your system, try
the following:
1. Power off and restart your system.
2. Update the system's firmware.
3. Back up your data and contact your HP Support Agent
for more advice.
1-Help 2-Advanced 3-Exit 4-Support Ticket
2–16
HP Integrity rx2600 server and HP workstation zx6000 Getting Started Guide
Troubleshooting
$IWHUWKHWHVWLVFRPSOHWHSUHVV47KH6XSSRUW7LFNHWZLOO
GLVSOD\RQWKHVFUHHQ)RUH[DPSOH
-----------------------------------------HEWLETT-PACKARD e-Diagtools Support Ticket
-----------------------------------------~~~~~~~~~~~~~~~~~~~~~~~~~~~~~~~~~~~~~~~~~~
Your system: HP - zx6000
Diagnostic: System Test Passed
Date/Time: 05/01/2003 14:37:41
~~~~~~~~~~~~~~~~~~~~~~~~~~~~~~~~~~~~~~~~~~
❏
7KH6XSSRUW7LFNHWLVDVFUHHQWKDWGLVSOD\VDFRPSOHWH
UHFRUGRIWKHWHVWUHVXOWVDQGWKHV\VWHP
VFRQILJXUDWLRQ,WLV
WKHPRVWHIIHFWLYHZD\RIFRPPXQLFDWLQJWKLVHVVHQWLDO
LQIRUPDWLRQWR\RXUVXSSRUWSURYLGHU
❏
7KHFXUUHQW6XSSRUW7LFNHWLVWKHRQHSURGXFHGE\WKHODVW
H[HFXWLRQRIH'LDJWRROV:KHQUXQQLQJH'LDJWRROV\RXFDQ
FUHDWHD6XSSRUW7LFNHWRQGHPDQGLQWKH&RQILJXUDWLRQ
'HVFULSWLRQ6FUHHQ:KHQ\RXUXQWKHEDVLFV\VWHPWHVWVRU
DGYDQFHGV\VWHPWHVWVD6XSSRUW7LFNHWLVFUHDWHG
DXWRPDWLFDOO\8VHWKH6XSSRUW7LFNHW6FUHHQWREURZVHLWIRU
LQIRUPDWLRQWKDWFDQKHOS\RXWURXEOHVKRRW\RXUV\VWHP
❏
+DYHWKHVXSSRUWWLFNHWRQWKHVFUHHQZKHQ\RXFRQWDFW
FXVWRPHUVXSSRUW8VHWKHDUURZNH\VWRVFUROOLIQHFHVVDU\
7KHVXSSRUWUHSUHVHQWDWLYHPD\DVN\RXWRUHDGWKH
LQIRUPDWLRQRYHUWKHSKRQH
3UHVV3 WRH[LWWKH6XSSRUW7LFNHWWRRO
HP Integrity rx2600 server and HP workstation zx6000 Getting Started Guide
2–17
Troubleshooting
restoring the OS
<RXUV\VWHPVKLSVZLWKD&'RU'9'WKDWDOORZV\RXWRUHLQVWDOO\RXU
26DQGGULYHUVRURWKHUIDFWRU\VXSSOLHGVRIWZDUHFRPSRQHQWV7KH
GULYHUVDQGVRIWZDUHXWLOLWLHVLQFOXGLQJGRFXPHQWDWLRQDQG
QDYLJDWLRQDODLGVKHOS\RXWRUHFRYHUWKHSUHORDGHGVRIWZDUH
7KHSURFHVVGRFXPHQWDWLRQDQGPHGLDDUHGLIIHUHQWIRUHDFK26
■
■
■
Ä
2–18
+38;
❏
+35HFRYHU\&'IRU+38;
❏
,QVWUXFWLRQVRQ&'VOHHYH
❏
www.hp.com/go/bizsupport
:LQGRZV
❏
,QWHJULW\U[VHUYHU:LQGRZV5H,QVWDOODWLRQ0HGLD
❏
ZRUNVWDWLRQ][:LQGRZV;3%LW(GLWLRQ9HUVLRQ
5HFRYHU\'9'
❏
,QVWUXFWLRQVRQ'9'VOHHYH
❏
'9'FRQWHQWVFDQEHDFFHVVHGWKURXJK:LQGRZV([SORUHU
/LQX[
❏
+3(QDEOHPHQW.LWIRU/LQX[&'
❏
,QVWUXFWLRQVLQ+3(QDEOHPHQW.LWIRU/LQX[ERRNOHW
❏
docs.hp.com/linuxXQGHU¦/LQX[IRU,WDQLXPEDVHG
6HUYHUVDQG:RUNVWDWLRQV§
CAUTION: Using the Recovery CD permanently erases the current contents
of your hard disk. Backup all data and personal files before using the
Recovery CD.
HP Integrity rx2600 server and HP workstation zx6000 Getting Started Guide
Troubleshooting
where to get help
+3&XVWRPHU&DUH&HQWHUVFDQKHOS\RXVROYHSUREOHPVUHODWHGWR+3
SURGXFWVDQGLIQHFHVVDU\LQLWLDWHDSSURSULDWHVHUYLFHSURFHGXUHV
6XSSRUWLVDYDLODEOHRQWKHZHEDQGE\SKRQH
)RULQIRUPDWLRQRQFRQWDFWLQJ+3&XVWRPHU&DUHJRWR
www.hp.com/go/bizsupport
information to collect before you contact support
%HIRUH\RXFRQWDFWVXSSRUW\RXVKRXOG
&ROOHFWWKHIROORZLQJLQIRUPDWLRQ
❏
0RGHOQXPEHUzx6000RUrx2600
❏
6HULDOQXPEHUSULQWHGRQWKHLQIRUPDWLRQWDEDERYHWKHKDUG
GULYHV
❏
3URGXFWQXPEHULIDSSOLFDEOHWKLVLVSULQWHGQH[WWRWKHVHULDO
QXPEHU
%HIDPLOLDUZLWK\RXUV\VWHPFRQILJXUDWLRQDQGQRWHDQ\HUURUV
WKDWKDYHRFFXUUHG)RUH[DPSOH
❏
:KHQGLGWKHSUREOHPVWDUW"
❏
+DYH\RXPDGHDQ\UHFHQWFKDQJHVWRWKHV\VWHP"
❏
:KDWILUPZDUHYHUVLRQLVLQVWDOOHG"
❏
+DYH\RXPDGHDQ\UHFHQWFKDQJHVWRWKHILUPZDUHVHWWLQJV"
❏
+RZPXFKPHPRU\LVLQVWDOOHG",VLW+3RUWKLUGSDUW\
PHPRU\"
❏
:KDWDFFHVVRU\FDUGVORWVDUHEHLQJXVHG"
❏
:KDW26LVLQVWDOOHGRQWKHV\VWHP"
❏
+DYH\RXFKDQJHGWRDGLIIHUHQW26",IVRZKDW26DQG
YHUVLRQ"
❏
,VWKH26JLYLQJDQ\HUURUPHVVDJHV"
&KHFNWKHSUHYLRXVVHFWLRQVLQWKLVFKDSWHUDQGDWWHPSWWRVROYH
WKHSUREOHP
HP Integrity rx2600 server and HP workstation zx6000 Getting Started Guide
2–19
Troubleshooting
7DNHQRWHRIDQ\/('DQGHEX]]HUHUURUPHVVDJHVDQGWU\WR
VROYHWKHSUREOHPDFFRUGLQJWRWKHVROXWLRQVVXJJHVWHG
❏
$UHWKHUHDQ\/('HUURUV"'LVSOD\VRQVFUHHQGXULQJERRW
6HH¦7URXEOHVKRRWLQJZLWKWKH/('V§RQSDJHIRUDOLVW
RIFRPPRQ/('HUURUVDQGUHFRPPHQGHGVROXWLRQV
❏
$UHWKHUHDQ\HEX]]HUHUURUV"$XGLEOHEHHSVGXULQJERRW
6HH¦7URXEOHVKRRWLQJZLWKWKHHEX]]HU§RQSDJHIRUD
OLVWRIHEX]]HUEHHSVHTXHQFHVDQGUHFRPPHQGHGVROXWLRQV
8VHWKHGLDJQRVWLFVRIWZDUHRQ\RXUV\VWHP6HH¦6RIWZDUH
'LDJQRVWLFV7RROV§RQSDJH
5XQ+3'LDJ7RROVDQGSURGXFHDVXSSRUWWLFNHW6HH¦+3
H'LDJ7RROV+DUGZDUH'LDJQRVWLFV§RQSDJH
online support
7RFRQWDFW+3&XVWRPHU&DUHRQOLQHVHHWKH:RUOGZLGH/LPLWHG
:DUUDQW\DQG7HFKQLFDO6XSSRUW*XLGHRUJRWR
www.hp.com/go/bizsupportDQGHQWHU\RXUSURGXFWQDPH
zx6000RUrx2600LQWKHVHDUFKILHOG
127($IWHUDFFHVVLQJWKHVLWHVHOHFWWKHDSSURSULDWHKDUGZDUH
6HOHFWHGSXEOLFDWLRQVDUHDOVRDYDLODEOHDVSULQWHGERRNV
7KHIROORZLQJLQIRUPDWLRQLVDYDLODEOHRQWKLVZHEVLWH
■
)LUPZDUHXSGDWHVLQFOXGLQJWKHXSJUDGHXWLOLW\DQGLQVWUXFWLRQV
■
7KHODWHVWGULYHUVDQGVRIWZDUHXWLOLWLHV
■
$GGLWLRQDOGRFXPHQWDWLRQVHHEHORZ
phone support
7RFRQWDFW+3&XVWRPHU&DUHE\SKRQH
2–20
■
&DOOKSDW86$
■
9LVLWwww.hp.com/country/us/eng/contact_us.html WR
ILQGWKHSKRQHQXPEHULQ\RXUUHJLRQ
HP Integrity rx2600 server and HP workstation zx6000 Getting Started Guide
Troubleshooting
additional documentation
7KHIROORZLQJGRFXPHQWDWLRQLVDYDLODEOHRQWKH'RFXPHQWDWLRQDQG
8WLOLW\&'SURYLGHGZLWK\RXUV\VWHPDQGRQWKHVXSSRUWZHEVLWH
OLVWHGDERYH
■
4XLFN6WDUW*XLGH¥EDVLFLQIRUPDWLRQRQVHWWLQJXS\RXUQHZ
V\VWHP
■
*HWWLQJ6WDUWHG*XLGHWKLVGRFXPHQW¥LQIRUPDWLRQRQVHWWLQJ
XSDQGFRQILJXULQJ\RXUV\VWHPDORQJZLWKEDVLFWURXEOHVKRRWLQJ
LQIRUPDWLRQ
■
2SHUDWLRQVDQG0DLQWHQDQFH*XLGH¥GHWDLOHGLQIRUPDWLRQRQ
LQVWDOOLQJDQGUHSODFLQJSDUWVWURXEOHVKRRWLQJDQGFRQILJXULQJ
WKHV\VWHP
■
6DIHW\DQG&RPIRUW*XLGH¥LQIRUPDWLRQRQXVLQJ\RXUV\VWHP
VDIHO\DQGDYRLGLQJLQMXU\RUGLVFRPIRUW
5HFRYHU\LQVWUXFWLRQVDFFRPSDQ\&''9'
■
5HFRYHU\&''9',QVWUXFWLRQV¥GHWDLOHGLQVWUXFWLRQVRQ
UHVWRULQJ\RXU26LI\RXQHHGWRUHVWRUHWKHV\VWHPWRWKHRULJLQDO
VKLSSLQJFRQILJXUDWLRQ
HP Integrity rx2600 server and HP workstation zx6000 Getting Started Guide
2–21
Troubleshooting
2–22
HP Integrity rx2600 server and HP workstation zx6000 Getting Started Guide
A
Regulatory Information
This appendix includes:
■
Declaration of conformity
■
International regulatory statements
HP Integrity rx2600 server and HP workstation zx6000 Getting Started Guide
A–1
Regulatory Information
declaration of conformity
Declaration of Conformity
according to ISO/IEC Guide 22 and EN 45014
Manufacturer:
Hewlett-Packard Company
3404 East Harmony Rd.
Fort Collins, CO 80528
USA
Declares that the:
Product Type:
Computer Workstation/Server
Marketing Designation(s): zx6000, rx2600
Regulatory Model Number: FCLSA-0201
Product Options:
All
conforms to the following specifications:
Safety.
IEC 60950:1991+A1+A2+A3+A4 / EN 60950:1992+A1+A2+A3+A4
IEC 60825-1:1993+A1 / EN60825-1: 1994+A11 Class 1 for LED's and Lasers
U.S.A. 21CFR Subpart J - for FC Laser module
China GB4943-1995
Russia GOST R 50377-92
EMC.
CISPR 22: 1997 / EN 55022: 1998 Class A
CISPR 24: 1997 / EN 55024: 1998
Also compliant with…
EN 61000-3-2:1998
EN 61000-3-3: 1995
EN 61000-4-2:1999 - 4 kV CD, 8 kV AD
EN 61000-4-3:1996 - 10V/m for server version (restricted USB peripherals)
3V/m for workstation version
EN 61000-4-4:1995 - 2 kV Signal, 4 kV Power Lines
EN 61000-4-5:1995 - 1 kV Differential mode, 2 kV Common mode
EN 61000-4-8:1993 - 3 A/m
EN 61000-4-11:1994
U.S.A. FCC Part 15, Class A
Japan VCCI Class A
Australia/New Zealand AS/NZS 2064:1997, AS/NZS 3548:1995
China GB9254-1998
Region of Taiwan CNS 13438:1997 Class A
Russia GOST R 29216-94
and is certified or verified by:
UL Listed to UL1950, 3rd edition, File E146385
cUL Listed to CSA C22.2 No. 60950-00 3rd Edition
UL GS Certificate to EN60950 2nd edition with A1+A2+A3+A4+A11
HP Fort Collins CCQD HTC
Supplementary information:
The product herewith complies with the requirements of the Low Voltage Directive 73/23/EEC and the EMC
Directive 89/336/EEC and carries the CE-marking accordingly.
This product was tested in a typical Hewlett Packard computer configuration.
For Compliance Information ONLY, contact: European contact: Hewlett-Packard, HQ-TRE,
Herrenberger Straße 140, D-71034 Böblingen
(FAX: +49-7031-14-3143)
Americas contact: Hewlett-Packard, WGBU Quality Manager, 3404 E. Harmony Rd., Ft. Collins, CO 80528,
U.S.A.(FAX: (970) 898-4556)
A–2
HP Integrity rx2600 server and HP workstation zx6000 Getting Started Guide
Regulatory Information
federal communications commission radio
frequency interference statement (for usa only)
This equipment has been tested and found to comply with the limits
for a Class A digital device, pursuant to Part 15 of the FCC Rules and
the Canadian Department of Communications. These limits are
designed to provide reasonable protection against harmful
interference when the equipment is operated in a commercial
environment. This equipment generates, uses, and can radiate radio
frequency energy and, if not installed and used in accordance with the
instruction manual, may cause harmful interference to radio
communications. Operation of this equipment in a residential area is
likely to cause harmful interference in which case the user will be
required to correct the interference at his own expense.
Hewlett-Packard’s FCC Compliance Tests were conducted with
HP-supported peripheral devices and HP shielded cables, such as
those you receive with your system. Changes or modifications not
expressly approved by Hewlett-Packard could void the user’s
authority to operate the equipment.
notice for canada
This Class A digital apparatus meets all requirements of the Canadian
Interference-Causing Equipment Regulations.
Cet appareil numérique de la Class A respecte toutes les exigences du
Règlement sur le matériel brouilleur du Canada.
safety warning for the usa and canada
If the power cord is not supplied with the computer, select the proper
power cord according to your local national electric code:
■
USA: use a UL listed type SVT detachable power cord.
■
Canada: use a CSA certified detachable power cord.
For your safety, never remove the system’s cover without first
removing the power cord and any connection to a telecommunication
network. Always replace the cover before switching on again.
HP Integrity rx2600 server and HP workstation zx6000 Getting Started Guide
A–3
Regulatory Information
Si le cordon secteur n’est pas livré avec votre ordinateur, utiliser un
cordon secteur en accord avec votre code electrique national.
■
USA: utiliser un cordon secteur “UL listed,” de type SVT.
■
Canada: utiliser un cordon secteur certifié CSA.
Pour votre sécurité, ne jamais retirer le capot de l’ordinateur sans
avoir préalablement débranché le cordon secteur et toute connection à
un réseau de télecommunication. N’oubliez pas de replacer le capot
avant de rebrancher le cordon secteur.
notice for france
Il y a danger ïexplosion s’il y a remplacement incorrect de la batterie.
Remplacer uniquement avec une batterie du même type ou ïun type
equivalent recommandé par le constructer. Mettre au rebut les
batteries usagées conformément aux instructions du fabricant.
notice for the netherlands
Bij dit apparaat zijn batterijen geleverd. Wanneer deze leeg zijn, moet
U ze niet weggooien maar inleveren als KCA.
notice for germany
Wenn die Batterie nicht korrekt eingebaut wird, besteht
Explosionsgefahr. Zu ihrer eigenen Sicherheit sollten Sie nicht
versuchen, die Batterie wiederaufzuladen, zu zerlegen oder die alte
Batterie zu verbrennen. Tauschen Sie die Batterie nur gegen den
gleichen oder ähnlichen Typ aus, der vom Hersteller empfohlen wird.
Bei der in diesem PC intergrierten Batterie handelts sich um eine
Lithium-Batterie, die keine Schwermetalle enthält. Batterien und
Akkumulatoren gehören nicht in den Hausmüll. Sie verden vom
Hersteller, Händler oder deren Beauftragten kostenlos
zurückgenommen, um sie einer Verwertung bzw. Entsorgung
zuzuführen.
A–4
HP Integrity rx2600 server and HP workstation zx6000 Getting Started Guide
Regulatory Information
noise declaration for germany
Lärmangabe nach Maschinenlärmverordnung - 3 GSGV
(Deutschland) LpA < 70 db am Arbeitsplatz normaler Betrieb nach
EN27779: 11.92.
notice for japan (class a)
notice for korea
notice for taiwan
HP Integrity rx2600 server and HP workstation zx6000 Getting Started Guide
A–5
Regulatory Information
A–6
HP Integrity rx2600 server and HP workstation zx6000 Getting Started Guide
B
Warranty Statements
This is your product warranty statement. Read it carefully.
To contact HP for warranty service:
■
Worldwide, go to:
www.hp.com/cpso-support/guide/psd/cscus.html
■
In the United States and Canada, call 1-800-593-6631.
hardware and software warranties
Hewlett-Packard (HP) warrants this hardware product against defects
in materials and workmanship under normal use, for a period of one
(1) year from receipt by the original end-user purchaser or date of
purchase. This is the warranty duration or period.
This warranty covers the following HP Product(s):
HP workstation zx6000 - 1 year, next day on-site
HP integrity Integrity rx2600 server - 1 year, next day on-site
This limited warranty includes: phone-in hardware support, parts,
labor and, when needed, next-day on-site response for the duration of
the warranty period. Parts and service are to be provided by an HP
Service Center or a participating Authorized HP Computer Dealer
Repair Center.
Warranty terms may be different in your country. If so, your
Authorized HP Dealer or Hewlett-Packard Sales and Service Office
can give you details.
HP Integrity rx2600 server and HP workstation zx6000 Getting Started Guide
B–1
Warranty Statements
warranty limitations
If HP receives notice of above defined defects during the warranty
period, HP will either, at its option, repair or replace products, which
prove to be defective. Should HP be unable to repair or replace the
product within a reasonable amount of time, the customer's alternate
exclusive remedy shall be a refund of the purchase price upon return
of the product to HP.
Only the system processor unit (SPU), keyboard, mouse, and all
Hewlett-Packard accessories installed inside the system processor
unit — such as video adapters, mass storage devices, and interface
controllers — are covered by this warranty. HP products external to
the system processor unit — such as external mass storage
subsystems, displays, printers, and other peripherals — are covered
by the applicable warranties for those products.
A hardware accessory is a hardware product, specifically designated,
and supported, for use with the HP workstation, that is added on or
integrated into an HP workstation in order to provide higher
performance, capacity or increased capability; and is listed as a
product in HP’s Corporate Price List. Upon installation inside an HP
workstation, the warranty that came with the accessory applies.
HP is not responsible for defects resulting from: a) improper or
inadequate calibration or maintenance, b) software, interfacing parts
or supplies not supplied by HP, c) unauthorized modification or
misuse, d) operation outside the published environmental
specification for the product, e) in-transit damage, e) improper site
preparation or maintenance or f) defects resulting from use of non-HP
software, accessories, media, supplies, consumables, or such items
not designed for use with the product.
Reloading the bundled or pre-loaded software on your workstation is
not covered by the HP warranty. HP products may contain
remanufactured parts equivalent to new in performance or may have
been subject to incidental use.
TO THE EXTENT ALLOWED BY LOCAL LAWS, THE ABOVE
WARRANTY IS EXCLUSIVE AND NO OTHER WARRANTY OR
CONDITION, WHETHER WRITTEN OR ORAL, IS EXPRESSED
OR IMPLIED WITH RESPECT TO THIS PRODUCT. HP
SPECIFICALLY DISCLAIMS ANY IMPLIED WARRANTIES OR
CONDITIONS OF MERCHANTIBILITY, SATISFACTORY
B–2
HP Integrity rx2600 server and HP workstation zx6000 Getting Started Guide
Warranty Statements
QUALITY, AND FITNESS FOR A PARTICULAR PURPOSE.
SOME STATES, PROVINCES OR COUNTRIES DO NOT ALLOW
LIMITATIONS ON HOW LONG AN IMPLIED WARRANTY
LASTS, SO THE ABOVE LIMITATION OR EXCLUSION MAY
NOT APPLY TO YOU.
This warranty is extended worldwide under certain conditions (please
check with your local HP office) to products purchased from HP or an
Authorized HP Computer Dealer which are reshipped by the original
purchaser either for use by the original purchaser or provided as an
incidental part of systems integrated by the original purchaser. When
available in the country of use, service is provided in the same
manner as if the product was purchased in that country and can only
be provided in countries where the product is designed to operate. If
the product is not normally sold by HP in the country of use, it must
be returned to the country of purchase for service. Response time for
on-site service, and parts delivery turn-around time for parts service,
are subject to changes from standard conditions based upon non-local
parts availability.
This warranty gives you specific legal rights, and you may also have
other rights, which vary, from state to state, province to province or
country to country.
limitation of liability and remedies
THE REMEDIES PROVIDED ABOVE ARE THE CUSTOMER'S
SOLE AND EXCLUSIVE REMEDIES. IN NO EVENT SHALL HP
OR ITS SUPPLIERS BE LIABLE FOR LOSS OF DATA OR FOR
ANY DIRECT, INDIRECT, SPECIAL, INCIDENTAL, OR
CONSEQUENTIAL DAMAGES, WHETHER BASED ON
WARRANTY, CONTRACT, TORT, OR ANY OTHER LEGAL
THEORY. Some countries, states, or provinces do not allow the
exclusion or limitation of incidental or consequential damages. If so,
the above limitation or exclusion may not apply to you.
The foregoing limitation of liability shall not apply in the event that
any HP product sold hereunder is determined by a court of competent
jurisdiction to be defective and to have directly caused bodily injury,
death, or property damage; provided, that in no event shall HP's
liability for property damage exceed the greater of $50,000 or the
purchase price of the specific product that caused such damage.
HP Integrity rx2600 server and HP workstation zx6000 Getting Started Guide
B–3
Warranty Statements
Some states, provinces or countries do not allow the exclusion or
limitation of incidental or consequential damages — including lost
profit — so the above limitation or exclusion may not apply to you.
THE WARRANTY TERMS AND CONDITIONS CONTAINED
HEREIN, EXCEPT TO THE EXTENT LAWFULLY PERMITTED,
DO NOT EXCLUDE, RESTRICT OR MODIFY, AND ARE IN
ADDITION TO, THE MANDATORY STATUTORY RIGHTS
APPLICABLE TO THE SALE OF THIS PRODUCT TO YOU.
third party products
HP does not warrant the performance, quality, form or content of
third-party hardware or software. HP does not warrant third-party
documentation that may be distributed with the workstation. These
products may be warranted by the third-party and HP provides such
products “as is.” On-site visits caused by third-party software or
hardware are subject to standard per-incident travel and labor
charges.
customer responsibilities
The customer is responsible for the security of its proprietary and
confidential information on this system and for maintaining a
procedure external to the products for reconstruction of lost or altered
files, data, or programs (i.e. backups).
For on-site responses, the customer must provide: access to the
product; adequate working space and facilities within a reasonable
distance of the product; access to and use of all information and
facilities determined necessary by HP to service the product; and
operating supplies and consumables such as the customer would use
during normal operation.
A representative of the customer must be present at all times during
on-site responses. The customer must state if the product is being
used in an environment which poses a potential health hazard to
repair personnel; HP or the servicing dealer may require that the
product be maintained by customer personnel under direct HP or
dealer supervision.
B–4
HP Integrity rx2600 server and HP workstation zx6000 Getting Started Guide
Warranty Statements
obtaining on-site warranty service
Support can be obtained from 1-800-593-6631 (U.S. and Canada).
For Worldwide locations, visit:
www.hp.com/cpso-support/guide/psd/cscus.html
You will be asked to provide the product model number and serial
number and may be required to provide dated proof of purchase.
During the on-site warranty period, customer-replaceable
components may be serviced through expedited part shipment. In this
event, HP will prepay shipping charges, duty, and taxes; provide
telephone assistance on replacement of the component when
necessary; and pay shipping charges, duty, and taxes for any part that
HP asks to be returned.
On-site visits caused by non-Hewlett-Packard products —whether
internal or external to the system processor unit— are subject to
standard per-incident travel and labor charges.
On-site service for this product is restricted or unavailable in certain
locations. In HP Excluded Travel Areas — areas where geographical
obstacles, undeveloped roads, or unsuitable public transportation
prohibit routine travel — service is provided on a negotiated basis at
extra charge.
Response time for HP on-site service in an HP Service Travel Area is
normally next business day (excluding HP holidays) for HP Travel
Zones 1-3 (generally 100 miles or 160 Km from the HP office).
Response time is second business day for Zones 4 and 5 (200 miles,
320 Km); third business day for Zone 6 (300 miles, 480 Km); and
negotiated beyond Zone 6 (greater than 300 miles). Worldwide
Customer Support Travel information is available from any HP Sales
and Service Office.
Travel restrictions and response time for dealer or distributor service
are defined by the participating dealer or distributor.
Service contracts which provide after-hour or weekend coverage,
faster response time, or service in an Excluded Travel Area are often
available from HP, an authorized dealer, or authorized distributor at
additional charge.
HP Integrity rx2600 server and HP workstation zx6000 Getting Started Guide
B–5
Warranty Statements
obtaining parts warranty service
The customer may be responsible for installing the replacement part
and restoring any operating system, applications, or data. HP may, at
its option but is not obligated to, repair the product at the customer’s
premises or “on-site.” If HP is unable to repair or replace the product,
the customer will be entitled to a refund of the purchase price upon
return of the product/parts.
When parts warranty service applies, the customer may be required to
run HP-supplied diagnostic programs before an on-site visit or
replacement part will be dispatched.
The customer shall return some defective parts upon HP demand. In
that case, HP will prepay shipping charges for parts returned to the
HP Parts Service Center.
software limited warranty
HP warrants for a one (1) year period from the date of purchase, that
the workstation operating system software will not fail to execute its
programming instructions due to defects in materials and
workmanship when all files are properly installed and used on HP
workstations.
HP does not warrant that the operation of software products will be
uninterrupted or error free.
Customer remedies shall be, at HP’s option, replacement of the media
or refund of purchase price based upon return of the product.
Removable Media (if supplied). HP warrants the removable media,
if supplied, upon which the software product is recorded to be free
from defects in materials and workmanship under normal use for a
period of ninety (90) days from the date of purchase. In the event the
media proves to be defective during the warranty period, the
customer’s remedy shall be to return the media to HP for
replacement. Should HP be unable to replace the media within a
reasonable amount of time, the customer’s alternative remedy shall be
a refund of the purchase price upon return of the product and
destruction of all other non-removable media copies of the software
product.
B–6
HP Integrity rx2600 server and HP workstation zx6000 Getting Started Guide
Warranty Statements
hp telephone support services
HP provides free telephone support for your workstation during the
warranty period. This service will also provide technical assistance
with the basic configuration and setup of your HP workstation and for
the bundled or pre-loaded operating system.
HP does NOT provide telephone support for workstations configured
as network servers. We recommend the HP Integrity rx2600 server
for your network server requirements.
supplemental warranty and service support
Enhanced hardware warranty services, such as after-hour or weekend
coverage, faster response, on-site repair, and service in a HP-excluded
travel area, may be available from HP at an additional charge. Contact
the HP Customer Support Center at 1-800-593-6631 for Itanium
workstations and servers.
contacting hp for warranty service
Worldwide refer to:
www.hp.com/cpso-support/guide/psd/cscus.html
In the United States and Canada, support can be obtained at
1-800-593-6631.
HP Integrity rx2600 server and HP workstation zx6000 Getting Started Guide
B–7
Warranty Statements
B–8
HP Integrity rx2600 server and HP workstation zx6000 Getting Started Guide
index
A
accessory slots 1–1
Add a Boot Option 1–20
Administrator 1–23
Advanced System Configuration Menu 1–24
Advanced System Information Menu 1–22
AGP graphics card 1–21
Auto Boot TimeOut 1–20
B
Baseboard Management Controller 1–26
BMC 1–26
Boot 1–24
boot 1–14
Boot commands 1–19
Boot from a File 1–20
Boot menu 1–14
Boot Options Maintenance menu 1–20
Bootable Devices 1–24
BootNext 1–20
C
Cache 1–24
Change Boot Order 1–20
Chip Revision 1–24
Cold Reset 1–21
components 1–6, 1–12
configuration 1–1, 1–26
Configuration commands 1–19
connectors 1–4, 1–8
Console 1–21
console 1–25, 1–26, 2–5
CPU 2–11
D
Date 1–22
declaration of conformity 2–1
Default 1–22
Delete Boot Option(s) 1–20
Device commands 1–19
Diagnostic LEDs 1–2, 1–3, 2–7
diagnostics 1–26, 2–1
Disk Activity LEDs 1–2
documentation 2–21
E
e-buzzer 1–2, 1–3, 2–1, 2–10
e-DiagTools 2–13
EFI 1–10, 1–14
EFI boot option screen 1–17
EFI command classes 1–19
EFI commands 1–18
EFI Shell 1–14
EFI shell 1–17
F
fan 1–1
File systems 1–17
Firmware 1–24
firmware version 1.x 1–14
firmware version 2.0 1–14
front panel 1–1, 1–2, 1–3
HP Integrity rx2600 server and HP workstation zx6000 Getting Started Guide
Index–1
Index
G
O
Gigabit LAN 1–4, 2–8
graphics cards 2–1, 2–5, 2–11
ODE 2–13
Offline Diagnostics Environment (ODE)
2–13
OS 2–1, 2–18
H
hardware problem 2–1
help 1–23, 2–1, 2–19
HP Customer Care 2–19
HP e-DiagTools 2–13
HP-UX 1–11, 2–18
P
keyboard 1–5, 2–1, 2–3
password 1–14, 1–23, 1–25, 2–5
Passwords 1–23
PCI cards 2–11
ports 1–4
power 1–1, 1–2, 1–3, 1–5, 1–11, 2–2, 2–6,
2–11
Processor 1–24
processor 2–11
L
R
LAN 1–5, 2–8
LAN LED 1–3, 1–4
LAN LEDs 2–8
LED 2–1
Linux 1–11, 2–18
Locator button 1–2, 1–4
Locator LED 1–2, 1–3, 1–4, 1–5
Locator LED and Button 2–6
lock 1–5
rack-mount 1–1, 1–3, 1–6
rear panel 1–1, 1–5
regulatory 2–1
remote 1–26
Remote access 1–16
reset 1–5
Reset Configuration to Default 1–22
I
IPMI 1–26
K
M
Manage BootNext Setting 1–20
Management Processor 1–1, 1–4, 1–25
Memory 1–24
memory 2–11
Memory commands 1–19
modem 1–25
Monitor 1–21
monitor 1–4, 2–1, 2–5
mouse 1–5, 2–1, 2–4
MP 1–4, 1–5, 1–25, 2–9
MP LAN 1–4, 2–9
MP VGA port 1–21
Index–2
S
safety 1–6, 1–7
Script 1–17
Scripts 1–19
SCSI 1–5
security 1–14, 1–22, 1–23
Security/Password Menu 1–14, 1–23, 1–24
Select Active Console Input Devices 1–21
Select Active Console Output Devices 1–21
Select Active Standard Error Devices 1–21
serial 1–5, 1–25
Set Auto Boot TimeOu 1–20
Set System Date 1–22
Set System Time 1–22
Shell commands 1–19
HP Integrity rx2600 server and HP workstation zx6000 Getting Started Guide
Index
shut down 1–11
software 1–11
start 1–10
startup.nsh 1–17
support 2–16, 2–19
support ticket 2–16
system board 2–11
system configuration 1–1
System Configuration Menu 1–14, 1–22
System LED 1–2, 1–3, 2–6
System Management 10/100 LAN 1–4, 2–9
Time 1–22
TOC button 1–5
tools 1–7
tower 1–1, 1–3, 1–6
troubleshooting 1–26, 2–6
T
W
telnet 1–25
Terminal emulation 1–16
warranty 2–1
Windows 1–11, 2–18
U
USB 1–5
User 1–23
V
VGA 1–5, 1–21
HP Integrity rx2600 server and HP workstation zx6000 Getting Started Guide
Index–3
Index
Index–4
HP Integrity rx2600 server and HP workstation zx6000 Getting Started Guide