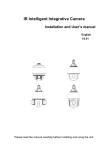
1
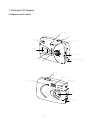
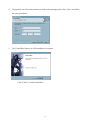
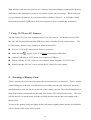
ViviCam 3355
Rev. 040317
-0-
INDEX
1.
2.
3.
4.
5.
6.
7.
8.
General Precautions
Introduction
Features of the ViviCam 3355
Capturing Images
Installing the driver and application Software
Transferring Images To Your Computer
Using The V3355 as a PC/Web Camera
Inserting a Memory Card
FCC STATEMENT
This device complies with Part 15 of the FCC Rules.
Operation is subject to the following two
conditions:
(1) This device may not cause harmful interference, and
(2) This device must accept any interference received, including interference that may cause
undesired operation.
Note:
This equipment has been tested and found to comply with the limits for Class B digital devices,
pursuant to Part 15 of the FCC rules. These limits are designed to provide reasonable
protection against harmful interference in a residential installation. This equipment generates,
uses and can radiate radio frequency energy and, if not installed and used in accordance with
the instructions, may cause harmful interference to radio communications. However, there is
no guarantee that interference will not occur in a particular installation. If this equipment
does cause harmful interference to radio or television reception, which can be determined by
turning the equipment off and on, the user is encouraged to try to correct the interference by
one or more of the following measures:
¡ Reorient or relocate the receiving antenna
¡ Increase the separation between the equipment and receiver
¡ Connect the equipment into an outlet on a circuit different from that to which the receiver is
connected
¡ Consult the dealer or an experienced radio/TV technician for help
Use of shielded cables is required to comply with Class B limits in Subpart B of Part 15 of the FCC
rules. Do not make any changes or modifications to the equipment unless otherwise specified in
the manual. If such changes or modifications should be made, you could be required to stop
operation of the equipment.
-1-
1. General Precautions and Warnings
Following these guidelines when using your V3355:
¦
¦
¦
¦
¦
¦
¦
Protect your camera away from the following:
- High temperatures and excessive humidity.
- Direct sunlight or other heat sources.
- Dust.
- Excessive vibration.
Do not use camera outdoors if it is raining or snowing.
If the lens or the viewfinder becomes dirty, clean them with a lens brush or soft, clean cloth.
Avoid touching the lens with your fingers.
If water or a foreign substance should get in the camera, turn the camera off immediately and
remove the batteries.
Do not open the camera case or attempt your own repairs. High-voltage internal components
may create risk of electrical shock or fire.
Do not open the battery compartment when the camera power is on.
Transfer important images to your computer as soon as possible to avoid losing image data.
Note: Images and movie clips can be stored and retained in camera memory only as long as a
battery is present and in good condition. If the battery goes dead or is removed your images
and movie clips will be lost. Make sure to download your images as soon as possible.
¦
Remove the batteries if the camera will not be used for an extended period of time. The
batteries may leak and soil the battery compartment. If the batteries leak, clean and wipe the
battery compartment carefully and install new batteries. Wash your hands carefully if you
touch the battery fluid.
¦
WARNING: Handling the USB and AV cables on this product may expose you to lead, a
chemical known to the State of California to cause birth defects or other reproductive
harm. Wash hands after handling.
¦
For drivers, revisions to this manual, and manuals in other languages please updates, refer to our
website.
TRADEMARK INFORMATION Microsoft® and Windows® are U.S. registered trademarks of Microsoft Corporation.
Pentium® is a registered trademark of Intel Corporation. Other names and products may be
trademarks or registered trademarks of their respective owner.
-2-
2. V3355 Introduction
2.1 Specifications
¦
¦
¦
¦
¦
¦
¦
¦
¦
¦
¦
Resolution:
Digital Still Images:
o 1280 x 1024 pixels
o 640 x 480 pixels
Movie clips:
o 320 x 240 pixels
PC Camera mode:
o 640 x 480 pixels
o 320 x 240 pixels
o 160 X 120 pixels
Still-Image Quality (compression) selections: High, and Low quality
Range of Focus: 3 feet to infinity from camera
24-bit full color
File formats:
o Still images: JPG
o Movie clips: AVI (without sound)
Memory:
o Internal Memory: 8MB SD RAM (approximately 5 MB buffer memory and 3 MB
image-storage memory)
o Removable memory: Secure Digital (SD) memory cards up to 128 MB (optional)
Flash Modes: Automatic, On/Fill, Off
Self-timer: 10 seconds
Power: (2) AA Alkaline batteries
Interface: USB (mass storage device)
Power Management: Automatically turns camera off if inactive for about 30 seconds.
Note: Due to the rapidly changing world of digital-imaging technology, these specifications are
subject to changed without notice.
-3-
2.2 Product Components and Accessories
Carefully unpack your ViviCam 33555 and ensure that you have the following items.
1.
2.
3.
4.
5.
6.
Digital Camera
USB cable
Camera hand strap
2 AA Batteries
User Manual
CD ROM with PC camera driver and application software
Note: The components and accessories that come with your ViviCam 3355 may be different
from those described in this manual. This is due to the fact that different retailers often specify
slightly different product inclusions and accessories to suit their market requirements, customer
demographics, and geographical preferences. Products very often vary between retailers
especially with accessories such as batteries, memory cards, cables, carrying cases/pouches, and
language support. Occasionally a retailer will specify a unique product color, appearance, and
internal memory capacity. Contact your dealer for precise product definition, and included
accessories.
-4-
3. ViviCam 3355 Features
3.1 Buttons and Controls
Power LED
Shutter
View finder
Power on/off
LCD panel
SD card Slot
Mode
Battery Compartment
Select
Shutter
Flash Light
Self-Timer LED
View finder
Lens
USB Connector
-5-
3.2 Status and Information LCD
7. Delete single image
11. Movie Mode
10. Battery Indicator
12. Self-timer
9. SD Card Indicator
8. Flash Mode
6. Delete all images
5. High Image Resolution
1. Image Counter
4. Low Image Resolution
2. USB Connection
3. Image Resolution Mode
1. Image Counter:
n
: The number of images (and movie clips) you have captured.
Note:
When the counter indicates “SEL” you are in a feature selection mode.
2. USB Connection:
n
: Indicates that the camera is connected to a PC by USB.
Note: When the camera is connected to your PC in the “mass storage mode”
(for downloading images) the Image Counter will indicate “Sto” (for Storage
mode.)
3. Image Resolution Mode:
n
: Indicating you are now able to set the still-image resolution
4. Low Image-Resolution is currently selected:
n
: 640 x 480 pixel resolution for still-images
5. High Image-Resolution is currently selected:
n
: 1280 x 1024 pixel resolution for still-images (default setting)
6. Multiple-Image Delete
n
: Delete all images and movie clips
7. Image Delete
-6-
n
: Delete a single image or movie clip
8. Flash Mode and Status Indicator:
n
Blinking: Indicates that the flash capacitor is charging
n
On: The flash is charged and ready
9. SD Card Indicator:
n
On when an SD card has been inserted
n
Off: An SD card is not present. Internal memory will be used.
Note: Like most digital cameras, the Vivicam 3355 has a memory card
“preference”. Whenever a memory card is present in the camera, the
memory card will be used in preference to internal memory.
10. Battery Indicator:
n
Two segments: the batteries are good. One segment: the batteries are OK.
n
Blinking: the batteries are low. Replace them immediately.
11. Movie Mode:
n
: The camera is set to movie mode, ready to capture short movie clips.
Note: In the movie mode the resolution will always be 320 x 240 and the quality
(compression) is not selectable, as it is defined by the video codec.
12. Self-Timer:
n
: Self-timer mode
3.3 Camera Function Selection
n
Press the Mode Button to select the desired function.
The function icons will display on the
status/information LCD panel. Press the Select (SET) button to confirm a selection.
n
As you press the Mode Button the Function icons will be presented as follows:
?
?
?
?
?
-7-
4. Capturing Images
4.1 Turning the Camera On and Off
n Power On: Press the Power button. The camera will beep and the power LED illuminates.
n
Power Off: Press the Power button again and camera will beep and turn off.
(The camera will automatically turn off if inactive after about 30 seconds when batteries are
fully charged. If the batteries are low the camera will power-off in less than 30 seconds.)
4.2 Capturing Images
n
Press the Shutter button to capture an image.
n
The LCD panel will increment by one after an image has been captured:
The camera will beep.
: Number of images (or movie clips) you have captured, so far.
: When the memory is full you will see “FUL.”
4.3 Self-Timer
If you would like to get into the image you may use the self-timer feature to delay image capture by
ten (10) seconds. Place the camera on a tripod or a flat, stabile surface. Turn on the camera.
” icon appears in the upper left-hand corner side of the
Press the Menu button until the “
information display.
n
Press the Mode button and look for the self-timer icon:
n
Press the Select (SET) button to start the self-timer.
n
The self-timer LED will blink and the camera will beep for 10 seconds.
n
After ten seconds the camera will capture the image.
n
The camera will exit the self-timer mode after each self-timed image.
.
4.4 Selecting the Image Resolution
Resolution is the size of a digital image measured in pixels (dots), expressed as the number of
horizontal pixels x number of vertical pixels. The ViviCam 3355 offers two resolution modes.
The highest (best) resolution is 1280 x 1024. This is called XGA resolution, and is symbolized as
“Hi” on the information display. The second choice of resolution is 640 x 480. This is called
VGA resolution, and is symbolized as “Lo” on the information display.
-8-
Hi resolution images are the best possible images from your camera. Lo resolution images are
noticeably smaller when you view them on your computer. Lo resolution is not recommended for
individual digital images. The primary advantage to Lo resolution, however, is that you may store
more images than Hi resolution.
n
Press the Mode button and look for the resolution icon:
n
Press the Select (SET) button.
.
appears. The camera is now set to low image resolution,
640 x 480 pixels. Repeat these steps to return to high resolution.
n
The default camera resolution setting is high image resolution, 1280 x 1024 pixels.
4.5 Capturing a Movie
n
Press the Mode button. Look for the movie icon:
n
Press the Select (SET) button once to begin capturing a movie clip.
n
Press the Shutter button to stop capturing a movie.
4.6 Deleting Images
1. Delete all images and Movie clips
n
Press the Mode button. Look for the delete-all icon:
n
Press the Select (SET) button twice to confirm the deletion of all images.
n
The image counter will reset to “000”.
.
2. Delete the last image or movie clip
n
Press the Mode button. Look for the delete-last icon:
n
Press the Select (SET) button to confirm the deletion of the last image.
n
The image counter will decrement by one. (e.g. “012” ?
.
“011”)
4.7 Using the Flash
Under low-light conditions you may wish to use the integral three-mode flash (strobe). The flash
will perform best when your subject is six to eight feet from the camera. Try the flash several times
at different ranges to become accustomed to its capabilities.
Fill-flash is a mode where the flash will alwasy fire, even if there is anple lighting. This is good for
conditions of high-contrast or deep shadows.
-9-
1. Flash Off
Press the Mode button until
appears. You are in Selection mode.
Press the Select (SET) button until
appears. Press the Mode button until
appears.
Press the Select (SET) button to confirm your selection and exit.
2. Automatic Flash
Press the Mode button until
appears. You are in Selection mode.
Press the Select (SET) button until
appears. Press the Mode button until
appears.
Press the Select (SET) button to confirm your selection and exit.
3. Flash On.
(Fill flash)
Press the Mode button until
appears. You are in Selection mode.
Press the Select (SET) button until
appears. Press the Mode button until
appears.
Press the Select (SET) button to confirm your selection and exit.
When capturing images with the flash, the
icon on the LCD panel will blink while the flash
recharges in preparation for the next flash shot. When full charged, the flash icon will display
without flashing.
4.8 Selecting the Image Quality
Image compression is a technique that allows digital images to be stored efficiently in the cameras
memory. The camera has 3 MB of internal (built-in) memory space for images and movie clips.
Every image must be electronically compressed (squeezed) so that a reasonable number of images
may be stored in the available memory. If you compress your images more, you can store more
images. However, when images are compressed they loose quality. Too much compression
reduces the visual quality of your digital images.
The ViviCam 3355 has two compression settings. High compression, (symbolized by “ ”) results
in highly compressed images. The camera can store twice the number of images using High
compression. Low compression (symbolized by “ ”) will offer better images. The default
camera setting is high image quality.
To change to low image quality:
n
Press the Mode button until
n
Press the Select (SET) button to enter select mode.
n
Press the Mode button until
appears.
appears. (The default setting is high image quality.)
- 10 -
n
Press the Select button select to
n
Press the Mode button until
n
Press the Select (SET) button to confirm and exit the selection mode.
. Image quality is now set to low.
appears.
4.9 PC/Web Camera mode
¦
Press the Mode button until
appears.
¦
Press the Select (SET) button to enter select mode.
¦
Press the Mode button until
¦
Press the Select (SET) button until
¦
Connect the USB cable to both camera and PC. Start your favorite video application
appears.
appears.
Note: All Windows users must install the PC/Web camera driver before
connecting the Vivicam 3355 in PC Camera mode for the very first time.
4.10 Selecting the Lighting Frequency
When capturing images or movie clips under indoor lighting the image quality will be best if you
set the camera to match the frequency of the room-lighting. In generally 60Hz frequency is used
in United States and Asia. 50Hz is most common in UK, Japan, and Europe.
To avoid flickering when capturing images with indoor lighting select the appropriate frequency as
follows:
n
Press the Mode button until
n
Press the Select (SET) button to enter select mode.
n
Press the Mode button until
n
Press the Select (SET) button select to
n
Press the Mode button until
n
Press the Select (SET) button to confirm and exit the selection mode
appears.
appears. (The default setting is 50Hz.)
. (The camera is now set to 60Hz.)
appears.
- 11 -
5. Installing the V3355 PC Camera driver and U-Lead Photo Express
5.1 Computer System Requirements
Please check your PC system requirements before installing the software:
1. Windows 98SE, ME, 2000, or XP.
2. Pentium 400 MHz CPU, or higher
3. CD-ROM drive
4. Available USB port. Windows XP users with USB 2.0 should first install Service Pack 1.
5. ActiveX version 9 is recommended.
5.2 Installation on Windows 98 SE, ME, 2000, and XP
1. Turn on your computer
2. Insert the V3355 CD ROM into the CD-ROM drive. The CD ROM will run automatically.
The following welcome screen will appear.
Click the “Install PC Camera Driver”
- 12 -
3. Your computer will display as follows:
Click “Next” and follow setup procedure.
4. The PC camera software installation is complete.
Click “Finish” to finish installation.
5. Open the folder “V3355” on the desktop to access the PCCam.
- 13 -
5.2 Installation of Ulead Photo Express 4.0 SE (Windows 98 SE, ME, 2000, XP)
1.
Click the “Install Ulead Photo Express 4.0 SE”
2.
Your computer will display as follows:
To display the list of languages available, click on the down arrow and highlight your selection.
Click “OK” to continue.
3.
The installation will display as follows:
Click “Next” and follow the setup procedures.
- 14 -
4.
If requested, enter the serial number provided in the packaging, then click “Next” and follow
the setup procedures.
5.
The Ulead Photo Express 4.0 SE installation is complete.
Click “Finish” to finish installation.
- 15 -
5.3 Read User Manual
Click the “User Manual” to read the user manual.
For User manual updates, refer to the Vivitar website at www.vivitar.com
- 16 -
6. Transferring Images To Your Computer
You can share recorded images and video clips with your family or friends via e-mail or post them
on the Web. Before doing those things, you need to connect the camera to your computer by using
the USB cable and then transfer the images and video clips.
The Vivicam 3355 is a Mass Storage Device (MSD). Windows Me, 2000, and XP users can
transfer images by simply connecting the camera and your computer with a USB cable without
driver installation. Windows 98 users must install the USB driver before connecting the cmaera to
their PC for thefirst time.
To transfer images and video clips from the camera to your computer, follow the steps below:
Step 1: Install the USB driver (only for Windows 98) as described in the previous section.
Step 2: Connecting the camera to your computer
Step 3: Downloading images and video clips
6.1 Connecting V3355 to PC
Connect the USB cable to the computer’s USB port and the USB connector of the V3355.
1.
Connect one end of the USB cable to an available USB port on your computer.
2.
Connect the other end of the USB cable to the USB connector on the camera.
3.
Turn the camera on. Your computers operating system will recognize the camera.
V3355
Computer
- 17 -
6.2 Finding your Images
1. From the Windows desktop double click on “My Computer”
2. Look for a new “removable disk” icon. This “removable disk” is actually the memory (or
memory card) in your camera. Typically, the camera will be assigned drive letter “e” or higher.
3. Double click on the removable disk and locate the DCIM folder.
4. Double click on the DCIM folder to open it to find more folders such as “100image”
5. Your recorded images and video clips will be inside these folders
6. Copy & Paste or Drag-N-Drop image and video files to a folder on your computer
Mac users: double-click the “unlabeled” disk drive icon on our desktop. iPhoto may automatically
launch. The volume label will vary depending upon whether you use internal camera memory, or a
memory card.
6.3 Transferring (downloading) your Images
When the camera is turned on and connected to your computer, it is considered to be a disk drive,
just like a floppy disk or CD. You can download (transfer) images by copying them from the
“removable disk” (“untitled” disk on a Macintosh) to your computer hard driver as described in the
prior section.
For Computers Running Windows Open the “removable disk” and subsequent folders by double clicking on them. Double click on
the folder. Your images are inside these folder(s). Select the images that you want, then choose
“Copy” from the “Edit” menu. Open the destination location (folder) and choose “Paste” from the
“Edit” menu.
You may also drag and drop image files from the camera to a desired location.
For Computers Running Mac OS and Desktop/LX Open the “untitled” disk window and the hard disk or the destination location. Drag and drop
from the camera disk to the desired destination folder.
- 18 -
Note: Memory card users may prefer to use a memory card reader (highly recommended). Memory
card readers offer advantages in terms of convenience, speed, and cost-savings. While connected
to your computer the batteries in your camera will be continue to be used.
A card reader, which
has no batteries and uses USB power from your computer, will save considerably on batteries.
7. Using V3355 as a PC Camera
You can connect V3355 to your computer and use it as a PC camera. All Windows users (98SE,
Me, 200, and XP) must first install the USB driver before using the PC/web camera feature.
The
PC/Web camera feature is only available on Windows-based PCs.
n
Set your V3355 to PC camera mode. Refer to section 4.9.
n
Make sure that
n
Connect USB cable to V3355 and to your computer’s USB port.
n
Double click the “V3355” folder on your computer. (Start, Programs, V3355, PCCam.)
n
Double click the “PCCam” icon to activate the PC camera for video capture.
appears on the LCD before connecting the USB cable.
8. Inserting a Memory Card
To use a memory card you must first examne the card to make sure it is unlocked.
There is usually
a small sliding tab on the edge of an SD memory card. Make sure the card is unlocked. Insert the
unlocked memory card into the slot on the side of the camera, pins first. The colorful manufacturers
label of the memory card should face the back of the camera. The card will insert easily.
The card
will not insert if it is upside down. Push the card fully into the card slot and it will engage with a
distinct click.
To remove the memory card press lightly on the card (push it slightly further into the slot) and there
will be a distinct click as the card is ejected.
- 19 -