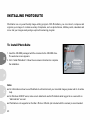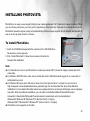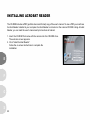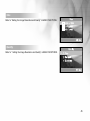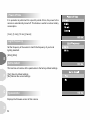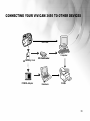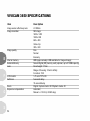
1
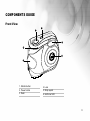
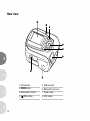
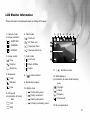
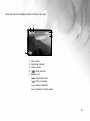
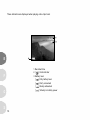
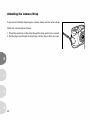
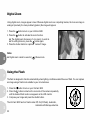
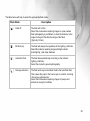
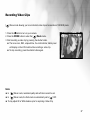
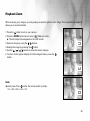
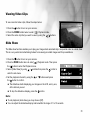
V3650 User Manual
English
041011TP
NOTICE
FCC Statement
This device complies with Part 15 of the FCC Rules. Operation is subject to the following two conditions:
This device may not cause harmful interference, and
This device must accept any interference received, including interference that may cause undesired
operation.
Note: This equipment has been tested and found to comply with the limits for Class B digital devices,
pursuant to Part 15 of the FCC rules. These limits are designed to provide reasonable protection against
harmful interference in a residential installation. This equipment generates, uses and can radiate radio
frequency energy and, if not installed and used in accordance with the instructions, may cause harmful
interference to radio communications. However, there is no guarantee that interference will not occur in a
particular installation. If this equipment does cause harmful interference to radio or television reception,
which can be determined by turning the equipment off and on, the user is encouraged to try to correct
the interference by one or more of the following measures:
Reorient or relocate the receiving antenna.
Increase the separation between the equipment and receiver.
Connect the equipment into an outlet on a circuit different from that to which the receiver is connected.
Consult the dealer or an experienced radio/TV technician for help.
Use of shielded cable is required to comply with Class B limits in Subpart B of Part 15 of the FCC rules.
Do not make any changes or modifications to the equipment unless otherwise specified in the manual. If
such changes or modifications should be made, you could be required to stop operation of the equipment.
1
READ THIS FIRST
Trademark Information
Microsoft® and Windows® are U.S. registered trademarks of Microsoft Corporation.
Pentium® is a registered trademark of Intel Corporation.
Macintosh is a trademark of Apple Computer, Inc.
SDTM, PhotoSuite and PhotoVista are trademarks.
Other names and products may be trademarks or registered trademarks of their respective owners.
Product Information
E
F
G
Product design and specifications are subject to change without notice. This includes primary product
specifications, software, software drivers, and user’s manual. This User’s Manual is a general reference guide
for the product.
The product and accessories that come with your ViviCam 3650 may be different from those described in this
manual. This is due to the fact that different retailers often specify slightly different product inclusions and
accessories to suit their market requirements, customer demographics, and geographical preferences.
Products very often vary between retailers especially with accessories such as batteries, chargers, memory
cards, cables, carrying cases/pouches, and language support. Occasionally a retailer will specify a unique
product color, appearance, and internal memory capacity. Contact your dealer for precise product definition
and included accessories.
The manufacturer assumes no liability for any errors or discrepancies in this user’s manual.
For user manual and driver updates, refer to our website or contact your dealer.
S
2
FOR YOUR SAFETY
Warnings
Do not use the camera if any foreign objects have entered the camera. Turn the camera off, remove the
batteries. Contact your dealer or authorized service facility. Do not continue to use the camera as this may
cause a fire or an electrical shock.
Do not place the camera in an unstable location such as on a wobbly table or sloping surface where the
camera may fall or tip over and cause injury. If the camera has been dropped or damaged, turn the camera off.
Contact your dealer or authorized service facility. Do not continue to use the camera as this may cause a fire
or an electrical shock.
WARNING: Handling the USB on this product may expose you to lead, a chemical known to the State of
California to cause birth defects or other reproductive harm. Wash hands after handling.
3
FOR YOUR SAFETY
Warnings
Do not attempt to modify this camera. Do not remove the camera casing. This may cause a fire or an electrical
shock. Internal inspection and repairs should only be carried out by an authorized service facility.
Never operate this camera in any way while driving a vehicle. This may cause a traffic accident.
Do not cover or wrap the camera with a cloth. This may cause heat to build up, distort the case and cause a
fire. Always use the camera and its accessories in well-ventilated locations.
E
Do not move the camera while it is switched on. Ensure that any connector cords or cables to other devices
are disconnected before moving the camera. Failure to do so may damage the cords or cables and cause a
fire or an electrical shock.
F
G
S
4
CONTENTS
INTRODUCTION ................................... 7
Overview ........................................................... 7
Package Contents ............................................ 8
Optional Accessories ....................................... 8
COMPONENTS GUIDE ......................... 9
Front View ......................................................... 9
Rear View .......................................................... 10
Multi-Selector Control ....................................... 11
LED Indicators .................................................. 12
LCD Monitor Information .................................. 13
PREPARING YOUR VIVICAM 3650 ...... 17
Installing the Batteries (Optional Accessory) .. 17
Loading an SD Memory Card
(Optional Accessory) ....................................... 18
Setting the Date and Time ............................... 19
Choosing the Language .................................. 19
Attaching the Camera Strap ............................ 20
BASIC FUNCTIONS ............................. 21
Turning the Power On ....................................... 21
Using the LCD Monitor ..................................... 21
Digital Zoom ..................................................... 22
Using the Flash ................................................ 22
Self-Timer ......................................................... 24
Setting the Image Resolution and Quality ....... 25
Recording Video Clips.....................................27
IMAGE PLAYBACK ............................... 28
Single Image Replay ........................................ 28
Playback Zoom ................................................ 29
Viewing Nine Images at a Time ....................... 30
Viewing Video Clips ......................................... 31
Slide Show ........................................................ 31
Protecting Images ............................................ 32
ERASING .............................................. 33
Deleting Images and Video Clips .................... 33
Deleting All Images and Video Clips ............... 34
Formatting an SD Memory Card or Internal
Memory ............................................................. 35
TRANSFERRING IMAGES AND VIDEO
CLIPS TO YOUR COMPUTER................36
Step 1: Installing the USB Driver on Windows
Computers.......................................................37
Step 2: Connecting the Camera to Your
Computer.........................................................38
Step 3: Downloading Recorded Images and
Video Clips.......................................................39
5
INSTALLING PHOTOSUITE.....................40
INSTALLING PHOTOVISTA......................41
INSTALLING ACROBAT READER............42
USER MANUAL.......................................43
E
LIST OF MENU OPTIONS........................44
Capture Menu......................................................44
Playback Menu...................................................49
Video Clip Menu.................................................50
Setup Menu.........................................................51
CONNECTING YOUR VIVICAM 3650
TO OTHER DEVICES................................53
VIVICAM 3650 SPECIFICATIONS............54
F
G
S
6
INTRODUCTION
Overview
Your new ViviCam 3650 delivers high quality, 1600 x 1200 resolution images using a 2.0 Megapixel sensor.
An auto-flash sensor automatically detects the shooting (lighting) conditions and determines whether the flash
should be used. This feature helps ensure that your images turn out right.
Internal (built-in) memory allows you to capture and store images without the immediate need for an additional
memory card. However, you may wish to expand the memory capacity by using an external memory card.
In addition to still images, you can record short videos by using the movie function.
Images you have captured can be downloaded to your computer using the USB cable (A USB driver is required
for Win 98 ). Y ou can enhance and retouch your images on your computer by using the provided editing software,
or image editing software you may already own. You may share your images with your friends via e-mail, in a
report, or on a website.
7
Package Contents
Carefully unpack your ViviCam 3650 and ensure that you have the following items. In the event that any item is
missing or if you find any mismatch or damage, promptly contact to your dealer.
Digital Camera
User’s Manual
USB Cable
Camera Strap
Software CD-ROM
Camera Pouch
Optional Accessories
E
F
G
2 AA Batteries
Note:
The accessories that come with your ViviCam 3650 may be different from those described in this manual due to
the fact that different retailers often specify slightly different product inclusions and accessories to suit their
market requirements, customer demographics, and geographical preferences. Products very often vary between retailers especially with accessories such as batteries, chargers, memory cards, cables, carrying cases/
pouches, and language support. Occasionally a retailer will specify a unique product color, appearance, and
internal memory capacity. Contact your dealer for precise product definition and included accessories.
S
8
COMPONENTS GUIDE
Front View
1
2
3
6
4
5
1. Shutter button
4. Lens
2. Power button
5. Strap eyelet
3. Flash
6. Self-timer LED
9
Rear view
8
1
2
3
4
5
E
7
F
6
G
S
10
1. LED indicator
5. USB connector
2. MODE button
6. Battery/SD card cover
3. Multi-Selector Control
7. Tripod socket
4.
8. LCD monitor
MENU button
Multi-Selector Control
1
5
2
3
4
1.
Arrow button (Up)
4.
Flash button
Thumbnail button
2.
3.
Delete button
Arrow button (Right)
Display button
OK button
Arrow button (Down)
5.
Arrow button (Left)
Self-timer
Digital zoom button
11
LED Indicators
Indicator
Status
Description/Activity
LED indicator
Solid red
The ViviCam 3650 is powering up
No
LED indicator
Solid green
The ViviCam 3650 is powered and ready
Yes *(1)
LED indicator
Blinking red
Camera error
Yes *(3)
LED indicator
Blinking red
Charging the flash
No
LED indicator
Blinking green
Image is being recorded to memory
No
LED indicator
Solid red
USB communication/transfer in progress
No
LED indicator
Solid green
The ViviCam 3650 is ready to record images
Yes *(1)
E
F
Sound
(or movies)
Self-timer indicator
Blinking red
The self-timer function is activated
No
----
----
Error message
Yes *(3)
----
----
Valid button event
Yes *(1)
(1) The ViviCam 3650 sounds one beep.
(3) The ViviCam 3650 sounds three beeps.
G
S
12
LCD Monitor Information
These indicators are displayed when recording still images:
1. Capture mode
2. Image resolution
6. Flash mode
] Flash off
[
[
] 1600X1200
[
[
] 1280X960
[
A
[
] 640X480
[
A
] Fill flash (on)
] Automatic flash
] Red-eye reduction
3. Image quality
] Fine
[
7. Color mode
[
] Full Color
[
] Normal
[
] Black & White
[
] Economy
[
] Sepia
4. Sharpness
[
H
[
[
] Medium
L
] Card indicator
8. [
] High
] Low
5. ISO speed
(no indication for Auto)
Auto
[
ISO
100
] 100
[
ISO
200
] 200
9. Remaining images
10. Battery level
[
] Fully battery level
11. [
] Self-timer mode
12. White balance
(no indication for auto white balance)
Auto
[
] Daylight
[
] Cloudy
[
] Fairly consumed
[
] Tungsten
[
] Nearly exhausted
[
] Fluorescent
[
] Virtually no battery power
13. EV compensation
13
These indicators are displayed when playing images back:
22/26
E
1. Reverse key
2. [
3.
4.
5.
6.
F
G
S
14
] Card indicator
Forward key
] Protect indicator
[
Current image/total number of images
Battery level
[
] Fully battery level
[
] Fairly consumed
[
] Nearly exhausted
[
] Virtually no battery power
These indicators are displayed when recording video clips:
1. Movie mode
2. Recording indicator
3. Video counter
4. [
] Card indicator
5. Battery level
[
] Fully battery level
[
] Fairly consumed
[
] Nearly exhausted
[
] Virtually no battery power
15
These indicators are displayed when playing video clips back:
00:00
E
1.Recorded time
] Card indicator
2.[
F
3. Battery level
[
] Fully battery level
G
S
16
[
] Fairly consumed
[
] Nearly exhausted
[
] Virtually no battery power
PREPARING YOUR VIVICAM 3650
Installing the Batteries (Optional Accessory)
You may use 2 AA size batteries (either Alkaline or Ni-MH) to power your camera.
1. Make sure your ViviCam 3650 is off.
2. Slide the battery/SD card cover.
3. Insert the batteries noting the correct polarity marks (+ or -).
4. Close the battery/SD card cover. Slide into locked position.
Note:
Never use manganese batteries.
Never use different types of batteries (together) or mix old and new batteries.
Avoid using the batteries in extremely cold environments as low temperatures may shorten the battery life and
reduce the camera performance.
Low temperature will influence alkaline battery performance.
Ni-MH rechargeable batteries are recommended.
If you won’t be using the batteries for an extended period of time, remove them from the camera to prevent the
leakage or corrosion.
New batteries or batteries that have not been used for an extended period of time (batteries that pass the
expiry date are exceptions) might affect the number of images that can be captured. Therefore, to maximize
their performance and lifetime, we recommend that you fully charge the batteries and discharge them for at
least one complete cycle before use.
You may also use a CR-V3 lithium battery pack.
17
Loading an SD Memory Card (Optional Accessory)
Your camera comes with internal memory, allowing you to store images and
video clips in the ViviCam 3650. However, you can expand the memory capacity by using an SD memory card. Optional SD memory cards provide
removable, reusable storage for images and video clips.
1. Make sure your ViviCam 3650 is off.
2. Open the SD card/battery cover.
3. Insert the SD memory card.
If the card cannot be inserted, check the orientation.
4. Close the SD card/battery cover.
E
F
Note:
To prevent valuable data from being accidentally erased from
an SD memory card you can slide the write protect tab (on the side of the SD memory card) to “LOCK”.
To save, edit, or erase data on an SD memory card, you must unlock the card.
If a memory card is present in the camera; the camera will automatically use the card in preference to internal
memory.
Be sure to format the memory card with this camera before its initial usage.
It is recommended that your format you memory occasionally to ensure
optimal performance.
To remove an SD memory card
G
S
1. Make sure your ViviCam 3650 is off.
2. Open the SD card/battery cover.
3. Press lightly on the edge of the memory card and it will eject.
Note:
Memory cards may become warm during use; observe caution when removing memory cards.
When a memory card is removed from the camera; the camera will automatically revert to using internal memory.
18
Setting the Date and Time
The Date/Time screen will be presented if/when:
The ViviCam 3650 is turned on for the first time.
The ViviCam 3650 is turned on after removing the batteries for a long
period of time.
When the date and time setting screen appears, follow these steps to set
the correct date and time.
1. Enter the values of the year, month, day and the time by using
the
/
/ / buttons.
To increase the value, press the
button.
To decrease the value, press the
button.
2. Press the
button after all fields are set.
Choosing the Language
Follow the steps below to set the OSD (On-Screen Display) language.
1. Select a language that you prefer by using the
2. Press the
/
buttons.
button to confirm.
Note:
The language setting will be retained even if the ViviCam 3650 is turned off.
19
Attaching the Camera Strap
To prevent accidentally dropping your camera, always use the camera strap.
Attach the camera strap as follows:
1. Thread the small loop of the strap through the strap eyelet on the camera.
2. Pull the large loop through the small loop until the strap is firmly secured.
E
F
G
S
20
BASIC FUNCTIONS
Turning the Power On
1. Press and hold the
button for two seconds to turn on the camera.
The LED indicator lights red while the camera is initialized.
Turning the Power Off
Press the
button again to turn off the camera.
Using the LCD Monitor
The LCD monitor can help you while capturing images, replay recorded images/video clips, and adjust camera
settings.
The mode icons, text and numbers that are displayed on the LCD monitor will vary according to the current
settings.
1. Press the
button to turn on your ViviCam 3650.
2. Compose your image on the LCD monitor.
3. Press the shutter button.
Note:
In the Capture mode, pressing
display button will select OSD Off/OSD On.
The LCD monitor is difficult to see in strong sunlight. This is not a malfunction.
21
Digital Zoom
Using digital zoom, images appear closer. Whereas digital zoom is a compelling feature, the more an image is
enlarged (zoomed), the more pixilated (grainier) the image will appear.
1. Press the
button to turn on your ViviCam 3650.
button to activate the zoom function.
2. Press the
The digital zoom choices are 1x (no zoom), 2x, and 4x.
To exit digital zoom, press the
button again.
3. Press the shutter button to capture a “zoomed” image.
Note:
E
Digital zoom cannot be used in [
] Movie mode.
Using the Flash
F
The flash is designed to function automatically when lighting conditions warrant the use of flash. You can capture
an image using a flash mode suitable to your circumstances.
G
S
1. Press the
button to turn on your ViviCam 3650.
2. Press the
button located on the rear side of the camera repeatedly
until the desired flash mode icon appears on the LCD monitor.
3. Compose your image and press the shutter button.
The ViviCam 3650 has four flash modes: Off, On (Fill flash), Automatic,
Automatic with Red-eye reduction.
22
The table below will help to select the appropriate flash mode:
Flash Mode
Description
[
]
Flash off
The flash will not fire.
Select this mode when capturing images in a place where
flash photography is prohibited, or when the distance to the
subject is beyond the effective range of the flash.
(Typically 12 feet)
[
]
Fill flash (on)
The flash will always fire regardless of the lighting conditions.
Select this mode for capturing images with high contrast
(backlighting ) and deep shadows.
]
Automatic flash
The flash fires automatically according to the ambient
lighting conditions.
Select this mode for general photography.
]
Red-eye reduction
The flash emits a precursor-flash before the main flash fires.
This causes the pupil in the human eye to constrict, reducing
the red-eye phenomenon.
Select this mode when capturing images of people and
animals in low-light conditions.
[
A
[
A
23
Self-Timer
By using the
self-timer you can get into the scene when capturing group shots.
Self-timer duration can be set to 5 seconds or 10 seconds. Self-timer mode appears cyclically as [05] --> [10]-> [Display Off]. After the self-timer is set, the shutter automatically releases after 5 seconds or 10 seconds. The
self-timer lamp starts blinking relatively slow for the first 2 seconds or the first 7 seconds and then blinking
rapidly for the last 3 seconds.
E
1. Secure the camera to a tripod or place it on a stable surface.
2. Press the
button to turn on your camera.
3. Compose your image.
4. Press the
self-timer button.
5. Press the shutter button.
The count down is displayed on the LCD monitor.
To cancel the self-timer, press the
button to disrupt the sequence.
F
G
Note:
After each self-timed image is captured, the self-timer is turned OFF.
S
24
Setting the Image Resolution and Quality
Resolution and quality settings determine the pixel size (dimension), image file size, and compression ratio for
your images. These settings affect the number of images that can be stored in memory, or on an SD memory card.
As you get to know the ViviCam 3650, it is recommended that you try each quality and resolution setting to get an
appreciation for the effects that these settings will have on your images.
Higher resolution and higher quality images offer the best photographic results but produce large files sizes.
Therefore, fewer images will take up more memory space.
High resolution and quality settings are recommended for printed output and situations requiring the finest detail.
Lower resolution/quality images take up less memory space and may be quite suitable for sharing images via
e-mail, in a report, or on a web page.
To change image resolution or quality settings perform the steps below:
1. Press the
2. Press the
by using the
button to turn on your ViviCam 3650.
button to enter the Capture menu and select [Size] or [Quality]
/
button.
3. Set [Size] or [Quality] by pressing the
/
button in the main menu or
press the
button to enter the sub-menu, then press the
confirm the setting.
button to
25
Number of Recordable Images
The frame counter indicates the approximate number of images that can be stored on the internal memory or the
SD memory card at the ViviCam 3650’s image quality and size settings. The number of recordable images may
vary depending on the recorded subject and the capacity of the memory card, or if there are files other than
images, or when the recording is made while switching the image quality/resolution.
Resolution Quality Compression Internal 8MB SD 16MB SD 32MB SD 64MB SD 128MB SD 256MB SD 512MB SD
Memory Memory Memory Memory Memory Memory
Memory
Memory
Ratio
Card
Card
Card
Card
Card
Card
Card
1600 x 1200
E
1280 x 960
F
640 x 480
G
*
S
26
8:1
16
25
50
100
200
400
800
1600
12:1
19
31
62
124
248
496
992
1984
16:1
21
35
70
140
280
560
1120
2240
8:1
21
34
68
136
272
544
1088
2176
12:1
29
47
94
188
376
752
1504
3008
16:1
30
49
98
196
392
784
1568
3136
8:1
58
94
188
376
752
1504
3008
6016
12:1
88
141
282
564
1128
2256
4512
9024
16:1
97
156
312
624
1248
2496
4992
9984
The above data shows standard test results. The actual capacity varies according to the shooting con ditions and
conditions.
Recording Video Clips
[
] Movie mode allowing you to record silent video clips at a resolution of 320X240 pixels.
button to turn on your camera.
1. Press the
2. Press the MODE button to enter the [
] Movie mode.
3. Start recording a video clip by pressing the shutter button.
The movie icon, REC , elapsed time, the card indicator, battery level
will display on the LCD monitor while recording a video clip.
To stop recording, press the shutter button again.
Note:
In [
] Movie mode, resolution/quality and self-timer cannot be set.
In [
] Movie mode, the flash mode is automatically set to [
] OFF.
To may adjust EV or White balance prior to capturing a Video Clip.
27
IMAGE PLAYBACK
In [
] Playback mode you can view your images and video clips. You can even magnify (zoom in on) your
images. Playback mode provides a thumbnail image display function that allows you to quickly search for the
image that you want. You may view your images in a slideshow.
Single Image Replay
To Play back still images one image at a time.
E
F
button to turn on your camera.
1. Press the
2. Press the MODE button twice to enter [
] Playback mode.
The last recorded image appears on the LCD.
3. View and select your recorded images by using the / buttons.
To view the previous image, press the
button.
To view the next image, press the
button.
22/26
Note:
G
To exit [
] Playback mode, press MODE button.
If there is no image stored in the internal memory or on the memory card, [No Image] appears on the LCD.
S
28
Playback Zoom
While reviewing your images, you may enlarge a selected portion of an image. This magnification capability
allows you to view fine details.
1. Press the
button to turn on your camera.
2. Press the MODE button twice to enter [
] Playback mode.
The last image frame appears on the LCD monitor.
3. Select an image by using the / buttons.
4. Enlarge the image by pressing the
button.
5. Use the
/
/ / buttons to select the area to enlarge.
6. To return to the regular display from 4X-enlarged status, press the
button.
Note:
Each press of the
button, the modes switch cyclically:
1X—>2X—>3X—>4X—>1X.
29
Viewing Nine Images at a Time
This function allows you to view nine thumbnail images on the LCD monitor simultaneously so that you can quickly
scan for a particular image.
E
1. Press the
button to turn on your camera.
2. Press the MODE button twice to enter [
] Playback mode.
3. Press the
thumbnail button and nine thumbnail images appear on the
LCD monitor. (Assuming there are nine or more recorded images in the
memory.)
4. Use the
/
/ /
buttons to move the cursor to select the image to
be displayed at regular size.
5. Press the
button to display the selected image on the full screen.
F
G
S
30
Viewing Video Clips
To view recorded video clips, follow the steps below:
00:00
1. Press the
button to turn on your camera.
2. Press the MODE button twice to enter [
] Playback mode.
3. Select the video clip that you want to view by using the
/ buttons.
Slide Show
The Slide show function enables you to play your images back automatically in sequential order as a slide show.
This is a very useful and entertaining feature for reviewing recorded images and for presentations.
button to turn on your camera.
1. Press the
2. Press he MODE button twice to enter [
] Playback mode. Then press
the
button to enter the Playback menu.
3. Select [Slide Show] by using
/
buttons then press the
button to
enter the sub-menu.
or
buttons and press
4. Set the playback interval by using the
the
button to confirm.
The slideshow starts displaying your images on the LCD, one by one,
at the interval you set.
To stop the slideshow display, press the
button.
Note:
To exit playback (slide show) you may choose [Off].
You can adjust the slideshow display interval within the range of 1 to 10 seconds.
31
Protecting Images
This feature allows you to prevent images from being accidentally erased.
1. Press the
button to turn on your camera.
] Playback mode. Then press
2. Press the MODE button twice to enter [
E
the
button to enter the Playback menu.
3. Select [Protect] by using the
/
buttons, and press the
4. You can protect one image or all images at one time by
using the
/
buttons, and press the
button.
Protect One: Protect one image
Protect All: Protect all images
5. Select [Unlock] or [Lock] by using the
/
buttons.
Unlock: Unlock the protected image.
Lock: Protect the selected image or all images.
6. Press the
button again to confirm the setting.
F
G
S
32
button.
22/26
ERASING
Deleting Images and Video Clips
You can delete a captured image or a recorded video clip at a time by pressing the
delete button.
1. Press the
button to turn on your camera.
2. Press the MODE button continuously to enter [
] Playback mode.
The last image frame appears on the LCD monitor.
3. View and select unwanted image by using the / buttons, then press
the
delete button.
4. To delete this image, select [OK] by using the
/
buttons and press
the
button.
5. Continue the deletion if necessary.
If all images are deleted, [No Image] will pop up.
To exit the deletion, press again the MODE button again.
Note:
Please note that deleted images cannot be recovered. Exercise adequate caution before deleting a file.
Protected images cannot be deleted with the erase function.
33
Deleting All Images and Video Clips
1. Press the
button to turn on your camera.
] Playback mode. Then press
2. Press twice the MODE button to enter [
the
button to enter the Playback menu.
/
button, and press the
button.
3. Select [Delete] by using the
4. Select [Delete All] by using the
/
button,then press the
button
to confirm the deletion.
5. To delete all images, select [OK] by using the
/
button and press
the
button.
If all images are deleted, [No image] will pop up.
E
F
G
Note:
Please be aware of that deleted images cannot be recovered. Exercise adequate caution before deleting a file.
Protected images cannot be deleted with the erase function.
If a memory card is present; the camera will automatically use the card in preference to internal memory.
S
34
Formatting an SD Memory Card or Internal Memory
This utility formats the internal memory (or memory card) and erases all stored images and data.
1. Press the
button to turn on your camera.
] Playback mode. Then press
2. Press the MODE button twice to enter [
the
button to enter the Playback menu.
3. Select [Delete] by using the
/
buttons, and press the
button.
4. Select [Format ] by using the
/
buttons, and press the
button.
5. If you want to format the SD memory card or the internal memory choose
[OK] by pressing
/
buttons, then press the
button to confirm.
To cancel the action, select [Cancel] instead.
[No Image] pops up after the SD memory card or the internal memory
is been formatted.
Note:
Be sure the SD memory card is properly inserted into the camera before formatting it.
To format images or video clips recorded in the internal memory, be sure to remove your SD memory card first.
Formatting will erase all information (even unrelated data) from the memory/card.
Format your memory card occasionally (perhaps weekly) to ensure optimal performance.
35
TRANSFERRING IMAGES AND VIDEO CLIPS TO YOUR
COMPUTER
You can share recorded images and video clips with your family or friends via e-mail or post them on the Web.
Before doing those things, you need to connect the camera to your computer by using the USB cable and then
transfer the images and video clips.
To transfer images and video clips from the camera to your computer, follow the steps below:
Step 1: Installing the USB driver (only for Windows 98)
Step 2: Connecting the camera to your computer
Step 3: Downloading images and video clips
E
F
System Requirements (Windows)
System Requirements (Macintosh)
CPU
Pentium 400 MHz processor or higher
G3/G4
OS
Windows98SE/Me/2000/XP
OS 9.0 or higher
Memory (System RAM)
128 MB
128 MB
Free Space on Hard Disk
128 MB hard disk space
128 MB hard disk space
Required Devices
CD-ROM Drive, available USB Port
CD-ROM Drive, available USB Port
G
S
36
Step 1: Installing the USB Driver on Windows Computers
The USB driver on the supplied CD-ROM is exclusively for Windows 98. Installing the USB driver on computers
running Windows 2000/Me/XP is not necessary.
1. Insert the CD-ROM packaged with the camera into the CD-ROM drive.
The welcome screen appears.
2. Click “Install USB Driver”. Follow the on-screen instructions to complete
the installation. After the USB driver installation is complete, restart your
computer.
37
Step 2: Connecting the Camera to Your Computer
1.
2.
3.
4.
5.
6.
7.
8.
9.
E
Connect one end of the USB cable to an available USB port on your computer.
Connect the other end of the USB cable to the USB connector on the camera.
Turn the camera on. Your computers operating system will recognize the camera.
From the Windows desktop double click on “My Computer”
Look for a new “removable disk” icon. This “ removable disk” is actually the memory (or memory card) in your
camera. Typically, the camera will be assigned drive letter “e” or higher.
Double click on the removable disk and locate the DCIM folder.
Double click on the DCIM folder to open it to find more folders such as “100CAMEA”
Your recorded images and video clips will be inside these folders
Copy & Paste or Drag-N-Drop image and video files to a folder on your computer
Mac users:
double-click the “unlabeled” disk drive icon on our desktop. iPhoto may automatically launch. The volume label
will vary depending upon whether you use internal camera memory, or a memory card.
F
G
S
38
Step 3: Downloading Recorded Images and Video Clips
When the camera is turned on and connected to your computer, it is considered to be a disk drive, just like a
floppy disk or CD. You can download (transfer) images by copying them from the “removable disk” (“untitled” disk
on a Macintosh) to your computer hard driver as described in the prior section.
For Computers Running Windows
Open the “removable disk” and subsequent folders by double clicking on them. Double click on the folder . Your
images are inside these folder(s). Select the images that you want, then choose “Copy” from the “Edit” menu.
Open the destination location (folder) and choose “Paste” from the “Edit” menu. You may also drag and drop
image files from the camera to a desired location.
For Computers Running Mac OS and Desktop/LX
Open the “untitled” disk window and the hard disk or the destination location. Drag and drop from the camera disk
to the desired destination.
Note:
Memory card users may prefer to use a memory card reader (highly recommended). Memory card readers
offer advantages in terms of convenience, speed, and cost-savings. While connected to your computer the
batteries in your camera will continue to be used. A card reader, which requires no batteries and uses USB
power from your computer, will save considerably on batteries.
39
INSTALLING PHOTOSUITE
PhotoSuite is a very user-friendly image-editing program. With PhotoSuite, you can retouch, compose and
organize your images. It contains a variety of templates, such as photo frames, birthday cards, calendars and
more. Get your images ready and go explore this amazing program.
To Install PhotoSuite
E
1. Insert the CD-ROM packaged with the camera into the CD-ROM drive.
The welcome screen appears.
2. Click “Install PhotoSuite”. Follow the on-screen instructions to complete
the installation.
F
G
Note:
For information on how to use PhotoSuite to edit and retouch your recorded images, please refer to its online
help.
For Windows 2000/XP users, make sure to install and use the PhotoSuite while logged in as a user with an
“Administrator” account.
PhotoSuite is not supported on the Mac. iPhoto or iPhoto2 (not included with the camera) is recommended.
S
40
INSTALLING PHOTOVISTA
PhotoVista is an easy-to-use program that lets you create spectacular 360 0 panoramic images in a snap. When
you view these panoramas, you can get the experience of being totally immersed in a realistic environment.
PhotoVista’s powerful engine quickly and automatically stitches images together, and its intuitive interface will let
even a novice get great results in minutes.
To Install PhotoVista
1. Insert the CD-ROM packaged with the camera into the CD-ROM drive.
The welcome screen appears.
2. Click “Install PhotoVista”. Follow the on-screen instructions to
complete the installation.
Note:
For information on how to use PhotoVista to create spectacular 360 0 panoramic images, please refer to its
online help.
For Windows 2000/XP users, make sure to install and use the PhotoVista while logged in as a user with an
Administrator account.
For Windows XP users which OS version does not include Service Pack 1 or higher, be sure to link to
http://www.java.com/en/download/windows_automatic.jsp first and download the Java Virtual Machine
installation. For more detail information about Java, please refer to its on-line help at http:java.sun.com/getjava/
help.html. After java software installation, you can start to install iSee Media Photovista Panorama.
Hereunder is iSee Media Photovista Panorama system requirements and recommendations:
Windows 95/ Windows 98/ Windows NT 4 (Service Pack 3 or higher)
Windows 2000*/ Windows Me*/ Windows XP* (Service Pack 1 or higher)
PhotoVista is not supported on the Mac.
41
INSTALLING ACROBAT READER
The CD-ROM includes a PDF (portable document format) copy of the user’s manual. To view a PDF you must have
Acrobat Reader installed in your computer. Acrobat Reader is included on the camera CD ROM. Using Acrobat
Reader, you can read the user’s manual and print sections of interest.
1. Insert the CD-ROM that came with the camera into the CD-ROM drive.
The welcome screen appears.
2. Click “Install Acrobat Reader”.
Follow the on-screen instructions to complete the
installation.
E
F
G
S
42
USER MANUAL
A copy of the user manual is provided on the CD-ROM in PDF format. It is a backup copy of the printed manual.
If you misplace the printed guide, you may print another copy from the CD-ROM. The only requirement for
viewing the User Manual on the CD-ROM is that you have Acrobat Reader (Adobe Reader) installed on your
computer. Updates to this manual, and versions in other languages may be found on the Vivitar website (www.
vivitar.com).
1. Insert the CD-ROM that came with the camera into the CD-ROM drive.
The welcome screen appears.
2. Click “Install User's Manual”. Follow the on-screen instructions to
complete the installation.
Alternatively, browse the CD-ROM to find the PDF file.
43
LIST OF MENU OPTIONS
Capture Menu
In the Capture menu, you can specify camera settings you would like to use such as resolution, image quality, EV
compensation, white balance, ISO, color mode, and sharpness.
1. Press the
E
button to turn on your camera.
2. Press the
button and then scroll through the options by using the
/
buttons. You may change the settings by pressing the
/ buttons
in the main menu or press the
button to enter the sub-menu and
choose the setting. After the setting is set, press the
button to confirm.
Capture menu items: Size, Quality, EV, White Balance, ISO, Color,
Sharpness, and Setup.
F
G
S
44
Size
Refer to “Setting the Image Resolution and Quality” in BASIC FUNCTIONS.
Quality
Refer to “ Setting the Image Resolution and Quality” in BASIC FUNCTIONS.
45
EV
Your ViviCam 3650 adjusts the exposure each scene automatically. However, when the subject is too dark or too
bright, you can adjust the exposure manually. This is called EV compensation.
The EV compensation of your camera can be adjusted from [-1.5 EV] to [+1.5 EV] (in 0.3 EV steps).
To adjust EV, press the / buttons in the main menu or press the
button to enter the sub-menu and choose the setting. After the
adjustment is set, press the
button to confirm.
Effective Subjects and Set Values
E
Positive (+) Compensation
Copying of printed text (black characters on white paper)
Backlit portraits
Very bright scenes (such as snowfields) and highly reflective subjects
F
Shots made up predominantly of sky
Negative (-) Compensation
Spot lighted subjects, particularly against dark backgrounds
Imaging of printed text (white characters on black paper)
Scenes with low reflectivity, such as shots of green or dark foliage
G
S
46
White Balance
When the brightness and nature (source) of the light changes, our eyes
adapt to the difference so that the white object remains white. Digital still
cameras, also see a white object as white by averaging the light around the
subject.
White Balance
Auto
Daylight
Cloudy
Tungsten
The ViviCam 3650 determines the white balance by averaging the various
kinds of light that enters the lens. You may specify the white balance when
capturing images under specific lighting conditions (Auto, Daylight, Cloudy,
Tungsten and Fluorescent).
White Balance
Fluoresent
[Auto]: automatically adjusts the white balance.
Daylight]: for recording outdoors on a bright day.
[
[
Cloudy]: for recording on an overcast day in shade, at twilight.
[
Tungsten]: for recording under tungsten lighting conditions.
[
Fluorescent]: for recording under fluorescent lighting conditions.
ISO
Select the photographic ISO to be used for image capture.
The higher the ISO sensitivity value, the greater sensitivity, but the
greater the noise. With a higher sensitivity selected, brighter images
can be captured with less light.
Auto adjustment
ISO
100
ISO
200
ISO
Auto
100
200
[ ISO
]: Sensitivity equivalent to ISO100
100
[ ISO
200 ]: Sensitivity equivalent to ISO200
47
Color Mode
When capturing an image, the ViviCam 3650 offers three types of color (Full
color/ Black & White/ Sepia) for you to match as your wish. Your images will
demonstrate different impression by choosing different types of color.
[Full Color]: Bright colors (24 bit RGB)
[Black & White]: Monochrome (grayscale)
[Sepia]: Sepia tones
Sharpness
E
Your ViviCam 3650 can automatically emphasize the borders between light
and dark areas of the image. This will make the image’s edges look sharper.
In some scenes you may prefer sharper edge detail. In other scenes you
may prefer softer edge detail.
H
L
Setup
F
Refer to “Setup Menu” in LIST OF MENU OPTIONS.
G
S
48
Sharpness
High
Medium
Low
Playback Menu
Using the Playback menu you can create an on-camera slide show. You may also delete images, and format your
SD memory card or the internal memory.
1. Press
button to turn the camera on.
2. Press MODE button twice to enter [
] Playback mode.
Then press the
button to enter Playback menu.
Scroll through the options by using the
/
buttons.
3. To enter the sub-menu, press the
button. After settings are set,
press again the
button to confirm.
Playback menu items: Delete, Copy to Card, Slide Show, Protect, and Setup.
Delete
Refer to “Deleting Images and Video Clips” in ERASING.
Copy to Card
This feature allows you to copy your images/video clips from the camera's
memory. This functions is enabled when the SD memory card is loaded
and the internal memory contains images/video clips.
Slide Show
Refer to “Slide Show” in IMAGE PLAYBACK.
Protect
Refer to “Protecting Images” in IMAGE PLAYBACK.
Setup
Refer to “Setup Menu” in LIST OF MENU OPTIONS.
49
Video Clip Menu
Use the Video Clip menu you can adjust EV compensation, white balance to record video clips with your preferences.
Video Clip menu items: EV, White Balance and Setup.
EV
Refer to “Capture Menu” in LIST OF MENU OPTIONS.
White Balance
Refer to “Capture Menu” in LIST OF MENU OPTIONS.
E
Setup
Refer to “Setup Menu” in LIST OF MENU OPTIONS.
F
G
S
50
Setup Menu
You can select preferences for the camera settings under Setup. Navigate
the options you wish to configure by using the
/
button.
Setup menu items: Date & Time, Beeper, Language, Power off time,
Light Frequency, Set to default, and System Infor..
Date & Time
Refer to “Setting the Date and Time”
Beeper
Specify whether or not beeps are to be generated when buttons are pressed.
[Off]:
[On]:
Beeper
Off
On
Beeps are not generated
Beeps are generated
Language
Specify OSD language menus and messages are to be displayed on the LCD monitor.
The provided languages are [English], [Italiano], [Español], [Français], [Deutsch], [
[
]
[
]and
51
Power off time
If no operation is performed for a specific period of time, the power to the
camera is automatically turned off. This feature is useful to reduce battery
consumption.
[3 min], [5 min], [10 min], [Cancel]
Light Frequency
Set the frequency of the sensor to match the frequency of your local
lighting standard.
[60Hz],[50Hz]
E
Set to default
This function will restore all the parameters to the factory-default settings.
F
G
[Yes]: Reset to default settings
[No]: Remain the current settings
System Infor.
Displays the firmware version of this camera.
S
52
CONNECTING YOUR VIVICAM 3650 TO OTHER DEVICES
USB Cable
Computer
SD Memory Card
PCMCIA Adapter
SD Card Reader
Notebook
Printer
53
VIVICAM 3650 SPECIFICATIONS
Item
Image sensor effective pixels
Image resolution
Image quality
E
F
G
Internal memory
External Memory
Lens
LCD monitor
Self-timer
Zoom
Exposure compensation
S
54
Description
2.0 Million
Still image:
1600 x 1200
1280 x 960
640 x 480
Video clip:
320 x 240
Fine
Normal
Economy
8MB (approximately 6 MB available for image storage);
Secure Digital (SD) memory card (optional, up to 512MB capacity)
Focal length: 7.7mm
Range of focusing: 3 feet to infinity
F-number: f/3.0
1.4" color TFT LCD
5-second delay
10-second delay
Digital: Capture mode: 4X/ Playback mode: 4X
Automatic;
Manual:+/-1.5 EV (in 0.3EV step)
Item
White balance
Description
Auto;
Manual: Daylight, Cloudy, Tungsten, Fluorescent
File format
JPEG, AVI
Interface
USB connector
Power
2 x AA Alkaline batteries (optional),
2 x AA Ni-MH batteries (optional),
One CR-V3 Lithium battery pack (not included).
Tripod socket
Yes
Dimensions
3.3 x 2.6 x 1.2 in/85 x 65 x 30mm (L x W x H)
Weight
Approximately 4.2 ounces (120g)
(without batteries and the SD memory card)
* Design and specifications are subject to change without notice.
55