1
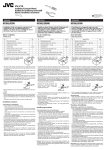
KZ-V10
MOBILE VIDEO CASSETTE RECORDER
ENGLISH
GRABADORA DE VIDEOCASSETTE MÓVIL
MAGNETOSCOPE MOBILE
AUDIO
AUTO
CONTROL
SP/EP
UNIT
POWER
|TRACKING
DISPLAY
{
STEREO
INDEX
KZ-V10
REW
PLAY
FF
REC
STOP
PAUSE
POWER
MOBILE
VIDEO
SP/EP
REMOTE
POWER
SP
CASSETTE
PAUSE
RECORDER
REC
REC
SQPB
PLAY
STOP
#
&
REW
1
FRANÇAIS
RM-RK20 REMOTE
ESPAÑOL
KZ-V10
FF
¡
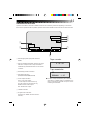
For installation and connections, refer to the separate manual.
Para la instalación y las conexiones, refiérase al manual separado.
Pour I' installation et les raccordements, se référer au manuel séparé.
INSTRUCTIONS
For customer Use:
Enter below the serial No. which is
located on the rear of cabinet. Retain
this information for future reference.
Model No. KZ-V10
Serial No.
MANUAL DE INSTRUCCIONES
MANUEL D'INSTRUCTIONS
ed in Japan
YSV OZ OZ
VNN3802-632
[J]
* *
KZ-V10*
3
98.12.9, 1:05 PM
1
KZ-V10*
1
98.12.9, 1:05 PM
2
Dear Customer,
Thank you for purchasing the JVC VHS video cassette recorder. Before use, please read the safety information and precautions contained in the following pages to ensure safe use of your new VCR.
CAUTIONS
CAUTION
RISK OF ELECTRIC SHOCK
DO NOT OPEN
CAUTION:
TO REDUCE THE RISK OF ELECTRIC SHOCK.
DO NOT REMOVE COVER (OR BACK).
NO USER-SERVICEABLE PARTS INSIDE.
REFER SERVICING TO QUALIFIED SERVICE PERSONNEL.
The lightning flash with arrowhead symbol, within an equilateral
triangle, is intended to alert the user to the presence of
uninsulated "dangerous voltage" within the product's enclosure
that may be of sufficient magnitude to constitute a risk of electric
shock to persons.
The exclamation point within an equilateral triangle is intended to
alert the user to the presence of important operating and
maintenance (servicing) instructions in the literature
accompanying the appliance.
WARNING:
TO PREVENT FIRE OR SHOCK
HAZARD, DO NOT EXPOSE THIS
UNIT TO RAIN OR MOISTURE.
CAUTION:
This video cassette recorder should be used with DC 12V only.
To prevent electric shocks and fire hazards, DO NOT use
any other power source.
This Class B digital apparatus meets all requirements of
the Canadian Interference–Causing Equipment Regulations.
“Cet appareil numérique de la classe B respecte toutes les
exigences du Règlement sur le matériel brouilleur du
Canada.”
5 Cassettes marked ''VHS'' (or ''S-VHS'') can be used with
this video cassette recorder. However, S-VHS recording
is not possible with this model.
5 This model is equipped with SQPB (S-VHS QUASI PLAYBACK) that makes it possible to play back S-VHS recordings with regular VHS resolution.
Failure to heed the following precautions may result in
damage to the VCR, remote control or video cassette.
1. DO NOT place the VCR . . .
... in an environment prone to extreme temperatures or
humidity.
... in direct sunlight.
... in a dusty environment.
... in an environment where strong magnetic fields are
generated.
... on a surface that is unstable or subject to vibration.
2. DO NOT block the VCR’s ventilation openings.
3. DO NOT place heavy objects on the VCR or remote
control.
4. DO NOT place anything which might spill on top of the
VCR or remote control.
5. AVOID violent shocks to the VCR during transport.
**MOISTURE CONDENSATION
Moisture in the air will condense on the VCR when you move
it from a cold place to a warm place, or under extremely
humid conditions—just as water droplets form on the surface of a glass filled with cold liquid. Moisture condensation
on the head drum will cause damage to the tape. In conditions where condensation may occur, keep the VCR’s power
turned on for a few hours to let the moisture dry before inserting a tape.
**ABOUT HEAD CLEANING
Accumulation of dirt and other particles on the video heads
may cause the playback picture to become blurred or interrupted. Be sure to contact your nearest JVC dealer if such
troubles occur.
Cautions on operation
• When the car is parked under the blazing sun or in an
extremely cold place for a long time, wait a while to use
this unit after the temperature of the cabin drops to the
normal temperature.
• Use this unit as the engine is running. If this unit is used as
the engine is stopping, it depletes the car battery and, if
worst comes to worst, the battery fails in starting the engine.
• If this unit is disconnected during operation (playback, fastforward, rewind, etc.), it may cause a machine failure.
When disconnecting this unit, be sure to remove the video
cassette from the unit beforehand.
• When the engine key is turned off, this unit is also turned
off at the same time. To operate this unit again, turn it on
once more after starting the engine.
3
CAUTION:
Change or modifications not approved by JVC
could void user's authority to operate the equipment. This equipment has been tested and found
to comply with the limits for a Class B digital device, pursuant to Part 15 of the FCC Rules. These
limits are designed to provide reasonable protection against harmful interference in a residential
installation. This equipment generates, uses, and
can radiate radio frequency energy and, if not installed and used in accordance with the instructions, may cause harmful interference to radio
communications.
However, there is no guarantee that interference
will not occur in a particular installation. If this
equipment does cause harmful interference to
radio or television reception, which can be
determined by turning the equipment off and on,
the user is encouraged to try to correct the
interference by one or more of the following
measures:
Reorient or relocate the receiving antenna.
Increase the separation between the equipment
and receiver.
Connect the equipment into an outlet on a
circuit different from that to which the receiver
is connected.
Consult the dealer or an experienced radio/TV
technician for help.
Tabel of contents
CAUTIONS ........................................................... 2
Features ................................................................ 4
Dew sensor circuit ............................................. 4
High temperature sensor circuit ......................... 4
Tape protection circuit ....................................... 4
ACCESSORIES ...................................................... 4
Inserting/removing cassette ................................... 5
Inserting cassette into recoder ........................... 5
Removing cassette from recorder ....................... 5
For protection of important recording ................ 5
How to playback VHS-C cassette tape
recorded by Video Movie .................................. 5
For playing back pictures clearly all the time
(Use of head cleaning cassette) ............................ 6
FRONT VIEW ....................................................... 7
REAR VIEW .......................................................... 8
REMOTE CONTROL UNIT ................................... 9
How to set batteries in the battery compartment 10
Indications on the screen .................................... 11
Playback ............................................................. 12
Playing back .................................................... 12
Fast-forwarding/Rewinding .............................. 12
Fast-forwarding/Rewinding
while looking at picture ................................... 12
Still playback/Frame-to-frame playback
/Slow playback ................................................... 12
Repeated playback ............................................. 12
Search playback ................................................. 13
Playing back from the beginning of each
program-Search playback ................................ 13
How to choose (specify) the address (index)
of a program .................................................... 13
Connection to other apparatus
Connection to Mobile Color Monitor System
KV-M65 ........................................................... 14
Connection to a video camera ......................... 15
Troubleshooting .................................................. 16
Specifications ..................................................... 16
4
Features
5 4-heads stereo Hi-Fi video cassette recorder
5 Cassette door with danger preventive dustproof
cover
5 Mountable in either vertical or horizontal posture
thanks to the highly reliable vibration-resistant design
5 Remote sensor unit extends the range to install the
video cassette recorder.
Caution on recording in running
• Recording in running occasionally brings an unsatisfactory result because noise is frequently recorded in running and considerable vibration of
the car makes recording disorder.
Protection circuits
(self-diagnosing circuits)
This video cassette recorder incorporates some protection circuits inside.
If this video cassette recorder is used as it is dewed, it
may damage the tape and video heads.
Dew sensor circuit
5 When the cabin whose temperature is considerably low is rapidly heated or the humidity in the
cabin is considerably high, insides of the windscreen and cabin windows are sometimes fogged.
At the same time, inside of the video cassette recorder mounted on the car is dewed.
5 In such the case (dewed condition), the dew sensor circuit functions to stop machine operation with
indication of blinking POWER indicator lamp.
When the machine falls into such the status, wait
for several hours until the POWER indicator lamp
stops blinking and lights continuously.
High temperature sensor circuit
5 When the temperature of the machine becomes
considerably high, the high temperature sensor circuit functions to stop machine operation with indication of blinking POWER indicator lamp. When
the machine falls into such the status, turn off the
machine and wait for a while until the POWER
indicator lamp stops blinking while leaving it in a
cool place to lower the temperature. When turning on the machine again, make sure that the
POWER indicator lamp does not blink before starting operation.
Tape protection circuit
5 When the machine remains in the still playback, slow
playback or recording pause mode for 5 minutes or
longer, the tape protection circuit functions to turn off
the machine for protecting the tape.
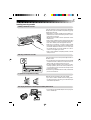
ACCESSORIES
• Check to see if the following accessories are supplied with the video cassette recorder.
AV cord
(5 m/16.7ft. long)
Power cord
(5m/16.7ft. long)
Mounting bracket x 2
Tapping screw (φ 5 x 20 mm) x 4
Screw (M5 x 8 mm) x 4
Velcro tape x 2 sets
Remote sensor unit
(5m/16.7ft. long)
Remote control unit
(RM-RK20)
Remote control data cord
(5m/16.7ft. long)
AA-size battery x 2
(for operation check)
5
Inserting/removing cassette
Inserting cassette into recorder
Open the dust-proof cover and insert a video cassette with
the tape side up into the cassette compartment by gently
pressing the center part.
•With insertion of a video cassette into the cassette compartment, the recorder is automatically turned on. (Automatic power on function)
•The tape counter is reset to 0:00:00. (Automatic counter
reset function)
• When a video cassette whose recording protection tab is
broken is inserted, the machine automatically starts playback of the cassette. (Automatic playback function)
• When the car is shaking, it is hard to insert a casette
because the machine is apt to hold the cassette firmly to
prevent the cassette form vibration. In such a case, insert
the cassette strongly or pull the cassette out of the recorder once and again try to insert it.
• When a video cassette is completely inserted, close the
dust-proof cover.
FF
REW
STOP
0
PLAY
PAUSE
SP/EP
POWER
POWER
SP
REC
#
&
1
¡
REC
REMOTE
Removing cassette from recorder
0
0
POWER
SP/EP
REMOTE
POWER
SP
REC
PAUSE
REC
PLAY
STOP
#
&
REW
1
FF
¡
Open the dust-proof cover and press the EJECT button in
the STOP mode.
•Don’t insert fingers or foreign substances into the cassette
compartment. When a little child is near the video cassette recorder, pay heed to him/her not to do so.
•If a video cassette is inserted in wrong posture, it is automatically ejected by the function of the protection circuit. If it happens, wait for a few seconds and try to insert
it correctly once again.
•After removing a cassette from the recorder, close the dustproof cover without fail.
For protection of important recording
Break the recording protection tab of the cassette.
•If you want to use the cassette whose recording protection tab was broken for recording, cover the broken part
with adhesive tape double.
Protection tab
How to play back VHS-C cassette tape recorded by Video Movie
•Use an optional VHS cassette adapter C-P6U to play back
VHS-C cassette tape.
6
For playing back pictures clearly all the time (Use of head cleaning cassette)
5 If this video cassette recorder is used for a longtime, it makes playback pictures rough. In such a case, clean
the video heads with an optional head cleaning cassette.
5 When the following symptom is observed:
• Playback picture is rough.
• Playback picture is unclear or no picture is reproduced on the screen.
5 If playback picture is still rough after the video
heads are cleaned by the head cleaning cassette,
consult the store that you got this recorder at or
the nearest JVC dealer about the matter.
What to do on such the occasions.
• Clean the video heads with a dry type head cleaning cassette.
5 Factors to soil heads
• High temperature, high humidity (in the rainy
season, etc.)
• Dust in air
• Damaged or soiled tape
• Long-time operation, etc.
7
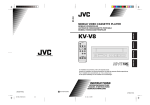
FRONT VIEW
1
2
3
4
KZ-V10
MOBILE VIDEO CASSETTE RECORDER
5
STEREO
POWER
SP/EP
REMOTE
POWER
SP
PAUSE
REC
REC
SQPB
PLAY
STOP
#
&
REW
1
FF
¡
Dustproof cover (cassette door)
Pull the dustproof cover to open it.
0
POWER
SP/EP
REMOTE
6
POWER
SP
PAUSE
REC
REC
PLAY
STOP
#
&
7 8 9
1 POWER button
Press this button to turn on or off this video cassette recorder.
2 REMOTE (remote sensor)
Aim the remote control unit at this part for operating this video cassette recorder with the remote
controller.
3 Indicator lamps
Each indicator lamp is on when its related function is in operation.
POWER : Power supply indicator lamp (red lamp)
SP : Standard play (SP) indicator lamp (green lamp)
REC : Recording indicator lamp (red lamp)
4 PLAY button
Press this button to play back a video cassette.
5 STOP button
Press this button to stop playback operation.
REW
1
FF
¡
0 !
6 0 (eject) button
Press this button to eject a video cassette.
7 SP/EP (standard play/extended play)
selector button
Press this button to change the recording speed.
8 PAUSE button
Press this button to suspend recording or playback
temporarily.
9 REC (recording) button
Press this button together with the PLAY button for
recording.
0 REW (rewind) button
Press this button to rewind the tape.
! FF (fast-forward) button
Press this button to fast-forward the tape.
8
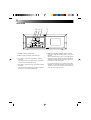
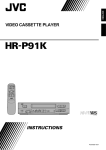
REAR VIEW
12 3 4
INPUT
5
OUTPUT
1
2
VIDEO
AUDIO
L
DC INPUT
DC 12V
R
AUDIO
MONO
(L+R)
REMOTE
CONTROL
SENSOR INPUT
1 POWER CORD CONNECTOR
2 INPUT (video and audio input) terminals
3 OUTPUT-1 (video and audio [stereo] output)
terminals
Connect the video and stereo audio input terminals of a TV set to these terminals.
4 OUTPUT-2 (video and audio [monaural] output)
terminals
Connect the video and monaural audio output terminals of a TV set to these terminals.
5 REMOTE CONTROL SENSOR INPUT terminal
Connect a supplied Remote sensor unit to this
terminal.
While a Remote Sensor unit is connected to this
terminal, the video cassette recorder cannot be operated by wireless remote control through the Remote sensor on the front panel.
For connecting the JVC AV control receiver (KDSX1000R, etc.) with the Remote control data cord
supplied as an accessory, refer to the instructions
of the JVC AV control receiver.
9
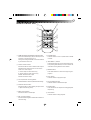
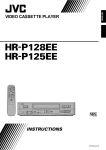
REMOTE CONTROL UNIT
1
7
2
8
RM-RK20 REMOTE CONTROL UNIT
AUDIO
3
SP/EP
POWER
AUTO
– TRACKING +
DISPLAY
INDEX
4
5
REW
PLAY
FF
REC
STOP
PAUSE
When the standard play (SP) is selected, the SP
indicator on the front panel is on.
Through recording SP and EP cannot be switched
by the remote control unit.
2 AUDIO selector button
Press this button to select a desired audio output.
Selected audio output is shown on the screen.
HI-FI: Hi-Fi audio output
L: Audio output on left channel only
R: Audio output on right channel only
NORM: Normal audio output
MIX: Mixed audio output
!
@
6
1 SP/EP (standard play/extended play) selector button
9
0
#
7 POWER button
Press this button to turn on/off the video cassette
recorder.
8 TRACKING +/- buttons
Press these buttons for manual tape tracking. Before pressing these buttons, be sure to switch off
automatic tracking with the AUTO button.
9 INDEX buttons
Press these buttons to search the beginning of a
program.
0 PLAY button
Press this button to play back tape.
3 AUTO (automatic tracking) button
Press this button to switch on/off automatic tracking.
! FF (fast-forward) button
Press this button to fast-forward tape.
4 DISPLAY selector button
Press this button to select display of tape counter
or tape remainder (by time).
@ PAUSE button
Press this button to suspend recording/playback
temporarily.
5 REW (rewind) button
Press this button to rewind tape.
# STOP button
Press this button to stop playback.
6 REC (recording) button
Press this button together with the PLAY button to
start recording.
10
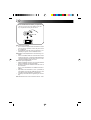
How to set batteries in the battery compartment
•Set two AA-size (SUM-3, R6P) batteries in the battery compartment following the indications.
5 Cautions on batteries
• Since batteries supplied with the Remote control
unit are just for operation check, they don’t work
for a long time.
• If the Remote controller won’t be used for a considerably long time, remove batteries from it.
5 Batteries need replacement in the following condition.
• If the controllable distance of the Remote control
unit becomes short, it shows that the batteries are
consumed and they will be dead. In such a case,
replace the batteries with new ones.
5 When replacing batteries:
• Replace batteries with two new AA-size batteries
(alkaline batteries are recommended).
• Be sure to replace two batteries with new ones at
the same time.
(Don’t use used batteries or different brands together.)
• Pay heed to the orientation (+ and - polarities) of
each battery and set two batteries following the
indications inside the battery compartment.
• Carefully read instructions appearing on the battery.
5 The Remote control unit conforms to the “A” code.
11
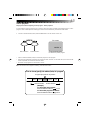
Indications on the screen
Operation and status of the video cassette recorder can be checked by indications appearing on the screen.
Each time an operation button is pressed, operation of the video cassette recorder is shown for about 5 seconds.
RECORD
HI-FI
4
5
6
INDEX –1
+
E
7
1
SP
2
0 : 00 : 00
+
B
+
3
1 Recording/Playback tape speed indication
(SP/EP)
2 Tape counter/Tape remainder indication (by time)
Indication of tape counter or tape remainder is
switchable by the DISPLAY button on the remote
controller.
3 Present tape position indication
4 Tape status indication
(PLAY/RECORD/FF/REW/PAUSE)
5 Audio output indication
HI-FI: Hi-Fi audio output
L: Audio output on left channel only
R: Audio output on right channel only
NORM: Normal audio output
MIX: Mixed audio output
6 Cassette indication
7 Program index indication
(Indication of “MARK” blinks for about 2
seconds.)
Tape counter
0 : 00 : 00
Tape remainder
SP
REMAIN
1 : 35
5 Indication of tape remainder is just a reference.
Some kind of cassette needs a considerable long
time to indicate the remainder of tape or fails in
indicating the remainder.
12
Playback
Playing back
Preparation: Turn on a Monitor set or TV set connected
with the video cassette recorder and set it to an external input mode (VIDEO 1, VIDEO 2, etc.).
1 Press the POWER button of the video cassette recorder to turn it on.
2 Insert a video cassette into the video cassette recorder.
When a video cassette whose recording protection
tab is broken is inserted, the video cassette recorder
automatically starts playback.
3 Press the PLAY button.
• Playback starts.
• Tape tracking is automatically adjusted.
5 Press the STOP button to discontinue playback.
5 When noise is generated in playback, press the
AUTO button on the remote control unit to switch
off the automatic tracking mode and manually adjust tape tracking with the TRACKING + and - buttons.
Fast-forwarding/Rewinding
Press the FF button or REW button when the tape remains stopping.
• Fast-forwarding or rewinding stops when the tape
reaches its end or beginning.
• If the POWER button is pressed within 2 seconds
after the REW button is pressed, the video cassette
recorder is turned off after the tape is completely
rewound to its beginning.
If the PLAY button is pressed within 2 seconds after the REW button is pressed, the video cassette
recorder starts playback of the tape.
Fast-forwarding/Rewinding while looking at picture
Momentarily press the FF button or REW button in
playback.
• The video cassette recorder starts search playback
in the normal (FF button) or reverse (REW button)
direction at a speed 7 times as fast as the normal in
the SP mode or 21 times as fast as the normal in
the EP mode.
• To play back the tape normally, press the PLAY
button.
• If the FF button or REW button is continuously
pressed for 2 seconds or longer in playback, the
tape is fast played back in the normal (FF button)
or reverse (REW button) direction (5 times as fast
as the normal in the SP mode or 7 times as fast as
the normal in the EP mode). When the FF or REW
button is released from pressing, playback speed
reverts to the normal.
Still playback/Frame-to-frame playback/Slow playback
Press the PAUSE button in playback.
• The playback picture becomes still.
• When the still picture fluctuates up and down, adjust tracking with the TRACKING +/- button
on the remote controller so that the picture be
comes stable.
Press the PAUSE button in the still playback mode.
• Each time the PAUSE button is pressed in the still
playback mode, pictures are played back from
frame to frame.
• If the same operation is performed in the reverse
playback mode, pictures are played back from
frame to frame in the reverse direction.
Continuously press the PAUSE button in playback for
2 seconds or longer.
• Playback speed goes down to 1/6 of the normal
speed (slow playback).
• When noise is generated in this operation, adjust
tracking with the TRACKING +/- button on the remote controller so that noise is minimized.
• If the same operation is performed in the reverse
playback, slow playback is operated in the reverse
direction.
5 To return to the normal playback from the slow
playback, press the PLAY button.
• In playback at a speed different from the normal
(in fast/slow playback), no sound is output from
the video cassette recorder.
• If noise is generated in the fast playback, reverse
playback or slow playback, it does not come from
machine trouble.
• If still playback or slow playback is continuously
operated for 5 minutes or longer, the video cassette recorder automatically stops playback for protecting the tape.
• If a badly recorded video tape or tape on which
recording was performed by a different machine is
played back, tracking adjustment occasionally results in failure.
• Automatic tracking is automatically activated the
moment the video cassette recorder is turned on
or a cassette is inserted.
Repeated playback
Press the PLAY button in playback for 5 seconds or more.
(The PLAY indication blinks.)
• The tape is repeatedly played back from the beginning to the end 20 times, and the 20th playback
ends at the end of the tape.
5 To discontinue repeated playback halfway, press
the STOP button.
13
Search playback
Playing back from the beginning of each program – Search playback
To start playback from the beginning of a program, search the index recorded at the beginning point of each
program. Video cassette tapes recorded by JVC machine have automatically recorded the index marks.
1 Choose a desired address (index) with the INDEX button on the remote control unit.
TV screen
INDEX
INDEX - 2
Rewind direction
Choose an address (index)
two before the present program.
Forward direction
• Search a desired address (index) for automatic playback of the program.
• Each time the right button is pressed, the number of index increases. On the other hand, each time the left
button is pressed, the number of index decreases.
• Maximum nine programs can be chosen at a time.
5 To discontinue search playback halfway, press the STOP button.
How to choose (specify) the address (index) of a program
Program played back at present
Program
Next
News one
before Drama program Movie
Address -3
-2
-1
Rewind direction
1
2
3
Forward direction
[Example]
To choose the next program:
Press the INDEX button (
) once.
To choose the program one before:
Press the INDEX button (
) twice.
14
Connection to other apparatus
Connection to Mobile Color Monitor System KV-M65
Example of connection
Connect the KV-M65 to the controller unit of the Mobile Color Monitor System KV-M65.
1 Connect the video-audio output terminals (VIDEO
OUTPUT-1) of the KV-M65 and the video-audio
input terminals (VIDEO INPUT-1) of the tuner unit
of the KV-M65 with the AV cord supplied as an
accessory.
2 When the JVC TV tuner system KV-C1 is used, the
same applies to it.
Signal flow
INPUT
OUTPUT
1
2
VIDEO
AUDIO
L
DC INPUT
DC 12V
R
To video-audio
output terminals
(VIDEO OUTPUT-1)
Mobile Color Monitor System or
Mobile TV tuner System
Controller unit
(or JVC KV-C1)
AV cord (supplied as accessory)
To VIDEO INPUT-1 terminal
AUDIO
MONO
(L+R)
REMOTE
CONTROL
SENSOR INPUT
15
Connection to a video camera
If a video camera is connected to this video cassette recorder, picture and sound can be recorded by the machine. However, there are some video cameras that cannot be connected to this video cassette recorder. For details, refer to the instructions of the video camera.
Example of connection
Signal flow
Video camera
1 Connect the audio-video output terminals of the
camera to the audio-video output terminals of this
video cassette recorder.
2 Insert a video cassette whose recording protection
tab is not broken.
• The video cassette recorder is automatically turned on.
• Choose a recording speed of SP or EP with the SP/
EP button.
To video-audio
output terminals
AV cord
3 While pressing the PAUSE button, press the REC button to enter the machine into the pause mode.
• The REC indicator lamp blinks.
Purchase another AV
cord proper to the video
camera to connect.
4 Press the PLAY button the moment you want to
record the scene.
• The machine starts recording.
5 To suspend recording temporarily, press the PAUSE
button.
5 To discontinue recording, press the STOP button.
MEMO
• If the machine remains in the
pause mode for 5 minutes or
longer, the pause mode is automatically canceled and the machine stops operation for protecting the video head.
• The copyright law forbids you to
use matters that you recorded by
the video cassette recorder without permission of the copyright
holder except the case you use
them for private enjoyment.
To video-audio input
terminals (INPUT).
KZ-V10
INPUT
OUTPUT
1
2
VIDEO
AUDIO
L
AUDIO
MONO
+
(L R)
DC INPUT
DC 12V
R
REMOTE
CONTROL
SENSOR INPUT
16
Troubleshooting
When you doubt if there is something wrong in the machine, check the symptom and cause referring to the following table.
No power supply
Power cord is disconnected.
Tightly plug the power cord into the jack.
Machine does not work though power is normally supplied. (POWER indicator lamp is blinking.)
Machine is dewed inside, or high temperature sensor circuit is in operation.
When the machine is dewed, wait for several hours until the inside becomes dry.
When the high temperature sensor circuit is functioning, cool the cabin to lower the machine temperature.
Indications don’t disappear from the screen.
Press the DISPLAY button on the remote control unit.
Noise appears in a part (or some parts) of playback picture.
Abnormal tracking.
If noise appears in the same part of playback picture all the time, the tape is damaged by the part.
Press the AUTO button on the remote control unit to cancel automatic tracking and manually adjust tracking with the TRACKING + and - buttons.
Still picture fluctuates up and down.
Vertical hold is maladjusted.
Adjust tracking with the TRACKING + and - buttons on the remote control unit.
Abnormal color
No video output
No audio output
Carefully read the instructions of the TV set connected to the video cassette recorder.
Playback picture is rough or frosted.
Video heads are soiled.
Clean the video heads with the head cleaning cassette.
Specifications
General
• Power supply
• Dimensions
: DC12 V (11-16V allowable) Negative ground
: 10-1/4 ''x3-3/4'' x10-11/16'' (259 x 94 x 270 mm)
(width x height x depth)
• Mass
: 7.1 lbs (3.2 kg)
• Allowable working temperature
: 0°C to + 40°C (32°F to 104°F)
• Allowable relative humidity
: 35% to 80%
• Allowable conservation temperature : -20°C to +60°C (-4°F to 140°F)
Video
•Recording/playback system
•Video signal
: VHS format (with SQPB), Hi-Fi 4-heads helical scan
: NTSC standard signal
Audio
•Recordinga system
•Audio track
: VHS stereo Hi-Fi audio
: 2 Hi-Fi audio channels and 1 normal audio channel
•Remote control unit
: A code
(A code and B code are switchable automatically in the main unit.)
Design and specifications subject to change without notice.
Å@Å@Å@@
KZ-V10
MOBILE
GRABADORA
MAGNETOSC
KZ-V
RM-RK20 REMOTE
AUDIO
AUTO
CONTROL
SP/EP
|TRACKING
DISPLAY
VICTOR COMPANY OF JAPAN, LIMITED
UNIT
POWER
{
INDEX
REW
PLAY
FF
REC
STOP
PAUSE
For installation and
Para la instalación
Pour I' installation
Printed in Japan
0998YSV OZ OZ
* *
KZ-V10*
2
98.12.9, 1:05 PM
M
MA