1
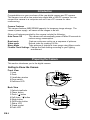
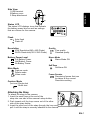
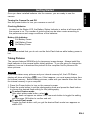
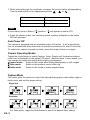
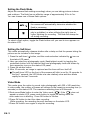
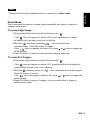
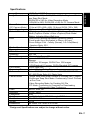
Vivicam 55
User Manual
English
030327
This camera is under warranty for one full year from the date of purchase by the
original purchaser. In case of defects in materials or workmanship, we will replace or
repair the camera free of charge. This warranty applies to the camera only. This
warranty does not include batteries, or other accessories which have not been
manufactured by our company. This warranty will not be honored if the camera has
been mishandled or tampered with, or altered by anyone other than the
manufacturer. Other than for the warranty herein, we are not responsible for loss,
damage, or inconvenience of any kind. A defective camera being returned under
warranty must be accompanied by a brief description of the difficulties encountered
and also by a proof of purchase with the date of purchase clearly indicated. All
related transportation costs and insurances are at the owner’s expense. Any
alteration of this warranty cannot be made without the written approval from our
company.
FCC Notice
This equipment has been tested and found to comply with the limits for a Class B
digital device, pursuant to part 15 of the FCC Rules. These limits are designed to
provide reasonable protection against harmful interference in commercial
installation. This equipment generates, uses and can radiate radio frequency
energy and if not installed and used in accordance with the instructions, may cause
harmful interference to radio communications. However, there is no guarantee that
interference will not occur in a particular installation. If this equipment does cause
harmful interference to radio or television reception, detectable by turning the
equipment in question off and on, the user is encouraged to try to correct the
interference by one or more of the following measures: Reorient or relocate the
receiving antenna; Increase the distance between the equipment and the receiver;
Connect the equipment to an outlet on a different circuit than that which the
receiver is connected to; Or consult the dealer or an experienced radio/TV technician for help.
NOTE
A shielded-type DC power cable incorporated with a ferrite core is required in order
to meet the FCC emission limits and also to prevent interference to the nearby
radio and television reception.
Use only shielded I/O cable incorporated with a ferrite core to connect this
equipment to host computer and TV set. Shielded A.C. power cable and shielded
I/O cables are required in order to meet the FCC emission limits. It is essential that
only the supplied power cord and I/O cable(s) can be used.
EN-1
ENGLISH
Warranty Policy
IMPORTANT
You should read this first before you start reading this Instruction Menu.
Notice and Request Regarding Instruction Menu and Software.
=======================================================================
1. The contents of the bundle driver, software, design,specifications and Instruction
Menu packaged with this camerapackage are subject to change without notice.
2. The accessories that come with the camera may differ from regions to regions.
3. We are not liable whatsoever for any compensation arising from errors in descriptions in this Instruction Menu.
=======================================================================
WARNING
Do not use this camera if it is emitting smoke, becomes unusually hot to be
touched, emitting any unusual odor or noise, or if it is in any other abnormal
states.
Operating the camera in any of these situations may cause a fire or an electrical
shock.
Stop using the camera immediately, turn the camera off, and then disconnect the
power source (batteries or AC power adapter). (If you are using the AC power
adapter, unplug the adapter from the AC power outlet after you have disconnected the camera.)
After checking that smoke is no longer being emitted, contact your dealer or your
local authorized service facility and request repairs. Never attempt to repair this
camera by yourself as this is dangerous.
Do not use the camera if any water has entered the camera.
Turn the camera off, and then disconnect the power source (batteries or AC power
adapter).
(if you are using the AC power adapter, unplug the adapter from the AC power
outlet after you have disconnected the camera.) Then contact your dealer or your
local authorized service facility.
Do not continue to use the camera as this may cause a fire or an electrical shock.
Do not use the camera if any foreign objects have entered the camera.
Turn the camera off, and then disconnect the power source (batteries or AC power
adapter).
(if you are using the AC power adapter, unplug the adapter from the AC power
outlet after you have disconnected the camera.) Then contact your dealer or your
local authorized service facility.
Do not continue to use the camera as this may cause a fire or an electrical shock.
If the camera has been dropped or if the camera case has been damaged, turn
the camera off, and then disconnect the power source (batteries or AC power
adapter). (if you are using the AC power adapter, unplug the adapter from the AC
EN-2
EN-3
ENGLISH
power outlet after you have disconnected the camera.) Then contact your dealer
or your local authorized service facility.
Do not continue to use the camera as this may cause a fire or an electrical shock.
Do not place the camera in any unstable locations such as on a wobbly table or
sloping surface where the camera may fall or tip over and cause injury.
Do not expose the camera to moisture and make sure that there is no water
getting into the camera. Take particular care when using the camera under
extreme weather conditions such as rain or snow, or when operating the camera
at the beach on near water.
Water in the camera may cause a fire or an electrical shock.
Do not insert or drop metallic or inflammable foreign objects into the camera
through access points such as the Compact Flash card slot.
This may cause a fire or an electrical shock.
Do not attempt to modify this camera.
This may cause a fire or an electrical shock.
Do not remove the camera casing.
This may cause an electrical shock.
Internal inspection, maintenance and repairs should only be carried out by your
dealer or local authorized service facility.
Avoid using this camera in the bathrooms.
Exposure to excessive moisture may cause a fire or an electrical shock.
Do not touch the power plug during a thunderstorm if you are using the AC power
adapter.
This may cause an electrical shock.
Never operate this camera in any way while driving a vehicle.
This may cause a traffic accident.
´
CAUTION
Do not place this camera in damp or dusty locations.
This may cause a fire or an electrical shock.
Do not place this camera in a location affected by oil fumes or steam, such as
near a cooking stove or humidifier.
This may cause a fire or an electrical shock.
Do not leave this camera in a location subject to extremely high temperatures,
such as in a sealed vehicle or in direct sunlight.
Exposure to high temperatures may adversely affect the camera case and internal
components and may cause a fire.
Do not cover or wrap the camera or the AC power adapter with a cloth or quilt.
This may cause heat to build up and distort the case and cause a fire.
Always use the camera and its accessories in well-ventilated locations.
Handle the camera carefully and do not bump the camera into any hard object.
Handling the camera roughly may cause a malfunction.
Do not move the camera while it is switched on.
(if you are using the AC power adapter, unplug the adapter from the AC power
outlet after you have switched off the camera.) Ensure that any connector cords
or cables to other devices are disconnected before moving the camera.
Failure to do so may damage the cords or cables and cause a fire or an electrical
shock.
When handling the camera, always unplug it from the power source (batteries or
AC power adapter) for safety.
(if you are using the AC power adapter, unplug the adapter from the AC power
outlet after you have disconnected the camera.)
Failure to do so may result in an electrical shock.
When leaving the camera unused for long periods, such as during a vacation,
always unplug the camera from the power source (batteries or AC power adapter )
for safety.
(if you are using the AC power adapter, unplug the adapter from the AC power
outlet after you have disconnected camera.)
Failure to do so could result in a fire.
Do not use batteries other than those specified for use with your camera.
The use of unsuitable batteries may result in the batteries splitting or leaking and
causing a fire, injury, or soiling of the battery compartment.
When fitting batteries into the camera, check the polarity markings on the battery
(- and + )to ensure that battery correctly.
Incorrect battery polarity may result in the batteries splitting or leaking and causing
a fire, injury, or soiling of the battery compartment.
Remove the batteries if the camera will not be used for an extended period of
time.
The batteries may leak and cause a fire, injury or soiling of the battery
compartment.
If the batteries leak, clean and wipe the battery compartment carefully and install
new batteries.
Wash your hands carefully if you touch the battery fluid.
EN-4
Table of Contents
Camera Features --------------------------------------------------------------------------------------- 6
Preparing the Camera -------------------------------------------------------------------------------- 6
Getting to Know the Camera ----------------------------------------------------------------------- 6
Front View -------------------------------------------------------------------------------------------------- 6
Back View ------------------------------------------------------------------------------------------------ 6
Side View --------------------------------------------------------------------------------------------------- 7
Status LCD --------------------------------------------------------------------------------------------------- 7
Attaching the Strap -------------------------------------------------------------------------------------- 7
Preparing Power Supply ------------------------------------------------------------------------------ 8
Getting Started -------------------------------------------------------------------------------------------- 9
Turning the Camera On and Off ----------------------------------------------------------------- 9
Checking Batteries ------------------------------------------------------------------------------------- 9
Taking Pictures ------------------------------------------------------------------------------------------ 9
Auto Power Off
-------------------------------------------------------------------------------------- 1 0
Camera Operating Modes -----------------------------------------------------------------------------Capture Mode ---------------------------------------------------------------------------------------Setting the Flash Mode -------------------------------------------------------------------------Setting the Self-Timer ---------------------------------------------------------------------------Video Mode ------------------------------------------------------------------------------------------Delete Mode ---------------------------------------------------------------------------------------Delete One ------------------------------------------------------------------------------------ -Delete ALL ----------------------------------------------------------------------------------------
10
10
12
12
12
13
13
13
Installing Camera Software ------------------------------------------------------------------ 14
System Requirement ----------------------------------------------------------------------------Installation CD Contents --------------------------------------------------------------------------Installing the Software (Driver & Image Applications) ----------------------------About Driver Software -------------------------------------------------------------------------------
14
14
14
14
Transferring Pictures to the Computer ---------------------------------------------- 15
Connecting the Camera to Your Computer
----------------------------------------- 15
Downloading Pictures --------------------------------------------------------------------------- 15
Using as a USB PC Camera ------------------------------------------------------------------ 16
Specifications ------------------------------------------------------------------------------------------- 17
EN-5
ENGLISH
Introduction ---------------------------------------------------------------------------------------------------- 6
Introduction
Congratulations on your purchase of the new digital camera and PC camera.
This camera is an all-in-one pocket size digital and a USB PC camera.You can
connect the camera to a computer and use it as a PC camera for video
conferencing.
Camera Features
This camera features 8MB SDRAM capacity for temporary image storage. The
cease of power supply will cause all the images to be lost.
Other cool features provided by the camera include the following:
Auto Power Off
This camera will automatically power off after 60 seconds to
reduce energy consumption.
Burst mode
Capture continuous motion as a sequence of pictures.
Video mode
Record video for creating AVI file .
Macro Mode
Take pictures of objects at close range using Macro mode.
Flexible Flash Settings Change the flash setting according to your lighting
environment.
Preparing the Camera
This section introduces you to the digital camera.
Getting to Know the Camera
Front View
2
5
1.Lens
2.Flash
3.Viewfinder window
4.Zoom switch
5.Self-timer LED
3
1
4
Back View
1.Optical viewfinder
2.Power button
3.Flash /
button
4.Self-timer /
button
5.Mode button
6.OK/Shutter button
7.Status LCD
8.Tripod socket
9.Flash LED
EN-6
2
1
9
6
MODE
5
3
4
7
8
Side View
1.USB terminal
2.Battery cover
3.Strap attachment
ENGLISH
1
3
2
Status LCD
The status LCD displays icons that indicate
the battery power level as well as settings
that are chosen for the camera.
Flash
Auto flash
Flash off
Resolution
VGA Resolution(640 x 480 Pixels)
QVGA Resolution(320 X 240 Pixels)
Battery Power Level
Full Battery Power
Half Battery Power
No Battery Power
Main Mode
Capture mode
Delete mode
Video mode
Capture Mode
Quality
Fine quality
Standard quality
Macro Mode
Macro Mode ON
Self-Timer
Self-timer ON
Frame Counter
Remaining frames that can
be taken at the current
Resolution setting
(no icon) Single shot
Burst shot
Attaching the Strap
To attach the strap to the camera:
1. Insert the small loop at the end of the
strap into one side of the camera's strap holder.
2. Push inward until the loop comes out of the other
side of the strap holder.
3. Insert the other end of the strap through the loop and
pull it until the strap is securely attached to the camera.
EN-7
Preparing Power Supply
Always make sure to turn off the camera’s power status before changing power
supply.
Important
The cease of power supply will cause all the images to be lost. When battery power level
is low, battery icon will blink. Connect to PC and save pictures immediately, or the
pictures may be lost due to the cease of power supply.
Back up time to store the recorded images/videos during batteries replacement is about 1
minute.
Loading Batteries
To load the batteries into the camera:
1. Slide the battery door open in the direction indicated by the arrow.
2. Insert AAA batteries (2 units) with polarity as shown on the diagram inside the
battery compartment.
3. Close the battery door.
Note
If you are not going to be using the camera for an extended period of time, you
should remove the batteries to prevent leaks or corrosion.
Do not use a mix of different types, manufactures, classification of batteries.
Low temperatures (under 0O ) may reduce the output efficiency of batteries, thereby
shortening the operation time of camera.
EN-8
Getting Started
ENGLISH
Once you have installed batteries into the camera, you are ready to use the
camera.
Turning the Camera On and Off
Use the power button to turn your camera on and off.
Checking Batteries
Located on the Status LCD, the Battery Status Indicator is active at all times while
the camera is on. The number of pictures that can be taken varies according to
the performance and usage conditions of the batteries.
Battery Life Indicator:
Full Battery Power
Half Battery Power
No Battery Power
Note
It is recommended that you do not use the Auto-Flash feature while battery power is
low.
Taking Pictures S
The camera features SDRAM only for temporary image storage. Always install the
fresh batteries in the camera before taking pictures. If you are going to change the
batteries, be sure to download the pictures to the computer first to preserve the
taken pictures.
Note
If you have taken many pictures and your internal memory full, the LCD Status
display will show a blinking (
) icon. If this happens, you must erase pictures from
the internal memory. Before erasing pictures, make sure you transfer them first from
the internal memory to your computer.
1. Press the Power button to turn on the camera’s power.
2. Press the mode button to set the photography mode and press the flash button
to choose the desired flash setting for this photography.
To select Capture mode
After short press mode button, select
.
If
does not appear on status LCD, use mode button to toggle the setting
and the press OK button to confirm and exit.
To select Flash mode
Toggle the flash button until you get the desired flash mode icon appears on
status LCD.
EN-9
3. While looking through the viewfinder, compose the picture before photographing.
Turn the zoom switch to the appropriate position
/
or
.
Focus mode
Focus range
Normal
0.5 ~ infinity
Macro
0.2 ~ 0.5
Note
If zoom switch turns to Macro ( ´ )position, ´
will appear on status LCD.
4. Press the shutter button, the remaining frame numbers indicated on the status
LCD will decrease.
Aoto Power Off
The camera is equipped with an automatic power off function. It will automatically
turn off automatically when there are no operations performed for over 60 seconds.
To restore the camera to power up state, press the power button once again.
Camera Operating Modes
Toggle the mode button to select Capture, Video, Delete until the desired subject
mode icon is displayed on the status LCD panel. Besides those 3 main modes, you
can change the resolution setting before taking photography.
Capture mode:
Switch to this mode when taking photography on still images.
Video mode:
Switch to this mode to record video clip.
Delete mode:
Switch to this mode to erase images/videos.
Capture Mode
This mode gives the options to select the desired photography mode either single or
burst mode, and set the image setting .
Single shot
Burst shot
For flash option, toggle the flash button to select the desired flash setting.
EN-10
To select single/burst photography in Record mode:
ENGLISH
Note
Burst pictures are a series of pictures that are photographed in sequence. A set of
4 pictures can be taken in each capture. Flash is disabled when your camera is in
Burst mode.
1.Short-press Mode button to enter the Capture mode(
) .If the
does not
appear on status LCD, press mode button to toggle the setting while the main
mode icon is blinking.
2.While the
is blinking, press
photography selection.
or
button to toggle the recording
Burst photography mode is indicated by the
icon on the status LCD.
3.Press OK button to confirm.
To select the image setting:
1.Short-press Mode button to enter the Capture mode (
).
If the
does not appear on status LCD, press mode button to toggle
the setting while the main mode icon is blinking.
is blinking, press
2.While the
image setting.
3.Press OK button to confirm.
or
button to toggle the
Note
The number of images can be captured depends on image setting. The number of
frames can be taken as follows:
Image Setting
Indicator on Status LCD
Number of images
VGA&Fine
26
QVGA&Fine
104
VGA&Standard
91
QVGA&Standard
367
EN-11
Setting the Flash Mode
Adjust the camera flash setting accordingly when you are taking pictures indoors
and outdoors. The flash has an effective range of approximately 0.5m to 3m.
You can choose one of these flash options:
Auto
When recording in a dark place and backlit conditions,
the camera will automatically determine whether the
flash is necessary.
Off
Used when recording in a place where flash photography is prohibited, or when utilizing the night view or
indoor lightning for recording. The flash will always be
off during recording.
To select a flash option, toggle the Flash button until you see its icon appears on
the status LCD.
Setting the Self-timer
This mode automatically releases shutter after a delay so that the person taking the
picture can be included in the image.
button, and this mode selection indicated by
icon on
1. Press the self-timer/
the status LCD panel.
2. User can select any photography mode (flash/subject mode) by toggling the
mode/flash button until the desired flash and photography mode are shown by
their respective icons on the status LCD panel.
3. Press the shutter button.
4. After 10 seconds, an image is captured and the timer will turn itself off.
The self-timer LED on the front of the camera will blink in red for 10 seconds. In
the first 7 seconds, the LED blinks at a rate relatively slow and then blinks
rapidly for the last 3 seconds.
Video Mode
This mode gives the option to record video photography with 320 x 240 resolution.
In video mode, the number of frames will change to the remaining recording time (in
seconds) on the status LCD. The maximum recording time is 60 seconds.
1.Short-press Mode button to enter the Video mode (
).If the
does not
appear on status LCD, press mode button to toggle the setting while the
main mode icon is blinking. Press OK button to confirm.
2.Press OK button to start the video recording.
While recording, the recording time will decrease on the status LCD.
3.Press OK button once again to stop the recording.
EN-12
Note
ENGLISH
Flash and self-timer are disabled when your camera is in Video mode.
Delete Mode
This mode gives the options to erase single images(the last image) or erase all
images from memory.
To erase single image:
1.Short-press Mode button to enter the Erase mode (
If the
).
does not appear on status LCD, press mode button to toggle
the setting while the main mode icon is blinking.
2.While the
is blinking, select the
icon to erase the last
recorded image. Press OK button to confirm.
If the
does not appear on status LCD, press
or
button to toggle the
delete setting.
3.Press OK button to erase the last recorded image or video clip.
To erase ALL images:
1.Short-press Mode button to enter the Erase mode (
If the
).
does not appear on status LCD, press mode button to toggle the
setting while the main mode icon is blinking.
2.While the
is blinking, select the
icon to erase the all recorded images.
Press OK button to confirm.
If the
does not appear on status LCD, press
or
button to toggle the
delete setting.
3.Press OK button to erase all images, or press mode button to toggle to
another main mode.
EN-13
Installing Camera Software
Before you can transfer the pictures to your computer, you need to install first the
camera software into your computer
System Requirements
Before installing the camera software, make sure your computer meets the following
system requirements:
Windows 98/2000/Me/XP, Pentium 166 MHz or higher for PC Users
Color monitor (XGA or better)
Available USB port, CD-ROM drive
80 MB available hard disk space
At least 32 MB RAM
Installation CD Contents
The camera's installation CD includes the following software:
Camera software(driver) for Windows, which lets you download pictures from a
Windows-based computer.
Image application software for Windows, which allows you to manage and edit any
picture captured with your camera.
Installing the Software(Driver & Image Applications)
1. Insert your camera's Installation CD into your CD-ROM drive.
2. The installation program starts. Follow the on-screen instructions to complete the
camera software installation.
3. Restart your computer.
4. For Windows 98 users, please adjust the following computer setting after driver
installation completed:
a.Go to [Start]-[Setting]-[Control Panel].
b.Double click [System].
c.Select Device Manager TAB.
d.On Disk Drives, double click GENERIC IDE DISK TYPE47.
e.Select Setting Value TAB. Select DMA and click OK.
About driver software
This software has the function to download the recorded images from the camera
and creating the video clips.
Save File: Save the selected image/movie into your computer
Save All Files: Save all the downloaded images and movies into your computer
PC Camera Mode
EN-14
Photo Album Mode
Start PC camera mode: Start preview video clip
Capture Single Frame: In PC camera mode, you can capture the frame during
preview.
ENGLISH
Stop PC camera mode: Stop the current preview/recording video clip
Transferring Pictures to the Computer
After you have installed the camera software, connect the digital camera to your
computer and start transferring your pictures.
Connecting the Camera to Your Computer
Your digital camera comes with a USB cable that you can use to connect the
camera to your computer.
1.Plug the smaller connector of the USB cable into the digital port on your camera.
2.Plug the other end of the USB cable to your computer's USB port.
Downloading Pictures
Once you have properly connected the camera to your computer, you are now
ready to transfer pictures. When USB connected, “PC” will then appear on the
status LCD to indicate the connection to PC.
To download pictures by using driver software:
1.After the USB connected, “PC” icon will appear on the status LCD.
2.Launch the driver software.
3.The message screen will pop out on the screen, asking to download the
recorded images from camera to your computer.
For example:
4.Click Yes to download images.
During transferring process you can hear consecutive beeps.
5.Wait until the transferring process completed, then you can see the captured
images on your computer.
6.Save those images into your computer’s hard disk.
EN-15
Playback on driver software:
Playback Item
Description
Image
For image playback, click on image file to view the image.
Movie
Movie is indicated by
icon attached on the image.
For movie playback, press
. Then, it will automatically
playback using Windows Media Player.
Using as a USB PC Camera
Aside from taking pictures, you can also use your camera as a video camera to
record the video clip by using the driver software.
1.Set the mode to PC camera mode. And set appropriate settings on the Option
mode for the video recording function.
2.Set the video capture file by specifying the filename on the hard disk.
3.Click Pull-down menu [Option]-[Capture Video] to start recording the video clip.
icon.
And stop the recording by clicking the
4.Once done, an .AVI file will be created.
Using your camera as a USB PC camera with Microsoft Netmeeting:
1. Make sure you have installed the camera driver.
2. Connect a USB cable to the camera and to your computer’s USB port.
3. Put the camera on a desktop or on the top of your computer monitor.
4. Press the power button to turn on the camera.
5. Launch Microsoft Netmeeting.
6. Click Play button to view live video.
7. Click Call button.
8.Type the email address or computer name or the network address of the computer
that you are calling.
9.Click Call.
The person you are calling must have Microsoft Netmeeting running and also
Accept your call to start the video conference.
Note
Video conferencing is only available with USB connection.
For more information about the operation of video conferencing software, please refer
to its respective software help.
EN-16
Image Sensor
Image Resolution
350K Pixel CMOS Sensor
-VGA(640 x 480) / QVGA(320 x 240) for Single and Continuous Snap Shot Mode
QVGA(320 x 240) for Video Recording Mode
-VGA(640 x 480)/ QVGA(320 x 240) for PC Camera Mode
ENGLISH
Specifications
Frame Rate
(PC Camera Mode)
Video Recording
Status LCD
15 fps at VGA (640 x 480), 30 fps at QVGA (320 x 240)
60 seconds at 7fps QVGA(320x240) by AVI format.
3-Digit Image Counter/Resolution/Continuous Shot/Camera
Mode (Capture->Delete->Video->Capture)/Flash Mode/
Battery Indication/Macro/Self-timer
Lens
Fixed Focus: Manual Adjustment (Normal & Macro)
-Focal length 5mm (Equivalent to 35mm: 48.1mm)
-Focus Range: 0.5m ~ Infinity (Normal), 0.2~0.5m(Macro)
- Aperture Ratio: f/3.2
Shutter Speed
Electronic Shutter (auto)
Exposure
Auto
White Balance
Auto
Sensitivity
ISO 100
Power Management 60 sec. Auto Power Off
Memory
Internal: 8MB SDRAM
Storage:
VGA/Fine: 26 Images, QVGA//Fine: 104 Images
VGA/Standard:91 Images, QVGA/Standard:367 Images
File Format
JPEG, BMP,AVI
Processing Time
Interval During Taking Pictures: 1 sec
Software
Driver: TWAIN driver for Windows 98/98SE/2000/ME/XP
AP: MGI Photo Suite 4.0, Photo Vista
Camera Mode
-Single Snap Shot mode: number of Pictures Left (3 Digits)
-Continuous Snap Shot Mode: Continuously Take 4 Pictures
at One Time
-Video Recording Mode: for Creating AVI File
-PC Mode: Connecting to Computer for Downloading
Pictures and Video Conference
Flash
Built-in, Auto, Off
Self-timer
10-sec. Delay
Connectors
USB
Port Power
2 x AAA (alkaline), DC 5V through USB Port
Certification
CE, FCC, VCCI
Weight
58.8g
Dimensions
88.39mm x 54.74mm x 26.07mm
*Design and Specifications are subject to change without notice.
EN-17