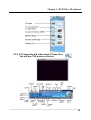
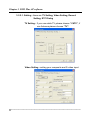
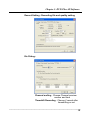
1
TVDVAVCombo
TV Program / Digital Video / Analog Video All-in-One
User’s Manual
_____________________________________________________________________________
FEDERAL COMMUNICATIONS COMMISSION
This device complies with Part 15 of the FCC Rules Operation is subject to
the following two conditions: this device may not cause harmful interference,
and (2) this device must accept any interference received, including
interference that may cause undesired operation.
This equipment has been tested and found to comply with the limits for a
Class B Digital Device, pursuant to part 15 of the FCC Rules. These limits
are designed to provide reasonable protection against harmful interference in
a residential installation. This equipment generates, uses and can radiated
radio frequency energy and, if not installed and used in accordance with the
instruction, may cause harmful interference to radio communication.
However, there is no grantee that interference will not occur in a particular
installation. If this equipment does cause harmful interference to radio or
television reception, which can be determined by tuning the equipment off
and on, the user is encouraged to try to correct the interference by one or
more of the following measures:
-Reorient or relocate the receiving antenna.
-Increase the separation between the equipment and receiver.
-Connect the equipment into an outlet on a circuit different from that to
which the receiver is connected.
-Consult the dealer or an experienced radio/TV technician for help.
Notice: Changes or modifications not expressly approved by the party
responsible for compliance could void the user’s authority to operate the
equipment.
CE DECLARATION
This device complies with CE . These limits are designed to provide
reasonable protection against harmful interface in a residential installation.
Printed in TAIWAN R.O.C No.01011004
All contents are subject to change without notice.
All trademarks are the property of their respective owner
I
Table of Contents
Chapter 1. Overview ------------------------------------------------------------ 1
1.1.
1.2.
1.3.
1.4.
1.5.
Introduction ------------------------------------------------------------------Features ----------------------------------------------------------------------Specifications ---------------------------------------------------------------Minimal System Requirements -----------------------------------------Package Contents ---------------------------------------------------------
Chapter 2. Installation -------------------------------------------------------2.1.
2.2.
1
1
2
2
3
4
Hardware Installation ----------------------------------------------------Driver Installation ----------------------------------------------------------
4
5
Chapter 3. DVD Plus AP software ------------------------------------
9
3.1.
3.2.
Installation ------------------------------------------------------------------Operation --------------------------------------------------------------------
9
9
Chapter 4. PowerDirectorPro AP software ------------------------- 14
4.1.
4.2.
Installation ------------------------------------------------------------------- 14
Operation -------------------------------------------------------------------- 15
Chapter 5. Remote Controller ---------------------------------------------- 19
Chapter 6. Trouble Shooting ------------------------------------------------ 20
_______________________________________________________________________________
II
Chapter 1. Overview
1.1 Introduction
Congratulations on your purchase of “TVDVAVCombo”. It Integrated TV
watching & DV(digital video) & AV(analog video) input All-in-1 PCI board
which enhance multimedia capability of your computer video application.
All-in-One functions make you record any TV program or video
(DV/D8/Hi8/VCR and any video device), no matter TV program, Digital
Video or Analog Video, easy capture and edit video, allows you to create
DVD quality home videos in real-time.
1.2 Features
Support TV, DV, S-video and composite video input, All-in-1 capture
Compatible with all DV, miniDV Camcorder, VHS/VCR, and Analog
Camcorder
TV input
- Support full TV frequency function
- 25 Channel Preview
- Auto channel scan
- Time-shifting
- Scaling TV windows display (full screen support)
DV input
- Fully interoperable with Firewire and i.Link implementations of IEEE
Std 1394, supports data transfer rate up to 400 Mbits/second
- New enhance DV export to Tape interface
Analog video(S-video, Composite) input
- Multi-system video support
Record/Capture
- Real-time MPEG1/2 recording and playback
- Schedule recording for TV program
- Snapshot function support
MPEG file editing directly
Build-in Video mail forwarding capability
Plug-and-play support for quick connection and easy capture
Easy make & enjoy creative movies in five steps : Capture -> Edit ->
Author -> Burn -> Playback
_____________________________________________________________
1
Chapter 1. Overview
Editing functions include Scene change detection/Trim/Split/Speed/
Titling/Audio/Video effects/Transition effects/Title effects/Color board
Authoring functions include Image slideshow/Add chapters/Make
menus/menu templates
Burning functions include VCD/SVCD/DVD/Multiple copies/Erase
rewritable disc
Bi-lingual function available for different model
1.3 Specifications
TV : 75 ohm coaxial TV Antenna/Cable input
Digital video : One i.Link DV 6 pin I/O port
Analog video : One S-video and one composite video input port,
Audio : One stereo audio input and one stereo audio output
Video system : NTSC, PAL, SECAM multi system support
Motion capture : MPG1/2 and AVI format support
Output streaming video file format : WMV, RealVideo
Performance : Upto 25 fps at 720x576 for PAL,
30 fps at 720x480 for NTSC
1.4 Minimum System Requirements
Pentium II 300 or higher CPU
Microsoft Windows 98SE/2000/ME/XP
64MB RAM (128MB RAM recommended)
300MB of available hard disk space (4GB recommended)
One PCI 2.1 bus slot
CD-ROM drive
CD-R/RW (for burning video application)
_____________________________________________________________
2
Chapter 1. Overview
1.5 Package Contents
TVDVAVCombo PCI board
4-pin to 6-pin 1394 cable
RCA L/R to 3.5mm stereo audio jack
One 3.5mm stereo to 3.5mm stereo audio cable
Remote controller
IR receiver for remote controller
Manual
Driver, TV Plus and DVD-Plus software CD
PowerDirector Pro software CD
_____________________________________________________________
3
Chapter 2. Installation
2.1. Hardware Installation
2.1.1. Shut down your computer before you plug in TVDVAVCombo
2.1.2. Open computer case
2.1.3. Plug TVDVAVcombo board in a free PCI slot (Recommend
second PCI slot)
2.1.4. Connect external video device as below
RC : For remote controller IR receiver(bundled in package) input
Vin : For analog composite video input from video source(e.g.
VCR)
TV
: For cable TV or antenna input
Sin : For analog S-video input from video source(e.g. VCR)
Ain : Audio input from video source (e.g. VCR)
※ If audio is L/R(Red/white) connector, please use RCA L/R
to 3.5mm stereo audio jack(bundled in package) to
connect
Aout : Please use stereo audio cable(bundled in package) connect
it to sound card’s “Line in”
DV
: For DV 6 pin I/O connect your 1394 device
※There are 6-pin to 4-pin 1394 cable was bundled in package
for your connection to convert any 6-pin or 4-pin device
_____________________________________________________________
4
Chapter 2. Installation
2.2. Driver Installation
※ This installation steps is for Windows XP/2k environment;
※
Win98/Me/2000 environment, Please use manual installation,
when windows detect New Hardware,
(a)The first, assign E:\TVDVAV\Driver\win98SE_Me\713x_driver
install chip driver
(b)Second, assign
E:\TVDVAV\Driver\win98SE_ME\Tuner_Driver\PAL BG
install tuner driver(suppose you are using Pal BG system)
(suppose your CD-ROM drive is E drive)
2.2.1. Please make sure TVDVAVCombo was plug in computer already
2.2.2. Turn on computer
2.2.3. System automatically detect new hardware(Multimedia controller)
as below
Please click " Cancel "
2.2.4. Put “ Multimedia Installation Kit “ CD into your CD-ROM drive;
please run “ E:\TVDVAV\Driver\setup.exe “; (suppose your
CD-ROM drive is E drive)
_____________________________________________________________
5
Chapter 2. Installation
Click “ Next “
2.2.5. Choose Destination Location and click “ Next “
2.2.6. When Windows XP show message “…about this software didn’t
pass windows logo…”, please click “Continue Anyway ”
(even TVDVAVcombo driver didn’t apply window logo approving,
but this software can run XP very well, it is not problem)
2.2.7. Setup type; please choose your located country
Click “ Set “
_____________________________________________________________
6
Chapter 2. Installation
2.2.8. When Windows XP show message “…about this software
didn’t pass windows logo…”, please click “Continue Anyway ”
(even TVDVAVcombo driver didn’t apply window logo approving,
but this software can run XP very well, it is not problem)
2.2.9. Complete WDM TVtuner driver installation
Click " Finish "
2.2.10. Finished TVDVAV driver
Click " Finish "
_____________________________________________________________
7
Chapter 2. Installation
2.2.11. Please restart computer
Click “ Ok “
2.2.12. After restart computer, please go to My Computer->Control
Panel->System->Hardware->Device Manager, make sure your
TVDVAVcombo driver all were installed completely.
_____________________________________________________________
8
Chapter 3. DVD Plus AP software
3.1. Installation
※ Before you install, please write down CD-key number of CD-ROM
(it was pasted on CD-ROM)
3.1.1. Please insert " Multimedia Installation Kit " CD into your
CD-ROM drive; please run "E:\TVDVAV\AP Software\Setup.exe ";
(suppose CD-ROM drive in E drive)
3.1.2. Select Country : Please choose the country you located
Click “ Ok “
3.1.3. Welcome to the installshield Wizard for DVDPlus Click “ Next “
3.1.4. License agreement; please click “ Yes “
3.1.5. Choose Destination Location; Click “ Next “
3.1.6. Select Program Folder; Click “ Next “
3.1.7. Windows Media Format 9 Series Runtime Setup; Click “ Yes “
3.1.8. License agreement; please click “ Yes “
3.1.9. Complete Windows Media Format 9 Series Runtime Setup; Click
“ Yes “
3.2. Oparation
3.2.1. Starting : Please click the ”DVD Plus 3.0” icon
after executed , you can see screen as below
_____________________________________________________________
9
Chapter 3. DVD Plus AP software
3.2.2. TV,Composite & S-video input; Please click
You will see TVR screen as below.
_____________________________________________________________
10
Chapter 3. DVD Plus AP software
3.2.2.1. Setting : there are TV Setting, Video Setting, Record
Setting, ETC Dialog
TV Setting : If you use cable TV, please choose “CATV”, if
use Antenna please choose “TV”.
Video Setting : setting your composite and S-video input
_____________________________________________________________
11
Chapter 3. DVD Plus AP Software
Record Setting : Recording file and quality setting
Etc Dialog :
Channel surfing : Choose Channel preview
number and time
Timeshift Recording : Choose if record after
timeshifting or not.
_____________________________________________________________
12
Chapter 3. DVD Plus AP software
3.2.2.2. Display scaling : Please move mouse to the down-right
corner of display windows, push mouse
left key to scale display windows.
3.2.2.3. Full screen : Double click display windows, will make full
screen on/off.
3.2.2.4. Recording : Please click record button to start recording,
and stop record while push again.
3.2.2.5. TimeShfit : Please click Timeshift button to make timeshift
and recording, you can move Slide bar to watch
any video section.
3.2.2.6. Video Folder : Provide video edit and video mail function.
※ Please ref. Online help of DVD Plus to get more
instructions about function operating
_____________________________________________________________
13
Chapter 4. PowerDirectorPro AP software
4.1. Installation
※ Before you install, please write down CD-key number of CD-ROM
(it was pasted on CD-ROM)
4.1.1. Please insert "PowerDirectorPro" CD-ROM into your CD-ROM
drive; Windows will autorun and show as below. (if windows didn’t
autorun, please Run "E:\Setup\Setup.exe "; (suppose CD-ROM
drive in E drive)
Choose language that you want
4.1.2. Ready to install; Click "Next"
4.1.3. License agreement; Click “Yes”
4.1.4. Type CD-key (the CD-key label paste on CD-ROM)
_____________________________________________________________
14
Chapter 4. PowerDirectorPro AP software
4.1.5. Choose destination location and click “Next”
4.1.6. Select working directory and click “Next”
4.1.7. Setup will install; click “Next”
4.1.8. Setup complete; click “Next” to finished PowerDirectorPro
installation.
4.2. Operation : Before you run PowerDirectorPro, please setup your
Display card(VGA) to 1024x768 16 bit color or upper.
The resolution define by software not hardware, if you use
other application software, you can set VGA resolution/color
as software define.
4.2.1.Please click the “ PowerDirector Pro “ icon
After executed, you can see screen as below
4.2.2. Capture Mode : Please click “Capture mode”
as below.
, Screen show
_____________________________________________________________
15
Chapter 4. PowerDirectorPro AP software
4.2.3. Analog Composite and S-video input setup
※ If you use DV input, please jump to 3.4
4.2.3.1. Please click “Analog Video Capture”
4.2.3.2. Please click “Video Setup”, show screen as below
_____________________________________________________________
16
Chapter 4. PowerDirectorPro AP software
(a) Video Setup
(a-1) Capture Device : Please choose “TVDVAVcombo”
(a-2) Capture Source : If S-video input, please choose “Video
Svideo”; If Composite video input,
please choose “Video Composite”
(b) Video Adjustment : Adjustment video display
(c) TV Setup : Choose video input system; e.g. USA(NTSC M),
Europe(PAL B)
4.3.3. Please click “Audio Setup”, show screen as below;
(a) Audio Device : Choose sound card device
(b) Audio Input : If audio connect to Line-in of sound card, please
choose “Line In”
4.4. DV (Digital Video) input
Please click “DV Capture”, screen show as below.
Non real-time capture will utilize a buffer and is recommended for
users who desire high quality but do not possess adequate computing
power. Thus, non real-time capture will take longer to process the
encoding of captured content when utilizing a buffer.
Real-time capture, the actual content being encoded will coincide with
the content that is being played in the Preview Window and consume
more CPU resources. This will not hold true for non real-time capture.
_____________________________________________________________
17
Chapter 4. PowerDirectorPro AP software
※ If your computer speed is not fast, we recommend choose Non
real-time capture
4.5. Profile Setup : Please click “Profile Setup” to setup recording file
format, screen show as below.
If you want burning recording file to VCD/SVCD/MiniDVD,
please choose “Video for Movie Disc Production”
4.6. Record : Now you can click “Record” start to make recording
※ Please ref. Online help of PowerDirector Pro to get more
instructions about function operating
_____________________________________________________________
18
Chapter 5. Remote controller
※ Exit TVR program : Just for power exit the software only
※ If you switch two digital channel, please do not delay long
time, or will change to first digital channel
_____________________________________________________________
19
Chapter 6. Trouble Shooting
Q1 : Why can not hear anything when preview/recording mode?
A1: (1) Please reference 2.1.4. Ain and Aout (page 4)
(2) Please check your sound card recording function, do not make
Line-In to be mute, and check the recording volume..
You can record other audio device(e.g.VCR) and playback the file for
testing.
Q2 : After Plug-in TVDVAVcombo in slot and power on, system hanged.
A2: There might be some reason cause such problem, please try as
below.
(1) Please try to move yourTVDVAVcombo board to other slot .
Because maybe IRQ conflict with other device.
(2) Please change IRQ in motherboard BIOS Setup.
e.g. Award BIOS,
Go into “Advanced”->”PCI Configuration”, there are “Slot 1 IRQ”,
“Slot 2 IRQ”, “Slot 3 IRQ”; each you can setup
“Auto”,”NA”,”3”,”4”…., if your TVDVAVcombo plug into Slot 2,
please try to change the “Slot 2 IRQ” setup, and find one IRQ
can work.
(3) Maybe your motherboard BIOS is old version, please update
motherboard BIOS from motherboard manufacture company.
(4) Maybe you had installed other analog TV tuner card driver before
(most TV card use same chipset ), please remove all other TV card
drivers and install TVDVAVcombo first.
Q3 : How can I get best performance in recording mode?
A3 : The best performance recording depend on computer system
performance, but you also can make some step as below to make
better.
(1) Keep Hardisk space larger.
(2) Make your hardisk drive DMA active; Go to My Computer->
Control Panel->System->Device Manager->Disk drives->
GENERIC IDE DISK TYPE47->Properties->Settings, click
“DMA”.
(3) Use speed more than 7200 Rotation hardisk drive
(4) Disable Power Management in BIOS
_____________________________________________________________
20
Chapter 6. Trouble Shooting
(5) Disable Power Saving mode of monitor
(6) Close some resident programs of your system
(7) Restruct your hardisk
(8) Do not run other program during recording
(9) If use DV input, please switch to Non Real-tim Capture, ref. 3.4
(10) You can choose VCD or AVI recording format instead of DVD
format.
Q4 : Why open TVR program, the error message “Could not initialize the
capture device ” show on?
A4 : When you want open TVR function, please power off DV camera.
_____________________________________________________________
21