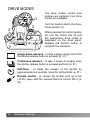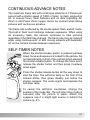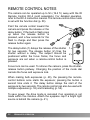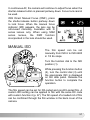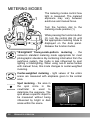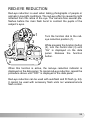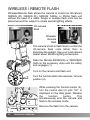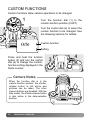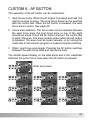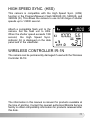
1
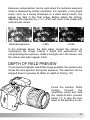
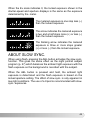
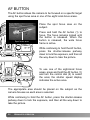
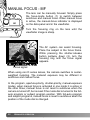
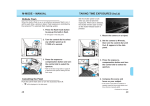
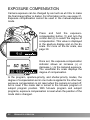
EXPOSURE COMPENSATION
Camera exposure can be changed by as much as ±3.0 Ev to make
the final image lighter or darker. For information on Ev, see page 31.
Exposure compensation cannot be used in the manual-exposure
mode.
2
1
Press and hold the exposurecompensation button (1) and turn the
control dial (2) to select the degree of
compensation. This value is displayed
in the aperture display and on the Ev
scale. For more on the Ev scale, see
page 39.
Once set, the exposure-compensation
indicator shows an increase (+) or
decrease (–) to the metered exposure.
The viewfinder Ev scale displays the
degree of compensation.
In the program, aperture-priority, and shutter-priority modes, the
degree of compensation set in one mode is applied to the other two;
exposure compensation is not reset when the camera is turned off,
but is reset if the mode dial is turned to the full-auto program or
subject program position. With full-auto program and subject
programs, exposure compensation is reset when the position of the
mode dial is changed.
42
ADVANCED
OPERATION
Exposure compensation can be used when the camera’s exposure
meter is deceived by certain conditions. For example, a very bright
scene, such as a snowy landscape or a white sandy beach, can
appear too dark in the final image. Before taking the picture,
adjusting the exposure by +1 or +2 EV will result in an image with
normal tonal values.
Metered exposure
–1.0Ev
–2.0Ev
In the example above, the dark water caused the camera to
overexpose the image making it bright and washed-out. By
compensating the exposure, detail is brought out in the leaves, and
the stones and water appear richer.
DEPTH OF FIELD PREVIEW
To provide the brightest viewfinder image possible, the camera only
closes the lens aperture during the exposure. The aperture can be
stopped down to preview its affect on depth of field (p. 30).
Focus the camera. While
looking
through
the
viewfinder, press and hold
the depth-of-field preview
button (1) to stop the lens
down to the aperture in use.
1
43
AE LOCK BUTTON
The AE-lock button locks the exposure without activating the AF
system. This allows the exposure to be set with a gray card or a
reference target outside the scene. The operation of the AE-lock
button can be changed with custom function 9 (p. 70). This button
is disabled in shutter-priority and manual-exposure modes.
Frame the exposure target in the viewfinder
depending on the metering mode in use (p. 58).
Press the AEL button (1) to lock the exposure; the
shutter speed and aperture are displayed and the
AEL indicator is displayed in the viewfinder.
Release the button to cancel the lock.
1
2
While holding the AEL button, place
the subject in the focus frame and
press the shutter-release button
partway down to focus (2). Press the
shutter-release button down all the
way to take the picture.
The exposure remains locked after the picture is taken if the AEL
button is not released.
While the exposure is locked, the camera meter is still active. The
viewfinder Ev scale shows the difference between the locked
exposure and the current light level measured with the meter.
AEL indicator
44
ADVANCED
OPERATION
Ev scale
When the Ev scale indicates 0, the locked exposure shown in the
shutter-speed and aperture displays is the same as the exposure
determined by the meter.
The metered exposure is one stop less (–)
than the locked exposure.
The arrow indicates the metered exposure
is two and a half stops more (+) or less (–)
than the locked exposure.
The blinking arrow indicates the metered
exposure is three or more stops greater
(+) or less (–) than the locked exposure.
ABOUT SLOW SYNC.
When using flash, pressing the AEL button activates the slow-sync.
function. This gives the same effect as the night portrait subject
program (p. 27) which balances the ambient light exposure with the
flash exposure so the background is recorded with the subject.
When the AEL button is pressed and held, the ambient light
exposure is determined and the flash exposure is based on the
locked aperture setting. The affect of slow sync. is only apparent in
low-light conditions. The use of a tripod is recommended with slowsync. exposures.
45
AF BUTTON
The AF button allows the camera to be focused on a specific target
using the spot focus area or one of the eight local-focus areas.
Place the spot focus area on the
subject.
Spot focus area
Press and hold the AF button (1) to
focus. The focus remains locked until
the button is released. When the
button is released, the wide focus
frame is active.
While continuing to hold the AF button,
press the shutter-release partway
down to lock the exposure, and then all
the way down to take the picture.
1
2
To use one of the eight-local focus
areas, press and hold the AF button (1)
and turn the control dial (2) to select
the area; the shutter speed display
indicates the active area.
1
The appropriate area should be placed on the subject as the
camera focuses as each area is selected.
While continuing to hold the AF button, press the shutter-release
partway down to lock the exposure, and then all the way down to
take the picture.
46
ADVANCED
OPERATION
The shutter speed display on the data panel and in the viewfinder
indicates the active focus area. The area is briefly illuminated in the
viewfinder when it is selected.
When the AF button is initially pressed, the spot focus area is active.
The control dial is used to cycle through the local-focus areas. To
select the spot focus area after selecting a local area, release and
then press the AF button again.
Camera Notes
Custom function 8 changes the operation of the AF button. See page 69
for information.
47
MANUAL FOCUS - MF
The lens can be manually focused. Simply press
the focus-mode button (1) to switch between
autofocus and manual focus. When manual focus
is active, the manual-focus indicator is displayed
on the data panel and in the viewfinder.
1
Turn the focusing ring on the lens until the
viewfinder image is sharp.
2
The AF system can assist focusing.
Place the subject in the focus frame.
While pressing the shutter-release
button partway down (2), turn the
focusing ring until the focus signal
appears.
Focus signal
When using non D series lenses, the camera switches to centerweighted metering. The metered exposure may be different in
autofocus and manual focus.
In the program, aperture-priority, shutter-priority, manual-exposure
modes, when manual focus is activated in one mode it is active in
the other three; manual focus is not reset to autofocus when the
camera is turned off, but is reset if the mode dial is turned to the fullauto program or subject program position. With full-auto program
and subject programs, manual focus is reset to autofocus when the
position of the mode dial is changed.
48
ADVANCED
OPERATION
FUNCTION DIAL
The function dial controls many of the cameras
creative functions and camera operations. for
descriptions of the functions, refer to the
appropriate sections.
Custom functions (p. 64)
Custom ISO (p. 57)
Red-eye reduction (p. 59)
Wireless / Remote flash (p. 60)
Drive modes (p. 50)
Metering modes (p. 58)
AF modes (p. 56)
Multiple exposure (p. 53)
Exposure bracketing (p. 54)
Audio signals (p. 49)
Date imprinting (p. 63) (Date model only)
Date and time setup (p. 18) (Date model only)
AUDIO SIGNALS
1
2
3
The audio signal gives a positive
confirmation for focus lock and
when using the self-timer and
remote control. The signal can be
turned off.
Turn the function dial to the audiosignal position (1). While pressing
the function button (2), turn the
control dial until “On” or “OFF” is
displayed on the data panel.
49
DRIVE MODES
1
3
2
The drive modes control how
pictures are captured. Four drive
modes are available.
Turn the function dial to the drivemode position (1).
While pressing the function button
(2), turn the control dial (3) until
the appropriate drive mode is
displayed on the data panel.
Release the function button to
complete the operation.
Single-frame advance - to take a single image each time
the shutter-release button is pressed (p. 21).
Continuous advance - to take a series of images when
the shutter-release button is pressed and held (p. 51).
Self-timer - to delay the release of the shutter by
approximately ten seconds. Used for self portraits (p. 51).
Remote control - to release the shutter from up to 5m
(16.4ft.) away with the optional Remote Control RC-3 (p.
52).
50
ADVANCED
OPERATION
CONTINUOUS-ADVANCE NOTES
The maximum frame rate with continuous advance is 3 frames per
second with a shutter speed of 1/250 or faster, no flash, single-shot
AF or manual focus, fresh batteries and no date imprinting. AF
Zoom xi and Power Zoom lenses cannot be zoomed when taking
pictures with continuous advance.
The frame rate is affected by the shutter speed, flash, and AF mode.
The built-in flash must recharge between exposures. When using
an accessory flash, the camera continues to take pictures
regardless if the flash has charged. The frame rate may be reduced
when using continuous AF or with moving subjects with Automatic
AF as the camera focuses between exposures.
SELF-TIMER NOTES
When the shutter-release button is pressed partway
down, focus and exposure is locked for the picture. Do
not stand directly in front of the camera when pressing
the shutter-release button. To change the focus point,
release the shutter button and then press it partway
down again.
Press the shutter-release button all the way down to
start the timer. The self-timer lamp on the front of the
camera blinks, then glows steadily just before the
shutter releases. The audio signal accompanies the
self-timer lamp.
To cancel the self-timer countdown, change the
position of the mode dial. The self-timer drive mode is
canceled after the picture is taken. Attach the
eyepiece cap if a bright light source is behind the
camera (p. 41).
51
REMOTE CONTROL NOTES
The camera can be operated up to 5m (16.4 ft.) away with the IR
Remote Control RC-3 (sold separately). For detailed operation,
refer to the RC-3 instruction manual. The remote-control drive mode
is set with the function dial (p. 50).
Point the remote control toward the
camera and press the release or the
delay button. If the built-in flash pops
up when the release button is
pressed, wait a few seconds for the
flash to charge and then press the
release button again.
The delay button (1) delays the release of the shutter
for two seconds. The release button (2) fires the
shutter without a delay. The subject should be
positioned within the focus frame; the focus and
exposure are set when a remote-control button is
pressed.
1
2
Focus lock can be used. To refocus the camera, press the shutterrelease button partway. Changing the position of the mode dial
cancels the focus and exposure lock.
When making bulb exposures (p. 40), the pressing the remotecontrol buttons once starts the exposure; pressing the button a
second time ends it. The delay button delays the start of the
exposure by two seconds. The remote control can also be used with
multiple exposures (p. 53) and bracketing (p. 54).
To save power, the drive mode is canceled if an operation is not
made within five minutes. Attach the eyepiece cap if a bright light
source is behind the camera (p. 41).
52
ADVANCED
OPERATION
MULTIPLE EXPOSURES
The multiple-exposure function
makes it possible to expose two or
more images on the same frame. The
built-in flash can be used, but
overexposure could result.
1
2
3
Turn the function dial to the
multiple-exposure position (1).
While pressing the function
button (2), turn the control dial
(3) until “ME” is displayed in the
frame counter. Release the
function button. The first
exposure can be taken.
ME will blink on the data panel after the
initial exposure to indicate the next exposure
will be the final one. Press the shutterrelease button to take the second exposure
and advance the film. Multiple-exposure
mode is canceled after the last exposure.
To make more than two exposures, press the function button and
turn the control dial to stop “ME” blinking after the initial exposure.
An unlimited number of exposures can be made by repeating this
procedure.
The camera meter indicates the required exposure for a single
picture. Depending on the scene, the exposure may have to be
compensated.
53
EXPOSURE BRACKETING
This function makes a three-image bracket of a scene. Bracketing
is a method of taking a series of images of a static subject in which
each image has a slight variation in exposure. Bracket your
exposures when shooting slides and other films with a small
exposure latitude.
1
3
2
Turn the function dial to the
exposure-bracketing position
(1).
While pressing the function
button (2), turn the control dial
(3) to select the bracketing
step: 0.3Ev, 0.5Ev, 0.7Ev, or
1.0Ev. The larger the number,
the greater the difference
between exposures. For more
on Ev, see page 31. Release
the function button.
Normal
Under
Over
0.3 Ev bracket
0.5 Ev bracket
1.0 Ev bracket
The order of the bracketing series is normal exposure,
underexposure, and overexposure. The built-in or accessory flash
cannot be used with bracketing; the flash is automatically canceled.
54
ADVANCED
OPERATION
When the bracketing function is initially selected, the drive mode is
automatically set to continuous advance. Compose the picture as
described in the taking-a-picture section (p. 21). The focus and
exposure are locked with the first frame.
Press and hold the shutter-release button all the way down to make
the bracketing series; three consecutive frames are taken. If the
shutter button is released before the last frame of the series is
taken, the bracket series is reset.
Changing the drive mode (p. 50) to singleframe advance, self-timer, or remote control
allows each frame to be taken each time the
shutter-release button is pressed all the way
down; the self-timer drive mode is reset after
each exposure. The data panel indicates the
next bracketing frame in the series.
To cancel the current bracketing series, turn the camera off. To
cancel the bracketing function, press the function button and turn
the control dial until “OFF” is displayed on the data panel.
Camera Notes
A button shortcut allows exposure
bracketing to be used with specific
subjects. Press and hold the
exposure-compensation
button
while pressing and holding the
shutter-release button for the
duration of the automatic threeframe 0.5 Ev bracket.
55
AF MODES
1
3
2
This function controls how the AF
system works. Four modes are
available.
Turn the function dial to the AFmode position (1).
While pressing the function button
(2), turn the control dial (3) until
the appropriate AF mode is
displayed on the data panel.
Release the function button to
complete the operation.
Automatic AF - the camera automatically switches
between single-shot AF and continuous AF.
Continuous AF - for moving subjects. The camera
continually focuses.
Single-shot AF - for static subjects. focus lock (p. 23) can
be used.
Direct Manual Focus - when focus is locked, the lens can
be manually focused. Available with D series lenses only.
The viewfinder focus signal indicates AF status.
Focus locked.
Focus is confirmed (Continuous AF).
Indicator blinks - cannot focus. The shutter is locked.
Focusing (Continuous AF). The shutter is locked.
56
ADVANCED
OPERATION
In continuous AF, the camera will continue to adjust focus when the
shutter-release button is pressed partway down. Focus lock cannot
be used.
With Direct Manual Focus (DMF), press
the shutter-release button partway down
to lock focus. When the manual focus
indicator (MF) appears, the lens can be
refocused manually. Available with D
series lenses only. When using SSM
series lenses, the DMF function
incorporated in the lens should be used.
MANUAL ISO
1
2
3
The film speed can be set
manually from ISO 6 to ISO 6400
in 1/3 Ev steps.
Turn the function dial to the ISO
position (1).
While pressing the function button
(2), turn the control dial (3) until
the appropriate ISO is displayed
on the data panel. Release the
function button to complete the
operation.
The film speed can be set for DX-coded and non-DX-coded film. A
custom ISO setting can be applied to film with the same DX code
with custom function 4 (p. 67). The film speed of a loaded roll of film
can be confirmed through the film window in the back cover of the
camera.
57
METERING MODES
1
3
2
The metering modes control how
light is measured. The metered
exposure may vary between
autofocus and manual focus.
Turn the function dial to the
metering-mode position (1).
While pressing the function button
(2), turn the control dial (3) until
the appropriate metering mode is
displayed on the data panel.
Release the function button.
14-segment honeycomb-pattern metering - the
camera’s standard metering mode appropriate for most
photographic situations. By combining information from the
autofocus system, this mode is less influenced by spot
lighting or backlighting. When using non-D series lenses
with manual focus, this mode changes to center-weighted
metering.
Center-weighted metering - light values of the entire
scene are measured with emphasis given to the central
area.
Spot metering - the area in
the spot circle in the
viewfinder
is
used
to
determine the exposure. The
spot allows a specific object to
be measured without being
influenced by bright or dark
areas within the scene.
58
ADVANCED
OPERATION
Spot metering area
RED-EYE REDUCTION
Red-eye reduction is used when taking photographs of people or
animals in low-light conditions. The red-eye effect is caused by light
reflected from the retina of the eye. The camera fires several preflashes before the main flash burst to contract the pupils of the
subject’s eyes.
1
2
3
Turn the function dial to the redeye reduction position (1).
While pressing the function button
(2), turn the control dial (3) until
“On” is displayed on the data
panel. Release the function
button.
When this function is active, the red-eye reduction indicator is
displayed on the data panel. To cancel red-eye reduction, repeat the
procedure above until “OFF” is displayed in the data panel.
Red-eye reduction can be used with autoflash and fill flash (p. 24).
It cannot be used with accessory flash units nor wireless/remote
flash control.
59
WIRELESS / REMOTE FLASH
Wireless/Remote flash allows the camera to control an off-camera
5600HS (D), 3600HS (D), 5400HS, 5400xi, or 3500xi flash unit
without the need of a cable. Single or multiple flash units can be
placed around the subject to create special lighting effects.
On-camera
flash
Wireless/
Remote
flash
The camera’s built-in flash fires to control the
off-camera flash units rather than to
illuminate the subject. See your local camera
dealer about Minolta lighting accessories.
1
Slide the Minolta 5600HS(D) or 3600HS(D)
flash on the accessory shoe until the safety
lock engages (1).
Turn on the camera and flash unit.
2
Turn the function dial to the wireless / remote
position (2).
4
3
While pressing the function button (3),
turn the control dial (4) until “On” is
displayed on the data panel. Release
the
function
button.
This
simultaneously sets the camera and
flash to the wireless mode.
Remove the flash from the camera.
60
ADVANCED
OPERATION
Press the flash mode button to raise
the flash.
Position the camera and flash around
the subject. See the following page
for the camera-to-subject and flashto-subject ranges. Make sure no
objects come between the camera
and flash unit.
The flash units can be test fired by pressing the
AEL button on the camera; custom function 9
must be set to 1 (p. 64). If the flash does not fire,
change the camera, flash, or subject position.
When the 5600HS(D) and 3600HS(D) flash is
charged, the AF illuminator on the front of the
unit blinks. Take a picture as described in the
basic operation section on page 21.
To cancel wireless/remote flash, mount the flash on the camera and
turn the function off using the function button and control dial. For
more about flash operation, refer to the manual supplied with the
flash unit.
61
WIRELESS / REMOTE FLASH NOTES
Camera-to-subject
distance
Flash-to-subject
distance
The camera and flash must
be within 5m (16.4 ft)
of the subject.
The following chart list the minimum distances required when using
Program/Maxxum Flash 5600HS (D) and 3600HS (D). For more
detailed information or when using High Speed Sync. (HSS), refer
to the flash unit manual.
Aperture
ƒ/2.8
ƒ/4.0
ƒ/5.6
Min. camera-to-subj. dist.
ISO 100
ISO 400
2.8m / 9.2ft
1.4m / 4.6ft
1.0m / 3.3ft
2.0m / 6.6ft
1.0m / 3.3ft
2.0m / 6.6ft
Min. flash-to-subj. dist.
ISO 100
ISO 400
2.8m / 9.2ft
1.4m / 4.6ft
1.0m* / 3.3ft* 2.0m / 6.6ft
1.0m* / 3.3ft* 2.0m / 6.6ft
* The maximum flash-to-subject distance when using
Program/Maxxum Flash 3600HS (D) is 3.5m (11.5ft) at ƒ/4.0 and
2.5m (8.2ft) at ƒ/5.6 with ISO 100 film.
Wireless/Remote flash performs best under subdued light or interior
lighting. Under bright light sources, the flash may not be able to
detect the control signals from the camera’s built-in flash.
When not using off-camera flash units, always turn off the wireless
flash mode; inaccurate flash exposures will result.
62
ADVANCED
OPERATION
DATE IMPRINTING - DATE MODEL
The date or the day and time the picture is taken can be imprinted
in the bottom right corner of a horizontal image. See page 18 to set
camera’s clock and calendar.
1
2
Date imprinting
3
Turn the function dial (1) to the
date position.
While pressing the function button
(2), turn the control dial (3) to
select date imprinting, time
imprinting, or imprinting off. The
date indicator remains on the
data panel to show imprinting is
active.
Time imprinting
Imprinting off
The date format is changed with custom function 15 (p. 64). Three
formats are available: year / month / day, month / day / year, and
day / month / year.
Imprinted data may be difficult to read if the lower-left corner of the
photograph is bright or non-uniform. Do not use the data back when
temperatures are outside the range of 0° to 50°C (32° to 122°F).
Since the date is recorded when the film is advanced to the next
frame, sometimes the last frame of the roll will not have the date
imprinted on it.
63
CUSTOM FUNCTIONS
Custom functions allow camera operations to be changed.
1
Turn the function dial (1) to the
custom-function position (CUST).
2
Turn the control dial (2) to select the
custom function to be changed. See
the following sections for details.
Custom function
Setting
Press and hold the function
button (3) and turn the control
dial (4) to change the customfunction setting displayed in the
frame counter.
Camera Notes
When the function dial is in the
custom-function position, the shutterrelease button is still active and
pictures can be taken. The other
camera buttons are disabled. With the
date model, the shutter-release button
is also active in the date-selection
position.
64
ADVANCED
OPERATION
3
4
Custom function
1
AF/shutter priority
2
Film rewind
3
Film leader at rewind
4
DX memory
5
Shutter lock - no film
6
Lens focus-hold button
7
Program shift
8
AF button
9
AEL button
10 AF illuminator
11 Flash metering
12 Focus area illumination
13 Shutter lock - no lens
14 Shutter lock - back open
15 Date format (Date model)
Setting
1 AF priority
2 Release priority
1 Automatic
2 Manual
1 Wind in
2 Leave out
1 Off
2 On
1 Unlocked
2 Locked
1 Focus hold
2 Continuous AF
3 Depth-of-field preview
1 Off
2 PA (Aperture shift)
3 PS (Shutter-speed shift)
1 Spot focus priority
2 AF-area selection
3 Wide / spot focus area toggle
1 Hold
2 Toggle
1 On
2 Off
1 ADI
2 TTL
1 0.3 sec. focus lock indication
2 0.6 sec. focus lock indication
3 Focus area selection only
1 Locked
2 Unlocked
1 Locked
2 Unlocked
1 Year / month / day
2 Month / day / year
3 Day / month / year
CUSTOM 1 - AF/SHUTTER PRIORITY
Custom function 1 has two settings:
1
AF priority. Shutter will not release until the camera focuses.
2
Shutter-release priority. Shutter releases even if the focus
cannot be confirmed. Use shutter-release priority when
photographing moving subjects. When using the continuousadvance drive mode, the camera does not focus between
exposures.
CUSTOM 2 - FILM REWIND
Custom function 2 has two settings:
1
Automatic. The film is automatically rewound at the end of the
roll.
2
Manual. The manual-rewind button must be pressed at the end
of the roll to initiate rewind (p. 29).
CUSTOM 3 - FILM LEADER
Custom function 3 has two settings:
1
Wind in. The film is completely rewound into
the cartridge.
2
Leave out. The film leader is exposed after
rewind. Turning the camera off during
rewinding allows the film leader to be
rewound into the cartridge by turning the
camera on after the film transport motor has
stopped.
66
ADVANCED
OPERATION
CUSTOM 4 - DX MEMORY
Custom function 4 has two settings:
1
DX Memory Off. The film speed is set automatically to the ISO
of DX-coded film. Non-DX-coded film is set to the ISO of the
previous DX-coded roll.
2
DX Memory On. A change to the ISO setting of a DX-coded film
is saved and applied to other DX-coded rolls with the same film
speed. This is used when a particular film is consistently push or
pull processed. To set film speed manually, see page 58.
CUSTOM 5 - SHUTTER LOCK (FILM)
Custom function 5 has two settings:
1
Unlocked. Shutter can be released even if no film is in the
camera.
2
Locked. Shutter cannot be released with no film in the camera;
0 blinks in the viewfinder and on the data panel as a warning
when the shutter-release button is pressed.
CUSTOM 6 - FOCUS-HOLD BUTTON
For lenses equipped with a focus-hold button. The operation of the
focus hold-button can be customized:
1
Focus Hold. Pressing the focus-hold button on the lens locks the
autofocus.
2
Continuous AF. Pressing and holding the focus-hold button
activates continuous AF. See page 56 for more information on
AF modes.
3
Depth-of-field preview. Pressing the focus-hold button stops
down the lens to the set aperture to view the affect of depth of
field on the image (p. 43).
67
CUSTOM 7 - PROGRAM SHIFT
Program shift allows the aperture and
1
shutter speeds set in full-auto
2
program and program exposure
modes to be changed without
affecting the total exposure. When
program shift is active, the autoflash
flash mode is disabled (p. 24).
Press the shutter-release button
partway down (1) to activate the
exposure system.
When the exposure is displayed, turn
the control dial (2) to change the
aperture
and
shutter
speed
combination.
Custom function 7 has three settings:
1
Off. Autoflash is available.
2
PA. The aperture can be shifted and the shutter speed
automatically compensates to provide the correct exposure.
3
Ps. The shutter speed can be shifted and the aperture
automatically compensates to provide the correct exposure.
Fill flash can be used when program shirt is selected, however the
exposure cannot be shifted. Program shift is canceled when the
flash is raised.
68
ADVANCED
OPERATION
CUSTOM 8 - AF BUTTON
The operation of the AF button can be customized:
1
Spot focus priority. When the AF button is pressed and held, the
spot focus area is active. The local focus areas can be selected
with the control dial. When the AF button is released, the wide
focus area is active. See page 46.
2
Focus area selection. The focus area can be selected between
the wide focus area, the spot focus area, or one of the eight
local-focus areas. Press the AF button and turn the control dial
to select the area. The area remains active when the AF button
is released. The area must be reset manually, or by turning the
mode dial to the full-auto program or subject program positions.
3
Wide / spot focus area toggle. Pressing the AF button switches
between the wide focus area and spot focus area.
The shutter-speed display on the data panel and in the viewfinder
indicates the active focus area when the AF button is pressed.
Wide focus area
69
CUSTOM 9 - AEL BUTTON
This custom function changes the operation of the AE lock button.
Custom function 9 has two settings:
1
Hold. Press and hold the AEL button to lock the exposure, see
page 44.
2
Toggle. Press the AEL button once to lock the exposure. Press
it a second time to cancel the lock. The lock will remain in effect
until canceled even after the exposure.
CUSTOM 10 - AF ILLUMINATOR
The built-in flash is used as an AF Illuminator. When the scene is
too dark for the camera to focus, the built-in flash fires a few short
bursts when the shutter-release button is pressed partway down to
provide the light necessary for the camera to focus.
Pressing the AF button also activates the AF illuminator. The range
of the AF Illuminator is approximately 1 to 5 m ( 3.3 to 16.4 ft.).
When an accessory flash is attached, the flash unit is used as the
AF illuminator in place of the camera’s built-in flash.
The AF illuminator will not fire in continuous AF mode or with flash
cancel. The AF illuminator may not operate with focal lengths of
300mm or longer or with 3x-1x Macro Zoom.
Custom function 10 has two settings:
1
AF Illuminator On.
2
AF Illuminator Off. An attached accessory flash’s AF illuminator
is not canceled.
70
ADVANCED
OPERATION
CUSTOM 11 - FLASH METERING
The metering mode for both the built-in and accessory flash can be
specified:
1
ADI Flash Metering. When the flash fires, ADI or pre-flash TTL
metering will be employed. Flash metering changes according
to the flash unit and lens being used, see below.
ADI (Advanced Distance Integration) metering uses the
distance information from D series lenses in addition to TTL
metering during the exposure. With the 5600HS (D), 3600HS
(D), and 2500 (D) accessory flash units, a pre-flash is also used.
With ADI metering, the exposure system is less influenced by
background conditions or the subject’s reflectance. Pre-flash
TTL uses a pre-flash to determine the reflectance of the scene
as well as controlling the flash output during the exposure.
2
TTL (Through The Lens) Flash Metering. The TTL flash
metering system controls the flash during the exposure
automatically. No pre-flash is used. To use flash or color meters,
or neutral density filters, the flash mode must be set to TTL
metering.
Flash
Camera flash
Program/Maxxum
5600HS (D)*
3600HS (D)*
2500 (D)
Program/Maxxum
5400HS*
Other flash units
D series lens
ADI
Other lenses
TTL
ADI
(with pre-flash)
Pre-flash TTL
Pre-flash TTL
Pre-flash TTL
TTL
TTL
* HSS (High Speed Sync.) must be active. If off, TTL metering is
used.
71
CUSTOM 12 - FOCUS AREA ILLUMINATION
During focus lock, the spot focus area or one of the local focus
areas are illuminated to indicate the focus point. The areas are also
illuminate when selected using the AF button (p. 46). Custom
function 12 has three settings:
1
0.3 second focus lock indication. The active AF area used for
focus is illuminated for 0.3 seconds.
2
0.6 second focus lock indication. The active AF area used for
focus is illuminated for 0.6 seconds.
3
Focus area selection only. The focus areas are only illuminated
when selected using the AF button.
CUSTOM 13 - SHUTTER LOCK (LENS)
Custom function 13 has two settings:
1
Locked. Shutter can only be released when a lens is mounted
on the camera.
2
Unlocked. Shutter can be released when no lens is mounted on
the camera. Use this setting when attaching the camera to a
telescope or microscope.
CUSTOM 14 - SHUTTER LOCK (BACK)
Custom function 14 has two settings:
1
Locked. Shutter can only be released when the back of the
camera is closed.
2
Unlocked. Shutter can be released when the back of the camera
is open.
72
ADVANCED
OPERATION
CUSTOM 15 - DATE FORMAT (DATE MODEL)
The format of the imprinted date can be changed. Custom function
15 has three settings:
1
Year / Month / Day
2
Month / Day / Year
3
Day / Month / Year
CUSTOM FUNCTION RESET
All of the custom functions can be reset to their initial setting, 1.
Custom 15 in the date model is not reset.
With the camera off, turn the function dial to
the custom function position (CUST).
While pressing the function button (1), turn
the camera on; clear (CLr) blinks on the data
panel to confirm the operation. Release the
function button.
1
73
ACCESSORY NOTES
This product is designed to work with accessories manufactured
and distributed by Konica Minolta. Using accessories or
equipment not endorsed by Konica Minolta may result in
unsatisfactory performance or damage to the product and its
accessories.
LENS NOTES
Only Minolta A-mount lenses can be used with this camera. For the
current line of our lenses, contact your Konica Minolta dealer.
This camera is sold by itself or with the following lens:
AF 28-100mm f/3.5-5.6 (D)
Construction
10 elements in 8 groups
Angle of view
75° - 24°
Minimum focus distance
0.48m / 1.6ft
Maximum magnification
0.25X
Minimum aperture
f/22-38
Filter diameter
55mm
66mm (dia.) X 78mm (L)
Dimensions
2.6in. (dia.) X 3.1in. (L)
Weight
240g / 8.5oz.
Specifications are based on the latest information available at the
time of printing and are subject to change without notice.
When the lens is not in use, always attach
the lens cap to protect front element. Press
the tabs on the lens cap to remove or
attach.
74
ACCESSORY NOTES
A lens hood improves image quality by
reducing flare, non-image forming light.
Slide the lens hood onto the bayonet
mount at the end of the lens. Turn the
hood clockwise until it clicks into place.
The hood can be reverse mounted for
storage. The lens cap can be attached
with the hood mounted.
Lens shadowing occurs when the lens or lens hood blocks part of
the output from the built-in flash. Lens shadowing appears as a
semi-circular shadow at the bottom (horizontal pictures) or side
(vertical pictures) of the image. Remove the lens hood before using
the built-in flash.
Lens shadowing may occur with the following lenses at the shorter
focal lengths:
AF
AF
AF
AF
Zoom
Zoom
Zoom
Zoom
28-70mm f/2.8G
17-35mm f/3.5G
28-135mm f/4.0-4.5
28-85mm f/3.5-4.5
The built-in flash can not be used with the following lenses:
AF 300mm f/2.8 Apo G(HS)
AF 600mm f/4.0 Apo G(HS)
AF 300mm f/2.8 Apo G(D)SSM
When using a filter with a filter factor greater than 0, or the focusrange limiter or macro release on certain lenses, the proper
exposure cannot be obtained with ADI or Pre-flash metering. Set
custom function 11 to setting 2 and set the accessory flash to a flash
mode that does not use a pre-flash.
75
ACCESSORY FLASH NOTES
When using an accessory flash, the viewfinder flash signals are the
same for the built-in flash (p. 25). The following flash units are
compatible with this camera:
Program/Maxxum Flash 5600HS (D)
Program/Maxxum Flash 3600HS (D)
Program/Maxxum Flash 2500 (D)
Macro Twin Flash 2400
Macro Ring Flash 1200
Contact your Konica Minolta dealer for information on these
products.
All Minolta i, si, and HS series flash units, and the Vectis SF-1 flash
are compatible with this camera. The Flash Shoe Adapter FS-1100
is required to mount AF series flash units (4000AF, 2800AF,
1800AF, and Macro flash 1200AF). When the FS-1100 is used, the
flash mode is set to fill flash and the AF illuminator is canceled. Xseries flash units and flash units sold by other manufacturers
cannot be used with this camera.
The flash mode of an accessory flash
can be set with the camera.
Press and hold the flash-mode button
(1) and turn the control dial (2) to
select the flash mode. Release the
button to complete the operation. The
flash mode is displayed on the data
panel.
2
The following flash accessories can be used with this camera:
Off-camera Shoe OS-1100
Off-camera Cable OC-1100
PC Terminal Adapter
76
ACCESSORY NOTES
1
HIGH SPEED SYNC. (HSS)
This camera is compatible with the High Speed Sync. (HSS)
function in the Program/Maxxum Flash 5600HS (D), 5400HS, and
3600HS (D). This allows the camera to use its full range of shutter
speeds up to 1/2000 second.
Attach a compatible flash unit to the
camera. Set the flash unit to HSS.
When the shutter speed exceeds 1/90
second, the High Speed Sync.
indicator (H) is displayed on the data
panel and in the viewfinder.
WIRELESS CONTROLLER IR-1N
The camera can be permanently damaged if used with the Wireless
Controller IR-1N.
The information in this manual is relevant for products available at
the time of printing. Contact the nearest authorized Minolta Service
facility to obtain compatibility information for products released after
this date.
77
TROUBLESHOOTING
Contact your nearest Konica Minolta Service Facility if the following
information does not cover the problem or the condition continues.
Problem
Autofocus does not
work when the
shutter-release
button is pressed
partway down.
Cause
A special focusing
situation is
preventing the AF
system from
focusing (p. 22).
Solution
Use focus lock (p.
23) or manual
focus (p. 48).
Camera is set to
manual focus.
Press the AF/MF
button.
Subject is too
close.
Check the lens’
minimum focus
distance.
Focus cannot be
confirmed.
Use focus lock (p.
23) or manual
focus (p. 48).
Camera is attached
to a microscope or
telescope.
Set custom 13 to
setting 2.
Flash fires when
the shutter-release
button is pressed
partway down.
Flash was used as
AF illuminator to
assist the autofocus
system.
To turn off the AF
illuminator, set the
flash mode to flash
cancel or custom
10 to setting 2.
Picture is blurred.
Flash did not fire in
a low-light situation
and the shutter
speed was slow.
Use fill flash, a
tripod, or faster
film.
Shutter cannot be
released.
78
TROUBLESHOOTING
Flash picture is too
dark.
Subject is beyond
flash range.
Make sure the
subject is within the
flash range.
When using the
built-in flash, the
bottom of the
picture is dark.
Lens hood was
attached or subject
distance was less
than 1m (3.3ft).
Remove the lens
hood. To prevent
lens shadowing, the
subject must be at
least 1m (3.3ft.)
from the camera.
Err appears on the
data panel.
Remove the batteries. Reinsert them after
turning the camera off and on. If normal
camera operation does not resume or the
camera malfunctions repeatedly, contact an
authorized Konica Minolta service facility.
CAUTION: if the film was not rewound, opening the back cover with
this method will fog the film; use a film changing bag, completely
dark room, or place the camera under a thick blanket.
To remove the film from the camera in case of a malfunction, use
the following procedure:
1. Turn the camera off.
2. Turn the function dial to the ISO position.
3. While pressing the function button and AEL button, turn the
camera on. The film transport motor will activate for a second to
release the film-chamber lock. The back cover can be opened.
When the camera is open, gently pull the film off the take-up
spool and rewind it back into the cartridge.
Contact an authorized Konica Minolta service facility.
79
CARE AND STORAGE
OPERATING CONDITIONS
• This camera is designed for use from -20° to 50°C (4 to 122 °F).
• Never leave your camera where it may be subjected to extreme
temperatures such as in the glove compartment of a car.
• The data panel response time will be slow at cold temperatures.
The display will temporarily darken at high temperatures, but will
be restored when the temperature normalizes.
• This camera is not waterproof or splashproof. When using the
camera in the rain, protect the camera and lens.
• Never subject the camera to extreme humidity.
• To prevent condensation from forming, place the camera in a
sealed plastic bag when bringing it from cold environment to a
warm one. Allow it to come to room temperature before removing
it from the bag.
• The low-battery indicator may appear even with fresh batteries
depending on the storage conditions. To restore camera power,
turn the camera on and off several times.
• Battery capacity decreases at colder temperatures. Keep your
camera and spare batteries in a warm inside pocket when
shooting in cold weather. Batteries will regain some of their
capacity when warmed to normal operating temperature.
STORAGE
When storing your camera for extended periods:
• Always attach the protective caps.
• Store in a cool, dry, and well-ventilated area away from dust and
chemicals such as moth balls. For long periods, place the camera
in an airtight container with a silica gel drying agent.
• Periodically release the camera’s shutter to keep it operating
properly.
• Before using the camera after prolonged storage, check that it is
operating properly.
80
CARE AND
STORAGE
CLEANING
• If the camera or lens barrel is dirty, wipe it gently with a soft, clean,
dry cloth. If the camera or lens comes in contact with sand, gently
blow away loose particles - wiping may scratch the surface.
• To clean the lens surface, first brush away any dust or sand then
gently wipe the lens with a cloth or tissue designed for optics. Use
lens cleaning fluid if necessary.
• Never place lens fluid directly on the lens.
• Never touch the interior of the camera, especially the shutter and
mirror, doing so may impair their alignment and movement.
• Dust on the mirror will not affect the exposure but may affect the
focus. Use a blower brush to remove dust from or around the
mirror.
• Never use compressed air to clean the camera’s interior; it may
damage sensitive internal components.
• Never use organic solvents to clean the camera.
• Never touch the lens surface with your fingers.
BEFORE IMPORTANT EVENTS
• Check the camera’s operation carefully, or take test photographs
before an event or journey.
• Konica Minolta is not responsible for any loss that may occur due
to an equipment malfunction.
QUESTIONS AND SERVICE
• If you have questions about your camera, contact your local
camera dealer or write to the Konica Minolta distributor in your
area.
• Before shipping your camera for repair, please contact an
authorized Konica Minolta service facility for instructions.
81
TECHNICAL SPECIFICATIONS
Camera type:
Lens mount:
Viewfinder:
Shutter type:
Shutter speeds:
Flash sync. speed:
Focus system:
AF sensitivity range:
AF illuminator:
AF control:
Exposure modes:
Metering:
Metering cell:
Metering range:
Film-speed setting:
82
APPENDIX
35mm
SLR
with
built-in
flash,
autoexposure, and action predictive
autofocus.
Minolta A-type bayonet mount
SLR roof mirror type, 90% field of view.
Magnification: 0.7X
Electronically-controlled, vertical-traverse,
focal-plane type.
30 - 1/2000s, bulb
1/90s
TTL phase-detection system, multi
metering with crosshair type CCD line
sensor metering cell. Autofocus and
manual focus modes.
EV -1 to18 (ISO 100)
Built-in with range of 1.0 - 5.0m (3.3 - 16.4
ft.). Automatically activated in low-light and
low-contrast situations.
Single-shot, continuous, automatic AFmode selection, and DMF.
P, PA, Ps, A, S, M, and 5 Subject Program
modes (Portrait, Landscape, Close-up,
Sports, Night Portrait)
TTL metering, direct TTL flash metering.
14-segment honeycomb-pattern SPC for
ambient light and 4-segment flashmetering SPC for flash.
14-segment metering: EV 1 - 20,
Spot metering: EV 4 - 20
(ISO 100, f/1.4 lens)
Automatic: ISO 25 - 5000 (DX-coded film)
Manual: ISO 6 - 6400 in 1/3 Ev
increments.
Flash: ISO 25 - 1000.
Film loading:
Rewind:
Frame counter:
Flash guide number:
Flash coverage:
Power source:
Battery performance:
Flash use
0%
50%
100%
Auto load
Auto and manual rewind.
Shows number of exposures taken.
16 (ISO 100 in meters)
52 (ISO 100 in feet)
28mm focal length lens.
Two CR2 lithium batteries
Condition A
20°C/68°F -10°C/14°F
30 rolls
24 rolls
14 rolls
11 rolls
9 rolls
7 rolls
Condition B
20°C/68°F -10°C/14°F
45 rolls
35 rolls
18 rolls
14 rolls
11 rolls
9 rolls
Based on 24 exposure rolls taken at a rate of two rolls per month.
Battery performance varies with conditions.
Condition A: Minolta 28-100 f/3.5-5.6 lens focused from infinity to
2m (6.6 ft.) three times and the shutter-release button held partway
down for ten seconds before each exposure.
Condition B: Minolta 28-100 f/3.5-5.6 lens focused from infinity to
2m (6.6 ft.) and the shutter-release button held partway down for
five seconds before each exposure.
Dimensions:
Weight :
135.0 (W) x 92.0 (H) x 66.5 (D) mm
5.3 (W) x 3.6 (H) x 2.6 (D) in.
375g (13.2oz) without camera battery.
Specifications and accessories are based on the latest information
available at the time of printing and are subject to change without
notice.
83
© 2003 Konica Minolta Camera, Inc. under the
Berne Convention and the Universal Copyright Convention.
9222-2166-11 NI-A311
Printed in China