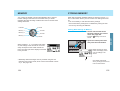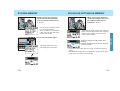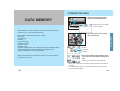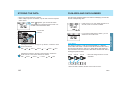
1
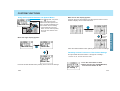
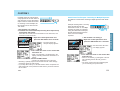
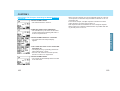
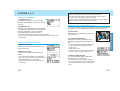
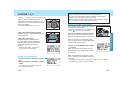
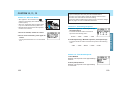
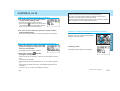
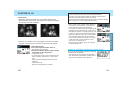
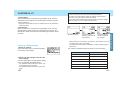
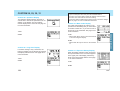
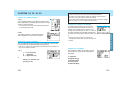
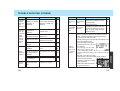
MEMORY
The memory function allows you to store a variety of camera settings as a group and recall them at any time. Three diferent set of
camera function settings can be stored.
• Each of the following can be stored in memory. See the appropriate section for details.
- Exposure mode
- Focus mode/Focus area
- Metering mode
- Exposure compensation/Flash compensation
- Drive mode
- Flash mode
- AF priority/Release priotity
• Exposure mode (P, A, S, M)
• Shutter speed in S mode, aperture in A mode, shutter speed and
aperture in M mode.
• Focus mode (AF-A, AF-C, AF-S, Manual focus)
• Focus area (wide focus area, local focus area)
• Metering mode (14-segment honeycomb-pattern, spot, center-weighted average)
• Exposure compensation value
• Flash compensation value
• Film drive mode (single-frame, continuous, bracketing, self-timer, multiple exposures)
• The adjust button settings for the drive mode (continuous and bracketing). Increment and size will be stored independently for the exposure
bracketing and flash bracketing.
• Flash mode with the built-in flash (normal, red-eye reduction, rear
flash sync, wireless/remote flash). However, whether the built-in flash
was on or off will not be stored.
• AF/Release priority (Custom 1 setting)
• Tasking on focus mode dial, AF-A position (Custom 22 setting)
When using the memory function, you cannot choose to have only
part of the above settings stored. All of them will be stored automatically. No other settings will be stored in memory. eg: date imprinting, display contrast, custom function settings (other that #1 or
#22), etc.
132
133
MEMORY
MEMORY
The following settings will be stored in your camera by using the
memory function.
MEMORY
STORING MEMORY
Your camera is capable of storing three different sets of camera
function settings. This feature is convenient when you will be
repeating the same shooting conditions and want to use the same
settings each time.
When first purchased, standard settings are stored in memory 1, 2,
and 3. This section shows you how to store new settings into memory.
• It is not necessary to use all three memory settings.
• The stored memory settings are not affected by turning the camera off or by removing the batteries.
Memory 1
Memory 2
P mode
A mode
S mode
Memory 3
M mode
Storing New Settings In Memory
1. Set the camera with all the
function settings you want to
store. See page 133.
• Full-auto
stored.
settings can not be
2. Open the control-panel door
and press the enter button.
When positions 1, 2, 3, or full-auto are selected, the settings of the controls do not necessarily correspond to the actual camera settings. The upper part of the display turns black
to let you know.
• Beautifully defocused images can be produced using the STF
(Smooth Trans Focus) mode, which can be used instead of memory 3 . See page 180.
134
• While pressing the enter
button, the display shows
only the settings to be
stored.
• This display will appear
when your finger is removed
from the enter button.
135
MEMORY
Full-auto
RECALLING SETTINGS IN MEMORY
3. While pressing the exposuremode dial lock-release button,
turn the exposure-mode dial to
1, 2, or 3.
• If the exposure-mode dial is turned
to 1, this display appears.
• Memory position 3 is not available
if STF mode has been selected by
Custom 25-2 (p. 180).
1. While pressing the exposuremode lock-release button, turn
the exposure-mode dial to
positions 1, 2, or 3.
• Stored settings will be displayed for 5 seconds.
• Upper part of the display turns black indicating
that the control settings may not match the
actual camera settings.
4. Press the enter button again.
• This display appears for 5 seconds. Settings are now stored.
Additional changes are still possible after
recalling.
Example: Changing the drive mode setting to
continuous mode.
• Pressing the enter button after the change overwrites the previous
setting.
• The additional changes will be cancelled if the exposure-mode dial is
turned or the main switch is turned to OFF.
136
137
MEMORY
STORING MEMORY
CHANGING THE STORED SETTINGS
2. Change the camera settings
using dials or levers.
Example: Going from 14-segment honeycomb-pattern metering to spot metering.
• It is possible to take a picture at this
point.
3. Press the enter button.
If only the exposure mode is to be changed, follow these steps.
1. Turn the exposure-mode dial to positions 1, 2, or 3.
2. While pressing the exposure-mode dial lock-release button, turn the front or rear control dial until the desired
mode appears.
3. Press the enter button.
Returning to Standard Settings
Clearing the memory in 1, 2, and 3, will result in the settings returning to the default settings.
1. Turn main switch to OFF.
2. While pressing the enter button, turn
the main switch back to ON.
• Display shows that the settings have been
reset to standard settings.
• If STF mode had been selected, using Custom
25-2 for memory 3 position, it will not be cancelled.
• This display appears for
5 seconds. Settings are
now stored.
138
139
MEMORY
1. While pressing the exposuremode dial lock-release button,
turn the exposure-mode dial to
positions 1, 2, or 3.
STORING THE DATA
DATA MEMORY
1. Open the control-panel door
and press the DATA button.
• Display shows current data
memory settings.
When selected, the data memory function stores the following information for up to 7 rolls of 36 exposure film.
Data is recorded for every exposure, except for (*) items which are
recorded for every roll.
2. Turn the front or rear control
dial to select ON.
DATA MEMORY
Data number* (including the body ID number)
ISO value*
Shutter-speed
Aperture
Lens focal length
Smallest f-number
Exposure mode
Metering mode
Exposure compensation value (including exposure bracketing value)
Flash compensation value (including flash bracketing value)
Year/month/date/hour/minute of photograph
Film area
Data number
Film speed
3. Press the shutter-release button partway down to select data memory function.
• Display shows data-memory-on indicator.
• When you do not want to store data, repeat the above and select off
in step 2.
• The stored data memory is not affected by turning the camera off or
by removing the batteries.
140
141
STORING THE DATA
FILM AREA AND DATA NUMBER
• Data is not stored unless film is loaded.
• When multiple exposure is selected, only the data of the last exposure
will be stored.
The film area and data number are useful in identifying a roll of film
and its corresponding data.
When
appears, you can use the focusarea selector, as well as the front or rear control dial to move between areas.
• If data memory is on, this display appears for 5
seconds, when a roll of film is loaded.
Focus-area
selector
Film Areas
Pressing the selector to the right or up direction, causes the areas
to move as follows:
OFF
On
Area 1
Area 2
•••
Area 7
OFF
Pressing the selector to the left or down direction, causes the
areas to move in the reverse direction as follows:
OFF
Area 7
Area 6
• • • Area 1
ON
OFF
The data from each of 7 rolls is stored separately in 7 different
areas called “film areas”. The first roll of film is stored in film area 1,
the second in film area 2, and so on. When all the data areas are
full, information from the next roll of film will be stored in film area 1,
erasing the previous data.
1st roll
2nd roll
3rd roll
• Data area assignments are not user
selectable.
• When the data is deleted, the film area is reset to area 1.
142
143
DATA MEMORY
• If you press the data-memory button, you can
confirm the current film area.
FILM AREA AND DATA NUMBER
Data Number
Comparison of Film Area and Data Number
In order to identify the photographic data with the developed film,
the data number is exposed on the “0” frame when the film cartridge is loaded into the camera (providing data memory has been
selected). Each time another roll of film is loaded, the data number
increases by 1.
The 7 film areas indicate where the data is stored and are useful
when you want to know how many rolls of film data is stored in the
camera.
Film leader
The data number is used to match the data to the corresponding
roll of film. It is printed automatically when a new roll of film is
loaded.
Data number
When all 7 film areas are full, the 8th roll of film will be recorded in
film area 1, erasing what was previously stored there.
The data number starts at dn1-0001 and increases by 1 for each
additional roll of film loaded.
• If data memory is off, the data number will not be printed, but the
counter will count up each time a roll of film is loaded.
• To reset the data number, see page 152.
• The third character of the data number (ie; the 1 in “dn1”) is changeable and can be used to identify an individual camera body. You can
select a number from 1 to 9 by using Custom 34 (page 187).
144
• This warning appears only when the film area
changes from 7 to 1. The warning disappears
after the first exposure is made.
• The old information in the data area is overwritten one frame at a time. A frame between the
old and the new information is erased and left
blank.
• Data can be transferred to external storage devices by using the Data
Saver DS-100. This accessory, which can be purchased separately,
attaches to the lens mount for downloading the data.
145
DATA MEMORY
Overwriting the film areas
DATA RECALL
Recorded data is shown on camera display.
3.Press the ADJ button.
Data Readout
1. Open the control-panel door
and press the DATA button.
• The 1st frame’s data will be
shown.
• Display shows current data
memory settings.
4. Press the display selection button to choose between showing a single frame’s data and
four frames’ data.
2. Turn the front or rear control
dial to select READ, and then
the desired fim area and data
number.
• When
appears, switching between
the single and four frames data display can be done using the display
selection button.
Film area
Data number
Film speed
Press the adjust button to recall the data.
Single frame display
4-frame display
•If
appears, the focus-area selector and
spot-AF button can also be used to select the
film area (p. 150).
146
147
DATA MEMORY
Selecting the Display and Frame
DATA RECALL
5. Turn the front or rear control
dial to select the desired frame.
Cancelling Data Recall
To see other film data, press DATA or
ADJ button, then follow step 2 on page
146.
To finish recalling, press the shutterrelease button partway down.
The single frame display will appear as:
• The standard display returns.
Exposure mode
Date and time
Focal length
Shutter speed and
aperture
Exposure compensation
Flash compensation
(if not shown, flash did
not fire)
Largest aperture
Metering mode
The 4-frame display will appear as:
Frame counter
Shutter speed
DATA MEMORY
Film data number
Frame counter
Film data number
Exposure compensation
Aperture
• Every exposure and flash compensation value will include exposure
bracketing and flash bracketing values.
• PA, PS, and STF will be stored as P mode.
148
149
DATA RECALL
DELETING STORED DATA
Using the Focus-Area Selector and Spot-AF Button
The data in all of the film areas will be deleted. Film areas cannot
be cleared individually.
• If the wide/local focus-area
switch is at the locked
position, the focus-area
selector does not work.
Pressing
• This display will appear.
2. Press the DATA button again.
in the directions indicated:
• Moves to the areas as follows:
OFF
ON
Area 1
Area 2
Area 7
OFF
1. Open the control panel door
and simultaneously press the
DATA and ADJ buttons.
•••
OFF
Area 7
Area 6
• • • Area 1
ON
OFF
• If you press the center spot-AF button,
when “READ” appears, data can be
recalled. This is the same as pressing the
ADJ button.
For the single frame display;
• Frame number will increase.
• This display appears
while all the data is
bieng deleted.
• Do not operate the camera while data is being deleted.
• The display returns to the standard display after the data in the film
area has been cleared.
• Frame number will decrease.
For 4-frame display;
• Display changes one-by-one.
• Display changes every 4-frames.
• The display returns to the data selection
display.
150
151
DATA MEMORY
When
appears, it is
possible to use the focusarea selector and the spotFocus-area AF button to select the film
selector
areas and data number.
DELETING STORED DATA
Film Area and Data Number Reset
Everytime film is loaded, both the film area and data number
increases by 1. When you first buy your camera, both are set to 1.
Film area reset:
When the data is deleted (p. 151), the film area returns to 1.
CUSTOM FUNCTIONS
Data number reset:
1. Turn the main switch to OFF.
2. While pressing the DATA button, turn
the main switch from OFF to ON.
Custom functions let you tailor the camera to your shooting style or
preferences. There are 35 custom functions. These are explained
on pages 158-187.
• The last four digits are reset to 0001.
• Data number cannot be reset is the film is in
the camera.
• Resetting the data number does not delete the
data or reset the film area.
152
153
CUSTOM FUNCTIONS
• The data number is not reset when the film area is reset.
CUSTOM FUNCTIONS
• Custom function setting
display appears.
•When
appears, use of the focus area selector as well as the front and rear control dials is
possible (page 156). When
appears, display
can be switched.
2. Turn the front control dial to
select the desired custom function (Custom 1-35).
4. Press the shutter-release button partway down to enter
the settings.
• When you first buy the camera, all custom functions are set to the
number 1 setting, except for Custom 33 and 35.
• This manual’s explanations assume that these settings have not been
changed.
• The custom functions’ settings are not affected by turning the camera
off or by removing the batteries.
Selecting the Display
• When
appears, switching between
the single display and the 15 item display is possible using the display
selection button.
3. Turn the rear control dial to
select the desired setting.
• In either display, select the desired custom function (Custom 1-35) by
using the front control dial. Select the desired setting using the rear
contol dial.
154
155
CUSTOM FUNCTIONS
1. Open the control-panel door
and press the CUSTOM button.
CUSTOM FUNCTIONS
When
appears, it is possiFocus-area ble to use the focus-area
selector
selector and the spot-AF button to choose the desired custom function and it’s setting.
• If the wide/local focus-area
switch is at the locked position,
the focus-area selector does
not work.
When the 15 item display appears:
Use both the focus-area selector and the spot-AF button to move
between displays and to make selections.
Press focusarea selector
Press
Spot-AF
button
When the single display appears:
Press the shutter-release button partway down to store the settings.
Resetting Custom Functions to Their Default Settings
This procedure will reset Custom 1 through 32 to setting 1.
• Custom 33, 34, and 35 will not be reset.
Press the shutter-release button partway down to store the settings.
156
1. Turn the main switch to OFF.
2. While pressing the CUSTOM button,
turn the main switch to ON.
157
CUSTOM FUNCTIONS
Using the Focus-Area Selector and Spot-AF Buton
To set custom functions;
CUSTOM 1, 2, 3
Custom 1 - AF/Release Priority
• Custom 1 will be stored in memory if you use
the memory function.
• When full auto
is selected, focus is always
AF priority, even if Custom 1-2 is selected.
1.Open control-panel door and press the CUSTOM button.
2.Turn the front control dial to select the desired custom function.
3.Turn the rear control dial to seclect the setting.
4.Press the shutter-release button partway down to enter the setings.
Refer to pages 154-157 for additional information.
Custom 3 - Film Tip
1. Film is completely rewound into
the cartridge.
1. AF priority
Shutter will not release unless
or
appears in the viewfinder.
Shutter releases even if the focus cannot be confirmed.
Use release priority when photographing moving subjects.
• RP will appear in the display.
CUSTOM FUNCTIONS
2. Release priority
2. Leader left out after rewind.
Camera setup for select-frame film
transport.
Custom 2 - Film Rewind Start
1. Automatic
Film is automatically rewound at the end of the
roll.
2. Manual
User must press the manual-rewind button
to initiate rewind.
158
Select-Frame Film Transport (When partially-exposed
film is reloaded)
This custom function allows you to reload a
partially exposed roll of film and wind to a
desired specified frame.
• Convenient when you want to switch to a different type of film, and the film presently in the
camera is only partially exposed.
• The camera cannot detect the beginning of an
unexposed frame, so you must remember.
• To avoid overlapping exposures, select 2
frames past the last previously exposed frame.
159
CUSTOM 3
Example where the roll was previously exposed to the 12th frame. It
was rewound, but now the photographer wants to reload and continue shooting. In this example, the
film should now be wound to the
14th frame.
Select-Frame Film Transport - Rewinding for Multiple Exposures
1. Set Custom 3 to setting 2.
2. Load the roll of film that had previously been exposed up
through the 12th frame.
• When the roll is loaded, the film will advance to the first frame, and
the frame counter will show 1.
3. Open the control-panel door and
press the ADJ button for 3 seconds.
• The select-frame film
transport display appears.
Example showing frame 11 having
been exposed and the film
advanced to frame 12. A multiple
exposure of frame 10 is desired.
Using the select-frame transport,
the film will be rewound back to
frame 10 for the multiple
exposure.
1. Set Custom 3 to setting 2.
2. Open the control-panel door and
press the ADJ button for 3 seconds.
• The select-frame film transport display appears.
4. Turn either the front or rear control dial
and select 14.
• When 14 is selected, [+13] will appear in the
display, indicating that the film will advance 13
frames.
5. Press the ADJ button.
• The film now advances to the 14th frame.
• Reloading a partially exposed roll increases the risk of film damage
(scratches) caused by dust and grit.
• If you keep data memory on, the data number will be overprinted. The
data number will not be printed if the data memory is turned off before
film is loaded.
160
3. Turn either the front or rear control dial
and select 10.
• When 10 is selected, [-2] will appear in the display, indicating that the film will go back 2
frames.
• The frame counter turns black indicating that
you are selecting an exposed frame.
161
CUSTOM FUNCTIONS
This feature is useful when shooting multiple exposures with bracketing.
CUSTOM 3
Select-Frame Film Transport - Rewinding for Multiple Exposures
(continued)
4. Press the ADJ button.
• Film will rewind back to frame 10.
• When rewound, subjects may not be positioned exactly as in the previous exposure, as the frame may be shifted a maximum of 1/2 of a
perforation hole.
• In the above example, a multiple exposure could also have been
taken with frame 11 before going to frame 12.
• Date imprint should be cancelled so as not to overlap the imprints.
• When custom 2-2 is selected, partial rewind is not possible after taking the last picture on the roll.
5. Take the picture in the 10th frame.
CUSTOM FUNCTIONS
• Film will advance by one frame and the frame
counter remains black indicating that frame 11
is also an exposed frame.
6. Press the ADJ button for 3 seconds.
• The select-frame film transport display
appears.
7. Turn either the front or rear control dial
and select 12.
• The display shows [+1] indicating that the film
will be advanced by 1 frame.
• Since the 12th frame has not been exposed,
the frame counter is no longer black.
8. Press the ADJ button.
• The camera will automatically advance the film
to the 12th frame.
162
163
Custom 4 - DX Memory
1. DX Memory Off
Film speed is always set to the DX-coded
ISO. Non-DX-coded film is set to the previous
roll’s ISO.
2. DX Memory On
Changes to the film speed for a DX-coded roll
are saved and applied to future rolls with the
same DX coded ISO. Use to consistently
over/under-expose a specific film type.
• Film must be loaded before the ISO can be changed.
• Once you load a roll with a different ISO number, the saved ISO will
be cancelled.
Custom 5 - Release Lock (Film)
1. Release Lock Off
Shutter can be released even if there is no
film in the camera.
2. Release Lock On
Shutter cannot be released unless film is
loaded.
• If the shutter-release button is pressed when
film is not loaded, 0 blinks in the viewfinder and
this message appears in the display.
• While the back cover is open, the shutter can
be released.
164
To set custom functions;
1.Open control-panel door and press the CUSTOM button.
2.Turn the front control dial to select the desired custom function.
3.Turn the rear control dial to seclect the setting.
4.Press the shutter-release button partway down to enter the setings.
Refer to pages 154-157 for additional information.
Custom 6- Focus-Hold Button (Lens)
This custom function changes the operation of the focus hold button
on the lens. (The mounted lens must have a focus hold button).
1. Focus Hold
Pressing the focus-hold button on the lens
locks the focus.
2. Continuous Bracketing
Continuous bracketing is set if the focus
hold button is pressed while taking the picture.
Focus-hold button
• Increment and size of bracketing will be the
same as that set in exposure bracketing
mode (p. 92).
• Flash does not fire.
• If the self-timer or multiple exposure mode is
selected, continuous drive will not work.
3. Depth-of-Field Preview
You can confirm the depth-of-field while
pressing the focus hold button.
• If not using a D lens, you must press both
the focus-hold button and the shutter-release
button partway down to confirm the depth-offield.
165
CUSTOM FUNCTIONS
CUSTOM 4, 5, 6
To set custom functions;
CUSTOM 7, 8, 9
1.Open control-panel door and press the CUSTOM button.
2.Turn the front control dial to select the desired custom function.
3.Turn the rear control dial to seclect the setting.
4.Press the shutter-release button partway down to enter the setings.
Refer to pages 154-157 for additional information.
Custom 7 - Eyepiece Sensor Activation
When an object is detected near the
viewfinder, the camera’s systems are activated to set the focus and exposure as you
frame your subject.
Custom 9 - AF/MF Control Button
• Eye-start switch must be on (p. 125).
This custom function changes the operation
of the AF/MF control button.
Grip sensor
1. By main switch and grip sensor
• Whenever the camera is in the manual focus
mode,
appears in the viewfinder.
When in autofocus mode, manual focus is
set while pressing the AF/MF control button.
AF/MF control button
2. By main switch only
Eyepiece sensor is activated when
the main switch is in the ON position.
Use this setting when the grip sensor
is not being tripped (user wearing
gloves).
• Slide the main switch to OFF when
the camera is not being used.
Custom 8 - Frame Counter
1. Frame counter in data panel counts
up.
2. Frame counter in data panel counts
down.
Eyepiece sensor
When in manual focus mode (MF), autofocus is set and focus is locked while pressing the AF/MF control button.
2. Press once to activate, press again
to cancel.
When in autofocus mode, press once to
select manual focus. Press again to return
to autofocus .
When in manual focus mode (MF), press
once to select AF. Press again to returns to
MF mode.
• Changing the focus mode or turning the camera off and on, cancels
the temporary manual or autofocus setting.
• The frame counter counts up when nonDX-coded film is loaded.
166
167
CUSTOM FUNCTIONS
1. Press to activate, release to cancel.
Eyepiece sensor is activated when the grip
sensor is tripped.
To set custom functions;
CUSTOM 10, 11, 12
1.Open control-panel door and press the CUSTOM button.
2.Turn the front control dial to select the desired custom function.
3.Turn the rear control dial to seclect the setting.
4.Press the shutter-release button partway down to enter the setings.
Refer to pages 154-157 for additional information.
Custom 10 - AE-Lock Button
1. Press to activate, release to cancel.
2. Press once to activate, press again to
cancel.
• Turning the built-in flash on or off cancels AE
lock.
Custom 11 - Bracketing Sequence
AE lock button
1. Metered exposure, Underexposure(s),
Overexposure(s)
• A 5 frame bracket in 1/2EV increments is
exposed in the following order…
Normal ➝ -0.5EV
➝ +0.5EV
➝ -1.0EV
➝ +1.0EV
2. Underexposure(s), Metered exposure, Overexposure(s)
• A 5 frame bracket in 1/2EV increments is exposed in the following
order…
-1.0EV
➝ -0.5EV
➝ Normal
➝ +0.5EV
➝ +1.0EV
Custom 12 - Film Rewind Speed
1. Fast Rewind
Rewinds a 36-exposure roll in approximately 7
seconds.
2. Slow (silent) Rewind
Rewinds a 36-exposure roll in approximately
15.5 seconds.
168
169
CUSTOM FUNCTIONS
• AEL appears in the viewfinder and
appears in the display when AE-lock button
is active (down).
• Slow sync is selected when the built-in flash
is up or an attached accessory flash is on.
• Manual shift is selected when the exposure
mode is set to manual.
To set custom functions;
CUSTOM 13, 14, 15
Custom 13 - Metering Display Duration
• Selecting longer display durations reduces battery performance.
1. 5 seconds
Custom 15 - Front and Rear Control Dial Lock
2. 10 seconds
1. Off
Custom 14 - AF Area Display
• Pressing the lens focus-hold button does not display the focus
area LEDs.
1 - Focus area LEDs display the active
focus area for 0.3 sec after the
focus locks.
3 - Focus area LED’s don’t display the
active focus area by pressing the
shutter-release button partway
down.
• Pressing the focus area selector or the spot
AF button displays the active focus area.
170
Focus area LEDs
• Front/rear control dials are functional.
2. Dials are not functional when the camera is not metering
and the grip sensor is not activated.
• If metering (ie; the shutter speed and aperture appear) or if you grip
the grip sensor, then the dials are functional.
• Front/rear control dials are functional for the operations which use
buttons inside the control panel (eg; changing the date, reading
stored data, custom functions, etc).
• If you turn the front/rear control dials when
dials are locked this message appears.
3. Dials are not functional only when not
metering.
• Refer to above note for metering explanation.
• If metering is activated, dials are functional.
171
CUSTOM FUNCTIONS
Use dial lock to prevent the settings from
being changed by accidental turning of the dial
while carrying the camera. If dials are locked,
the settings cannot be changed by rotation of
the front or rear control dials.
3. 30 seconds
2 - Focus area LEDs display the active
focus area for 0.6 sec after the
focus locks.
1.Open control-panel door and press the CUSTOM button.
2.Turn the front control dial to select the desired custom function.
3.Turn the rear control dial to seclect the setting.
4.Press the shutter-release button partway down to enter the setings.
Refer to pages 154-157 for additional information.
CUSTOM 16, 17, 18
• [- -] appears when the shutter button is
pressed partway down, and then this message
appears when all the way down.
2. Shutter can be released if a lens is not
attached.
• Use when mounting the lens to a non-coupling
lens mount (telescope, microscope etc).
Custom 18 - Exposure Compensation Using the Rear
Control Dial in P, A, and S Mode
You can compensate the exposure using the
rear control dial. This is convenient when you
are using a heavy lens and want to use your
left hand to support it.
1. Default operation
Exposure compensation is not possible using the rear control dial.
Exposure
Mode
Control Dial Tasking
Front Control Dial
Rear Control Dial
PA - aperture
P - Mode
PS - shutter speed
A - Mode
Aperture
Aperture
S - Mode
Shutter speed
Shutter speed
2. Exposure compensation using rear control dial (PA - aperture in P mode)
In P/A/S mode, exposure compensation is possible using the rear
control dial.
• If you turn the front control dial in P mode, you can select aperture.
Custom 17 - AF Drive Speed
1 - Fast
• AF will operate at the maximum speed.
2 - Slow
• For use in close-up or low light conditions.
Exposure
Mode
Control Dial Tasking
Front Control Dial
Rear Control Dial
P - Mode
PA - aperture
A - Mode
Aperture
S - Mode
Shutter speed
Exposure
compensation
• The exposure compensation value is displayed in the meter index
and the display.
• Exposure-compensation dial must be set to +/– 0.
• Compensation range is +/– 3 EV for both 1/2 and 1/3 EV increments.
172
Continued on next page
173
CUSTOM FUNCTIONS
Custom 16 - Release Lock (Lens)
1. Shutter cannot be released if a lens is
not attached.
To set custom functions;
3. Exposure compensation using rear control dial (PS - shutter speed in P mode)
In P/A/S mode, exposure compensation is possible using the rear
control dial.
• If you turn the front control dial in P mode, you can select the shutter
speed.
Exposure
Mode
Control Dial Tasking
Front Control Dial
Rear Control Dial
P - Mode
PS - shutter speed
A - Mode
Aperture
S - Mode
Shutter speed
Exposure
compensation
• Exposure compensation, using the rear control dial, is the same as for
setting 2. Please refer to the notes in setting 2.
1.Open control-panel door and press the CUSTOM button.
2.Turn the front control dial to select the desired custom function.
3.Turn the rear control dial to seclect the setting.
4.Press the shutter-release button partway down to enter the setings.
Refer to pages 154-157 for additional information.
Custom 20 - Flash Metering
Your camera uses ADI flash metering as the
standard flash metering mode, but it can be
changed.
• This applies to both the built-in and accessory
flash.
• When full auto
is selected, if possible, flash
metering is always ADI, even if Custom 20-2/3
is selected. If not possible, due to a flash/lens
combination, TTL 4-segment flash will be used.
4-segment metering
1. ADI 4-segment
When flash fires, ADI 4-segment or pre-flash metering will be used.
• For more information see page 108.
Custom 19 - Control Dial - Exchanged Control
This custom function allows you to switch the operations of the front
and read control dials.
2. TTL 4-segment
1. Unchanged from Custom 18.
When flash fires, TTL 4-segment metering will be used.
2. Front and rear control dial functions
exchanged.
• Control dial tasking does not change for bracketing, data memory, and custom functions.
174
• Recommend TTL 4-segment metering if using a flash/color meter,
close-up diffuser, or filter.
3. TTL Average
When flash fires, TTL average metering will be used.
175
CUSTOM FUNCTIONS
CUSTOM 19, 20
Custom 21 - AF Illuminator
In low-light/low subject contrast situations, the
AF illuminator automatically projects a pattern
of lines onto the subject for the camera’s AF
sensors to focus on.
• When full auto
is selected, the AF illuminator always fires, even if custom 21-2 is
selected.
1. AF-A (Automatic autofocus) mode
Focus-mode switch positions:
S
Single shot autofocus
A
Automatic autofocus
C
Continuous autofocus
M
Manual focus
2. DMF (Direct manual
focus) mode
Focus-mode switch positions:
S
Single shot autofocus
A
Direct manual focus
C
Continuous autofocus
M
Manual focus
• After focus is confirmed,
you can manually adjust
the focus by turning the
focusing ring.
1. Fires if necessary.
2. Canceled
• Both the camera’s and accessory flash’s AF iIluminator will not fire
under any circumstance.
• Focusing may be difficult without AF illumination under low-light or
low contrast conditions.
How to use DMF
1. Set custom 22 to 2.
2. Turn the focus-mode switch to A.
•
Custom 22 - Tasking on the Focus-Mode Switch - AF-A
Position
The A (automatic autofocus) position on the
focus-mode switch can be changed to DMF
(direct manual focus) using this custom
function.
•When full auto
is selected, this position is
always automatic autofocus, even if Custom
22-2 is selected.
176
appears in the display.
3. Press the shutter-release button partway down to focus.
•
glows and
appears in the viewfinder.
• DMF can also be selected when focusing by pressing the focus area
selector or the AF/MF control button.
4. While pressing the shutter-release button, turn the lens
focusing ring to adjust focus.
5. Press the shutter-release button all the way down to take
the picture.
Focus-mode switch
• If you remove your finger from the shutter-release button, autofocus
will be activated again when the shutter-release button is pressed
partway down.
• To cancel DMF, turn the focus-mode switch to a position other than A.
• DMF is not possible with xi series lenses and the AF power zoom
lens.
177
CUSTOM FUNCTIONS
CUSTOM 21, 22
CUSTOM 23, 24, 25
Custom 23 - AF Using Shutter-Release Button
1. AF works when you press the shutterrelease button partway down.
To set custom functions;
1.Open control-panel door and press the CUSTOM button.
2.Turn the front control dial to select the desired custom function.
3.Turn the rear control dial to seclect the setting.
4.Press the shutter-release button partway down to enter the setings.
Refer to pages 154-157 for additional information.
• AF does not work when MF is selected.
• When full auto
is selected, AF works when
you press the shutter-release button partway
down, even if Custom 23-2 is selected.
• Press the focus-area selector or the spot-AF button to activate AF.
Custom 25 - Tasking on Exposure-mode Dial - Position 3
The exposure-mode dial has 3 memory
positions. You can choose to have position
3 used for the STF mode.
CUSTOM FUNCTIONS
2. AF does not work when you press the shutter-release
button partway down.
Custom 24 - Full-Auto mode of the Exposure-Mode Dial
1. When the exposure mode is set to
full-auto, changes to camera functions are not possible.
• See page 26 for the full-auto settings.
1. Memory mode
This setting uses position 3 for memory.
2. Even after selecting
full-auto,
changes are acceptable.
• When Custom 24-2 is selected, “Full Auto” will not appear in the display.
• Auto-flash is not possible.
• Flash always fires if the built-in flash is up, or the accessory flash is
on.
• When the main switch is turned off, the additional changes will be
cancelled.
• Custom 1, 20, 21, 22, and 23 settings are effective.
178
Continued on next page
179
To set custom functions;
2. STF mode
• Beautifully defocused images can be produced using the STF
(Smooth Trans Focus) mode. The images are reproduced faithfully
as to shape, with softened edges.
Effect using STF
STF not used
• Because your camera’s STF mode triggers a continuous multiple
exposure, it should only be used with a tripod and a still subject.
1.Open control-panel door and press the CUSTOM button.
2.Turn the front control dial to select the desired custom function.
3.Turn the rear control dial to seclect the setting.
4.Press the shutter-release button partway down to enter the setings.
Refer to pages 154-157 for additional information.
• When in STF mode, aperture will be displayed
in T-numbers, not f-numbers. T-numbers are
practical aperture values which take into
account the f-number as well as the light lost by
absorption in the optical system. In this case, it
indicates the aperture of a single exposure. Use
in place of f-numbers for determining exposure.
• When the subject is bright, STF is not possible.
The aperture’s background will appear white.
• If you use the 135mm f/2.8 [T4.5], you can get
a STF effect with a single exposure. In this
case, don’t use Custom 25-2.
• STF mode is not possible if you are using the
AF Reflex 500mm f/8.
CUSTOM FUNCTIONS
CUSTOM 25, 26
1. Set Custom 25-2.
2. Turn the exposure-mode dial to 3.
• STF appears in the display.
180
Custom 26 - Flash Burst with Exposure Compensation
3. Press the shutter release button all the
way down to take the picture.
You can control the flash burst when exposure
compensation is selected.
• 7 exposures occur.
• To cancel STF mode, turn the exposure-mode
dial to a position other than 3, or set Custom
25-1.
• Shutter speed and aperture will be set automatically.
• Flash doesn’t fire.
• Exposure compensation is possible.
• This applies only for exposure compensation,
and not for flash compensation. Please refer to
page 80 for explanation of the difference.
181
CUSTOM 26, 27
1. Varied burst
When the flash fires and exposure compensation is set, both the
flash burst and the aperture and shutter-speed change to compensate the exposure.
To set custom functions;
1.Open control-panel door and press the CUSTOM button.
2.Turn the front control dial to select the desired custom function.
3.Turn the rear control dial to seclect the setting.
4.Press the shutter-release button partway down to enter the setings.
Refer to pages 154-157 for additional information.
• Exposure compensation is done for subjects both in and outside the
flash range area.
When the flash fires and exposure compensation is set, only the
aperture/shutter-speed change to compensate the exposure. The
flash burst is fixed. Exposure within the flash range remains almost
the same.
Custom 27 - Detailed Display
1. Show all settings.
Select this setting if you want all the settings
to be shown in the display.
2. Show only the changes from the standard settings.
Use this setting when you feel that the display
is too crowded with all settings shown.
• The standard settings will not be shown, only
those that have been changed.
• The standard settings are shown on the next
page.
182
Standard settings
A mode with spot
metering, and exposure
compensation
Same plus flash is
raised and bracketing selected
• When Custom 27-2 is selected, an exposure compensation of 0.0 will
not appear in the large icon display.
• The exposure-mode indicator and battery-condition indicator appear
all the time.
The camera’s standard settings are shown in the chart below.
Item
Standard Settings
Focus
AF-A (Autofocus priority)
Focus area
Wide focus area
Metering
14 Segment honeycomb
Exposure compensation
+/- 0
Flash compensation
+/- 0
Drive
Single frame advance
183
CUSTOM FUNCTIONS
2. Fixed burst
Custom 28 - Operation Display
The operation display appears whenever a
camera dial or function is operated that is not
already on the display. The new settings
remain displayed for 5 seconds. See page 42
for more information.
To set custom functions;
1.Open control-panel door and press the CUSTOM button.
2.Turn the front control dial to select the desired custom function.
3.Turn the rear control dial to seclect the setting.
4.Press the shutter-release button partway down to enter the setings.
Refer to pages 154-157 for additional information.
Custom 30 - Meter Index Display
1. On
The meter index displays the values of compensation and bracketing that you have selected. Select Custom 30-2, if you want to have it
shown only in the viewfinder. See page 40 for
more information.
2. Off
1. On
CUSTOM FUNCTIONS
CUSTOM 28, 29, 30, 31
• Meter index will be shown in both the viewfinder and the navigation display.
2. Off
• Meter index will only be shown in the viewfinder.
Custom 29 - Large Icon Display
For easier viewing of only a few items, the
large-icon display can be selected by pressing
the display-selection button. See page 39 for
more information.
1. On
2. Off
Custom 31 - Exposure History Display
When the display-selection button is pressed,
the exposure data for the next frame appears
in the upper part of the display, followed by
those of the last 5 frames below it. See page
41 for more information.
1. On
2. Off
184
185
To set custom functions;
CUSTOM, 32, 33, 34, 35
1.Open control-panel door and press the CUSTOM button.
2.Turn the front control dial to select the desired custom function.
3.Turn the rear control dial to seclect the setting.
4.Press the shutter-release button partway down to enter the setings.
Refer to pages 154-157 for additional information.
Custom 32 - Vertical Display
1. On
The navigation display automatically changes orientation, depending on whether the camera is in a horizontal or vertical position.
Custom 34 - Camera’s ID Number
Vertical display
2. Off
The display remains in the horizontal orienation, regardless of the camera’s positon.
Custom 33 - Imprint Intensity
The data number starts at dn1-0001 and
increases each time another roll of film is
loaded. This custom function allows you to
change the 3rd character (ie; the 1 in “dn1”) to
be used to identify an individual camera body.
Turn the rear control dial to select number 1 to
9.
CUSTOM FUNCTIONS
• The change occurs when the shutter-release button
is pressed partway down.
• Whenever the ID number is changed, the
change takes effect when the next roll of film is
loaded.
You can adjust the imprint intensity for the date/time. Turn the rear
control dial to set the desired imprint intensity level.
• If the ISO is lower than 100 or higher than 800, all of the intensity settings are not always effective.
1 to 7
1 - 3 Low intensity
4
Standard
5 - 7 High intensity
0
When 0 is selected, the
printing is off.
186
Custom 35 - Language
The navigation display is capable of giving
information in any one of the following five
languages.
1. Japanese
2. English (Eng)
3. German (Deu)
4. French (Fra)
5. Spanish (Esp)
187
ACCESSORY INFORMATION
APPENDIX
The information in this manual is relevant for products introduced
before August 2000. Contact the nearest authorized Minolta
Service Facility to obtain information for products released after
this date.
Lenses
• All Minolta AF lenses can be used with this camera.
• MD and MC series lenses (manual focus) cannot be used with this
camera.
• “D lens” in this manual indicate the lenses whose name include “D”.
Flash Units
• All Minolta i, si, and HS series flash units, and
the Vectis SF-1 flash, are compatible with this
camera.
• The Flash Shoe Adapter FS-1100 is required to
mount AF series flash units (4000AF, 2800AF,
1800AF, and Macro flash 1200AF).
• The AF illuminator will not activate when the
FS-1100 is attached.
• X-series flashes cannot be used with this camera.
• “D flash” in this manual indicate the flashes
whose name include “D”.
Vertical Control Grip VC-7
188
APPENDIX
The Vertical Control Grip VC-7 offers
the same comfort and security as
when the camera is operated horizontally. It has duplicate controls (shutterrelease buton, control dials, grip
switch, etc.) for improved vertical
operation. There are three battery
types to choose from for extended
shooting sessions.
189
ACCESSORY INFORMATION
Data Saver DS-100
Remote Cord
Using the camera’s data memory
mode, photographic data for
400~1900 rolls of film can be saved
on 3.3v 2-32 MB Smart Media card.
The saved data can be viewed on the
camera’s navigation panel or
accessed by a PC.
Attach either Remote Cord RC-1000S or RC-1000L to reduce blur
when taking long exposures.
1. Slide the remote-control terminal cover open.
2. Insert the plug into the terminal.
Focusing Screen 7
Four focusing screens can be used with your camera.
Designed for users of large aperture lenses, the M type screen
uses the super spherical acute matte surface for greater light dispersion and sharper focus control.
• The edges of the viewfinder may appear dark when some telephoto lenses are used with the type G, S, and L focusing screens.
The final image will not be affected.
• Screens can only be changed at an authorized Minolta Service
Facility.
• Use the cord holder to secure the
remote cord.
Type S
Remove the eyepiece cup, when attaching
a finder accessory (AngleFinder, etc).
• Push up to remove the eyepiece cup.
Type L/ML
The following accessories are not compatible with this camera:
• Control Grip CG-1000
• Data Receiver DR-1000
190
191
APPENDIX
Others
Type G/M
TROUBLE SHOOTING (DISPLAY)
Upper part of display
turns black
blinks.
Cause
Solution
When full-auto
or
one of the memory
positions is selected,
the position of the
controls may not
match the camera
settings.
Take picture using
the information presented in the navigation display.
Scene or subject
brightness is beyond
the camera’s meter- Bright Light
ing range.
Use slower speed
film, a neutral density
(ND) filter, or reduce
the light level of your
Light level is beyond surroundings.
the range of available shutter speeds
and apertures.
Shutter speed and
aperture turns black
or blinks.
The required shutter
speed is beyond the
range of the camera
(A mode only)
Low Light
Use higher speed
film or a flash.
Select a larger or
smaller aperture
until the display
returns to normal.
Display
Cause
The required aperture is beyond the
range of the lens.
(S mode only)
Solution
Select a faster or
slower shutter speed
until the display
returns to normal.
Aperture turns black
or blinks.
Frame counter turns
black
This indicates that a multiple exposure is
about to be made. Either multiple exposure
has been selected by the drive mode
lever, or the film has been partially rewound
using the select-frame film transport function.
A combination of causes has occurred.
Remove and reinstall the batteries. If normal camera operation does not resume or
the camera malfunctions repeatedly, contact
an authorized Minolta Service Facility.
Shutter speed turns
black or blinks.
192
193
APPENDIX
Display
TROUBLE SHOOTING (OTHERS)
Cause
Solution
No display
appears
Batteries are loaded Remove and reinstall the
when cam- incorrectly or
batteries, or install new
era is
exhausted.
batteries.
switched on
Autofocus
does not
work when
shutterrelease
button is
pressed
partway
down.
Shutter
cannot be
released.
Picture is
blurred.
194
Page
17
Situation is
unsuitable for
autofocus.
Use focus lock or
manual focus.
29/
48
Camera is set to
manual focus mode.
Turn the focus-mode
switch to AF.
46
Subject is too close.
Check the minimum focus
distance for your lens.
–
Custom 23 set to
setting 2.
Set Custom 23 to setting
1.
178
Focus cannot be
confirmed.
Use focus lock or manual
focus.
29/
48
Camera is attached
to a microscope or
telescope.
Set Custom 16 to setting
2.
172
Custom Function 5
set to setting 2.
Set Custom 5 to setting
1.
Flash didn’t fire and
shutter speed was
slow.
Use flash or a tripod.
Problem
Flash picture is too
dark
Cause
Subject is
beyond flash
range
Lower part
of the flash Lens hood
picture is
attached
dark
Solution
Page
Make sure the subject is within
the flash range.
32
Remove lens hood.
The distance between the subject and the camera must be at
least 1m (3.3ft.) when the builtin flash is used.
–
This camera has a safety-lock feature and you cannot
open the back-cover when film is loaded. In case of
trouble, it can be opened by following these steps.
Cannot
open the
back cover
to remove
the film.
1. Turn the main switch to OFF.
2. While pressing the ISO and AE-lock buttons, turn
the main switch to ON.
3. This message will appear
and the back-cover can now
be opened.
• If you change your mind and
don’t want to open the backcover, repeat steps 1 and 2. No
message will appear and you can continue to take pictures.
If the back cover still won’t open,
164
–
APPENDIX
Problem
1. Remove the screw and small panel, located
below the PC terminal.
2. Place the camera in a dark
(light tight) box.
3. Slide the inside lever down
to open the cover.
195
CARE AND STORAGE
Operating Temperature and Conditions
Cleaning
• This camera is designed for use from –20 to 50 °C (4 to 122 °F).
• Never leave your camera where it may be subjected to extreme
temperatures such as the glove compartment of a car.
• Data panel response time will be slow at colder temperatures. The
display will temporarily darken at higher temperatures, but will
restore when the temperature normalizes.
• This camera is not waterproof or splashproof. When using the
camera in the rain, protect the camera and the lens.
• Never subject the camera to extreme humidity.
• To prevent condensation from forming, place the camera in a
sealed plastic bag when bringing it from cold environment to a
warm environment. Allow it to come to room temperature before
removing it from the bag.
• A low-battery indicator may appear even with fresh batteries
depending on the storage conditions. To restore camera power,
repeat turning the camera on and off.
• Battery capacity decreases at colder temperatures. A half or lowbattery indicator may appear even with fresh batteries, so keep
your camera and spare batteries in a warm inside pocket when
shooting in cold weather. Batteries will regain some of their capacity when warmed to normal operating temperature.
• If the camera or lens barrel is dirty, wipe it gently with a soft,
clean, dry cloth. If the camera or lens comes in contact with sand,
gently blow away loose particles - wiping may scratch the surface.
• To clean the lens surface, first brush away any dust or sand then,
if necessary, moisten a lens tissue with lens cleaning fluid and
gently wipe the lens in a circular motion, starting from the center.
• Never place lens fluid directly on the lens.
• Never touch the interior of the camera, especially the shutter and
mirror, doing so may impair their alignment and movement.
• Dust on the mirror will not affect the exposure but may affect the
focus. Use a blower brush to remove dust from or around the mirror.
• Never use compressed air to clean the camera’s interior, it may
cause damage to sensitive interior parts.
• Never use organic solvents to clean the camera.
• Never touch the lens surface with your fingers.
• Check the camera’s operation carefully, or take test photographs.
• Minolta is not responsible for any loss that may occur due to an
equipment malfunction.
When storing your camera for extended periods,
• Always attach the protective caps.
• Store in a cool, dry, and well-ventilated area away from dust and
chemicals such as moth balls. For long periods, place the camera
in an airtight container with a silica gel drying agent.
• Periodically release the camera’s shutter to keep it operating properly.
• Before using after prolonged storage, check the camera’s operation to make sure it is functioning properly.
Questions and Service
• If you have questions about your camera, contact your local camera
dealer or write to the Minolta distributor in your area.
• Before shipping your camera for repair, please contact an authorized
Minolta Service Facility for details.
196
197
APPENDIX
Before Important Events
Storage
SPECIFICATIONS
Focus
Type:
35mm SLR with built-in flash, autoexposure
(AE)
9 point TTL phase-detection system, multi
metering with dual cross-hair type CCD line
sensor metering cell.
Multi-dimensional predictive focus control is
available for moving subjects.
AF Sensitivity Range: EV -1 to 18 (ISO 100)
AF Illuminator:
Built-in LED. Automatically activated in lowlight/ low-contrast situations.
Range: 0.7 - 7m (With a standard 50mm lens.)
AF Control:
Single-shot, continuous, automatic AF-mode
selection. DMF mode is possible.
Exposure
Modes:
P, A, S, M (PA/Ps available)
Type:
TTL metering; direct TTL metering for flash
Metering Cell:
14-segment honeycomb-pattern SPC, 4segment flash-metering SPC for flash
Metering Range :
14-segment metering: EV 0 - 20,
(ISO 100, f/1.4 lens)
Center weighted average: EV 0 - 20,
Spot metering: EV 3 - 20
Film-speed Setting:
Automatic: ISO 25 to 5000 for DX-coded film.
Manual: ISO 6 to 6400 in 1/3 EV increments.
Flash: ISO 25 - 1000.
Shutter
Type:
Electronically-controlled, vertical-traverse,
focal-plane type
Speeds:
30 sec. - 1/8000 sec., bulb (approximately 7
hours with fresh batteries).
Flash sync speed:
1/200 or slower (synchronizes with all speeds
in HSS mode).
198
Built-in Flash
GN:
Coverage:
Recycling Time:
Modes:
Viewfinder
Type:
Field of view:
Magnification:
Focusing Screen:
Eye-Relief:
Diopter:
Film Transport
Drive Modes:
Loading:
Rewind:
12 (ISO 100 in meters)
24mm angle of view
Approx. 2 sec. (3.5 sec when red-eye reduction
or wireless/remote flash is used) - (according to
Minolta test methods)
Fill-flash, Fill-flash with red-eye reduction,
Flash Cancel, Wireless flash, Slow-sync, and
Rear-flash sync., Autoflash when full-auto is
set.
Eye level fixed pentaprism
Approx. 92% x 94% (with 50mm f/1.4 at ∞)
0.8X (with 50mm lens f/1.4 at ∞)
Spherical acute matte
22.5 mm from the eyepiece, 18.5 mm from the
eyepiece frame.
–1 diopter, Adjustment: –2.5 - +0.5
Single frame advance, Continuous advance
(Low 2 frames/sec., High 4 frames/sec, 3.7 in
AF mode) , Self-timer (10 or 2 second),
Exposure bracketing (single-frame or
continuous advance), Multiple exposure.
Auto load
Auto rewind, manual start
Rewind time (24 exposure film): High speed:
5.5 sec., Silent: 12 sec.
199
APPENDIX
Camera Type:
SPECIFICATIONS
Additional
Power:
Two CR123A lithium batteries
Battery Performance:
24 Exposure Rolls
36 Exposure Rolls
Flash Use (%)
20 °C
–20 °C
20 °C
–20 °C
0
45 rolls
13 rolls
30 rolls
9 rolls
50
21 rolls
6 rolls
14 rolls
4 rolls
100
13 rolls
4 rolls
9 rolls
2 rolls
Test Conditions : Lens (24-85 f/3.5-4.5) is focused from infinity to 2m
three times and the shutter-release button held
partway down for ten seconds before each exposure.
• Battery performance will vary with usage conditions.
• Exposures taken at a rate of 3 rolls/month for 24
exposure rolls, 2 rolls/month for 36 exposure rolls
(starting with fresh batteries).
Dimensions (WxHxD): 143.5 x 97.5 x 65.5mm (WxHxD)
Weight :
575g (w/o camera battery)
Specifications are based on the latest information available at the time
of printing and are subject to change without notice.
This device complies with Part 15 of the FCC Rules. Operation is subject
to the following two conditions: (1) This device may not cause harmful
interference, and (2) this device must accept any interference received,
including interference that may cause undesired operation. Changes or
modifications not approved by the party responsible for compliance
could void the user's authority to operate the equipment. This equipment
has been tested and found to comply with the limits for a Class B digital
device, pursuant to Part 15 of the FCC Rules. These limits are designed
to provide reasonable protection against harmful interference in a
residential installation. This equipment generates, uses and can radiate
radio frequency energy and, if not installed and used in accordance with
the instructions, may cause harmful interference to radio
communications. However, there is no guarantee that interference will
not occur in a particular installation. If this equipment does cause
harmful interference to radio or television reception, which can be
determined by turning the equipment off and on, the user is encouraged
to try to correct the interference by one or more of the following
measures:
• Reorient or relocate the receiving antenna.
• Increase the separation between the equipment and the receiver.
• Connect the equipment to an outlet on a circuit different from that to
which the receiver is connected.
• Consult the dealer or an experienced radio/TV technician for help.
This mark on the bottom of your camera is there to inform
you that this camera meets the requirements of the EU
(European Union) concerning interference causing
equipment regulations. CE stands for Conformité
Européenne (European Conformity).
200
201
APPENDIX
This Class B digital apparatus complies with Canadian ICES-003.
INDEX
Page No.
Accessory flash ............................................................................107
ADI flash metering..........................................................................98
AF illuminator .................................................................................59
AF/MF control button......................................................................50
Audio ............................................................................................131
Automatic autofocus (A) .................................................................46
Automatic exposure lock (AEL)......................................................81
Batteries .........................................................................................17
Brightness distribution display........................................................85
Continuous advance drive mode....................................................88
Continuous autofocus (C)...............................................................47
Custom functions ..................................................................153-187
Display illumination.........................................................................44
Display contrast..............................................................................44
Data memory.........................................................................140-152
Data saver DS-100.......................................................................190
Diopter adjustment .......................................................................130
Depth-of-field preview ..................................................................128
Detailed display ..............................................................................39
Display - When upper part turns black...........................................43
Exposure bracketing .................................................................92-95
Exposure compensation............................................................77-80
Exposure history display ................................................................41
Exposure modes .......................................................................60-69
Eye-start .......................................................................................125
Focus lock ......................................................................................29
Film - loading.............................................................................20-22
Film - rewinding.........................................................................33-34
Flash bracketing....................................................................104-106
Flash - built-in.................................................................................31
Flash compensation .....................................................................103
Flash metering..............................................................................108
Flash - PC terminal.......................................................................118
202
Subject
Page No.
Flash range ....................................................................................32
Flash units compatibility ...............................................................189
Focus areas ..............................................................................53-58
Focus signals .................................................................................28
Full auto mode ..........................................................................24-27
High-speed sync ...........................................................................110
ISO - manually set..........................................................................86
Large icon display ..........................................................................39
Lens - attaching/removing.............................................................19
Manual focus ..................................................................................48
Manual shift ....................................................................................72
Memory .................................................................................132-139
Meter index display ........................................................................40
Metering methods .....................................................................74-76
Multiple exposure ...........................................................................96
Navigation display ..........................................................................36
Operation display ...........................................................................42
Pre-flash metering ........................................................................108
Rear-flash sync ............................................................................101
Red-eye reduction ........................................................................100
Remote cord.................................................................................191
Select-frame film transport ...........................................................161
Self-timer ........................................................................................90
Single-shot autofocus................................................................47-48
Slow-shutter sync .........................................................................102
Special focus situations..................................................................30
STF mode.....................................................................................180
Strap - attaching .............................................................................16
Time exposures (bulb) ..........................................................126-127
TTL metering ................................................................................108
Vertical control grip.......................................................................189
Wireless/Remote Off-camera flash........................................112-118
Vertical display ...............................................................................42
203
APPENDIX
Subject