1
Symantec NetRecon™
3.6 Getting Started Guide
2
Symantec NetRecon™ 3.6 Getting Started Guide
The software that is described in this book is furnished under a license agreement and may
be used only in accordance with the terms of the agreement.
Documentation version 3.6
PN: 10025826
Copyright Notice
Copyright © 2002 Symantec Corporation.
All Rights Reserved.
Any technical documentation that is made available by Symantec Corporation is the
copyrighted work of Symantec Corporation and is owned by Symantec Corporation.
NO WARRANTY. This technical documentation is being delivered to you
AS-IS, and Symantec Corporation makes no warranty as to its accuracy or use. Any use of
the technical documentation or the information contained therein is at the risk of the user.
Documentation may include technical or other inaccuracies or typographical errors.
Symantec reserves the right to make changes without prior notice.
No part of this publication may be copied without the express written permission of
Symantec Corporation, 20330 Stevens Creek Blvd., Cupertino, CA 95014.
Trademarks
Symantec, the Symantec logo, Symantec NetRecon, and Norton AntiVirus are U.S.
registered trademarks of Symantec Corporation. LiveUpdate, LiveUpdate Administration
Utility, Symantec AntiVirus, and Symantec Security Response are trademarks of Symantec
Corporation.
Other brands and product names that are mentioned in this manual may be trademarks or
registered trademarks of their respective companies and are hereby acknowledged.
Printed in the United States of America.
10 9
8
7
6 5
4
3 2
1
3
Technical support
Technical support
As part of Symantec Security Response, the Symantec Global Technical Support
group maintains support centers throughout the world. The Technical Support
group’s primary role is to respond to specific questions on product feature/
function, installation, and configuration, as well as to author content for our
Web-accessible Knowledge Base. The Technical Support group works
collaboratively with the other functional areas within Symantec to answer your
questions in a timely fashion. For example, the Technical Support group works
with Product Engineering as well as Symantec Security Response to provide
Alerting Services and Virus Definition Updates for virus outbreaks and security
alerts.
Symantec technical support offerings include:
■
A range of support options that gives you the flexibility to select the right
amount of service for any size organization
■
Telephone and Web support components that provide rapid response and
up-to-the-minute information
■
Upgrade insurance that delivers automatic software upgrade protection
■
Content Updates for virus definitions and security signatures that ensure the
highest level of protection
■
Global support from Symantec Security Response experts, which is available
24 hours a day, 7 days a week worldwide in a variety of languages
■
Advanced features, such as the Symantec Alerting Service and Technical
Account Manager role, that offer enhanced response and proactive security
support
Please visit our Web site for current information on Support Programs. The
specific features that are available may vary based on the level of support
purchased and the specific product that you are using.
Licensing and registration
If the product that you are implementing requires registration and/or a license
key, the fastest and easiest way to register your service is to access the Symantec
licensing and registration site at www.symantec.com/certificate. Alternatively,
you may go to www.symantec.com/techsupp/ent/enterprise.htm, select the
product that you wish to register, and from the Product Home Page, select the
Licensing and Registration link.
4
Technical support
Contacting Technical Support
Customers with a current support agreement may contact the Technical Support
group by phone or online at www.symantec.com/techsupp.
Customers with Platinum support agreements may contact Platinum Technical
Support by the Platinum Web site at www-secure.symantec.com/platinum/.
When contacting the Technical Support group, please have the following:
■
Product release level
■
Hardware information
■
Available memory, disk space, NIC information
■
Operating system
■
Version and patch level
■
Network topology
■
Router, gateway, and IP address information
■
Problem description
■
Error messages/log files
■
Troubleshooting performed prior to contacting Symantec
■
Recent software configuration changes and/or network changes
Customer Service
To contact Enterprise Customer Service online, go to www.symantec.com, select
the appropriate Global Site for your country, then choose Service and Support.
Customer Service is available to assist with the following types of issues:
■
Questions regarding product licensing or serialization
■
Product registration updates such as address or name changes
■
General product information (features, language availability, local dealers)
■
Latest information on product updates and upgrades
■
Information on upgrade insurance and maintenance contracts
■
Information on Symantec Value License Program
■
Advice on Symantec's technical support options
■
Nontechnical presales questions
■
Missing or defective CD-ROMs or manuals
SYMANTEC CORPORATION SOFTWARE LICENSE AGREEMENT
SYMANTEC CORPORATION SYMANTEC NETRECON
SOFTWARE LICENSE AGREEMENT
SYMANTEC CORPORATION. AND/OR ITS SUBSIDIARIES
(“LICENSOR”) IS WILLING TO LICENSE THE SOFTWARE TO
YOU AS AN INDIVIDUAL OR THE COMPANY OR LEGAL ENTITY
THAT WILL BE UTILIZING PRODUCT AND THAT YOU
REPRESENT AS AN EMPLOYEE OR AUTHORIZED AGENT ("YOU
OR YOUR") ONLY ON THE CONDITION THAT YOU ACCEPT
ALL OF THE TERMS OF THIS LICENSE AGREEMENT. READ THE
TERMS AND CONDITIONS OF THIS LICENSE CAREFULLY
BEFORE USING THE SOFTWARE. THIS IS A LEGAL AND
ENFORCEABLE CONTRACT BETWEEN YOU AND LICENSOR. BY
OPENING THIS PACKAGE, BREAKING THE SEAL, CLICKING ON
THE "I DO AGREE" OR “YES” BUTTON OR LOADING THE
PRODUCT, YOU AGREE TO THE TERMS AND CONDITIONS OF
THIS AGREEMENT. IF YOU DO NOT AGREE TO THESE TERMS
AND CONDITION, CLICK ON THE "I DO NOT AGREE" OR “NO”
BUTTON AND DO NOT USE THE SOFTWARE.
1. LICENSE TO USE
Licensor grants You a non-exclusive and non-transferable license (the
“License”) to use the number of licenses authorized by Your license key
of Licensor’s software in machine readable form and accompanying
documentation (the “Product”) on Your computer systems or those
authorized by Licensor. The License governs any releases, revisions or
enhancements to the Product, which Licensor may furnish to You. You
may use Product only to scan networks and computer systems for
security-related information to detect actual and potential security
flaws and vulnerabilities. You may use the Product only to scan or test
computer networks, systems or devices owned by You or which You
have express permission to access that you have sufficiently backed-up
in case of damage caused by this Product. MISUSE OF THE
PRODUCT OR DATA GENERATED BY THE PRODUCT IS
STRICTLY PROHIBITED BY LICENSOR, MAY VIOLATE U.S. AND
OTHER LAWS AND MAY SUBJECT YOU TO SUBSTANTIAL
LIABILITY. You are solely responsible for any misuse of the Product
Licensed under this Agreement, and You agree to indemnify Licensor
for any liability or damage related in any way to Your use of the
Product in violation of this Agreement or the rights of any owner or
operator of a computer network, system or device. You are also
responsible for using the Product in accordance with the limitations of
the license You acquired. The types of licenses are as follows: 1)
Evaluation License: You may scan an unlimited number of network
resources from one system. Each scan is limited to ten minutes unless
otherwise authorized by Licensor, and the evaluation license expires in
fifteen days unless otherwise authorized by Licensor. 2) Limited
License: You may scan Your small network (up to 254 unique network
resources) from one system. 3) Unlimited License: You may scan Your
large network (an unlimited number of network resources) from one
system. 4) Consultant License: You may scan multiple networks
belonging to Your customers as long as permission is obtained before
such scan, but such scan shall last for no longer than seven days per
customer and Product must be removed thereafter. 5) Not For Resell
(NFR) License: You may scan multiple networks belonging to Your
customers so long as permission is obtained before such scan, but such
scan shall last for no longer than fifteen minutes per customer and
Product must be removed thereafter. 6) Single Engagement (SE)
License: You may scan multiple networks belonging to a single
customer for no longer than thirty (30) days. This license is good for
use on one of Your customers only and you must obtain permission
before any scan is performed. Such scan may only be for delivering
assessment services. You will indemnify and hold Licensor harmless
for any claims arising out of the use of Product on machines belonging
to any of Your customers or any third party that has been provided
access to Product or is scanned by You, except to the extent those
claims arise out of Licensor's breach of this license.
2. RESTRICTIONS
The Product is owned by Licensor, contains valuable trade secrets of
Licensor and is protected by copyright, trademark and trade secret laws
and international treaties. You agree to use Product only for Your
business purposes, and You agree not to provide any other person with
a copy of, or access to, any part of Product unless authorized by Your
type of license. You may make one copy of Product for back-up,
archive or disaster recovery purposes. You may only make copies of
documentation as needed for Your internal use of the Product. Each
copy of any part of the Product made by or for You must contain all of
Licensor’s proprietary markings and copyright notices without
alteration. You may not sell, transfer, sublicense, lend, or rent Product
to any other person or allow any other person to use Product for any
reason, including by making it available for timesharing, service bureau
or on-line use. Use by persons to which You have contracted any of
Your data processing services is permitted only if each contractor (and
its associated employees) is subject to a valid written agreement
prohibiting the reproduction or disclosure to other persons of software
products and associated Documentation to which they have access and
such prohibitions apply to Product. You may not decompile,
disassemble, reverse engineer, modify or attempt to discover the source
code of Product except as expressly permitted by the laws of the
jurisdiction in which You are located, and You may not copy, transfer,
or otherwise use Product except as expressly permitted by this license.
Use of Product in conjunction with any software product that
decompiles or recompiles the Product or in any way creates a derivative
or modified copy of Product is an unauthorized use and is prohibited.
3. LIMITED WARRANTY
Licensor will replace, at no charge, defective media and product
materials that are returned within 30 days of shipment. Licensor
warrants, for a period of 30 days the shipment date, that Product will
perform in substantial compliance with the written materials
accompanying the Product on that hardware and operating system
software for which it was designed, as stated in the documentation. Use
of Product with hardware and/or operating system software other than
that for which it was designed and voids this applicable warranty. If,
within 30 days of shipment, You report to Licensor that Product is not
performing as described above, and Licensor is unable to correct it
within 30 days of the date You report it, You may return Product, and
Licensor will refund the License fee. If You promptly notify Licensor of
an infringement claim based on an existing U.S. patent, copyright,
trademark or trade secret, Licensor will indemnify You and hold You
harmless against such claim, and shall control any defense or
settlement. This warranty is null and void if You have modified
Product, combined the Product with any software or portion thereof
owned by any third party that is not specifically authorized or failed
promptly to install any version of Product provided to You that is noninfringing. If commercially reasonable, Licensor will either obtain the
right for You to use the Product or will modify Product to make it noninfringing. The remedies above are Your exclusive remedies for
Licensor’s breach of any warranty contained herein.
4. LIMITATION OF REMEDIES
You understand that the operation of Program may cause problems on
or failures of computer networks, systems and devices, which may
result in loss of data, unavailability of computing resources or other
damage. You represent to Licensor that You own or are authorized to
use Product on any computer networks, systems or devices on which
Product may be used or that may be tested by Product, You accept all
risk of any such damage or loss, any You hereby waive all rights,
remedies and causes of action that may arise therefrom. IN NO
EVENT WILL LICENSOR OR ITS REPRESENTATIVES BE LIABLE
ANY SUCH DAMAGES OR LOSSES WHATSOEVER, INCLUDING
ANY LOSS OF PROFITS, LOST SAVINGS, LOSS OF DATA OR LOSS
OF USE OR COMPUTER HARDWARE OR SOFTWARE
MALFUNCTION OR OTHER SPECIAL, PUNITIVE, INCIDENTAL
OR CONSEQUENTIAL DAMAGES ARISING OUT OF YOUR USE
OF OR INABILITY TO USE THE PRODUCT, EVEN IF LICENSOR
OR ITS REPRESENTATIVES HAVE BEEN ADVISED OF THE
POSSIBILITY OF SUCH LOSSES OR DAMAGES. LICENSOR AND
ITS REPRESENTATIVES WILL NOT BE LIABLE FOR ANY LOSSES
OR DAMAGES CAUSED BY USE OF THE PRODUCT NOT
PERMITTED BY THIS AGREEMENT. IN NO EVENT SHALL
LICENSOR’S TOTAL LIABILITY UNDER THIS AGREEMENT
EXCEED THE AMOUNT PAID FOR THE PRODUCT. BECAUSE
SOME STATES DO NOT ALLOW THE EXCLUSION OR
LIMITATION OF LIABILITY FOR CONSEQUENTIAL OR
INCIDENTAL DAMAGES, THE ABOVE LIMITATION MAY NOT
APPLY TO YOU. No action or claim arising out of or relating to this
Agreement may be brought by You more than one (1) year after the
cause of action is first discovered.
5. CONFIDENTIALITY
You agree that all information relating to the Product is confidential
property of the Licensor ("Proprietary Information"). You will not
disclose any Proprietary Information to any third party except to the
extent You can document that any such Proprietary Information is in
the public domain and generally available for use and disclosure by the
general public without any charge or license. If you have obtained a
Consultant or NFR license, disclosure to Your clients is permitted only
if they have executed a confidentiality agreement that encompasses
non-disclosure of Proprietary Information with protections as strict as
those contained herein, and such disclosure shall not last longer than
allowed by restrictions on use under such license. You recognize and
agree that there is no adequate remedy at law for a breach of this
section, that such a breach would irreparably harm Licensor and that
Licensor is entitled to equitable relief (including, without limitation,
injunctive relief) with respect to any such breach or potential breach, in
addition to any other remedies available at law.
6. EXPORT REGULATION
You agree to comply strictly with all US export control laws, including
the US Export Administration Act and its associated regulations and
acknowledge Your responsibility to obtain licenses to export, re-export
or import the Product. These products are prohibited for export or reexport to Cuba, North Korea, Iran, Iraq, Libya, Syria or Sudan.
7. US GOVERNMENT RESTRICTED RIGHTS
If You are acquiring the Product or its accompanying documentation
on behalf of the US Government, it is classified as “Commercial
Computer Product” and “Commercial Computer Documentation”
developed at private expense, contains confidential information and
trade secrets of Licensor and its licensors, and is subject to “Restricted
Rights” as that term is defined in the Federal Acquisition Regulations
(“FARs”). Contractor/Manufacturer is: Symantec Corporation., and
its subsidiaries, Cupertino, CA, USA.
8. MISCELLANEOUS
This License is made under the laws of the State of California, USA,
excluding the choice of law and conflict of law provisions. This License
is the entire License between You and Licensor relating to the Product
and: (i) supersedes all prior or contemporaneous oral or written
communications, proposals, and representations with respect to its
subject matter; and (ii) prevails over any conflicting or additional
terms of any quote, order, acknowledgment, or similar communication
between the parties during the term of this License. Notwithstanding
the foregoing, some Product or products of Licensor may require
Licensee to agree to additional terms through Licensor's on-line "clickwrap" license, and such terms shall supplement this Agreement. If any
provision of this License is held invalid, all other provisions shall
remain valid unless such validity would frustrate the purpose of this
License, and this License shall be enforced to the full extent allowable
under applicable law. No modification to this License is binding,
unless in writing and signed by a duly authorized representative of each
party. The License granted hereunder shall terminate upon Your
breach of any term herein and you shall cease use of and destroy all
copies of Product. Any Product purchased by You after the purchase
of the Product which is the subject of this License shall be subject to all
of the terms of this License. All of Symantec Corporation’s and its
subsidiaries’ licensors are direct and intended third-party beneficiaries
of this License and may enforce it against you.
Revision February 21, 2001
Contents
Chapter 1
Introducing Symantec NetRecon
Identifying vulnerabilities ................................................................................. 9
Understanding the Program window ............................................................ 10
Control pane ............................................................................................ 10
Graph pane .............................................................................................. 14
Data Table pane ....................................................................................... 14
Performing scans ............................................................................................. 15
Using path analysis ......................................................................................... 16
Generating reports .......................................................................................... 17
Generating objective and vulnerability descriptions .................................... 19
Running progressive scanning ....................................................................... 19
Chapter 2
Installing Symantec NetRecon 3.6
System requirements ...................................................................................... 22
About installation ........................................................................................... 22
Integrating with Symantec Enterprise Security Manager (ESM) .......... 23
Uninstalling Symantec NetRecon ........................................................... 25
Entering a license key and serial number ...................................................... 25
Running Symantec NetRecon ................................................................. 25
Changing a license key ............................................................................ 26
Creating or changing a password ................................................................... 27
Creating a new password ........................................................................ 27
Changing an existing password .............................................................. 27
Scanning in Demo mode ................................................................................ 27
Chapter 3
Configuring NetRecon to run with ESM
Installing the Integration module .................................................................. 29
Using the Integration module ........................................................................ 29
Configuring the Symantec NetRecon policy .......................................... 30
Running the Symantec NetRecon policy ............................................... 32
8 Contents
Chapter 4
Using the Command Line Interface
Advantages of the CLI .....................................................................................37
Syntax of the CLI .............................................................................................38
Sample commands with results ...............................................................39
Understanding .nrd files .................................................................................40
ScanWhat .................................................................................................40
Objective ...................................................................................................41
Duration ...................................................................................................41
Report keywords ......................................................................................42
HTML reports .................................................................................................46
Index
Chapter
1
Introducing Symantec
NetRecon
This chapter includes the following topics:
■
Identifying vulnerabilities
■
Understanding the Program window
■
Performing scans
■
Using path analysis
■
Generating reports
■
Generating objective and vulnerability descriptions
■
Running progressive scanning
Identifying vulnerabilities
Symantec NetRecon is a network vulnerability detection system. It lets a security
administrator scan networks to discover their security vulnerabilities. Symantec
NetRecon combines ordinary testing and information gathering tools that are
available in most networks with specialized system-cracking tools. Symantec
NetRecon helps administrators identify which parts of a network are most
susceptible to unauthorized access and denial of service.
Because Symantec NetRecon probes systems in various manners, it demonstrates
the many ways that networks are vulnerable. Because the process is automated, a
large amount of information can be gathered in a short amount of time.
Symantec NetRecon reports provide detailed information regarding potential
problems such as weak passwords, system services that are vulnerable to denial of
10 Introducing Symantec NetRecon
Understanding the Program window
service attacks, and so on. This allows administrators to fix particular problems
and see vulnerability patterns.
While Symantec NetRecon tests for the possibility of denial of service attacks, it
does not actually perform such attacks.
Symantec NetRecon discovers vulnerabilities—it does not fix them. Using
Symantec NetRecon is just one part of the network security process. It should be
used to help formulate strong security policies and put them into practice.
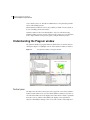
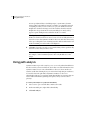
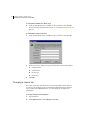
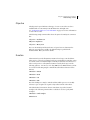
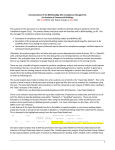
Understanding the Program window
The Symantec NetRecon program window is divided into several areas that are
called panes. Figure 1-1 highlights sections of the Symantec NetRecon window.
Figure 1-1
The Symantec NetRecon Program window
Control pane
The Objectives tab in the Control pane, in the upper left corner of the Symantec
NetRecon main window, lets you select which Symantec NetRecon objectives to
run. The Network Resources tab displays scan results that are related to particular
network resources, and the Vulnerabilities tab displays scan results that are
related to vulnerabilities during or after a scan. The contents of the Graph and
Introducing Symantec NetRecon
Understanding the Program window
Data Table panes are controlled by the objective, network resource, or
vulnerability that is selected in the Control pane.
Objectives tab
Use the Objectives tab to select Symantec NetRecon objectives to run. To
discover network vulnerabilities, Symantec NetRecon has the following preset
goals, some for gathering information about networks and vulnerabilities in
network resources and some that use that information to gain access to network
resources. These goals are referred to in Symantec NetRecon as objectives.
Symantec NetRecon objectives are organized into a hierarchy, as represented by
the tree structure. To expand any part of the tree, click the plus symbol to the left
of any parent objective.
Selecting an objective in the Objectives pane limits the records that are displayed
in the Data Table pane and the Graph pane to those that meet the selected
objective.
Objectives for live scans are divided into the following four categories:
■
Heavy scan
■
Medium scan
■
Light scan
■
Granular objectives
Light scan
A Light scan is primarily for identifying network resources (including finding
names and aliases and determining which operating system is running on that
network resource) and searching for the most common services or ports that are
known to have vulnerabilities, such as SMTP, FTP, and so on.
Medium scan
A Medium scan includes everything that is performed by a light scan and also
tries to find a much wider range of vulnerabilities by checking for services on
more ports and using more protocols. A medium scan also does a more in-depth
analysis of common services, such as SMTP, to try to find vulnerabilities.
Heavy scan
A Heavy scan includes everything that is performed by a light and medium scan
and also attempts to use any information that is gathered to actually gain access
to network resources by logging into login servers, accessing shared Windows
resources, and so on. A heavy scan also attempts to crack any encrypted
11
12 Introducing Symantec NetRecon
Understanding the Program window
passwords that Symantec NetRecon has discovered and to analyze files that
Symantec NetRecon has retrieved.
Granular objectives
Granular objectives give users the ability to run certain commonly-used
objectives individually, rather than as part of a full scan. This provides users with
the versatility to select specific objectives from a predefined list. Because
Symantec NetRecon runs only the necessary scans to obtain information about
selected objectives, rather than running a full scan, users quickly have the needed
information.
All objectives that were previously contained in the miscellaneous category, as
well as certain objectives from the light, medium, and heavy scans, are part of the
list of granular objectives. Those objectives from the light, medium, and heavy
scans are still part of the full scans and they run when a full scan is selected.
Granular objectives have parent and child objectives. Select a parent objective to
run each of the child objectives, or select a child objective to run it individually.
In the list of granular objectives, indented items are child objectives.
■
Discover NFS vulnerabilities
■
Use Windows networking
■
Use Windows networking to discover vulnerabilities
■
Obtain access to Windows network resources
■
Discover vulnerabilities of NetWare network resources
■
Discover RPC services
■
Obtain maps from NFS servers
■
Discover SMB server vulnerabilities
■
Discover SMTP vulnerabilities
■
Discover FTP vulnerabilities
■
Discover IRC vulnerabilities
■
Discover HTTP vulnerabilities
■
Discover finger vulnerabilities
■
Discover BIND vulnerabilities
■
Discover Oracle database vulnerabilities
Introducing Symantec NetRecon
Understanding the Program window
■
■
Trojans
■
Discover trojans and vulnerable services running on UDP ports
■
Discover trojans and vulnerable services running on TCP ports
SNMP vulnerabilities
■
Guess SNMP community names
■
Discover SNMP vulnerabilities
■
Discover SNMP vulnerabilities of identified SNMP agents
■
Discover network resources that are not running Symantec Enterprise
Security Manager agents
■
Discover network resources that are not running Symantec Intruder Alert
agents
■
All TCP services
■
Discover all privileged TCP services
■
Discover all non-privileged TCP services
■
Discover select TCP services
■
Discover select UDP services
■
Discover all UDP services
■
Obtain banners from TCP services
■
Discover network resources that are running Norton AntiVirus Corporate
Edition
■
Discover network resources that are not running Norton AntiVirus
Corporate Edition
■
Enumerate resources
■
Identify network resources
■
Enumerate target network resources
■
Use ICMP protocol to scan network resources
■
Analyze resources to determine preliminary vulnerabilities
Granular objectives cannot be run simultaneously with full scans or other
granular objectives.
Network Resources tab
Use the Network Resources tab to focus on scan results for particular network
resources. For example, if you are concerned about the security of a particular
13
14 Introducing Symantec NetRecon
Understanding the Program window
server, during or after a scan, or after you have reloaded a saved scan file, you can
select the Network Resources tab and then select the network resource that you
are concerned about. When you do so, the Graph pane and Data Table pane
change to reflect only vulnerability information for that network resource. Press
Ctrl or Shift to select more than one network resource.
Vulnerabilities tab
Use the Vulnerabilities tab to focus on scan results for particular vulnerabilities.
For example, if you want to see all network resources with the FTP root directory
is writable vulnerability, you can select the Vulnerabilities tab, then select FTP
root directory is writable (assuming that that particular vulnerability has been
reported on any network resources that Symantec NetRecon has scanned). When
you do so, the Graph pane and Data Table pane change to reflect information
about only that vulnerability, including the network resources that are found to
have it. Press Ctrl or Shift to select more than one vulnerability.
Graph pane
The Graph pane, in the upper right corner of the Symantec NetRecon main
window, displays the number of low-risk, medium-risk, and high-risk records
that are discovered as Symantec NetRecon runs. The graph is refreshed as the
program runs and discovers new information.
The record count that is displayed by the Graph pane depends on what is selected
in the Control pane. See “Control pane” on page 10 for more information.
The Graph pane gives you a brief overview of the scan results.
Data Table pane
The Data Table pane, in the bottom half of the Symantec NetRecon window,
shows records that are generated by Symantec NetRecon as it runs. When
Symantec NetRecon discovers vulnerabilities or information that could lead to
the discovery of vulnerabilities, it stores the information that it finds in records.
Records are pieces of data regarding networks that are scanned by Symantec
NetRecon. Each row contains one record. The columns in the table show field
values in those records. Records usually have multiple fields.
By default, Symantec NetRecon limits the records that are displayed to those that
are specifically related to whatever is selected in the Control pane. (See “Control
pane” on page 10 for more information.) You can show all records that are
generated during a scan by selecting the All Records command in the View menu.
Introducing Symantec NetRecon
Performing scans
By default, Symantec NetRecon sorts by risk in descending order every 15
seconds during a scan. You can turn off Auto Sort by deselecting Auto Sort in the
View menu. To the left of each record is an icon that indicates its risk level.
Performing scans
Before you begin to scan network resources, determine which network resources
you want to scan and who can grant permission to scan those resources, then be
sure to obtain permission. Scanning network resources without permission is a
serious matter that may result in legal action and/or civil litigation.
To perform a scan
1
Select an objective in the Objectives tab of the Control pane.
The Heavy scan objective contains most of the other scan objectives and is
selected by default.
2
Do one of the following:
3
■
On the taskbar, click Start Scan.
■
On the Scan menu, click Start Scan.
In the Start Scan dialog box, do one of the following:
■
Type the network resources that you want to scan.
■
Drag the icon of a text file containing network addresses from the
Windows Explorer into the dialog box to specify network resources.
■
Click Suggest Network Resources to have Symantec NetRecon build a
list of network resources that you may want to scan.
15
16 Introducing Symantec NetRecon
Using path analysis
You can specify IP addresses (including ranges), system names, domain
names, a Microsoft Windows Network, a NetWare or Compatible Network
or anything else that you can see when you open your Windows Network
Neighborhood. When referring to network containers from the Network
Neighborhood, type them into the Start Scan dialog box exactly as they
appear. Separate multiple entries with a line break or a comma.
Warning: If you click Suggest Network Resources to have Symantec
NetRecon search for network resources, be sure to look carefully at the list of
network resources that Symantec NetRecon discovers and edit it if necessary
before proceeding with a scan. Scanning networks without authorization can
result in criminal prosecution and/or civil litigation.
4
Click OK to begin the scan, after you are satisfied that you have specified only
network resources that you want to scan.
Note: Ensure that the selected objective accepts the Network Resource type.
For example, “Scan for NAVCE systems,” takes only IP addresses or IP
ranges.
Using path analysis
Symantec NetRecon provides a way for you to see not only what vulnerabilities it
has discovered in your network but also how it discovered the information. Since
Symantec NetRecon uses some vulnerabilities to discover others, much as an
attacker would when learning about your network and exploiting its weaknesses,
it is useful to know the path that led Symantec NetRecon to discover a
vulnerability. That way you can learn which vulnerabilities are gateways that can
lead to further information gathering and exploits, and you can close those
gateways.
To see the path analysis for a particular vulnerability
1
Start a scan or open a .nrd file that contains scan results.
2
In the Data Table pane, right-click a vulnerability.
3
Click Path Analysis.
Introducing Symantec NetRecon
Generating reports
The path appears in a tree format in the Scan Path pane of the Path Analysis
dialog box.
Each item on the tree represents a record, with those closest to the top of the
tree being the most recent. Some of these records may contain vulnerability
names, but some records are for information gathering and rearranging and,
therefore, do not have an associated vulnerability.
4
To see more information about any item on the path, click it.
If it has an associated vulnerability, the description of that vulnerability
appears in the Vulnerability Description area of the dialog box.
Note: Some vulnerabilities have multiple sources and, therefore, may show
more than one information branch in the Path Analysis dialog box.
Generating reports
As Symantec NetRecon runs, it gathers information about the networks it scans.
The graph in the Graph pane is a visual indicator of the accumulation of scan
data. Each piece of data is called a record. The Data Table pane shows records that
are related to the objective, network resource, or vulnerability that is selected in
the Control pane. At any point during the scan, you may have Symantec
17
18 Introducing Symantec NetRecon
Generating reports
NetRecon generate a report, which is a summary of the information that is
gathered to that point.
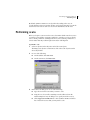
To create and view a report
1
Select Report> Generate Report.
2
In the Generate Report dialog box, next to Report Title, type the name of the
report.
3
Under Report Type, do one of the following:
■
Click Executive Summary to generate reports that include an overview
of the network security for the network resources that are scanned by
Symantec NetRecon and do not provide any scan details.
■
Click Detailed Report to generate reports that include enough
information to see and verify vulnerabilities and resolve problems.
The option with the most detail is Grouped by Network Resource, with
the Include descriptions and solutions for each vulnerability found
check box selected.
■
Click Custom Report Template to use Crystal Reports to create custom
templates or select an existing template.
4
(Optional) To further refine your report output (including only
vulnerabilities within a certain risk range), click Options.
Select any additional report options.
5
Click OK to generate your report and view it in the Crystal Reports report
viewer.
Introducing Symantec NetRecon
Generating objective and vulnerability descriptions
6
To save the report in one of the Crystal Reports exportable formats, click the
following button:
7
Select an export format.
Generating objective and vulnerability descriptions
Symantec NetRecon lets you generate one report that contains all the objective
descriptions and another report that contains all the vulnerability check
descriptions. These can be useful for learning how to narrow the focus of scans
and for learning the kinds of vulnerabilities that Symantec NetRecon is capable of
finding.
You can generate either of these reports from within Symantec NetRecon.
To generate a report that contains all Symantec NetRecon objectives
◆
Select Report> View Objective Descriptions.
To generate a report that contains descriptions all of all vulnerabilities that
Symantec NetRecon can discover
■
Select Report> View Vulnerability Descriptions.
Running progressive scanning
Each Symantec NetRecon objective runs separately and simultaneously. Most
objectives receive information from or pass information to other objectives. The
interdependency of Symantec NetRecon objectives is their strength. Because they
share information with each other, Symantec NetRecon can probe a system much
like a user would, using all the information gathered as a lever to gain additional
information.
Note: Particularly with progressive scanning, as opposed to other scanning
methodologies, the vulnerabilities that are reported during a network scan may
vary from scan to scan. That’s because some network resources may be offline
and, because Symantec NetRecon uses the information that is found by some
vulnerabilities to detect others, having a network resource offline might reduce
an entire branch of information.
19
20 Introducing Symantec NetRecon
Running progressive scanning
Chapter
Installing Symantec
NetRecon 3.6
This chapter includes the following topics:
■
System requirements
■
About installation
■
Entering a license key and serial number
■
Creating or changing a password
■
Scanning in Demo mode
2
22 Installing Symantec NetRecon 3.6
System requirements
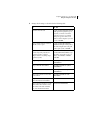
System requirements
Minimum system requirements to run Symantec NetRecon version 3.6 are listed
in the following table:
Table 2-1
Minimum system requirements
System variables
Minimum requirements
Operating system
Windows NT 4 (Workstation or Server) with Service
Pack 6 or greater, Windows 2000, and Windows XP
Memory
96 MB
Disk space
40 MB
Display
VGA
CPU
Pentium-class or greater
About installation
The Start menu shortcut to the Symantec NetRecon program is installed in the
Microsoft Windows NT personal profile that is active when the software is
installed. Therefore, before installing Symantec NetRecon, log on to the
computer using the account that you plan to use when performing Symantec
NetRecon scans.
The account that you plan to use for installing and using Symantec NetRecon
should have administrative access to the computer where Symantec NetRecon is
being installed.
To install Symantec NetRecon from autorun on CD
1
Insert the Symantec NetRecon CD into your CD-ROM drive.
The Symantec NetRecon CD has an autorun program that should start when
your computer reads the CD.
2
In the Welcome screen, click Next.
3
In the Symantec License Agreement screen, click Yes.
4
In the Choose Destination Location screen, do one of the following:
■
Accept the default location where setup installs Symantec NetRecon.
■
Browse to a different location where setup installs Symantec NetRecon.
Installing Symantec NetRecon 3.6
About installation
5
6
In the Select Program Folder screen, do one of the following:
■
Select a folder from the list where setup installs program icons.
■
Type a new folder name where setup installs program icons.
Click Next.
To install Symantec NetRecon from CD
1
Insert the Symantec NetRecon CD into your CD-ROM drive.
2
On the Windows taskbar, click Start > Run.
3
In the Run prompt, type D:\setup.exe.
If your CD-ROM has a drive letter other than D, replace D with that drive
letter.
4
Click OK.
5
Click Install.
6
In the Welcome screen, click Next.
7
In the Symantec License Agreement screen, click Yes.
8
In the Choose Destination Location screen, do one of the following:
9
■
Accept the default location where setup installs Symantec NetRecon.
■
Browse to a different location where setup installs Symantec NetRecon.
In the Select Program Folder screen, do one of the following:
■
Select a folder from the list where setup installs program icons.
■
Type a new folder name where setup installs program icons.
10 Click Next.
Integrating with Symantec Enterprise Security Manager (ESM)
The Symantec NetRecon integration has been updated to integrate with
Symantec ESM version 5.5 as part of the installation.
If Symantec ESM is installed, Symantec NetRecon automatically prompts the user
to reregister with Symantec ESM. Additionally, a shortcut (the ESM Registration
Tool) is installed in the Symantec NetRecon directory in the start menu:
Start>Programs>Symantec>NetRecon 3.6.
If Symantec ESM is installed, but not registered with Symantec NetRecon, only
the shortcut is installed in the Symantec NetRecon directory.
23
24 Installing Symantec NetRecon 3.6
About installation
The new Symantec ESM Registration Tool launches esmregister.exe, allowing the
user to register Symantec NetRecon with Symantec ESM at any time. The
Symantec ESM Registration Tool also repairs broken Symantec ESM registrations
to Symantec ESM version 5.5. Symantec NetRecon 3.6 is registered with
Symantec ESM files, when the Symantec ESM files are updated to SU13.
If a Symantec ESM agent is not installed, the Symantec NetRecon integration will
not be prompted for.
Symantec NetRecon data files (.nrd files) can be loaded into Symantec ESM if you
have installed the Integration module. The Symantec NetRecon installation
program determines whether a Symantec ESM agent is installed on your
computer. If it finds a Symantec ESM agent, it asks whether you want to install
the Symantec ESM/NetRecon integration software.
To install the Symantec ESM/NetRecon integration software
1
In the message box that prompts you to install the integration software, click
Yes.
2
In the ESM Agent Registration dialog box, do the following:
■
Type the ESM User Name for the Symantec ESM manager to which the
agent is registered (or one of them, if it is registered to multiple
managers).
■
Specify a password for the manager user.
Installing Symantec NetRecon 3.6
Entering a license key and serial number
■
Type the ESM Manager name. The name of the ESM manager is
typically the name of the computer where the manager is installed.
Note: You are registering the Integration module to an ESM manager, which
may be on a different computer from the Symantec ESM agent where
Symantec NetRecon is being installed.
3
Click Next.
4
After the Symantec NetRecon installation adds the appropriate files and
registers the Integration module with the specified Symantec ESM manager,
click Finish.
If the Symantec NetRecon agent is not registered to the manager that you specify
in step 2, an error message prompts you to register the agent with the appropriate
manager.
For more information about using the Symantec ESM Symantec NetRecon
Integration module, see Chapter 3, “Configuring NetRecon to run with ESM” on
page 29.
Uninstalling Symantec NetRecon
Symantec NetRecon’s uninstall capability has been enhanced. The uninstall in
version 3.5 did not clean files that were added with security updates. Uninstall in
version 3.6 now recognizes and removes files that are added to Symantec
NetRecon through security updates after the initial installation of Symantec
NetRecon version 3.6.
Entering a license key and serial number
Before you can perform live Symantec NetRecon scans of actual network
resources, you must enter a license key and serial number in Symantec NetRecon.
If you do not have a license key and serial number, contact the service and
support department. If you do not enter a license key and serial number,
Symantec NetRecon runs only in Demo mode.
Running Symantec NetRecon
Without a license key and serial number, Symantec NetRecon runs only in Demo
mode.
25
26 Installing Symantec NetRecon 3.6
Entering a license key and serial number
To run Symantec NetRecon in Demo mode
◆
At the prompt asking if you would like to enter your license key, click No.
You can run the program in Demo mode (see “Scanning in Demo mode” on
page 27).
To run NetRecon with a license key
1
At the prompt asking if you would like to enter your license key, click Yes.
2
In the New License dialog box, type the following new license information:
3
■
Company name
■
Serial number
■
License type
■
License key
Click OK.
Changing a license key
If you have previously entered a license key and serial number but now have a
new license (for example, if you previously had an Evaluation license but have
since purchased an Unlimited license), you can change the existing license
information.
To change existing license information
1
Open NetRecon.
2
Click Administration > View/Change License Key.
Installing Symantec NetRecon 3.6
Creating or changing a password
3
4
In the New License dialog box, type the following new license information:
■
Company name
■
Serial number
■
License type
■
License key
Click OK.
Creating or changing a password
Creating a new password
Immediately after entering license information the first time the program runs,
you must specify a password. The password ensures that only authorized
personnel can perform Symantec NetRecon scans. You are prompted to enter the
password twice to protect against making typographical errors.
Changing an existing password
You can change an existing password at any time.
To change a password
1
Click Administration > Change Password.
2
In the Change Password dialog box, type the old password.
3
Type the new password.
4
Click OK.
Scanning in Demo mode
You can run Symantec NetRecon in Demo mode without entering a license key
and serial number. Running a scan while in Demo mode causes Symantec
NetRecon to produce simulated scan data. You can use this simulated data to
learn how Symantec NetRecon’s features work. For example, you can manipulate
the data in the Data Table pane or create and view reports. You cannot scan any
real networks or network resources while Symantec NetRecon is running in
Demo mode.
27
28 Installing Symantec NetRecon 3.6
Scanning in Demo mode
Chapter
3
Configuring NetRecon to
run with ESM
This chapter includes the following topics:
■
Installing the Integration module
■
Using the Integration module
Installing the Integration module
The Symantec ESM NetRecon Integration module lets you import Symantec
NetRecon (.nrd) data files into Symantec ESM, allowing you to use Symantec
ESM’s reporting features, trend analysis features, and so on to assess the results of
Symantec NetRecon scans.
The Symantec ESM NetRecon Integration module can be installed during a
Symantec NetRecon installation if the installation program finds a Symantec
ESM agent on that computer.
For more information about installing the module and registering it to a
Symantec ESM manager, see Chapter 2, “Installing Symantec NetRecon 3.6” on
page 21.
Using the Integration module
You can use the Integration module by running its associated policy, called
NetRecon, from the Symantec ESM Enterprise Console. First, however, you
should configure the policy to specify which Symantec NetRecon data file to
open, which details to import, and so on.
30 Configuring NetRecon to run with ESM
Using the Integration module
Configuring the Symantec NetRecon policy
To configure the Symantec NetRecon policy
1
Open the Symantec ESM Enterprise Console.
This may not be on the same computer as the Symantec ESM agent computer
where Symantec NetRecon is installed.
2
In the Enterprise tree, open the manager.
3
Under the manager, click Policies.
4
Click NetRecon.
If the NetRecon policy does not appear here, you need to reinstall Symantec
NetRecon on a computer with a Symantec ESM agent and/or run the
Symantec ESM Registration Tool. Follow the instructions in Chapter 2 for
adding the Symantec ESM Integration module and registering it to an ESM
manager.
5
Click Network Vulnerabilities.
6
Click Windows NT/2000/XP.
7
Select a Symantec NetRecon Network Vulnerability title in the Symantec
ESM Enterprise tree at the point where you want to configure the NetRecon
policy.
Configuring NetRecon to run with ESM
Using the Integration module
8
Change check settings, as described in the following table:
To
Do This
Perform a network scan
Double-click the Perform a network
scan option and specify the type of
objective you want to run. In the
Network resources to be scanned
dialog box, type the names or IP
addresses of the computers you want
to scan. Click OK.
Choose which Symantec NetRecon
data file (.nrd) to open
Double-click the Open Existing
NetRecon Scan option and specify a
file name and path (this is the path
on the agent system). Click OK.
Specify system names and aliases to
include (importing only data for
specified systems) or exclude
(import data for everything except
specified systems)
Double-click Filter by network
resource names and/or aliases, type
the names of network resources or
aliases, select Include or Exclude.
Click OK.
Import High vulnerabilities
Check Report NetRecon ‘red’
vulnerabilities
Import Medium vulnerabilities
Check Report NetRecon ‘yellow’
vulnerabilities
Import Low vulnerabilities
Check Report NetRecon ‘green’
vulnerabilities
Import the network resources that
were scanned
Check Report NetRecon scan
information
Import all data records, not just
those that include vulnerabilities
Check View all records
Import Symantec NetRecon-specific
data (such as the record ID, source
ID, NetRecon module command,
etc.) into the Information field
Check View internal fields
31
32 Configuring NetRecon to run with ESM
Using the Integration module
Running the Symantec NetRecon policy
You must configure the Symantec NetRecon policy before you can successfully
run it. See “Configuring the Symantec NetRecon policy” on page 30.
To run the NetRecon policy
1
Open the Symantec ESM Enterprise Console.
This may not be on the same computer as the Symantec ESM agent where
Symantec NetRecon is installed.
2
On the taskbar, to start the Run Wizard policy, click the following button:
3
Select a manager (the manager that you selected when you installed the
Integration module).
4
Click Next.
5
Select the Symantec NetRecon policy.
6
Click Next.
If the Symantec NetRecon policy does not appear here, you need to reinstall
Symantec NetRecon on a computer with a Symantec ESM agent and follow
the instructions in Chapter 2 for adding the ESM Integration module and
registering it to an ESM manager.
7
Click Next.
The Network Vulnerabilities module–the only one available with this policy–
is already selected.
8
Select the domain where you want this policy to run. This will limit the
agents from which you can choose.
9
Click Next.
10 Select an agent.
This must be an agent that is installed on a computer where Symantec
NetRecon is installed.
11 Click Next.
12 Do one of the following:
■
Click Finish to run the policy immediately.
■
Click Schedule to select a date and time for the policy to run.
Configuring NetRecon to run with ESM
Using the Integration module
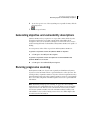
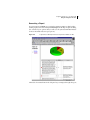
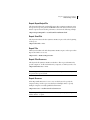
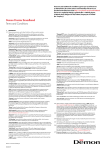
Viewing a Summary Graph
After the policy runs, Symantec NetRecon data is imported into Symantec ESM.
Figure 3-1 shows the Symantec ESM console as it appears, in Summary Mode,
after selecting the Network Vulnerabilities policy under the agent where
Symantec NetRecon is installed. The number of high, medium, and low security
risks are summarized in the graph.
Figure 3-1
Network Vulnerabilities policy run summary
33
34 Configuring NetRecon to run with ESM
Using the Integration module
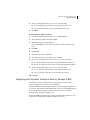
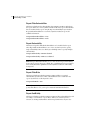
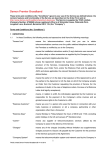
Viewing Policy Run Data
By selecting a policy run under the agent in the Enterprise tree (not under Policy
Runs), you can see the details of a particular run, which in this case consists of all
the imported Symantec NetRecon records. Figure 3-2 shows the results of a
policy run.
Figure 3-2
A List of Symantec NetRecon vulnerabilities
Configuring NetRecon to run with ESM
Using the Integration module
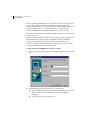
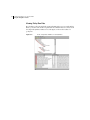
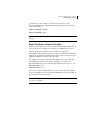
Generating a Report
You can generate an HTML report using the Symantec NetRecon data by rightclicking a policy run and selecting Security Report. In the Report Options dialog
box, select the report options that you want (see the Symantec ESM User Manual
for more information about report options).
Figure 3-3
A Symantec ESM report based on Symantec NetRecon data
The Table of Contents frame in the left pane lets you navigate through the report.
35
36 Configuring NetRecon to run with ESM
Using the Integration module
Chapter
4
Using the Command Line
Interface
This chapter includes the following topics:
■
Advantages of the CLI
■
Syntax of the CLI
■
Understanding .nrd files
■
HTML reports
Advantages of the CLI
The Symantec NetRecon Command Line Interface (CLI) allows scans to be run
or spawned from other programs. The CLI provides important functionality in a
number of different contexts.
The following examples illustrate possible uses for the CLI:
■
Integrates Symantec NetRecon into Symantec Enterprise Security Manager
(ESM) using the ICE module.
■
Facilitates integration into management frameworks, such as Tivoli
Enterprise, HP OpenView, CA Unicenter, and BMC PATROL.
■
Schedules regular scans via the NT/W2K at command.
■
Provides a way for service providers to launch Symantec NetRecon scans
automatically after collecting customer scan requests on a Web site.
38 Using the Command Line Interface
Syntax of the CLI
Syntax of the CLI
The specification for the Symantec NetRecon command line is as follows:
NetRecon [infile] [outfile] [-hide] [minimize] [-kill] [-registry <registrykey>]
The Symantec NetRecon command also runs without any parameters. The order
of all hyphenated (-) parameters is irrelevant, but the first non-hyphenated
parameter is interpreted as the infile and the second is interpreted as the outfile.
infile
This parameter indicates the input file (path and file
name) from which Symantec NetRecon draws the .nrd
file that contains information from a previous scan and/
or directives for the current scan.
outfile
This parameter indicates the output file (path and file
name) into which Symantec NetRecon saves the results
of a scan.
-hide
This option instructs Symantec NetRecon to hide the
GUI during the scan. This option may be abbreviated as
-h.
-minimize
This option instructs Symantec NetRecon to minimize
the GUI during the scan. This option may be
abbreviated as -m.
-kill
This directive instructs Symantec NetRecon to end a
scan that is currently running. The results of the scan to
the point of the kill command are saved in the file that is
specified by the outfile parameter. If there is no scan
running, Symantec NetRecon exits normally. This
option may be abbreviated as -k.
-registry <registrykey>
This directive specifies the registry key that contains the
path, license, and other information that is necessary for
the scan. The default value (if the option is not specified)
is “-registry netrecon.” This translates to the following
Registry key: HKEY_LOCAL_MACHINE\SOFTWARE\
Symantec\netrecon. The registry specification option
may be abbreviated as -r <registrykey>.
Table 4-1:
Using the Command Line Interface
Syntax of the CLI
Sample commands with results
The following table lists sample CLI commands with descriptions of their results:
Table 4-1
Sample CLI commands and results
NetRecon
Starts Symantec NetRecon with a normal GUI
interface but does not initiate a scan.
NetRecon -h
Exits with non-zero code and logs an error in
error.log
NetRecon infile.nrd
Starts Symantec NetRecon with a normal GUI,
loads the information from infile.nrd, but does not
automatically begin a scan. An outfile must be
specified before the scan can run.
NetRecon infile.nrd -h
Exits with non-zero code and logs an error in
error.log.
NetRecon infile.nrd
outfile.nrd -m
Starts Symantec NetRecon with a minimized GUI
and loads instructions from infile.nrd. If the
instructions from infile.nrd are sufficient, the scan
runs and the output is sent to outfile.nrd.
NetRecon -k
Terminates any running scans and saves any
recorded information to the specified outfile. If
there are no Symantec NetRecon scans currently
running, the program exits.
NetRecon infile.nrd
outfile.nrd -h -r webrecon
Starts Symantec NetRecon with a hidden GUI and
loads instructions from infile.nrd. The registry
information is drawn from the following source:
HKEY_LOCAL_MACHINE\
SOFTWARE\SYMANTEC\webrecon
The default setting, if no registry key is specified
with the -r option, is:
HKEY_LOCAL_MACHINE\SOFTWARE\SYMAN
TEC\netrecon
39
40 Using the Command Line Interface
Understanding .nrd files
Understanding .nrd files
Symantec NetRecon data (.nrd) files contain the actual data that are gathered
during a scan as well as some basic instructions for running the scan.
These basic instructions are:
■
Which computers to scan
■
What kind of a scan to run
■
How long the scan should run
This information is usually specified through the GUI. If you are using the CLI,
however, it is important to understand that this information is stored as a series
of comment lines containing keywords in a .nrd file.
The relevant keywords that Symantec NetRecon recognizes in a comment line are
ScanWhat, Objective, and Duration. The syntax and meaning of each is
summarized below.
Note: While comment lines may be interspersed with the data in a .nrd file,
Symantec NetRecon interprets keyword comment lines correctly only when they
appear before the first data record.
ScanWhat
The ScanWhat keyword tells Symantec NetRecon which network resources to
scan. This instruction may consist of a host name, an IP address, or a range of IP
addresses.
The following sample comment lines show the syntax of ScanWhat:
# ScanWhat = mugwump
#ScanWhat = 10.12.14.1 - 10.12.14.254
#scanwhat=10.12.14.16
Spaces between elements are irrelevant and the keyword itself is not case sensitive.
There is no default setting for the ScanWhat comment line. If there is no
ScanWhat comment line in the infile.nrd that is specified by a Symantec
NetRecon command, the scan does not run.
Using the Command Line Interface
Understanding .nrd files
Objective
The Objective keyword indicates what type of a scan to run. There are three
available kinds of scans, Heavy Scan, Medium Scan, and Light Scan.
See “Configuring NetRecon to run with ESM” on page 29. for more information
on each of these scans.
The following sample comment lines show the syntax of an Objective comment
line:
# objective = medium scan
#Objective=LightScan
# objective = Heavy Scan
Note case insensitivity and the irrelevance of spaces between elements. If no
Objective is specified in a .nrd file, the default setting is specified in the
modules.inf file. Heavy Scan is the default.
Duration
The Duration keyword tells Symantec NetRecon how long a scan should run.
There are two options for specifying how long a scan should run. The first option
is to tell the scan to run Until Complete. This may be abbreviated as the letter “u.”
The second option is to tell Symantec NetRecon exactly how long to run the
following syntax: D HH:MM:SS. D is days, HH is hours, MM is minutes, and SS
is seconds. The following sample comment lines all indicate a duration of five
minutes.
# Duration = 0 0:5:0
# Duration = 0:5:0
# Duration = 5:0
# Duration = 300
Note that leading zeros may be omitted and that, while spaces are not usually
relevant, a space is required to separate a days value from the other values.
The default value for Duration, when no time frame is specified, is Until
Complete. The following comment lines could also be used to specify Until
Complete.
# Duration = until complete
#Duration=u
41
42 Using the Command Line Interface
Understanding .nrd files
The first letter (u) is the only necessary parameter. Spaces between elements are
irrelevant.
Report keywords
Symantec NetRecon generates HTML reports using keywords that are contained
in the .nrd files. These parameters specify what information is contained in a
report, the type of report, and the output location of the report.
GenerateReport
GenerateReport is the keyword that prompts Symantec NetRecon to generate the
reports. When GenerateReport is set to true, Symantec NetRecon looks for
further keywords that indicate information to include in the report. The word
true is not case sensitive.
GenerateReport = True
Report.CrystalTemplateFile
This keyword indicates the path and file name of the Crystal Reports template
that is used to format the report. Four Crystal Reports templates are available:
■
Executive Summary.rpt
■
By Vulnerability.rpt
■
By Machine.rpt
■
By Machine No Details.rpt
These templates correspond to the types of reports that you can generate from the
Symantec NetRecon graphical user interface.
Executive Summary.rpt is a report with few details that is designed to give an
overview of vulnerabilities. By Vulnerability.rpt is more detailed and is grouped
by vulnerabilities. By Machine No Details.rpt is similar to By Vulnerability.rpt,
but this report is grouped by Network resource. By Machine.rpt is the same as By
Machine No Details.rpt, except that it contains more detail regarding
vulnerability descriptions and solutions.
# Report.CrystalTemplateFile = C:\NetRecon Folder\By Machine.rpt
Using the Command Line Interface
Understanding .nrd files
Report.ReportOutputFile
This keyword indicates the path and file name where Symantec NetRecon writes
the report. The report is generated in HTML format. The value for this keyword
must be expressed as an absolute path name, as shown in the following example:
# Report.ReportOutputFile = C:\Folder\Folder1\FileName.html
Report.ShowTitle
This keyword indicates whether Symantec NetRecon puts a title at the beginning
of the report.
# Report.ShowTitle = True
Report.Title
This keyword indicates the title that Symantec NetRecon puts on the report when
Report.ShowTitle is set to true.
# Report.Title = NetRecon Report Name
Report.FilterResources
This keyword tells Symantec NetRecon whether to filter report information by
specific computers. To filter information by computers, set this keyword to true.
# Report.FilterResources = True
Note: If Report.FilterResources is set to true and no Report.Resource keywords
are present, the report is blank.
Report.Resource
When Report.FilterResources is set to true, use this keyword to specify the
computers that go in the report. Use this keyword multiple times to specify
multiple computers. Use fully qualified domain names.
# Report.Resource = machinename.host.domain.com
Note: To get a fully qualified domain name for a computer, ping it using its IP
address and the –a option.
43
44 Using the Command Line Interface
Understanding .nrd files
Report.FilterVulnerabilities
This keyword indicates the vulnerabilities that Symantec NetRecon includes in
the report. When set to True, Symantec NetRecon filters the report vulnerabilities
that are included in the report using the Report.Vulnerability keyword. When
Report.FilterVulnerabilities is set to False, Symantec NetRecon reports all
available information.
# Report.FilterVulnerabilities = True
# Report.FilterVulnerabilities = False
Report.Vulnerability
This keyword specifies individual vulnerabilities to be included in the report
when Report.FilterVulnerabilities is set to True. Use this keyword to specify
single vulnerability names. Use this keyword multiple times to specify multiple
vulnerabilities.
# Report.Vulnerability = IP name obtained
# Report.Vulnerability = FTP access obtained
Note: If Report.FilterVulnerabilities is set to True and no Report.Vulnerability
keywords are present, the report is blank. Also, capitalization for keyword values
must exactly match the capitalization in the Symantec NetRecon vulnerability
descriptions.
Report.FilterRisks
This keyword indicates whether Symantec NetRecon filters recognized
vulnerabilities by risk level. To filter vulnerabilities that are contained in the
reports by risk level, set this keyword to True.
# Report.FilterRisks = True
Note: If you set this keyword to true, but do not use the necessary keywords to
specify what filters to use, your report contains all available information.
Report.SortRiskBy
This keyword indicates whether Symantec NetRecon filters vulnerabilities by risk
according to custom filters or preset filters. When you set this keyword to
Custom, use the Report.FilterBelow and the Report.FilterAbove keywords to
Using the Command Line Interface
Understanding .nrd files
customize your settings. When you set this keyword to Preset, use the
Report.FilterHighs, Report.FilterMediums, and Report.FilterLows keywords to
select the preset filter.
# Report.SortRiskBy = Custom
# Report.SortRiskBy = Preset
Note: When you set the Report.FilterRisks keyword to True, you must use this
keyword.
Report.FilterBelow and Report.FilterAbove
These keywords indicate your custom settings for filtering vulnerabilities by risk
level. Use these keywords when you set the Report.SortRiskLevel to Custom.
Symantec NetRecon uses number values to indicate the risk level of
vulnerabilities. These number values have a range of 0 to 100. Report.FilterBelow
indicates the upper limit of the number value that you want to use in your reports
while Report.FilterAbove indicates the lower value.
For example, if you want to include all vulnerabilities in your report that have
values falling between the number values of 0 and 55, you would set the
Report.FilterBelow keyword to 56 and the Report.FilterAbove keyword to –1.#
Report.FilterBelow = 56
# Report.FilterAbove = -1
If you want to include all vulnerabilities in your report that have values falling
between 45 and 100, you would set the Report.FilterBelow keyword to 44 and the
Report.FilterAbove keyword to 101.
Note: These keywords are necessary when Report.SortRiskLevel is set to custom
or your report is blank.
45
46 Using the Command Line Interface
HTML reports
Report.FilterHighs, Report.FilterMediums, Report.FilterLows
These keywords indicate preset vulnerability level filters. To include
vulnerabilities that Symantec NetRecon classifies as high, set Report.FilterHighs
to True. Do the same for the other keywords to get medium and low preset filters.
# Report.FilterHighs = True
# Report.FilterMediums = True
# Report.FilterLows = True
Note: This keyword is necessary when Report.SortRiskLevel is set to Preset or
your report is blank.
HTML reports
Symantec NetRecon has several new options in the CLI that lets users create
reports in HTML format. These options let you select the format of the report
and determine the report’s content. Selectable options include vulnerability,
computer name, vulnerability risk by number, vulnerability risk by color, and
other parameters.
Note: When Symantec NetRecon is run without the GUI, error messages that
would normally be presented in message boxes are logged to a file called
errors.log. This file is stored in the directory that is specified by the path string in
the registry key. Serious errors terminate the scan and generate an exit code other
than zero.
Symantec NetRecon™ v
CD Replacement Form
CD REPLACEMENT: After your 60-Day Limited Warranty, if your CD becomes unusable, fill out and return 1) this form, 2)
your damaged CD, and 3) your payment (see pricing below, add sales tax if applicable), to the address below to receive
replacement CD. DURING THE 60-DAY LIMITED WARRANTY PERIOD, THIS SERVICE IS FREE. You must be a registered
customer in order to receive CD replacements.
FOR CD REPLACEMENT
Please send me: ___ CD Replacement
Name __________________________________________________________________________________________________
Company Name __________________________________________________________________________________________
Street Address (No P.O. Boxes, Please)_________________________________________________________________________
City_________________________________________________________ State _______ Zip/Postal Code _________________
Country* ___________________________________________Daytime Phone _______________________________________
Software Purchase Date ____________________________________________________________________________________
*This offer limited to U.S., Canada, and Mexico. Outside North America, contact your local Symantec office or distributor.
Briefly describe the problem: ________________________________________________________________________________
CD Replacement Price
Sales Tax (See Table)
Shipping & Handling
$ 10.00
______
$ 9.95
TOTAL DUE
______
SALES TAX TABLE: AZ (5%), CA (7.25%), CO (3%), CT (6%), DC (5.75%), FL (6%), GA (4%), IA (5%),
IL (6.25%), IN (5%), KS (4.9%), LA (4%), MA (5%), MD (5%), ME (6%), MI (6%), MN (6.5%), MO
(4.225%), NC (6%), NJ (6%), NY (4%), OH (5%), OK (4.5%), PA (6%), SC (5%), TN (6%), TX (6.25%),
VA (4.5%), WA (6.5%), WI (5%). Please add local sales tax (as well as state sales tax) in AZ, CA, FL, GA,
MO, NY, OH, OK, SC, TN, TX, WA, WI.
FORM OF PAYMENT ** (CHECK ONE):
___ Check (Payable to Symantec) Amount Enclosed $ _________
__ Visa
__ Mastercard
__ AMEX
Credit Card Number _____________________________________________________________________ Expires __________
Name on Card (please print) ____________________________________ Signature ___________________________________
**U.S. Dollars. Payment must be made in U.S. dollars drawn on a U.S. bank.
MAIL YOUR CD REPLACEMENT ORDER TO:
Symantec Corporation
Attention: Order Processing
555 International Way
Springfield, OR 97477 (800) 441-7234
Please allow 2-3 weeks for delivery within the U.S.
Symantec and NetRecon are trademarks of Symantec Corporation.
Symantec Enterprise Security Manager and LiveUpdate are tradearks of Symantec Corporation.
Other brands and products are trademarks of their respective holder/s.
© 2002 Symantec Corporation. All rights reserved. Printed in the U.S.A.
Index
Symbols
.nrd files
definition 40
duration keyword 41
objective keyword 41
A
errors.log 46
ESM Registration Tool shortcut 23
Executive Summary report 18
G
granular objectives 12
Graph Pane 14
administration 26
administrative access 22
administrator, security 9
H
C
I
chart 14
Command Line Interface
hide option 38
infile 38
kill option 38
minimize option 38
outfile 38
registry option 38
sample commands 39
syntax 38
Control pane 10
import
NetRecon data into Enterprise Security
Manager 31
install 22
CD 22
integration module 29
intensity 11
D
Data Table Pane 14
Demo Mode 25, 27
denial of service 9
denial of service attacks 10
Detailed report 18
heavy scan 11, 41
L
license
change 26
key 25
light scan 11, 41
M
medium scan 11, 41
Microsoft Windows Network 16
E
N
Enterprise Security Manager integration module
install 29
use 29
Enterprise Security Manager, integration with 29
error messages 46
NetRecon policy 29
configure 30
run 31
NetWare Network 16
Network Neighborhood 16
network resources 25
50 Index
Network Resources tab 13
nrd files
scanwhat keyword 40
O
objective 11, 15, 19
Objectives tab 11
P
pane 10
Control 10
Data Table 14
Graph 14
objectives 10
password 9, 27
change 27
new 27
path analysis 16
personal profile 22
policies 10
policy, NetRecon 29
program window 10
progressive scan 19
R
records 14
report 17, 29
Detailed 18
executive summary 18
S
scan 15, 25
heavy 11, 41
intensity 11
light 11, 41
medium 11, 41
progressive 19
simulated 27
start 15
security 10
security administrator 9
serial number 25
services 9
shortcut
ESM Registration Tool 23
start scan 15
summary report 18
Symantec
NetRecon features 9
system
requirements 22
services 9
T
tab
Network Resources 13
Objectives 11
Vulnerabilities 14
trend analysis 29
U
unauthorized access 9
V
Vulnerabilities tab 14
vulnerability 9, 19
description 18
solution 18
W
weak passwords 9