1
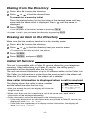
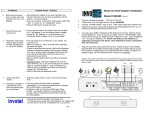
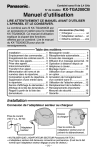
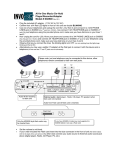
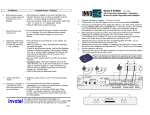
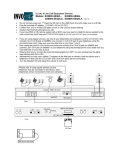
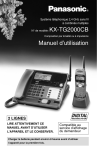
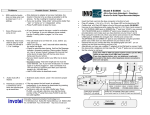
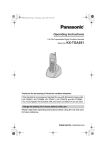
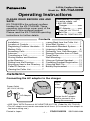
2.4GHz Cordless Handset
Model No.
KX-TGA400B
Operating Instructions
PLEASE READ BEFORE USE AND
SAVE.
KX-TGA400B is the optional cordless
handset for the KX-TG4000B. These
operating instructions cover most of the
features of this cordless handset.
Please read the KX-TG4000B operating
instructions for further details.
Accessories (included)
For extra orders, call
1-800-332-5368.
Charger .................one
AC Adaptor............one
Order No. KX-TCA1-G
Belt Clip.................one
Order No. PQKE10101Z1
Contents
Installation ................................... 1
Location of Controls..................... 2
Registering Cordless Handsets ... 3
Making Calls ................................ 3
Answering Calls........................... 4
Intercom....................................... 4
Transferring a Call ....................... 4
Storing Names and Numbers
in the Directory ............................ 5
Dialing from the Directory ............ 6
Erasing an Item in the Directory .. 6
Caller ID Service.......................... 6
Viewing the Caller List ................. 7
Calling Back from the Caller List .. 7
Voice Mail System ....................... 7
Automated Attendant System...... 8
Listening to Messages................. 9
Delivering Your Own Message ....10
Remote Operation from a Touch
Tone Phone .................................10
Wall Mounting..............................11
Using an Optional Headset..........11
Canceling Handset Registration ..11
Using the Belt Clip .......................12
Battery Replacement ...................12
Installation
Connecting the AC adaptor to the charger
Bottom
of the
charger
Power Outlet
(AC 120 V, 60 Hz)
AC Adaptor
Fasten the AC adaptor
cord to prevent it from
being disconnected.
• USE ONLY WITH Panasonic AC ADAPTOR KX-TCA1 (Order No. KX-TCA1-G).
• The AC adaptor must remain connected at all times. (It is normal for the adaptor to
feel warm during use.)
Printed in Japan
–1–
PQQX12631ZA SS0700NA1090
Charging the battery
Place the cordless handset on the charger and
charge for about 8 hours before initial use.
Make sure the handset faces forward as shown.
• The CHARGE indicator lights.
The battery
is beneath
this cover.
• If you charge the discharged battery, it will be
charged quickly. In that case the handset may
feel warm. This is normal.
CHARGE
• Recharge the battery when:
Indicator
– “Recharge” is displayed,
–“
” flashes on the display, or
– the handset beeps intermittently while it is in use.
Handset battery information
After your Panasonic battery is fully charged:
Operation
Approx. battery life
While in use (TALK)
Up to about 8 hours
While not in use (Standby)
Up to about 4 days
• Clean the charge contacts of the handset and the charger with a soft, dry
cloth once a month. Clean more often if the unit is subject to grease, dust or
high humidity. Otherwise the battery may not charge properly.
Location of Controls
Display
(TALK)
Navigator Key
( , , I, H)
(FUNCTION/EXIT)
LINE Buttons
(CLEAR)
Headset Jack
(ENTER)/
(Voice Mail)
(REDIAL/EDIT)
CHARGE
Indicator
Charge Contacts
(INTERCOM/HOLD/TRANSFER)
–2–
Charge Contacts
Registering Cordless Handsets
Registration is necessary for cordless handsets. A handset will be assigned
the number at registration. The handset number is used as the extension
number (p. 4, 8). You can register up to 8 cordless handsets at the
KX-TG4000B base unit.
Make sure that the base unit and cordless handset are in the standby mode.
Registration must be completed within 1 minute.
1
Base unit:
Press (FUNCTION).
7
2
Select “Registration” by
pressing
or
, and press H.
3
Select “HS registration” by
pressing
or
, and press H.
4
Cordless handset:
Press (FUNCTION).
5
Select “Registration” by
pressing
or
, and press H.
6
Press H to select “HS
registration”.
Base unit/Cordless handset:
Wait until a beep sounds and until
both of the displays show the
assigned handset number.
Press (EXIT).
• The handset number ([1]–[8]) is
displayed in the standby mode.
If a PIN (Personal Identification
Number) has been stored:
Follow steps 1 to 6, and enter the
PIN. Press (ENTER).
Making Calls
Four calls can be handled simultaneously on separate telephone lines by
the base unit and 3 cordless handsets (or by 4 cordless handsets).
1
Press (TALK).
2
3
Dial a phone number.
• You can press a line button instead of pressing (TALK).
To hang up, press (TALK) or place the handset on the charger.
• To adjust the receiver volume, press
or
while talking.
To dial after confirming the entered number:
Enter a phone number, and press (TALK).
• To redial a number from the redial list (contains the last 10 numbers dialed), press
(REDIAL) until the desired number is displayed, and press (TALK).
–3–
Answering Calls
Four calls can be handled simultaneously by the base unit and 3 cordless
handsets (or by 4 cordless handsets).
Press (TALK).
• You can press the called line button
instead of pressing (TALK).
• You can also answer a call by pressing
any dialing button (0) to (9), (*) or (#).
OR
If the handset is on the charger, just
lift up.
,
,
What “
display mean:
,
” on the
Off (invisible): The line is free.
On: The line is being used.
Flashing:
A call is on hold. The Automated
Attendant System or Answering
System is responding to a call.
Flashing quickly:
A call is being received.
• During a conversation, if two tones sound, an incoming call is being received on
another line. To answer the second call while holding the first call, press (HOLD)
and press the called line button. To return to the first call, press the line button.
Intercom
Each number assigned to a handset at registration is the extension number
(p. 3). The base unit extension number is 0.
Making intercom calls
1
2
3
Press (INTERCOM).
To page the base unit, enter (0).
To page another handset, enter the extension number ((1) to (8)).
To end the intercom, press (TALK) or place the handset on the charger.
• To answer an intercom call, press (TALK) or lift the handset off the charger.
Transferring a Call
1
2
During a call, press (TRANSFER).
To page the base unit, enter (0).
To page another handset, enter the extension number ((1) to (8)).
3
If required, wait for the paged party to answer, and you can announce
the transfer.
If not required, go to step 4.
4
To complete the transfer, press (TALK) or place the handset on the
charger.
–4–
Storing Names and Numbers in the Directory
You can store names and phone numbers in the directory. The cordless
handset can store up to 50 items. All directory items are sorted by the first
word in alphabetical order. Using the directory, you can make a call by
selecting a name on the display.
Make sure that the cordless handset is in the standby mode.
1
2
Press (FUNCTION).
3
Enter a name, up to 16
characters, using the dialing
buttons (see below).
Press H to select “Save
directory”.
• To move the cursor, press I or H.
4
5
Enter a phone number, up to 22
digits.
6
Press (ENTER).
7
Press (EXIT).
• To store other items, repeat from
step 2.
• To exit the programming mode any
time, press (EXIT).
Press (ENTER).
Selecting characters to enter names
The dialing buttons can be used to enter letters and symbols. Pressing each
button selects a character as shown below.
Keys
Index
Keys
Index
(7)
PQRSpqrs7
ABCabc2
(8)
TUVtuv8
(3)
DEFdef3
(9)
WXYZwxyz9
(4)
GHIghi4
(0)
0 blank
(5)
JKLjkl5
I
To move the cursor to the left.
(6)
MNOmno6
H
To move the cursor to the right.
(1)
#&’()
(2)
,-./1
• To enter another character using the same number key, press H to move the
cursor to the next space.
If you make a mistake while entering a name:
Press I or H to move the cursor to the incorrect character. Press (CLEAR)
to delete the character. Enter the correct character. To erase all characters,
press and hold (CLEAR).
–5–
Dialing from the Directory
1
2
3
Press I or H to enter the directory.
Press
or
to find the desired item.
To search for a name by initial:
Press the dialing button for the first letter of the desired name until any
name with the same initial is displayed. Press
until the name is
displayed.
Press (TALK).
• You can press a line button instead of pressing (TALK).
• In steps 1 and 2, you can leave the directory by pressing (EXIT).
Erasing an Item in the Directory
Make sure that the cordless handset is in the standby mode.
1 Press I or H to enter the directory.
2
Press
3
4
Press (CLEAR).
or
to find the directory item you want to erase.
• To search for the item by initial, see above.
Press (ENTER), and press (EXIT).
Caller ID Service
This unit is compatible with a Caller ID service offered by your telephone
company. After subscribing to a Caller ID service, the calling party’s
information will be displayed after the first ring.
The unit can record information of up to 30 different callers in the Caller List.
The Caller List information is sorted from the most recent to the oldest call.
When the 31st call is received, the oldest call is deleted.
How caller information is displayed when a call is received
The display shows the caller’s name, number
and the called line after the first ring.
• After you answer the call, the display will show the
length of the call.
TINA ROBINSON
1-000-222-3333
-----Line1------
• When more than one line is receiving a call at the same time, each caller’s
information will be displayed alternately.
• Caller information cannot be displayed in the following cases:
— If the caller dialed from an area which does not provide a Caller ID service, the
display will show “Out of area”.
— If the caller has requested not to display his/her information, the display will
show “Private caller”.
–6–
Viewing the Caller List
If you have received new calls, “Received calls” will be displayed in the
standby mode. Caller List information includes the caller’s name and phone
number, and the time and date the call was received.
Make sure that the cordless handset is in the standby mode.
1
Press
2
To search from the most recent call, press
To search from the oldest call, press
.
or
to enter the list.
• To scroll between callers, press
3
10 new calls
∨∧
H=Directory
• The number of new calls is displayed.
or
.
.
JACK SMITH
1-234-567-8901
3:10P JUN. 9
To exit the list, press (EXIT).
• If there is no name information for a caller, the display will only show the phone
number.
• After viewing all of the new call entries, “Received calls” will disappear.
What “√” means:
You have viewed a new call, answered the call or
called back the caller.
NANCY BROWN
1-000-222-3333
3:10P JUN.10 √
If a caller calls more than once:
The number of times the same caller called is
displayed (×2 to ×9). After checking, ×2 to ×9 will
be replaced with “√”.
Ex. The caller called 5 times.
NANCY BROWN
1-000-222-3333
3:10P JUN.10 × 5
Calling Back from the Caller List
1
2
Press
or
Press
or
desired caller.
3
Press (TALK).
• In step 2, if required, edit the phone
number by pressing (EDIT). The phone
number will be edited into one of 4
patterns as follows:
to enter the list.
to find the
Ex. 1-234-321-5555 ➝ 321-5555 ➝
• You can press a line button instead
of pressing (TALK).
➝ 234-321-5555 ➝ 1-321-5555
Voice Mail System
The Voice Mail System allows you to receive and deliver voice messages
using mailboxes. The unit accommodates one general delivery mailbox and
a maximum of 8 personal mailboxes which are assigned to the registered
cordless handsets. The mailbox numbers are the same as the handset
numbers.
The Voice Mail System works fully with the Automated Attendant System,
which routes incoming calls to a specified mailbox and allows a caller to
leave a message. With the Answering System, all calls are routed to the
general delivery mailbox.
(continued \)
–7–
You can use the Voice Mail System by accessing your mailbox. Each
cordless handset user can only access his/her own mailbox. The general
delivery mailbox is managed by the base unit user (operator). The cordless
handset users can access this mailbox.
You can also access the Voice Mail System features remotely from a touch
tone phone.
Setting the mailbox password
Assign a password to your mailbox to prevent unauthorized persons from
accessing your mailbox and listening to the messages remotely from a
touch tone phone. The preset password for each mailbox is a 4-digit number
using the mailbox number. (Ex. “1111” for Mailbox 1, “2222” for Mailbox 2)
You can stop unauthorized accesses to your personal mailbox from the
cordless handset using this password. If required, turn the direct handset
access mode OFF on your handset. Once you turn it OFF, no one can use
the
(Voice Mail) button features and access the mailbox without
entering the password. Your cordless handset comes from the factory set to
ON. Make sure that the cordless handset is in the standby mode.
1. Press (FUNCTION), and select “Voice mail” by pressing
or
, and
press H.
2. Select “Set password” by pressing H.
3. Enter a password using a 4-digit number (0000-9999), and press
(ENTER).
4. To turn the direct handset access mode ON, select “On” by pressing
or
. To turn the mode OFF, select “Off” by pressing
or
.
5. Press (ENTER), and press (EXIT).
Automated Attendant System
The automated attendant answers incoming calls and then routes the callers
to the base unit or the desired cordless handset.
The base unit plays the role of operator with the cordless handsets as the
extensions. Callers can reach desired mailboxes using this system to leave
messages.
Calling the automated attendant
Call is received.
Automated Attendant System
Caller presses the required
extension number ((1) to (8)) and (#).
Caller presses (0) and (#)
for the operator.
The extension (cordless handset)
answers.
The operator (base unit)
answers.
–8–
Setting the handset answer
mode
Recording a personal
greeting message
If you turn ON the answer mode of
your handset, calls will be greeted
with a greeting message (see on the
right) and callers can leave
messages in your mailbox. To take
calls, leave this mode OFF (factory
preset).
If the handset answer mode is ON,
callers will hear a pre-recorded
personal greeting message.
You can also record your own
greeting message of up to 2
minutes.
1
While the handset is in the
standby mode, press
.
• If the direct handset access mode
is OFF (p. 8), enter the mailbox
password and press (#).
• If you have new messages, listen to
all of them.
2
3
Press (5).
4
Press
To select ON, press (1).
To select OFF, press (2).
.
1
While the handset is in the
standby mode, press
.
• If the direct handset access mode
is OFF (p. 8), enter the mailbox
password and press (#).
• If you have new messages, listen to
all of them.
2
3
4
Press (3).
5
Press (2), and press
Press (1).
After the tone, talk clearly. To
end, press (1).
.
Listening to Messages
If “
” flashes and “Voice mail” is shown on your handset display, new
messages have been received in your mailbox. During playback “
” is
displayed.
Listening to new messages
1
While the handset is in the
standby mode, press
.
During playback:
• To adjust the handset volume, press
or
.
• If the direct handset access mode
is OFF (p. 8), enter the mailbox
password and press (#).
• New messages are played.
2
After listening to all new
messages;
To listen to all messages,
press (1).
To listen to messages in the
general delivery mailbox, press
(4).
To end the operation, press
.
To transfer a message to other
mailboxes:
While the message you want to
transfer is being played or before the
start of the next message, press (7).
Enter the destination mailbox numbers
using the corresponding dialing
buttons ((0), (1) to (8)), and press (#).
To erase a message:
While the message you want to erase
is being played or before the start of the
next message, press (3) or (CLEAR).
–9–
Delivering Your Own Message
You can send an identical message of up to 3 minutes, to several
mailboxes.
1
While the handset is in the
standby mode, press
.
• If the direct handset access mode
is OFF (p. 8), enter the mailbox
password and press (#).
• If you have new messages, listen to
all of them.
2
3
4
5
Press (#).
6
Press (2), and press
After the tone, talk clearly.
To end recording, press (1).
.
Press (2).
Enter the destination mailbox
numbers using the
corresponding dialing buttons
((0), (1) to (8)).
Remote Operation from a Touch Tone Phone
You can access the Voice Mail System from any touch tone phone if the
Automated Attendant System or the Answering System is on for any of
lines. You can listen to recorded messages in your mailbox and the general
delivery mailbox. When you access your mailbox, you are required to enter
the mailbox password (p. 8).
How to access the Voice Mail System
Call the line’s phone number to which the Automated Attendant
System or the Answering System is assigned.
Press (*) and enter your mailbox password during or
after the greeting message.
After the number of new messages is announced, new messages will be
played.
To end the remote operation, press (*) and hang up.
• After each message playback, you can select options by following the voice menu
(guidance). After all new messages have been played, you will hear a different
menu.
• Press buttons firmly.
– 10 –
Wall Mounting
The charger can be wall
mounted.
Install screws using the
wall template on the right.
Connect the AC adaptor.
Mount the charger, then
slide it down.
Wall
Template
Screws
3 cm
(13 16˝ )
To Power
Outlet
3 cm
(13 16˝ )
Using an Optional Headset
Plugging an optional headset into the cordless handset allows a hands-free
phone conversation. Please use only the Panasonic KX-TCA88 headset.
To order, call the accessories telephone number on page 1.
Connecting the headset to the cordless handset
Open the headset jack cover, and connect the headset to the headset jack
as shown.
When the headset is
connected, make sure
to use the headset to
talk with the caller. If
you want to have a
normal cordless
phone conversation,
disconnect the
headset.
Headset Jack
Canceling Handset Registration
Make sure that the base unit and cordless handset are in the standby mode.
Base unit:
1. Press (FUNCTION).
2. Select “Registration” by
pressing
or
, and press H.
3. Select “Deregistration” by
pressing
or
, and press H.
4. Press H or I to move the cursor
to the handset number to be
canceled.
5. Press (ENTER).
6. Press (CLEAR), and press (EXIT).
Cordless handset:
1. Press (FUNCTION).
2. Select “Registration” by
pressing
or
, and press H.
3. Select “Deregistration” by
pressing
or
, and press H.
4. Press (CLEAR), and press (EXIT).
– 11 –
• [–] is displayed.
Using the Belt Clip
You can hang the cordless handset on your belt or pocket using
the belt clip.
To attach the belt clip
To remove the belt clip
Battery Replacement
If “Recharge” is displayed and/or “
” flashes on the display after being
fully charged, replace the battery with a new Panasonic
HHR-P506 (PQHHR150AA21) battery. To order, call the accessories
telephone number on page 1.
1
Remove the cover by sliding
while pressing the arrow.
2
Replace the battery, and close
the cover. Be sure to charge the
new battery for about 8 hours.
• After replacing the battery or re-connecting the battery plug,
be sure to place the handset on the charger until a confirmation
tone sounds or the battery strength prompt displays.
• The handset battery is a Nickel-Metal Hydride battery. You cannot recycle this
battery.
CAUTION:
To reduce the risk of fire or injury to persons, read and follow these instructions.
1. Use only the battery(ies) specified.
2. Do not dispose of the battery(ies) in a fire. They may explode. Check with local
waste management codes for special disposal instructions.
3. Do not open or mutilate the battery(ies). Released electrolyte is corrosive and may
cause burns or injury to the eyes or skin. The electrolyte may be toxic if swallowed.
4. Exercise care in handling batteries in order not to short the battery to conductive
materials such as rings, bracelets, and keys. The battery and/or conductor may
overheat and cause burns.
5. Charge the battery(ies) provided with or identified for use with this product only in
accordance with the instructions and limitations specified in this manual.
– 12 –
WARNING:
TO PREVENT FIRE OF SHOCK HAZARD, DO NOT EXPOSE THIS
PRODUCT TO RAIN OR ANY TYPE OF MOISTURE.
FCC and Other Information
When programming emergency numbers and/or making test calls to emergency
numbers:
1. Remain on the line and briefly explain to the dispatcher the reason for the call
before hanging up.
2. Perform such activities in the off-peak hours, such as early morning hours or late
evenings.
This device complies with Part 15 of the FCC Rules. Operation is subject to the
following two conditions: (1) This device may not cause harmful interference, and (2)
this device must accept any interference received, including interference that may
cause undesired operation.
Privacy of communications may not be ensured when using this phone.
CAUTION:
Any changes or modifications not expressly approved by the party responsible for
compliance could void the user’s authority to operate this device.
Note:
This equipment has been tested and found to comply with the limits for a Class B
digital device, pursuant to Part 15 of the FCC Rules. These limits are designed to
provide reasonable protection against harmful interference in a residential
installation. This equipment generates, uses, and can radiate radio frequency energy
and, if not installed and used in accordance with the instructions, may cause harmful
interference to radio communications. However, there is no guarantee that
interference will not occur in a particular installation. If this equipment does cause
harmful interference to radio or television reception, which can be determined by
turning the equipment off and on, the user is encouraged to try to correct the
interference by one or more of the following measures:
— Reorient or relocate the receiving antenna.
— Increase the separation between the equipment and receiver.
— Connect the equipment into an outlet on a circuit different from that to which the
receiver is connected.
— Consult the dealer or an experienced radio/TV technician for help.
Panasonic Consumer Electronics Company,
Division of Matsushita Electric Corporation of America
One Panasonic Way, Secaucus, New Jersey 07094
Panasonic Sales Company,
Division of Matsushita Electric of Puerto Rico, Inc.
Ave. 65 de Infantería, Km. 9.5, San Gabriel Industrial Park
Carolina, Puerto Rico 00985
Panasonic World Wide Web address: http://www.panasonic.com
Panasonic’s e-mail address for customer inquiries:
[email protected]