1
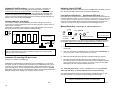
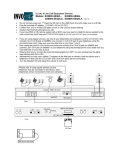
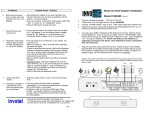
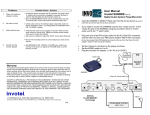
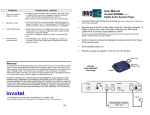
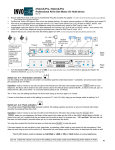
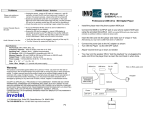
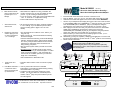
Problems
6.
MOH works but audio
does not stop when call
is picked up in 1 or 3
settings.
Possible Cause / Solution
Model # SX8600
• Wire distance to adapter is too long, Centralize the
location of device to be as close as possible to all the
phones. Try the 2 setting for maximum power.
• If you are re-wiring “daisy chain” wiring works better than
” star” or “home run” or Independent wiring
• Press FLASH button to stop the music.
•
•
•
•
7.
8.
Some Phones work ,
some do not
Randomly Hold music
starts to play by it self
or does not activate in
1, 2 or 3 settings
• All your phones need to be same model for activation
in 1 or 2 settings. If you mix different phone models,
Use the 3 setting (refer to pages 3 or 4 for more
details)
• The call needs to be on Hold min. 2 sec. before you
•
•
•
Audio shuts off or
flickers
•
the same line again.
Check for extra devices sharing that line like Message
indicator, Answering machine, Alarm system, Modem
etc. Use a “privacy module” between the line and that
extra device to keep them off the line when line is
being used by your phone.
Set your Alarm system and/or your DSL line to share
FAX line.
Excessive wiring- Total wire length per line must be
under 500 feet ( Ex: if you have 9 wall jacks -no matter
spare or a phone plugged in- each connected via a
100 foot wire to a common point then your total wire
length is 9 x 100=900 feet )
Use FLASH button to deactivate music.
• Extensive audio volume. Lower the volume to proper
level.
Insert the Flash card into the blue connector in the front of unit.
Plug AC adapter (110V AC to 12V AC), the Green LED on the back turns ON.
Confirm that all 4 Red LED lights in front of this unit are double BLINKING
Use one of your telephones and unplug the cord for L1/L2 from it and connect it
st
to 1/2/3 PHONE LINES jack on SX8600 (the 1 jack from 12VAC), now connect
rd
1/2/3 TELEPHONE jack on SX8600 (3 jack) to your telephone using the
provided phone cord, make sure you have dial tone on your lines 1 and 2
Now unplug the cord for L3/L4 from your phone and connect it to 3/4 PHONE
LINES jack on SX8600 (the 2nd jack from 12VAC) and connect 3/4
th
TELEPHONE jack on SX8600 (4 jack) to your telephone using the provided
phone cord, make sure you have dial tone on your lines 3 and 4
Observe that as you connect the lines the blinking lights turn OFF. (on non
existing lines the lights keep blinking and that is OK)
• When you hang up, wait 2 seconds before selecting
•
9.
•
may pick it up.
•
•
Alternatively you may use a splitter (T adapter) at the Wall jack to connect both
rd
th
this device and a telephone (in that case the 3 and 4 jacks are not connected)
Set the volume to mid level.
If you have PBX or KSU type phone system connect just the WALL
JACKs to input side of your PBX lines in parallel.
If you have regular phones, only one telephone is optionally
connected to this device, other telephones remain connected to
their own wall jacks.
110 V
3/4
VOLUME
REC
BANK
Innovative Telecommunication Technology LLC.
1112 Montana Ave Suite 250 Santa Monica, CA 90403 USA
Tel: 310-899-0078 Fax: 310-857-6401
AUDIO
TEST
SWITCH
ABC 12 3
PHONE PHONE
inadvertently, it can always be deactivated by pressing
the FLASH button in any setting.
• Conference calls can be done a better way: Press
FLASH, you will get a dial-tone now dial the phone
nd
number of the 2 party then press FLASH to join the
two calls together.
http://www.invotel.com
P16
1/2
Microphone IN
10. Hold Music activates in • If for any reason the hold music is activated
a conference call or
when two phones pick
up at same time
Rev 25.8
All-In-One Auto Attendant + Greeting +
Music-On-Hold Player/Recorder/Adapter
STATUS 1 2
WALL
JACK
WALL
JACK
L3/L4 L1/L2/L3 L3/L4 L1/L2/L3 12VAC
TELEPHONE
PHONE LINES 600ma
Audio IN for recording
Ring OUT in B setting
L1 L2
Audio OUT to headset (Flash card in place)
Live Audio Input for On Hold (if Flash card removed)
Flash Card
L3 L4
Connection Test: To confirm that everything is connected correctly, select line 1 on the
phone, confirm that L1 Red LED on SX8600 (left most LED) turns ON, then press the L1
Audio Test button to hear the audio. Double check your connections or adjust the volume if
needed.
Switch setting: Please Read the Operation instructions for each setting carefully
There are two 3 position switches on the SX8600 that control the operation of the device:
A BC
Music On Hold only
C SX8600 does not answer the calls. Ringing lines are answered live by you.
SX8600 provides music on hold functions when calls are placed on hold.
B
Greetings + Music On Hold
(see pages P6, P14 for more details)
In “Day Mode” SX8600 answers the lines, plays the “Day greeting”, then
takes the calls to “on Hold” until calls can be handled. It also provides music
on hold functions when calls are placed on hold.
In “Night Mode”, SX8600 does not answer Line 1, but answers L2, L3, L4
with “night greeting” before taking the calls to “on Hold”
Trouble Shooting:
Problems
1.
Adapter not working
or stopped working
Unplug the 12VAC plug from the back of the Invotel
adapter and unplug the phone lines; Wait 60 seconds
then plug them back in, make sure the AC adapter is
plugged in securely.
2.
Adapter does not
activate or stopped
activating
telephone was changed or power failure - do as above,
then select L1, L2, L3, L4 making sure that dial tone is
there.
3.
Red LED double
blinks ON then turns
OFF on some lines
Some phone Lines are removed from MOH adapter or do
not exist. on non existing lines the lights keep blinking and that is
OK)
4.
No Audio
or
Audio not Loud
enough
Select the line 1 on the phone and push the Audio Test
button located in the back of unit to hear the Audio, adjust
the volume if needed to hear it. Check the flash card,
Unplug -Plug back IN.
5.
Audio Test is OK
but no audio when
Hold is pressed in
1 2 or 3 settings .
• If answering a call allow 1 second before pressing Hold.
Auto Attendant + Greeting + Music On Hold
A
1 2 3
In “Day Mode” SX8600 answers the lines 1st , plays the day greeting then
rings the lines again, if the calls are not answered they are taken to “on
Hold” until they can be handled, SX8600 keeps ringing the lines at 1 minute
intervals (for up to 30 minutes) before letting them ring continuously.
It also provides music on hold functions when calls are placed on hold.
In “Night Mode” SX8600 answers the lines 1st , plays the night greeting then
rings the lines continuously. (see pages P6, P14 for more details)
Hold or Flash button activation
Possible Cause / Solution
Un-plug phone lines for 5 seconds and plug it back in .
• You may need your “Local service” with the dominant
rd
phone company in your area (not 3 party local service)
see page 3 & 4 for full details
• Is your location within city limits? are all your phone
numbers DSL qualified? your location may need to be
close enough to your phone company’s central office to
guarantee for Hold button activation. That is why some
discount phone companies service does not work even
though you have compatible phones for Hold activation.
Flash button activation
see page 4 for full details
Hold button activation
see page 3 for full details
Regular 1 to 4 line telephones have differences when it comes to Music-On-Hold activation
compatibility, some models work by just pressing HOLD button some work via Flash then
Hold, this switch lets you find out which setting works best for your telephones.
IMPORTANT NOTE: The audio may activate in the middle of a call due to factors
like excessive wiring (see page 12 item 8), bad or old wiring , existing unstable lines,
sparks, too many wall jacks , Noisy phone lines, Bad telephones, “Hot Lines” (see P6
special cases) If that ever happens, press the FLASH button to stop the audio! and
continue your conversation. The FLASH button is found on every telephone, it could
be labeled as CALL WAIT / FLASH or LINK or ON or TALK button
Audio Test on Line 1: select L1 on your phone and press the Audio Test located next to
power connection . Adjust the volume to mid level or check the FLASH card to hear the audio.
Note1: You can not perform audio test on lines 2, 3 or 4
Note2: Do not set the volume too loud it may flicker or shut off the on-hold audio.
Note3: Do not use a Cell phone to setup or test the device. Use a fax line, etc.
ii
P2
• Use the device in position 3 setting via Flash then Hold.
• Some telephones need other settings (see page 6).
In A setting calls are Answered then hangs up? This is because SX8600
requires the 3 way calling service enabled from your phone company in order to ring the
lines again, also make sure “1st person cutoff ring back protection” is working on your 3
way call service, some phone companies like ATT may not provide this service, if so use
the B setting instead; In B setting calls are answered but not ringed again; a simulated
Ring can be heard from Audio IN /Ring OUT jack via a connected amplified speaker.
see page P6 for details on B setting operation. (or use C setting if you answer calls Live)
DSL: If you have DSL line, this device needs to be installed after
the DSL filter (otherwise internet may not work properly)
VOIP/Vonage: if you have D-Link VTA-VD phone adapter, you
must use single line phone cords to connect it to SX8600
P15
Music on hold activation:
Notes: Day/Night mode, Auto attendant and Greetings:
BANK
2
Bank1 / Bank2
Bank1 contains the “Holiday Format” and Bank2 contains the “Normal Format” hold
music (normally switch is in Bank 2 unless you record your flash card differently).
Use the bank switch any time to select between these two productions.
Day Mode / Night Mode: In switch positions A or B in which the device answers the
lines, set to “Day Mode” during day and “Night Mode” during the night as follows:
1)
2)
3)
4)
5)
Select Line 1 you will get dial tone
Press FLASH you will get dial tone
Press FLASH you will get dial tone again
Press #
you will get a prompt “device is set to Day mode” or “device is
set to Night Mode”
Hang up
Day Greeting: This message is heard when the device answers the lines
in “Day Mode” it can be up to 30 seconds.
activation in Positions 1 or 3 via just Hold
Start with position 1, make or receive a real call, the LED on the SX8600 turns ON
solid, then simply press the HOLD button on your telephone, the Music will be
heard to the caller and the LED on the SX8600 will start to BLINK , to return to the
call just re-select that line. (Be sure to allow 1 or 2 seconds before putting a call on
HOLD). If it did not work hang up and then try it again 2 or 3 times.
Position 3: if after a few tries it is not working hang up and change the switch to
position 3 and try it a few times.
Deactivating hold music manually If for any reason the hold music is activated inadvertently,
it can be deactivated by pressing the FLASH button
The following are examples of phones that work in position 2 or 3 via Flash then Hold:
American Venture, ATT 962, ATT 972, Casio any model , Airway 2 line, Airway 4 line,
Panasonic KX-TG 2000B, KX-TG4000B, KXTG2000, KX-TG2720, KX-TG2730, KX-TG2740,
KXTG4000, KX-TGA200, KXTGA400, KX-TGA420, SBC 410,
List of corded regular phones compatible via Hold Button activation:
Night Greeting: This message is heard when the device answers the lines
in “Night Mode” it can be up to 30 seconds.
Transfer Message: This message is heard just before the line is going to
ring again, like “please hold while we transfer your call” it can be up to 4 seconds.
All greetings, messages and the Hold Music are stored on the same Flash card
Examples of typical office use:
If you do not want any greeting stuff just set the switch to C and use the device just
for Music-on-hold function. The other switch is usually in Bank2 for “Normal Format”
Example of a day greeting: “...Thank you for calling XYZ......please hold for a
representative...”
to disable the auto attendant, flip the switch to C (SX8600 does
not answer the calls so your answering machine/service can take a message), or set the
Mode of operation to Night mode, in this case when the device is in A setting it will
play your “night or after hours greeting.. we are not available at this time please leave
a message then it rings so that your answering machine will take a message; and if
the device is in B setting it does not answer the calls to let your answering take them.
Example of a night greeting: ...our office is now closed... our normal office hours
are...please stay on the line to leave a message... ; set your answering machine or
nd
rd
voice mail service to answer at 2 or 3 or higher ring so when the device rings the
lines again it can take the message.
iii
1 2 3
P14
Please note: This is a partial list, there are other factors relevant to activation via Hold button in
these settings-see-the trouble shooting section or special setting, If your phone is not on this list
try it any way or use the setting 2 or 3 that works on all phones via Flash then hold.
AT&T: 21070, 262, 272, 412, 422, 4952, 612, 622, 712, 722, 732, 742, 752, 812, 822, 830,
832, 842, 843, 853, 854, 874, 902, 912,922, 944, 945*, 952, 953, 954, 955, 964,
974*,984*, 982, 992, SIGNATURE, FT483 (* rev prior to 11/2006)
Brother Quatro: 412
Bell: 223, 232, 259, 261, 268, 367, 470, 52905, Sonecor 412, 412CID, 4900, BE5200,
BE5300, Techline 420
Bell South 225, 420 (most compatible phones & guaranteed Hold button activation)
[these phones are available at http://www.invotel.com]
GE: 187, 2-9315-A, 2-9318, 2-9435-A -B -C, 2-9436-A, 2-9438-A, 2-9450-A -B -C -D -E F, 2-9439-A to -EGL, 2-9451A, 2-9481, 2-9487GE2-A, 2-9488, 2-9638-A, 2-9975, 29488GE2-A
IBM: 412, 412CID, 4900
Northern Telecom: Unity
Phonemate: PMG-4600
Panasonic: KX-T3110 3120 3122 3135 3145 3155 3160 3165 3170 3175 3280 3980-H
3980-R7 3981, KX-TC930, KX-TS20, KX-TS21, KX-TS25, KX-TS27, KX-TS208, VA-8400
Radio Shack: 206, 208, 209, 210, 212, 411, 412, 612, 43-373D, 43-430, 43-642, ET-180,
43-470, ET-184, ET-192, ET-193, 43-622, 43-469 , 1710, 1753
RCA 25403 RCA, 25413, 414,415 RCA-2, all models including cordless portion.
Sony: IT-M804
SBC: 2105, 4000, 225, 420
Southwestern Bell: FT325, FT360, FT365BL FT383, FT412, FT483, FT484
Sprint/Radio Shack: SP-702 / 43-5702, SP-705
TT Systems: 4012, 412, 412CID, 4900, 4300, 5100, 5200, 5300, 7993
Vtech: 4121
P3
Music on hold activation:
1 2 3
Definitions of files:
To deactivate just re-select that line and press FLASH
There are 5 audio files that are recorded in the SX8600, these are:
•
Day Greeting
•
Night Greeting
•
Transfer Message
•
On hold in Bank 1
•
On Hold in Bank 2
Voice Deactivation: if the call has been on Hold at least a few seconds, it can
also be deactivated by just speaking over the Audio for example say : “Hi I am
Back” .
What is a Greeting file ?
Greeting is a short audio that is played by the SX8600 when it answers a ringing line,
it is like an introduction and plays one time - more details on P14
If for some reason you are not able to voice -deactivate, try speaking a little
louder and more direct into the microphone. Remember you can always use the
Flash button to deactivate the audio as well.
What is an On Hold file ?
The on Hold file is the audio that SX8600 plays when the calls are kept on Hold
either after the greeting is played or when ever you place the calls on Hold.
This is a longer audio usually 2-8 minutes that encourages the callers to stay on the
line and not hang-up and repeats automatically when it ends.
activation in Positions 2 or 3 via Flash then Hold
Hang up and set the switch to middle or right most position
To activate: press FLASH then HOLD
Want to use just one button ? Press FLASH to activate MOH and when
ready to go back to caller just speak over the audio!. Or press Flash again.
Note: this does not hold the line so the other party may still hear you, set the
volume louder to mask it.
What is Bank1 or Bank2 ?
SX8600 can store two on Hold file as explained above into a Bank1 and a Bank 2
For example one audio file with Holiday back ground music in Bank1 and another
audio file with normal (not holiday) back ground music in Bank2.
The Bank1 /Bank2 switch lets you play either one on the Fly. This is convenient
during holidays or if you want to create Variety with an easy flip of a switch.
In position 2 the device works only via Flash then Hold, in position 3 the device
works via Flash then Hold or just Hold (if you have a compatible phone). This
mode of operation is useful when you have mix of phones that some are
compatible with Hold only activation and some activate via Flash then Hold.
How do I record my greetings? See pages P5, P6
Note that since Flash button is used in this case to activate the audio you need
to use Flash -Flash for things like: Call waiting , 3 way calling, Centrex Call
Transfer
Example ( for positions 2 or 3 ) to answer a call waiting call press
FLASH
How do I record my On Hold stuff ? see pages P9,P10
FLASH
Example (position 2/ 3 ) to make a 3 way or conference call press FLASH FLASH
you will get a dial-tone now dial the desired phone number & press FLASH FLASH
to join the two calls together.
NOTE: If you have “Call Waiting” service, only one call may be placed on
Music-On-Hold, the other call is held in the phone company central office in
silence not in your office.
I have a Custom MP3 file for Music/Message On Hold , How do I load it ?
connect your PC to Audio IN (see pages P9,P10)
How can I answer the calls live, with Music On Hold ?
Flip the switch to C
How do I ensure my answering machine/service takes a message when I leave?
There are several ways, 1) you may just flip the switch to C when you leave, 2) You
may set the device to Night Mode (see page P14) when you leave, then set it back to
Day Mode when you arrive in the morning. 3) You may plug the device AC adapter to
a power strip and just flip it off when you leave (device always powers up in Day
Mode when power is restored in the morning)
Tip: If you have audio flicker problem , Reduce the Volume
P4
iv
How do I get a Custom professional greeting and On Hold message?
Contact your Re-seller or (Invotel for a referral), a custom program can be provided
to you pre-loaded in a new Flash card for an easy exchange with your existing flash
card.
P13
Specifications:
Auto Attendant operations: refer to page 1 for connections
make sure switch is in A or C (not B)
File Formats supports any sound file format such as Windows .wav, MP3,
WMA, etc.
Frequency response 20Hz to 20 KHz.
Sampling rate 8-bit/16-bit uncompressed PCM @ 8, 11, 12, 16, 22, 24, 32, 44
& 48 KHz
Distortion less than 0.1% THD
Audio Quality supports better than CD Quality at 188 KB/s
Special effects: supports Windows Media Files and SRS WOW Effects
Memory Capacity 1 to 34 minutes (17 minutes @ full 188 KB/s sample rate).
Memory Type Multi-level Flash, 100 years retention time at no power, 100K rerecordable
Playback auto-repeat
Message loading Email load, automatic via playing the email; CD load
automatic
Power supply 110VAC 60 Hz. To 12VAC 600ma
Audio output 1000 mili watts, Mono RCA , 2V p-p @ 8Ω 4V p-p @ 600Ω, 8V p-p
@1200Ω
Size 5.5” x 4” x 1.5” (L x W x H) Color Metallic Blue
Weight 1.50 pounds (2.00 pounds with power supply)
To Hear the current greetings:
•
•
•
•
set the bank switch to bank 1 for day greeting or bank 2 for night greeting
remove the Microphone (usually RED color connector) from MIC IN jack
remove the recording cord from the Audio IN jack
connect the head set to Audio Out Jack or make a call and place yourself on Hold,
adjust the volume level if needed so you can hear the on hold stuff.
•
Press and hold the REC button for about 5 seconds till the Green status light turns
OFF, now release the REC button and you will hear the current greeting.
To Hear the current Transfer message:
•
•
To Record a new Greeting via Microphone: (this will erase the current greeting)
•
•
Package Content:
SX8600 Digital Player/Recorder/adapter unit
Power adapter 110v AC to 12v AC 600 ma
3.5mm male to 3.5mm male audio cord 6’
2 Rj-14 phone cords
User’s Manual
MX9008 or MX9017 Flash Card
Microphone/Headset
•
•
•
Warranty
This product is warranted against defects for a period of Five (5) year from the date of original
invoice. We will repair/replace the Product with no charge for parts or labor within this time. To
obtain warranty service the Product needs to be returned fright prepaid by the customer with a
copy of original invoice. This warranty does not apply if in the sole opinion of Innovative
Telecommunication Technology LLC, the product has been tampered with or damaged by
lightning or any other acts of nature, misuse, neglect or unauthorized service.
EXCEPT AS SPECIFICALLY PROVIDED IN THIS AGREEMENT, THERE ARE NO OTHER
WARRANTIES, EXPRESSED OR OTHERWISE,INCLUDING, BUT NOT LIMITED TO ANY
IMPLIED WARRANTIES OR MERCHANTIBILITES OR FITNESS FOR A SPECIAL PURPOSE.
IN NO EVENT SHALL INNOVATIVE TELECOMMUNICATION TECHNOLOGY LLC BE LIABLE
FOR LOSS OF PROFITS OR BENEFITS, INDIRECT, SPECIAL, CONSEQUENTIAL OR
OTHERWISE ARRISING FROM ANY BREACH OF THIS WARRANTY OR OTHERWISE.
set the bank switch to bank 2, remove & make the connections as above.
Press and hold the REC button for about 5 seconds till the Green status light turns
OFF, Hold it pressed 5 more seconds till the Green turns back ON, now release the
REC button and you will hear the current transfer message.
set the bank switch to bank 1 for day greeting or bank 2 for night greeting
connect the Microphone to MIC IN jack (usually RED color connector)
you may optionally connect the recording cord to Audio IN jack (if you want to
record a back ground music)
connect the head set to Audio Out Jack or make a call and place yourself on Hold,
adjust the volume level if needed so you can hear the on hold stuff
Press and hold the REC button for about 5 seconds till the green status light turns
OFF, now release the REC button , Green and RED begin turning ON/OFF
continuously to indicate it is ready to start recording. [to abort remove Mic]
Press the REC button to start recording your new greeting and begin speaking into
the microphone (you have up to 30 seconds), press REC again when you are
finished, it will re-play it for you, while re-playing you may press REC again to rerecord, when you are done let it play the final recording for you and do not press
REC and it will automatically exit to normal ON hold playback. Remove Mic.
To Record a new Transfer message via microphone: (this will erase the current one)
•
•
•
set the bank switch to bank 2, make the connections as above.
Press and hold the REC button for about 5 seconds till the Green light turns OFF,
Hold it pressed 5 more seconds, the Green turns back ON, now release the REC
button , Green and RED begin turning ON/OFF continuously to indicate it is ready to
start recording. [to abort remove Mic]
Press the REC button to start recording your new transfer message and begin
speaking into the microphone (you have up to 4 seconds), press REC again when
you are finished, it will re-play it for you, while re-playing you may press REC again
to re-record, when you are done let it play the final recording for you and do not
press REC and it will automatically exit to normal ON hold playback. Remove Mic.
•
v
P12
See pages P9, P10, P11 to Record your “on Hold” stuff
P5
To Record a new day or night greeting from PC, CD player, etc.
•
•
•
•
•
Other settings:
set the bank switch to bank 1 for day Greeting or Bank 2 for night greeting
remove the Microphone from MIC IN jack
connect the recording cord to Audio IN jack
connect the head set to Audio Out Jack or make a call and place yourself on Hold,
adjust the volume level if needed so you can hear the on hold stuff
Press and hold the REC button for about 5 seconds till the Green status light turns
OFF, now release the REC button, Green and RED begin turning ON/OFF
continuously to indicate it is ready & waiting for incoming audio [to abort remove
recording cord], now start your audio from your PC etc. Recording starts
automatically, RED stays ON, when audio finished press REC button to stop it.
To Record a new transfer message from PC, etc.
•
•
•
•
•
set the bank switch to bank 2
remove the Microphone from MIC IN jack
connect the recording cord to Audio IN jack
connect the head set to Audio Out Jack or make a call and place yourself on Hold,
adjust the volume level if needed so you can hear the on hold stuff
Press and hold the REC button for about 5 seconds till the Green status light turns
OFF, hold it pressed 5 more seconds till Green turns back ON, now release the
REC button, Green and RED begin ON/OFF continuously to indicate it is ready &
waiting for incoming audio [to abort remove recording cord], now start your audio,
RED turns ON, when audio finished press REC button to stop it.
Auto Attendant and greetings:
You may pick up the line any time for immediate connection to the caller. If you later place
the call on Hold the music on hold function continues to operate until the call is hanged up.
In B setting the device answers the lines then it plays the day greeting (if the device is in Day
Mode) it then takes the call to “On Hold” for up to 20 minutes, blinking the LED lights on the
unit fast to indicate the call is on Hold / waiting for you to take it ( If you prefer not to look at the
LED lights, just estimate how long the greeting takes and pick up the line or connect speakers
to “Audio IN/Ring OUT” jack to hear a simulated BEEP /RING)
If the device is set to Night mode, it does not answer the calls on L1, so the answering
machine or voice mail service can take a message, However it answers L2...L4 with your Night
greeting..e.g. our office is closed please call back etc. You can change these setting and there
are choices for continuously ring back or Beeping via speakers (see P7 for more options)
If audio activates suddenly in 3 switch settings , your lines may be “too
powerful” Try 1 setting.
MX9008 / MX9017 Flash Cards
The MX9008 or MX9017 is a Flash card usually pre-recorded with the audio prior to
your installation and it holds the audio all the time even if power is removed. When
the power is restored the play back automatically resumes from the card. This
device is designed for automatic player turn OFF once the flash card is removed, and
automatic turn ON when the flash card is re-inserted. If you had any trouble remove
the power by un plugging the AC adapter from the player, Install the new flash card,
then re-apply the power.
Unlike other Flash based cards that compress the audio, voice and audio signals are recorded
directly into solid state memory in the MX9008 card in their natural, un-compressed form,
providing superior quality voice and music
Message Duration: There is a total of 7.5 minutes available for recordings of Bank1
and Bank2 with MX9008 card and 16 minutes with MX9017 card.
BANK Selection: There are 2 Banks in SX8600, BANK1 & BANK2 - one Bank holds
the primary audio file, the other BANK holds the extra audio file(optional) such as
“Holidays”, special events, weekend special sales, promotions, etc. You can switch
from Bank1 to Bank2 or vise versa any time via the BANK selection switch.
To Record /Update your “On Hold” audio please refer to Manual recording in
page P9, this method uses the Audio IN jack for best audio quality
If you still want to record the “on Hold” audio from Microphone that is possible as
follows:
To Record a new On Hold audio via Microphone: (this will erase the current one)
In A setting the device answers the line and plays the day / night greeting , if it is set to day
mode it then rings the same line again to see if you want to take it or not, if you did not, it takes
the caller to “On hold” automatically playing the on hold messages, at any time you may pick up
the line to talk to the caller. (the call is kept on hold for up to 30 minutes). Every minute the
device rings that line again to remind that you still have a call on Hold, it will also play a short
transfer message each time it is about to ring the line, such as “Your call is Next” or “please
stay on the line while we transfer your call” at the end if you still did not take the call it will ring it
through that line continuously until the call is answered; you may place the call on Hold for
Music On hold at any time thereafter.
If the device was in Night mode, it just rings the same line continuously after the initial night
greeting until your answering device or voice mail service takes a message.
The day or night greeting messages (each up to 30 seconds long- is a good way to provide the
repeat information like office hours, web site address, etc.)
see the programming section to change the number of rings or to play/record the greetings etc.
vi
P6
•
•
•
•
•
set the bank switch to bank 1 for “On Hold in bank 1” or bank 2 for “on Hold in Bank 2
connect the Microphone to MIC IN jack (usually RED color connector)
you may optionally connect the recording cord to Audio IN jack (if you want to record a
back ground music)
connect the head set to Audio Out Jack or make a call and place yourself on Hold,
adjust the volume level if needed so you can hear the on hold stuff
Press and release the REC button, Green and RED begin turning ON/OFF
continuously to indicate it is ready to start recording. [to abort remove Mic]
Press the REC button to start recording your new On Hold audio and begin speaking
into the microphone (you have up to 16 minutes depending on the flash card), press
REC again when you are finished, it will stop recording and will start playback of that
bank continuously. To re-record, press REC start all over. Be sure to remove Mic. &
recording cord (if any) when done.
P11
Programming number of Rings and Ring through times:
Manual BANK2 Recording:
The SX8600 model has dual banks and a Bank1/Bank2 switch for immediate
playback of bank1/bank2 by just flipping the bank switch, the total default recording
st
time on the MX9008 is 7.5 minutes (16 minutes on the MX9017), you must 1 record
bank1 before recording in bank2 so for example if your Bank1 recording is 3 minutes
long then Bank2 can be used for a second production of up to 4.5 minutes duration.
Flexible duration: Bank2 addressing is not fixed, you can record any duration in
BANK1 and any duration in BANK2 as long as the total is 7.5 minutes or less for
MX9008 or 16 minutes or less for MX9017 Flash card.
Examples of recording for the extra bank are “Holidays”, special events, sale
promotions, etc. The SX8600 automatically calculates the Bank2 start point when
you finish recording BANK 1.
st
You need to record BANK1 1 Before you can record BANK2
after you finish recording bank1, the SX8600 automatically calculates the bank2
starting point
To record into Bank2:
2
set switch to BANK2
and do the same 4 steps
as recording in BANK 1
The device automatically starts it’s normal playback, and will play what you just
recorded and will keep repeating. If you need to re-record just repeat the 4 steps.
During the playback you may flip the switch to Bank1 or bank 2 any time and device
will play back that bank repeatedly.
Frequent production recording tip: If you need to re-record the Bank1, then
you need to re-record the Bank2, therefore we suggest to keep the production that is
not changed frequently in bank1 like “holidays recording” and the main production in
bank2, so you only need to re-record bank2 each time you update.
(please note some music titles are not royalty-free and you may
want to use the royalty-free music titles to avoid annual licensing
payments to ASCAP and BMI for playing those titles on-hold)
vii
Switch set to
# of Rings to answer the call
# of Minutes to hold the call then
ring through.
No Ring Back in B setting
Result
B1
B2
B3
1 Ring
2 Ring ← factory preset value
4 Ring
A1
A2
A3
2 minutes ←factory preset value
8 minutes
30 minutes
C1
factory preset In B mode, play day or night greeting then
go to on hold (for 5 , 8 or 20 minutes
depending on A1,A2,A3 programming done
above) default value is 5 minutes
Allow Ring Back in B setting
C2
In B mode, play greeting then Ring Back
continuously
Continuously BEEP in B setting
C3
In B mode, play greeting then continuously
Beep via speaker
You can program each line on your phone for the number of rings or the duration
,etc. independently, you may do this from any phone even if it is not connected to the
SX8600
To program:
•
Set the switches for the desired operation above
•
select L1 on your phone to get a dial tone
•
wait about 10 seconds to hear the Hold music then press the Flash button, you
will get confirmation via Hold music turning ON and OFF twice
•
Hang up and repeat for lines L2...L4
BANK
1
Operations
Be sure to change the switches back to the way they were prior to programming.
Example: to change the number of rings to answer the calls from the factory preset
value of 2 rings to 4 rings do as follows:
set the switches to B3, select L1(dial tone), wait 10 seconds into dial tone and you
hear the Hold music for a second now press Flash, you will get Hold music ON and
OFF twice to confirm the operation was done. Do this for L2...L4 if you need changes
to apply for those lines as well. set switch back to the way it was.
Example: You want to be able to Hold the calls up to 8 minutes instead of the factory
default of 2 minutes, set the switch to A2, select L1(get dial tone), wait 10 seconds
when you hear the quick Hold music press Flash, you will get confirmation via hold
music turning On-Off. Do this for L2...L4 as needed, set switch back to the way it
was.
Note: your changes remains intact even if power is lost or you remove the
SX8600 entirely. To restore the factory settings you need to re-program the device
to factory settings above.
P10
P7
Automatic Email Recording:
(This feature is available on SX8600E only)
st
SX8600E is the 1 device in the world with an exclusive feature: “It can be
automatically recorded by playing an email”. The production audio emailed to you
from your dealer contains a “coded noise file” that automatically activates & then
stops the recording process (The RED Status LED light indicates recording is in
progress, the noise codes themselves will not be recorded), all other audio that you
play on your PC will not effect the SX8600E.
Volume setting for recordings
The recording volume is directly effected by the volume setting on your PC, we
recommend you set the media player volume to about 50% level, volume control &
wave to 100% . as follows:
Double click on speaker symbol (located on lower right hand side of your screen)
then adjust the Volume control and Wave to Maximum 100%
Adjusting Output VOLUME
If the On Hold audio volume is too low turn the VOLUME control clockwise; If it is too
loud turn the VOLUME control counter clockwise to desired level.
Live audio from Radio etc.. Input/output RCA jack ( 8Ω )
If the Flash card is inserted, the big RCA jack can be used to connect the head set
to monitor the audio content. (to connect a speaker to this RCA jack be sure to use a 5 inch
or smaller speaker to avoid overloading the out put beyond it’s limits). If the Flash card is
removed, the built in digital player turns OFF and this RCA jack can be used as
“input” for connection to an any Live audio source for the adapter function.
Manual Recording: Connecting to an external audio source:
BANK
1 2
Volume control Wave
Volume
100%
MIC AUDIO IN
RCA
REC
Windows Media Player
Volume setting
IN
Optional for user
recordings
Input/output RCA jack
Audio source
PC, CD player, ipod,...
Connect the Audio IN jack to your audio source speaker or headphone jack using
the provided 3.5mm to 3.5 mm audio cord. Select the bank you want to record
Refer to page P8 to adjust your volume levels
Not Mute
50
1. Press REC to stop the playback, GREEN/ RED STATUS LEDs Blink ON/OFF
continuously.
Note on PC audio connection: You may use male to female extension audio
cords or other methods if you need to extend the length of the connecting cord
2.
(Maximum audio cord length 500 feet)
Start your music/audio, email MP3 file etc. Recording starts automatically (or
you may press REC to start recording manually if you prefer)
3.
RED STATUS LED light turns ON solid to indicate recording in progress.
4.
Recording stops automatically after 15 seconds of silence in the end of
recording, the unit then removes the silences and resumes playback operation.
(You may also press REC to stop recording if you prefer to control it manually). RED
Status light turns OFF and Green Status will turn ON.
Automatic CD recording (CD Auto Load):
(This feature is available on SX8600E only)
SX8600E can automatically be recorded from a PC CD ROM drive or a CD player,
Just insert the CD you received from your dealer into the CD ROM drive of your PC
or insert it into your CD player (volume mid level ), press the play button on the CD
player and walk away. The CD contains a code that starts the recorder in SX8600E
(RED Status LED turns ON) and then stops the recorder, the LED Green Status turns
back ON and play back resumes. The CD player stops on its own.
This Automatic Start / Stop:. Feature on SX8600 allows you to just start the
audio and walk away, no need to watch the unit for end of recording.
The device automatically starts it’s normal playback, and will play what you just
recorded repeatedly. If you need to re-record repeat the above steps.
If you have trouble getting the device to start recording, try removing
power for 10 seconds then re-connect power and try again.
P8
viii
P9