1
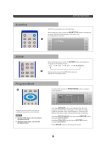
Myryad Systems Ltd
2 Piper’s Wood
Waterberry Drive
Waterlooville PO7 7XU
Tel +44 (0) 23 9226 5508
Fax +44 (0) 23 9223 1407
[email protected]
For further information,
please contact
Myryad direct or visit:
www.myryad.co.uk
Z-SERIES
Z140 Remote Controlled Integrated Amplifier
Z160 Power Amplifier
Owner’s manual
contents
introduction
• Introduction
2
• Installation and Safety Notes
2
• Accessories
2
• Setting Up Your System
3
Z140 and Z160 diagrams
• Rear panel Connections
4
• Front Panel Controls
5
• Loudspeaker Output Protection
and Muting
6
• Remote Handset Operation
6
• Installing and Replacing Batteries
6
• Z-Series System Operation with
Smart My-Link
7
• Trouble-shooting guide
7
• Specifications
7
The Myryad Z140 and Z160 have been
designed to offer a combination of high
quality sound reproduction and elegant
styling.
The Z140 Integrated Amplifier can accept up
to six line-level input sources, including two
tape recorders. Outputs are provided for one
pair of loudspeakers, for headphones and for
an auxiliary power amplifier. All functions –
input selection, volume and standby – can be
operated using the infra-red remote control
handset supplied.
The Z160 power amplifier can be used to
provide power for high quality stereo systems
when partnered by a suitable preamplifier or,
in partnership with a Z140 Integrated
Amplifier, to provide a very high performance
four channel solution for bi-amp capable
loudspeakers. Multiple Z160 amplifiers can
also be used to power a full-surround music
or Home Cinema sound system of the
highest quality.
The Z160 has a pair of unbalanced line inputs
plus directly linked line outputs, all on RCA
phono sockets.
The Z140 and Z160 are both Smart My-Link
compatible. When the Z140 is linked via the
“Smart My-Link” to other compatible Myryad
Z-Series, Cameo or M-Series products a
number of extra features become available
which make the system as a whole easier and
quicker to operate.
installation and
safety notes
The Z140 and Z160 both generate a modest
amount of heat and thus require ventilation.
Do not place either on a rug or other soft
surface into which they could sink,
obstructing the air inlets in the underside. Do
not allow papers or cloth to obstruct the
ventilation grille in the top cover. Neither
amplifier should be placed in a built-in
installation such as a bookcase or rack unless
proper ventilation is provided. If a number of
Z-Series units are stacked on top of one
another, the amplifier(s) should be placed on
top.
CAUTION: TO PREVENT A FIRE OR SHOCK
HAZARD, DO NOT PERMIT ANY OF THESE
PRODUCTS TO BECOME WET. IF LIQUID IS
ACCIDENTALLY SPILLED ON ONE, IMMEDIATELY
SHUT OFF ITS POWER AT THE WALL SOCKET
AND UNPLUG THE AC POWER CORD. ALLOW
SUFFICIENT TIME FOR COMPLETE
EVAPORATION TO OCCUR BEFORE OPERATING
IT AGAIN. IF THE LIQUID IS ANYTHING BUT
WATER AND/OR ALCOHOL, A QUALIFIED
SERVICE TECHNICIAN SHOULD EXAMINE THE
UNIT BEFORE IT IS USED AGAIN.
DO NOT PLACE NAKED FLAMES SUCH AS
LIGHTED CANDLES ON THIS PRODUCT.
Do not remove the cover, or attempt to
modify or repair any item yourself.
Refer all servicing to a qualified technician.
accessories
The Z140 and Z160 are supplied with the
following accessories.
Z140 Integrated Amplifier
• Separate mains power cord to suit country
of sale.
• Remote control handset.
• Four AAA batteries for handset (not in
some countries).
Z160 Power Amplifier
• Separate mains power cord to suit country
of sale.
z-series system
operation with
smart my-link
When used as a linked system (e.g Integrated
Amplifier plus Power Amplifier, CD Player,
DVD Player and Tuner), Z-Series products
have a number of extra features that make the
system as a whole easier and quicker to use
than a normal hi-fi. These include:
Start-on-Play (CD, DVD):
Press play on the CD or DVD Player (or the
relevant remote control) and the player and
Amplifier will switch out of standby (if
necessary) and play the disc. The Amplifier
will automatically select the appropriate
source.
Start-on-Open (CD, DVD):
With the units in standby, press open/close
on the player. Both the player and amplifier
will switch out of standby and the player’s
drawer will open. The Amplifier will
automatically select the appropriate source.
Intelligent Input Selection (Amplifier):
Press a source select button on the remote
control and the system will awaken (if in
standby) only the Amplifier and the selected
source.
trouble-shooting
guide
Possible solutions to some of the most
common problems.
No sound:
• Power turned off or system in standby
mode. Check that the green STANDBY LED
in the amplifier is illuminated and that the
relevant source component is also active.
• An inoperative input has been selected
(e.g. CD input with no CD playing).
• An input has been selected with no
source connected.
• Protection relay has operated because of a
short circuit loudspeaker wire or amplifier
overheating. Carefully check all wiring after
Automatic Switch-On (CD, DVD, Tuner):
If the standby button on the Tuner, CD or
DVD player is pressed, the Amplifier will also
awaken and select the correct source.
Sound in one channel only:
• Loudspeaker cable pulled loose. Check
all connections, both at the loudspeakers
and amplifier.
• Interconnect cable pulled loose or making
poor contact. Check and, if necessary,
un-plug and re-plug all relevant cables.
Loud buzz or hum:
• Interconnect cable pulled partially out
of its socket.
• Defective interconnect cable.
For further help please visit:
www.myryad.co.uk/faqs.html
Bi-Amp connection of Z140 and Z160 to
appropriate loudspeakers.
Connect Z140 BI-AMP
OUTPUT to Z160 LINE
INPUT.
Connect Z140 SPEAKERS
to loudspeaker “Bass” or
“LF” terminals and Z160
SPEAKERS to
loudspeaker “Treble” or
“HF” terminals. Take
care to observe LEFT and
RIGHT.
Mute/Pause Control (Amplifier/CD or DVD):
When using the CD or DVD Player, selecting
mute from the remote control will mute the
Amplifier and pause the disc. When the
amplifier mute is cancelled, the disc will
continue playing.
Power-Saving Mode (Amplifier):
The Amplifier will switch the CD Player, DVD
Player or Tuner into standby if any source
remains unused for more than ten minutes.
switching the amplifier POWER OFF to
allow it to cool.
• UK version only: The fuse in the mains plug
has failed. Check and replace if necessary.
specifications
Z140 Integrated Amplifier
Continuous rated power output, 8Ω (<0.1% THD) ......................................................................................................50W
Signal/noise ratio (A-weighted, ref 50W)....................................................................................................................102dB
Input sensitivity (ref 50W) ....................................................................................................................Line inputs: 250mV
Input sensitivity (ref 50W)....................................................................................................................Phono input: 2.5mV
Frequency response (20Hz – 20kHz) ........................................................................................................................±0.3dB
Dimensions (w x h x d) ..........................................................................................................................436 x 78 x 316mm
Weight (net) ....................................................................................................................................................................6.7kg
Supply voltage (set by internal wiring) ............................................................................................................120 or 230V
Finish …………………………………………Natural Silver fascia with Silver Grey casing/Satin Black fascia with Black Casing.
Z160 Power Amplifier
Continuous rated power output, 8Ω (<0.1% THD) ......................................................................................................50W
Signal/noise ratio (A-weighted, ref 50W) ....................................................................................................................110dB
Input sensitivity (ref 50W) ..........................................................................................................................................700mV
Frequency response (20Hz – 20kHz) ........................................................................................................................±0.3dB
Dimensions (w x h x d) ..........................................................................................................................436 x 78 x 316mm
Weight (net) ....................................................................................................................................................................6.0kg
Supply voltage (set by internal wiring) ............................................................................................................120 or 230V
Finish …………………………………………Natural Silver fascia with Silver Grey casing/Satin Black fascia with Black Casing.
Stock No: OST0012110, Revision: A
2
7
loudspeaker
output protection
and muting
When the amplifier is in standby mode the
loudspeaker output terminals are isolated
from the amplifier by high quality relays.
When the amplifier is first switched on from
standby mode the loudspeaker outputs
remain disconnected for a few seconds to
allow the internal voltage levels to settle. The
same process occurs when the amplifier is
switched back into standby mode. This
power-on mute does not disconnect the
headphone socket, so it is recommended that
headphones are unplugged from the amplifier
before switching to standby mode and
plugged in again after switch-on.
The same loudspeaker mute relay is used to
protect both the amplifier and your
loudspeakers against possible damage. If any
one of a number of fault modes is detected
(loudspeaker outputs short circuit, amplifier
overheating, amplifier DC fault) the
loudspeakers will be disconnected from the
amplifier to protect both. In the case of a
short circuit or DC fault the loudspeakers will
be re-connected after a few seconds, but will
be disconnected again if the fault persists. If
overheating has caused the protection system
to operate, then it will take some time for the
heatsinks to cool sufficiently to allow the
loudspeakers to be re-connected (probably
between five and fifteen minutes depending
upon the room temperature and ventilation).
The amplifier will cool more quickly if it is
switched to standby mode, or if the POWER
is switched OFF.
The “VIDEO” key selects the DVD input on
the Z140. The TAPE 1 key functions exactly as
the front panel TAPE 1 button.
Pressing one of the VOLUME × or Ø keys
will cause the motorised volume control in
the amplifier to rotate clockwise or anticlockwise respectively. There is one aspect in
which the remote operation of the volume
control is different from manual operation. If
the amplifier is in mute mode (after pressing
MUTE on the R/C handset) then pressing the
VOLUME × key will automatically disengage
mute mode and re-connect the loudspeakers.
This prevents an excessively high volume level
from being set by mistake.
Pressing the MUTE key on the handset will
engage mute mode. The loudspeakers will be
disconnected and the green STANDBY LED
will flash slowly. MUTE is a “toggle” function,
so pressing the key again will disengage the
mute mode.
The green STANDBY key at the bottom left of
the handset can be used to toggle the
amplifier into or out of STANDBY mode (see
Front Panel Controls, section).
The remainder of the System Handset buttons
are dedicated to controlling the Z-Series CD
Player and Tuner. Notes on their use can be
found in the appropriate Owner’s manual.
setting up your
system
Z140 Integrated Amplifier
installing
and replacing
handset batteries
DVD
The System Remote Handset uses four 1.5 V
type AAA batteries. To fit new batteries first
open the battery compartment in the rear of
the handset and remove any existing batteries.
Fit the new ones as directed by the symbols
moulded inside the battery compartment,
then replace the battery compartment cover.
The batteries should always be removed if
they are discharged (indicated by no remote
control operation or by operation only at very
short range), or if the remote control is not
going to be used for an extended period.
2
Amplifier
TAPE 1
STANDBY
1
3
4
TAPE 2
5
CD
DVD TUNER PHONO
6
Æ
Z160 Power Amplifier
LINE
OUTPUT INPUT
CD player
Æ
L
R
remote control
handset
operation
The Z140 Integrated Amplifier is supplied
with a System Remote Handset which can
also control the Z-Series CD Player and
Tuner.
CD player
and tuner
Æ
16
Tuner
15
4
3
2
1
Æ
STANDBY
The nine keys at the top of the handset
control the Z140 Amplifier. The first five keys
(CD, VIDEO, TUNER, AUX and TAPE 2) are
used to select the input in a similar way to the
front panel SOURCE button, but allowing any
of these five sources to be accessed directly.
All components
Æ
1
6
3
rear panel
connections
1 Power inlet
Before making any connection, check that the
mains voltage setting printed on the rear
panel is the same as your local mains supply.
Plug the female (socket) end of one of the
power cords supplied into the power inlet on
the rear of each component. Plug the male
(plug) end of each cord into a “live” wall
socket or a suitable heavy duty extension
cable.
UK version: The mains plug is supplied fitted
with a 5A fuse. It should only be replaced
with a fuse of the same rating (5A) which
complies with BS1362.
2 Power switch
Press one side of this rocker switch (the side
nearer the edge of the rear panel) to switch
the amplifier ON and the other side to switch
it OFF. When the POWER switch is in the
OFF position all power is disconnected from
the amplifier and it cannot be powered up
from the front panel or the remote control.
When the POWER switch is in the ON
position (and the power cord correctly
inserted and plugged in to a live wall socket)
the amplifier will power up in standby mode
(see FRONT PANEL CONTROLS, STANDBY,
page 5).
It is recommended that the POWER switch is
turned OFF if the amplifier is not going to be
used for an extended period of time.
3 My-Link input/output
When the Z140 or Z160 is used in a system
with other Z-Series (or Myryad M-Series, or
Cameo) products, all may be joined together
via My-Link. The My-Link is a communications bus that allows all the linked
components to operate together as a system
and distributes the remote commands
received by any one to each of the others. The
simplest function provided by the My-Link
bus is that all linked units will switch into or
out of standby mode when the integrated
amplifier or remote control standby key is
pressed.
Use a short RCA-to-RCA (phono-to-phono)
interconnect cable to connect from the MYLINK OUT socket on the amplifier to the
MY-LINK IN socket on the CD player and a
second cable from the MY-LINK OUT socket
on the CD player to the MY-LINK IN socket
on the tuner. Further Myryad Z-Series (e.g
4
Z160), Cameo or M-Series products can be
linked in the same way, running from the
MY-LINK OUT socket on the tuner.
Inexpensive interconnects may be used as the
Smart My-Link bus carries only control
signals, not audio, so these cables have no
effect on sound quality.
When Z-Series units are connected via the
Smart My-Link bus many more powerful
system features are available (see page 7).
4 Loudspeaker outputs
The loudspeaker outputs are capable of
driving all loudspeakers with rated
impedances in the range 4Ω to 16Ω. The
loudspeaker terminals are high–current
binding–posts, coded red or black. The terminals on the left side of the amplifier
(viewed from the front) and marked “L”
should be wired to the left –hand
loudspeaker. Those on the right, marked “R”,
should be wired to the right-hand
loudspeaker.
For correct stereo imaging it is important that
the two loudspeakers are wired “in phase”. To
ensure correct phasing wire the black (–)
terminal on the amplifier to the black or “–”
terminal on the loudspeaker. The red (+)
terminal on the amplifier should be wired to
the red or “+” terminal on the loudspeaker.
The loudspeakers should be positioned as
recommended by the loudspeaker
manufacturer. The two loudspeakers should
always be placed at equal distances from the
main listening position and usually spaced a
similar distance apart. It is generally best to
keep the loudspeakers away from room
corners and many loudspeakers work best
away from all walls.
5 Bi-amp output (Z140)
Many loudspeakers today are made so that
the bass and treble sections can be separated
and fed from two sets of speaker cables. This
is known as “bi-wiring” and can yield a
significant improvement in sound quality. A
further sound quality gain may be made by
“bi-amplifying” the loudspeaker – using two
separate power amplifiers to drive the bass
and treble sections.
The Z140 makes provision for this with its
“BI-AMP” output, which can be used to feed
a separate Myryad Power Amplifier. The
Z140’s loudspeaker outputs should be
connected to the bass sections of the
loudspeakers (left and right) while the
separate power amplifier drives the treble. The
diagram on page 7 illustrates bi-amp
connection.
6 Tape 1 input/output (Z140)
11 Phono/Aux switch (Z140)
These connectors are suited to any type of
tape recorder, including high-quality “3head” types which allow you to monitor the
signal off the tape whilst it is being recorded.
Connect a stereo cable from the TAPE 1 REC
output sockets of the amplifier to the LINE IN
or RECORD IN sockets on your tape deck.
Connect a second stereo cable from the TAPE
1 PLAY input sockets of the amplifier to the
LINE OUT or PLAY OUT sockets on your tape
deck.
This switch is used to select between the
PHONO and AUX inputs described below.
With the switch released (button protruding)
the signals from a record player connected to
the PHONO input will be heard when the
PHONO input is selected via the front panel
switch or remote control. When the switch is
pressed in, signals from the AUX input will be
heard when PHONO is selected.
Any source selected for listening on the
amplifier will automatically be fed to the
TAPE 1 REC output sockets for recording. If
the TAPE 2 input is selected then tape copies
may be made from TAPE 2 to TAPE 1. It is
NOT possible to copy from TAPE 1 to TAPE 2.
7 Tape 2 input/output (Z140)
These connectors are suited to any type of
tape recorder, but “off-tape” monitoring is
not possible using TAPE 2. The wiring from
TAPE 2 to your tape deck is identical to the
TAPE 1 wiring described above.
Any source selected for listening, except TAPE
1, will automatically be fed to the TAPE 2
REC output sockets for recording. It is NOT
possible to record from TAPE 1 to TAPE 2.
8 CD input (Z140)
Connect the audio output cables from a CD
player to these sockets. If you do not have a
CD player then any other line level source
may be connected to this input.
Sources can be left permanently connected to
both the PHONO and AUX inputs and the
PHONO/AUX switch used to select between
them if desired.
12 AUX input (Z140)
The audio output from any line level source
may be connected to this input.
13 Phono input (Z140)
Connect the audio output cables from a
record player to these sockets. The input is
designed for use with moving-magnet or
“high-output” moving-coil phono cartridges.
Consult your dealer if you are in any doubt
what type of phono cartridge you have.
14 Ground terminal (Z140)
This terminal (marked GND) is provided for
grounding a record player connected to the
PHONO input. Some record players do not
have a separate ground wire, in which case
make no connection to this terminal.
15 Line input (Z160)
NOTE: THIS INPUT IS FOR AN AUDIO SIGNAL,
NOT FOR THE DIGITAL OUTPUT FROM YOUR
PLAYER.
The line inputs may be connected to the line
outputs of any quality preamplifier, or to the
bi-amp outputs of an integrated amplifier
such as the Myryad Z140.
9 DVD input (Z140)
16 Line output (Z160)
Connect the audio signal output cables from
a DVD player to these sockets. Use the
outputs marked L and R or LF and RF (if the
player has a built-in 5.1 channel decoder).
Alternatively, any other line level source may
be connected to this input.
The line outputs are directly connected to the
line inputs, without buffering. The line
outputs allow further power amps to be
“daisy-chained” so more complex systems
may be built.
NOTE: THIS INPUT IS FOR AN AUDIO SIGNAL,
NOT FOR THE DIGITAL OUTPUT FROM YOUR
PLAYER.
front panel
controls
10 Tuner input (Z140)
Connect the audio output cables from a radio
tuner to these sockets. If you do not have a
tuner then any other line level source may be
connected to this input.
1 Standby
When amplifier is plugged into a live wall
socket and the POWER switch is turned ON,
it will power up in “standby” mode and the
LED (Light Emitting Diode) by the STANDBY
button will glow red. In this mode the
internal circuitry is powered up, but disabled
so that it consumes very little power and the
loudspeaker outputs are muted by a relay.
When the STANDBY button is pressed the
circuitry is activated and, after a few seconds
delay, the audio outputs will be enabled.
During this delay period while the internal
circuitry is settling the STANDBY LED will
flash green. When the outputs are de-muted it
will glow green continuously. When the
STANDBY button is pressed again the
amplifier will be returned to standby mode,
the STANDBY LED will glow red again and all
other LEDs and displays will be extinguished.
When the Z140 is switched out of standby,
the input used last is automatically selected
and, after a few seconds settling delay, the
loudspeaker outputs will be connected. When
first switched out of standby after POWER
ON, the CD input will be selected by default.
CAUTION: WHEN IN STANDBY MODE THE
INTERNAL CIRCUITRY IS STILL LIVE, SO ALL
SAFETY PRECAUTIONS MUST BE FOLLOWED.
2 Infra-red receiver (Z140)
The infra-red (IR) remote control receiver is
mounted behind this window in the position
indicated. It must therefore not be obscured
when the component is to be operated using
the remote control handset. Where possible it
is best to arrange that the IR window is in
“line-of-sight” of the remote handset. When
components are connected via the My-Link
bus, only one needs to receive the IR command signals in order to control any of the
linked units.
socket automatically disconnects the
loudspeakers, silencing them. In order to
resume listening to loudspeakers you must
unplug the headphones from this socket. The
headphones output is not muted when
switching in and out of STANDBY mode, so it
is recommended that headphones are
unplugged from the amplifier before
switching to standby mode and plugged in
again after switch-on.
5 Tape 1 (Monitor) (Z140)
When you press the TAPE 1 button you can
hear the output signal from a tape deck
connected to the TAPE 1 PLAY sockets on the
rear panel. This is a “toggle” function switch:
you press it once to engage and press again to
disengage. The green LED next to the TAPE 1
button illuminates to indicate that TAPE 1 is
engaged.
Pressing the TAPE 1 button has no effect on
any other input selected. The signal source
selected by the SOURCE button will be fed to
the TAPE 1 REC output sockets, irrespective
of whether the TAPE 1 button is engaged or
not. Thus, if you have a “three-head” tape
deck that permits off-tape monitoring you
can use the TAPE 1 button to switch back
and forth between the source signal and the
off-tape signal, to check its quality, whilst the
recording is in progress.
NOTE: IF THE TAPE 1 BUTTON IS ENGAGED
WITH NO SIGNAL SOURCE CONNECTED TO
THE TAPE 1 PLAY SOCKETS, OR WITH NO
TAPE RUNNING, THEN YOU WILL HEAR ONLY
SILENCE, REGARDLESS OF THE SETTINGS OF
ANY OF THE OTHER CONTROLS.
3 Volume control (Z140)
The volume control adjusts the sound level
for both loudspeakers and headphones. It
does not affect the signals fed to the TAPE 1
and TAPE 2 REC sockets so it can safely be
adjusted whilst making a recording.
When the MUTE mode is engaged using the
remote control, the STANDBY LED will flash
repeatedly to indicate this condition. Always
press MUTE on the remote handset again to
disengage MUTE before advancing the
volume control setting.
6 Source select button and LEDs
(Tape 2, CD, DVD, Tuner and Phono
inputs) (Z140)
The SOURCE select button is used to choose
which of the signal sources you want to
listen to (apart from TAPE 1 – see above). The
chosen signal source is indicated by one of
the green LEDs to the left of the source select
button. When the button is pressed the next
source is chosen, moving left to right (TAPE 2
Æ CD Æ DVD Æ TUNER Æ PHONO). If the
button is pressed with PHONO selected the
TAPE 2 input is selected next.
4 Headphone socket (Z140)
The headphones socket will accept a standard
3.5mm stereo jack plug or adapter. All types
of headphones of any impedance may be
used, with one exception: electrostatic
headphones are usually supplied with an
adapter unit which must be connected
directly to the loudspeaker terminals.
Insertion of a plug into the headphones
Whichever source is selected will be sent both
to the loudspeakers and to the TAPE 1 REC
and TAPE 2 REC output sockets for recording.
The only exception is TAPE 2 which will not be
fed to the TAPE 2 REC output sockets as this
could cause dangerous oscillation. Recordings
may be made from TAPE 2 to TAPE 1, but not
from TAPE 1 to TAPE 2.
5