1
Windows® XP
Gold eBook
Pedro Filipe C. Jesus
April / 2009
Microsoft Windows® XP – Gold eBook
Pedro Filipe C. Jesus
2|Page
www.pedrojesus.net
Microsoft Windows® XP – Gold eBook
Pedro Filipe C. Jesus
INDEX
INTRODUCTION ................................................................................................................................ 5
HOW TO TROUBLESHOOT WINDOWS XP STARTUP PROBLEMS .................................................... 6
Where to Start .............................................................................................................................. 6
The Last Known Good Configuration and Chkdsk ........................................................................ 7
TROUBLESHOOTING WINDOWS XP SLOW STARTUP ISSUES ......................................................... 8
Using the Shift key ........................................................................................................................ 9
Editing the registry in Windows XP ............................................................................................ 10
The Windows XP System Configuration Utility .......................................................................... 12
TROUBLESHOOTING THE BLUE SCREEN OF DEATH (BSoD) .......................................................... 14
How to troubleshoot a Windows XP Stop message ................................................................... 14
Different types of Stop messages ............................................................................................... 15
Windows XP Error Codes ............................................................................................................ 17
HOW TO RECOVER FROM CHANGES TO WINDOWS XP ............................................................... 19
Device driver rollback ................................................................................................................. 19
Windows XP System Restore ...................................................................................................... 20
- Reinstall System Restore in Windows XP ............................................................................. 21
- Running System Restore from the Recovery Console (well, sort of) ................................... 22
Windows XP Automated System Recovery (ASR)....................................................................... 24
TROUBLESHOOTING WINDOWS XP HARDWARE ISSUES.............................................................. 25
Device Manager Error Codes. ..................................................................................................... 27
- Code 1................................................................................................................................... 27
- Code 3................................................................................................................................... 27
- Code 10................................................................................................................................. 29
- Code 12................................................................................................................................. 31
- Code 14................................................................................................................................. 31
- Code 16................................................................................................................................. 32
- Code 18................................................................................................................................. 32
- Code 19................................................................................................................................. 32
- Code 21................................................................................................................................. 33
- Code 22................................................................................................................................. 33
- Code 24................................................................................................................................. 33
- Code 28................................................................................................................................. 33
www.pedrojesus.net
Page |3
Microsoft Windows® XP – Gold eBook
Pedro Filipe C. Jesus
Manually troubleshooting hardware issues .............................................................................. 34
- Before you begin – be forewarned ...................................................................................... 34
- Resolving hardware conflicts ............................................................................................... 34
USB and printer problems.......................................................................................................... 36
Troubleshooting print queue overload and network congestion.............................................. 37
- How to create a network printer pool ................................................................................. 37
- Create a printer pool step-by-step ...................................................................................... 38
- Creating a priority print queue ............................................................................................ 39
Other Hardware Issues .............................................................................................................. 41
TROUBLESHOOTING HANG CONDITIONS ..................................................................................... 42
TROUBLESHOOTING NETWORK CONNECTIVITY ISSUES .............................................................. 43
WINDOWS XP PERFORMANCE TUNNING ..................................................................................... 44
WINDOWS XP SECURITY ............................................................................................................... 46
Basic Security Measures ............................................................................................................ 46
Intermediate Security Measures................................................................................................ 49
Advanced Security Measures ..................................................................................................... 54
Other Security and Authentication Issues ................................................................................. 57
TROUBLESHOOTING WINDOWS XP SHUTDOWN ISSUES ............................................................ 58
NOTES ............................................................................................................................................ 59
4|Page
www.pedrojesus.net
Microsoft Windows® XP – Gold eBook
Pedro Filipe C. Jesus
INTRODUCTION
Though Windows XP is Microsoft's most popular desktop operating system, it is not
without its challenges. Like with any OS or application, troubleshooting Windows XP can
be frustrating for Windows administrators. Fortunately, with the right tips any admin
can troubleshoot Windows XP desktop issues with relative ease, and our Windows XP
Troubleshooting Tutorial is designed to help IT pros do just that. This tutorial provides
troubleshooting tips that every admin should know, with advice on troubleshooting
Windows XP startup problems and the dreaded Blue Screen of Death (BSoD). You'll also
find info on how to troubleshoot features such as Windows XP System Restore and Device Manager, network and printer problems and more interesting stuff.
This troubleshooting guide was made with the objective to join in one document a collection of several “Favorites” websites that I had in my computer.
Requirements:
You need a computer with internet access.
www.pedrojesus.net
Page |5
Microsoft Windows® XP – Gold eBook
Pedro Filipe C. Jesus
HOW TO TROUBLESHOOT WINDOWS XP STARTUP PROBLEMS
One of the most common troubleshooting problems in Microsoft Windows XP involves
the failure of a system to start up properly. These failures can be caused by a number of
issues, including poorly written or malicious software, faulty device drivers, hardware
incompatibilities, corrupt or missing system files and incorrect system configurations.
Determining the source of the problem -- and fixing it -- is easier if you use a methodical,
step-by-step approach.
Where to Start
The first question that should be asked when troubleshooting Windows XP startup problems is: What changed? If a user has just loaded new software, added new hardware,
updated drivers or made a change to the Windows XP system configuration, you should
assume this was the cause of the issue until you have ruled it out by undoing the change.
This includes operating system updates from Microsoft, which have been known to
cause an occasional issue. If a recent change is not a potential cause of the Windows XP
startup failure, you should suspect hardware failure, viruses or malicious software or
data corruption. Troubleshooting the issue will depend on the point at which startup
fails. The further along in the startup process the failure occurs, the easier it is to troubleshoot and repair.
If the workstation starts normally and fails after logon, then the problem may be related
to a user profile, network logon script, application, driver or service. If Windows XP produces an error message or blue screen, copy the message and check Microsoft's Knowledge Base to see if it is a known issue and if a workaround or patch exists. If the issue is
not in Microsoft's database, try searching technical discussion groups, third-party sites
or Usenet.
If you do not receive an error message, and the system simply hangs or continually restarts, there are several troubleshooting techniques you can try. For example, you can try
logging in with a different account, or a local account. You can also perform a clean boot
or try booting into Safe Mode.
When troubleshooting Windows XP, if the system will not start in Normal Mode or Safe
Mode -- it's usually not a good sign. This may be the result of corrupt or missing system
files, a corrupt registry, hardware drivers or failed services. Your first step is to press F8
during Windows XP Startup and select the Last Known Good Configuration option from
the Windows Advanced Options Menu. If Windows XP boots normally, check the event
logs and hardware manager for clues as to what may have caused the failure. You may
also want to check the Add/Remove Programs menu for any new applications that may
have contributed to the failure.
6|Page
www.pedrojesus.net
Microsoft Windows® XP – Gold eBook
Pedro Filipe C. Jesus
The Last Known Good Configuration and Chkdsk
If the Last Known Good Configuration fails, the next step is to start the Windows XP Recovery Console. The Windows XP Recovery Console is a command line utility that can be
used to troubleshoot a number of issues in the event that Windows XP cannot start, including starting and stopping services and drivers. You can start the Recovery Console by
booting from the Windows XP Startup CD and pressing "R" to repair when the "Welcome
to System Setup" screen appears, then press "C" to start the Recovery Console. If you
receive an error on startup stating that a system file is missing or corrupt, Recovery Console can be used to replace those files as well.
If you are unable to determine if a driver or service is responsible for the Windows XP
startup failure, you should run the Windows XP Checkdisk utility from the Recovery Console by typing CHKDSK at the command prompt. This utility scans your hard drive and
checks for problems with the disk or file system, which may result in corrupt or missing
system files.
These Windows XP troubleshooting techniques should usually help you figure out the
source of the startup problems. However, if you are still unable to determine the cause
of startup failure at this point, you do have a few options left.
If your Windows XP machine won't boot at all, you can try using your emergency Windows XP boot floppy. If your hard drive's boot sector or Windows' basic boot files have
been corrupted, this disk will circumvent the problem and boot you into Windows XP. If
you don't have an emergency boot floppy, you may be able to use one created on
another PC running Windows XP, but there's no guarantee that it will boot your machine.
www.pedrojesus.net
Page |7
Microsoft Windows® XP – Gold eBook
Pedro Filipe C. Jesus
TROUBLESHOOTING WINDOWS XP SLOW STARTUP ISSUES
One way to troubleshoot Windows XP when the system is slow to startup is by disabling
annoying and unnecessary Windows XP startup programs. By far the easiest way to
temporarily disable startup programs is to boot the system into Safe Mode, as Safe
Mode boots Windows XP using a bare configuration. It loads only the essential device
drivers, and Windows does not load any startup programs. That way, if a particular device driver or startup program is causing problems, you can boot Windows XP without
loading it. You are then free to disable or remove the driver, service or application that is
causing the problem.
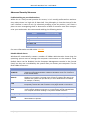
You can access Safe Mode by pressing the F8 key just before Windows XP begins to boot
(you may have to press F8 repeatedly). Upon doing so, the Windows boot menu will be
displayed, which gives you several different boot modes to choose from, such as Safe
Mode with Networking, Safe Mode with Command Prompt and Directory Services Restore Mode. Below is a brief explanation of each of these modes:
Safe Mode - Safe Mode boots Windows using a minimal driver set and without loading any startup applications.
Safe Mode with Networking - This option does the same thing as Safe Mode, except
that it also loads the drivers and services necessary for network access.
Safe Mode with Command Prompt - This option is similar to Safe Mode, except that
the system boots to a command prompt rather than to a GUI. This option is most useful for repairing GUI-related problems.
Enable Boot Logging - If you select this option, Windows will create a diagnostic log
of the boot process. You can use this log to figure out where the process is breaking
down. The log file is named NTBLOG.TXT and is located in the %SYSTEMROOT% folder. You can use boot logging in conjunction with any of the safe mode boot options
except for the Last Known Good Configuration option.
Enable VGA Mode - The Enable VGA Mode option is intended for use when the correct video driver is installed, but Windows was accidentally configured to use an incompatible display resolution. The Enable VGA Mode option boots Windows using
the current video driver but uses a 640 x 480 resolution. This gives you the opportunity to reset the display resolution. Safe Mode and Safe Mode with Networking also use
a decreased screen resolution but do so by using the VGA.SYS driver rather than the
video driver that was specifically designed for your video card. Therefore, the Enable
VGA Mode is the option of choice for resetting the display resolution.
8|Page
www.pedrojesus.net
Microsoft Windows® XP – Gold eBook
Pedro Filipe C. Jesus
Last Known Good Configuration - When Windows boots successfully, it makes note
that it was able to boot successfully by marking the configuration as "good." If you
make a configuration change that renders Windows unbootable, you can select the
Last Known Good Configuration option to boot Windows using a known good configuration.
Directory Services Restore Mode - Although this option appears on Windows XP's
menu, it is only valid for Windows Server machines that are acting as domain controllers.
Debugging Mode - This option is an obsolete leftover from Windows NT. The option
allows you to send debugging information over a serial port (COM2) to another computer that is running a debugger. However, modern computers are no longer
equipped with traditional serial ports.
Disable Automatic Restart on System Failures - This option prevents Windows from
automatically rebooting when a blue screen error occurs. It is useful for troubleshooting when a machine mysteriously reboots itself in the middle of the night.
Start Windows Normally - This option causes Windows to load in the normal way.
Reboot - Use this option to reboot the machine.
Return to OS Choice Menu - Selecting this option takes you to a screen that lets you
choose which of the installed operating systems you want to boot. Unless you are
running a dual boot or a multi-boot configuration, Windows XP will be the only
choice.
Using the Shift key
You can also prevent some Windows XP startup programs from running by simply using
the Shift key. When you boot Windows XP, enter your username and password and click
OK. Immediately after that, hold down on the Shift key until all of your desktop icons
appear. However, be aware that this troubleshooting trick will not give you quite as
clean of a boot as booting to Safe Mode, and all of the usual device drivers will be
loaded. Holding the Shift key down only prevents Windows XP applications from launching automatically from the following locations:
\Documents and Settings\Username\Start Menu\Programs\Startup
\Documents and Settings\All Users\Start Menu\Programs\Startup
Windir\Profiles\Username\Start Menu\Programs\Startup
Windir\Profiles\All Users\Start Menu\Programs\Startup
One important thing to keep in mind about this technique is that applications may still
launch from other locations. For example, it is common for applications to be launched
by instructions embedded in the system's registry. If an application is called from the
registry, it will still load, regardless of whether the Shift key was held down or not.
www.pedrojesus.net
Page |9
Microsoft Windows® XP – Gold eBook
Pedro Filipe C. Jesus
Editing the registry in Windows XP
The Windows registry can be configured to launch applications at startup. In fact, adding
calls to launch applications to the Windows registry is a favorite technique of malware
authors. Don't assume though that just because a process is being launched from a call
in the registry that the process is related to malware, because many legitimate applications are launched through the registry. This is particularly true of antivirus software and
other applications that run in the background.
The most effective way to prevent an application from running on startup is to simply
delete the registry key that calls it. Before you do, though, it is extremely important that
you know exactly what it is that you are deleting. I will talk about identifying unknown
processes in much more detail later in this series. For now, however, if you need to identify a process prior to deleting a registry key that calls it, try doing a Google search on
the process' file name.
WARNING: Editing the registry is dangerous. Making an incorrect modification to the
registry can destroy Windows and/or your applications. I therefore recommend making
a full system backup before continuing.
With that said, Windows differentiates between processes that are only run during the
next reboot and those that are configured to run every time Windows is started. Calls to
processes that are run only after the next reboot can be found beneath the following
registry locations:
HKEY_LOCAL_MACHINE\SOFTWARE\Microsoft\Windows\CurrentVersion\RunOnce
HKEY_Current_User\SOFTWARE\Microsoft\Windows\CurrentVersion\RunOnce
Finding calls to processes that run each time Windows is booted is a bit trickier. Here are
the primary locations where these calls are stored:
HKEY_LOCAL_MACHINE\SOFTWARE\Microsoft\Windows\CurrentVersion\Run
HKEY_Current_User\SOFTWARE\Microsoft\Windows\CurrentVersion\Run
Calls can also be made on a per-user basis. The problem is that users are identified by
GUID, rather than by user name. It is common for some types of malware to create a call
to a malicious process for each individual user. The idea is that if one user cleans the call
to the process from the machine, another user can log into the machine and cause it to
become infected all over again. This is because Windows processes a registry key that is
not processed when other users log in. Therefore, if you are trying to track down a malicious process, then it is a good idea to check each user account.
10 | P a g e
www.pedrojesus.net
Microsoft Windows® XP – Gold eBook
Pedro Filipe C. Jesus
Typically, there won't be too many accounts to sift through, and you can find calls to
startup programs for individual user accounts at the following location:
HKEY_Users\user's GUID\SOFTWARE\Microsoft\Windows\CurrentVersion\Run
For users working in large networks, Group Policy can be used to prevent the registry
from launching applications on system startup in Windows XP. Keep in mind though that
using Group Policy settings as a troubleshooting technique here is usually an all or nothing proposition, as the Group Policy Object Editor isn't flexible enough to allow users to
selectively enable and disable various processes. You have the option of preventing
Windows XP from using the registry to launch processes at startup, but, by doing so, you
may disable desirable processes as well as unwanted ones. You do, however, have the
option of specifying the processes you want to run when a user logs in directly through
the Group Policy rather than through the registry.
Since Group Policies are hierarchical in nature, in the beginning I recommend that you
experiment with this technique using only the local security policy on a few workstations. If testing reveals that this technique isn't going to cause problems, then you can
always implement the settings at the domain or OU level of the Group Policy hierarchy
later on.
To prevent processes from being called from the registry at system startup, open the
Group Policy Object Editor and navigate through the Group Policy tree to the following
location:
User Configuration\Administrative Templates\System\Logon
There are three Group Policy settings of interest in this location:
Do Not Process the Run Once List - This setting prevents processes listed in the following registry locations from being launched:
HKEY_LOCAL_MACHINE\SOFTWARE\Microsoft\Windows\CurrentVersion\RunOnce
HKEY_Current_User\SOFTWARE\Microsoft\Windows\CurrentVersion\RunOnce
Do Not Process the Legacy Run List - This setting prevents processes listed in the following registry locations from being launched:
HKEY_LOCAL_MACHINE\SOFTWARE\Microsoft\Windows\CurrentVersion\Run
HKEY_Current_User\SOFTWARE\Microsoft\Windows\CurrentVersion\Run
KEY_Users\user's GUID\SOFTWARE\Microsoft\Windows\CurrentVersion\Run
Run These Programs at User Logon - This setting allows you to specify the process that
you do want to run during startup.
www.pedrojesus.net
P a g e | 11
Microsoft Windows® XP – Gold eBook
Pedro Filipe C. Jesus
Calls to startup processes can be associated either with the computer or with the user
account. Therefore, you will find a duplicate set of Group Policy settings beneath the
Group Policy Editor's Computer Configuration container at Computer Configuration\Administrative Templates\Logon.
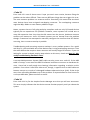
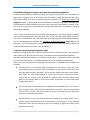
The Windows XP System Configuration Utility
Other ways to disable Windows XP startup programs include making changes to the
Startup folder and WIN.INI file. For example, any application placed in the Startup folder
will load automatically when Windows XP is booted. Although you can edit the Startup
folder and the WIN.INI file manually, it's sometimes easier to use the System Configuration Utility when troubleshooting Windows XP instead, because it allows you to enable
or disable commands by simply selecting or deselecting check boxes. This is handy since
sometimes you might see an entry for a startup program that you don't recognize.
The System Configuration Utility allows you to temporarily disable such an entry - and
learn the effects of doing so - without making a permanent configuration change to your
system. Once you are confident in the changes that you have made, you can then make
them permanent. You can access the System Configuration Utility by entering the
MSCONFIG command at the Run prompt.
Another place where Windows can load programs during startup is the WIN.INI file. The
WIN.INI file is left over from the days of Windows 3.x and has been retained for backward compatibility purposes.
WIN.INI is a text file located in the \Windows folder that can be opened using Notepad.
There are two lines in the WIN.INI file that are of particular interest to admins. These
lines are:
LOAD=
RUN=
By default these particular lines of code do not even exist in Windows XP, while older
versions of Windows included these lines near the top of the WIN.INI file. The idea was
that third-party application developers could use them as a way of automatically loading
applications or application modules at system startup.
Microsoft chose to remove the Load= and Run= lines from Windows XP because it prefers application developers to use the registry as the primary means for launching code
during startup. Even so, these commands are still fully supported and are often added to
the WIN.INI file by malware authors. Over the past several years, I've seen numerous
cases in which various types of spyware have been launched through the WIN.INI file
because relatively few people know that WIN.INI can be used to launch startup programs.
12 | P a g e
www.pedrojesus.net
Microsoft Windows® XP – Gold eBook
Pedro Filipe C. Jesus
Although you can edit the Startup folder and the WIN.INI file manually, it's sometimes
easier to use the System Configuration Utility instead. Personally, I prefer using the System Configuration Utility initially because it allows you to enable or disable commands
by simply selecting or deselecting check boxes. This is handy since sometimes you might
see an entry for a startup program that you don't recognize. The System Configuration
Utility allows you to temporarily disable such an entry - and learn the effects of doing so
- without making a permanent configuration change to your system. Once you are confident in the changes that you have made, you can then make them permanent.
Also, any time you've made a change to the system startup by using the System Configuration Utility, you will see a warning message during the boot process. To get rid of this
warning message, you must perform a normal startup and then manually remove the
offending settings.
www.pedrojesus.net
P a g e | 13
Microsoft Windows® XP – Gold eBook
Pedro Filipe C. Jesus
TROUBLESHOOTING THE BLUE SCREEN OF DEATH (BSoD)
When Windows XP encounter a serious system problem, the result is what has become
known as the Blue Screen of Death, which is an error displayed in a full-screen, nonwindowed text mode, with white text on a blue background providing information about
why Windows XP crashed.
The first step in troubleshooting the Windows XP Blue Screen of Death is figuring out
what is causing the error to occur. Whenever a Blue Screen of Death error is displayed,
the error contains a Stop message - a short error message meant to give you a clue as to
the cause of the problem. When troubleshooting Windows XP, it's important to know
that the Stop message is broken into four different parts, each of which has its own purpose. These parts include Bug Check Information, Recommended User Action, Driver
Information and Debug Port and Status Information.
How to troubleshoot a Windows XP Stop message
The Bug Check Information is made up of a stop error number immediately followed by
four additional parameters that are listed in parenthesis. From a Windows administrator's standpoint, the four numbers found in parenthesis are almost always unimportant,
as knowing the stop error code is typically sufficient.
The second part of the Stop message in Windows XP is the Recommended User Action,
which is usually a generic message telling you to try disabling or removing whatever
hardware or software was recently installed. While this is good advice, it won't always
fix the problem. By far the most important part of the Recommended User Action is the
very first line. This line directly corresponds to the stop error number. Using this bit of
text in conjunction with the stop error number can give admins a lot of insight into what
the problem is.
The Driver Information section tells you which file triggered the stop error. By looking at
the driver listed in this section and the information provided in the Bug Check Information and Recommended User Action sections, you can usually gain a fairly clear picture
of what has happened.
The Debug Port and Dump Status Information section tells you few things. First, it tells
you is which COM port is being used by the debugger and what speed the COM port is
running at (information that can be ignored with Windows XP). The other thing that this
section tells you is that a dump file was created. Essentially this means that the entire
contents of the system's memory were written to a file and placed on the hard drive.
Some Windows administrators like to use this file as a tool for troubleshooting the problem, though it is usually possible to fix the problem without delving into that level of
complexity.
14 | P a g e
www.pedrojesus.net
Microsoft Windows® XP – Gold eBook
Pedro Filipe C. Jesus
Different types of Stop messages
There are five different Stop messages that are commonly displayed when a Windows XP
Blue Screen of Death error is disk-related.
Stop: 0x0000007B or INACCESSIBLE_BOOT_DEVICE
This error message only occurs when Windows is booting. Two conditions can trigger
this error:
Windows was unable to initialize the disk hardware.
Windows initializes the disk hardware, but does not recognize the data found on the
system volume.
Whenever I've seen this error, it was caused by corrupted or incorrect device drivers for
the disk controller. (This is particularly common when the system is booting from a SCSI
drive or a RAID array.) However, this error can also result from file system corruption, a
boot sector virus or disk-related hardware problems. It can even occur on new systems
in which the disk controller contained outdated firmware.
Stop: 0x00000050 or PAGE_FAULT_IN_NONPAGED_AREA
Actually, this particular Stop error is not always disk-related. More often than not it's
related to faulty memory. The error indicates that the system tried to read data from the
system memory, but that the requested data was not found.
When the above error is disk-related, it can usually be traced to either a corrupted disk
volume or faulty disk cache memory.
Stop: 0x00000024 NTFS_FILE_SYSTEM
In newer versions of Windows, this error message almost always points to either corrupted system files on an NTFS volume or to bad blocks on the hard drive. In either case,
I recommend running the chkdsk tool with the /F switch to correct the error. Although
chkdsk can repair many types of disk errors, you may end up having to reinstall the latest
Windows service pack (or reinstall Windows if no service packs exist yet) so that system
files are overwritten with clean versions.
Older versions of Windows produced this error message for other reasons. The AppleTalk driver was known to trigger the error if too many files were present on a shared
volume. The error might also be attributed to the use of an incompatible antivirus program or disk utility.
0x00000077 or KERNEL_STACK_INPAGE_ERROR
This is another error message that can point to several causes. The error itself indicates
that the system attempted to read data from the pagefile, but was unable to locate the
requested page. The cause is often a memory error or else a storage hardware problem,
such as a loose data ribbon, incorrect SCSI termination or bad sectors on the hard disk.
www.pedrojesus.net
P a g e | 15
Microsoft Windows® XP – Gold eBook
Pedro Filipe C. Jesus
The problem can also occur if another system component has a resource conflict with
the disk controller, or if a virus is present.
Stop: 0x0000007A or KERNEL_DATA_INPAGE_ERROR
Although this error refers to the actual pagefile data rather than the stack, the actual
causes of the error are identical to those of a KERNEL_STACK_INPAGE_ERROR. The only
real difference is that, in rare cases, this error can occur if the system runs low on nonpaged pool resources.
You can troubleshoot this Blue Screen of Death error by trying the Last Known Good
Configuration utility. If that doesn't work, the next step would be to boot your Windows
XP recovery CD to repair the problem in Recovery Console Mode. Typing chkdsk drive: /F
/R at the command prompt windows should fix the error.
In most cases, stop errors will occur immediately after installing a piece of hardware or
software, or changing some aspect of Windows XP's configuration. If you notice this type
of cause and effect pattern, then a good Windows XP troubleshooting best practice
would be to boot Windows XP into Safe Mode and then troubleshoot whatever action it
was that caused the problem (or remove the new hardware).
If the problem just starts happening for no apparent reason, then there are two things
that you should look for; file corruption and memory problems. Try reinstalling the latest
Windows XP service pack (to refresh the system files) and download the latest versions
of all of the device drivers that are used by the system. If that doesn't work, then try
removing the computer's memory and replacing it with known good memory. Nine
times out of ten this will fix the problem.
Windows XP Events and Errors Database
The Windows XP Events and Errors search page provides an easy-to-search, online reference for the error and event messages generated by Windows XP Professional. Find detailed explanations, recommended user actions, and links to additional support and resources.
Webcast: Basic "Blue Screen" Error Troubleshooting
Microsoft Knowledge Base Article: 325011 - In this session, we will cover the basics of
"blue screen" errors, what they mean, and some common methods to troubleshoot the
problems. We will provide some background information about blue screen errors, and
we will talk about how to interpret the information, as well as how to recover from these
errors.
16 | P a g e
www.pedrojesus.net
Microsoft Windows® XP – Gold eBook
Pedro Filipe C. Jesus
Windows XP Error Codes
Stop: 0xA0 - Error Message during Hibernation
Microsoft Knowledge Base Article: 320899 - When you try to hibernate Windows XP
Stop: 0xC2 or
Stop: 0x000000C2 Error
Microsoft Knowledge Base Article: 314492 - This article explains how to debug Stop C2
errors.
Stop: 0x000000EA - Error Message When You Run Video-Intensive Programs
Microsoft Knowledge Base Article: 314215
Stop: 0x000000ED UNMOUNTABLE_BOOT_VOLUME
Microsoft Knowledge Base Article: 297185 - When you first restart your computer during
the upgrade to Windows XP.
Stop: 0x000000ED Error Message When Volume on IDE Drive with Caching Enabled Is
Mounted
Microsoft Knowledge Base Article: 315403 - When you use volumes that use the NTFS
file system on integrated device electronics (IDE) drives with caching enabled, you may
receive the following error message during startup:
Stop: 0x000000D1 - Error Message When You Turn Your Computer Off
Microsoft Knowledge Base Article: 317326 - When you shut down your computer that
has one or more universal serial bus (USB) devices attached to it.
Stop: 0x0000001E - Error Message During Windows Setup
Microsoft Knowledge Base Article: 314451 - When you run Windows XP Setup.
Stop: 0x0000007B - Errors in Windows XP
Microsoft Knowledge Base Article: 324103
Stop: 0x0000007B
Microsoft Knowledge Base Article: 314082 - After you move the system (boot) disk to a
backup computer, you may receive the following Stop error when you try to start Windows XP.
Stop: 0x0000007F
Microsoft Knowledge Base Article: 314102
Stop: c0000218 {Registry File Failure} The registry cannot load the hive (file):
\SystemRoot\System32\Config\SOFTWARE or its log or alternate. It is corrupt, absent,
or not writable.
Microsoft Knowledge Base Article: 307545
www.pedrojesus.net
P a g e | 17
Microsoft Windows® XP – Gold eBook
Pedro Filipe C. Jesus
Stop: C0000221 Unknown Hard Error or
Stop: C0000221 STATUS_IMAGE_CHECKSUM_MISMATCH
Microsoft Knowledge Base Article: 314474
Stop: 0xc000026C or
Stop: 0xc0000221 "Unable to Load Device Driver" - Error When You Start Windows XP
Microsoft Knowledge Base Article: 315241
Stop: 0x9F - Error in Windows XP
Microsoft Knowledge Base Article: 315249
18 | P a g e
www.pedrojesus.net
Microsoft Windows® XP – Gold eBook
Pedro Filipe C. Jesus
HOW TO RECOVER FROM CHANGES TO WINDOWS XP
As a Windows administrator, there are times when changes are made to Windows XP
that cause serious system problems. Fortunately, troubleshooting Windows XP to recover from these configuration changes can be easier than you might think -- depending on
the changes that have been made.
The first troubleshooting trick for Windows XP involves the Last Known Good Configuration feature. This will reverse the most recent system and driver changes within the
hardware profile, and If you are lucky and able to boot Windows XP using the Last
Known Good Configuration, then there is nothing else that you need to do (i.e. Windows
should boot successfully on the next attempt without you having to do anything special).
While that may seem simple enough, some admins still prefer to try and boot the system
into Safe Mode and manually troubleshoot the problem. This involves booting Windows
XP using a minimal set of drivers, making any necessary configuration repairs, and then
booting Windows XP normally. The disadvantage to using Safe Mode is that it is only
effective if you know how to fix the problem that rendered the system unbootable in the
first place. The Last Known Good Configuration feature, on the other hand, usually fixes
the problem even if you don't know what caused it.
Device driver rollback
Another troubleshooting technique for recovering from changes to Windows XP involves
device driver rollback. This is useful when someone installs an invalid device driver,
which can result in anything from a single hardware device not working to the entire
Windows XP system being rendered unbootable.
It's difficult to protect against faulty device drivers because they pose so many potential
problems. For example, although some are built into Windows XP, most are supplied by
third-parties, and they require intimate contact with the guts of the system. They can
also interact in odd ways, and a faulty one can cause problems at a point far removed
from the applications it services. In short, like dynamic link libraries, device drivers don't
just affect the application they are intended for. They can affect many other applications
that are performing quite different tasks but occasionally use the services of the particular device driver in question.
To use the device driver rollback technique with Windows XP, simply boot into Safe
Mode and open the Control Panel. Then click on the Performance and Maintenance link,
followed by the System link. When you do, Windows will open the System Properties
sheet. Select the sheet's Hardware tab and click the Device Manager button to open it.
www.pedrojesus.net
P a g e | 19
Microsoft Windows® XP – Gold eBook
Pedro Filipe C. Jesus
When the Device Manager opens, scroll through the list of devices until you find the
device that has an invalid driver associated with it. Next, right-click on that device and
choose the Properties command from the resulting shortcut menu to access the device's
properties sheet. Finally, select the sheet's Driver tab and click the Roll Back Driver button. Windows XP will now revert the device driver to the previous version.
Windows XP System Restore
There are a number of activities ranging from registry changes to software installations
that can cause Windows XP configuration problems. In such situations, often you can
troubleshoot with Windows XP System Restore to take your computer back to where it
was prior to the change. Basically, Windows XP creates system restore points just prior
to various types of configuration changes. If the change is catastrophic, then you can
revert back to the system restore point.
Simple boot to Safe Mode, log in as an admin and select the following commands from
the Start menu: All Programs > Accessories > System Tools > System Restore. When the
Windows XP System Restore application loads, choose the Restore My Computer to an
Earlier Time option and click Next. You will be taken to a screen that allows you to
choose a point in time that you want to revert the system to.
It's important to remember that while System Restore can be very a helpful troubleshooting tool, it also isn't perfect, and is not a good substitute for a normal backup. System Restore information is stored on the drive that System Restore is protecting. Therefore, if a hard drive goes bad, then the System Restore information may be lost as well.
You also might need to troubleshoot Windows XP System Restore itself. If you find that
you are unable to create or roll back system restore points, then the suggested troubleshooting technique is to reinstall System Restore. The one drawback to doing this is that
all existing System Restore points will be deleted. If you need to get System Restore
working, however, this may be a relatively small price to pay. Remember that if you have
a virus or malware infection and System Restore still seems to be working properly (i.e.,
you can create restore points), do not attempt to reinstall System Restore until after you
have dealt with the other issues. Reinstalling System Restore will delete all your existing
restore points, and those restore points may be the only way to get back what's been
damaged in Windows XP.
20 | P a g e
www.pedrojesus.net
Microsoft Windows® XP – Gold eBook
Pedro Filipe C. Jesus
- Reinstall System Restore in Windows XP
The most common symptoms of a damaged System Restore installation in Windows are
fairly obvious: You can't create System Restore points anymore, and you can't roll back
to them either. Most users don't know this -- and many experts don't either.
It is possible, however, to reinstall System Restore and get it running again if the mechanisms for performing System Restore become damaged or unregistered. The one
drawback to doing this is that all existing System Restore points will be deleted. But if
you need to get System Restore working, this may be a relatively small price to pay.
1. Enable hidden and system files in Explorer if you haven't done so already. To do this,
open Control Panel > Folder Options > View, and in Advanced Settings under Hidden
Files and Folders, select "Show hidden files and folders". Below that, uncheck "Hide
protected operating system files." (You will probably want to restore this option later.)
2. From Start > Run, type %SystemRoot%\inf and press Enter.
3. Find the file named sr.inf. Right click on it and select Install.
4. You may be prompted for your Windows installation media or a directory on your
hard drive that has the \i386 folder. If you installed Service Pack 2 (as opposed to installing a version of Windows XP with SP2 preinstalled), use the folder:
%SystemRoot%\ServicePackFiles\i386
If you have a virus or malware infection and System Restore still seems to be working
properly (i.e., you can create restore points), do not attempt to reinstall System Restore
until after you have dealt with the other problems at hand. As I mentioned, reinstalling
SR will delete all your existing restore points, and those restore points may be the only
way to get back what's been damaged if it comes to that.
www.pedrojesus.net
P a g e | 21
Microsoft Windows® XP – Gold eBook
Pedro Filipe C. Jesus
- Running System Restore from the Recovery Console (well, sort of)
One of the most commonly requested features in Windows is the ability to boot to the
Recovery Console and perform a System Restore operation. There are times when it's
simply not possible to boot Windows in safe mode to run System Restore, and the Recovery Console has no built-in way of running System Restore.
That being said, if you need to run System Restore to revert the system to an earlier version of the SYSTEM or SOFTWARE Registry hive, because of a corrupted Registry, it is
possible to do this manually. This method is far from perfect and doesn't take into account any of the other changes that System Restore might track (such as changed .DLLs
or other system components), but it will allow you to recover copies of the Registry in
the event of a failure—provided they've been saved with System Restore and are available.
Here is the 12-step process:
1.
Boot the Recovery Console from the Windows XP installation CD.
2.
When you're at the Recovery Console command prompt, change into the root directory of the system drive with the cd command (i.e., cd \).
3.
Change into the System Volume Information directory by typing cd system~1
on most machines, or cd "System Volume Information".
The filenames with ~1 are generated by default to provide backwards compatibility with programs that only recognize 8.3-format filenames. It's possible to disable
8.3 filename generation on NTFS volumes to gain some speed, but the speed
gained by doing this is generally pretty small and it can have the unintended consequence of making it impossible to use 8.3 filenames in contexts like this. If you
can't use 8.3 filenames to navigate, 8.3 name generation might be disabled. See
Microsoft's support document called How to Disable the 8.3 Name Creation on
NTFS Partitions.
4.
The System Volume Information directory contains a folder name _restore followed by a GUID in curly braces. Change into it by typing cd _resto~1; if that
doesn't work you'll have to type cd "_restore{GUID_STRING}", with the
full GUID string in place of GUID_STRING.
5.
In the _restore directory are a group of subdirectories starting with the letters
RP and followed by a number. These are the different restore points available for
that volume.
22 | P a g e
www.pedrojesus.net
Microsoft Windows® XP – Gold eBook
Pedro Filipe C. Jesus
6.
Check the date on each directory and look for one that corresponds to a date before you began experiencing problems.
7.
Change into the appropriate directory. If the directory is named RP74, for instance,
change into it by typing RP74.
8.
Inside that directory will be a subdirectory named snapshot; change into that
directory as well (cd snapshot)
9.
The snapshot directory holds backup copies of the SOFTWARE and SYSTEM Registry hives, named _REGISTRY_MACHINE_SOFTWARE and
_REGISTRY_MACHINE_SYSTEM, respectively.
10.
The target directory for these files is \Windows\System32\Config, and the hives
there are named SOFTWARE and SYSTEM. Rather than overwrite those files entirely, you can rename them to something else. Typing:
ren \windows\system32\config\software windows\system32\config\software.bak
and
ren \windows\system32\config\system \windows\system32\config\system.bak
will rename them to software.bak and system.bak, respectively.
11.
Copy in the backup hives:
copy _REGISTRY_MACHINE_SOFTWARE \windows\system32\config\software
and
copy _REGISTRY_MACHINE_SYSTEM \windows\system32\config\system
12.
Type exit to leave the Recovery Console and restart the computer.
If you have an alternate operating system, such as a Linux live-recovery CD or another
installation of Windows, that has access to the NTFS file system, you can perform the file
copying from there as well, without having to struggle as much with the command line.
www.pedrojesus.net
P a g e | 23
Microsoft Windows® XP – Gold eBook
Pedro Filipe C. Jesus
Windows XP Automated System Recovery (ASR)
The Automated System Recovery (ASR) feature in Windows XP Professional makes it
easier to restore a Windows system if the operating system, Registry and related files on
the system volume become corrupted. Like using a restore point, ASR rolls back the system to a known good state.
However, in XP Professional, ASR is much more powerful than restore points and requires careful use. In fact, Microsoft recommends that ASR only be used as a last resort
before going through the process of wiping the disk and restoring everything from the
installation CDs on up. ASR for Windows Server 2003 is related but different. For example, the procedure assumes you will be backing up over a network. Also, ASR reformats
the system volume in the process of restoration.
Recovery with ASR in XP Professional is a two-step process. In the boot recovery process,
a new copy of XP is installed on the system from the original CD. Next, restore a previously saved copy of the installation you're trying to recover. This overwrites some of
the files installed in the boot recovery process and restores the system state.
To make this work, you need three things: an ASR recovery floppy (which you create and
keep current yourself), an ASR backup and the original installation CD.
Use the ASR option in the Backup and Restore Wizard to create the ASR backup. This
backs up not only the disks containing the operating system, but also the system state
and related information. The ASR backup will amount to about 2 GB of data, so it is best
done to another hard disk.
The ASR floppy is vital to the operation and needs to be kept current. Although there is a
procedure for creating an ASR floppy from the backup media, it is much better to have a
floppy with your current Registry and other system state information on hand.
Microsoft provides instructions on using ASR, but, the fact is, you're much better off if
you can avoid ASR entirely. You should try other options such as system point restore,
driver rollbacks and restoring from a regular backup before resorting to ASR.
Use ASR to restore Windows system only as a last resort
24 | P a g e
www.pedrojesus.net
Microsoft Windows® XP – Gold eBook
Pedro Filipe C. Jesus
TROUBLESHOOTING WINDOWS XP HARDWARE ISSUES
The Windows XP Device Manager is a centralized console for configuring system hardware. If a piece of hardware is malfunctioning, the Device Manager will usually let you
know about it. While that may seem simple enough, Windows XP Device Manager errors
tend to consist of error codes and a brief, often cryptic description of the problem, and
the tricky part involves deciphering and troubleshooting those error codes.
You access Device Manager by opening the Control Panel and clicking the Performance
and Maintenance links, followed by the System link. Upon doing so, Windows will display the System Properties sheet. Select the properties sheet's Hardware tab, and click
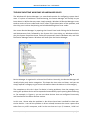
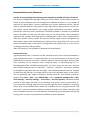
the Device Manager button. Windows will now open the Device Manager.
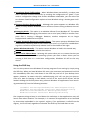
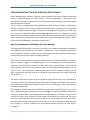
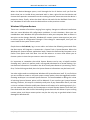
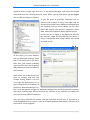
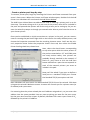
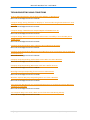
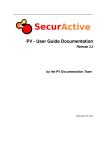
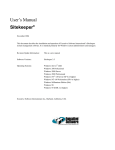
Fig. A
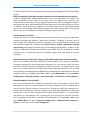
Device Manager is organized in a hierarchical fashion. Normally, the Device Manager will
initially display only device categories. This keeps the view nice and clean, and you can
simply expand a category to gain more information about the devices in that category.
The exception to this rule is that if a device is having problems, then the category containing the problem device will be expanded automatically upon opening Device Manager. For example, in Figure A, you can see three devices that are configured incorrectly
and listed within the Other Devices section.
In this case, I know what the problem is: No drivers have been installed for these particular devices. I can tell the problem is driver related, because the screen capture was
taken from my wife's computer, and I'm the one that set it up. If, however, I didn't alwww.pedrojesus.net
P a g e | 25
Microsoft Windows® XP – Gold eBook
Pedro Filipe C. Jesus
ready know what the problem was, I could simply right click on a device and select the
Properties command from the resulting shortcut menu. Upon doing so, Windows would
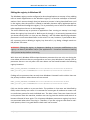
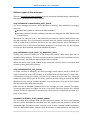
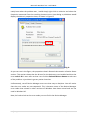
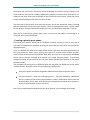
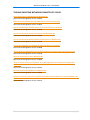
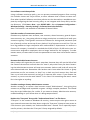
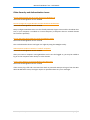
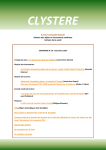
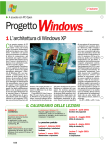
display the device's properties sheet, as shown in Figure B.
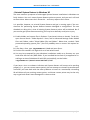
Fig. B
As you can see in the figure, the properties sheet's General tab contains a Device Status
section. This section shows that the drivers for the device are not installed and that the
error code is 28. It even tells me that I can click the Reinstall Drivers button to take care
of the problem. It just doesn't get any easier than that.
Unfortunately, not all Device Manager errors are that easy to decipher. You will notice
that the error codes are not sequential. This is because some of the Device Manager
error codes that existed in other versions of Windows have been retired and are not
used in Windows XP.
Now, let’s take a look at the error codes you can find in the Device Manager.
26 | P a g e
www.pedrojesus.net
Microsoft Windows® XP – Gold eBook
Pedro Filipe C. Jesus
Device Manager Error Codes.
- Code 1
The Device is not Configured Correctly (Code 1) - This error message usually means that
an incorrect device driver is associated with the device. Windows XP takes steps to prevent you from installing an invalid device driver, but the problem can occur if the system
was upgraded from a previous operating system or if you take steps to circumvent the
Device Manager.
To fix, I recommend visiting the hardware manufacturer's Web site and downloading the
correct driver for the device.
- Code 3
The Driver for this Device May be Corrupt or Your System May be Running Low on
Memory or Other Resources (Code 3) - In this case, the Device Status section actually
gives you a pretty good description of the problem but not a lot of information about
what to do about the problem. Initially, go with the assumption that the device driver is
corrupt. That being the case, you should begin the process by downloading the latest
version of the driver from the hardware manufacturer's Web site.
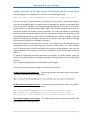
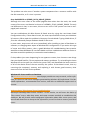
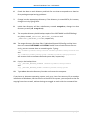
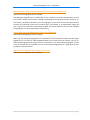
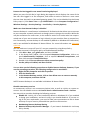
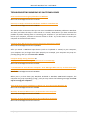
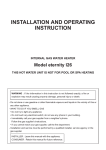
Once you have the new driver in hand, go to the Device Manager's Driver tab, shown in
Figure C, and click the Uninstall button. This will remove the corrupt driver.
Once the corrupt driver has been removed, the
error code should change from Error 3 to Error 1.
Follow the steps in the section above to install the
new device driver and correct the problem.
Error code 3 also cited a lack of system resources
as a possible cause of the problem. In all of my
years working with Windows XP, I have seen only
one system that was so low on memory that a device driver refused to load, and that problem was
because of a virus. Typically, if memory gets to be
Fig. C
so low that a device driver can't be loaded, you are
going to see some other rather severe performance and stability problems before the
system ever gets to the point of rejecting device drivers.
www.pedrojesus.net
P a g e | 27
Microsoft Windows® XP – Gold eBook
Pedro Filipe C. Jesus
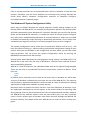
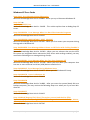
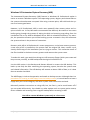
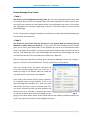
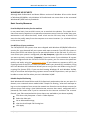
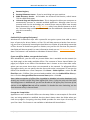
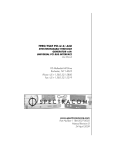
Even so, if you want to check your system's available memory, the easiest way to do so
is to press Ctrl+Alt+Delete and click the Task Manager button. When the Windows Task
Manager opens, go to the Performance tab. In Figure D, the Performance tab shows you
how much physical memory is installed in the computer and how much of that memory
remains.
You can easily resolve
some of the error messages produced by Device Manager. The first
step in fixing the problem is knowing what
the problem is.
Fig. D
28 | P a g e
www.pedrojesus.net
Microsoft Windows® XP – Gold eBook
Pedro Filipe C. Jesus
- Code 10
Error code 10 is displayed when a device driver is not started. A lot of people don't realize it, but Windows XP treats device drivers very similarly to services. In fact, device drivers can be stopped and started just like a service can. The reason why a lot of people
don't know this is because Microsoft doesn't provide us with a console similar to the
Service Control Manager that can be used for stopping and starting device drivers.
Getting rid of error code 10 is fairly simple, provided that you have the correct driver
installed and that driver isn't corrupt. I recommend uninstalling the device's driver and
installing a freshly downloaded version prior to attempting the following tactic.
If you still can't get the device driver to start, open a Command Prompt window and enter the DRIVERQUERY command. As you can see in Figure A, this command provides you
with some basic information about each device driver that is installed in the system. You
should scroll through this list until you locate the device driver that is giving you trouble.
Once you have located the correct driver, make note of its Module Name.
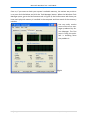
Now, what the
DRIVERQUERY
command doesn't
tell you is whether or not the drivers are running.
To see the status
of each device
driver, enter the
DRIVERQUERY
command again,
but this time append
the
/V
Fig. A switch. This will
cause DRIVERQUERY to run in verbose mode. In Figure B, you'll see that this command
tells you which drivers are running and which ones have stopped.
www.pedrojesus.net
P a g e | 29
Microsoft Windows® XP – Gold eBook
Pedro Filipe C. Jesus
You can use this information to verify what the Device Manager is telling you. Assuming
that DRIVERQUERY reports a device as being stopped, you can use the NET command to
start it. For example, Figure B shows that the Windows Driver Foundation Kernel has
stopped. This is normal for my system, but let's pretend that the driver is having problems and needs to be manually started.
Fig. B
First, I would have
to record the driver's module name,
which is WudfRd. I
can then plug this
module name into
the NET command,
along with the
start parameter.
The actual command looks like
this:
NET START
WudfRd
In this particular case, I receive an error message telling me that the driver can't start
because the device is disabled, as shown in Figure C. Even so, this gives me something to
go on. If this were a real-world problem, I could open the Device Manager, enable the
offending device and then re-enter the NET START WudfRd command. That should
make the problem go away.
Fig. C
30 | P a g e
www.pedrojesus.net
Microsoft Windows® XP – Gold eBook
Pedro Filipe C. Jesus
- Code 12
Error code 12 is one of those errors I hope you won't ever receive, because fixing the
problem can be rather difficult. There are two different things that can trigger this error.
The most common problem is a resource conflict. Essentially, this means that two hardware devices have been assigned overlapping resources. The overlapping resources
might be IRQs, DMAs or even memory address ranges.
Newer systems that are fully plug-and-play compliant and use only PCI-based devices
typically do not experience this problem. However, some systems still include one or
more ISA expansion slots. Any time that ISA comes into the picture, hardware resource
conflicts can become an issue. PCI-based systems are not exempt from the problem
though. If someone has attempted to manually configure the resources that PCI devices
are using, then a resource overlap is possible.
Troubleshooting and correcting resource overlaps is a very tedious process. For a quick
and dirty fix, you can disable one of the devices that is using overlapping resources. Then
the other device that requires those resources will usually begin to function. If you are
looking for a more in-depth, step-by-step solution to this error, check out Page 34 - Manually troubleshooting hardware issues
A corrupt Multiprocessor System (MPS) table can also cause error code 12. If the MPS
table is corrupt, it can cause the BIOS to allocate insufficient resources to hardware devices. I have had a really tough time locating information regarding a solution to this
problem. From what I have been able to tell, though, it appears that an MPS table can
become corrupt as a result of a damaged hardware abstraction layer (HAL). If that is the
case, then reinstalling Windows may fix the problem. If anyone knows for sure how to fix
a corrupt MPS table, please send me an email.
- Code 14
Error code 14 is by far the simplest Device Manager error that you will ever encounter.
This error simply indicates that the device cannot function properly until you reboot the
system.
www.pedrojesus.net
P a g e | 31
Microsoft Windows® XP – Gold eBook
Pedro Filipe C. Jesus
- Code 16
In most cases, you will only receive error code 16 on Windows XP systems that are running legacy or non-plug-and-play hardware. The actual error code indicates that Windows XP could not identify all of the resources that the device uses. Fortunately, correcting this problem is fairly easy.
To begin, open the Device Manager, right-click on the device that is experiencing difficulties and select the Properties command from the resulting shortcut menu. Upon doing
so, the Device Manager will display the device's properties sheet. Go to the properties
sheet's Resources tab and look for the identified resource. The unidentified resource will
be designated with a question mark.
The technique for assigning resources varies from device to device. In most cases, you
should be able to just select a new resource from the drop-down list. If Windows XP will
not allow you to do this, then verify that the Use Automatic Settings check box is cleared
and then click the Change Settings button.
- Code 18
This particular error code indicates that Windows XP requires the device's driver to be
reinstalled. Typically, you will only receive this error if the device driver has been damaged. The easiest way of troubleshooting this problem is to right-click on the device that
is experiencing difficulties and then select the Uninstall command from the resulting
shortcut menu. Once the device driver has been uninstalled, simply scan for hardware
changes and Windows will give you an opportunity to install a new device driver.
- Code 19
This is one of the more difficult errors to troubleshoot. Error code 19 indicates that the
registry entries related to the device are corrupt. Specifically, there are three different
registry problems that can cause this error to occur. Those conditions are:
Multiple services are defined for a device
A failure occurs while opening the service subkey
Windows cannot obtain the driver name from the service subkey
If you do an Internet search on this particular error code, you'll find many different
courses of action. I tend to think that the best thing to initially try is to boot Windows XP
using the Last Known Good Configuration. Other options include uninstalling the driver
and scanning for hardware changes or launching the Troubleshooting Wizard by clicking
the Troubleshoot button found on the General tab of the device's properties sheet.
Unfortunately, it seems Microsoft does not publish specific instructions on how to manually correct this problem by editing the registry. This means that if none of the other
repair techniques work, you may find yourself having to restore a backup or reinstall
Windows XP.
32 | P a g e
www.pedrojesus.net
Microsoft Windows® XP – Gold eBook
Pedro Filipe C. Jesus
- Code 21
Error code 21 usually involves a situation in which the administrator is faster than the
computer. This error code means that Windows is in the process of removing the device,
but that the process has not yet been completed. Most of the time, you can just wait a
few seconds, press the F5 key and the error will go away. If that doesn't fix the problem,
then a reboot usually will.
- Code 22
This error simply indicates that a device has been disabled. When a device is disabled, a
large red X will appear over the device's icon.
You can make the error go away by re-enabling the device. To do so, right-click on the
device and choose the Enable command from the resulting shortcut menu.
- Code 24
Error code 24 is one of the more generic Device Manager error codes. It indicates that
the device is either not present, not working properly or does not have all of the necessary drivers installed.
Because this error code can mean several different things, troubleshooting the problem
can be a bit tricky. If it seems that Windows XP thinks that the device is not present,
then the problem could be bad hardware or you may have an outdated driver that does
not fully recognize the hardware.
Occasionally, you may also find that error code 24 occurs if the device has been prepared for removal, but has not yet been removed. In such cases, the error should go
away as soon as the device is removed.
Microsoft's recommended course of action for the problem is to run the Troubleshooting Wizard. You can access this wizard by clicking the Troubleshooting button found on
the General tab of the device's properties sheet.
- Code 28
This is one of the more common error codes. It indicates that no drivers are installed for
the device. You can correct this problem by right-clicking on the device and choosing the
Update Driver command from the resulting shortcut menu.
www.pedrojesus.net
P a g e | 33
Microsoft Windows® XP – Gold eBook
Pedro Filipe C. Jesus
Manually troubleshooting hardware issues
Although plug-and-play technology has become fairly reliable as it has matured, in some
cases, it still doesn't work perfectly. For example, to this day there are still system
boards that contain ISA expansion slots, which allow modern PCs to use legacy devices.
Sometimes ISA-based devices can interfere with PCI devices.
Likewise, some x86 system boards use IRQ sharing across two or more PCI slots. Most of
the time this arrangement works well, but sometimes conflicts do occur.
If you don't happen to have an ACPI-based system, or a system that allows you to toggle
between ACPI and non-ACPI modes, then you may be able to resolve hardware conflicts
by manually reallocating hardware resources.
- Before you begin – be forewarned
The technique I am about to show you is very similar to a resource allocation technique
that used to be common for systems running Windows 95, Windows 98 and Windows
ME. While you can generally use this technique without consequence in a Windows 9x
or a Windows ME environment, Windows XP is a much more sophisticated operating
system. Depending on the change you make, it is possible that you will receive a Blue
Screen of Death, citing a STOP: 0x00000079 error.
When this error occurs, it is because the HAL (Hardware Abstraction Layer) no longer
matches the machine's hardware configuration. If this happens, you will have to perform
a clean Windows installation (an upgrade won't work).
My point is that the following technique should allow you to resolve any hardware resource conflicts, but you must be prepared to install Windows from scratch if necessary.
- Resolving hardware conflicts
Generally speaking, you must ensure that each hardware device has both a unique IRQ
and memory range. If a hardware device uses a DMA, then that should be unique as
well.
Note: As I mentioned earlier, most modern systems are designed to use IRQ
sharing, but if you are reading this, then I'm assuming that IRQ sharing isn't
working for one reason or another.
When resource conflicts occur, typically either one or both of the conflicting devices
won't work. That being the case, your goal is to eliminate the conflict so that both devices can work. Incidentally, if you don't need both devices, then you can save yourself a
whole lot of effort by simply disabling or removing the device that you don't need. To
34 | P a g e
www.pedrojesus.net
Microsoft Windows® XP – Gold eBook
Pedro Filipe C. Jesus
disable a device, simply right click on it in the Device Manager, and select the Disable
command from the resulting shortcut menu. When you do, the device will be flagged
with a red X, as shown in Figure A.
If you do need to manually reallocate the resources that a device is using, then right click on
the device and select the Properties command from
the resulting shortcut menu. When you do, Windows will display the device's properties sheet.
Now, select the properties sheet's Resources tab.
As you can see in Figure B, the Resources tab lists
the memory range and the IRQ that the device is
using. If the device were using a DMA, that would
be listed as well.
Fig. B
Fig. A
At this point, you must deselect
the Use Automatic Settings check
box. If this check box is not available, then your system probably
uses the ACPI HAL, which ignores
IRQ assignments that are stored in
the firmware.
Now, select the resource that you
want to reassign and click the
Change Setting button. You will
now have the opportunity to assign a different set of resources to
the device. Notice the Device Conflict List at the bottom of Figure B. Windows compares the currently selected resources
with those used by other devices and lists any conflicts. If any conflicts are listed, then
you must choose different resources.
Once you have resolved the conflict, click OK and hope for the best. If you receive a
STOP: 0x00000079 error, then it's time to reinstall Windows. Remember, this must be a
clean install, not an upgrade.
www.pedrojesus.net
P a g e | 35
Microsoft Windows® XP – Gold eBook
Pedro Filipe C. Jesus
USB and printer problems
Universal Serial Bus is the standard for connecting USB devices from printers to external
USB hard drives on Windows XP computers. Unfortunately, transferring files between a
USB 2.0 hub and a Windows XP system can fail in several strange ways. For example, if
you are using a USB keyboard, the transfer may fail. Troubleshooting problems like this
is fairly simple, as Microsoft has issued a hotfix to solve the issue. For most hardware
related problems, though, it's not that easy.
Printer driver and hardware incompatibilities are often at the heart of many printer
problems, especially if you are using the 64-bit edition of Windows XP. Most often, the
issues involve hardware drivers since so many low-end or inexpensive hardware devices
that have 32-bit drivers for Windows XP do not have a corresponding 64-bit version. This
problem can be solved failty easily with printers that use PCL or PostScript, but printers
that use the driver to perform the actual rasterization but have no 64-bit driver, it
creates a problem, as in this case 32-bit hardware drivers cannot be used at all.
So unless the hardware manufacturer changes its tune, or unless you decide to swap in a
device that has 64-bit driver support, there is no easy workaround for the problem. One
that is frequently suggested – installing the printer on another computer with 32-bit
driver support and sharing the printer out -- doesn't work either, because the other
computer still needs a 64-bit driver to print to it.
I found a workaround that's elaborate, but functional. A user had a 32-bit machine with
a printer attached to it, and whenever he needed something printed, he simply dropped
the file from the 64-bit machine into the 32-bit computer's shared files folder. If the application needed to do the printing wasn't available on the target machine, he used a 64bit PostScript printer driver to produce a .PS file, which he could then rasterize on the
target machine. (His chosen way to do this was to use Adobe Acrobat).
Microsoft has a generic PostScript driver in 64-bit Windows, the MS Publisher Imagesetter, that should handle most output-to-PostScript jobs. For the best possible flexibility,
set default settings for the printer's PostScript options as follows:
TrueType Font: Download as Softfont
PostScript Output Option: Optimize for Portability
TrueType Font Download Option: Outline
Send PostScript Error Handler: Yes
Compress Bitmaps: Yes
These settings can be found in the printer's Properties pane, under General|Printing
Preferences|Advanced. (You'll need to expand all the available trees to see each option).
36 | P a g e
www.pedrojesus.net
Microsoft Windows® XP – Gold eBook
Pedro Filipe C. Jesus
Troubleshooting print queue overload and network congestion
Common network printer problems involve print queue overload, which is caused by too
many users trying to print at the same time. For admins using Windows XP with Windows Server 2003, one way to troubleshoot this problem is by creating a printer pool
(page 37), which is a group of printers attached to a common print queue, allowing multiple documents to be printed at the same time. Once the printer pool is created, users
can print to the pool by connecting to it using a defined share, immediately reducing
print queue overload.
There is more than one cause of network printer congestion, too. For example, frivolous
users send out large and unnecessary print jobs, it can slow everything down. If you notice that a particular user has a reputation for printing large jobs and creatibg problems,
you can troubleshoot the problem be creating a priority print queue (page 39) just for
that user. If you are looking for freeware to put an end to printer congestion, there are
several usefull options out there, such as PaperCut.
- How to create a network printer pool
Network printing allows more than one user to share a common printer. But when too
many users try to print at the same time, a network printer can become congested.
One way around this problem is to create a printer pool -- a group of printers attached
to a common print queue, so multiple documents can be printed simultaneously.
There are three prerequisites to creating a printer pool in a Windows Server 2003 environment.
All the printers in the printer pool be identical to each other. Since you never
know which printer will print a user's document, all the printers must work with
the same device driver. Moreover, all the printers need to have the same capabilities. (After all, what would happen if a user tried to print a document in color,
and one of the printers in the pool did not support color printing?) When every
device in the printer pool is of the same make and model, you can avoid these
compatibility issues.
The printer pool must be hosted on a Windows Server 2003 server. The printers
don't actually have to be physically attached to the server, but the print queue
must exist on a server. This print queue must then be shared so that users can
print to the network print queue.
All the printers in the print pool need to be located in the same place. (This is
more a matter of practicality than a requirement.) If the printers in the pool are
scattered, users will be running all over the building to figure out where their
documents printed.
www.pedrojesus.net
P a g e | 37
Microsoft Windows® XP – Gold eBook
Pedro Filipe C. Jesus
- Create a printer pool step-by-step
To create a printer pool, begin by choosing the Printers and Faxes command from your
server's Start menu. When the Printers and Faxes window opens, double-click the Add
Printer icon. Windows will now launch the Add Printer Wizard.
The Add Printer Wizard does not address the issue of creating a printer pool in an obvious way. The easiest thing to do is to pick one of the printers that will be included in
the pool and pretend that printer will be the only printer you're setting up. So just answer the wizard's prompts as though you wanted to be able to print from the server to
your chosen printer.
Once you've established an initial connection to a printer in the pool, you can concentrate on creating the pool itself. Right-click on the icon for the newly defined printer, and
choose the Properties command from the resulting shortcut menu. You'll see the printer's properties sheet. Select the properties sheet's Ports tab, then select the Enable
Printer Pooling check box, shown here.
Next, select the check boxes corresponding
to any other ports which the other printers in
the pool are attached to. LPT and COM ports
are nearly extinct today. Your printers are
probably directly attached to the network. If
that's so, you'll have to click the Add Port
button and define a port that corresponds to
each of the network printers you want to
include in the pool.
Now you'll be asked if you want to define a
local port or a standard TCP/IP port. Choose
the Standard TCP/IP port option and click
Next. Windows will now launch the Add Standard TCP/IP Printer Port wizard. Click Next
to bypass the wizard's Welcome screen. A screen will now ask you for a printer name (or
IP address) and a port name.
I'm assuming that the printer already has an IP address assigned to it, so just enter that
address into the space provided. You can enter anything you want for the port name,
but the port name must be unique. By default, Windows will create a port name of IP_,
followed by the printer's IP address.
38 | P a g e
www.pedrojesus.net
Microsoft Windows® XP – Gold eBook
Pedro Filipe C. Jesus
Click Next and you'll see a summary screen displaying the options you've chosen. Click
Finish and the port will be created. Repeat this process for each printer that will be included in the pool. Once you've defined all the necessary printer ports, select the check
boxes corresponding to each port you want to use.
The final step in the process is to share the printer. Go to the properties sheet's Sharing
tab and select the Share this Printer button. You'll be prompted to enter a share name
for the printer, and you should also select the List in the Directory check box. Click OK.
Now you've created your printer pool. Users can print to the pool by connecting to it
using the share you just defined.
- Creating a priority print queue
Prioritized print queues allow you to configure network printing in such a way that a
user with a reputation for frivolous printing will never disrupt users who are trying to do
legitimate work.
Sure, it's possible for admins to simply delete a user's job from the print queue when it
ties up a printer for hours. But a priority print queue is a much more reliable and efficient solution to this perennial problem. And, they are easy to set up because Windows
allows you to connect multiple print queues to a single physical printer. To prioritize
network printing, all you have to do is to point these multiple print queues to the same
physical printer.
The procedure for doing so is no different than the way that you would set up any other
network printer. However, there are two important differences:
Each print queue should be assigned a different local name and share name.
The print queues – both low and high priority -- must be hosted by a Windows
server. Creating a low priority print queue on a user's workstation won't have the
desired effect; users must send documents through these shared print queues in
order for prioritization to work correctly.
Once you've created and tested the various print queues, you can begin prioritizing.
www.pedrojesus.net
P a g e | 39
Microsoft Windows® XP – Gold eBook
Pedro Filipe C. Jesus
Step 1: Lock the troublesome user
out of your primary print queue.
Right click on your primary print
queue, and select the Properties
command from the resulting
shortcut menu. You'll see the printer's properties sheet. You can use
the properties sheets Security tab,
shown in Figure A, to deny print
rights to the troublesome user.
This will prevent the user from
simply connecting to a print queue
that has been assigned a higher
priority.
Fig. A
Step 2: Assign a priority to the
print queue that you have created
for the troublesome user.
Go to the properties sheet's Advanced tab. As you can see in Figure B, the Advanced tab contains a
Priority setting. By default, all network printers have a priority setting of 1. The lower the priority
setting, the higher the priority.
Therefore, you'll want to use a
number that is higher than 1 for
your low priority print queue.
Fig. B
You might also notice in the figure that the Advanced tab allows you to configure the
times a day when the printer is available. You can use these settings to prevent a troublesome user from coming in to the office late at night and printing something. Availability settings are applied to specific print queues, so you can limit the hours that the printer is available to the troublesome user, without impacting the other users.
40 | P a g e
www.pedrojesus.net
Microsoft Windows® XP – Gold eBook
Pedro Filipe C. Jesus
Other Hardware Issues
A Partial List of Driver Error Codes That the Driver Verifier Tool Uses to Report Problems
Microsoft Knowledge Base Article: 315252
How Processor Speed Is Reported to a Computer
Microsoft Knowledge Base Article: 312104
How to Determine Which Video Driver Is Loading in Windows XP
Microsoft Knowledge Base Article: 314854
How to Troubleshoot CD-ROM Drive Problems in Windows XP
Microsoft Knowledge Base Article: 314096
How to Troubleshoot Hardware and Software Driver Problems in Windows XP
Microsoft Knowledge Base Article: 322205
How to Troubleshoot the Video Adapter Driver in Safe Mode
Microsoft Knowledge Base Article: 292460
How to Use Driver Verifier to Troubleshoot Device Drivers in Windows XP
Microsoft Knowledge Base Article: 244617
Resources for Troubleshooting Sound Problems in Windows XP
Microsoft Knowledge Base Article: 307918
Resources for Troubleshooting Modem Problems in Windows XP
Microsoft Knowledge Base Article: 308022
Resources for Troubleshooting Games and Multimedia in Windows XP
Microsoft Knowledge Base Article: 310697
Troubleshooting Cable Modems
Microsoft Knowledge Base Article: 310089
CD-ROM May Not Run Automatically in Windows XP
Microsoft Knowledge Base Article: 314855
www.pedrojesus.net
P a g e | 41
Microsoft Windows® XP – Gold eBook
Pedro Filipe C. Jesus
TROUBLESHOOTING HANG CONDITIONS
An Error Message Appears with an Asus Video Adapter in Windows XP
Microsoft Knowledge Base Article: 309126
Computer Hangs During Shutdown or Displays a "Cannot Find Enough Free Resources" Error
Message
Microsoft Knowledge Base Article: 314101
Computer Hangs if USB Selective Suspend Option of USB Mouse Is On
Microsoft Knowledge Base Article: 317673
Computer Hangs When You Resume from Hibernation or Standby if Your Ultra Bay Has a
UDMA Device
Microsoft Knowledge Base Article: 317087
Computer Stops Responding After It Restarts During Windows XP Setup
Microsoft Knowledge Base Article: 307551
Computer Stops Responding When You Install Windows XP on a Computer with an i815 Chip
Set Motherboard
Microsoft Knowledge Base Article: 282195
Computer Stops Responding with a Black Screen When You Start Windows
Microsoft Knowledge Base Article: 314503
Computer Stops Responding When Shim Code Has a Buffer Overrun
Microsoft Knowledge Base Article: 308035
Msconfig.exe Stops Responding if User Is Not an Administrator
Microsoft Knowledge Base Article: 314448
Windows Explorer May Stop Responding When You Close a Window
Microsoft Knowledge Base Article: 315094
Your Computer May Hang If You Unexpectedly Remove a PC Card Storage Device While the
Computer Is in Standby
Microsoft Knowledge Base Article: 311822
You Computer May Pause with a Black Screen If You Press ESC During Startup
Microsoft Knowledge Base Article: 311799
42 | P a g e
www.pedrojesus.net
Microsoft Windows® XP – Gold eBook
Pedro Filipe C. Jesus
TROUBLESHOOTING NETWORK CONNECTIVITY ISSUES
Basic L2TP/IPSec Troubleshooting in Windows XP
Microsoft Knowledge Base Article: 314831
General Troubleshooting for IEEE 1394 Devices and Host Controllers
Microsoft Knowledge Base Article: 314873
How to Troubleshoot Possible Causes of Internet Connection Problems
Microsoft Knowledge Base Article: 314095
How to Troubleshoot TCP/IP Connectivity with Windows XP
Microsoft Knowledge Base Article: 314067
How to Troubleshoot Wireless Network Connections in Windows XP
Microsoft Knowledge Base Article: 313242
How to Use TRACERT to Troubleshoot TCP/IP Problems in Windows
Microsoft Knowledge Base Article: 314868
How to Write an LMHOSTS File for Domain Validation and Other Name Resolution Issues
Microsoft Knowledge Base Article: 314108
Inbound Connections Limit in Windows XP
Microsoft Knowledge Base Article: 314882
"Ping: Transmit Failed, Error Code 65" Error Message When You Attempt to Ping Another
Computer
Microsoft Knowledge Base Article: 316414
SSL Connection Does Not Work on Windows XP
Microsoft Knowledge Base Article: 314864
TCP/IP Functionality and Internet Connectivity Are Disrupted When You Uninstall McAfee Personal Firewall
Microsoft Knowledge Base Article: 316522
www.pedrojesus.net
P a g e | 43
Microsoft Windows® XP – Gold eBook
Pedro Filipe C. Jesus
WINDOWS XP PERFORMANCE TUNNING
Windows XP offers excellent overall performance-which includes dramatically faster
boot and resume times, along with highly responsive applications. This white paper addresses some of the key performance improvements in Windows XP, and highlights
some of the issues you should keep in mind when evaluating a system configuration.
Description of the Windows XP Logman.exe, Relog.exe, and Typeperf.exe Tools
Microsoft Knowledge Base Article: 303133
This article provides a description of the Windows XP Logman.exe, Relog.exe, and Typeperf.exe
command-line tools you can use in conjunction with, or separate from, System Monitor and the
Performance Logs and Alerts snap-in.
Description of Performance Options in Windows
Microsoft Knowledge Base Article: 259025
This article describes the performance options in Windows
Performance Benchmarking on Windows XP
This article discusses some of the built-in performance tuning features of Windows XP
How to Set Performance Options
Microsoft Knowledge Base Article: 308417
Windows allocates resources according to its settings and manages devices accordingly. You can
use the System tool in Control Panel to change performance options that control how programs
use memory, including paging file size, or environment variables that tell your computer where
to find some types of information. This article explains how to set the performance options for
your computer.
Using Performance Monitor To Identify A Pool Leak
Microsoft Knowledge Base Article: 130926
A memory leak occurs when a memory pool allocates some of its memory to a process and the
process does not return the memory. When this happens repeatedly, the memory pool is depleted.
Windows Print Spooler Performance Enhancements
Microsoft Knowledge Base Article: 240683
Windows includes several print spooler optimizations designed to significantly reduce startup
time. This article lists these print spooler enhancements.
44 | P a g e
www.pedrojesus.net
Microsoft Windows® XP – Gold eBook
Pedro Filipe C. Jesus
How to Configure Paging Files for Optimization and Recovery in Windows XP
Microsoft Knowledge Base Article: 314482
The paging file (Pagefile.sys) is a hidden file on your computer's hard disk that Windows XP uses
as if it were random access memory (RAM). The paging file and physical memory comprise virtual memory. By default, Windows stores the paging file on the boot partition (the partition that
contains the operating system and its support files). The default, or recommended, paging file
size is equal to 1.5 times the total amount of RAM. This article discusses how you can configure
the paging file for system optimization and recovery
How to Overcome 4,095-MB Paging File Size Limit in Windows
Microsoft Knowledge Base Article: 237740
When you are setting the paging file size in Windows, the documentation states that the largest
paging file you can select is 4,095 megabytes (MB). This is the limit set per volume; you can actually create paging files this large on one or more drives if you need a larger paging file. If extra
drives or volumes are not available, you can create multiple paging files on a single drive by placing them in separate folders.
How to View and Manage Event Logs in Event Viewer
Microsoft Knowledge Base Article: 308427
www.pedrojesus.net
P a g e | 45
Microsoft Windows® XP – Gold eBook
Pedro Filipe C. Jesus
WINDOWS XP SECURITY
Although both Professional and Home Edition versions of Windows XP are miles ahead
of Windows 95/98/Me, only Windows XP Professional can come close to the venerated
Windows NT/2000 security standards.
Basic Security Measures
Provide Physical Security for the machine
It may seem basic, but we didn't want you to overlook the obvious. The simple fact is
that most security breaches in corporate environments occur from the inside. Keep your
workstation in an office that locks, install a lock on the CPU case, keep it locked, and
store the key safely away from the computer at a secure location. (i.e. a locked cabinet
in the server room)
Use NTFS on all your partitions
The FAT16/FAT32 file systems that were shipped with Windows 95/98/ME offered no
security for your data and left your system wide open to attacks. The NTFS file system is
faster than FAT32 and allows you to set permissions down to the file level. If you're unsure of how your system is configured, open My Computer, right click on the drive letter
you want to check, and select "Properties" from the menu. If your Windows XP system
was preconfigured with the FAT16 or FAT32 file system, you can convert the partitions
quickly and easily using the convert.exe utility. (If you choose to convert to NTFS, you
cannot go back to the FAT or FAT32 file system unless you reinstall XP) In addition, using
NTFS on Windows XP Professional allows you to encrypt files and folders using the Encrypting File System (EFS). If you are dual booting Windows XP and Windows 9x/Me,
keep in mind that these operating systems cannot read NTFS partitions, and you won't
be able to access the files when you are in Windows 9x/ME.
Disable Simple File Sharing
Both Windows XP Home Edition and XP Professional workstations that are not part of a
domain, use a network access model called "Simple File Sharing," where all attempts to
log on to the computer from across the network are forced to use the Guest account (to
prevent them from using a local Administrator account that wasn't configured with a
password) This means that if you're connected to the internet and don't use a secure
firewall, your files contained within those shares are available to just about anybody.
Click Start > My Computer > Tools > Folder Options
Select the View tab
Go to Advanced Settings,
clear the Use Simple File Sharing box
click Apply
46 | P a g e
www.pedrojesus.net
Microsoft Windows® XP – Gold eBook
Pedro Filipe C. Jesus
Unfortunately, XP Home Edition doesn't allow you to disable Simple File Sharing and is
unable to join a domain, so the best you can hope for is to make sure you set your
shared folders to be read only, hide the file shares by using a $ sign after the folder
name, or if your using the NTFS file system, use the 'Make Private" option in the folder
properties. Windows XP Professional workstations that are part of a domain or that have
Simple File Sharing disabled, use the "Classic" NT security model that requires all users
to authenticate before granting access to shared folders. For more information on File
Sharing in XP, see KB Article 304040.
Use passwords on all user accounts
Both Windows XP Professional and Home Edition allow user accounts to utilize blank
passwords to log into their local workstations, although in XP Professional, accounts with
blank passwords can no longer be used to log on to the computer remotely over the
network. Obviously, blank passwords are a bad idea if you care about security. Make
sure you assign passwords to all accounts, especially the Administrator account and any
accounts with Administrator privileges. By the way, in XP Home Edition all user accounts
have administrative privileges and no password by default. Make sure you close this hole
as soon as possible
Use the Administrator Group with care
It's very common for home users and small business administrators to simply give all
local accounts full Administrator privileges in order eliminate the inconvenience of logging into another account. However this practice gives a hacker the opportunity to try to
crack a greater number of administrator level accounts and increases his/her chance for
success. It also increases the odds that malicious code executed via an e-mail attachment or other vector can do more damage to your files. In a workgroup consider placing
local users with a greater need for control in the local Power Users group, instead of the
Administrators group. And avoid the temptation of using the local administrator account
as your default login account.
Disable the Guest Account
The guest account has always been a huge hacker hole, and should be disabled as soon
as you install your workstation. Unfortunately, this setting recommendation only applies
to Windows XP Professional computers that belong to a domain, or to computers that
do not use the Simple File Sharing model. Windows XP Home Edition will not allow you
to disable the Guest account. When you disable the Guest account in Windows XP Home
Edition via the Control Panel, it only removes the listing of the Guest account from the
Fast User Switching Welcome screen, and the Log-On Local right. The network credentials will remain intact and guest users will still be able to connect to shared resources of
the affected machine across a network. Microsoft Knowledge Base Article: 300489 de-
www.pedrojesus.net
P a g e | 47
Microsoft Windows® XP – Gold eBook
Pedro Filipe C. Jesus
scribes this behavior and states that it is by design. The best workaround for XP Home
Users is to assign a strong password to the Guest account.
Use a firewall if you have a full time internet connection
Having instant, high speed access to the internet is a real convenience but it also puts
your data at risk. Although XP comes with a built in firewall (called ICF), it is not enabled
by default, and it only filters incoming traffic without attempting to manage or restrict
outbound connections at all. While this may be fine for most users, we highly recommend using a third party personal firewall. For corporate users already behind a firewall,
consider using Group Policy to enable ICF and disable specific ports when users are not
connected to the corporate network. For more information on ICF, see: How to Enable
or Disable Internet Connection Firewall in Windows XP (Q283673)
Install Antivirus Software on all workstations
Viruses and other forms of malicious software have been around for years, but today's
malware utilizes the internet and e-mail systems to spread globally in a matter of hours.
Installing Antivirus software is a basic step in protecting your data, but it's near useless if
the definitions aren't updated.
Keep up to date with hotfixes and service packs
Windows XP is a complex operating system and is not immune to its own bugs and security holes. Its common tactic for hackers to use the latest known security hole to break
into a system and work backward from there until they find an open door that gives
them full access. In fact 99% of system breaches are executed using known security vulnerabilities that were never patched. Use the Windows Update feature or automatic
update to keep your system up to date. You can also use the Microsoft Baseline Security
Analyzer to check your system for known vulnerabilities.
To enable automatic update in Windows XP:
Click Start > Control Panel > Performance and Maintenance > System.
On the Automatic Updates tab, click the setting of your choice
Secure your Backup tapes
It's amazing how many organizations implement excellent platform security, and then
don't encrypt and/or lock up their backup tapes containing the same data. It's also a
good idea to keep your Emergency Repair Disks locked up and stored away from your
workstations as well.
48 | P a g e
www.pedrojesus.net
Microsoft Windows® XP – Gold eBook
Pedro Filipe C. Jesus
Intermediate Security Measures
Use the Security Configuration Manager and templates provided with XP Professional
The Security Configuration Manager (SCM) set of tools allows security administrators to
define security templates that can be applied to individual machines or any number of
machines via group policy. Security templates can contain password policies, lockout
policies, Kerberos policies, audit policies, event log settings, registry values, service startup modes, service permissions, user rights, group membership restrictions, registry
permissions and file system permissions. Microsoft provides a number of predefined
security templates to help you lock down your PC via Group Policy. These templates
represent low, medium, and high security configurations, which can be customized to
meet your specific security needs. The security relevant registry values configurable by
SCM appear under Local Policies\Security Options when using SCM tools such as the
security templates snap-in, the security configuration and analysis snap-in, or the security settings extension to Group Policy.
Note: This feature is not available on Windows XP Home Edition
Password Security
A good password policy is essential to your network security, but is often overlooked. In
large organizations there is a huge temptation for lazy administrators to create all local
Administrator accounts (or worse, a common domain level administrator account) that
uses a variation of the company name, computer name, or advertising tag line. i.e.
%companyname%#1, win2k%companyname%, etc. Even worse are new user accounts
with simple passwords such as "welcome", "letmein", "new2you", that aren't required
to changed the password after the first logon. Use complex passwords that are changed
at least every 60 -90 days. Use Group Policy or the local computer policy to set restriction on password age, length, complexity, lockout duration, and number of bad attempts. (Click Start > Run > type GPEDIT.MSC > Go to Computer Configuration > Windows Settings > Security Settings > Local Policy > Security Options) Passwords should
contain at least eight characters, and preferably nine (recent security information reports that many cracking programs are using the eight character standard as a starting
point). Also, each password must follow the standards set for strong passwords. The
basic goal is that the password should be complex enough to foil hacker attempts, and
not so complex that users will have difficulty remembering their passwords and end up
writing them on sticky notes pasted to the bottom of their keyboards.
www.pedrojesus.net
P a g e | 49
Microsoft Windows® XP – Gold eBook
Pedro Filipe C. Jesus
Use software restriction policies
Using a software restriction policy, you can prevent unwanted programs from running;
this includes viruses and Trojan horses, or other software that is known to cause conflicts when installed. Software restriction policies can also be used on a standalone computer by configuring the local security policy, or can integrate with Group Policy and Active Directory. (Click Start > Run > type GPEDIT.MSC > Go to Computer Configuration >
Windows Settings > Security Settings > Software Restriction Policies)
Note: This feature is not available on Windows XP Home Edition
Limit the number of unnecessary accounts
Eliminate any duplicate user accounts, test accounts, shared accounts, general department accounts, etc., Use group policies to assign permissions as needed, and audit your
accounts regularly. These generic accounts are famous for having weak passwords (and
lots of access) and are at the top of every hacker's list of accounts to crack first. This can
be a big problem at larger companies with understaffed IT departments. An audit at a
Fortune 10 company I worked for revealed that 3,000 of their 15,000 active user accounts were assigned to employees who no longer worked for the company. To make
matters worse, we were able to crack the passwords on more than half of those inactive
accounts.
Rename the Administrator Account
Many hackers will argue that this won't stop them, because they will use the SID to find
the name of the account and hack that. Our view is, why make it easy for them. Renaming the Administrator account will stop some amateur hackers cold, and will annoy the
more determined ones. Remember that hackers won't know what the inherit or group
permissions are for an account, so they'll try to hack any local account they find and
then try to hack other accounts as they go to improve their access. If you rename the
account, try not to use the word 'Admin" in its name. Pick something that won't sound
like it has rights to anything.
Consider creating a dummy Administrator account
Another strategy is to create a local account named "Administrator", then giving that
account no privileges and impossible to guess +10 digit complex password. This should
keep the script kiddies busy for a while. If you create a dummy Administrative account,
enabled auditing so you'll know when it is being tampered with.
Replace the "Everyone" Group with "Authenticated Users" on file shares
"Everyone" in the context of Windows XP security, means anyone who gains access to
your network can access the data. Never assign the "Everyone" Group to have access to
a file share on your network, use "Authenticated Users" instead. This is especially important for printers, who have the "Everyone" Group assigned by default.
50 | P a g e
www.pedrojesus.net
Microsoft Windows® XP – Gold eBook
Pedro Filipe C. Jesus
Prevent the last logged-in user name from being displayed
When you press Ctrl-Alt-Del, a login dialog box appears which displays the name of the
last user who logged in to the computer, and makes it easier to discover a user name
that can later be used in a password-guessing attack. This can be disabled via the Group
Policy snap in. (Click Start > Run > type GPEDIT.MSC > Go to Computer Configuration >
Windows Settings > Security Settings > Local Policy > Security Options)
Make sure that Remote Desktop is disabled
Remote Desktop is a new feature in Windows XP Professional that allows you to connect
to your computer remotely and work as though you are sitting at the console. While this
may be convenient for some users, it also makes it easier for a hacker who has compromised one of your user accounts to log in directly to your machine from a remote location. Fortunately, remote desktop is not enabled by default on Windows XP Professional,
and is not available for Windows XP Home Edition. For more information see KB Article
Q306300
You can make sure it stays off your PC's on your network by using Group Policy.
To use the computer's local group policy to disable Remote Desktop:
1. Click Start > Run, type gpedit.msc, and then click OK.
2. In the Group Policy editor, click to expand Computer Configuration, click to expand Administrative Templates, click to expand Windows Components, and
then click to expand Terminal Services.
3. Double-click the Do not allow new client connections policy.
4. Set the policy to Enabled, and then click OK.
You can also use the following procedure to disable Remote Desktop; however, if you
use the preceding procedure, the following configuration is overridden:
1. Right-click My Computer and click Properties.
2. Click the Remote tab.
3. In the Remote Desktop section, click to clear Allow users to connect remotely
to this computer, and then click OK.
NOTE: Remote Desktop is not available in Windows XP Home Edition
Disable unnecessary services
An unnecessary service is an unnecessary hacker hole, as well as a drain on system resources. You can disable services via Control Panel > Administrative Tools > Services
You may wish to consider disabling the following services:
Disable IIS - Luckily, IIS in not installed by default in Windows XP. If you enabled
it during your installation, and aren't using it you should disable it. If you are using IIS on your workstation, you need to take extra precautions to lock it down
and stay on top of security vulnerabilities specific to web services.
NetMeeting Remote Desktop Sharing
Remote Desktop Help Session Manager - If you haven't disabled this via Group
Policy already
www.pedrojesus.net
P a g e | 51
Microsoft Windows® XP – Gold eBook
Pedro Filipe C. Jesus
Remote Registry
Routing & Remote Access - if you’re not dialing into your machine.
SSDP Discovery Service - this disables the Universal PNP Service, which leaves
TCP Port 5000 wide open.
Universal Plug and Play Device Host - This is designed to allow your computer to
automatically connect to network-enabled appliances. Although there are no
practical uses for this technology yet, several severe security flaws have already
been discovered. Use the UnPlug and Pray utility from Gibson Research to disable "Universal Plug and Play". Gibson's web site has additional information about
why this is necessary
Telnet
Enable EFS (Encrypting File System)
Windows XP Professional ships with a powerful encryption system that adds an extra
layer of security for drives, folders, or files. This will help prevent a hacker from accessing your files by physically mounting the hard drive on another PC and taking ownership
of files. Be sure to enable encryption on Folders, not just files. All files that are placed in
that folder will be encrypted. For more information check out our EFS Resource Center
Note: This feature is not available on Windows XP Home Edition
If you use Offline Folders, encrypt the local cache
With Windows XP, you can mark any shared folder that is available on the network (or
any Web page) to be made available offline. The contents of these shared folders (or
pages) are copied to an Offline Files database that is known as the client-side cache,
where you can access them when not connected to the network. To safeguard offline
files against theft, you can specify that the client-side cache is encrypted. To encrypt the
Offline Files database on a local computer: Click Start > Folder Options > select the Offline Files tab > If Offline Files are not already enabled, click the Enable Offline Files option > Click the Encrypt offline files to secure data option > Click OK.
Note: When encryption of offline files is enabled or disabled, the entire database is affected; you cannot encrypt only some offline files. Also, if you are using the Fast User
Switching feature in Windows XP, you will not be able to use offline files, and none of the
options on the Offline Files tab will be available. To disable Fast User Switching, use the
User Accounts utility in Control Panel.
Encrypt the Temp Folder
Applications such as Microsoft Office use the temp folder to store copies of files while
they are being updated or modified, but they don't always clean the folder when you
close the program. Encrypting the temp folder provides an extra layer of security for
your files. Note: This feature is not available on Windows XP Home Edition
52 | P a g e
www.pedrojesus.net
Microsoft Windows® XP – Gold eBook
Pedro Filipe C. Jesus
Clear the page file at shutdown
The Windows XP Page file can occasionally contain passwords and other sensitive data
that your system has stored into memory. You can force the operating system to clear
the page file by using the Local Computer Policy via the MMC, or via Group Policy
www.pedrojesus.net
P a g e | 53
Microsoft Windows® XP – Gold eBook
Pedro Filipe C. Jesus
Advanced Security Measures
Enable Auditing on your Workstations
While this is a fairly normal practice for servers, it isn't usually performed on workstations unless there is a high risk of data theft. Our philosophy is that the time to fix the
roof is before it starts to rain. By selectively auditing a few key actions, you'll have a
place to start investigating theft or destruction of data if someone ever does compromise your workstation. We recommend auditing the following actions:
Event
Account logon events
Account management
Logon events
Object access
Policy change
Privilege use
System events
Levels of Auditing
Success, failure
Success, failure
Success, failure
Success
Success, failure
Success, failure
Success, failure
For more information see KB article Q310399
Disable default shares
Windows XP automatically creates a number of hidden administrative shares that the
operating system uses to manage the computer environment on the network. These
default shares can be disabled via the Computer Management console in the Control
Panel, but they are re-enabled by the system after you restart your computer. The default hidden shares are:
Path
Fuction
C$ D$ E$
Admin$
Root of each partition. For a Windows XP Professional computer, only
members of the Administrators or Backup Operators group can connect to
these shared folders.
%SYSTEMROOT% This share is used by the system during remote administration of a computer. The path of this resource is always the path to the
Windows XP system root (the directory in which Windows XP is installed:
for example, C:\Winnt).
Fax$
This used by fax clients in the process of sending a fax. The shared folder
temporarily caches files and accesses cover pages stored on the server.
IPC$
Temporary connections between servers using named pipes essential for
communication between programs. It is used during remote administration
of a computer and when viewing a computer's shared resources
Policy change
This is used by the Netlogon service to process log on requests
PRINT$
%SYSTEMROOT%\SYSTEM32\SPOOL\DRIVERS Used during remote
administration of printers.
54 | P a g e
www.pedrojesus.net
Microsoft Windows® XP – Gold eBook
Pedro Filipe C. Jesus
To prevent these shares from being created at startup, open RegEdit and edit the following key:
HKeyLocal Machine\SYSTEM\CurrentControlSet\Services\LanManServer\Parameters
Create a DWORD value called AutoShareWks and set the parameter to 0. (Note: This
does not disable the IPC$ share in our tests, we're still working on a solution). You
should test the functionality of your programs and services after you disable the default
administrative shares. Some Windows services depend on the existence of these shares.
In addition, some third-party programs may require that some of the administrative
shares exist. For example, some backup programs may require these shares. You may be
able to restore functionality by manually creating the required shares.
Disable Dump File Creation
A dump file can be a useful troubleshooting tool when either the system or application
crashes and causes the infamous "Blue Screen of Death". However, they also can provide a hacker with potentially sensitive information such as application passwords. You
can disable the dump file by going to the Control Panel > System > Advanced > Startup
and Recovery and change the options for 'Write Debugging Information" to None. If you
need to troubleshoot unexplained crashes at a later date, you can re-enable this option
until the issue is resolved but be sure to disable it again later and delete any stored
dump files
Disable the ability to boot from a floppy or CD ROM on physically unsecured systems.
There are a number of 3rd party utilities that pose a security risk if used via a boot disk
(including resetting the local administrator password.) If your security needs are more
extreme, consider removing the floppy and CD drives entirely. As an alternative, store
the CPU in a locked external case that still provides adequate ventilation. You can also
restrict access to the floppy and CD-ROM drives in Windows XP Professional via the Local
Computer Policy in the MMC (Click Start > Run > type GPEDIT.MSC > Go to Computer
Configuration > Windows Settings > Security Settings > Local Policy > Security Options)
Disable AutoRun for the CD-ROM
One of the easiest ways for a hacker with physical access to a company's PC's to distribute malicious code is via the CD-ROM. By creating a custom CD with a payload set to
launch from the autorun feature in any machine, a hacker can affect any number of unlocked systems without ever leaving a fingerprint or touching a keyboard. Or he/she can
simply leave a few of these lying around the office marked "MP3's", or "Payroll Data"
and wait for an unsuspecting user to simply pick it up and insert it into their machine.
You can disable this function in Windows XP Professional by clicking Start > Run > and
type GPEDIT.MSC Then go to Computer Configuration > Administrative Templates >
System > Locate the entry for Turn autoplay off
www.pedrojesus.net
P a g e | 55
Microsoft Windows® XP – Gold eBook
Pedro Filipe C. Jesus
Consider using SmartCard or Biometric devices instead of passwords.
The more stringent your password policy is, the more likely your users will begin keeping
paper password lists in their desk drawers, or taped to the bottom of their keyboard.
Windows 2000 supports these devices, so consider the costs vs. risks of your most sensitive data. When using smart cards please make sure to apply configure your workstation
to lock if you remove the smart card. Under Local Policies > Security Options > Interactive logon > Smart card removal behavior > Lock Workstation setting
56 | P a g e
www.pedrojesus.net
Microsoft Windows® XP – Gold eBook
Pedro Filipe C. Jesus
Other Security and Authentication Issues
How to Automatically Log On a User Account in Windows XP
Microsoft Knowledge Base Article: 282866
How to Change the Logon Window and the Shutdown Preferences
Microsoft Knowledge Base Article: 291559
Setup configures Windows XP to use the friendly Welcome logon screen and the shutdown buttons, if your computer is installed as a home computer (a computer where a network domain
has not been specified).
How to Set Logon User Rights by Using the NTRights Utility
Microsoft Knowledge Base Article: 315276
This article describes how to set logon user rights by using the NTRights utility.
Administrator Unable to Unlock a "Locked" Computer
Microsoft Knowledge Base Article: 242917
After you restart a computer running Windows and no one has logged on, you may be unable to
log on to the computer either locally or to the domain.
A User Logon Request Is Rejected Without Any Messages
Microsoft Knowledge Base Article: 313322
If the security log is full and a restricted user with no password attempts to log on from the Windows XP Welcome screen, the logon request is rejected without any error messages.
www.pedrojesus.net
P a g e | 57
Microsoft Windows® XP – Gold eBook
Pedro Filipe C. Jesus
TROUBLESHOOTING WINDOWS XP SHUTDOWN ISSUES
How to Perform an Emergency Shutdown in Windows
Microsoft Knowledge Base Article: 279134
Resources to Help Troubleshoot Shutdown Problems in Windows XP
Microsoft Knowledge Base Article: 308029
This article refers to resources that you can use to troubleshoot shutdown problems in Windows
XP. After you follow the steps in each article in a section, determine if you have resolved the
problem by either shutting down or restarting your computer. If you still cannot shut down or
restart your computer, continue to the next section in order. Try to shut down or restart your
computer at the end of each section.
Computer Does Not Shut Down Properly if Selective Suspend Is Enabled
Microsoft Knowledge Base Article: Q315664
After you attach a USB-based input device (such as a keyboard or mouse) to your computer,
your computer may no longer shut down properly. For example, your computer may stop responding (hang) after you click Turn off or Restart
Computer Hangs During Shutdown or
Displays a "Cannot Find Enough Free Resources" Error Message
Microsoft Knowledge Base Article: 314101
"It is Now Safe to Turn Off Your Computer" Error Message When You Try to Shut Down Your
Computer
Microsoft Knowledge Base Article: 810903
When you try to shut down your Windows XP-based or Windows 2000-based computer, the
computer may stop responding ("hang"), and you may receive the following message:”It is now
safe to turn off your computer”
Stop: Ox7E Error Occurs in Kbdclass.sys When You Try to Shut Down Windows XP
Microsoft Knowledge Base Article 313050
Windows XP Restarts When You Try to Shut Down Your Computer
Microsoft Knowledge Base Article: 311806
Windows XP Stops Responding (Hangs) During Windows Shutdown
Microsoft Knowledge Base Article: 307274
58 | P a g e
www.pedrojesus.net
Microsoft Windows® XP – Gold eBook
Pedro Filipe C. Jesus
NOTES
www.pedrojesus.net
P a g e | 59