1
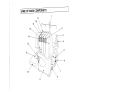
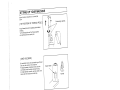
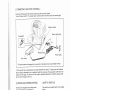
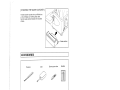
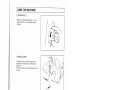
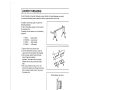
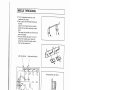
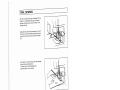
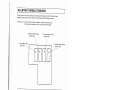
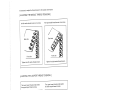
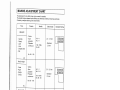
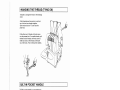
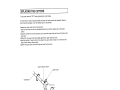
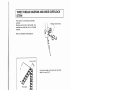
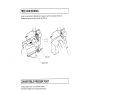
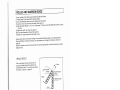
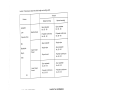
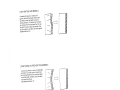
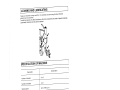
C-)
a)
I
m
0
C)
C
p
D
CD
CD
E
z
-I
m
I-
C
z
z
0
-I
C-)
c
Cl)
z
TABLE OF CONTENTS
NAME OF MAIN COMPONENTS
SETTONG UP YOUR MACHINE
The position of thread pole
Cone holders
Spool caps
Connecting the foot control
Controlling sewing speed
Safety switch
Attaching the waste catcher
ACCESSORIES
USING THE MACHINE
Hand wheel
Front cover
Free arm
LOOPER THREADING
NEEDLE THREADING
TRIAL SEWING
ADJUSTING THREAD TENSIONS
Adjusting the needle thread tensions
Adjusting the looper thread tensions
MACHINE ADJUSTMENT CHART
CHANGING THE THREAD
BUILT-IN POCKET HANDLE
ADJUSTMENT OF STITICH LENGTH
Stitch length setting
CUTTING WIDTH
The proper cutting width
Adjust to a wider cutting width
Adjust to a narrower cutting width
CHANGING THE NEEDLE
REPLACING THE BULB
REPLACING THE CUTTERS
THREE THREAD NARROW AND WIDE OVERLOCK STITCH
FREE ARM SEWING
CONVERTIBLE PRESSER FOOT
ROLLED AND NARROW EDGE
Rolled edge
Narrow edge
Rolled hemming
Narrow hemming
DIFFERENTIAL FEED
Differential feed mechanism
Adjusting the differential feed
Wavy knits & Gathering
Stretching to prevent puckering
TROUBLE SHOOTING GUIDE
CLEANING AND LUBRICATING
SPECIFICATION OF MACHINE
4-5
6-8
6
6
6
7
7
7
8
8
9
9
9
9
10
11
12
13-14
14
14
15
16
16
17
17
18
18
18
18
19
19
20
21
22
22
23-24
23
23
24
24
25-26
25
25
26
26
27
28
28
.
IMPORTANT SAFETY INSTRUCTIONS
When using an electrical appliance, basic safety precautions should always be followed,
including the following:
Read all instructions before using
(this sewing machine)
DANGER To reduce the risk of electric shock:
An appliance should never be left unattended when plugged in. Always unplug this
appliance from the electric outlet immediately after using and before cleaning.
Always unplug before relamping, Replace bulb with same type rated 15 watts.
WARNING
To reduce the risk of burns, fire, electric shock, or
injury to persons:
Operate sewing machine only when mounted in sewing machine table, case, and the like.
See the installation instructions.
1. Do not allow to be used as a toy. Close attention is necessary when this appliance is
used by or near children.
2. Use this appliance only for its intended use as described in this manual. Use only
attachments recommended by the manufacturer as contained in this manual.
3. Never operate this appliance if it has a damaged cord or plug, if it is not working
properly, if it has been dropped or damaged, or dropped into water, Return the
appliance to the nearest authorized dealer or service center for examination, repair,
electrical or mechanical adjustment.
4. Never operate the appliance with any air openings blocked, Keep ventilation openings
of the sewing machine and foot controller free from the accumulation of lint, dust, and
loose cloth.
5. Never drop or insert any object into any opening.
6. Do not use outdoors.
7. Do not operate where aerosol (spray) products are being used or where oxygen is
being administered.
8. To disconnect, turn all controls to the off (“0”) position, then remove plug from outlet.
9. Do not unplug by pulling on cord. To unplug, grasp the plug, not the cord.
10. Keep fingers away from all moving parts. Special care is required around the sewing
machine needle.
11. Always use the proper needle plate. The wrong plate can cause the needle to break.
12. Do not use bent needles.
13. Do not pull or push fabric while stitching. It may deflect the needle causing it to break.
14. Unplug the sewing machine when making any adjustments in the needle area, such as
threading needle, changing needle, changing presser foot, etc.
15. Always unplug sewing machine from the electrical outlet when removing covers,
lubricating, or when making any other user servicing adjustments mentioned in the
instruction manual.
SAVE THESE INSTRUCTIONS
INTRODUCTION
THANK YOU FOR CHOOSING OUR OVERLOCK MACHINE
—
This overlock machine can stitch dependable seams on all kinds of fabric, both light and heavy,
including cotton, wool, rayon, tricot, jersey, and knits.
You do not need a special table for this portable machine.
We suggest that you read this instruction manual carefully before you start to operate the machine.
FOR YOUR SAFETY
1. Keep your eyes on the needles when operating the overlock machine. Do not touch the
handwheel, the cutter or the needles when the machine is running.
2. Turn off the power switch, and pull out the plug from electric socket in the following cases:
* When you have finished your sewing.
* When you leave the serger temporarily.
* When replacing the parts.
* When cleaning and adjusting the machine.
BEFORE YOU USE
1. Wipe dust and oil off the machine to avoid any stains on the sewing materials.
2. Test sew by using the same sewing materials you intend to sew.
3. Read this instruction manual thoroughly before replacing the cutters and the needles. Follow the
instructions for correct replacements and adjustments.
TABLE OF CONTENTS
NAME OF MAIN COMPONENTS
SETTONG UP YOUR MACHINE
The position of thread pole
Cone holders
Spool caps
Connecting the foot control
Controlling sewing speed
Safety switch
Attaching the waste catcher
ACCESSORIES
USING THE MACHINE
Hand wheel
Front cover
Free arm
LOOPER THREADING
NEEDLE THREADING
TRIAL SEWING
ADJUSTING THREAD TENSIONS
Adjusting the needle thread tensions
Adjusting the looper thread tensions
MACHINE ADJUSTMENT CHART
CHANGING THE THREAD
BUILT-IN POCKET HANDLE
ADJUSTMENT OF STITICH LENGTH
Stitch length setting
CUTTING WIDTH
The proper cutting width
Adjust to a wider cutting width
Adjust to a narrower cutting width
CHANGING THE NEEDLE
REPLACING THE BULB
REPLACING THE CUTTERS
THREE THREAD NARROW AND WIDE OVERLOCK STITCH
FREE ARM SEWING
CONVERTIBLE PRESSER FOOT
ROLLED AND NARROW EDGE
Rolled edge
Narrow edge
Rolled hemming
Narrow hemming
DIFFERENTIAL FEED
Differential feed mechanism
Adjusting the differential feed
Wavy knits & Gathering
Stretching to prevent puckering
TROUBLE SHOOTING GUIDE
CLEANING AND LUBRICATING
SPECIFICATION OF MACHINE
4-5
6-8
6
6
6
7
7
7
8
8
9
9
9
9
10
11
12
13-14
14
14
15
16
16
17
17
18
18
18
18
19
19
20
21
22
22
23-24
23
23
24
24
25-26
25
25
26
26
27
28
28
.
-.3 -
NAME OF MAIN COMPONETS
I
5
Ii
6
9
1. Thread pole
2. Lower looper thread tension dial
3. Spool pin
4. Spool holder
5. Handwheel
6. Base
7. Machine socket
8. Power switch
9. Front cover
10. Support bed
11. Free arm
12. Needle plate
13. Left needle thread tension dial
14. Right needle thread tension dial
15. Upper looper thread tension dial
16. Thread guide
17. Thread guide plate
-4
I
7
6
5
2
4
3
1.
2.
3.
4.
5.
6.
7.
8.
Upper looper
Lower looper
Free arm release lever
Free arm
Lower knife
Cutting width adjustment knob
Presser foot
Upper knife
-D
NE
SETTING UP YOUR MACHI
on a sturdy flat
Set your Overlock machine
surface.
Positioning catches
AD POLE]
[THE POSITION OF THRE
hest point before
Pull up thread pole to its hig
threading.
thread guides
Turn the thread pole so the
pins.
ol
spo
the
ve
come right abo
[CONE HOLDERS]
estic type thread
Both industrial cones and dom
machine.
spools can be used on this
cones use the
ial
ustr
For large diameter ind
at the top.
end
e
larg
the
h
cone holders wit
use the same cone
For small diameter cones.
the top.
holders with the small end at
[SPOOL CAPS
Spool holder
Normal
J
thread spools,
When using domestic type
place spool
remove the spool holders and
ols.
caps over the thread spo
A
Spool cap
Notch
-6-
[CONNECTING THE FOOT CONTROL]
Push foot control plug into the machine socket and then into main socket.
Turn on the power switch. This power switch controls both the machine power and sewing light.
Machine socket
Power supply plug
Power switch
Power supply
Foot control
This sewing machine is designed to be used with a Yamamoto foot control, Model YC-482.
•:This appliance has a polarized plug (one blade widerthan the other). To reduce the risk of electric
shock, this plug is intended to fit in a polarized outlet only one way, if the plug does not fit fully in the
outlet, reverse the plug. If it still does not fit, contact a qualified electrician to install the proper outlet.
Do not modify the plug in any way.
[CONTROLLING SEWING SPEED]
[SAFETY SWITCH]
The foot control regulates the sewing speed.
The sewing speed can be adjusted by
increasing or decreasing the pressure on the
foot control.
This machine is equipped with a micro safety
switch.
The machine is automatically cut off form the
electricity supply if either the free arm
or front cover is open.
Close both free arm and front cover before
you start sewing.
Safety switch
Foot control
-7-
[ATTACHING THE WASTE CATCHER]
The waste catcher catches the cut-off fabric as
you sew, keeping your working area clean.
Place the waste catcher between the machine
and table.
I ACCESSORIES
Tweezers
Machine cover
Instruction manual
Spare upper cutter
Oiler
Brush
Screwdriver
Spool caps
8-
Needles
Hexagon wrench key
USING THE MACHINE
[HAND WHEEL]
Always turn handwheel toward you, i.e. the
same direction as on a household sewing
machine.
/
[FRONT COVER]
To open front cover, slide the hollow to the
right as far as 1 will go then pull front cover
toward you.
The front cover won’t close while the free arm
is open.
[FREE ARM]
Open the free arm for threading.
Open the front cover first.
While pushing the release lever, push the free
arm down ward with your left hand.
-9-
LOOPER THREADING
Correct threading is important otherwise uneven stitches or thread breakage may result.
A convenient threading chart is placed on the front panel inside the front cover.
In addition. each thread guide is colored for
threading indication.
To help in threading, tweezers can be found in
the accessory box.
Threading must be carried out in the following
sequence.
1.
2.
3.
4.
FIRST
SECOND
THIRD
FINALLY
Upper looper
Lower looper
Right needle
Left needle
1. Open the front cover and free arm.
2. Turn the handwheel toward you until. the
looper comes to best position for threading.
3. Pass the upper looper thread and lower
looper thread as illustrated.
Important: The thread must lie correctly
between the two discs inside the tension
dials.
4. Pull out the thread end about 10cm (4”)
long from the looper eyes. Raise the presser
foot and place threads under it, then lower
the presser foot.
Thread between two discs
Upper looper thread
Lower looper thread
-10-
NEEDLE THREADING
5. Turn the handwheel toward you until
needles are fully raised.
6. Pass the right and left needle threads as
illustrated.
Important: The thread must lie correctly
between the two discs inside the tension
dials.
Pass through the needle eyes from front to
back as illustrated.
7. Pull out the thread end about 10 cm (4”)
long from the needle eyes. Raise the
presser foot and place threads under it,
then lower the presser foot.
Left needle thread
1
Right needle thread
Thread between two discs
3®
II
-
TRIAL SEWING
the
When the overlock has been threaded for
d
threa
of
first time or re-threaded because
the
breakage during sewing, start sewing in
ner.
following man
left
Holding the end of threads between your
rd
towa
ly
slow
l
whee
hand
the
turn
finger tips,
d
threa
k
the
chec
and
s
time
three
or
two
you
chain.
er
Place fabric for trial sewing under the press
ly.
foot and start sewing slow
The fabric will be automatically fed.
Guide the fabric as you serge.
When work is finished, continue sewing to
from
form about 5 cm (2”) long thread chain
c.
fabri
of
the end
Cut the threads with a scissor.
-
12-
I ADJUSTING THREAD TENSIONS
Thread tensions will vary according to the type and thickness of both
thread and fabric.
Adjust the thread tension of the machine accordingly while checking
the seam.
Thread tension: Turn dial toward smaller numbers, tension becomes
loose.
Turn dial toward larger numbers, tension becomes tight.
B: Right needle thread
tension dial
C: Upper looper thread
tension dial
/
A: Left needle thread
tension dial
ir
D: Lower looper thread
tension dial
Correct thread tension
(0.24”)
Lower looper thread
Upper looper thread
-
13-
below.
It is necessary to adjust the thread tension for the seams shown
[ADJUSTING THE NEEDLE THREAD TENSIONS]
The left needle thread tension is too loose.
The right needle thread tension is too loose.
Tighten the right needle thread tension.
Tighten the left needle thread tension.
[ ADJUSTING
THE LOOPER THREAD TENSIONS
J
The upper looper thread is tight and/or
the lower looper thread is loose.
The lower looper thread is tight and/or
the upper looper thread is loose,
Loosen the upper looper thread tension
and/or tighten the lower looper thread
tension.
Loosen the lower looper thread tension
and/or tighten the upper looper thread
tension,
14.-
MACHINE ADJUSTMENT CHART
The best tension for one fabric may not be correct for another.
The required tensions depend upon stiffness and thickness of fabric, thread size and
type.
If necessary, readjust referring to the chart below.
Fabrics
Threads
Needle
Stitch length
Standard Setting
Light-weight
Georgette
Organdy
• Lawn
Voile
• Crepe-de-chine
• Silk
.
Cotton
Spun
polyester
Polyester
continuous
No. 80
-
HA X 1
No. 11
130 I 705H
No. 80
2.0
-
3.5 mm
Standard
2.5 mm
100
etc.
Medium-weight
Cotton
Spun
polyester
Polyester
continuous
Cotton
• Poplin
Gingham
• Corduroy
HA X 1
No.11-14
130 / 705H
No. 80 90
2.0
-
3.5 mm
Standard
2.5 mm
-
No. 60
-
100
etc.
Heavy-weight
• Cotton
Spun
polyester
Polyester
continuous
• Denim
Tweed
• Velour
No. 50
-
HA x 1
No.14
130/705H
No. 90
80
etc.
-
15-
2.5 4.0 mm
-
Standard
3.0 mm
I
f
iiiiiiii1
[]IJIAi[41 I
CHANGING THE THREAD (TYING ON)
It is simple to change the thread in the following
manner.
Cut the thread above the spool pin, and knot
ends of old and new threads together.
Set the tension dials to “0” and raise the
presser foot.
Pull the other end of thread until knots come
under the presser foot. For needle threads, pull
the other ends of threads until knots come to
needle eyes and cut the threads at the both
sides of the knots. Then re-thread the needles.
I BUILT-IN POCKET HANDLE
The Built in pocket handle is a convenient way
to carry your machine.
Pocket handle
-
16-
ADJUSTMENT OF STITCH LENGTH
There are nine setting adjustments which can be made from 1.0 to 5.0 mm.
Most overlock work is done with a basic stitch length setting of 2.5-3.5 mm.
Stitch length
adjustment knob (Inner dial)
I
[STITCH LENGTH SETTING]
I
Stitches
Stitch length
Regular seaming
2.0 5.0 mm
3.0 mm (Standard Setting)
Narrow seaming
1.0 2.0 mm
Rolled edging
1.0 2.0 mm
Picot edging
3.0 4.0 mm
-
-
-
-
-
CUTTING WIDTH
each time, and adjust the
The proper cutting width differs with the type of fabric. Check the seams
cutting width as follows.
lowest position.
1. Turn the handwheel toward you until the needles are at the
arm.
2. Open the front cover and free
lie along the edge of the fabric.
3. Turn the cutting width adjustment knob until the looper threads
sewing. Turn the cutting width
Adjust to a narrower cutting width if the fabric edges curl when
adjustment knob to the right.
fabric. Turn the cutting width
Adjust to a wider cutting width if the thread loops off the edge of the
adjustment knob to the left.
Needle plate
[THE PROPER CUTTING WIDTH]
Wide
Cutting width
adjustment knob
[ADJUST TO A NARROWER
CUTTING WIDTH]
[ADJUST TO A WIDER CUTTING
WIDTH]
Threads looping
off edge of fabric
—
Front side
—
-18-
Front side
—
CHANGING THE NEEDLE
Turn the power switch to “OFF” before
changing the needles.
Do not use any needle which is bent or blunt.
1. Turn the handwheel toward you until the
needles are fully raised.
2. Open the front cover and lower the presser
foot.
3. Using the hexagon wrench key from the
accessory box, loosen the needle clamp
screws and remove the needles. Upper left
screw for left needle and lower right screw
for right needle.
4, Insert the new needle with the flat side to the
back into the needle clamp, making sure it
is inserted as far up as possible. Tighten the
needle clamp screw firmly.
Hexagon wrench key
Needle
(Use HA*1)
When the needles are set correctly, the left
needle is slightly higher than the right one.
If needles are not correctly inserted, skipped
stitches will result.
This machine is equipped with needle systems
i1.A*1 (Needle are household type).
Flat side to rhe back
Machine front
REPLACING THE BULB
Turn the power switch to ‘OFF” before replacing
the bulb.
1. Take the hole cap off by needle.
2. Loosen the screw until it is taken apart.
3. Pull the lamp cover off from the low part.
4. Push and twist and then remove the old
bulb.
5. Insert the new bulb and twist to its position.
Important:
This machine is designed to use 15 watt bulb.
The bulb is available from your local dealer.
-
-
19-
REPLACING THE CUTTERS
Turn the power switch to “OFF” before replacing the cutter blades.
The lower cutter is made of special material and does not usually need to be replaced. However,
should it become damaged, it can be replaced by your local dealer.
To replace the upper cutter when it becomes dull:
1. Open the front cover and turn the handwheel toward you until the needles are in the lowest
position.
2. Using the screwdriver from the accessory box, loosen the upper cutter set screw and remove the
upper cuter.
3. Replace the new upper cutter and slightly tighten the upper cutter set screw.
4. Adjust the position of upper cutter so the edge of the upper cutter overlaps 0.5-1.0mm from the
edge of lower cutter as shown below.
5. Tighten the upper cutter set screw firmly and close the front cover.
Upper cutter set screw
Upper cutter
Screwdriver
Overlaps
0.5—1.0mm
Lower cutter
-
20
-
THREE THREAD NARROW AND WIDE OVERLOCK
STITCH
This machine is a 3/4 thread convertible
overlock.
Remove either the right or left needle. Your
machine is now ready for use as a 3-thread
overlock.
key
Refer to CHANGING THE NEEDLE”
4mm (0.16)
Using the needle on the right only, the stitch
width is 4 mm (0.16).
6mm (0.24”)
Using the needle on the left only, the stitch
width is 6 mm (0.24’).
Front side
-21-
[REE ARM SEWING
Remove the support bed as illustrated which easily converts from a flat bed to free arm.
Convenient for sewing pant legs, sleeves and cuffs, etc.
Free arm
Support bed
CONVERTIBLE PRESSER FOOT
The special presser foot, is set for normal overlock
with the letter N adjacent to the vertical screw at front
of presser foot. When you need to sew a rolled edge,
simply loosen the large screw slightly and move the
finger that protrudes from left side of foot forward until
is stops, then re-tighten the screw. The letter R will
now be adjacent to screw.
Finger
-
22
-
ROLLED AND NARROW EDGE
-
follows.
To carry out either of the above sewing tasks proceed as
.
setting
(1) Refer to page 22 for special foot position
raised.
(2) Turn the handwheel toward you until needles are fully
19.
page
.
See
needle
left
er
remov
and
(3) Open front cover
Also ensure that differential control is set at
(4) Set stitch length between 1 .0-2.0 mm. See page 17.
‘N’ position.
(5) Adjust stitch width, as shown on page 18.
(6) If not already threaded re-thread the machine.
(7) Place fabric under presser foot and start to sew.
before sewing on an actual garment.
Always test the stitch and tension settings on scrap fabric
you change the threads as shown on
When either Rolled or Narrow hemming, we recommend
page 24.
l serging after you have finished your rolled
ALWAYS remember to re-set the special foot for norma
edge procedure.
[ROLLED EDGE]
With a rolled edge the loops formed by the
upper looper thread should be pulled to the
underside of the fabric. This is done by setting
the tensions as shown on page 24.
1.5mm
Back
[NARROW EDGE]
1.5mm
For seams on sheer or lightweight fabrics, set
tensions as shown on page 24 for a balanced
tension.
-
23
-
cutting width.
Important: If necessary, adjust the stitch length and
Threads
Fabrics
Narrow hemming
Rolled hemming
Spun polyester
No. 50 80
Spun polyester
No. 50 80
Polyester continuous
No. 50 80
Polyester continuous
No. 50 80
Silk
Spun polyester
Wooly-nylon
Broadcloth
Wooly-nylon
Spun polyester
No. 50 80
• Georgette
-
-
Needle thread
• Lawn
• Crepe-de-chine
-
-
Upper looper
thread
Rayon
-
.
Rayon thread
.
Polyester continuous
No. 50 80
-
• Voile
Lower looper
thread
Spun polyester
No.50-80
Spun polyester
No.50-80
Polyester continuous
No. 5 0- 80
Polyester continuous
No. 50 80
-
etc.
[NARROW HEMMING j
[ROLLED HEMMING
ri
1
[1E
I I I
[J[J
I
ii
-
24
-
I DIFFERENTIAL FEED
The differential feed prevents wavy seams in knitted fabrics and also movement between the layers
of fabric. It also ensures pucker-free seams on lightweight fabrics.
[DIFFERENTIAL FEED MECHANISM]
There are two sets of feed teeth, one front and one rear. The two sets of feed teeth move
independently. Differential feed allows the two sets of feed teeth to move at different rates.
I
ci
[ADJUSTING THE DIFFERENTIAL FEED]
II
The differential feed can be adjusted by simply turning the differential feed adjustment knob in the
direction desired. Adjustment of the differential feed can be made while sewing.
Important:
When sewing without differential feed, the adjustment knob for the differential feed should be set on
the “N” position,
I
Differential feed
adjustment knob (Outside)
-
25
-
[WAVY KNITS & GATHERING]
knit
For perfectly flat seams in stretchy
to feed
d
nee
h
teet
feed
garments, the front
vent
pre
to
h
teet
feed
rear
faster than the
feed
front
stretching the fabric. To Gather, the
rear
the
than
er
fast
teeth will also need to feed
e
(Se
th,
leng
h
stitc
long
a
g
feed teeth. By usin
er.
gath
y
easil
will
c
fabri
your
st).
adju
page 25 to
Set differential feed 2.0.
CKERING
[STRETCHING TO PREVENT PU
on lightweight
To avoid any puckering in seams
rear feed
the
n,
nylo
oth
woven fabrics or smo
feed teeth.
front
the
than
er
fast
teeth must feed
s
hold the fabric
The front feed teeth, therefore,
taut to prevent puckering.
Set the differential feed to .07.
-
26
-
J
r
TROUBLE SHOOTING GUIDE
Check items below before calling for service.
Problem
Cause
Corrective action
Page
1. Replace with new needles.
19
Needles break
1. Needles are bent, blunt or
points are damaged.
2. Needles not inserted
correctly.
3. You have forcibly pulled the
fabric
2. Insert the needles correctly to
the needle clamp.
3. Guide fabric gently with both
hands.
19
Th reau urea k s
1. Threading is incorrect.
2. Thread tension is too tight.
3. Needles not inserted
correctly.
1. Thread the machine correctly.
2. Reset the thread tension.
3. Insert the needles correctly to
the needle clamp.
1. Needles are bent, blunt or
points are damaged.
2. Needles not inserted
correctly.
3. Threading is incorrect.
4. Wrong needles used.
1. Replace with new needles.
19
2. Insert the needles correctly to
the needle clamp.
3. Thread the machine correctly.
4. Use correct needles. (HAx1 or
130/ 705H)
19
10
1. Correct the thread tension.
13
14
2. Check threading path of each
thread.
10
11
1. Correct the thread tension.
2. Thread the machine correctly.
3. Check threading path of each
thread.
4. Set differential feed to 0.7
13
10
10
14
11
11
Skipped stitches
Stiches are
irregular
1. Thread tension is not
correct.
2. Thread is caught.
Seam puckering
1. Thread tension is too tight.
2. Threading is incorrect.
3. Thread is caught.
4. Differential feet not set.
11
14
10
13
19
11
19
26
Fabric not
cutting neatly
1. Upper cutter is blunt or
wrongly positioned.
1. Replace or adjust the cutter.
20
Fabric edges
curl
1. Too much fabric is within the
stitch.
1. Re-adjust seam width.
18
-
27
-
I CLEANING AND LUBRICATING
h from the
; it is necessary to clean using the brus
To keep your machine running smoothly
accessory box now and then.
e of special materials.
cation as the main components are mad
This machine requires very little lubri
ts illustrated.
Occassionally, lubricate only the poin
MACHINE
rSPECIFICATION OF
Specification
Description
Number of threads
4 or 3
Number of needles
2 or 1
Sewing speed
Up to 1500 s.p.m
4-thread
6 mm
3-thread
6mmor4mm
Stitch width
5 mm
Stitch length
1
Lift of presser foot
4.5 mm
—
HA
x
1 No. 11-14
Needles
130/ 705H No. 75
Dimentions
Weight
285 mm (W)
x
-
90
285 mm (D)
7 kg (approx. 15 lbs.)
-
28
-
x
291 mm (H)


![PLAS A O ]-OR](http://vs1.manualzilla.com/store/data/005852706_1-5db0b7ed584537f0e62af161fb124638-150x150.png)