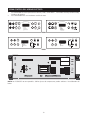
1
Electric
Wall Oven
Single and Double
Welcome .................................. 2
Important Safety Instructions ... 3-4
Features at a Glance .............. 5
Before Setting
Oven Controls ......................... 6
Setting Oven Controls ........... 6
Cooking Informations ......... 7-9
Care & Cleaning ............... 10-13
Adjusting Your
Oven Temperature ................ 13
Before You Call
Solutions to
Common Problems
........................................... 14-15
Warranty ................ Back Cover
318200924 (0407) Rev. A
Welcome & Congratulations
Questions?
1-800-944-9044
(United States)
1-866-294-9911
(Canada)
Please attach sales receipt
here for future reference.
Congratulations on your purchase of a new appliance! At Electrolux Home
Products, we are very proud of our product and are completely committed to
providing you with the best service possible. Your satisfaction is our number one
priority.
We know you’ll enjoy your new appliance and Thank You for choosing our product.
We hope you consider us for future purchases.
PLEASE CAREFULLY READ AND SAVE THESE INSTRUCTIONS
This Use & Care Manual contains general operating instructions for your appliance
and feature information for several models. Your product may not have all the
described features. The graphics shown are representative. The graphics on your
appliance may not look exactly like those shown. These instructions are not
meant to cover every possible condition and situation that may occur. Common
sense and caution must be practiced when installing, operating and maintaining
any appliance.
Please record your model and serial numbers below for future reference.
Model Number:
Serial Number:
Purchase Date:
Product Registration
Register Your Product
The PRODUCT REGISTRATION CARD should
be filled in completely, signed and returned to
Electrolux Home Products.
Serial Plate Location
Versión en español
Si desea obtener una copia en español
de este Manual del Usuario, sírvase
escribir a la dirección que se incluye a
continuación. Solicite la P/N
318200924E.
Spanish Use & Care Manual
Electrolux Home Products
P. O. Box 212378
Augusta, GA 30917
Single Wall Oven
Serial Plate Location
Double Wall Oven
Serial Plate Location
© 2004 Electrolux Canada Corp.
All rights reserved
2
Important Safety Instructions
Read all instructions before using this appliance.
Save these instructions for future reference.
This manual contains important safety symbols and instructions. Please pay attention to these symbols and follow all
instructions given.
This symbol will help alert you to situations that may cause serious bodily harm, death or property damage.
This symbol will help alert you to situations that may cause bodily injury or property damage.
• Remove all tape and packaging wrap before using the
appliance. Destroy the carton and plastic bags after
unpacking the appliance. Never allow children to play
with packaging material. Do not remove the wiring label and
other literature attached to the back of the wall oven. Do not
remove model/serial number plate.
• Never modify or alter the construction of the appliance
by removing panels, wire covers, or any other part of
the product.
• Proper Installation—Be sure your appliance is properly
installed and grounded by a qualified electrician or
installer in accordance with the National Electrical
Code ANSI/NFPA No. 70 (U.S.A.) or CSA C22.1, PART 1
(Canada)—latest editions and local code requirements.
Install only per installation instructions provided in the
literature package for this appliance.
Stepping, leaning, sitting or pulling down
on the door of this appliance can result in serious injuries
and may also cause damage to the appliance. Do not allow
children to climb or play around the appliance.
• Remove the oven door from any unused appliance if it
is to be stored or discarded.
• Storage in or on Appliance—Flammable materials
should not be stored in an oven. This includes paper,
plastic and cloth items, such as cookbooks, plasticware
and towels, as well as flammable liquids. Do not store
explosives, such as aerosol cans, in or near the appliance.
Ask your dealer to recommend a qualified technician and an
authorized repair service. Know how to disconnect the
electrical power to the appliance at the circuit breaker or fuse
box in case of an emergency.
Do not use the oven for storage.
Do not store items of interest to children in
the cabinets above an appliance. Children climbing on the
appliance to reach items could be seriously injured.
Electronic controllers can be damaged by
cold temperatures. When you use your appliance for the
first time, or if it has not been used for a long period of
time, make sure that it has been exposed to a temperature
above 0°C/32°F for at least 3 hours before connecting it to
the power supply.
• Do not leave children alone—Children should not be
left alone or unattended in the area where an appliance
is in use. They should never be allowed to sit or stand on
any part of the appliance.
• User Servicing—Do not repair or replace any part of the
appliance unless specifically recommended in the
manuals. All other servicing should be done only by a
qualified technician to reduce the risk of personal injury and
damage to the appliance.
•
•
•
•
• DO NOT TOUCH INTERIOR OVEN ELEMENTS OR
INTERIOR SURFACES OF THE WALL OVEN UNTIL
THEY HAVE COOLED. The oven heating elements may be
hot even though the elements are dark in color. Areas near
the elements may become hot enough to cause burns.
During and after use, do not touch, or let clothing or other
flammable materials touch these areas until they have had
sufficient time to cool. Among these areas are the oven
vent openings, the surfaces near these openings, oven
door and window.
All wall ovens can tip.
Injury to persons could result.
Install anti-tip bracket packed with
wall oven.
See Installation Instructions.
• Wear Proper Apparel—Loose-fitting or hanging
garments should never be worn while using the
appliance. Do not let clothing or other flammable materials
contact hot surfaces.
To reduce the risk of tipping, the wall
oven must be secured by properly
installed anti-tip bracket provided with
the wall oven. Refer to the Installation
Instructions for proper anti-tip bracket
installation.
Never use your appliance for warming or
heating the room.
3
Important Safety Instructions
• Do not cover the broiler grid or oven bottom with
aluminum foil. Exposed fat and grease could ignite.
• Do Not Use Water or Flour on Grease Fires—Smother
the fire with a pan lid, or use baking soda, a dry
chemical or foam-type extinguisher.
• Do not touch a hot oven light bulb with a damp cloth.
Doing so could cause the bulb to break. Disconnect the
appliance or shut off the power to the appliance before
removing and replacing the bulb.
• When heating fat or grease, watch it closely. Fat or
grease may catch fire if allowed to become too hot.
• Use Only Dry Pot holders—Moist or damp pot holders
on hot surfaces may result in burns from steam. Do not
let the pot holders touch the hot heating elements. Do not
use a towel or other bulky cloth instead of a pot holder.
• Protective liners—Do not use aluminum foil to line the
oven bottom. Only use aluminum foil as recommended in
this manual. Improper installation of these liners may result
in risk of electric shock, or fire.
• Do Not Heat Unopened Food Containers—Build-up of
pressure may cause the container to burst and result in
injury.
IMPORTANT INSTRUCTIONS FOR CLEANING
YOUR OVEN
IMPORTANT—Do not attempt to operate the appliance
during a power failure. If power fails, always turn off the
appliance. If the appliance is not turned off and the power
resumes, it will begin to operate again. Once the power
resumes, reset the clock and oven function.
• Clean the appliance regularly to keep all parts free of
grease that could catch fire. Exhaust fan ventilation
hoods and grease filters should be kept clean. Do not allow
grease to accumulate. Greasy deposits in the fan could
catch fire. Refer to the hood manufacturer's instructions for
cleaning.
IMPORTANT INSTRUCTIONS FOR USING
YOUR OVEN
• Cleaners/Aerosols—Always follow the manufacturer's
recommended directions for use. Be aware that excess
residue from cleaners and aerosols may ignite causing
damage and/or injury.
• Use Care When Opening an Oven Door—Stand to the
side of the appliance when opening the door of a hot oven.
Let hot air or steam escape before you remove or replace
food in the oven.
SELF-CLEANING OVEN MODELS
• Keep Oven Vent Ducts Unobstructed. The wall oven is
vented at the upper control panel or at the center trim
depending of the model. Touching the surfaces in this area
when the wall oven is operating may cause severe burns.
Also, do not place plastic or heat-sensitive items near the
oven vent. These items could melt or ignite.
• Clean in the self-cleaning cycle only the parts of the
appliance listed in this Owner's Guide. Before using the
self-cleaning cycle of the appliance, remove the broiler pan
and any utensils stored in the appliance.
• Do not clean the oven door gasket. The door gasket is
essential for a good seal. Care should be taken not to rub,
damage or move the gasket.
• Placement of Oven Racks. Always place oven racks in
desired location while oven is cool. Remove all utensils
from the rack before removing rack. If rack must be moved
while oven is hot, use extreme caution. Use pot holders and
grasp the rack with both hands to reposition. Do not let pot
holders contact the hot oven element or interior of the oven.
• Do not use oven cleaners. No oven cleaner or oven liner
protective coating of any kind should be used in or around
any part of the appliance
The health of some birds is extremely sensitive
to the fumes given off during the self-clean cycle of any wall
oven. Move birds to another well ventilated room.
• Do not use the broiler pan without its insert. The broiler
pan and grid allow dripping fat to drain and be kept away
from the high heat of the broiler.
IMPORTANT SAFETY NOTICE
The California Safe Drinking Water and Toxic Enforcement Act requires the Governor of California to publish a list of
substances known to the state to cause cancer, birth defects or other reproductive harm, and requires businesses to warn
customers of potential exposure to such substances.
4
Features At A Glance
Electronic Oven Controls with Clock and Kitchen
Timer (Features will vary according to model)
Your Electric
Wall Oven
Features
At A Glance
Oven
Broil
Vent
Element
Dual or Single Interior Oven Lights
depending on your model
Manual or Self-Clean Oven
depending on your model
Broil Pan Insert
Broil Pan
Electronic Oven
Controls with Clock
and Kitchen Timer
(Features will vary
according to model)
Upper Oven
Broil
Element
Upper Oven
Vent
Large 1 Piece Door Handle
Glass Front Oven Door with
Large Window Opening
Lower Oven
Adjustable
Oven Racks
Single Wall Oven
Dual or Single Interior Oven Lights
depending on your model
Self-Clean Oven
depending on your model
Adjustable Oven Racks
Large 1 Piece Door Handle
Glass Front Oven Door with
Large Window Opening
Broil Pan Insert
Broil Pan
Manual or Self-Clean Oven
depending on your model
Double Wall Oven
Features will vary according to model
5
Before Setting Oven Controls
Single and Upper Oven
Vent Location
Upper Oven
Lower Oven
Some models are equipped with a blower which runs in baking
and self-cleaning mode to keep all internal components at a cool temperature.
The blower may keep running even if the oven has been turned off, until the
components have cooled down.
Oven Vent Location
The ovens are vented at the center trim. When the oven is on, warm air is released through
the vent. This venting is necessary for proper air circulation in the oven and good baking
results.
Arranging Oven Racks
ALWAYS ARRANGE OVEN RACKS WHEN THE OVEN IS
COOL (PRIOR TO OPERATING THE OVEN). Always use
oven mitts when using the oven.
Lower Oven
Vent Location
To remove an oven rack, pull the rack forward until it stops.
Lift up front of rack and slide out.
To replace an oven rack, fit the rack onto the guides on the
oven walls. Tilt the front of the rack upward and slide the
rack back into place.
Air Circulation in the Oven
If using 1 rack, place in center of oven. If using multiple racks, stagger
cookware as shown.
For best air circulation and baking results allow 2-4" (5-10 cm) around the
cookware for proper air circulation and be sure pans and cookware do not touch
each other, the oven door, sides or back of the oven cavity. The hot air must
circulate around the pans and cookware in the oven for even heat to reach
around the food.
1 Oven Rack
Multiple Oven Racks
Setting Oven Controls
Refer to the Electronic Oven Control Guide for oven settings.
6
Cooking Informations
Oven Baking
For best cooking results, heat the oven before baking cookies, breads, cakes, pies or pastries, etc... There is no need to
preheat the oven for roasting meat or baking casseroles.
The cooking times and temperatures needed to bake a product may vary slightly from your previously owned appliance.
Baking Problems and Solutions Chart
Baking
Problems
Causes
Corrections
Cookies and biscuits burn on the
bottom.
• Cookies and biscuits put into
the oven before the preheating
time is completed.
• Oven rack overcrowded.
• Allow oven to preheat to the selected temperature before placing food in oven.
• Choose pan sizes that will permit 5.1 cm to 10.2 cm (2”
to 4”) of air space on all sides when placed in the oven.
• Use a medium-weight aluminum baking sheet.
• Dark pan absorbs heat too fast.
Cakes too dark on
top or bottom.
• Cakes put into the oven before
preheating time is completed.
• Rack position too high or low.
• Oven too hot.
• Allow oven to preheat to the selected temperature before placing food in the oven.
• Use proper rack position for baking needs.
• Set oven temperature 25°F/12°C lower than recommended.
Cakes not done in
the center.
• Oven too hot.
• Set oven temperature 25°F/12°C lower than recommended.
• Use pan size suggested in recipe.
• Use proper rack position and place pan so there is 5.1
cm to 10.2 cm (2” to 4”) of space on all sides of pan.
• Incorrect pan size.
• Pan not centered in oven.
Cakes not level.
• Place a marked glass measuring cup filled with water
on the center of the oven rack. If the water level is uneven, refer to the installation instructions for leveling
the range.
• Be sure to allow 5.1 cm to 10.2 cm (2” to 4”) of clearance on all sides of each pan in the oven.
• Do not use pans that are dented or warped.
• Range not level.
• Pan too close to oven wall or
rack overcrowded.
• Pan warped.
Foods not done
when cooking time
is up.
• Oven too cool.
• Set oven temperature 25°F/12°C higher than suggested
and bake for the recommended time.
• Be sure to remove all pans from the oven except the
ones to be used for baking.
• Open oven door only after shortest recommended baking time.
• Oven overcrowded.
• Oven door opened too frequently.
7
Cooking Informations
Broiling
Broiling is a method of cooking tender cuts of meat by direct heat under the broil element
of the oven.
Preheating
Preheating is suggested when searing rare steaks. (Remove the broiler pan before
preheating. Foods will stick if placed on hot metal.) To preheat, set the control(s) to BROIL
as instructed in the Owner's Guide. Wait for the element to become red-hot, usually about
2 minutes. Preheating is not necessary when broiling meats well-done.
Broil Stop Position
To Broil
Broil on side until the food is browned; turn and cook on the second side. Season and
serve. Always pull rack out to the "stop" position before turning or removing food.
Determine Broiling Times
Broiling times vary, so watch the food closely. Time not only depends on the distance from element, but on the thickness and
aging of meat, fat content and doneness preferred. The first side usually requires a few minutes longer than second. Frozen
meats also require additional time.
Grid
Broiling Tips
The broiler pan and its grid allow dripping grease to drain and be kept away from the
high heat of the broiler.
DO NOT use the pan without its grid. DO NOT cover the grid with foil. The
exposed grease could ignite.
Should an oven fire occur, close the oven door and turn off the
oven. If the fire continues, throw baking soda on the fire or use fire extinguisher. DO
NOT put water or flour on the fire. Flour may be explosive.
Broiler Pan
Broiler Clean-Up Tips:
To make cleaning easier, line the bottom of the broiler pan with aluminum foil. DO NOT cover the broiler grid with foil.
To prevent grease from baking on, remove the broiler pan from the oven as soon as cooking is completed. Use hot pads
because the broiler pan is extremely hot. Pour off grease. Soak the pan in HOT, soapy water.
Clean the broiler pan as soon as possible after each use. If necessary, use soap-filled steel wool pads. Heavy scouring may
scratch the grid.
8
Cooking Informations
Convection Cooking (some models)
The convection oven uses a fan located in the rear wall of the oven to circulate heated air around the food to be cooked. The
controlled air flow pattern quickly seals the food surface retaining the natural juices and flavour. This method of cooking enables
you to obtain the best culinary results when baking, thawing, dehydrating and roasting foods.
Convection notes:
1. Batch cooking is more convenient with better results.
2. Defrosting is quicker in convection mode when compared to regular radiant cooking.
3. Remember to use tested recipes with times adjusted for convection baking/roasting when using the convection mode. Times
may be reduced by as much as 30% when using the convection feature.
Convection Roasting (some models)
When convection roasting, use the broiler pan and grid, and the roasting rack. The broiler pan will catch grease spills and the
grid will help prevent spatters. The roasting rack will hold the meat.
To prevent food from contacting the broil element
and to prevent grease spattering, DO NOT use the roasting rack
when broiling.
1. Place oven rack on next-bottom rack position.
2. Place the grid in the broiler pan. The roasting rack fits on the grid
allowing the heated air circulate under the food for even cooking
and helps to increase browning on the underside. Make sure the
roasting rack is securely seated on the grid in the broiler pan. DO
NOT use the broiler pan without the grid or cover the grid with
aluminum foil.
3. Position food (fat side up) on the roasting rack.
4. Place the broiler pan on the oven rack. Note: Always pull rack out
to the stop position before removing food.
NOTE: For best convection roasting result, always use the broiler
pan, grid and roasting rack.
9
Roasting Rack
Broiler Pan Grid
Broiler Pan
Care & Cleaning
(Cleaning Chart)
Surfaces
How to Clean
Aluminum (Trim Pieces)
& Vinyl
Use hot, soapy water and a cloth. Dry with a clean cloth. Do not scour or use all-purpose
cleaners, ammonia, powdered cleaners or commercial oven cleaner. They can scratch
and discolor aluminum.
Painted and Plastic Parts,
Body Parts, and Decorative
Trim
For general cleaning, use hot, soapy water and a cloth. For more difficult soils and builtup grease, apply a liquid detergent directly onto the soil. Leave on soil for 30 to 60
minutes. Rinse with a damp cloth and dry. DO NOT use abrasive cleaners on any of these
materials; they can scratch.
Stainless Steel, Chrome,
Control Panel, Decorative
Trim
Before cleaning the control panel, turn all controls to OFF. Clean using hot, soapy
water and a dishcloth. Rinse with a clean water using a dishcloth. Be sure to squeeze
excess water from the cloth before wiping the panel.
Clean stainless steel with hot, soapy water and a dishcloth. Rinse with clean water
and a cloth. Do not use cleaners with high concentrations of chlorides or
chlorines. Do not use harsh scrubbing cleaners. Only use kitchen cleaners that are
especially made for cleaning stainless steel. Always be sure to rinse the cleaners
from the surface as bluish stains may occur during heating that cannot be removed.
Porcelain Enamel Broiler
Pan and Insert, Door Liner,
Body Parts
Gentle scouring with a soapy scouring pad will remove most spots. Rinse with a 1:1
solution of clear water and ammonia. If necessary, cover difficult spots with an
ammonia-soaked paper towel for 30 to 40 minutes. Rinse with clean water and a
damp cloth, and then scrub with a soap-filled scouring pad. Rinse and wipe dry with a
clean cloth. Remove all cleaners or the porcelain may become damaged during future
heating. DO NOT use spray oven cleaners.
Oven Racks
Oven racks may be removed or left in the oven during the Self-Clean cycle for
cleaning. If removed, clean by using a mild, abrasive cleaner following manufacturer's
instructions. Rinse with clean water and dry.
If the racks are cleaned in the Self-Clean cycle, their color will turn slightly blue and
the finish will be dull. After the Self-Clean cycle is complete, and the oven has
cooled, rub the sides of the racks with wax paper or a cloth containing a small
amount of salad oil (this will make the racks glide easier into the rack positions).
Oven Door
DO Hand
Clean Frame
DO Hand
Clean Door
DO NOT
Hand Clean
Oven Door
Gasket
Use soap & water to thoroughly clean the top, sides and front of the oven door. Rinse
well. You may use a glass cleaner on the outside glass of the oven door. DO NOT
immerse the door in water. DO NOT spray or allow water or the glass cleaner to
enter the door vents. DO NOT use oven cleaners, cleaning powders or any harsh
abrasive cleaning materials on the outside of the oven door.
DO NOT clean the oven door gasket. The oven door gasket is made of a woven
material, on Self-Cleaning models, which is essential for a good seal. Care should be
taken not to rub, damage or remove this gasket.
10
Care & Cleaning
Self-Cleaning (some models)
Self-Cleaning Oven
A Self-Cleaning oven cleans itself with high temperatures (well above cooking
temperatures) which eliminate soils completely or reduces them to a fine
powdered ash you can wipe away with a damp cloth.
Adhere to the following cleaning precautions:
• Allow the oven to cool before cleaning.
• Wear rubber gloves when cleaning any exterior parts of the oven manually.
• DO NOT clean the oven door gasket. The woven material of the oven door
gasket is essential for a good seal. Care should be taken not to rub, damage
or remove the gasket.
• DO NOT use any cleaning materials on the oven door gasket. Doing so could
cause damage.
• Remove the broiler pan and insert, all utensils and any aluminum foil.
These items cannot withstand high cleaning temperatures.
• Oven racks do not have to be removed, if they are not removed during the
Self-Clean cycle their color will turn slightly blue and the finish will be dull. If
left in, after the cycle is complete and the oven has cooled, rub the sides of
the oven racks with wax paper or a cloth containing a small amount of salad
oil (this will make the racks glide easier into the rack position).
• Remove any excessive spillovers in the oven cavity before starting the
Self-Cleaning cycle. To clean, use hot, soapy water and a cloth. Large
spillovers can cause heavy smoke or fire when subjected to high
temperatures. DO NOT allow food spills with a high sugar or acid content
(such as milk, tomatoes, sauerkraut, fruit juices or pie filling) to remain on the
surface as they may leave a dull spot even after cleaning.
• Clean any soil from the oven frame, the door liner outside the oven door
gasket and the small area at the front center of the oven bottom. These
areas heat sufficiently to burn soil on. Clean with soap and water.
NOTE: Prior to setting the Self-Clean cycle, any spills remaining on the oven
bottom should be removed.
During the self-cleaning
cycle, the outside of the wall oven can
become very hot to the touch. DO NOT
leave small children unattended near
the appliance.
The health of some birds
is extremely sensitive to the fumes given
off during the self-clean cycle of any wall
oven. Move birds to another well
ventilated room.
DO NOT line the oven
walls, racks, bottom or any other part of
the appliance with aluminum foil. Doing
so will destroy heat distribution, produce
poor baking results and cause permanent
damage to the interior (aluminum foil will
melt to the interior surface of the oven).
DO NOT force the oven
door open. This can damage the
automatic door locking system. Use
caution when opening the door after the
Self-Cleaning cycle is completed. The
oven may still be VERY HOT.
Some models have an exposed Bake element in the lower oven cavity. On these
models the bake element is designed to be tilted up using your hand from the
front of the bake element. This will allow easier access to the oven bottom for
cleaning. Be careful not to raise the element more than 4 or 5 inches from the
resting position.
The oven bake and broil elements may appear to have cooled after
they have been turned OFF. The elements may still be hot and burns may
occur if these elements are touched before they have cooled sufficiently.
What to Expect during Cleaning:
While the oven is in operation, the oven heats to temperatures much higher than those
used in normal cooking. Sounds of metal expansion and contraction are normal. Odor
is also normal as the food soil is being removed. Smoke may appear through the oven
vent.
If heavy spillovers are not wiped up before cleaning, they may flame and cause more
smoke and odor than usual. This is normal and safe and should not cause alarm. If
available, use an exhaust fan during the self-cleaning cycle.
To Set the Self-Clean Cycle
Refer to the Oven Control Guide for Self-Clean Cycle settings.
11
DO Hand
Clean Frame
DO Hand
Clean Door
DO NOT Hand Clean
Oven Door Gasket
Note: See additional cleaning
information for the oven door in the
General Care & Cleaning section.
Care & Cleaning
Cleaning the Manual Clean Oven (Regular oven models only)
Porcelain has a smooth finish and is a type of glass fused to metal. Oven cleaners can be used on all interior oven surfaces.
REMOVE SPILLOVERS AND HEAVY SOILING AS SOON AS POSSIBLE.
REGULAR CLEANINGS WILL REDUCE THE NUMBER OF MAJOR CLEANINGS LATER.
Adhere to the following cleaning precautions:
• Allow the oven to cool before cleaning.
• Wear rubber gloves when cleaning the appliance manually.
General Cleaning
Remove soils using hot, soapy water. Do not allow food spills with a high sugar or acid content (such as milk, tomatoes,
saukerkraut, fruit juices or pie filling) to remain on the surface as they may cause a dull spot even after cleaning.
To Remove Heavy Soil
1. Allow a dish of ammonia to sit in the oven overnight or for several hours with the oven door closed. Clean softened spots
using hot, soapy water. Rinse well with water and a clean cloth.
2. If soil remains, use a soap-filled scouring pad or a nonabrasive cleaner. If necessary, use an oven cleaner following
manufacturer's instructions. DO NOT mix ammonia with other cleaners.
Adhere to the following precautions when using oven cleaners:
1. DO NOT spray on the electrical controls or switches because it could cause a short circuit and result in sparking or fire.
2. DO NOT allow a film from the cleaner to build up on the temperature sensing bulb; it could cause the oven to heat improperly.
(The bulb is located in the rear of the oven.) Carefully wipe the bulb clean after each oven cleaning, being careful not to move
the bulb. A change in its position could affect how the oven bakes. Avoid bending the bulb and capillary tube.
3. DO NOT spray any cleaner on the oven door trim or gasket, handles or any exterior surfaces of the appliance, wood or painted
surfaces. The cleaner can damage these surfaces.
To Clean the Oven Bottom
Clean using hot, soapy water, a mild abrasive cleanser, a soap-filled abrasive pad or oven cleaner following manufacturer's
instructions.
Ammonia must be rinsed before operating the oven. Provide adequate ventilation.
DO NOT line the oven walls, bottom, racks or any other part of the appliance with aluminum foil. Doing so will
destroy heat distribution, produce poor baking results and cause permanent damage to the oven interior (aluminum foil will melt
to the interior surface of the oven).
Care and Cleaning of Stainless Steel (some models)
Some models are equipped with stainless steel exterior parts. Special care and cleaning are required for maintaining the
appearance of stainless steel parts. Please refer to chart provided at beginning of the Care & Cleaning section in this Use &
Care Manual.
12
Care & Cleaning
Hinge lever hook
Hinge
support
Removing and Replacing the Oven Door
The door is heavy. For safe, temporary storage, lay the door flat
with the inside of the door facing down.
Lock engaged for door removal
Figure 1
HINGE SLOT - Door removed
from the oven
Figure 2
Hinge lever
To Remove Oven Door:
1. Open the door to the fully opened position.
2. Pull up the lock located on both hinge supports and engage it in the hinge
lever hooks (Figure 1). You may have to apply a little downward pressure on
the door to pull the locks fully over the hinge lever hooks.
3. Grab the door by the sides and pull the bottom of the door up and toward you
to disengage the hinge supports. Keep pulling the bottom of the door toward
you while rotating the top of the door toward the range to completely disengage the hinge levers (Figure 2).
4. To clean oven door, follow the instructions provided in the General Care &
Cleaning table.
To Replace Oven Door:
1. Grab the door by the sides; place the hinge supports in the hinge slots. Open
the door to the fully opened position.
2. Disengage the lock from the hinge lever hooks on both sides (Figure 3).
Note: Make sure the hinge supports are fully engaged before unlocking the hinge
levers.
3. Close the oven door.
Special Door Care Instructions
Most oven doors contain glass that can break.
Read the following recommendations:
1. Do not close the oven door until all the oven racks are fully in place.
2. Do not hit the glass with pots, pans, or any other object.
3. Scratching, hitting, jarring or stressing the glass may weaken its structure
causing an increased risk of breakage at a later time.
Lock in normal position
Figure 3
Changing the Oven Light
On some models an interior oven light will turn automatically when the oven
door is opened. The oven light may be turned on when the door is closed by
using the oven light switch located on the control panel. On some models,
the lamp is covered with a glass shield held in place by a wire holder. THE
GLASS SHIELD MUST BE IN PLACE WHENEVER THE OVEN IS IN USE.
To replace the light bulb:
CAUTION: BE SURE THE OVEN IS COOL.
1. Turn the power off at the main source.
2. Wear a leather-faced glove for protection against possible broken glass.
3. Replace bulb with 40-watt appliance bulb only.
4. For models with glass shield, press holder on one side to release glass
shield, change bulb and be sure to replace the glass shield.
13
Care & Cleaning
To remove the “hidden bake” cover (some models)
1. In order to remove the “hidden bake” cover, pull the back edge with one
hand about 1/2" inch and lift up the “hidden bake” cover with both hands.
(See picture)
2. When re-installing the “hidden bake” cover, be sure to put it all the way to
the back of the oven and lay it down on the 2 shoulder screws. Then push
the front edge of the cover in its place below the front bracket.
To have easier access to the "hidden bake" cover, you can remove the oven
door by following the instructions on previous page.
IMPORTANT: Always replace the “hidden bake” cover before the next use.
Adjusting Your Oven Temperature
For instructions on how to adjust the oven temperature refer to the electronic oven control guide.
Before you call
Solutions to Common Problems
OCCURRENCE
POSSIBLE CAUSE/SOLUTION
Oven Control Beeps and Displays any F
code (for exemple F11).
Electronic control has detected a fault condition. Push CLEAR pad to clear the display
and stop the display from beeping. Reprogram the oven. If a fault reoccurs, record the fault
number, push the CLEAR pad and contact an authorized servicer.
-F8- is displayed.
The door was left open and controls set for self-cleaning cycle. Close the door and push
both upper and lower oven CLEAR pads.
Installation.
Place oven rack in center of oven. Place a level on the oven rack. Contact installing agent
if rack and cabinet cutout flooring are not level.
Kitchen cabinet misalignment may make oven appear to be not level. Be sure cabinets
are square and level. Contact cabinet maker to correct problem.
Entire oven does not operate.
When the oven is first plugged in, or when the power supply to the oven has been
interrupted, the display will flash. The oven cannot be programmed until the clock is set.
Be sure electrical cord is securely connected into the electrical junction box.
Cord/plug is not installed and/or connected. Cord is not supplied with oven. Contact your
dealer, installing agent or authorized servicer.
Service wiring not complete. Contact your dealer, installing agent or authorized servicer.
Power outage. Check house lights to be sure. Call your local electric company.
Short in cord/plug. Replace cord/plug.
Controls are not set properly. See instructions under Setting Oven Controls to set the
controls.
14
Before you call
Solutions to Common Problems
OCCURRENCE
POSSIBLE CAUSE / SOLUTION
Entire oven does not operate.
House fuse has blown or circuit breaker has tripped immediately following installation.
House fuse may not be fully engaged. Check fuse and screw or engage circuit breaker
securely.
House fuse has blown or circuit breaker has tripped after the oven has been
installed and previously operating. Call an authorized servicer.
Oven light does not work.
Burned-out or loose bulb. Follow the instructions under Changing Oven Light to replace
or tighten the bulb.
Oven smokes excessively during
broiling.
Oven door is closed. Door should be open during broiling.
Meat too close to the broiler unit. Reposition the rack to provide more clearance between
the meat and the broiler. Preheat broil element for quick searing operation.
Meat not properly prepared. Remove excess fat from meat. Slash remaining fatty edges
to prevent curling, but do not cut into the lean.
Grid on broiler pan wrong side-up. Grease does not drain into broiler pan. Always place
the grid on the broiler pan with the ribs up and the slots down to allow grease to drip into
the pan.
Broiler pan used without grid or grid cover with foil. DO NOT use the broiler pan without
the grid or cover the grid with foil.
Oven needs to be cleaned. Grease has built up on oven surfaces. Regular cleaning is
necessary when broiling frequently. Old grease or food spatters cause excessive
smoking.
Poor baking results.
Many factors affect baking results. See Baking for hints, causes and corrections. See
Adjusting Oven Temperature.
Self-cleaning cycle does not work.
Make sure the oven door is close.
Controls not set properly. Follow instructions.
Self-cleaning cycle was interrupted. Stop time must be set 2-4 hours past the start time.
Follow steps under "To Stop or Interrupt a Self-Cleaning Cycle" in the Timer Control Guide.
Soil not completely removed after selfcleaning cycle is completed.
On a dual cavity model, one oven is in operation. If one oven is set for any mode, the second
oven cannot be set to CLEAN.
Failure to clean bottom, from top of oven, frame of oven or door area outside oven seal.
These areas are not in the self-cleaning area, but get not enough to burn on residue. Clean
these areas before the self-cleaning cycle is started. Burned on residue can be cleaned
with a stiff nylon brush and water or a nylon scrubber. Be careful not to damage the oven
gasket.
Excessive spillovers in oven. Set the self-clean cycle for longer cleaning time.
Flames inside oven or smoke from
vent.
Excessive spillovers in oven. This is normal, especially for high oven temperatures, pie
spillovers or for large amounts of grease on bottom of oven. Wipe up excessive spillovers.
15
LIMITED WARRANTY
Your Wall Oven is protected by this warranty
WARRANTY
PERIOD
THROUGH OUR AUTHORIZED
SERVICERS WE WILL:
THE CONSUMER WILL BE
RESPONSIBLE FOR:
FULL ONE-YEAR
WARRANTY
One year from original
purchase date.
Pay all costs for repairing or replacing any parts of this Costs of service calls that are listed under NORMAL
appliance which prove to be defective in materials or RESPONSIBILITIES OF THE CONSUMER.*
workmanship.
LIMITED WARRANTY
(Applicable to the
State of Alaska)
Time periods listed above.
All of the provisions of the full and limited warranties above Costs of the technician's travel to the home and any costs
and the exclusions listed below apply.
for pick up and delivery of the appliance required because
of service.
In the U.S.A., your appliance is warranted by Electrolux Home Products, Inc. In Canada, your appliance is warranted by Electrolux Canada Corp. We authorize
no person to change or to add to any of our obligations under this warranty. Our obligations for service and parts under this warranty must be performed
by us or an authorized servicer.
* NORMAL
RESPONSIBILITIES
OF THE CONSUMER
This warranty applies only to products in ordinary household use, and the consumer is responsible for
the items listed below:
1. Proper use of the appliance in accordance with instructions provided with the product.
2. Proper installation by an authorized servicer in accordance with instructions provided with the appliance and in
accordance with all local plumbing, electrical and/or gas codes.
3. Proper connection to a grounded power supply of sufficient voltage, replacement of blown fuses, repair of loose
connections or defects in house wiring.
4. Expenses for making the appliance accessible for servicing, such as removal of trim, cupboards, shelves, etc., which
are not a part of the appliance when it was shipped from the factory.
5. Damages to finish after installation.
6. Replacement of light bulbs and/or fluorescent tubes (on models with these features).
EXCLUSIONS
This warranty does not cover the following:
1. CONSEQUENTIAL OR INCIDENTAL DAMAGES SUCH AS PROPERTY DAMAGE AND INCIDENTAL EXPENSES
RESULTING FROM ANY BREACH OF THIS WRITTEN OR ANY IMPLIED WARRANTY.
Note: Some states do not allow the exclusion or limitation of incidental or consequential damages, so this limitation
or exclusion may not apply to you.
2. Service calls which do not involve malfunction or defects in workmanship or material, or for appliances not in ordinary
household use. The consumer shall pay for such service calls.
3. Damages caused by services performed by servicers other than Electrolux Home Products, Inc., Electrolux Canada
Corp., or their authorized servicers; use of parts other than genuine Electrolux parts; obtained from persons other
than such servicers; or external causes such as abuse, misuse, inadequate power supply or acts of God.
4. Products with original serial numbers that have been removed or altered and cannot be readily determined.
IF YOU NEED
SERVICE
Keep your bill of sale, delivery slip, or some other appropriate payment record. The date on the bill establishes the warranty
period should service be required. If service is performed, it is in your best interest to obtain and keep all receipts. This
written warranty gives you specific legal rights. You may also have other rights that vary from state to state. Service
under this warranty must be obtained by contacting Electrolux Home Products, Inc. or Electrolux Canada Corp.
This warranty only applies in the 50 states of the U.S.A., Puerto Rico, and Canada. Product features or specifications as described or illustrated are subject to change without
notice. All warranties are made by Electrolux Home Products, Inc. or Electrolux Canada Corp.
2004_02
USA
800•944•9044
Electrolux Home Products, Inc.
P.O. Box 212378
Augusta, GA 30917
Canada
866•294•9911 (English or French)
Electrolux Canada Corp.
6150 McLaughlin Road
Mississauga, Ontario, Canada
L5R 4C2
16
ELECTRONIC OVEN CONTROL
Control Pad Functions
Read the instructions carefully before using the oven. For satisfactory use of your oven, become familiar with the various
functions of the oven as described below. Note: The graphics on your timer may not look exactly like the one shown. This
doesn't change the way it operates.
Note: The oven function will not work if the time of day clock is not set.
Speed Bake Pad- Used
to enter the speed bake
mode temperature (some
models).
Speed Clean
Pad- Used to
select the speed
clean cycle
(some models).
Feature indicator
lights- These light
show which
feature is in use.
Bake Pad
Used to enter
the normal
baking mode
temperature.
Broil Pad- Used
to select the
variable broil
function.
Bake Time
Pad- Used to
enter the length
of the baking
time.
Up and Down arrow pads- Used along with
the function pads to select oven temperature,
cooking time, start time (when programming
an automatic start time), time of day, clean
time and minute timer.
Speed
bake
Speed
clean
Bake
time
Broil
Keep
warm
Clean
Start
time
Keep Warm
Pad- Used to
set the Keep
Warm feature.
Clean Pad
Used to
select the
selfcleaning
cycle.
Oven
Preheat
Door Locked
Start Time Pad- Used
to set the desired start
time for baking. Can be
used with BAKE TIME
to program a delayed
bake cycle.
Clock
Oven
light
Timer
Clear
/Off
On/Off
Oven Interior Light
Pad- Used to turn
oven interior light ON
and OFF.
Clear Pad- Used to
clear any function
previously entered
except the time of day
and minute timer.
Push Clear pad to
stop cooking.
Speed Bake Oven
Bake
Clock Pad- Used to
set the time of day.
Controls
Timer Pad- Used to
set or cancel the
minute timer. The
minute timer does not
start or stop cooking.
Oven, Preheat & Lock lights- The "oven" light indicates
that the oven is functionning. The "Preheat" light will glow
when the oven is first set to operate, or if the desired
temperature is reset higher than the actual oven temperature.
The "Door Locked" light will flash until the door locks when
the self-clean cycle is in use. It glows constantly after the door
locks (some models).
The oven can be programmed to:
Bake normally, Speed Bake, Keep warm, Time Bake,Delay Start (delayed bake), Broil, Clean and Speed Clean.
Note: Push buttons or pads may be shaped differently.
For a silent control panel:
When choosing a function, a beep will be heard each time a pad is pushed. If desired, the controls can be programmed for silent
operation.
To tell if your oven is set for normal or silent operation push and hold START TIME pad for 7 seconds. "- -" or "SP" appears in the
display. Within 5 seconds, press the UP or DOWN ARROW pad to switch between normal sound operation and silent operation
mode. The display will show either "- -" or "SP". Wait 5 seconds to return to normal operating mode.
Note: If "SP" appears, the control will operate with normal sounds and beeps. If "- -" appears, the control is in the silent operation
mode.
Temperature Conversion
Versión en español
(Fahrenheit / Celsius)
The electronic oven control is set to operate in °F (Fahrenheit) when shipped from the factory.
The oven can be programmed for any temperature from 170°F to 550°F (77°C to 288°C).
To change the temperature to °C (Celsius) or from °C to °F (control should not be
in a Bake or Clean mode):
1. Press and hold BROIL pad for 7 seconds until °F or °C appears in the display.
2. Press the UP or DOWN ARROW pad to change °F to °C or °C to °F.
3. Wait 5 seconds to accept the changes or press CLEAR/OFF pad to accept the changes.
1
Si desea obtener una copia en
español de este Manual del
Usuario, sírvase escribir a la
dirección que se incluye a
continuación. Solicite la P/N
318200189E.
Spanish Owner's Guides
Frigidaire Company
P. O. Box 9061
Dublin, Ohio 43017-0961
318200189 (0406) Rev. A
Setting the Clock and Minute Timer
Speed Bake Oven
Bake
Speed
bake
Speed
clean
Bake
time
Broil
Keep
warm
Clean
Start
time
Oven
Preheat
Door Locked
Clock
Oven
light
Timer
Clear
/Off
On/Off
Controls
Note: The time of day must first be set in order to operate the oven.
To set the Clock
When the range is first plugged in, or when the power supply to the appliance has been interrupted, the display will flash "12:00".
1. Press the CLOCK pad once (do not hold pad down).
2. Within 5 seconds, push and hold the UP or DOWN ARROW pad until the correct time of day appears in the display.
3. Press the CLOCK pad to accept the new time of day. If the CLOCK pad is not pressed, the timer will return automatically
to the new time of day after 7 seconds.
Note: The clock cannot be changed during any bake, timed bake, delayed time bake, clean cycle, speed clean or delayed
clean cycle.
Changing between 12 or 24 Hour Time of Day Display
1. Press and hold the CLOCK pad for 7 seconds. After 7 seconds, "12Hr" or "24Hr" will appear in the display and the control
will beep once.
2. Press the UP or DOWN ARROW pad to switch between the 12 and 24 hour time of day display. The display will show either
"12Hr" or "24Hr".
3. Wait 5 seconds or press the CLEAR/OFF pad to return to the time of day display.
4. Reset the correct time as described in To set the Clock above. Please note that if the 24 hour time of day mode was chosen,
the clock will now display time from 0:00 through 23:59 hours.
To Set the Minute Timer
1. Press the TIMER ON/OFF pad.
2. Press the UP ARROW pad to increase or DOWN ARROW pad to decrease the time in one minute increments. The timer can
be set for any amount of time from 1 minute to 11 hours and 59 minutes.
3. The display shows the timer count down in minutes if more than 1 hour remains. When less than 1 hour remains, the display
will count down in seconds.
4. When the set time has run out, the timer will beep 3 times. It will continue to beep 3 times every 8 seconds until the TIMER
ON/OFF pad is pressed.
Note: The indicator light located above the TIMER ON/OFF pad will glow while the minute timer is active.
Note: The minute timer does not start or stop cooking. It serves as an extra timer in the kitchen that will beep when the set time
has run out. The minute timer can be used alone or during any of the other oven functions. When the minute timer is in use with
any other mode, the minute timer will be shown in the display. To view other functions, press the function pad for that mode.
To Cancel the Minute Timer before the set time has run out: Press the TIMER ON/OFF pad.
2
Setting Oven Controls
Note: The time of day must first be set in order to operate the oven.
To Set or Change the Temperature for Normal or Speed Baking
The oven can be programmed to bake at any temperature from 170°F to 550°F (77°C to 288°C).
To Set the Controls for Normal or Speed Baking:
1. Press the BAKE or SPEED BAKE pad."— — —°" appears in the display.
2. Within 5 seconds, Press the UP or DOWN ARROW pad. The display will show "350°F (177°C)." By holding the UP or DOWN
ARROW pad, the temperature can then be adjusted in 5°F (1°C if control is set to display Celsius) increments.
3. 8 seconds after the UP or DOWN ARROW pad is released, the oven will begin heating to the selected temperature. When
the displayed temperature reaches the desired baking temperature, the preheat indicator light will turn OFF.
4. To cancel the baking function, press the CLEAR/OFF pad.
To Change the Oven Temperature after Baking has Started:
Press the UP or DOWN ARROW pad to increase or decrease the set temperature.
Speed BakeTM Cooking System (some models)
Speed BakeTM Cooking System uses a fan to circulate the oven’s heat uniformly and
continuously around the oven. This improved heat distribution allows for fast, even cooking and
browning results. It also gives better baking results when using two racks at the same time.
Heated air flows around the food from all sides, sealing in juices and flavors. Meats cooked with
Speed BakeTM Cooking System are juicer. Poultry is crisp on the outside while staying tender
and moist on the inside. Breads and pastry brown more evenly. Most foods baked in a standard
oven can be cooked faster and more evenly with Speed BakeTM Cooking System.
Benefits of Speed BakeTM Cooking System:
-
Foods cook up to 30% faster, saving time and energy.
Two racks can be used with more even cooking and browning.
No special pans or bakeware needed.
General Cooking Instructions:
1. To convert baking times from normal recipes to Speed Bake times, start with a 30%
reduction in time and increase the time until desired doneness is obtained. Time reductions
will vary depending on the amount and type of food.
2. Preheating is not necessary when cooking with Speed Bake, except with items such as
cakes, cookies, biscuits, breads, etc.
3. When using two racks at the same time, place them in positions 1 and 3 for the best
results.
4. When baking cakes with Speed Bake, set temperature 25°F (13°C) degrees lower than the
recommended setting for best results.
To Set Control for Continuous Bake or 12 Hour Energy Saving:
The oven control has a built-in 12 Hour Energy Saving feature that will shut off the oven if the control is left on for more than 11
hours and 59 minutes. The oven can be programmed to override this feature for continuous baking.
To set control for continuous baking:
1. Press and hold the TIMER ON/OFF pad for 7 seconds until a tone is heard.
2. Within 5 seconds, press the UP or DOWN ARROW pad to switch between Continuous Bake and 12 Hour Energy Saving mode.
The display will show either "— — hr" or "12hr".
If "- - hr" appears, the oven will be set to continuous baking. If "12hr " appears, the oven is set to 12 hour energy saving mode.
3. Wait 5 seconds or press the CLEAR/OFF pad to accept the changes.
To Set Control for Oven Lockout (some models):
The control can be programmed to lock the oven door (some models) and/or lock the oven control pads (all models).The Oven
Lockout feature prevents the oven from being accidentally turned on. It does not disable the clock, minute timer or the interior
oven light.
To Set Control for Oven Lockout feature:
1. Press the CLEAR/OFF pad and hold for 3 seconds. The "Door Locked" indicator light will flash and the motor driven door lock
will begin to close automatically. DO NOT open the oven door while the indicator light is flashing. Allow about 15 seconds
for the oven door to lock. Once the oven door is locked, "Loc " will appear in display.
2. To cancel the Oven lockout feature, press the CLEAR/OFF pad and hold for 3 seconds. The control will unlock the oven door
3
and resume normal operation.
Setting Oven Controls (continued)
Speed Bake Oven
Bake
Speed
bake
Speed
clean
Bake
time
Broil
Keep
warm
Clean
Start
time
Oven
Preheat
Door Locked
Clock
Oven
light
Timer
Clear
/Off
On/Off
Controls
Broil
Broiling is a method of cooking tender cuts of meat by direct heat under the
broil element of the oven. A beep lets you know when the broil temperature is
reached. Be sure you center the broiler pan directly under the broil element for
best results.
Arrange oven rack while oven is still cool. Position the rack as needed.
The broiler pan and its insert allow dripping grease to drain and be kept away
from the high heat of the broiler. DO NOT use the pan without its insert. DO
NOT cover the insert with foil. The exposed grease could ignite.
Grid
Should an oven fire occur, close the oven door and turn off the
oven. If the fire continues, throw baking soda on the fire or use a fire
extinguisher. DO NOT put water or flour on the fire. Flour may be explosive and
water can cause a grease fire to spread and cause personal injury.
To set for broiling:
1. Arrange the oven rack while oven is still cool.
2. Press the BROIL pad. "- -" will appear in the display.
3. Press the UP or DOWN ARROW pad until the desired broil setting level appears
in the display. Press the UP ARROW pad for HI broil or the DOWN ARROW pad
for LO broil. Most foods may be broiled at the HI broil setting. Select the LO broil
setting to avoid excess browning or drying of foods that should be cooked to the
well-done stage.
4. Place the insert on the broiler pan, then place the food on the insert. DO NOT
use the pan without the insert or cover the insert with aluminum foil. The
exposed grease could ignite.
5. Place the pan on the oven rack. Open the oven door to the broil stop
position when broiling.
6. Broil on one side until food is browned. Turn and broil food on 2nd side.
Note: Always pull the rack out to the stop position before turning or removing
food.
7. When broiling is finished, press the CLEAR/OFF pad.
To Operate the Oven Light(s)
The interior oven light(s) will automatically turn ON when the oven door is opened.
Press the OVEN LIGHT pad to turn the interior light(s) ON and OFF whenever the door
is closed.
The interior oven light(s) is (are) located at the upper left (and right, some models)
rear wall of the oven interior and is covered with a glass shield held by a wire holder.
The glass shield must be in place whenever the oven is in use. To change the interior
oven light(s), see changing the Oven Light in the General Care & Cleaning section
in the Owner's Guide.
4
Broiler Pan
Broil Stop Position
Setting Oven Controls (continued)
To Set the Timed Bake and Delay Start Features
The BAKE TIME and START TIME pads operate the features that will turn the oven ON and OFF at the times you select in advance.
The oven can be programmed to start immediately and shut off automatically (Timed Bake) or to begin baking at a later time
with a delayed start time (Delay Start).
Note: During Timed Bake the preheat indicator light will function during the preheat operation.
To Program the Oven to Begin Baking Immediately and To Shut Off Automatically (Timed Bake):
1. Be sure that the clock shows the correct time of day.
2. Place the food in the oven.
3. Press the BAKE pad. "— — —°" appears in the display.
4. Within 5 seconds, press the UP or DOWN ARROW pad. The display will show "350°F (177°C)". By holding the UP or DOWN
ARROW pad, the temperature can then be adjusted in 5°F increments (1° if the control is set to display Celsius).
5. Wait 8 seconds to accept the temperature.
6. Press the BAKE TIME pad. "0:00" will flash in the display (MIN:SEC) and (HR:MIN) if programmed for more than 60 minutes.
7. Press the UP or DOWN ARROW pad until the desired baking time appears in the display.
8. The oven will turn ON and begin heating.
Note: When the control is set for this function the oven temperature will be displayed. To see the cook time remaining press the
BAKE TIME pad and to see the time of day press the CLOCK pad.
To Program Oven for a Delayed Start Time and to Shut-Off Automatically (Delayed Start Bake):
1. Be sure that the clock shows the correct time of day.
2. Place the food in the oven.
3. Press the BAKE pad. "— — —°" appears in the display.
4. Within 5 seconds, press the UP or DOWN ARROW pad. The display will show "350°F (177°C)." By holding the UP or DOWN
ARROW pad, the temperature can then be adjusted in 5°F increments (1° if the control is set to display Celsius).
5. Wait 8 seconds to accept the temperature.
6. Press the BAKE TIME pad. "0:00" will flash in the display (MIN:SEC) and (HR:MIN) if programmed for more than 60 minutes.
7. Press the UP or DOWN ARROW pad until the desired baking time appears.
8. Wait 5 seconds for the control to accept the time.
9. Press the START TIME pad. The earliest possible start time will appear in the display.
10. Press the UP or DOWN ARROW pad until the desired start time appears in the display and wait 7 seconds to accept.
11. Once the controls are set, the control calculates the time when baking will start and stop.
12. The oven will turn ON at the delayed start time and begin heating.
Note: When the control is set for a delayed time bake the time of day is displayed until the delayed time bake is reached.
When the oven will turn on, the oven temperature will be displayed. To see the cook time remaining press the BAKE
TIME pad and to see the time of day press the CLOCK pad.
When the Set Bake Time Runs Out:
1. "END" will appear in the display window and the oven will shut off automatically.
2. The control will beep 3 times every 25 seconds until the CLEAR/OFF pad is pressed.
To Change the Oven Temperature or Bake Time after Baking has Started:
1. Press the function pad you want to change.
2. Press the UP or DOWN ARROW pad to adjust the setting.
Use caution with the Timed Bake and Delayed Start features. Foods that can easily spoil such as milk, eggs, fish,
meat or poultry, should be chilled in the refrigerator first. Even when chilled, they should not stand in the oven for more than 1
hour before cooking begins, and should be removed promptly when cooking is completed.
5
Setting Oven Controls (continued)
Speed Bake Oven
Bake
Speed
bake
Speed
clean
Bake
time
Broil
Keep
warm
Clean
Start
time
Oven
Preheat
Door Locked
Clock
Oven
light
Timer
Clear
/Off
On/Off
Controls
Setting the Keep Warm Feature
The KEEP WARM pad turns ON the Keep Warm feature and will maintain an oven temperature of 170° F (77°C). The Keep
Warm feature will keep oven baked foods warm for serving up to 3 hours after cooking has finished. After 3 hours the Keep Warm
feature will shut the oven OFF automatically. The Keep Warm feature may be used without any other cooking operations or can
be used after cooking has finished using BAKE TIME or DELAYED TIMED BAKE.
To set Keep Warm:
1. Arrange the interior oven racks and place baked food in the oven.
2. Press the KEEP WARM pad. "- -" will appear in the display and the Keep Warm indicator light above the pad will turn ON.
Note: If no further pads are touched within 6 seconds the request to turn ON Keep Warm will be cleared.
3. Press the UP or DOWN ARROW pad to start. "Hld" will be displayed.
4. To turn Keep Warm OFF at any time press the CLEAR/OFF or KEEP WARM pad. The Keep Warm indicator light above the
pad will turn OFF.
To set Keep Warm to turn ON automatically:
1. Arrange the interior oven racks and place food in the oven. Set the oven properly for Timed Bake or Delayed Timed Bake.
2. Press the KEEP WARM pad. "- -" will appear in the display and the Keep Warm indicator light above the pad will turn ON.
3. Press the UP or DOWN ARROW pad to start. Keep Warm is set to turn ON automatically after Timed Bake or Delayed Start
Bake has finished.
4. To turn Keep Warm OFF at any time press the CLEAR/OFF pad. The Keep Warm indicator light above the pad will turn OFF.
6
Setting Oven Controls (continued)
To Set the Sabbath Feature (for use on the Jewish Sabbath & Holidays)
The BAKE TIME and START TIME pads are used to set the Sabbath feature. The Sabbath feature may only be used with the
BAKE pad. The oven temperature may be set higher or lower after setting the Sabbath feature (the oven temperature
adjustment feature should be used only during Jewish Holidays), however the display will not visibly show or provide any
audible tones indicating whether the change occurred correctly. Once the oven is properly set using Bake with the Sabbath
feature active, the oven will remain continuously ON until cancelled. This will override the factory preset 12-Hour Energy
Saving feature.
If the oven light will be needed during the Sabbath, press the OVEN LIGHT pad before activating the Sabbath feature. Once
the oven light is turned ON and the Sabbath feature is active, the oven light will remain ON until the Sabbath feature is
turned OFF. If the oven light needs to be OFF, be sure to turn the oven light OFF before activating the Sabbath feature.
IMPORTANT NOTES: It is not advised to attempt to activate any other program feature other than BAKE while the Sabbath
feature is active. ONLY the following key pads will function after setting the Sabbath feature; UP or DOWN ARROW, BAKE
& CLEAR/OFF. ALL OTHER KEYPADS will not function once the Sabbath feature is properly activated.
To Program the Oven to Begin Baking Immediately & activate the Sabbath feature:
1. Be sure that the clock is set with the correct time of day.
2. Place the food in the oven.
3. Press the BAKE pad. " — — — ° " appears in the display.
4. Within 5 seconds, press the UP or DOWN ARROW pad. The display will show "350°F (177°C)." By holding the UP or
DOWN ARROW pad, the temperature can then be adjusted in 5°F increments (1°C if the control is set to display
Celsius).
5. If you desire to set the oven control for a Timed Bake or a Delayed Start do so at this time. If not, skip this step and
continue to step 6. Refer to the Bake Time (complete steps 6-7) / Start Time (complete steps 6-10) section for
complete instructions. Remember the oven will shut down after using Bake Time or Start Time and therefore may only
be used once during the Sabbath/Jewish Holidays. The maximum Start Time Bake time is 11 hours & 59 minutes.
6. The oven will turn ON and begin heating.
7. Press and hold both the Bake Time and Start Time pads for at least 3 seconds. SAb will appear in the display. Once
SAb appears in the display the oven control will no longer beep or display any further changes and the oven is properly
set for the Sabbath feature.
Note: You may change the oven temperature once baking has started by pressing the UP or DOWN ARROW (for Jewish
Holidays only). The oven temperature will be adjusted in 5°F increments with each press of these pads (1°C if the control
is set to display Celsius). Remember that the oven control will no longer beep or display any further changes
once the oven is set for the Sabbath feature.
8. The oven may be turned OFF at any time by first pressing the Clear/Off pad (this will turn the oven OFF only). To turn
OFF the Sabbath feature press and hold both the Bake Time and Start Time pads for at least 3 seconds. SAb will
disappear from the display.
Should you experience a power failure or interruption, the oven will shut off. When power is returned the oven will not turn
back on automatically. The oven will remember that it is set for the Sabbath and the food may be safely removed from the
oven while still in the Sabbath feature, however the oven cannot be turned back on until after the Sabbath. After the
Sabbath observance turn OFF the Sabbath feature. Press and hold both the Bake Time and Start Time pads for at least 3
seconds. SAb will disappear from the display and the oven may be used with all normal functions. For further assistance,
guidelines for proper usage, and a complete list of models with the Sabbath feature, please visit the web at
http:\\www.star-k.org.
7
Oven Cleaning
Self-Clean or Speed Clean Cycle time length
For satisfactory results, use a 2 hour Self-Clean cycle for light soils and a 3 hour cycle for average or heavy soils.
NOTE: The kitchen area should be well ventilated using an open window, ventilation fan or exhaust hood during the SelfClean or Speed Clean cycle. This will help eliminate the normal odors associated with the Self-Cleanning cycles.
To Set the Controls for a Self-Clean or Speed Clean Cycle or a
Delayed Start Self-Clean or Delayed Start Speed Clean Cycle:
(Note: If you do not want to start a Delayed Self-Clean or Speed Clean Cycle, skips
steps 2 & 3.)
1. Be sure the clock shows the correct time of day.
2. Press the START TIME pad.
3. Press and hold the UP ARROW pad to scroll to the time to start the delayed SelfClean cycle. Release the pad when the desired time is displayed.
4. Press the CLEAN pad (for a 3 hour cycle) or the SPEED CLEAN pad (for a 2 hour
cycle). "- -" appears in the display.
5. Press the UP ARROW pad once.
As soon as the controls are set, the motor driven lock will begin to close
automatically and the “Door Locked” indicator light will flash. DO NOT open the
oven door while the light is flashing (it takes about 15 seconds for the oven door to
lock).
6. "CLn" will appear in the display during the Self-Clean cycle and the "Door Locked"
light will glow until the Self-Cleaning cycle is complete or cancelled and the oven
temperature has cooled.
NOTE: A smoke eliminator in the
oven vent converts most of the soil
into a colorless vapor.
To avoid possible
burns use care when opening the
oven door after the Self-Cleaning
cycle. Stand to the side of the oven
when opening the door to allow hot
air or steam to escape.
DO NOT force the
oven door open. This can damage
the automatic door locking system.
Use caution and avoid possible burns
when opening the door after the
Self-Cleaning cycle has completed.
The oven may still be VERY HOT.
When the Self-Clean or Speed Clean Cycle is Completed:
1. The time of day or "End" will appear in the display window and the “Clean” and
"Door Lock" light will continue to glow.
2. Once the oven has cooled down for about 1 HOUR and the "Door Lock" light has
gone out, the oven door can be opened.
3. If “End” is in the display and the Select Clean indicator light remains ON, press the
CLEAR/OFF pad. The time of day will appear in the display.
NOTE: When the oven is cool, wipe away any residue or powdered ash with a damp
cloth or paper towel.
Stopping or Interrupting a Self-Cleaning or Speed Cleaning Cycle
If it becomes necessary to stop or interrupt a Self-Cleaning cycle:
1. Press the CLEAR/OFF pad.
2. Once the oven has cooled down for about 1 HOUR and the "Door Lock" light has
gone out, the oven door can be opened.
3. Restart the Self-Clean cycle once all conditions have been corrected.
Adjusting the Oven Temperature
Your oven thermostat has been precisely set at the factory. This setting may differ from your previous oven, however, so your recipe
times may not give you the results you expect. If you think that the oven is cooking too hot or cool for your recipe times, you can
adjust the thermostat so that the oven cooks hotter or cooler than the temperature displayed.
To Adjust Oven Temperature:
1. Press and hold the BAKE pad for 8 seconds. The display now indicates the amount of degrees offset between the original factory
temperature setting and the current temperature setting. If the oven control has the original factory calibration, the display will
read “0”.
2. The temperature can now be adjusted up or down 35°F or 19°C, in 1°F or 1°C steps by pushing and holding the UP or DOWN
ARROW pad. Adjust until the desired amount of degrees offset appears in the display. When lowering the oven temperature,
a minus sign (-) will appear before the number to indicate that the oven will be cooler by the displayed amount of degrees.
3. When you have made the desired adjustment, wait 5 seconds and the display will go back to the time of day.
Note: Oven temperature adjustment made will not change the Self-Cleaning feature temperature.
8
Self-Cleaning O ven
Bake
Clean
Bake
tim e
Broil
Keep
w arm
Start
tim e
Oven
Preheat
Door Locked
Clock
Oven
light
Tim er
Clear
/Off
On/Off
Controls
"
Product No.
FEB30S5DBB
FEB30S5DSB
38254331E4062 38254331E4012
Series
30" single
Color
black
30" single
white
Market
North America
North America
Wiring Diagram
318046237
318046237
Owner's Guide
318200924
318200924
Installation Instructions 318201514
318201514
Service Data Sheet
318047413
318200189
Timer Guide
318200189
318200189
FEB30S5D.eps CFEB30S5DSA.eps BFEB30S5DSA.eps DFEB30S5DSA.eps
318046237.eps
Electrolux Major Appliances
North & Latin America
P.O. BOX 212378
AUGUSTA, GA 30917
SINGLE ELECTRIC
WALL OVEN
Model No.
FEB30S5D
Publication No.
5995443172
05/08/01
(EN/SERVICE/BJH)
377
Copyright © 2005 Electrolux Home Products, Inc.
All rights reserved.
Publication No: 5995443172
FEB30S5D
CONTROL PANEL
08/05
2
FEB30S5D
Publication No: 5995443172
CONTROL PANEL
Model Index:
POS. NO
2A
2B
19
19
20 #
*
*
# Functional Parts
* Non-Illustrated Parts
PART NO.
318257300
318260100
318274601
318274600
316418522
316021107
5303211311
A FEB30S5D (FEB30S5DBB)
B FEB30S5D (FEB30S5DSB)
A
A
A
A
B
B
B
B
A B
A B
DESCRIPTION
Shield, oven top
Cover, box
Control Panel Assembly, glass, black, w/touch pad
Control Panel Assembly, glass, white, w/touch pad
Clock/Timer, electronic, ES350W1
Screw, hex head, 8-32, silver
Screw, 8 x 0.500
3
08/05
Publication No: 5995443172
FEB30S5D
BODY
08/05
4
FEB30S5D
Publication No: 5995443172
BODY
Model Index:
POS. NO
1
2
6
9
10
12 #
14
14*
15
16
17
29
37 #
41
54
56
56
56A
56A
58A
58B
58D
59
59A
62
62*
66 #
67 #
68
70
71
76
80
81
82
83
86
87
89 #
90
90
99
108#
*
108A
112#
119#
127
131
# Functional Parts
* Non-Illustrated Parts
PART NO.
318259202
318258900
318262502
5303317977
5303317976
318089917
318224000
318268099
5303013071
3201911
5304400195
318147411
316217002
5303310526
318222400
318259904
318259902
318259905
318259903
318285055
318285056
318285058
318072560
318261600
316056000
5303323144
318255600
318255401
5304403015
318259100
318260007
318056217
5303320846
318192400
318258707
318261403
5303310524
318260600
318261202
318259701
318259700
318256200
318073018
08016432
318251300
318112701
318004900
318317100
318272900
A FEB30S5D (FEB30S5DBB)
B FEB30S5D (FEB30S5DSB)
A
A
A
A
A
A
A
A
A
A
A
A
A
A
A
A
A
A
A
A
A
A
A
A
A
A
A
A
A
A
A
A
A
A
A
A
A
A
A
A
A
A
A
A
A
A
B
B
B
B
B
B
B
B
B
B
B
B
B
B
B
B
B
B
B
B
B
B
B
B
B
B
B
B
B
B
B
B
B
B
B
B
B
B
B
B
B
B
B
B
B
B
DESCRIPTION
Back, main
Shield, insulation, upper
Rack, oven
Pan, broiler
Insert, broiler pan
Switch, light
Receptacle, oven light
Insulation, oven light
Bulb/Lamp, oven light
Cover, oven light, glass
Retainer, light cover
Bumper, (2)
Probe, oven temp
Cover, hinge cutout
Housing, oven light
Trim, side filler, black, RH
Trim, side filler, white, RH
Trim, side filler, black, LH
Trim, side filler, white, LH
Insulation, oven wrapper
Insulation, oven back
Insulation, 1/2" thick, 43 x 9.5
Duct, oven vent
Bracket, vent tube
Terminal Block
Nut, 10-32
Element, broil, 2750W
Element, bake, 3400W
Support, hanger, (2), broil element
Shield, insulation, sides, (2)
Panel, rear box
Front, oven
Plate, oven mtg
Spring, oven
Shield, insulation, lower
Liner, oven assy
Receptacle, hinge
Bracket, cable mtg.
Motor, latch assy
Trim, oven front, black, bottom
Trim, oven front, white, bottom
Bracket, side, bottom, (2)
Motor, blower
Screw, truss head, 8-18 x 0.375
Bracket, fan support
Relay
Switch, thermal
Adapter Assembly, vent tube, w/converter
Box, vent
5
08/05
Publication No: 5995443172
FEB30S5D
BODY
08/05
6
FEB30S5D
Publication No: 5995443172
BODY
Model Index:
A FEB30S5D (FEB30S5DBB)
B FEB30S5D (FEB30S5DSB)
POS. NO
132
142
*
143
163
185
219#
219A
264
310
311
311*
312
312
PART NO.
318003000
318123910
5303324184
318172904
318014111
318014700
318003614
318003613
318257701
5304440067
318246010
5304438005
318246702
318246703
A
A
A
A
A
A
A
A
A
A
A
A
A
A
B
B
B
B
B
B
B
B
B
B
B
B
B
B
DESCRIPTION
Plate, shield
Deflector
Screw, 8-18 x 5/16, black, (4)
Support, wire/glass
Spacer
Spacer, oven shield, (4)
Thermostat, safety
Thermostat, safety
Trim, oven, black, front
Cabinet Mounting Kit
Bracket, cabinet mtg, (2)
Screw, 6 x 1, black
Tool, cabinet bracket, RH
Tool, cabinet bracket, LH
* #
*
*
*
*
*
*
318078542
318231735
5303323136
5303211311
5303323139
5303323277
5304436875
A
A
A
A
A
A
A
B
B
B
B
B
B
B
Box & wires assy
Harness, wiring, main
Screw ground
Screw, 8 x 0.500
Screw, 10-24 x 0.906
Screw, 8-18 X 13/32
Screw, 8-18 X 1/2, black
# Functional Parts
* Non-Illustrated Parts
7
08/05
Publication No: 5995443172
FEB30S5D
DOOR
08/05
8
FEB30S5D
Publication No: 5995443172
DOOR
Model Index:
A FEB30S5D (FEB30S5DBB)
B FEB30S5D (FEB30S5DSB)
POS. NO
3
3A
4
4
6
7
7A
8
9
10
12
17
23
29
39
39
40
56
64
PART NO.
318260201
318260401
318261300
318261301
318260500
318285057
318285062
316117500
318259601
5304416408
318053130
316402403
5303310828
318014402
318231200
316203001
318242700
5304436875
318165800
A
A
A
A
A
A
A
A
A
A
A
A
A
A
A
A
A
B
B
B
B
B
B
B
B
B
B
B
B
B
B
B
B
B
DESCRIPTION
Trim, oven door, black, upper
Trim, oven door, side, (2)
Glass Assy., oven door, black, outer, w/trim
Glass Assy., oven door, white, outer, w/trim
Baffle, door
Insulation, oven door
Insulation, oven door
Glass, oven door, heat barrier
Liner, oven door
Screw, 10-24 x 1.750, handle mtg
Seal, oven door
Spacer, door glass, (2)
Hinge, oven door, (2)
Spacer, door
Handle, black
Handle, door, white
Bracket, glass holder, (2)
Screw, 8-18 X 1/2, black
Spacer, (2)
*
*
*
*
08016432
5303211311
5303300265
5303323277
A
A
A
A
B
B
B
B
Screw, truss head, 8-18 x 0.375
Screw, 8 x 0.500
Screw, 8-18 x 0.500, chrome, (3)
Screw, 8-18 X 13/32
# Functional Parts
* Non-Illustrated Parts
9
08/05
Publication No: 5995443172
FEB30S5D
WIRING DIAGRAM
08/05
10
SERVICE DATA SHEET
318047413 (0405) Rev. A
Electric Wall Oven with Electronic Oven Control
NOTICE
°
This service data sheet is intended for use by persons having electrical and mechanical training and a level of
knowledge of these subjects generally considered acceptable in the appliance repair trade. The manufacturer
cannot be responsible, nor assume any liability, for injury or damage of any kind arising from the use of
this data sheet.
.
SAFE SERVICING PRACTICES
To avoid the possibility of personal injury and/or property damage, it is important that safe servicing practices be
observed. The following are examples of some, but not all, of these practices.
1. Do not attempt a product repair if you have any doubts as to your ability to complete it in a safe and satisfactory
manner.
2. Before servicing or moving an appliance, remove power cord from electric outlet, trip circuit breaker to OFF, or
remove fuse and turn off gas supply.
3. Never interfere with the proper installation of any safety device.
4. USE ONLY REPLACEMENT PARTS CATALOGED FOR THIS APPLIANCE. SUBSTITUTIONS MAY DEFEAT COMPLIANCE
WITH SAFETY STANDARDS SET FOR HOME APPLIANCES.
5. GROUNDING: The standard color coding for safety ground wires is GREEN OR GREEN WITH YELLOW STRIPES.
Ground leads are not to be used as current carrying conductors. IT IS EXTREMELY IMPORTANT THAT THE SERVICE
TECHNICIAN REESTABLISH ALL SAFETY GROUNDS PRIOR TO COMPLETION OF SERVICE. FAILURE TO DO SO
WILL CREATE A POTENTIAL HAZARD.
6. Prior to returning the product to service, ensure that:
• All electric connections are correct and secure.
• All electrical leads are properly dressed and secured away from sharp edges, high-temperature components,
and moving parts.
• All non-insulated electrical terminals, connectors, heaters, etc. are adequately spaced away from all metal
parts and panels.
• All safety grounds (both internal and external) are correctly and securely reassembled.
• All panels are properly and securely reassembled.
1
ES350/355 ELECTRONIC OVEN CONTROL
1. This self-cleaning controller offers Bake, Broil, Speed Bake (some models) modes, Timed and Delayed Baking, and
Cleaning functions.
2. This Controller has a touch sensitive membrane.
Bake
Speed
Bake
Speed
Clean
Bake
time
Broil
Keep
Warm
Clean
Start
time
Self-Cleaning Oven
Speed Bake Oven
Clock
Timer
Oven
Preheat
Door Locked
On/Off
Oven
light
Clear
/Off
Controls
ES350
Add 1
Cook
Minute
Time
Select
Clean
Timer
Set/Off
Delay
Start
Oven
Preheat
3
Door Locked
Bake
Bake
Broil
STOP
Warm &
Clear
Hold
Cook
Time
Timer
Set/Off
Delay
Start
Oven
Preheat
Oven
Lockout
Bake
Broil
STOP
Warm &
Clear
Hold
Oven
3 Lockout
ES355
P2
P14
P3
BROIL
BAKE
P1
L1
P11
P4
L2 OUT
P7
L2 IN
P9
P8
P10
P15
P5
NOTE: The Controller's are not field repairable. Only temperature settings can be changed. See oven calibration.
2
SPEED BAKE MODE (some models)
The speed bake oven uses the addition of a fan to move the air already in the oven. Moving the heated air helps to
destratify the heat and cause uniform heat distribution. Cooking times can be reduced by as much as 30%. The air
is drawn in through a fan shroud located on the rear wall of the oven. It is then discharged around the outer edges
of this shroud. The air circulates around the food and then enters the shroud again. There is still an oven vent which
discharges through the bottom of the control panel.
To set the control in speed bake mode, follow these steps:
1.Press the SPEED BAKE pad.
2. Enter the desired temperature on the keypad (set point).
3. Press the START pad.
The oven will automatically start and the fan will begin to run. To cancel the speed bake function, press the CANCEL
pad.
NOTE: The fan runs continuously while in the speed bake mode. The fan will stop if the door is opened. The bake
element will continue to operate if the door is opened.
PREHEAT
During a preheat mode, the oven uses a bake element to reach the controller set point. The element uses full power
when it's on. When the set point is reached, the preheat mode is converted to a normal bake mode.
NORMAL BAKE
During a normal bake mode, the controller preheats the oven with the bake element. When the desired temperature
is reached, the controller adds top heat by cycling the broil element on for 12 to 18 seconds per minute. The bake
element is on for the remaining time of the minute. Both elements use full power when they are on but they are never
on at the same time.
CLEAN
During a cleaning process, the oven uses bake element.
CLEAN AND TIMED CLEAN
When these modes are selected, the door locks right after start button is pushed.
FIRST RISE
It is normal to see a temperature overshoot in the
first rise of all modes when you monitor the temperature.
First rise overshoot
T°
set point
t (sec)
OVEN CALIBRATION
Set the electronic oven control for normal baking at 350°F/176°C. Obtain an average oven temperature after a
minimum of 5 cycles. Press Cancel to end bake mode.
Note: Changing calibration affects all the cooking modes but not the clean mode.
3
ELECTRONIC OVEN CONTROL
ELECTRONIC OVEN CONTROL (EOC) FAULT CODE DESCRIPTIONS AND RTD SCALE
Note: Only three fault codes series are displayed by this control “F1”, "F3" and “F9”. Generally speaking “F1” implies a
control failure, “F3” an oven probe problem, and “F9” a latch motor problem. In all occurrences the alarm is accompanied
by a display of “F1“.
Fault Code
Series
Likely Failure Condition/Cause
Suggested Corrective Action
F1
(F10) Control has sensed a potential
runaway oven condition. Control
may have shorted relay, RTD sensor
probe may have gone bad.
(F11) Shorted keypad.
(F13) Control's internal checksum may
have become corrupted.
(F14) Misconnected flat cables.
1. Check RTD sensor probe and replace if necessary. If oven is
overheating, disconnect power. If oven continues to overheat
when the power is reapplied, replace EOC. Severe overheating
may require the entire oven to be replaced, should damage
be extensive.
2. Press CLEAR key.
3. Disconnect power, wait 30 seconds and reapply power. If
fault returns upon power-up, replace EOC.
4. Disconnect power; verify flat cable connections (P6 or P12).
F3
(F30) Open RTD sensor probe/ wiring
problem. Note: EOC may initially
display an "F1", thinking a
runaway condition exists.
(F31) Shorted RTD sensor probe / wiring
problem. Note: "F3" is displayed
when oven is in active mode or an
attempt to enter an active mode is
made.
1. Press CLEAR key.
2. Check wiring in probe circuit for possible open condition.
Check RTD resistance at room temperature (compare to
probe resistance chart). If resistance does not match the
chart, replace the RTD sensor probe.
3. Let the oven cool down and restart the function
F9
(F90
to
F94)
1. Press CLEAR key.
2. If CLEAR key does not eliminate problem, turn off power for
30 seconds, then turn on power.
3. Check wiring of Lock Motor, and Lock Switch and Door
Switch circuits.
4. Unplug P5, apply power (L1) directly to the Lock Motor, if the
motor does not rotate, replace Lock Motor Assembly. Plug
P5.
5. Check Lock Switch A for proper operation (do they open and
close, check with ohmmeter). The Lock Motor may be
powered as in above step to open and close Lock Switch. If
the Lock Switch is defective, replace Motor Lock Assembly.
6. If all above steps fail to correct situation, replace control.
Door motor mechanism failure.
4
RTD SCALE
Temp. °F
32 ± 1.9
75 ± 2.5
250 ± 4.4
350 ± 5.4
450 ± 6.9
550 ± 8.2
650 ± 9.6
900 ± 13.6
Temp. °C
0.0 ± 1.1
23.9 ± 1.4
121.1 ± 2.4
176.7 ± 3.0
232.2 ± 3.8
287.8 ± 4.6
343.3 ± 5.3
482.2 ± 7.6
Resistance (ohms)
1000 ± 4.0
1091 ± 5.3
1453 ± 8.9
1654 ± 10.8
1852 ± 13.5
2047 ± 15.8
2237 ± 18.5
2697 ± 24.4
OVEN TEMPERATURE
SENSOR
CIRCUIT ANALYSIS MATRIX
ELEMENTS
Bake
Broil
Speed Bake
Clean
Locking
Locked
Unlocking
Unlocked
Light
Door Open
Door Closed
* Denotes Topheat
Bake
P2
Broil
P3
X
X*
X
X
X
Speed
Bake
P5-3
Light Door Motor
P5-8
P5-6
Lock Motor Switches
Cooling fan Door Switch
P15-1 A P15-1
P15-3
DLB
&
&
L2 out
COM-NO
P15-7
P15-2
X
X
X
X
X
X
X
NC
NO
NO
NC
NO
NC
NC
NO
X
X
** Stage 1
+ Stage 2
X
Relay will operate in this condition only
ELECTRICAL RATING
27" Wall Oven
30" Wall Oven
KW Rating 240/208 V
See nameplate
See nameplate
Broil Element Wattage
3400W / 2554W
2750W / 2066W
Bake ElementWattage
2300W / 1728W
3400W / 2553W or
3000W / 2253W
2 SPEEDS COOLING FAN
A relay and a thermostat (170°/140°) control the speeds of the blower.
5
EXPLODED VIEW OF SPEED BAKE SYSTEM (some models)
Speed Bake Fan
Motor Assembly
Mounting Plate
Oven Cavity
Fan Nut
Speed Bake
Fan Blade
Convection
Fan Cover
Fan Cover Screws
FAN BLADE
The fan blade is mounted in the rear of the unit and has a "D" shaped mounting hole. Only minimum clearance exists
between the oven back, fan blade, and fan shroud. Be careful not to bend blade when removing or installing.
Access to the fan blade is gained by removing the fan shroud, held in place by three screws, from the inside of the oven.
The fan blade is held in place with a hex nut that has left handed threads. When removing this nut, gently hold the
fan blade, and turn the nut clockwise. If one of the blades becomes deformed, it may be bent back into shape using
a flat surface as a reference.
A flat washer is located on the motor shaft between the snap ring on the shaft and the fan blade.
NOTE: If the fan blade is bent and motor vibrations increase, the noise made by the fan will be greater.
MOUNTING PLATE OVEN
The fan motor on the rear of the unit is mounted to the main back (with three screws). There is a mounting plate held
in place between the main back (with 2 screws) and the rear oven wall (with 2 screws). Should it be necessary to replace
the oven cavity, you must remove the 2 screws located inside the unit at the rear of the oven cavity.
FAN MOTOR
The 120 volt fan motor is located on the outside of the rear of the oven.
6
FAN RELAY
The fan motor runs continuously while in the speed bake mode unless the door is opened. If the fan does not operate,
check the following:
• Display illuminated on the electronic control.
• Voltage output between terminals P5-3 and Neutral.
• 120 Volts available at fan motor.
• Fan motor coil resistance 56.5 ohms ± 10%.
• Door/light switch.
DOOR LOCK MECHANISM
The appliance is equipped with an electronic oven control
and has an auto locking door latch feature. When the self
clean cycle is programmed, the door is locked by a motor
Motor Cooling Fan
operated latch system. The interior of oven doesn't need to
Upper Air Channel
heat up to 500°F/260°C before the door locks. However, until
the temperature inside oven reaches 500°F/260°C, the selfAccess Plate
clean program can be canceled and door will unlock
immediately. After oven reaches temperatures over 500°F/
260°C, the door will not unlock until temperature drops
below 500°F/260°C.
Door Locking
Mechanism
Assembly
If a problem appears and the door stays locked it is possible
for the servicer to unlock the door without removing the
Safety
Thermostat
appliance from its place. Follow the steps below:
1. Trip the circuit breaker to OFF position.
2. Remove the 2 screws, which are fixing the oven door
latch, located between the control panel and the oven
door.
3. When the screws are removed it is possible to unlock the
latch with a flat screwdriver, or one of the tools supplied
with the wall oven which are used to take off the oven
from the cabinet. Insert the tool tip through the slot on top
of the oven door. During this step it's important to take
care to not damage the appliance.
4. As soon as the latch is in the unlock position, you can
open the door.
5. Replace the motor latch:
1. To have access to the door latch assembly, remove the 3 screws under the control panel which are fixing it.
2. Remove the access plate located on the upper air channel by removing the screw.
3. Replace the motor latch by a new one and reassemble in reverse order.
7
OVEN DOOR REMOVAL AND REPLACEMENT
To Remove the Oven Door:
1. Open the door to the fully opened position.
2. Pull up the lock located on each hinge supports and engage it in the hinge lever. You may have to apply a little
downward pressure on the door to pull the locks fully over the hooks.
3. Grab the door by the sides, pull the bottom of the door up and toward you to disengage the hinge supports.
Keep pulling the bottom of the door toward you while rotating the top of the door toward the range to completely disengage the hinge levers.
To Replace the Oven Door:
1. Grab the door by the sides; place the hinge supports in the hinge slots. Open the door to the fully opened
position.
2. Disengage the lock from the hinge levers on both sides.
Note: Make sure the hinge supports are fully engaged before unlocking the hinge levers.
3. Close the oven door.
The door is heavy. After removing door, lay it flat on the floor with the inside of the door facing down.
Hinge
lever
Hinge
support
Lock in normal position
Lock engaged for door
removal
8
HINGE SLOT
Door removed
from the range
HOJA DE SERVICIO
318047413 (0405) Rev. A
Horno Eléctrico de Pared con Control Electrónico de Horno
NOTICIA
Esta hoja de servicio esta dirigida a las personas con entrenamiento tecnico y a los que tienen un buen nivel de
comprehension en la reparación de estos aparatos. El fabricante no puede ser responsable de heridas o daños
de algún tipo por el uso de esta hoja de información.
PRACTICAS DE SERVICIO SEGURAS
Para evitar heridas o daños a la propiedad, es importante de seguir estas practicas medidas. A continuación, son
ejemplos, pero sin limitación, de estas medidas.
1. No trate de reparar el aparato a menos que crea poder hacerlo satisfactoriamente.
2. Antes de reparar o de desplazar el aparato, retire el cable del toma corriente, APAGUE el suministro de energía
o retire los fusibles y apague el suministro de gas.
3. Nunca interfiera con la instalación adecuada de un aparato.
4. UTILICE SOLAMENTE EL CATALOGO DE PIEZAS DESIGNADO PARA ESTE APARATO. EL SUBSTITUIRLAS PODRIA
ESTAR EN DESACUERDO CON LAS MEDIDAS NECESARIAS PARA LOS APARATOS DE CASA.
5. PUESTA A TIERRA: los cables de seguridad a tierra son VERDES CON LINEAS AMARILLAS. Los cables de tierra no
pueden ser utilizados como conductores. ES MUY IMPORTANTE QUE EL TECNICO ESTABLEZCA LA SEGURIDAD
DE LA PUESTA TIERRA ANTES DE TERMINAR EL SERVICIO. EL NO HACERLO PUEDE CREAR MUCHO PELIGRO.
6. Antes de devolver el aparato al servicio, asegúrese que:
• Todas las conexiones electricas estan bien conectadas y aseguradas.
• Todos los cables de tierra deben estar bien asegurados, lejos de elementos afilados, lejos de altas temperaturas
y cualquier elemento movible.
• Todos los cables no aislados, conectadores, calentadores, etc. deben estar lo suficientemente lejos de las
partes metálicas y de los paneles.
• Todos los cables de tierra (externos y internos) estan correctamente y bien asamblados.
• Todos los paneles estan bien y correctamente asamblados.
9
ES500 CONTROL DEL HORNO ELECTRICO
1.
Este controlador de auto-limpieza ofrece horneo, asado, "SPEED BAKE", horneado a retardo y cronometrado y
funciones de limpieza.
Este Controlador tiene una membrana sensible al tacto.
2.
Bake
Speed
Bake
Speed
Clean
Bake
time
Broil
Keep
Warm
Clean
Start
time
Self-Cleaning Oven
Speed Bake Oven
Clock
Timer
Oven
Preheat
Door Locked
On/Off
Oven
light
Clear
/Off
Controls
ES350
Add 1
Cook
Minute
Time
Select
Clean
Timer
Set/Off
Delay
Start
Oven
Preheat
3
Door Locked
Bake
Bake
Broil
STOP
Warm &
Clear
Hold
Cook
Time
Timer
Set/Off
Delay
Start
Oven
Preheat
Oven
Lockout
Bake
Broil
STOP
Warm &
Clear
Hold
Oven
3 Lockout
ES355
P2
P14
P3
BROIL
BAKE
P1
L1
P11
P4
L2 OUT
P7
L2 IN
P9
P8
P10
P15
P5
NOTA: Los ES350/355 no son reparables. Solo los ajustes de temperaturas pueden ambiarse. Vea calibracíon del
horno.
10
MODO DE HORNEADO RÁPIDO (“SPEED BAKE”) (algunos modelos)
El horno de HORNEADO RÁPIDO (“SPEED BAKE”) usa un ventilador adicional para mover el aire en el horno.
El movimiento del aire caliente ayuda a destratificar el calor y a distribuir el calor uniformemente. El tiempo de
cocción pueden ser disminuído hasta 30%. El aire es conducido por dentro con la cubierta del ventilator situado en
la pared trasera del horno. Despues es descargado al exterior por bordes de la cubierta. El aire circula alrededor de la
comida y después entra a la cubierta una vez mas. Al igual que en las cocinas eléctricas convencionales, hay un
orificio de ventilación del horno que se descarga detrás de la parte inferior del panel de control frontal.
Para ajustar el control al horno “speed bake”, siga estos pasos:
1. Pulse el boton SPEED BAKE (HORNEAR/ASAR CONV).
2. Ponga la temperatura deseada en el tablero numérico (setpoint).
3. Pulse el boton START (PRENDIDO).
El horno comenzará automaticamente y el ventilador empezará. Para cancelar el MODO DE HORNEADO RÁPIDO
pulse el boton CANCEL (CANCELAR).
NOTA: El ventilador funciona continuamente en el MODO DE HORNEADO RÁPIDO. El ventilador se parará si abra la
puerta. El elemento de hornear continuará a funcionar si la puerta está abierta.
PRECALENTAMIENTO
Durante un modo de precalentamiento, el horno usa el elemento del horneo para alcanzar el punto ES500. El
elemento usa toda la fuerza cuando esta encendido. Cuando se alcanza el punto, el modo de precalentamiento es
convertido a un modo normal de horneo.
HORNEO NORMAL
Durante el modo normal de un horneo, el ES500 precalienta el horno con el elemento de horneo. Cuando la
temperatura elejida esta alcanzada, el ES500 añade el calor del elemento superior, y el elemento de asado se
enciende de 12 a 18 segundos per minuto. El elemento de hornear sige funcionando por lo que resta del minuto. Los
dos elementos usan todas sus fuerzas cuando estan encendidos, pero nunca estan encendidos al mismo tiempo.
LIMPIAR
Durante el proceso de limpieza, el horno usa el elemento de horneo.
LIMPIEZA Y LIMPIEZA CRONOMETRADA
En estos modos la puerta se cierre inmediatamente después que presione el boton.
CALENTAMIENTO INICIAL
Es normal de ver la temperatura exceder la norma durante
el calentamiento inicial de todos los modos cuando controle
la temperatura.
T°
Exceso de la norma inicial de
calentamiento
ajuste de punto
t (sec)
CALIBRACIÓN DEL HORNO
Ajuste el control del horno eléctrico para un horneado normal de 350 F°/176 C°. Obtenga una temperatura promedio
despues de un minimo de 5 ciclos. Pulse CANCEL (CANCELAR) para apagar el modo del horneo.
Nota: cambiar la calibración afecta todos los modos de cocina, pero no el modo de limpieza.
11
CONTROL DEL HORNO ELECTRÓNICO
DESCRIPTIONES DEL CODIGO DE ERROR DEL CONTROL DEL HORNO ELECTRÓNICO Y LA ESCALA HID
Nota: Al seleccionar esta función del horno, obtiene tres series posibilidades en la pantalla; “F1”, “F3” y “F9.
Generalmente, F1 indica los errores internos en los controles del horno, F3 un problema con la sonda del horno y F9 un
problema con el bloqueo de motor. Cada vez que hay un error en la función, una alarma se escuchará.
Código
de error
Condición/Causa probable del
malfuncionamiento
Sugerencias para corregir
F1
(F10) El control ha detectado una
situación de escape del horno. El
control ha podido acortar el relevo,
el sensor RTD se ha descompuesto.
(F11) Tablero numérico acortado.
(F13) El verificador interno de los
controles ha sido distorcionado.
(F14) Falso contacto de cables.
1. Verifique el sensor RTD y remplázelo si es necesario. Si el
horno continua a recalentarse, remplace el EOC. Un
recalentamiento extremo necesitaría el remplazo del horno
entero si el daño es más importane.
2. Pulse el boton CLEAR.
3. Desconecte el suministro eléctrico, espere 30 segundos y
conecte el suministro. Si la falla se repite, remplace CHE
(EOC).
4. Desconecte la corriente, verifique la conexion de los cables
(p6 ó p12).
F3
(F30) Abrir el sensor RTD/problema de
lambrado. Nota: EOC puede
mostrar inicialmente un “F1”,
pensando que una situación de
escape existe.
(F31) Acortar el sensor RTD/problema de
alambrado. Nota: “F3” aparecerá
cuando el horno este en modo
activo o se intenta de entrar al
modo activo.
1. Pulse el boton CLEAR.
2. Verifique si el circuíto de alambrado no está corto. Verifique
la resistencia de RTD a la temperatura de la pieza (compárela
a la tabla de resistencias). Si la resistencia no es igual a la de
la tabla, remplaze el sensor RTD.
3. Deje enfriar el horno y vuelva a empezar la función
F9
(F90
a
F94)
1. Pulse el boton CLEAR
2. Si al pulsar CLEAR, el problema no desaparece, desconecte el
suministro eléctrico por 30 segundos y luego vuelva a
conectarlo.
3. Verifique el alambrado del Cierre del motor y el Cierre del
interruptor y también los Circuítos de interruptores de la
puerta.
4. Desconecte P5, conecte el suministro eléctrico (L1)
directamente al Cierre del motor. Si el motor no rota,
remplace el Asamblado del cierre del motor. Conecte P5.
5. Verifique si los Interruptores de cierre A funcionan
correctamente (se abren y se cierran, verifiquelo con un
ohmometro). El Cierre del motor puede ser utilizado como
anteriormente para abrir y cerrar los Interruptores de cierre.
Si estos no funcionan, remplace el Asamblado del cierre del
motor.
6. Si todas estas sugerencias no corrigen la situación, remplace
el control.
Falla del mecanisom del motor de
puerta.
12
RTD SCALE
Temp. °F
Temp. °C
Resistancia (ohms)
32 ± 1.9
0.0 ± 1.1
1000 ± 4.0
75 ± 2.5
23.9 ± 1.4
1091 ± 5.3
250 ± 4.4
121.1 ± 2.4
1453 ± 8.9
350 ± 5.4
176.7 ± 3.0
1654 ± 10.8
450 ± 6.9
232.2 ± 3.8
1852 ± 13.5
550 ± 8.2
287.8 ± 4.6
2047 ± 15.8
650 ± 9.6
343.3 ± 5.3
2237 ± 18.5
900 ± 13.6
482.2 ± 7.6
2697 ± 24.4
SONDA DE
TEMPERATURE
DE HORNO
MATRIZ DE ANÁLISIS DE CIRCUITO
ELEMENTOS
Hornear
Asar
Horneado rápido
Limpiar
Cerrando
Cerrado
Abriendo
Abrido
Luz
Puerta Abierta
Puerta Cerrada
Hornear
P2
Asar
P3
X
X*
X
Horneado
rápido
P5-3
X
X
Luz
P5-8
Motor
Puerta
P5-6
Interr. Motor Cierre
P15-10 A P5-10
&
P5-13
&
P5-11
DLB
L2 out
Cerradura de
puerta P15-3
COM-NO
X
X
X
X
X
X
X
NC
NO
NO
NC
NO
NC
NC
NO
X
X
X
Puerta Cerrada
* Denota el calor del elemento superior
** Etapa 1 + Etapa 2
El relé va a funcianar en esta
condición solamente.
CALIBRACIÓN ELÉCTRICA
Horno de pareed 27"
KW Calibración 240/208 V
Ver la placa del fabricante
Horno de pared 30"
Ver la placa del fabricante
Vatio de elemento para asar
3400W / 2554W
2750W / 2066W
Vatio de elemento para hornear
2300W / 1728W
3400W / 2553W o
3000W / 2253W
2 VENTILADOR PARA ENFRIAR EL HORNO CON VELOCIDADES
Un relé y un termostato (170°/140°) controlan las velocidades del ventilador.
13
VISTA AGRANDADA DE SISTEMA DE HORNEADO RÁPIDO
Montaje para motor de ventilador
de MODO DE HORNEADO RÁPIDO
Placa de montaje
Cavidad de horno
Tuerca de
ventilador
Pala de ventilador
de HORNEADO
RÁPIDO
Cubierta de
ventilador de
HORNEADO RÁPIDO
Tornillos de cubierta
de ventilador
LAMA DEL VENTILADOR
La lama del ventilador esta montada detrás del aparato y tiene una forma de “D” montada en el hueco. Solo un
pequeño espacio existe entre la parte posterior del horno, la lama del ventilador y la cubierta del ventilador del horno.
Tenga mucho cuidado de no inclinar la lama cuando la retire o la instale.
Puede tener acceso a la lama del ventilador retirando la cubierta de este por adentro del horno. La cubierta del
ventilador esta fijada con 3 tornillos.
La lama del ventilador esta fijada con un tornillo hexagonal con enrosques hacia la izquierda. Cuando quite este
tornillo, sostenga delicadamente la lama del ventilador y voltee el tornillo en la dirección de las agujas de un reloj. Si
unas de estas lamas se deforman, se pueden doblar para que tomen forma en una superficie plana.
Un lavador plano esta situado en el eje del motor entre el anillo sujetador y la lama del ventilador.
NOTA: Si la lama del ventilador esta doblada y las vibraciones del motor aumentan, el ventilador producirá mas
ruido.
MONTAJE DEL PLATO DEL HORNO
El motor del ventilador localizado detrás del aparato, esta ajustado a la parte trasera (con tres tornillos). Esta tambien
un plato montado sostenido en su lugar entre la parte trasera (con dos tornillos) y detras de la pared del horno (con dos
tornillos). Si es necesario reemplazar la cavidad del horno, tiene que retirar los 2 tornillos situados dentro del aparato
detras de la cavidad del horno.
MOTOR DEL VENTILADOR
El motor de ventilador esta situado en la parte exterior trasera del horno. Es un motor de 2120 voltios.
14
RETRAZO DEL VENTILADOR
El motor del ventilador funcionará continualmente en el modo de HORNEADO RÁPIDO mientras la puerta no este
abierta. Si el ventilador no funciona, revise lo siguiente:
-
Lo que aparece en la pantalla del control electronico.
Voltaje entre los terminales P5-3 y Neutral
120 voltios disponible en el motor del ventilador
El motor del ventilador tiene una resistencia de 56.5 ohms =10%
Boton de puerta /luz
CIERRE DE LA PUERTA
El aparato esta equipado con un horno eléctrico y tiene
un cerrojo auto-cierre para la puerta. Cuando la autolimpieza este programada, la puerta esta cerrada con un
motor funcionando con un sistema de cerrojo. El interior
del horno no necesita llegar a una temperatura mas de
500° F/260° C antes que la puerta cierre. Mientras que la
temperatura del horno no llegue a 500° F/260° C, el
programa de auto-limpieza puede ser cancelado y la
puerta se abrirá rapidamente. Después que la temperatura
llegue mas de 500° F/260° C, la puerta no abrirá hasta
que la temperatura baje menos de 500°F/260°C.
Ventilador de
enfriamiento del
motor
Conducto de ventilación
Asamblaje del
mecanismo del
cierre de la
puerta
Si surge un problema y la puerta queda cerrada, es
Thermostato
posible que quien realiza el servicio destrabe la puerta
de securidad
sin retirar el artefacto de su lugar. Seguir los siguientes
pasos:
1. Girar el interruptor automático a la posición de
APAGADO.
2. Retirar los 2 tornillos que fijan el cierre de la puerta
del horno, ubicado entre el panel de control y la
puerta del horno.
3. Cuando se retiran los tornillos es posible destrabar el
cierre insertando un destornillador plano, o
utilizando una de las herramientas que se proveen
con la cocina y que se usan para retirar el artefacto
del mueble, a través de la ranura que está en la
parte superior de la puerta del horno. Durante este
paso es importante tener cuidado de no dañar el
artefacto.
4. Ni bien el cierre esté en la posición de abrir, se puede abrir la puerta del horno.
5. Reemplazar el motor del mecanismo de cierre:
1. Para tener acceso al mecanismo de cierre, remueva los tres tornillos localizados debajo del panel de control
que lo fijan.
2. Remueva la placa localizada en el canal de aire removiendo el tornillo.
3. Remplaze el motor por uno nuevo y re-ensamble en orden inverso al mencionado.
15
PARA RETIRAR Y REPONER LA PUERTA DEL HORNO
Para retirar la puerta del horno:
1. Abra la puerta completamente.
2. Tire el cierre situado en cada una de las bisagras de ambos lados y colóquelo en las palancas de las bisagras. Tendrá
que aplicar una pequeña presión hacia abajo sobre la puerta para poder retirar el cierre de sus ganchos.
3. Tome la puerta de cada lado, tire la base de la puerta para arriba y hacia Ud. para desalojarla de sus soportes.
Siga tirando la base de la puerta hacia Ud, y haciendo un movimiento de rotación de la parte superior hacia la cocina
para desalojar completamente de las bisagras.
Para remplazar la puerta del horno:
1. Tome la puerta por los lados; coloque los soportes sobre las ranuras de las bisagras. Abra la puerta completamente.
2. Desaloje el cierre de la palanca de las bisagras de ambos lados.
Nota: Asegúrese que los soportes de las bisagras estén completamente en posición antes de liberar las palancas
de las bisagras.
3. Cierre la puerta del horno.
La puerta es pesada. Luego de retirarla, colóquela a tierra con la parte interior hacia abajo.
Cierre en posición
normal
Cierre en posición enganchada,
para sacar la puerta
16
Agujero para la bisagra
puerta quitada del horno