1
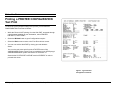
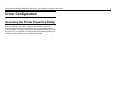
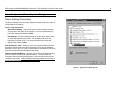
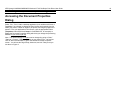
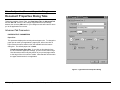
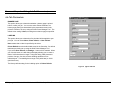
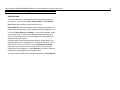
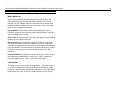
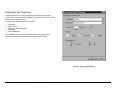
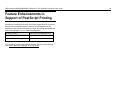
XES Synergix™
8825/8830/8850/8855
Windows NT 4.0 PostScript Print
Driver User Guide
701P36867
July 2001
This page left intentionally blank.
Trademark Acknowledgments
®
Windows NT is a registered trademark of Microsoft Corporation.
®
Microsoft Word is a copyright protected program of Microsoft Corporation.
PostScript is a trademark of Adobe Systems Incorporated.
PageMaker and Acrobat are registered trademarks of Adobe Systems
Incorporated.
CorelDRAW is a registered trademark of Corel Corporation.
WinZip is a registered trademark of Nico Mak Computing, Inc.
®
XEROX , XES Synergix 8855 and 8855 Digital Solution, XES Synergix 8850
and 8850 Digital Solution, XES Synergix 8825 and 8825 Digital Solution, XES
Synergix 8830 and 8830 Digital Solution, XES Synergix Scan System, the
digital box icon, AccXES, and the acronym XES are trademarks of XEROX
Corporation.
XES Synergix 8825/8830/8850/8855 Windows NT 4.0 PostScript Print Driver User Guide
i
XES Synergix 8825/8830/8850/8855 Windows NT 4.0 PostScript Print Driver User Guide
Table of Contents
Trademark Acknowledgments ......................................................... i
Introduction...................................................................................... 1
Purpose of this Guide ..................................................................... 1
Basic Requirements........................................................................ 1
How to Use this Guide .................................................................... 1
Before You Start .............................................................................. 2
Check your protocol and printer port............................................... 2
Printing a PRINTER CONFIGURATION Test Print ......................... 3
Driver Installation ............................................................................ 4
Driver File Format ........................................................................... 4
Driver Installation Procedure........................................................... 5
Driver Configuration ........................................................................ 6
Accessing the Printer Properties Dialog.......................................... 6
Printer Properties Dialog Tabs........................................................ 7
Device Settings Parameters...................................................................... 8
Accessing the Document Properties Dialog .................................. 10
Document Properties Dialog Tabs ................................................ 11
Advanced Tab Parameters ..................................................................... 11
PAPER/OUTPUT PARAMETERS ...................................................... 11
GRAPHIC PARAMETERS.................................................................. 13
DOCUMENT OPTIONS PARAMETERS............................................ 14
Page Layout (N-up) Option .............................................................14
PostScript Options ..........................................................................14
AccXes Options ..............................................................................16
Job Tab Parameters ............................................................................... 17
BANNER PAGE.................................................................................. 17
LABELING .......................................................................................... 17
RASTER STAMP................................................................................ 18
FINISHING.......................................................................................... 19
PLOT NESTING ................................................................................. 19
MEDIA MISMATCH ............................................................................ 20
JOB PRIORITY................................................................................... 20
Page Setup Tab Parameters................................................................... 21
Feature Enhancements in Support of PostScript Printing ......... 22
ii
Removing the Driver...................................................................... 23
Introduction
4. Click OK on the Print Screen to print your job.
5. If you no longer need the driver, remove the driver as stated in the
Removing the Driver section of this Guide.
Purpose of this Guide
The purpose of this Guide is to assist you with instructions for installing a
PostScript Print Driver, adjusting the Print Driver’s settings to meet your
needs, printing with the Print Driver, and removing the driver when it is no
longer needed.
Electronic copies of this Guide are available on the Internet at www.xes.com.
Basic Requirements
A Workstation running Windows NT 4.0 with Service Pack 3, or higher,
installed.
A Working Knowledge of your Workstation’s Operating System.
Appropriate Cabling connecting your workstation to the network or directly
to the printer's AccXES Controller.
Appropriate protocols and ports enabled on both the printer and
workstation, with a connection established through the network or directly
between the printer and your workstation.
How to Use this Guide
1. Read “Before You Start” for valuable information on checking the
status of your communication protocols and creating a new printer port
for use with the PostScript Driver.
2. Install the driver on your workstation as stated in the Driver
Installation section of this Guide.
3. Configure the driver settings to meet your needs as stated in the
Driver Configuration section of this Guide.
XES Synergix 8825/8830/8850/8855 Windows NT 4.0 PostScript Print Driver User Guide
1
XES Synergix 8825/8830/8850/8855 Windows NT 4.0 PostScript Print Driver User Guide
Before You Start
Note: In a network environment, with communication occurring directly
between the individual workstation and the printer, you MUST check your
protocol and printer port. If you are printing through a direct connection
(such as through the serial or parallel port), you can skip this step. If you
are printing through a network server, you should consult your System
Administrator and refer to the Network Administrator's Guide
(admine.pdf) available on the Internet at www.xes.com.
Check your protocol and printer port
Before installing the PostScript Driver you MUST consider the following:
You will need the TCP/IP protocol enabled at BOTH your workstation
and the printer to facilitate communications.
Check the protocols that are currently enabled at your workstation. Start by
right mouse clicking on “Network Neighborhood” on your desktop, then select
“Properties," and left mouse click on the “Protocols” Tab.
Check the protocols that are currently enabled at the printer by printing a
PRINTER CONFIGURATION Test Print as stated in this Guide.
If you will be changing protocols from an existing working setup, or setting up
a new protocol or port, you may want to refer to the step-by-step setup
instructions provided in the Network Administrator’s Guide available on the
Internet at http://www.xes.com. This Guide is in Adobe Acrobat format with
the name of "admine.pdf."
2
What desktop port will you be using to communicate to the printer?
Make sure that you have a printer port available before starting the driver
installation. Click “Start,” “Settings,” “Printers,” “File,” “Server Properties” and
the “Ports” tab to view the list of available ports. Write down an appropriate
port, then click Cancel to escape.
If you do not have a port to use with this driver, it is recommended that you
create a new printer port on your desktop. This process typically begins by
clicking “Start,” “Settings,” “Printers,” “File,” “Server Properties,” “Ports” tab
and “Add Port.” Select the type of port that you would like to create and click
“Add Port.”
Notes:
The XES TCP/IP Port works well with this driver. This port is available for
installation with the XES Synergix 8825/8830/8850/8855 HP-GL/2/HP
RTL Print Driver. To obtain a copy of this driver, go to
http://www.xes.com.
You must have Administrator privileges to install or add an XES TCP/IP
Port.
Before You Start
Printing a PRINTER CONFIGURATION
Test Print
To check the communication settings of the printer, print a PRINTER
CONFIGURATION Test Print as follows:
•
While the Printer is NOT printing, from the Web PMT, accessed through
a web browser installed on your workstation, select PRINTER
DEFAULTS, TEST PRINT.
•
Select the Minimal button to get a Configuration test print.
•
Select the Back arrow to return to the Test Print choices screen.
•
You can now exit the Web PMT by closing your web browser.
Notes:
You can also print a test print from the UTILITIES menu of the
8825/8830/8850 Printer Control Panel, as explained in the XES Synergix
8825/8830/8850/8855 System Introduction for Firmware 7.0.
Note that the POSTSCRIPT LICENSE must be PRESENT in order to
print with this driver.
Figure 1. Typical Printer
Configuration Test Print
XES Synergix 8825/8830/8850/8855 Windows NT 4.0 PostScript Print Driver User Guide
3
XES Synergix 8825/8830/8850/8855 Windows NT 4.0 PostScript Print Driver User Guide
Driver Installation
Driver File Format
This PostScript driver is typically delivered in Zip file format in multiple
languages on CD ROM at the time that new Firmware is released. However,
this driver can also be downloaded in self-extracting Zip file format from the
Internet at http://www.xes.com. If downloaded from the Internet, double click
on the appropriate file (AccXES70_PS_NT_ENU.EXE, for example) and the
driver files will be automatically extracted to the indicated default folder on
your hard drive.
Note: If this process is not fully automated, click on “Unzip” within the WinZip
window. Click on OK when the files have been successfully unzipped.
4
Driver Installation (continued)
Driver Installation Procedure
1. On the Windows desktop, use your mouse to select “Start,” “Settings,”
“Printers” and “Add Printer.”
2. Select the My Computer radio button unless you will be printing to the
printer through a Network Server (as in the case of Novell NetWare, for
example) in which case you should select Network printer server. Click
Next.
3. If you selected My Computer:
•
•
When the “Ports” screen displays, use your mouse to place a check
mark in the box in front of the port you wish to use to communicate
with the printer.
6. When prompted, accept the default printer name in the Printer Name
field, or give your printer an easily recognized name.
7. Select either Yes or No to make this printer your default Windows printer.
Choose Yes if you will be printing primarily to this printer from your
Windows applications. Click Next.
8. When prompted, select “Not Shared” unless the printer is directly
connected to your workstation and you wish to “Share” it with other
network users.
Click Next.
9. If the printer is powered on and properly connected to your workstation,
when prompted to print a test page select Yes.
Click Finish.
10. Verify that an icon representing your printer is now displayed in your
desktop "Printers" window.
Click Next.
Note: If you are upgrading or reinstalling the driver, you may need to
restart your computer to use the new driver.
If you selected Network printer server in step 2 above:
•
Instead of selecting a port you will be required to browse through the
Network directories and sub-directories.
•
Locate your printer’s primary server and queue (NetWare 3.12), or
your printer’s Network tree, context, and queue/name (NetWare
4.xx).
•
Highlight the printer and click OK.
•
Click Next.
4. When the “Manufacturers and Printers” window displays:
•
Click on Have Disk… and enter in the path to your CD ROM, or to
the driver files on your workstation. Note that you can use the
Browse button to locate the required ".inf" file.
•
Click Open, if required, then click OK.
5. When the “Printers” list is displayed on screen, select your printer (XES
Synergix 8855 PS, for example) and click Next.
XES Synergix 8825/8830/8850/8855 Windows NT 4.0 PostScript Print Driver User Guide
5
XES Synergix 8825/8830/8850/8855 Windows NT 4.0 PostScript Print Driver User Guide
Driver Configuration
Accessing the Printer Properties Dialog
From your Desktop, click “Start,” “Settings,” and “Printers” to open the
Printers Window revealing a representative icon for your PostScript printer.
From this window, if you right mouse click on the PostScript printer icon, then
left mouse click on Properties, you will open the Printer Properties dialog (set
of tabbed screens) shown on the next page of this Guide.
6
Driver Configuration (Printer Properties Dialog)
Printer Properties Dialog Tabs
The following is a list of the Tabs of the Printer Properties Dialog containing
numerous printer parameters that can be set as the print processing defaults
for ALL print jobs by left mouse clicking on the appropriate tab and making
the available selections.
•
General Tab – Click “Print Test Page” to print a test page. Other buttons
are not supported at this time.
•
Ports Tab – Allows you to add and delete ports and select (with a check
mark) the currently active port for the displayed printer. You MUST have
an active port created and selected for use with the PostScript
printer or you will not be able to print.
•
Scheduling Tab – Allows you to set the availability of the printer on a 24
hour basis; to set the priority of document printing (with higher priorities
taking precedence in queues); and to set spooler options so that print
jobs are spooled (directed) to RAM or your hard drive for background
printing, freeing up your desktop application(s) in the process.
•
Sharing Tab – Allows you to set up the printer as a shared network
printer in a peer-to-peer network environment.
•
Security Tab – Allows you to set up printer administrator permissions,
printer auditing information, and printer ownership information in a peerto-peer network environment.
•
Device Settings Tab – The most user-oriented, feature-laden Tab of this
dialog, allowing the setting up of the driver with installed media roll sizes,
and the configuration of the font substitution table for substituting printerresident fonts for TrueType fonts when such substitution is activated
(selected from the Advanced Tab of the Document Properties dialog).
XES Synergix 8825/8830/8850/8855 Windows NT 4.0 PostScript Print Driver User Guide
Figure 2. Typical Printer Properties Dialog
7
XES Synergix 8825/8830/8850/8855 Windows NT 4.0 PostScript Print Driver User Guide
8
Driver Configuration (Printer Properties Dialog)
Device Settings Parameters
The Device Settings tab of the Printer Properties dialog contains a number of
configurable device settings.
Form to Tray Assignment
Manual Feed Setting - Lets you set the size of the manual feed option
on the printer if the printer is so equipped. It is recommended that you
leave this setting at the default of letter.
Roll Settings - Use these parameters to set up the driver with the sizes
of media rolls installed in the printer. For the 8855 printer there will
typically be four Rolls to set. It is recommended that you leave this
setting at the default of letter.
Font Substitution Table - Displays a list of your system-installed fonts and
the printer-resident fonts set for their replacement if you choose Substitute
with Device Font in the True Type Font parameter of the Advanced Tab of the
Document Properties Dialog as stated in this Guide.
Available PostScript Memory - Specifies the amount of PostScript memory
which is a subset of total printer physical memory. The driver uses this
information when performing printing tasks, such as sending fonts from the
computer to the printer. Unless PostScript printing problems are occurring, it
is best if the default setting of 2048 kilobytes is used. The range for this
setting is 249 to 32767KB.
Figure 3. Typical Device Settings Tab
Parameters of the Device Settings Tab (continued)
Output Protocol – Specifies the output format. It is recommended that you
leave this setting at the default of ASCII.
Add Euro Currency Symbol to PostScript Fonts – This setting adds the
euro currency symbol to most PostScript fonts.
Job Timeout - Leave this setting at the default of 0 seconds.
Wait Timeout Leave this setting at the default of 300 seconds.
Minimum Font Size to Download as Outline - Specifies the minimum font
size (in pixels) for which the PostScript driver will download TrueType fonts
as scaleable outline (Type 1) fonts. A font smaller than the minimum setting
will be downloaded as a bitmap (Type 3/Type 32) font. This option essentially
lets you fine tune the Automatic setting for the TrueType Font Download
option on the Advanced tab in the Document Properties dialog box (available
from “File,” “Print,” “Properties” in your desktop application).
instructions available on the Internet at www.xes.com. After downloading
the executable file to your workstation, open a command prompt on your
desktop and provide the path to the "xesfin.exe" file on your workstation.
A sample entry might be: C:\Temp>xesfin.exe (assuming the executable
file was downloaded to your Temp directory). Press Enter. At the
command prompt, create a command like the example shown on screen.
With the finishing device attached to your printer's Controller and
powered on, press Enter to create your own finisher file. You can then
use the Select Finisher button as described above to import the finisher
file into this driver.
Display Units - Select this option to enable you to choose "display units"
in inches or millimeters for all applicable, driver-displayed options. The
driver default setting is English (inches).
Firmware Revision - Select the version of AccXES firmware currently
installed in your printer’s Controller for the correct display of firmwaresupported driver options.
Maximum Font Size to Download as Bitmap - Specifies the maximum font
size (in pixels) for which the PostScript driver will download TrueType fonts
as bitmap (Type 3/Type 32) fonts. A font larger than the maximum setting
will be downloaded as a scaleable outline (Type 1) font. This option lets you
fine tune the Automatic setting or override the bitmap (Type 3/Type 32)
setting for the TrueType Font Download option on the Advanced tab in the
Document Properties dialog box (available from “File,” “Print,” “Properties” in
your desktop application).
AccXES Settings
About AccXES Plug-in - Select this option and click the "About AccXES
Plug In" button to display a screen informing you of the version number of
the XES features created to work with this PostScript driver.
Select Finisher - Select this option, then click the "Select Finisher"
button to open and import a Finisher (.fin) file into the driver. This file
informs the driver of available Finishing Device options to display under
the Finisher group of the Job Tab of the Document Properties Dialog.
Note: Make sure that the Finisher file that you select matches the
capabilities of the Finisher (folder) that you purchased. If necessary, you
can create your own Finisher file using the XESFin.exe program and
XES Synergix 8825/8830/8850/8855 Windows NT 4.0 PostScript Print Driver User Guide
9
XES Synergix 8825/8830/8850/8855 Windows NT 4.0 PostScript Print Driver User Guide
Driver Configuration (Document Properties Dialog)
Accessing the Document Properties
Dialog
Select “File,” “Print,” within a desktop application (such as Microsoft Word, or
PageMaker, for example) to display the Print Screen which typically lets you
select your printer, number of copies to be printed, and range of pages to be
printed. From your application’s Print Screen, click the appropriate button
(Properties in Microsoft Word, Setup in CorelDRAW 5.0, for example) to
display the Document Properties dialog which lets you change the processing
defaults for your current job only.
Note: The default settings for all jobs can be changed by going to “Start,”
“Settings”, “Printers”. Right mouse click on your printer’s icon. Left mouse
click on “Document Defaults” to get to the Default Document Properties
screen. You will see the Page Setup, Advanced, and Job Tabs just as you
see them in Figure 4.
10
Driver Configuration (Document Properties Dialog)
Document Properties Dialog Tabs
This dialog consists of three Tabs: the Page Setup Tab, the Advanced Tab
and the Job Tab. Select a Tab, change any parameters to the settings
desired, then click the OK button for your changes to take effect and to return
you to the application Print screen.
Advanced Tab Parameters
PAPER/OUTPUT PARAMETERS
Paper Size
This parameter displays the currently-selected paper size. To change the
paper size to match your application’s page layout, left mouse click on
Paper Size and make a selection from the available list in the bottom
dialog box. The default paper size is Letter.
PostScript Custom Page Size - If you click on this selection from
the list of available paper size settings, you can create Custom Page
Size dimensions and modify the position of your printed page relative
to the edge of the roll or sheet of media. Note that with roll fed media
the paper feed direction is not applicable.
Figure 4. Typical Document Properties Dialog
XES Synergix 8825/8830/8850/8855 Windows NT 4.0 PostScript Print Driver User Guide
11
XES Synergix 8825/8830/8850/8855 Windows NT 4.0 PostScript Print Driver User Guide
Document Properties Dialog (Advanced Tab Parameters)
Orientation
This parameter displays the currently-selected orientation of the printed
document on the page. To change the printed document orientation, left
mouse click on Orientation and make a selection from the available radio
buttons in the bottom dialog box. Portrait prints the document vertically
on the page. Landscape prints the document horizontally on the page.
The rotated selection prints the document rotated as shown on the
dialog. The default orientation is Portrait.
Paper Source
This parameter displays the currently-selected paper source. To change
the paper source, left mouse click on Paper Source and make a selection
from the available list in the bottom dialog box. The following paper
source options are supported:
•
Automatically Select
•
Manual Feed
•
Roll 1
•
Roll 2
•
Roll 3
•
Roll 4
The default paper source is Automatically Select.
12
Media
This parameter displays the currently-selected media. To change the
media, left mouse click on Media and make a selection from the available
list in the bottom dialog box. The following media types are supported:
•
•
•
•
Any
Bond
Vellum
Film
The default media type is Bond.
Note: To tell your printer how to handle possible mismatches between
the media type you select here and the media types actually installed in
the printer, see the information presented in this User Guide under the
Media Mismatch Mode feature.
Document Properties Dialog (Advanced Tab Parameters)
TrueType Font
Copy Count
This parameter displays the currently-selected number of copies to print.
To change the Copy Count, left mouse click on Copy Count and enter a
selection from 1 to 999 in the entry box supplied in the bottom dialog box.
Note that although the driver supports 9999 copies, the printer is
restricted to a maximum count of 999. The default copy count is 1.
Collate Copies
When you select Copy Count and make an entry of more than 1, the
Collate Copies check box is enabled at the bottom of the dialog. If
you would like to have copies printed out in 1-2-3, 1-2-3 order
(depending upon your application), use your left mouse button to
place a check mark in the Collate Copies box. The default for
collation is off.
This parameter displays the currently-selected option for printing with
TrueType Fonts. To change the selection, left mouse click on TrueType
Font and click on the appropriate radio button. If you would like to print
with the TrueType fonts exactly as shown on your screen, select
Download as Soft font. If you prefer substituting printer-resident
PostScript fonts for your TrueType fonts, speeding up the printing
process, select Substitute with Device Font. The default is Substitute
with Device Font.
Tip: To quickly view your system-installed fonts and the printer-resident
fonts currently selected for substitution, go to “Start,” “Settings”,
“Printers,” right mouse click on your PostScript printer icon, select
“Properties,” and click on the Device Settings Tab. Double click on Font
Substitution Table. To see a display of printer-resident fonts available for
substitution, click on any font and a list will be displayed at the bottom of
the dialog.
GRAPHIC PARAMETERS
Color Appearance
As the printer is a Monochrome device, the setting for Color Appearance
is not important. If Monochrome is not the default, you may click on
Color Appearance and select the Monochrome radio button at the bottom
of the dialog.
Scaling
This parameter displays the currently-selected Scaling of the printed
image. To change the scaling, left mouse click on Scaling and enter a
selection from 10 - 999%, which is the scaling range supported by the
printer. The default setting is 100%.
Note: If you are performing a large scale enlargement, be sure to
manually select the appropriate Paper Size so that your image will fit onto
one of the available rolls of media installed in the printer.
XES Synergix 8825/8830/8850/8855 Windows NT 4.0 PostScript Print Driver User Guide
13
XES Synergix 8825/8830/8850/8855 Windows NT 4.0 PostScript Print Driver User Guide
Document Properties Dialog (Advanced Tab Parameters)
DOCUMENT OPTIONS PARAMETERS
PAGE LAYOUT (N-UP) OPTION
Click on this option to reveal a selection box specifying how many
pages of your document to print on a single piece of media. Make
your selection and click OK. The default setting is Normal (one up).
Note: This feature may be incompatible with some applications. For
specific information, consult the driver Read Me file.
POSTSCRIPT OPTIONS
14
True Type Font Download Option
This parameter specifies how TrueType fonts are downloaded.
Typically this parameter should be left at the default of Automatic
enabling the driver to decide which format is best. To change the
setting, click on TrueType Font Download Option and make a
selection from the list displayed at the bottom of the dialog.
•
Click Outline to download TrueType fonts as scalable outline
(PostScript Type 1) fonts. Use this option for high-resolution
printers and documents using point sizes of 10 or more.
•
Click Bitmap to download TrueType fonts as bitmap fonts (Type
3 or Type 32 PostScript fonts). Adobe recommends this option
for low resolution printers and documents using smaller (14 point
or less) type sizes.
•
Click Native TrueType (Type 42) to download TrueType fonts in
their native (non-PostScript-interpreted format) for printed fonts
that appear as the closest representation to what your see on
your screen.
PostScript Output Option
This parameter specifies the output format for PostScript files. For
everyday printing you should leave this parameter at the default of
Optimize for Speed. To select other options, click on PostScript
Output Option to reveal other selections at the bottom of the dialog.
•
Optimize for Portability works together with the Print to File
selection on your application’s print screen to let you create a
.prn file that can be transported to other workstations (on floppy
disk for example) for printing on any printer. To print the file you
can use the AccXES Client Tool or perform some type of manual
operation, such as using the command line to perform an lpr print
routine such as: lpr -P raw -S xxx.xxx.xxx.xxx A:\sample.prn
[ENTER]. Note that xxx stands for the IP address of the printer.
•
Encapsulated PostScript works together with the Print to File
selection on your application’s print screen to let you create a file
that is importable as an (EPS) image in another document to be
printed from a different program.
•
Archive Format works together with the Print to File selection on
your application’s print screen to let you produce a .prn file
containing no ppd (PostScript Printer Description) feature
information.
Document Properties Dialog (Advanced Tab Parameters)
PostScript Language Level
At the default value of 3, the driver displays the highest PostScript
language level supporting the maximum features of the printer. A
lower level (2) may resolve some printing problems, but at a cost of
fewer supported printer features.
Send PostScript Error Handler
With a default of Yes, this parameter specifies whether an error page
will be generated when an error is detected in the print job. Click on
Send PostScript Error Handler to reveal the radio style selection
buttons Yes and No and make your selection.
Mirrored Output
Click this option to reveal the Yes or No radio buttons. Make your
selection and click OK. The default setting is No. Note: This feature
may be incompatible with some applications. For specific
information, consult the driver Read Me file.
Negative Output
This parameter controls negative printing output. Click on Negative
Output to reveal the Yes or No radio buttons at the bottom of the
dialog. Click Yes to print a negative (white on black) image. Leave
the default at No to print a normal black on white image. Note: This
feature may be incompatible with some applications. For specific
information, consult the driver Read Me file.
XES Synergix 8825/8830/8850/8855 Windows NT 4.0 PostScript Print Driver User Guide
15
XES Synergix 8825/8830/8850/8855 Windows NT 4.0 PostScript Print Driver User Guide
Document Properties Dialog (Advanced Tab Parameters)
ACCXES OPTIONS
About AccXES Plug-In
Select this option and click the "About AccXES Plug In" button to
display a screen informing you of the version number of the XES
features created to work with this PostScript driver.
Printer Accounting
Note: This feature is meant to work with the Job Accounting
parameters set up by your System Administrator.
DEPENDING UPON YOUR FIRMWARE REVISION, set on the
Device Settings Tab of this driver, the printer accounting feature will
require EITHER the entry of numbers, OR the entry of alphanumeric
characters.
Yes/No Drop-Down Selection Box (default of No)
Click Yes to enable the Printer Accounting… button, which opens a
dialog that allows you to enter an account number of 1 to 999999 and
a sub-account number of 1 to 9999 (Firmware 6.1 or older), or a User
ID and Account ID of 1 to 32 alphanumeric characters (Firmware 7.0
or newer) to charge media use to. These must be the same
numbers (or User and Account identifications) that were assigned to
you by your System Administrator. These numbers (or IDs) will be
sent to the printer along with your print job.
Note: When job accounting is fully, rather than optionally,
enabled on the printer's Controller, if you submit an invalid
account number (ID), or no account number (ID), your job will
NOT print and an error page will be generated.
Leave the default at No to disable the driver accounting feature.
Note: If you click No and Job Accounting is fully, rather than
optionally, enabled on the printer's Controller, your job will NOT
print and an error page will be generated.
16
Document Properties Dialog (Job Tab Parameters)
Job Tab Parameters
BANNER PAGE
This option allows you to determine whether a banner page is printed
before or after your job. You can also select Printer Defaults to let
banner page printing be determined by the parameters stored in the
printer's Controller, as set up using the Web Printer Manager Tool. The
default driver setting is None, meaning that no banner page is specified.
LABELING
This option allows you to determine if a plot label will be applied to your
print job. You can select None, Printer default, or User defined.
None means that no label is specified by the driver.
Printer Default uses the default label stored in the Controller, if a default
label was previously set up using the Web Printer Manager Tool.
If you select User defined, the Settings… button will be enabled. When
you click this button, a Label dialog will display allowing you to create a
label of 1048 characters in length. Using this dialog, label placement
position, font type, font size, and text shading attributes can be
individually set. Text shading has a range of 0% (white text) to 100%
(solid black text).
The factory default setting for the Labeling option is Printer Default.
Figure 5. Typical Job Tab
XES Synergix 8825/8830/8850/8855 Windows NT 4.0 PostScript Print Driver User Guide
17
XES Synergix 8825/8830/8850/8855 Windows NT 4.0 PostScript Print Driver User Guide
Document Properties Dialog (Job Tab Parameters)
RASTER STAMP
This option allows you to determine if a raster stamp will be applied to
your print job. You can select None, Printer default, or User defined.
None means that no stamp is specified by the driver.
Printer Default uses the default raster stamp stored in the Controller, if a
default stamp was previously set up using the Web Printer Manager Tool.
If you select User defined, the Settings… button will be enabled. When
you click this button, a Raster Stamp dialog will display allowing you to
enter a known stamp name of up to 32 alphanumeric characters in the
"Raster stamp name" text box.
Using this dialog, raster stamp placement position, stamp rotation, and
scaling attributes can be individually set. Scaling has a range of 10% to
999% in your choice of two options. Select the Relative to drawing
radio button if you wish to have your stamp scaled in size to the plot
image that it is being applied to. Select Absolute if you wish to have the
scaling factor literally applied to the stamp file itself.
The factory default setting for the Raster Stamp option is Printer Default.
18
Document Properties Dialog (Job Tab Parameters)
FINISHING
Note: If you do not have a Finishing (.fin) File installed, "Folder bypass"
will be displayed in gray and any other options will be unavailable for
selection.
Single Job creates a plot nest restricted to the contents of your current
job. Plots from other job sources will not be intermixed with plots from
your job. If you select Single Job, the Settings… button will be enabled.
When you click this button, a Plot Nesting Options dialog will display
allowing you to adjust the margins between printed images on your
nested page.
If you installed a Finishing (.fin) File from the "Select Finisher" option of
the Printer Properties dialog "Device Settings Tab," as stated in this User
Guide, the finishing drop-down list will be available for your selection.
You can use the drop-down list to select either Printer default or User
defined.
Printer Default uses the default finisher settings stored in the Controller,
previously set up using the Web Printer Manager Tool.
If you select User defined, the Settings… button will be enabled. When
you click this button, a Finishing Options dialog will display allowing you to
select the finishing program to use with your Finishing Device, override
features of the finishing program, select an output bin, and to let the
finisher know the location of the Title block in your document, if any. For
an explanation of the individual dialog features, click the "?" key in the
upper right corner of the dialog.
PLOT NESTING
This option allows you to determine if plot nesting will be applied to your
print job. The purpose of Plot Nesting is to efficiently group the printing of
plots on a single sheet of media to eliminate media waste. The factory
default setting is Off, however you can select either Printer default or
Single job as an option.
Printer Default uses the default plot nesting settings stored in the
Controller, previously set up using the Web Printer Manager Tool. These
pre-determined settings include: Exclusive nesting (i.e. reserved to a
Single Job), Timeout, Margins (between nested plots), and maximum
Nesting Length.
XES Synergix 8825/8830/8850/8855 Windows NT 4.0 PostScript Print Driver User Guide
19
XES Synergix 8825/8830/8850/8855 Windows NT 4.0 PostScript Print Driver User Guide
Document Properties Dialog (Job Tab Parameters)
MEDIA MISMATCH
Working with the Media Mismatch Mode parameters set up by your
System Administrator using the Web Printer Manager Tool, you can
select one of four available options to determine how you would like to
handle mismatches between your job’s media type, or size, and media
types, or sizes, installed in the printer.
Printer Default uses the default plot nesting settings stored in the
Controller, previously set up using the Web Printer Manager Tool (PMT).
This is the default driver setting.
Scale To Fit will scale the size of your job to the nearest, printer-installed
medium to your requested print size.
Block Printing will cause the printer to hold a media mismatched job
until the proper medium has been installed in the printer. Depending
upon how the System Administrator has set up the Mismatch parameters
using the Web PMT, the mismatched job will either halt printing, or send
the job to a mismatch queue for later recall and media size or type
resolution.
Substitute Media will substitute a medium size or type on which to print
the requested, mismatched job in either a 1 to 1 ratio or scaled to fit
currently installed media. This is a “print at all costs” option.
JOB PRIORITY
This option lets you select a job processing priority. The range is from 1
to 10, with 1 representing a low priority job and 10 representing a high
priority job. Higher priority jobs generally print faster in a print queue than
lower priority jobs. Click on the up or down arrows to set your priority.
20
Page Setup Tab Parameters
The Page Setup Tab is a more graphically pleasing display of a limited
number of the many parameters available for setting on the Advanced Tab of
the Document Properties dialog.
The parameters displayed on this Tab include:
•
•
•
•
•
Paper Size
Paper Source
Copy Count & Collate Copies
Orientation
Color Appearance
For full details on the setting of these parameters, see the previously
presented information in the Advanced Tab section of this Guide.
Figure 6. Typical Page Setup Tab
XES Synergix 8825/8830/8850/8855 Windows NT 4.0 PostScript Print Driver User Guide
21
XES Synergix 8825/8830/8850/8855 Windows NT 4.0 PostScript Print Driver User Guide
Feature Enhancements in
Support of PostScript Printing
Because the PostScript driver does not currently support all of the numerous
printing features available with the Controller, the following table shows
additional printing features that can be set as job processing defaults with the
Web Printer Manager Tool on a networked workstation.
Printing Feature
Set with Printer Manager Tool
Margins & Justification
yes
Scale to Fit (Autoscaling)
yes
For information on how to set these parameters using the Printer Manager
Tool see the Web Printer Manager Tool User Guide.
22
Removing the Driver
1. To remove the PostScript Print Driver, from the Windows NT 4.0 desktop
click on “Start,” “Settings,” “Printers.”
2. Right click on the icon representing your PostScript printer.
3. Select Delete from the drop down menu.
4. Click Yes when prompted. This will remove the PostScript Print Driver
from your Windows NT 4.0 operating system.
5. You may want to run Windows Explorer to remove the files that were
created when the original driver file was downloaded from the Internet
and then unzipped to a default location on your hard drive.
6. Refer to the Release Notes that accompanied the driver for additional
files that you might wish to remove.
XES Synergix 8825/8830/8850/8855 Windows NT 4.0 PostScript Print Driver User Guide
23
This page left intentionally blank.
This page left intentionally blank.
Prepared by:
Xerox Corporation
Global Knowledge & Language Services
800 Phillips Road
Building 845-17S
Webster, New York 14580-9791
USA
©2001 XESystems Inc. All rights reserved.
Printed in the United States of America
®
XEROX , XES Synergix 8855 and 8855 Digital Solution, XES Synergix
8850 and 8850 Digital Solution, XES Synergix 8825 and 8825 Digital
Solution, XES Synergix 8830 and 8830 Digital Solution, XES Synergix
Scan System, the digital box icon, AccXES, and the acronym XES are
trademarks of XEROX Corporation.
701P36867
July 2001