1
24" 1080p LCD Television
with LED backlight
LED24VF60
19
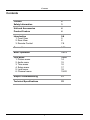
Contents
Contents
Caution
Safety Information
2
3
Unit and Accessories
Product Feature
4
4
Introduction
1. Front View
2. Rear View
3. Remote Control
5-8
5
6
7-8
Connection
9-11
Basic Operation
12-13
OSD Menu
1. Picture menu
2. Audio menu
3. Time menu
4. Setup menu
5. Lock menu
6. Channel menu
14-20
14
15
16
17
18
19-20
Simple Troubleshooting
21
7HFKQLFDO6SHFL¿FDWLRQV
22
1
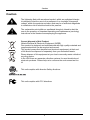
Caution
Caution
7KHOLJKWHQLQJÀDVKZLWKDUURZKHDGV\PEROZLWKLQDQHTXLODWHUDOWULDQJOH
LVLQWHQGHGWRDOHUWWKHXVHUWRWKHSUHVHQFHRIXQLQVXODWHGGDQJHURXV
YROWDJHZLWKLQWKHSURGXFWVHQFORVXUHWKDWPD\EHRIVXI¿FLHQWPDJQLWXGH
WRFRQVWLWXWHDULVNRIHOHFWULFVKRFNWRWKHSHUVRQV
7KHH[FODPDWLRQSRLQWZLWKLQDQHTXLODWHUDOWULDQJOHLVLQWHQGWRDOHUWWKH
XVHUWRWKHSUHVHQFHRILPSRUWDQWRSHUDWLQJDQGPDLQWHQDQFHVHUYLFLQJ
LQVWUXFWLRQVLQWKHOLWHUDWXUHDFFRPSDQ\LQJWKHDSSOLDQFH
Correct disposal of this Product
:DVWH(OHFWULFDO(OHFWURQLF(TXLSPHQW:(((
<RXUSURGXFWLVGHVLJQHGDQGPDQXIDFWXUHGZLWKKLJKTXDOLW\PDWHULDOVDQG
FRPSRQHQWVZKLFKFDQEHUHF\FOHGDQGUHXVHG
7KLVV\PEROPHDQVWKDWHOHFWULFDODQGHOHFWURQLFHTXLSPHQWDWWKHLUHQG
RIOLIHVKRXOGEHGLVSRVHGRIVHSDUDWHO\IURP\RXUKRXVHKROGZDVWH
3OHDVHGLVSRVHRIWKLVHTXLSPHQWDW\RXUORFDOFRPPXQLW\ZDVWHFROOHFWLRQ
UHF\FOLQJFHQWUH
,QWKH86$WKHUHDUHVHSDUDWHFROOHFWLRQV\VWHPVIRUXVHGHOHFWULFDODQG
HOHFWURQLFSURGXFWV3OHDVHKHOSXVWRFRQVHUYHWKHHQYLURQPHQWZHOLYH
in!
7KLVXQLWFRPSOLHVZLWK$PHULFD6DIHW\GLUHFWLYHV
7KLVXQLWFRPSOLHVZLWK)&&GLUHFWLYHV
2
Safety Information
Safety Information
7RHQVXUHUHOLDEOHDQGVDIHRSHUDWLRQRIWKLVHTXLSPHQWSOHDVHUHDGFDUHIXOO\DOOWKH
LQVWUXFWLRQVLQWKLVXVHUJXLGHHVSHFLDOO\WKHVDIHW\LQIRUPDWLRQEHORZ
Electrical safety
7KH79VHWVKRXOGRQO\EHFRQQHFWHGWRDPDLQVVXSSO\ZKLFKPDWFKHVWKDWVWDWHGRQ
WKHODEHORQWKHPDLQVDGDSWRU
7RSUHYHQWRYHUORDGGRQ
WVKDUHWKHVDPHPDLQVVXSSO\VRFNHWZLWKWRRPDQ\RWKHU
LWHPVRIHTXLSPHQW
'RQRWSODFHDQ\FRQQHFWLQJZLUHVZKHUHWKH\PD\EHVWHSSHGRQRUWULSSHGRYHU
'RQRWSODFHKHDY\LWHPVRQWKHOHDGVZKLFKPD\GDPDJHWKHP
+ROGWKH0DLQVSOXJQRWWKHZLUHVZKHQUHPRYLQJIURPDVRFNHW
'XULQJDWKXQGHUVWRUPRUZKLOHOHDYLQJWKH79IRUORQJSHULRGVGLVFRQQHFWWKHDHULDOLI
RXWGRRUDQGPDLQVDGDSWRUIURPWKHVXSSO\
'RQRWDOORZZDWHURUPRLVWXUHWRHQWHUWKH79RUPDLQVDGDSWRU'R127XVHLQZHW
RUPRLVWDUHDVVXFKDV%DWKURRPVVWHDP\NLWFKHQVRUQHDUVZLPPLQJSRROV
3XOOWKHSOXJRXWLPPHGLDWHO\DQGVHHNSURIHVVLRQDOKHOSLI
WKHPDLQVSOXJRUFDEOHLVGDPDJHG
OLTXLGLVVSLOWRQWRWKHVHWRULILWLVDFFLGHQWDOO\H[SRVHGWRZDWHURUPRLVWXUH
DQ\WKLQJDFFLGHQWDOO\SHQHWUDWHVWKHYHQWLODWLRQVORWV
WKHVHWGRHVQRWZRUNQRUPDOO\
'R127UHPRYHWKHVDIHW\FRYHUV7KHUHDUHQRXVHUVHUYLFHDEOHSDUWVLQVLGH
<RXPD\LQYDOLGDWHWKHZDUUDQW\4XDOL¿HGSHUVRQQHORQO\DUHSHUPLWWHGWRVHUYLFHWKLV
DSSDUDWXV
7RDYRLGEDWWHU\OHDNDJHUHPRYHH[KDXVWHGEDWWHULHVIURPWKHUHPRWHFRQWURO
KDQGVHWRUZKHQQRWXVLQJIRUDORQJSHULRG
'R127EUHDNRSHQRUWKURZH[KDXVWHGEDWWHULHVRQD¿UH
Physical safety
'R127EORFNYHQWLODWLRQVORWVLQWKHEDFNFRYHU<RXPD\SODFHWKH79LQDFDELQHWEXW
HQVXUHDWOHDVWFPFOHDUDQFHDOODURXQGWKHXQLW
'R127WDSRUVKDNHWKH79VFUHHQ\RXPD\GDPDJHWKHLQWHUQDOFLUFXLWU\7DNHJRRG
FDUHRIWKHUHPRWHFRQWUROGRQRWGURSLWRUDOORZLWWRFRPHLQWRFRQWDFWZLWKOLTXLGV
7RFOHDQWKH79XVHDVRIWGU\FORWK'R127XVHVROYHQWVRUSHWUROEDVHGÀXLGV)RU
VWXEERUQVWDLQV\RXPD\XVHDGDPSVRIWFORWKZLWKGLOXWHGGHWHUJHQW
3
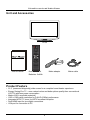
Unit and Accessories and Product Feature
Unit and Accessories
TV set
INPUT
1
2
3
4
5
6
7
8
9
0
-/--
PICTURE SOUND
SLEEP
DISPLAY
CH+
VOL+
MUTE
CH-
VOL-
MENU
EXIT
OK
CC
User's manual
MTS
EPG
FAV
Mains adaptor
Remote control
Batteries: 2xAAA
Mains cable
Product Feature
• 21.6” (measured diagonally) wide screen for a complete home theater experience
• Energy Saving Eco TV – more natural colors and better picture quality than conventional
LCD TVs with less power consumption
• Made of 95% recyclable materials
• 1920 x 1080 native resolution for Full-HD (1080p) performance
• Integrated ATSC TV tuner for HDTV broadcast reception
• Dual HDMI input for true digital connections
• VGA port for connection to PC
4
Introduction
Introduction
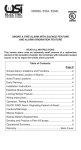
1. Front View
MENU CH-
CH+ VOL- VOL+ INPUT POWER
Led Indicator
Remote Control window
(Keep clear)
1. (IR) Infrared Receiver: Receives IR signals from the remote control.
(Power on/Standby)LED Indicator: Press POWER to turn on and off.
Indicator on(Red)
Indicator on(Green)
Standby mode
Power on mode
The effective receiving range for the signal is 5-8 metres from the front of the remote
control window, and 300 to the left or right side and 200 above or below the remote control
window.
2. The functions of the buttons:
INPUT: Press to display the input source menu.
MENU: Press to display the OSD menu,
press again to exit the menu.
CH+/-: Press to scan through channels.
VOL+/-: Press to adjust the volume.
POWER: Turn on/standby the TV set.
INPUT SOURCE
TV
AV
Component
HDMI1
HDMI2
VGA
Press INPUT button on the TV set or remote control to
display the input source menu, and use CH+/- button on
the TV set or Ĥ / ĥ button on remote control to select the
input source, press OK button on the remote control to
enter.
Note: Before you select the input source, make sure the
connections are prepared.
5
Introduction
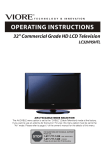
2. Rear View
11
10
9
8
1
2
3
4
5
6
7
1. POWER: Connect to the mains adaptor.
2. USB: For update the soft.
3. HDMI1/2: Connect it to the HDMI of DVD or other equipment.
4. VGA: For PC display.Connect it to the D-Sub 15 pins analog output connector of the PC.
5. PC-IN: Connect it to the audio output terminal of PC.
6. Coax: Digital coaxial output.
7. Headphone: Connect it to your headphone or other audio equipment.
8. YPbPr: Connect them to the YPbPr video output terminal of DVD.(used in component source)
9. VIDEO: Connect it to video output terminal of DVD.
10. R/L in: Connect them to the audio output terminal of DVD.(shared with YPbPr)
11. RF: Connect antenna or cable 75 Ohm coaxial to receive TV signal.
Wall Mounting
The TV is provided with mounting holes for a VESA approved wall mounting bracket (NOT
SUPPLIED). Remove the pozi screws holding the base to the base bracket and lift the
base away (do not remove the base mounting bracket). Mount the VESA bracket using
4 x M4 x10 Iso metric threaded screws (not supplied). Do not use screws longer than 10 mm,
damage will occur to the internal parts. Fit the wall bracket securely following the manufacturer’s
instructions.
6
Introduction
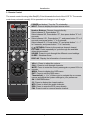
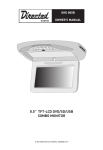
3. Remote Control
The remote control is using Infra-Red(IR). Point it towards the front of the LCD TV. The remote
control may not work correctly if it is operated out of range or out of angle.
POWER(red button): Turn the TV on/standby.
INPUT: Press to display the input source menu.
INPUT
1
2
3
4
5
6
7
8
9
0
-/--
PICTURE SOUND
SLEEP
DISPLAY
CH+
VOL+
MUTE
CH-
VOL-
MENU
EXIT
OK
CC
Number Buttons: Choose channel directly.
Select channel 5, Press button "5";
Select channel 62, Press button "6", then press button "2" in 2
seconds;
Select channel 151, Press button "1", and press button "5" in 2
seconds, and press button "1" in 2 seconds;
Select channel 5-1, Press button "5", and press button "- / - -"
in 2 seconds, and press button "1" in 2 seconds;
(RETURN): Return to the previous channel viewed.
PICTURE: Press repeatedly to cycle through the available
video picture modes.
SOUND: Press to cycle through the different sound settings.
SLEEP : Shutdown timer.
DISPLAY: Display the information of current mode.
MTS
EPG
FAV
VOL+/-: Press to adjust the volume.
CH+/-: Press to scan through channels.
MUTE: Press to mute the sound, press again or press VOL+ to
unmute.
MENU: Press to display the OSD menu.
EXIT: Press to exit the OSD menu.
Thumbstick(=!? Ĥĥ ): Allows you to navigate the on-screen
menus and adjust the system settings to your preference.
OK: CONFIRM button.
CC: Press to display the closed caption.
MTS: Press to select the audio channels.
EPG: Press to enter the EPG menu directly.
FAV: Press to add or remove favorite channel.
7
Introduction
Installing Batteries
1. Open the battery compartment cover on the back of the remote control.
2. Insert two 1.5V AAA size batteries observing the polarity markings inside the battery
compartment. Don’t mix different types or used batteries with new ones.
3. Close the cover.
- The remote control should be operated within 30 feet(7m) and 300 to the left and right of the
IR receive at the front of the LCD TV.
- Used batteries should be disposed properly.
8
Connection
Connection
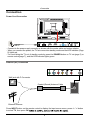
Power Cord Connection
- Connect to the power supply correctly as shown with the mains cable and mains adaptor.
- When you connect the power, the TV set comes into standby mode and the LED indicator (Page
5) lights red.
- You could bring the TV out of standby mode by press the POWER button on TV set (page 5) or
remote control(page 7), and the LED indicator lights green.
Antenna (RF) Connection
Wall jack with F-Connector
Coaxial (Round) Antenna Cable
RF
External Antenna
Press INPUT button on the remote control to display the input source menu, press Ĥ ĥbutton
to select TV, then press OK
9
Connection
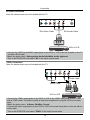
AV Input Connection
Note: All cables shown are not included with the TV.
RCA Video Cable
RCA Audio Cable
DVD or VCR
- Connect the VIDEO and AUDIO output jacks on the DVD or VCR to the AV IN jacks on the TV
set with a RCA cable.
- Match the jacks colors: Video=yellow, Audio left=White, Audio right=red.
- Turn on the DVD/VCR, and select “AV” in the input source menu.
YPbPr Connection
Note: All cables shown are not included with the TV.
Audio Cable
YPbPr Cable
Y Pb Pr
DVD or VCR
- Connect the YPbPr output jacks on the DVD or VCR to the YPbPr input jacks on the TV set
with a YPbPr cable. The picture quality is improved compared to a regular VCR to the video
input.
- Match the jacks colors: Y=Green, Pb=Blue, Pr=red.
- Connect the audio output jacks on the DVD or VCR to the audio input jacks on the set with an
audio cable.
- Turn on the DVD/VCR, and select “YPbPr” in the input source menu.
10
Connection
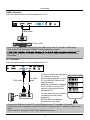
HDMI Connection
Note: All cables shown are not included with the TV.
HDMI cable
DVD or VCR
- Connect the HDMI jack on the DVD to the HDMI jack on the TV set with a HDMI cable.
- Turn on the DVD, and select “HDMI1/2” in the input source menu.
A/V
interface that supports uncompressed standard. One jack supports both video and audio
information.
PC Connection
Note: All cables shown are not included with the TV.
VGA cable
PC audio
cable
- If using a sound card, adjust the
PC sound as required.
- Set the video resolution of your
PC to 1024x768, 60Hz on its
original monitor.
Make the connections between
the TV monitor and your PC,
switch on the monitor before
booting the PC.
You can now set your preferred
resolution from the choice
supported.
See the table of supported
resolutions on the right.
1920 x 1080, 60Hz
- Connect the RGB jack on the PC to the VGA jack on the TV set with a VGA cable.
- Connect the audio output jack on the PC to the PC IN jack on the TV set with a stereo audio
cable.
- Turn on the PC, and select “VGA” in the input source menu.
11
Basic Operation
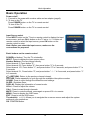
Basic Operation
Power on/off
1. Connect to the power with a mains cable and an adaptor (page9).
2.-To turn on the TV
Press POWER button on the TV or remote control.
-To turn off the TV
Press POWER button on the TV or remote control.
Input Source select
Press INPUT button on the TV set or remote control to display the input
source menu, and use CH+/- button on the TV set or Ĥ / ĥ button on
remote control to select the input source, press OK button on the
remote control to enter.
Note: Before you select the input source, make sure the
connections are prepared.
INPUT SOURCE
TV
AV
Component
HDMI1
HDMI2
VGA
Basic buttons on the remote control
POWER(red button): Turn the TV on/standby.
INPUT : Press to display the input source menu.
Number Buttons: Choose channel directly.
Select channel 5, Press button "5";
Select channel 62, Press button "6", then press button "2" in 2 seconds;
Select channel 151, Press button "1", and press button "5" in 2 seconds, and press button "1" in
2 seconds;
Select channel 5-1, Press button "5", and press button "- / - -" in 2 seconds, and press button "1"
in 2 seconds;
(RETURN): Return to the previous channel viewed.
PICTURE: Press repeatedly to cycle through the available video picture modes.
SOUND: Press to cycle through the different sound settings.
SLEEP: Shutdown timer.
DISPLAY: Display the information of current mode.
VOL+/-: Press to adjust the volume.
CH+/-: Press to scan through channels.
MUTE: Press to mute the sound, press again or press VOL+ to unmute.
MENU: Press to display the OSD menu.
EXIT: Press to exit the OSD menu.
Thumbstick(=!? Ĥĥ ): Allows you to navigate the on-screen menus and adjust the system
settings to your preference.
OK: CONFIRM button.
12
Basic Operation
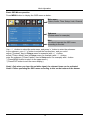
Basic OSD Menu operation
Press MENU button to display the OSD menu as below:
Main menu
Picture, Audio, Time, Setup, Lock, Channel
Submenu
(Picture menu for example)
Hint
you should operate the OSD menu
according to the hint.
Use =!/ ? button to select the main menu, and press ĥ!button to enter the submenu.
In the submenu, use Ĥ / ĥ button to select the function item, and you could:
adjust ("Contrast" item in Picture menu for example) with =!/ ? button;
select ("Picture Mode" item in Picture menu for example) with =!/ ? button;
enter the submenu ("Close Caption" item in Setup menu for example) with ?!button.
* (Press MENU button to return to the upper menu.)
* (Press EXIT button to exit the menu display.)
Note1: Only when you input the suitable signal, the relevant items can be activated
Note2: Please operating the OSD menu according to hint on the bottom of the banner.
13
OSD Menu
OSD Menu
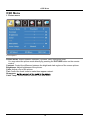
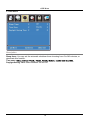
1. Picture menu
Description
Picture mode: Select between Standard, Dynamic, Mild, Sports and User.
You may select the picture mode directly by pressing the PICTURE button on the remote
control.
Contrast: Control the difference between the bright and dark regions of the screen picture.
Brightness: Adjust brightness of the picture.
Color: Adjust color of the picture.
Tint: Control the fresh tones to make them appear natural.
Sharpness:
Color Temp.: Select between Normal, Cool and Warm.
14
OSD Menu
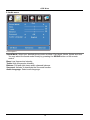
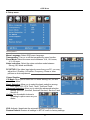
2. Audio menu
Flat
Description
Sound Mode: Select your desired picture mode as follow: Flat, Music, Movie, Sports and User
You may select the sound mode directly by pressing the SOUND button on the remote
control.
Bass: Low frequencies intensity.
Treble: High frequencies intensity.
Balance: Left and right stereo audio channels balance.
Surround: Activate or deactivate the Surround function.
Audio Language: Select audio language.
15
OSD Menu
3. Time menu
Description
Sleep timer: You may set the automatic shutdown timer choosing from 5 to 240 minutes, or
deactivate this function.
Time zone:
Daylight Saving Time: Select between On and Off.
16
OSD Menu
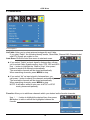
4. Setup menu
16:9
PC SETUP
Closed Caption
Description
Menu Language: Select OSD menu language.
Transparency: Turn on or off the transparency menu function.
Zoom Mode: Select the zoom mode between 16:9, 16:9 zoom,
4:3, 4:3 zoom.
Noise reduction: Select the noise reduction mode between
Strong, Off, Weak and Middle.
PC SETUP: If the video input signal comes from your PC, you may
adjust the V-Position, H-Position, Frequency, Phase or even
perform an Auto adjustment.
Closed Caption:
CC Mode: Allow you to select the CC Mode among: On, Off and
CC on Mute.
Basic Selection: Allow you to select the basic selection among:
CC1, CC2, CC3, CC4, Text1, Text2, Text3 and Text4.
Advanced Selection: Allow you to select the advanced selection
among: Service1, Service2, Service3 Service4, Service 5 and
Service 6.
Option: Use thumbstick buttons to
operating in option menu as your
desire.
XVS: Activate / deactivate the automatic dynamic brightness function.
Restore Default: Restore all settings in SETUP menu to factory settings.
17
OSD Menu
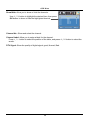
5. Lock menu
<RXPXVWHQWHUWKHSDVVZRUGWRJDLQDFFHVVWRWKH/RFNPHQX7KHGHIDXOWSDVVZRUGLV
<RXPD\PRGLI\WKHIROORZLQJRSWLRQV
Description
Change password:&KDQJHWKHSDVVZRUG\RXPXVWHQWHUWKHQHZSDVVZRUGWZLFHWRFRQ¿UP
LW1RWH'RQRWIRUJHWWKHSDVVZRUG
Lock: $OORZ\RXWRWXUQRQRURIIWKHV\VWHPORFN,IGHDFWLYDWHGWKHIXQFWLRQVGHVFULEHGEHORZ
don’t work.
7KLVRSWLRQPHQXDOORZV\RXWRORFNDQ\79FKDQQHORUDGMXVWWKH0RYLHUDWLQJ¿OWHU
US:!
TV: 8VHĤ 0 ĥ EXWWRQVWRVHOHFWWKHGHVLUHGUDWLQJDQGSUHVV
?EXWWRQWREORFNRUXQEORFNUDWLQJ
MPAA:7KH0RYLHUDWLQJ03$$LVXVHG
IRURULJLQDOPRYLHVUDWHGE\WKH0RWLRQ
3LFWXUH$VVRFLDWLRQRI$PHULFD03$$
DVEURDGFDVWHGRQFDEOH79DQGQRW
HGLWHGIRUWHOHYLVLRQ
8VHĤ 0 ĥ EXWWRQWRVHOHFW1$*
3*3*51&RU;
Canada:!
Canada English: 6HOHFWDPRQJ(&&*3*DQG
Canada French: 6HOHFWDPRQJ(*DQVDQVDQVDQG
DQV
Reset RRT:$OORZ\RXWRUHVHWWKH557VHWWLQJ
18
OSD Menu
6. Channel menu
Description
Air/Cable: Allow you to select antenna between Air and Cable.
If you selet “Cable”, the following items(Favorite, Show/Hide, Channel NO, Channel Label
and DTV Signal) are unable to use.
Auto Scan: Enter the Auto Scan menu to start auto scan.
ƾ If you select “Cable” as input signal in Antenna item, allows
you to select Cable System among: Auto, STD, IRC and HRC.
Use Ģ button to highlight the “Start to Scan”, then press !
button to search the channels automatically.
The receivable channels will be stored automatically.
When searching channels, press MENU to stop.
ƾ If you select “Air” as input signal in Antenna item, you
can press ! button to search the channels automatically.
The receivable channels will be stored automatically.
When searching channels, press MENU to stop.
NOTE: It will take a while to auto scan in NTSC or ATSC
mode, please wait patiently.
Favorite: Allow you to add these channels which you desired as the favorite channels.
Use ġ Ģ button to highlight the desired item, then press
OK button to add or remove the highlighted channel as
favorite.
19
OSD Menu
Show/Hide:$OORZ\RXWRVKRZRUKLGHWKHFKDQQHOV
8VHĤ 0 ĥ EXWWRQWRKLJKOLJKWWKHGHVLUHGLWHPWKHQSUHVV
OKEXWWRQWRVKRZRUKLGHWKHKLJKOLJKWHGFKDQQHO
Channel No.:6KRZDQGVHOHFWWKHFKDQQHO
Channel Label:$OORZ\RXWRVHWXSDODEHOIRUWKHFKDQQHO
3UHVV=!0!?!EXWWRQWRVHOHFWWKHSRVLWLRQRIWKHWDEOHDQGSUHVVĤ 0 ĥ EXWWRQWRVHOHFWWKH
ZRUGV
DTV Signal:6KRZWKHTXDOLW\RIGLJLWDOVLJQDOJRRG1RUPDO%DG
20
Simple Troubleshooting
Simple Troubleshooting
,IWKHGLVSOD\IDLOVRUSHUIRUPDQFHGUDPDWLFDOO\GHWHULRUDWHVFKHFNWKH'LVSOD\LQDFFRUGDQFH
ZLWKWKHIROORZLQJLQVWUXFWLRQV5HPHPEHUWRFKHFNWKHSHULSKHUDOVWRSLQSLRQWWKHVRXUFHRIWKH
IDLOXUH
,IWKHGLVSOD\VWLOOIDLOVWRSHUIRUPDVH[SHFWHGFRQQHFW\RXUKHOSOLQHIRUDVVLVWDQFH
No power
&KHFNDOOFRQQHFWLRQVWRWKH79
3UHVVHLWKHUWKHSRZHUEXWWRQRUWKH6WDQGE\EXWWRQRQWKH5HPRWHFRQWURO
No picture or sound
(QVXUHWKDWWKH79LVSOXJJHGLQDQGWKHSRZHULVRQ
(QVXUHWKDWWKHDHULDOLVFRQQHFWHG
7U\DGLIIHUHQWSURJUDPPH
Poor picture quality
&KHFNWKHDHULDOFRQQHFWLRQV
&KHFNWKDWWKHFKDQQHOLVWXQHGLQSURSHUO\
$GMXVWWKHSLFWXUHVHWWLQJVEULJKWQHVVFRORXUVKDUSQHVVFRQWUDVWKXH
0DNHVXUHWKDWWKH79LVQRWORFDWHGFORVHWRHOHFWULFDODSSOLDQFHVWKDWPD\HPLWUDGLR
IUHTXHQF\LQWHUIHUHQFH
No colour
$GMXVWWKHFRORXUVHWWLQJ
&KHFNWKDWWKHSURJUDPPHLVEURDGFDVWLQFRORXU
&KHFNWKDWWKHFDQQHOLVWXQHGSURSHUO\
TV does not respond to remote control
&KHFNWKDWWKHUHDUHQRREVWUXFWLRQVEHWZHHQWKHUHPRWHFRQWURODQGWKHXQLW
&KHFNWKDWWKHUHPRWHFRQWUROLVZLWKLQUDQJHRIWKHXQLW
&KHFNWKDWWKHEDWWHULHVLQWKHUHPRWHFRQWURODQGQRWZHDNRUH[KDXVWHG
7KLV/&'79LVIRUKRXVHKROGXVHDQGUHJLVWHUHGDVKDUPOHVVRQHOHFWURPDJQHWLFZDYHV
7KHUHIRU\RXFDQXVHLWLQHYHU\ORFDWLRQDVZHOODVUHVLGHQWLDODUHDV
21
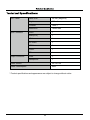
LCD Panel
Input Connector
Output Connector
Panel Size
24 inch (diagonal)
Brightness
300 cd/m2
Contrast
1000:1
Resolution
1920x1080
Video
1
Audio(L/R)
1
VGA
1
PC Audio
1
HDMI
2
YPbPr
1
RF
1
Coax
1
Headphone
1
Power Source
DC 12V 5A
Power Consumption
60W
* Product specifications and appearance are subject to change without notice.
22
VIORE, Inc. 7801 Hayvenhurst Avenue, Van Nuys, California 91406
Printed in China