1
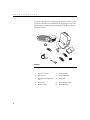
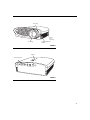
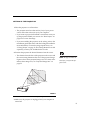
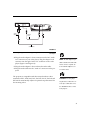
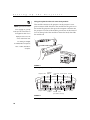
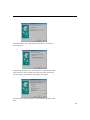
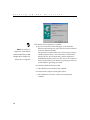
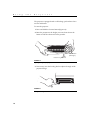
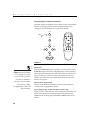
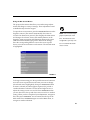
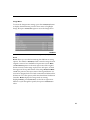
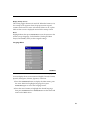
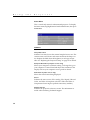
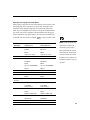
TOSHIBA
The power to open people’s eyes
TDP-S3
USER GUIDE
!
FCC Warning
" ! ! #! $ % # ! ! $ & # ' ( !! ! $ # #$ % "
! $$ " !
$ ! ! #"$ ! # ! ! ! $$!$
% $ $ # #$ ! $
$ ) # " ! $ # #$ %$ $ % "! $$ #$
% *
Canada
! $ % ! +, -
." ! $ $# / 01
!
- ! Safety Certifications
23 23 45 0) +(
EN 55022 Warning
!$ + ! $ $ ! #
$ %$ $ "! !" $ $#$ ! Declaration of Conformity
#$ 6 7 !$ ! 89- ! 89- :$ $# #% !$ ! 6
, 8$ ;<=-->=,, !! <-=>;=,,
,6 ,0 &&
,0 && ?
,0 >
-
,0 >
-3% 5 8$ @-= -=,, !! <-=>;=,,
# 6 ,0 > <& 6 << A A A - A ?6 <<@
Trademarks
$ ! 9%1 ! ! ! #
+$ +1 ! 9= ! ! ! #
+ 1 $ +$ $# 9%9 ! 7!% ! ! ! # $# 8 3 9
$ ! ! ! # * + TABLE OF CONTENTS
Safety Instructions
iii
Introduction
+ ( 2$ 9:$ 2 B!
+# C 0! $
1
?
?
Setting up the Projector
$ $ 5! 8 $
2 $! $$ !
9% 9:$ )## 9:$ 5
@
;
&
Using the Projector
1$ + !: !: 9:$ 2 ( 2 D! ! ( 1 2 )$ 8 ! + ! $! 3 17
@
@
<
?
>
@
-
-?
i
T
ii
a
b
l
e
o
f
C
o
n
t
e
n
t
s
Maintenance & Troubleshooting
3
($ 9:$ 3
9:$ 3 ' $
($ 1 ( 2 $ 3$
35
-&
-&
-;
-<
-<
?
Appendix
$#$ $$
9 ! 3 $ 2 5! % 9%1 9:$ ! + E
45
?&
?>
?@
&
&-
Index
55
SAFETY INSTRUCTIONS
9 ! ! #% # $ !! 1,')(,
% :$ ' $ % # $
# $ $ $ : !
! $ !! " 9
# $ Safety Definitions:
F Warning: ! # $! $ $ $! :
F Caution: ! # $! $ $ $!
! " Safety Symbols:
Attention: ' # # # # 2G B!
Warning: H #$ 8 $
% ! :$ Safety Terms:
F Warning: 8G !$ % ! FWarning: $ ## :$ ! % $! ! % - # ! '% $ !! 2G B!
FWarning: 9 % $! !! $
% $! $ $ % $ # I J ! F Warning: (# $ "#! $ $ % :$ % ! % #
% # $ $ $ $ # F Caution: 8G $ iii
S
a
f
e
t
y
I
n
s
t
r
u
c
t
i
o
n
s
F Caution: 8G "! :$ ! "! ! :$ F Caution: 8G $ :$ #$ !$
F Caution: 8 ! :$ :$ ! $K # ! # # Important Operating Considerations
8 $ :$ $ # $ $ + # $ # # :$ ! !
$! ! $! t (.
2f
)
6m
Do not place objects in
this area in front of the projector
Customer Service
9 $ $ ! # ! iv
INTRODUCTION
89- ! 89- ! :$ $#$ !! # $
$ 8 3 9$L I839J $
$$ ! 89- 5B ; *> 89- MB ?*@>; #$ # % !$ ! $ *$ % !K # G ! !$ Image Resolution
NOTE: The TDP-S3 automatically
TDP-S3
5B # 89-G :$ ! ; *> :$ $ % $ ; * ? +# $ G $ ; * ? % # $$ :$ expands 640x480 images to
800x600. You can display these
images at their native resolutions
by turning off the Auto Resize feature. See “Resize” on page 27 for
TDP-T3
MB # 89-G :$ ! ?*@>;
:$ $ % $ ; * ? +# $ G $ ; * ? % # $$ :$ more information.
Compatibility
:$ $ % %! # $ !
! ! $ $!6
NOTE: The TDP-T3 automatically
F +1$ $ $! ; *
images to 1024x768. You can dis-
F N $ N ! 9%1N $ ; *
? ?
expands 640x480 and 800x600
play these images at their native
resolutions by turning off the Auto
Resize feature. See page 27.
F !! 5( 858 H85 $ $$!
! !$ Unpacking the Projector
:$ $ % % ' $ $!!
NOTE: The projector is compatible with 1080i and 720P HDTV
formats.
1
I
n
t
r
o
d
u
c
t
i
o
n
+# *$! $! % $!! * ' $
! $$ ! :$ # 2G B!
2
1
3
key
sto
ne
bac
k
vid
eo
dat
a
for
wa
rd
me
nu/
sel
ect
4
5
9
6
8
7
10
FIGURE 1
Shipping box contents
2
1.
Projector + lens cap
6.
Computer cable
2.
Soft carry case
7.
Audio cable adapter
3.
User’s Guide and quick start
card
8.
Audio cable
4.
Power cord
9.
Composite video cable
5.
Remote control
10,
Macintosh adapter
zoom ring
focus ring
power
cord
connector
height adjustment
button
FIGURE 2
Front view of projector
keypad
connector panel
FIGURE 3
Back view of projector
3
I
n
t
r
o
d
u
c
t
i
o
n
Usage Guidelines
F 8 !$ :$ % ! F 8 $ :$ ( $ #%
$ $ ! ## +# % # $ F H! :$ %! !$ % $ 1 $ $# ! F ! :$ !$ * $!
# * !! ! # +# % $
# F :$ ! ! ! # $
$ ! # # $ $$
! If You Need Assistance
# $ # 1 $$
! O P ? 9 $ $ ! # ! 4
SETTING UP THE PROJECTOR
1 9$ :$ # #$
F :$ % # I- J # %
$ ! % > # I; J # $ F +# %
:$ # ! $ $ :$ ! $ O( 9:$ P - F +# :$ $ # ! $ % D #
# ! !% O 9:$ P - D !
$ $ ! !
2 9 :$ !! ! $ # $
F ! $ # # :$ $ !
E ! E # :$ ! ' ? % :$ ! E ' #
E O9:$ ! + EP &-
NOTE: The projector must be at
least 5 feet (1.5 m) from the projection screen.
8.3
ft.
7
ft.
5.0
f t.
11.6 ft.
9.7 ft.
6.9 ft
FIGURE 4
Projected image size at minimum zoom
3 :$ ! ! $ ! ##
5
S
e
t
t
i
n
g
u
p
t
h
e
P
r
o
j
e
c
t
NOTE: Before you continue,
o
r
Audio in
make sure the projector is
S-video composite
video
computer
unplugged and your equipment is
turned off. If you’re connecting a
computer, make sure the distance
between it and the projector is 6
feet or less.
FIGURE 5
Connector panel
NOTE: The enhanced connectivity
computer 1-M1
computer
audio in
module is an optional accessory
component
video
wired remote
RS-232
that provides RS-232, component
video, VESA computer, M1
computer, and monitor loop
through capabilities. Contact your
Toshiba dealer to order.
composite
computer 2-VESA computer
S-video
audio in
audio in video
(for all video sources)
monitor
FIGURE 6
Connector panel on optional enhanced connectivity module
NOTE: If you are connecting an
older Macintosh computer that
does not have a 15-pin connector,
to USB mouse
to computer video
you must use a Mac adaptor
between the computer and the
to computer
projector. The Mac adapter will
only work with the 1024x768
resolution. Please set your Mac’s
6
video card accordingly.
FIGURE 7
Computer cable
to projector
Connecting a Computer
:$ % $ $ +# $
! $ ! ! $
$ 2 ! $ " ! O) $$P ?>
1 9 ! # $ $ % $ 9 $$ :$ 2 9 ! # $ $ ! $$
$ NOTE: Many laptop computers
do not automatically turn on their
external video port when a secondary display device such as a
projector is connected. Refer to
your computer manual for the
computer cable
command that activates the exter-
USB mouse
nal video port. Activation commands for some laptop computers
FIGURE 8
Connecting the projector to a computer
Do you want to advance slides in a PowerPoint presentation using
the projector’s remote?
1 9 21 $ 21 $$ $ 21 #$ 21 ! ? # ! Do you want to play your computer’s audio on the projector?
1 9 ! # ! $ ! $$ $ 2 9 ! # ! $ ! + $
$ :$ 0% G ! % :$ ! O9% 9:$ P are listed in the Appendix of this
manual on page 47 and in the
Service section of our website.
NOTE: The USB mouse is supported for use with
Windows 98, Windows ME,
Windows 2000, and Apple OS 8.5
and higher only.
NOTE: You do not need to restart
your computer after connecting a
USB mouse to use it (it is hot-pluggable).
7
S
e
t
t
i
n
g
u
p
t
h
e
P
r
o
j
e
c
t
o
r
Connecting a Video Device
1 +# ! ! $ !
$$ G ! ! $ ! ! ! $ ! $ ! % :$ F +# ! ! # ! $
NOTE: HDTV sources are
connected to the projector using
the computer cable. See the
previous pages for details.
$ G ! ! $ !! !
$ ! ! ! ! $ ! I O) $$P ?>J
2 9 $ ! $G % $$ O ! P $$ ! I' <J $$ ! O P
F +# G ! $ $$ O !
P $$ ! I' J
3 9 % $$ $ ! $
$ :$ F +# G ! ! # $ O !P $$ :$ I' J
audio
adapter
composite video
cable
audio cable
FIGURE 9
Connecting the projector to a video player using the standard video cable (with composite video connector) and the audio cable and adapter
8
audio
adapter
S-video
cable
audio cable
FIGURE 10
Connecting the projector to a video player using an S-video cable and the audio cable
and adapter
4 9 ! ! G % $$ # O!
P $$ ! 9 ! G !
$$ O! P $$ !
I' < ! ' J
5 9 ! ! G ! ! $
6 9 ! $ O! P $$ :$ :$ $ % : !$ !
!!6 0 0 ??- 93 93 930 93> !
, + $ !: E #$ #
$ !
NOTE: The audio adapter is provided so that the same audio cable
used to connect a computer can
be used with the adapter to connect a video device.
CAUTION: Your video player
may also have a “Video Out” connector for a coaxial cable connection. DO NOT use this to connect
to the projector.
9
S
e
t
t
i
n
g
u
p
t
h
e
P
r
o
j
e
c
t
o
r
Using the optional enhanced connectivity module
NOTE: If you have turned Auto
Source off (page 31), you may
need to press the source button on
the keypad more than once to
! $$ :$ :$ G $
$$ ! ! $ # :$ $ $$ :$ ! !% * !
# # ! $ !
! ##
display an active source. The
sources switch in this order:
PC 1-Analog, PC 1-Digital,
PC 2-VESA, Video 3-Component,
Video 1 S-Video, and Video 2Composite.
FIGURE 11
Connecting the optional connectivity module to the projector
computer 1-M1
computer
audio in
component
video
wired remote
composite
computer 2-VESA computer
S-video
audio in
audio in video
(for all video sources)
FIGURE 12
Connector panel on optional enhanced connectivity module
10
RS-232
monitor
! ! #% != ! 6
Source
Video
Audio
5,
5, !! (B1 IH8&J
:$
8
8 !!
! :$
5!
1! $
! I(J
3# ! I (J
5!
1! $ ! I(J
3# ! I (J
5!
! C= I? $$
J
3# ! I (J
! ! %! I! % J I! ! ! $ G % :$ $J
! ( - I $ :$ # 38 $ J
11
S
e
t
t
i
n
g
u
p
t
h
e
P
r
o
j
e
c
t
o
r
Powering up the Projector
1 ( $
NOTE: Always use the power cord
that shipped with the projector.
2 9 % $! ! # :$ $ $ $ ! % $!!
F 3,8 # :$ I' @ J
3 power ! F ! % ! 3,8
% # % E 7 E
$ 3,8 ! ! $ 4 +# $$ ! ! F ! ! ! :$ $ +#
!G source ! video ! ! C $ $ !# $ ! %$ $
:$ * # ! % # $ !K O8# $P -
F 2 volume !:
5 $ ' 7!% <;6
a # $$ $ $ :$ $ $E :$ O% !
%P ! !! 0% H!% 7E! '%
$ 7E! ! $$
! I%$ % ! % 7!% J
12
$ 0* O$ # ! P $ !
$$ 0* 2$$ $$! * $$ 0* 7!% $ $ ! +# ! ! !
! 7!% 8
7 7!% #! ! ! $
0* 13
S
e
t
t
i
n
g
u
p
t
h
e
P
r
o
j
e
c
t
o
r
$ ' % $ NOTE: The USB mouse is
supported for use with Windows
98, Windows ME, Windows 2000,
and Apple OS 8.5 and higher only.
Windows NT is not supported.
b +# $$ ! 21 $ I @J !! 0%
H!% 7E! 8 !
21 #$ 7E! $! # ! $ 21 8 $ $! 21 H
+ #$ 8 $ I# !J ! ! 21 H + #$ 8 $ I# J "!
! $ ! 7!% !
7!% 8
' 7!%
! 7!% ,6
a 21 ! $ !
' $ $ $ ) <6
a 21 ! # $ $
!
14
6 $ ! ! :$ $
+# !G source ! data
! $ G G * ! $ !K O9 ! 3 $ P ?@ # ! F +# $ !: :$ G $ menu/select ! $ 8 + ' # -
NOTE: With some computers,
the order in which you power up
the equipment is very important.
Most computers should be turned
on last, after all other peripherals
have been turned on. Refer to your
computer’s documentation to
determine the correct order.
Turning Off the Projector
+# % ## :$ # ! # standby ! $ # ## :$ IC
$ $ # :$ !
!K - # ! J # & * ! ! standby I+ $! # :$ $ # %
! :$ J # ! !
!
## :$ power ## ! 3,8 # % # $
$ 7 $! 3,8
! # 2 % $! $
% ## :$ NOTE: Lamp life will be extended
if you turn the power off, then wait
1 minute while the lamp cools
before unplugging the projector.
The Lamp LED will light green
when the lamp has cooled.
15
S
16
e
t
t
i
n
g
u
p
t
h
e
P
r
o
j
e
c
t
o
r
USING THE PROJECTOR
$ !$ % ! !: :$ + ! #$ ! ! ! # $ Basic Image Adjustment
1 %! " ! I J
2 +# !G ! $ E I @J !: # :$ I ;J $ !: E $ I <J 1 :$ < ! $
3 +# # #$ #$ I @J
4 +# $ !G !: $ $ I ?J
Adjusting the Projector
#$ #$ I' -J $ E E !: E C $ E # zoom ring
NOTE: To obtain the best overall
focus quality, open the menu and
focus on the text. This will ensure
that the best overall image quality
is achieved.
focus ring
FIGURE 13
Focus ring and zoom ring
17
U
s
i
n
g
t
h
e
P
r
o
j
e
c
t
o
r
:$ "! % #$ "$ # ! :$ 6
1 9 ! ! I' ?J
2 ( :$ % $ # elevator button
(under finger)
elevator foot
FIGURE 14
Adjusting the height of the projector
3 +# $ !: # :$ ! FIGURE 15
Turning the leveling knob
18
Using the Remote Control
#%! ! $%! ! $ ! 9%9 $$ 21 $$
$ $ $ @ # ! 9 $ :$ $ # $ # :$ I $ J # & # +# :$ $ ! $ $ ! $ :$ " & # ' !$ :$ POWER
MENU/
SELECT
ZOOM -
ZOOM +
FORWARD
BACKWARD
ZOOM MODE
KEYSTONE STANDBY
DATA
VIDEO
FIGURE 16
Remote control
19
U
s
i
n
g
t
h
e
P
r
o
j
e
c
t
o
r
Using the Keypad and Remote Buttons
7 !! $ ! !
! $ O2 )$ P - # ! POWER
LED
POWER
MENU/
SELECT
ZOOM -
ZOOM +
MENU
SOURCE
FORWARD
BACKWARD
VOLUME -
VOLUME +
ZOOM MODE
KEYSTONE STANDBY
DATA
VIDEO
STANDBY
FIGURE 17
Keypad and remote buttons
NOTE: If you have turned Auto
Source off (page 31), you may
need to press the source button
more than once to display an
active source. The sources switch
in this order: PC 1-Analog,
PC 1-Digital, Video 1 S-Video, and
Video 2-Composite.
Menu/select
9 menu/select $ 9
menu/select I% ,* !J $ I $ $ # - $! # !J 7 $ :$ $ ! ' # $
-
Mouse buttons (keypad only)
2 E ! OQ !P # ! Source (keypad only) or Data and Video (remote only)
7 $ I$ ! !J $
$ ! :$ $ % source ! data video 20
Keystone + - (remote only)
2 # !: $ ! "
1 9 keystone + !$ # ! keystone - !$ %
C $ !: # 8 I
? # ! J
increasing keystone
decreasing keystone
FIGURE 18
Adjusting the keystone
Forward/back buttons (remote only)
$ ! !% $ G ! C $ ! $ ! % 9%9 L # $$ 21 $$ $ $ $ @ # ! Up/down/left/right arrow buttons (remote only)
2 ! !: $ O2 )$ P - # ! Power button
! ## # ! !% ! 21
U
s
i
n
g
t
h
e
P
r
o
j
e
c
t
o
r
Zoom mode
$ E # 7 E $ % $ # $ 9
zoom + E # zoom - E 7 E! $
=!%=# = % ! !##
# E! I J 9 zoom mode
* ! ! E
C $ Q ! + !
E ! ! % ! ; # ! Zoom +/-
% E ! # Standby
7 standby ! ! ! ## ! $ !! # & C $ $ # :$ ! !K -
# ! 3,8 % :$ !
F +# standby % & :$ ! 3,8 $
# F +# !G standby ## # &
3,8 ! # % :$ $ !% :$ ## ! 3,8
! Volume (keypad only)
$ volume +. !$ volume -.
22
Using the On-Screen Menus
:$ % !: ! $ # !: G
!$ # !
$ menu/select ! I $ $ # >
$! # !J ! ! $ $ ! ! ! ! !: I %
3,8 ! !$ $J
9 $! $ !
!% % $ ! !
NOTE: Some menu items may be
grayed out (dimmed) at certain
times. This indicates the item is
not applicable to your setup or the
item is not enabled until another
selection is made.
FIGURE 19
Main menu
$ ! !% % $ ! !% % $
I $ ! !J menu/select 7
$ ! !! ! !$ # $ 2 # ! % !: ! ## 9 menu/select %
! 9 ! !% % 7 $ ! !: ,* menu/select C ! # 9 menu/select * 23
U
s
i
n
g
t
h
e
P
r
o
j
e
c
t
o
r
Display Menu
$$ 8 menu/select ! !% % 8
menu/select $$ 8 FIGURE 20
Display menu
Keystone
" # :$
$! 2 # !: $
! " # ! !: 1 9 !% D menu/select 2 # ! % !: 9 menu/select $$ $
Brightness
!: $ # 1 2 ! !% % 1 menu/select % !: menu/select $$ $
24
Contrast
$ $ ! # !##$ % ! ! # $ !: $ $
# $ ! % 1 2 ! !% % menu/select % !: $ menu/select $$ $
Tint
!: ! $ $ :$ !
1 2 ! !% % menu/select % !: menu/select $$ $
NOTE: The color setting applies
to video sources only. The tint setting applies to NTSC video sources
only.
Color
$ !: ! # $ ! % # ! $
1 2 ! !% % menu/select % !: $ menu/select $$ $
Sharpness
!: # ! 1 2 ! !% % menu/select % $$ # !# ! !! ! ! menu/
select $$ $ Blank screen
1 $ ! % $ !! % $ $ ! % :$ !
1 2 ! !% % 1 $ menu/select % $$ $ ! % menu/select $$ $
25
U
s
i
n
g
t
h
e
P
r
o
j
e
c
t
o
r
Audio Menu
FIGURE 21
Display menu
Volume
C $ !: !$ # :$ G !
1 2 ! !% % 5 menu/select % !: menu/select $$ $
Mute
!
1 2 ! !% % menu/select # % ! ##
I ! !$ # J menu/select
$$ $
26
Image Menu
$$ + menu/select ! !% % + menu/select $$ + FIGURE 22
Image menu for computer sources
Resize
Resize % $ # # !## E
!# Standard %$ E # # !! ?*- $ $ Widescreen Letterbox >*< $ # $! ?*- $ $
! # Enhanced Widescreen $ # ! !! ! % $ ,$! #
7!$ 5 ! ! 7!$
3 * Native ! % E
H Resize menu/select # %
$$ menu/select $ 27
U
s
i
n
g
t
h
e
P
r
o
j
e
c
t
o
r
Zoom
% E ! % H Zoom menu/select # %
E ! menu/select ,* E # E $ % $ 2 E !
# E 2 ! ! E! *
E ! # ## + zoom mode Auto Image
:$ $ !: $ $E
! $ ! E # $ +#
% !: # ##
Auto image # H Auto image menu/select # % # ## ! Manual Sync
NOTE: The Manual Sync,
Manual Tracking, Horizontal
Position and Vertical Position
options are available only for
analog computer sources. The
projector sets these options
automatically for digital computer
:$ !: $E $ #
$ 1 # :$ ! $ #EE
! Auto image ## $ +# ! !: $E 6
1 + ##
2 H $ menu/select, % !: $ ! # #
menu/select
and video sources, with no manual
override.
Manual Tracking
:$ !: $ $ $ !
# $ H% # ! % $! #EE $ # :$ ! %!
% # $ Auto Image ## $
+# ! !: $ 6
1 ##
2 H $ menu/select, %
!: $ #EE $ menu/select
28
Horizontal Position
'% !: E 6
1 ##
2 H HE menu/select, % !: HE menu/select
9 !: ! % ## :$
Vertical Position
'% !: $ 1 ##
2 H 5 $ menu/select, %
!: 5 $ menu/select
9 !: ! % ## :$
Overscan (video sources only)
$ ! # ! ! $ #
! $ Video Standard (video sources only)
7 5! :$ $ ! !! I0 0 ??- 93 93 930 93 >
,J $ ! $ I ! !! !! # %!J +# :$ ! $ $$ !! $ O P +# $ ! !!
H Video standard menu/select # % $$ menu/select $ 29
U
s
i
n
g
t
h
e
P
r
o
j
e
c
t
o
r
Color Management Menu
FIGURE 23
Color Management menu
Degamma
% $ $#$
! # $ ! # H Degamma menu/select # % $$ menu/select $ Auto Color Gain
7 # ) :$ $ !
! $ # $ $ 7 ## $ !: $ Red, Green, Blue
!: $ 6
1 B ##
2 H (! B 1 menu/select, % !: menu/select
! # $ $
30
Control Menu
$$ menu/select ! !% % menu/select $$ FIGURE 24
Control menu
Auto Source
7 # ) :$ $ #! $ $ $$ !# $ # 7 # )## :$ !# $ $ ! 8#
$ ! $ $ source ! data video
H Auto source menu/select # % # ## ! Default Source
! %$ $ :$ $$ # # $ ! ! % $ 9 9 8 5! 5! ! 5! I 9 5, !
5! - % $$ !
J
H Default source menu/select # % $$ menu/select $ Standby Time
$ % ! $ !! % :$ !
! # :$ ## $ & & !
- ! ! $$ # %
! $$ 31
U
s
i
n
g
t
h
e
P
r
o
j
e
c
t
o
r
Advanced Menu
FIGURE 25
Advanced menu
Rear Project
7 Rear Project :$ $ :$ # ! $ $
H Rear Project menu/select # % # ## ! Ceiling Project
7 Ceiling Project :$ ! !% # $ ! :$ H 9:$ menu/select # % # ## ! Low Power
% ! ## % # * ! # %
# ! :$ " Display Messages
% ) ! )## 7 # )
$ O0 ! $ !P O !
$ P % $ # $
32
Display Startup Screen
% ) ! )## 7 # )
$ % :$ !
$ $ ! $ ! 7 ## $ $ !! ! # $
Reset
H ( menu/select I*$ 3 5! !! ! (
9:$ ! ! J Language Menu
FIGURE 26
Language menu
C $ ! $ , '$ B
9 D
1 9 menu/select ! % 3 menu/select $$ 3 2 9 % !! menu/select 9 menu/select * !
33
U
s
i
n
g
t
h
e
P
r
o
j
e
c
t
o
r
Status Menu
! # # !
# menu/select
FIGURE 27
Status menu
Lamp Hours Used
+!$ % $ $ E ! $ $ ($ % $$ O($ 9:$ 3P -& # ! Computer Resolution (computer sources only)
% $ G $ $ G 9 ! !: 8 $ G G ! # ! Video Format (video sources only)
% ! # !!
Source
+!$ $ $ 9 9 8 5! 5! ! 5! I 9 5, ! 5! -
% $$ !J
Software Version
+!$ :$ G # % # # % $ $ $$ 34
MAINTENANCE & TROUBLESHOOTING
$ !$ % 6
F$ F$ :$ F$ :$ # $
F$ F $ $ # F :$ Cleaning the Lens
'% $ :$ 6
1 $ $ # ! $ F ! *$ # $ ! !G
$ !$ F $ $$ $ $ 2 3 % $ $ $$
3 +# !G ! :$ ! $
$
Replacing the Projection Lamp
$ $ #
# <; # O 3P $ %
:$ ! % *
# % C $ !
% ! # !
'% $ :$ 6
1 ## :$ ! % $!
WARNING: To avoid burns,
allow the projector to cool for at
least 30 minutes before you open
the lamp module door. Never
extract the lamp module while the
projector is operating.
2 7 - % :$ $ 35
M
a
i
n
t
e
n
a
n
c
e
&
T
r
o
u
b
l
e
s
h
o
o
t
i
n
g
3 + :$ # # #$ !
! %! $ I' ;J % ! ! $ $ # :$ 3# ! WARNING: Be extremely careful
when removing the lamp module.
In the unlikely event that the bulb
ruptures, small glass fragments
may be generated. The lamp
module is designed to contain
these fragments, but use caution
when removing the lamp module.
FIGURE 28
Removing the lamp door
CAUTION: Never operate the
4 3 % $% ! # ! I' <J
projector with the lamp door open
or removed. This disrupts the air
flow and causes the projector to
overheat.
FIGURE 29
Loosening the screws on the lamp module
36
5 3# ! % ! # ! I'
- J 8 # ! FIGURE 30
Removing the lamp module
6 + % ! $$
WARNING: Do not drop the
7 9 ! # % $ # :$ lamp module or touch the glass
8 $% ! # !
cause injury.
bulb! The glass may shatter and
9 ($ ! ! :$ ! !
$ % ! ! $ $ # :$ +# ! !
# ! ! !
10 9 % $! ! power :$ $ 11 $ %!% ! ! volume - source I% ! !% volume - J # & $!
5# $ % % $ %!%
37
M
a
i
n
t
e
n
a
n
c
e
&
T
r
o
u
b
l
e
s
h
o
o
t
i
n
g
Cleaning the Projection Lamp Filter Screens
+ ! ! ! # $ ! $ $ $! $ ! ! $ $ # ( $ ! !
! # $ % !
# *E # % $
$ & 1 ( ! (# O($ 9:$ 3P -& # $ 2 ,* ! # $ $ ! # !
+# $ $! $! $ $ $ % !! $
% $ $ # R %! $ $
$! $! % % $ screen
screen
FIGURE 31
Lamp module screens
3 1# $ $! $! $ :$ 4 ($ ! !
38
Replacing the Batteries in the Remote Control
# # !! % # ! % # % $ $! $
% ! !$! # '% $ 6
1 #$ !% !
2 9 ! %! # ! # ! ##
3 ( ! ! ! # 4 + % % $ $$ !$ 5 + ! ! !
Using the Security Lock
:$ $ $$ # % 9 B!
3$ I' - J O) $$P ?> # ! # (# # $ % $ # $ % $ :$ FIGURE 32
Installing the security lock
39
M
a
i
n
t
e
n
a
n
c
e
&
T
r
o
u
b
l
e
s
h
o
o
t
i
n
g
Troubleshooting
Problem: The projector is not running
F % $! $$ ! #
#$ $ $ % $!
$$ ! :$ F+# :$ ! % % ! F :$ ! Problem: Projector is running, but nothing appears on projection screen
F ! $ :$ # # :$ F$ :$ G $ $
$ ! ! ! ! # $ ## O($ 9:$ 3P -&
Problem: Only the start-up screen displays
F5# $ $$ ! $$ @
; # $$ $!
F $ ! F5# $ $$ ! O$
I! J 8 ! 5! I JP FC ! ## ! % " ! (# $
G !$ ! $$ !
F G * ! ! O9 ! 3 $ P ?@ $ G # ! F $ G ! ! ! ! $
#! $$ F $ $ ! ! :$ G B ,B $ 40
+# G 7!% <;6
1 ) O P $ 9 #! !
8 $
2 $ 3 5# 8 ; *
? Problem: Color or text not being projected
FC ! !: !% * (# O1 P ? # #
Problem: The screen resolution is not right
F $ G ! $! # #
; * ?
Problem: Image isn’t centered on the screen
F :$ F( (# OHE 9 P < ! O5 $ 9 P <
F1 :$ < ! $
Problem: Image is too wide or narrow for screen
F!: E :$ $ F!:
; *
# ! $! # G ?
Problem: Image is out of focus
F :$ #$ F :$ $ & # I& J #
:$ F$ :$ # ! $
Problem: Image and menus are reversed left to right
F( :$ ! ! ( 9:$
## ! ! #%! :$ O( 9:$ P - 41
M
a
i
n
t
e
n
a
n
c
e
&
T
r
o
u
b
l
e
s
h
o
o
t
i
n
g
Problem: the projector displays vertical lines, “bleeding” or
spots
F!: O1 P ?
F$ :$ # ! $
Problem: no sound
F!: F ## O P >
F5# != $$ F!: ! $
Problem: Image is “noisy” or streaked
!
1 8$ $ $ 2 Auto Image ## ! $ O +P ;
3 Auto Image ## ! !: $E ! $
#! O $P
; ! O $P ;
F $! % $ G ! $! +#
$$ !## $ Problem: Projected colors don’t match the computer or video
player’s colors
F !##$ ! # !## # !##$ % $ ! :$ ! !: !=
$ # 8 O1 P ?
O P & ! O P &
Problem: Lamp seems to be getting dimmer
F % #
($ !$! O($ 9:$ 3P -&
42
Problem: Lamp shuts off
F % $ ## 2
:$ % $ F $!
F # $ ## # 1# $ ! # $ #% # 6
F :$ G I$ ! J
F # $ 43
M
44
a
i
n
t
e
n
a
n
c
e
&
T
r
o
u
b
l
e
s
h
o
o
t
i
n
g
APPENDIX
Specifications
:$ ! ! ! % ! ! $#!
Temperature
Operating
50 to 104° F (10 to 40° C) at sea level
50 to 95° F (10 to 35° C) at 10,000 feet
Non-operating
-4 to 158° F (-20 to 70° C)
Altitude
Operating
Non-operating
0 to 10,000 feet (3,048 meters)
0 to 20,000 feet (6,096 meters)
Humidity
Operating and non-oper.
10% to 95% relative humidity, non-condensing
Dimensions
10.25 x 3.34 x 11 inches (26 x 8.5 x 28 cm)
with module 10.25 x 3.34 x 12 inches (26 x 8.5 x 30.5 cm)
Weight
5.7 lbs. (2.6 kg) unpacked
with module 6.5 lbs. (2.9 kg)
Optics
Focus Range
5 - 16 feet (1.5-5 m)
Lamp
Type
270-watt SHP lamp
Input Power Requirements
100-120VAC 5A;50/60Hz
200-240VAC 3A; 50Hz
45
A
p
p
e
n
d
i
x
Accessories
Standard Accessories
(ship with the projector)
Quick Start card
User’s Guide
Soft Case
Shipping Box
Analog Computer Cable 6 ft (1.8 m)
Composite Video Cable 6 ft (1.8 m)
Computer Audio Cable 6 ft (1.8 m)
Audio Adapter (RCA to 3.5mm)
Remote
Projection Lamp Module (included in projector)
Lens Cap
Macintosh Adapter
NOTE: Use only Toshibaapproved accessories. Other
products have not been tested with
the projector.
Power Cords (one ships with projector, type depends on country)
North American Power Cord
Australian Power Cord
UK Power Cord
European Power Cord
Danish Power Cord
Swiss Power Cord
Optional Accessories
Enhanced Connectivity Module
ATA Case
Deluxe Carry Case
Deluxe Travel Case
Digital Computer Cable with USB
Ceiling Mount
PC Guardian Projector Cable Lock
46
Portable and Laptop Activation Chart
$ ! $ * ! % :$ $$ ! $ $
! # $ ! #%
I+# $ ! $! !
% # $ G !$ # $!J ) $ #$ ! % $ # *
* (=38
Key command to
de-activate port
NOTE: Usually, pressing the key
Computer
Key command to
activate port
Toshiba* **
Ctrl-Alt-End
Ctrl-Alt-Home
external video port, pressing it
FN-End
FN-Home
again activates both the external
FN-F5
FN-F5
and internal ports, and pressing it
setup screen option
setup screen option
a third time activates the internal
Acer
Ctrl-Alt-Esc (for setup)
Ctrl-Alt-Esc (for setup)
AST* **
FN-D or Ctrl-D
FN-D or Ctrl-D
Ctrl-FN-D
Ctrl-FN-D
FN-F5
FN-F5
type from A:/IVGA/CRT
type from A:/IVGA/CRT
FN-F12
FN-F12
AMS
FN-F2
FN-F2
AMT
setup screen
setup screen
AT&T
FN-F3
FN-F6
FN-F3
FN-F6
Advanced Logic
Research
Ctrl-Alt-V
Ctrl-Alt-V
Altima
Shift-Ctrl-Alt-C
Shift-Ctrl-Alt-L
setup VGA/
Conf.Simulscan
setup VGA/
Conf.Simulscan
FN-F12
FN-F12
FN-F5
FN-F5
F2/Choose Option/F5
F2/Choose Option/F5
setup menu
setup menu
Shift-Ctrl-D
Shift-Ctrl-D
Ambra**
Amrel* **
Apple
see Mac Portable and Mac PowerBook
Aspen
automatic
automatic
commands once activates the
port. Refer to your computer’s documentation for details on your specific model.
47
A
p
p
e
n
d
i
x
Computer
Key command to
activate port
Key command to
de-activate port
Award
FN-F6
FN-F6
BCC*
automatic
reboot computer
Bondwell
LCD or CRT options after
bootup
reboot for LCD or CRT
options to appear
Chaplet**
setup screen
setup screen
FN-F6
FN-F6
FN-F4
FN-F4
Chembook
FN-F6
FN-F6
Commax
Ctrl-Alt-#6
Ctrl-Alt-#5
Compaq* **
Compuadd* **
Ctrl-Alt->
FN-F4
automatic
automatic
mode/? (for setup option)
mode/? (for setup option)
automatic
automatic
Alt-F for screen setup
option
Alt-F for screen setup
option
Data General
Ctrl-Alt-Command
Ctrl-Alt-Command
Data General
Walkabout
2 CRT/X at DOS prompt
reboot
Datavue
Ctrl-Shift-M
Ctrl-Shift-M
DEC**
FN-F5
FN-F5
FN-F4
FN-F4
Dell**
Ctrl-Alt-<
Ctrl-Alt->
Ctrl-Alt-F10
Ctrl-Alt-F10
FN-F8 (CRT/LCD)
FN-F8
FN-D
FN-D
FN-F12
FN-F12
automatic
reboot
FN-F2
FN-F2
Dolch
dip switch to CRT
dip switch to LCD
Epson
dip switch to CRT
dip switch to LCD
Everex*
setup screen option
setup screen option
For-A
Ctrl-Alt-Shift-C
Ctrl-Shift-Alt-L
Fujitsu
FN-F10
Digital*
48
Ctrl-Alt-<
FN-F4
Key command to
activate port
Key command to
de-activate port
Gateway
FN-F3
FN-F1/FN-F1 again simultaneous
FN-F3
FN-F1
Grid* **
FN-F2, choose auto or
simultaneous
FN-F2
Ctrl-Alt-Tab
Ctrl-Alt-Tab
Hitachi
FN-F7
FN-F7
Honeywell
FN-F10
FN-F10
Hyundai
setup screen option
setup screen option
IBM 970*
automatic
warm reboot
reboot, enter setup menu
FN-F2
Computer
IBM ThinkPad**
FN-F7, select choice from
setup menu
FN-F1, select choice
FN-F5, select choice
PS/2 SC select choice
(CRT, LCD, etc.)
Infotel
FN-F12
FN-F12
Kaypro
boot up, monitor plugged
in
unplug monitor
Kris Tech
FN-F8
FN-F8
Leading Edge
FN-T
FN-T
Mac Portable
100
no video port: not compatible
Mac PowerBook
140, 145, 150,
170
no video port: requires a 3rd-party interface
160, 165, 180,
520, 540, 5300
Control Panel folder,
PowerBook Display
folder; Activate Video
Mirroring
210, 230, 250,
270, 280, 2300
requires Apple Docking Station or Mini Dock
Magitronic
FN-F4
warm reboot
FN-F4
Mastersport
FN-F2
FN-F1
Micro Express*
automatic
warm reboot
49
A
p
p
e
n
d
i
x
Computer
Key command to
activate port
Key command to
de-activate port
Micron
FN-F2
FN-F2
Microslate*
automatic
warm reboot
Mitsubishi
SW2 On-Off-Off-Off
SW2 Off-On-On-On
NCR
setup screen option
setup screen option
NEC* **
setup screen option
setup screen option
CRT at the DOS prompt
LCD at the DOS prompt
Olivetti*
Packard Bell* **
FN-F3
automatic
FN-O/*
FN-O/*
FN-F0
FN-F0
Ctrl-Alt-<
Ctrl-Alt->
Panasonic
FN-F2
FN-F2
Prostar
Ctrl-Alt-S at bootup
Ctrl-Alt-S at bootup
Samsung*
setup screen option
setup screen option
Sanyo
setup screen option
setup screen option
Sharp
dip switch to CRT
dip switch to LCD
Sun SPARCDataview
Ctrl-Shift-M
Ctrl-Shift-M
Tandy**
Ctrl-Alt-Insert
Ctrl-Alt-Insert
setup screen option
setup screen option
Tangent
FN-F5
FN-F5
Texas Instruments*
setup screen option
setup screen option
Top-Link* **
setup screen option
setup screen option
FN-F6
FN-F6
Ctrl-Alt-End
Ctrl-Alt-Home
Toshiba* **
Twinhead*
50
FN-F3
automatic
FN-End
FN-Home
FN-F5
FN-F5
setup screen option
setup screen option
FN-F7
FN-F7
FN-F5
FN-F5
Automatic
Automatic
Computer
Key command to
activate port
Key command to
de-activate port
WinBook
Ctrl-Alt-F10
Ctrl-Alt-F10
Wyse
software driven
software driven
Zenith**
FN-F10
FN-F10
FN-F2
FN-F2
FN-F1
FN-F1
Ctrl-Shift-D
FN-F1
Ctrl-Shift-D
FN-F1
Zeos**
* These manufacturers have models that automatically send video
to the external CRT port when some type of display device is
attached.
** These manufacturers offer more than one key command depending on the computer model.
51
A
p
p
e
n
d
i
x
Using Video Mirroring with a PowerBook Computer
7 ! I$! $ % 9%
1S %J :$ ! #
9%1G $ 7
! ## :$ $ !
! # # 6
1 ) $ K $$ 2 # $ % 3 ) $$ $
4 $ O 5! )P
0% $ ! ! ## # % $ 7 ! ! $ $ $ ! % :$ ! $$ $
! % +# # #% 6
1 ## ! 2 ) $ 3 % :$ 4 ( 9%1
Using SimulScan
% 9%1 ! * :$ !## 7 $ :$ ! # 9%1
$ $6
1 ) 9 !$$ !
!
2 + ( $ $ ! $$
)D
3 +# $ ! ! * $ )D $# $
52
Projected Image Size
NOTE: Use the graph and table
Diagonal Image Size (inches)
200
to help you determine projected
150
maximum image size
image sizes.
100
50
0
minimum image size
5
10
15
20
25
Distance to Screen (feet)
FIGURE 33
Projected image size
Distance to screen
Diagonal
Screen Size
(inches)
60
72
84
90
100
Image Width
(inches)
48
58
67
72
80
Maximum
distance
(feet)
8.5
10.2
11.9
12.7
14.1
Minimum
Distance
(feet)
6.9
8.3
9.7
10.4
11.6
53
A
54
p
p
e
n
d
i
x
INDEX
C
$
! @
A
$ ! ;
$$ ! ?>
$ $ > @
$ $! # $
! ?>
?@
!! 0% H!% 7E! !: % ?>
! ;
$ ! ?>
?
$ :$ -
$ &
$ ; <
$ -
$ # $ -;
$ $ :$ -&
&
# :$ ;
?
&
! $! 9:$ 8 8 $ -3% 9% ( :$ ( --
$ 8 $ !: &
$
!G $ $ ?
!! ?
$ +1$ $ $
! ! ?&
$ ! ;
$ $$ $ ! $ $$ @
! >
5 >
$ $$ @
$$ ! $ @
$ -
$ @
;
% $! $ -
@
21 @
B
!: ?
!
=$
9% $
!
5
! ! $ ;
$$ $! $ !: &
$ -
8# $ -
! -
55
I
n
d
e
x
D
! - ?
8# $ -
E & &-
8 -
! ?
8 %! % ?
1 $ &
1 ?
E @
+ &
+ ;
&
HE 9 <
D ?
$ ;
&
$ ;
) $ <
&
8 -
(E @
8 $ --
5 9 <
! $ 5! !! <
! Q ;
! E
=# ;
$! $$ ! F
#$ @
K
!
L
#%!=$ $ # $ -;
#EE ;
! ?>
$ -&
## *$ ! ?-
H
H85 ; &
!: ;
$ -? -& -@
3 - $ # --
I
+1$ $ $ $ "$ %
$! ! ?@
!: @
$ @
$ <
$ !G $ $ G ?
#$ @
#EE ;
?
$ ! ?
!! ?
# #$ ?
" ?T?
56
$$ @
3,8
$ ?>
$ -&
% % ! -
M
R
8 $ $ >
:$ -
$ $ $ $ ! $ 9%9 !
! ?
% @ $ $$ @
$ $ % @
:$ ! $ !G $
$ -<
?
<
$ :$ ! -&
$$ @
$
>
<
!: --
N
0 ! <
$ -@
E @
O
$ $ # -! $ <
( - $ S
# ! $ $ -< ?>
&
P
93 ! <
9% % $!
$$ ! ?>
% "$ & ?
9%9 ! ! $ % @ :$ # ! $ :$ # $ -
$ % 9%1 &
$ $#$ ?&
! &
! -
-?
! $$ ;
T
$$ # !
# $ ? ?&
?
* ?
!: &
?
## :$ &
:$ 57
I
n
d
e
x
U
21 $$ @
! V
$ !! ; ?
5, $$ ! 9%1 &
! E <
! !! <
5 !: W
%!$ ! @
Z
Q !
E @
58
;