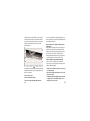
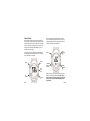
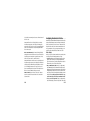
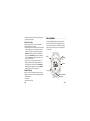
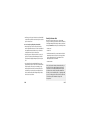
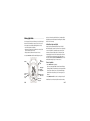
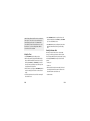
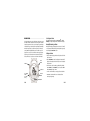
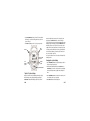
1
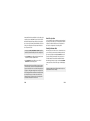
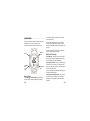
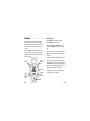
Button Functions
WARNING:
It is your responsibility to use the Bodylink® Performance
Monitor in a safe manner and to maintain full awareness of
conditions and surroundings at all times. Consulting the
Bodylink® Performance Monitor while moving is unsafe and
could result in collision or other accident causing damage and
personal injury to yourself and others. The watch contains
memory functions that should be used to record your speed
and distance data for later review.
INDIGLO
DISPLAY
Press to view
performance
data.
SET/FORMAT
Hold to set.
Press to change
display format in
Chrono.
English
117-095000 W-125 NA
page 1-i
Français
page 2-i
Español
página 3-i
Português
página 4-i
MODE
Press and
release to go
to the next
MODE.
STOP/RESET
Press and HOLD
to RESET
START/SPLIT
Start Chrono.
Take a split.
Viewing Performance Data in Chrono Mode
HRM
ONLY
HEART RATE
SPLIT
LAP
HEART RATE
LAP
SPLIT
HEART RATE
SPLIT
LAP NUMBER
Configure Mode
HEART RATE
LAP
LAP NUMBER
Ķ
WATCH
SETTINGS
S&D
ONLY
LAP
PACE
DISTANCE
SPLIT
PACE
DISTANCE
LAP
AVG PACE
DISTANCE
SPLIT
AVG PACE
DISTANCE
SPLIT
AVG SPEED
DISTANCE
LAP
AVG SPEED
DISTANCE
SPLIT
SPEED
DISTANCE
LAP
SPEED
DISTANCE
LENGTH
UNITS
Ä
¶
HRM &
S&D
HEART RATE
PACE
DISTANCE
HEART RATE
AVG PACE
DISTANCE
HEART RATE
SPEED
DISTANCE
HEART RATE
AVG SPEED
DISTANCE
HEART RATE
SPLIT
DISTANCE
HEART RATE
SPEED
LAP
HEART RATE
PACE
LAP
HEART RATE
SPEED
SPLIT
HEART RATE
PACE
SPLIT
HEART RATE
LAP
DISTANCE
Push and release DISPLAY until you see data you want.
+=MILES/KM/NM
ZONE
SETTINGS
+=OFF/
SELECT
PACE
SMOOTHING
AUTO-STOP
+=ON/OFF
+=ON/OFF
Ä
¶
BUTTON
BEEP
HOURLY
CHIME
AUTO-START
+=ON/OFF
+=ON/OFF
+=ON/OFF
SPEED
SMOOTHING
ZONE
SETTINGS
+=AUDIBLE/
NO ALRT/
SILENT
BY TIME/
BY DIST
Ä
¶
HRM
SETTINGS
SELECT
AUTO-SPLIT
+=ON/OFF
Ķ
S+D
SETTINGS
SELECT
SELECT
NIGHT
MODE
Ķ
HANDS-FREE
SETTINGS
+=ON/OFF
DISTANCE
ALERT SETTING
+=ON/OFF
Press START/SPLIT (+) to change the “Quick Set” option indicated in the bubble for each of the options above.
Ä
¶
MAX
HR
+=SELECT ZONE
CONTENTS
INTRODUCTION . . . . . . . . . . . . . . . . . . . . . . . . . . . . . . . . . . 1-1
HOW THIS MANUAL IS ARRANGED . . . . . . . . . . . . . . . . . 1-1
WELCOME . . . . . . . . . . . . . . . . . . . . . . . . . . . . . . . . . . . . 1-2
RESOURCES ON THE INTERNET . . . . . . . . . . . . . . . . . . . . 1-8
MEET YOUR NEW TRAINING PARTNER . . . . . . . . . . . . . . . 1-9
THE MODES . . . . . . . . . . . . . . . . . . . . . . . . . . . . . . . . . . . 1-9
THE DISPLAY . . . . . . . . . . . . . . . . . . . . . . . . . . . . . . . . . . 1-11
BUTTON FUNCTIONS . . . . . . . . . . . . . . . . . . . . . . . . . . . 1-12
STARTING THE BODYLINK® SYSTEM . . . . . . . . . . . . . . . 1-14
VIEWING PERFORMANCE DATA . . . . . . . . . . . . . . . . . . . 1-15
BODYLINK® INFORMATIONAL AND ERROR MESSAGES . 1-16
CONFIGURING THE WATCH FOR FIRST USE . . . . . . . . . . 1-19
BASIC SETTINGS . . . . . . . . . . . . . . . . . . . . . . . . . . . . . . . 1-19
TARGET ZONE SETTINGS . . . . . . . . . . . . . . . . . . . . . . . . 1-20
ADVANCED SETTINGS . . . . . . . . . . . . . . . . . . . . . . . . . . 1-20
TIME OF DAY MODE . . . . . . . . . . . . . . . . . . . . . . . . . . . . . 1-21
TIME ZONES . . . . . . . . . . . . . . . . . . . . . . . . . . . . . . . . . . 1-22
1-i
SETTING THE TIME OF DAY . . . . . . . . . . . . . . . . . . . . . . 1-22
VIEWING PERFORMANCE DATA . . . . . . . . . . . . . . . . . . . 1-25
CHRONOGRAPH MODE . . . . . . . . . . . . . . . . . . . . . . . . . . 1-26
A NOTE ABOUT LAPS AND SPLITS . . . . . . . . . . . . . . . . . 1-27
CHRONO OPERATION . . . . . . . . . . . . . . . . . . . . . . . . . . . 1-27
HANDS-FREE OPERATION . . . . . . . . . . . . . . . . . . . . . . . 1-29
VIEWING PERFORMANCE DATA . . . . . . . . . . . . . . . . . . . 1-29
LAP DATA MODE . . . . . . . . . . . . . . . . . . . . . . . . . . . . . . . . 1-30
MODE OPERATION . . . . . . . . . . . . . . . . . . . . . . . . . . . . . 1-30
DATA STORED FOR EACH LAP . . . . . . . . . . . . . . . . . . . . 1-31
SUMMARY MODE . . . . . . . . . . . . . . . . . . . . . . . . . . . . . . . 1-32
MODE OPERATION . . . . . . . . . . . . . . . . . . . . . . . . . . . . . 1-33
WHAT DATA IS STORED? . . . . . . . . . . . . . . . . . . . . . . . . 1-33
TIMER MODE . . . . . . . . . . . . . . . . . . . . . . . . . . . . . . . . . . . 1-36
TIMER OPERATION . . . . . . . . . . . . . . . . . . . . . . . . . . . . . 1-37
SETTING THE TIMER . . . . . . . . . . . . . . . . . . . . . . . . . . . . 1-38
VIEWING PERFORMANCE DATA . . . . . . . . . . . . . . . . . . . 1-39
ALARM MODE . . . . . . . . . . . . . . . . . . . . . . . . . . . . . . . . . . 1-40
SELECTING AN ALARM . . . . . . . . . . . . . . . . . . . . . . . . . . 1-41
ARMING/DISARMING AN ALARM . . . . . . . . . . . . . . . . . . 1-41
SETTING AN ALARM . . . . . . . . . . . . . . . . . . . . . . . . . . . . 1-41
1-ii
CONFIGURE MODE . . . . . . . . . . . . . . . . . . . . . . . . . . . . . . 1-43
NAVIGATING THROUGH THE OPTIONS . . . . . . . . . . . . . . 1-43
“QUICK-SET” OPTION SETTINGS . . . . . . . . . . . . . . . . . . . 1-44
CHANGING THE OPTION SETTINGS . . . . . . . . . . . . . . . . 1-45
OPTION DESCRIPTIONS . . . . . . . . . . . . . . . . . . . . . . . . . 1-46
HRM Settings . . . . . . . . . . . . . . . . . . . . . . . . . . . . . . 1-46
Heart Rate Target Zone . . . . . . . . . . . . . . . . . . . 1-46
Max HR (HRMAX ) . . . . . . . . . . . . . . . . . . . . . . . . . . 1-48
S + D Settings . . . . . . . . . . . . . . . . . . . . . . . . . . . . . . 1-48
Speed/Pace Zone . . . . . . . . . . . . . . . . . . . . . . . . 1-49
Distance Alert . . . . . . . . . . . . . . . . . . . . . . . . . . 1-51
Speed and Pace Smoothing . . . . . . . . . . . . . . . 1-52
HANDS-FREE SETTINGS . . . . . . . . . . . . . . . . . . . . . . . . . 1-52
Auto-Start and -Stop . . . . . . . . . . . . . . . . . . . . . . . . 1-52
Auto-Split . . . . . . . . . . . . . . . . . . . . . . . . . . . . . . . . . 1-53
WATCH SETTINGS . . . . . . . . . . . . . . . . . . . . . . . . . . . . . . 1-54
Night Mode . . . . . . . . . . . . . . . . . . . . . . . . . . . . . . . 1-54
Hourly Chime . . . . . . . . . . . . . . . . . . . . . . . . . . . . . . 1-54
Button Beep . . . . . . . . . . . . . . . . . . . . . . . . . . . . . . . 1-54
Length Units . . . . . . . . . . . . . . . . . . . . . . . . . . . . . . . 1-54
CHANGING THE BATTERY . . . . . . . . . . . . . . . . . . . . . . . . 1-55
COMMON QUESTIONS . . . . . . . . . . . . . . . . . . . . . . . . . . . 1-57
1-iii
Introduction
How This Manual Is Arranged
We’ve divided the manual into five major sections:
1. This Introduction section.
2. “Meet Your New Training Partner” (page 9), where you will find
a general introduction to the watch, the modes and some
common operating procedures for things like setting and
working with the Bodylink® sensor data.
3. “Configuring the Watch for First Use” (page 19) is the section
that describes how to set up the most important watch
options so you’ll get the most benefit from the watch before
you go out for your first workout.
4. Next, you’ll find the mode description sections, one for each of
the modes in the watch. Here you will find detailed information
about all aspects of each mode.
5. Last, we’ve included a list of Common Questions (page 57) to
help you solve any problems you may encounter with the
Bodylink® system.
1-1
Welcome
The Timex® Bodylink® System offers athletes and fitness enthusiasts the unprecedented ability to track, store and analyze several
key indicators of personal performance. Using the very latest in
digital technology, the Bodylink® System is comprised of a network of up to four devices† worn on the body that act together as
a single information and sport monitoring system.
Bodylink® Performance Monitor†
Digital Heart Rate Sensor†
Speed + Distance Sensor†
Data Recorder†
†
Device(s) enclosed or available separately at www.timex.com.
Bodylink® Performance Monitor
This sport watch is the essential link to the Bodylink® System by
providing real-time workout data. It teams with the Digital Heart
Rate Sensor or the Speed + Distance Sensor, or it can function
simultaneously with both devices to provide comprehensive performance feedback.
Digital Heart Rate Sensor
As the world leader in sport timing devices, Timex has created a
Heart Rate Sensor that offers the digital transmission accuracy
1-2
required by world-class athletes with functions that anyone can
use to stay “fit for life.”
Always consult your physician before beginning or modifying
any exercise program.
Speed + Distance Sensor
Utilizing signals from the system of 24 GPS satellites, the Timex®
Speed + Distance Sensor accurately sends data to the watch to
continuously calculate your speed, pace and distance. As part of
the Bodylink® System, you can now have the performance information at your fingertips to answer the all-important questions,
“How far? How fast?”
Data Recorder
The Timex® Data Recorder functions as the ultimate training log by
collecting precise information from your Heart Rate Sensor, Speed
+ Distance Sensor, or both devices at the same time. Data can be
later downloaded to your PC, through the simple USB connection,
and teamed with Timex® Trainer software to chart your progress.
Timex Takes the Guesswork Out of Fitness
Improved fitness and athletic performance are as simple as setting
a realistic fitness objective and using the Timex® Digital Heart
Rate Sensor as a personal trainer.
1-3
Here is how it works.
First, Select a Fitness Objective That’s Right for You
• Improve Your Fitness
• Lose Weight and Burn Fat
• Increase Stamina and Aerobic Endurance
• Improve Your Fitness Condition
• Achieve Peak Athletic Performance
Second, Select a Heart Rate Exercise Zone That’s Right for You
Heart Rate Zone Exercise is the methodology widely used by fitness
and sports training professionals for achieving the above fitness
objectives. Once set, this Digital Heart Rate Monitor can automatically show you when you are in the Exercise Zone you choose,
and signal when you are not. It functions as a personal trainer to
help keep your body exercising at an intensity level that can help
you achieve your desired Fitness Objective without over- or underexercising.
Guidelines for Selecting Your Heart Rate Exercise Zone
There are five basic heart rate exercise zones. Simply select a
zone that is the fitness goal you want to achieve during a particular exercise. When you begin your exercise, always start out at a
lower zone and allow your body to warm up and prepare to work
in your target exercise zones. For example, you can “warm up” in
1-4
the Light Exercise zone, spend the majority of your exercise in the
Weight Management zone, and then even spend a bit of time in
the Aerobic Base Building Zone. The intensity of Zones 4 and 5 is
demanding enough that exercise in these zones should be done
for limited intervals of a workout and with the guidance of a qualified medical or coaching professional.
FIVE HEART RATE FITNESS ZONES
Intensity Level
(% Maximum
heart rate)
Zone
Ideal For
Benefit Desired
1
Light
Exercise
Maintain Healthy
Heart/Get Fit
50%-60%
2
Weight
Management
Lose Weight/
Burn Fat
60%-70%
3
Aerobic Base
Building
Increase Stamina
Aerobic Endurance
70%-80%
4
Optimal
Conditioning
Maintain Excellent
Fitness Condition
80%-90%
5
Elite Athlete
Maintain Superb
Athletic Condition
90%-100%
For example, if you want to Lose Weight/Burn Fat: do your favorite
exercise at 60%-70% of your maximum heart rate for at least 30
minutes a day, three times a week. The Target Heart Rate Zone
Chart (next page) illustrates the different Target Zone values using
an age-based method (220 minus your age).
1-5
Select which level of condition represents your current physical
condition and locate the Lower and Upper Heart Rate Zones for
your age from the Target Heart Rate Zone chart. See Target Zone
Settings to select the desired Target Zone on your Timex®
Performance Monitor.
You are ready for higher levels of physical activity when you can
work out for this amount of time and heart rate without breathing
hard and with minimal soreness.
Why Heart Zone Exercise is Widely Used by Fitness/Sports
Training Experts.
Regular exercise can help keep the heart, lungs and muscles “in
shape.” The heart supplies the lungs and muscles with the oxygenated blood supply needed to exercise. Heart Rate represents
the effects of exercise on all parts of the body. Heart Zone
Exercise systematically conditions the heart, lungs, and muscles
to perform at higher levels so the body can stay in shape.
Optimal Conditioning is Simply a Higher Training Habit
You do not have to be an athlete to get into optimal shape.
Anyone at any age can do this by using cross training to optimal
condition. Follow these guidelines:
The latest findings on fitness show anyone at any age can get fit/
stay fit without being fanatic. For the “moderate” exerciser, staying fit can be as simple as:
• Exercise 3 Times a Week
• Exercise 30-45 Minutes Each Time
• Exercise in Your Appropriate Target Heart Rate Zone
1-6
• Pick the exercise activities you enjoy or the ones you need
for a training program.
• Train at the appropriate Target Heart Rate for 30 to 60 minutes 3-4 times a week.
• You will approach optimal condition when you can sustain
a complete exercise session without “burnout” or excessive fatigue or excessive soreness.
1-7
Your Timex® Digital Heart Rate Sensor is Your Electronic
Fitness Coach.
You can walk, run, bike, use exercise machines, or do any aerobic
exercise with the Timex® Digital Heart Rate Sensor. The key to
achieving and maintaining your desired Fitness Objective is to
exercise in your Ideal Heart Rate Zone.
Resources on the Internet
The Timex web site (www.timex.com) is an excellent source of
information to help you get more out of your Timex® Bodylink®
System purchase. Other resources to check on the Timex site
include:
www.timex.com/bodylink/
For more information on the Timex® Bodylink® System, including
product feature listings and simulations.
www.timex.com/software/
For releases and updates to software that work with Timex®
products.
www.timex.com/fitness/
For fitness and training tips using the Timex® Bodylink® System
and its Heart Rate and Speed + Distance sensors.
1-8
Meet Your New Training Partner
The Modes
First, you might want to take a spin through the modes to familiarize yourself with the different features present in your watch.
Press and release the MODE button to cycle through the watch
modes in the following order:
TIME OF DAY – This mode shows the current time of day and date
for one of two time zones. You can also view a limited set of performance data in the lower line, when using the Bodylink® sensors.
CHRONO – This is the main “workout” mode in the watch. Here
you can operate the Chronograph and monitor a full complement
of performance data when using your Bodylink® sensors.
LAP DATA – You’ll spend time here when you want to review the
laps taken in the Chronograph. In this mode you can view per-lap
speed, pace, distance and heart rate statistics.
SUMMARY – This is the mode that will enable you to view overall
and aggregate performance data, such as your overall average
heart rate, event time or overall average pace for example. You’ll
also find a resettable “Trip Odometer” in this mode for keeping
track of your distance traveled over long periods of time or across
multiple workouts.
1-9
TIMER – Use this mode if you need a countdown timer to time a
fixed event, such as a spinning workout. Performance data displays
are more limited in this mode than in the Chronograph.
ALARM – Timex has provided five alarms that can be configured
to sound every day, weekdays only, weekends only or one time
only (think “appointment reminder”).
CONFIGURE – The place to adjust settings for how the watch
responds to HRM and Speed + Distance data. Features such as
Heart Rate target zones, speed/pace alert settings and Chrono
hands-free features are set here.
The Display
Your Timex® Performance Monitor is capable of conveying a lot
of information at a glance while occupying only a small space on
your wrist. Here is a quick overview of what the symbols on the
watch display mean:
TIMER IS RUNNING
GPS BATTERY VOLTAGE IS LOW
(ARROW INDICATES
TIMER SET TO
REPEAT)
BODYLINK® SYSTEM IS ACTIVE,
FLASHES DURING DATA OUTAGES
CHRONO IS RUNNING
AT LEAST ONE ALARM IS ARMED,
FLASHES DURING BACKUP PERIOD
NIGHT-MODE IS ACTIVATED
HOURLY CHIME IS ENABLED
TIP: Press and hold the MODE button for 1.5 seconds to return
to Time of Day from any other mode.
1-10
1-11
Button Functions
Most of the time, the button functions correspond to the labels
that are painted on the case. However, there are situations where
the button functions have to change to enable you to set the Time
of Day, or configure your heart rate target zone. In situations like
these, the button’s new function will be indicated by an icon or
text visible on the watch display.
For example, here is how the buttons function while setting the
Time of Day. Notice how the functions of the buttons correspond
to the symbols visible on the display:
INDIGLO
Increase
(+)
Select
next
value
Done
setting
1-12
Decrease
(–)
Here is a second example of the button functions in Lap Data
mode. Here the buttons change their functions to enable you to
navigate through the stored lap data. Again, the new function of
each button is indicated on the watch display.
INDIGLO
Next
data value
(¶)
To next mode/
Hold to go to
Time of Day
Previous
data value
( Ä)
It isn’t necessary for you to remember the exact function of the
buttons in each mode; simply remember this: When a button
function changes from it’s normal operation, the watch will
remind you of the new functionality by displaying the new
button function.
1-13
Starting the Bodylink® System
When using the Performance Monitor, you can view real-time data
from a Heart Rate Sensor or Speed + Distance Sensor, or both, in
Time of Day, Chrono and Timer. The procedure to do this is the
same in all modes, though the data that you can view and their
position on the display in each mode will vary.
1. Make sure you’re wearing your Heart Rate Sensor or Speed +
Distance Sensor, or both, and that they are powered up and
functional.
2. Stand at least 6 feet (2 meters) away from any other users of
fitness monitor systems and from any source of radio interference such as electrical equipment, power lines, etc.
NOTE: Though the Bodylink® system has a working range of
about 3 feet (1 meter) from the sensors to the watch, for the
most reliable operation, make sure that the watch is as close to
the sensors as possible when starting the system up.
3. Press and release the DISPLAY button. This tells the watch to
look for any Bodylink® sensors nearby; it will search for one
minute. The antenna icon will appear on the watch display, indicating that the Bodylink® system is active.
1-14
NOTE: As a convenience, Chrono and Timer will automatically
search for Bodylink® sensors for fifteen seconds upon entering
the mode.
4. When the watch has successfully detected transmissions from
the sensors, the watch display will switch to a new format
showing some or all of the sensor data, depending on the
mode. Time of Day and Timer show the data in the lower line
exclusively, while Chrono allows up to three lines of performance data.
Viewing Performance Data
Press and release the DISPLAY button to select the data or combination of data that you wish to view during your workout. For
your convenience, a “banner” showing the names of the information and their position on the display is shown briefly before
showing the data itself.
Here are a few more things you should know to use the watch
effectively:
• While in the Chrono, press and release SET/FORMAT to swap
the positions of the information in the upper and middle display
lines. This allows you to view the data most important in the
larger middle display line.
1-15
• If you want to stop monitoring data from your Bodylink® sensors, hold the DISPLAY button down until the message HOLD
TO SHUT OFF RCVR is displayed on the watch display. Continue
holding the DISPLAY button for a few more seconds; the watch
will beep indicating that the radio link between the watch and
the sensors has been shut down.
TIP: If you are already viewing data from one sensor, for example, the Heart Rate Sensor, and you wish to also view data from
the Speed + Distance Sensor, simply press and hold the DISPLAY
button until the watch emits a short beep and the antenna icon
begins flashing. The watch is now searching for a second
Bodylink® sensor. When it detects this second device, the
antenna icon will stop flashing and the display may change to
a new format that includes the new information. Press and
release the DISPLAY button (as detailed previously) to view
various combinations of two sensor’s data.
Bodylink® Informational and Error Messages
When monitoring data from your Heart Rate or Speed + Distance
Sensors, the watch may display informational messages to communicate the status of the sensor device or of the radio link
between the watch and the sensors.
1-16
SEARCHING (Speed + Distance) – The Speed + Distance Sensor
has not yet detected enough GPS satellites to calculate your current position, speed and distance. You will not be able to view
speed, pace or distance information until the Speed + Distance
Sensor locks to a sufficient number of GPS satellites.
WEAK GPS SIGNAL (Speed + Distance) – The Speed + Distance
Sensor has lost its link with the GPS satellites. This message will
appear when the Sensor no longer has a clear view of the sky,
such as under a dense forest canopy or inside a building; move
to a more open area as soon as you can.
NOTE: Both the Sensor and the watch employ techniques to
maintain reasonable distance accuracy during these periods
when GPS tracking is temporarily lost or when the radio link is
temporarily interrupted.
NO DATA FROM HRM (GPS) – The watch is not receiving data
from the indicated Sensor. Ensure that the Sensor is not more
than 3 ft. (1 m) away from the watch and that it is powered up
and functional.
The watch will attempt to “find” the Sensor after this message
has been displayed. It is possible that the watch may inadvertently lock to another sensor nearby and not necessarily yours; there-
1-17
fore, if possible, move away from other users of Timex® Sensors if
this error occurs.
The watch will search for the “missing” device for one minute
after this message appears on the display. See “Viewing Performance Data” on page 14 for the procedure on reestablishing a link
to this Sensor if the watch does not automatically find it within
the one minute period.
NOISY DATA FROM HRM (GPS) – The watch is having difficulty
receiving data from the indicated sensor due to radio interference.
If possible, try to move away from any potential sources of interference such as TVs, monitors or motorized devices.
The watch will continue to track the Sensor for about thirty seconds
after this message has appeared on the display; if the interference
condition persists, the watch will stop tracking data from the Sensor. See “Viewing Performance Data” on page 14 for the procedure on reestablishing a link to this Sensor if the interference condition is not corrected within the thirty second period.
FATAL GPS ERROR (Speed + Distance) – The Speed + Distance
Sensor has encountered a severe internal error. Contact Timex
Customer Service.
1-18
Configuring the Watch for First Use
Now that you’ve become familiar with the layout and functions of the
buttons, as well as the way the modes are arranged on the watch, it
is time to set the watch up for use. There are a few essential settings that must be made, such as time and maximum heart rate.
Then, you may want to set up your target zones. Finally, you can
explore the more advanced features the watch has to offer.
Basic settings
Before you use your Performance Monitor during a workout, make
sure that you’ve set the following parameters correctly:
1. Set the Time of Day. For detailed setting instructions, refer to
page 22 of this manual. If you are using this watch with the
Speed + Distance Sensor, your time settings will be corrected to
follow UTC time, and corrected for drift over time.
2. Enter you Maximum Heart Rate (HRMAX). Go to Configure Mode,
select “HRM Settings” and then “Max HR.” This setting is used to
determine your five preset heart rate target zones. If you need help
navigating through Configure mode, refer to the section for that
mode on page 43. There are many methods to estimate your maximum heart rate. One widely used age-based method is 220 – age;
use this formula if you don’t know your maximum heart rate.
3. Select your desired length units. Again, in Configure Mode,
select “Watch Settings,” then select “Length Units.” This setting
1-19
determines how distance and pace values and settings are displayed throughout the watch.
Target Zone Settings
Use target zones to keep your heart rate and speed within a
defined set of limits during your workout.
• Heart Rate Target Zone. Go to Configure Mode, and select “HRM
Settings.” You will then see your current target zone and alert
settings. You can quickly select a target zone by pressing the
START/SPLIT (+) button (see “Quick-Set” Option Settings” on
page 19). Press SET/FORMAT (SELECT) to enter the setting procedure to set MANUAL zone limits (if desired) and to change
the out-of-zone alert settings.
• Speed/Pace Zone. Go to Configure Mode, and select “S + D
Settings.” As with the heart rate settings, you will see the current settings for your Speed/Pace Zone. Press SET/FORMAT
(SELECT) to begin the setting procedure, or press START/SPLIT
(+) quickly change the out-of-zone alert setting.
Advanced Settings
Refer to the section for “Configure Mode” starting on page 43 for
explanations of these more advanced Performance Monitor features:
• Hands-Free Features
• Distance Alert
• Speed and Pace Smoothing
1-20
Time of Day Mode
Your Timex® watch will display time, date and day of week for
two time zones. Each time zone is kept synchronized to highly
accurate UTC time (also known as Greenwich Mean Time) when
you use the Speed + Distance Sensor and can be displayed in 12or 24-hour format.
INDIGLO
View
performance
data
Hold to set
To Chrono
Peek to secondary time/
Hold to switch
1-21
Time Zones
This watch has two independent groups of time settings, which
we refer to as “zones.” The one that is visible on the display is
called the primary zone; the one you can’t see is called the secondary zone. You may “peek” at your secondary zone by pressing
and briefly holding the START/SPLIT button while in Time of Day.
If you release the button, you return to your primary time zone display; continue to hold the button down and you will swap settings,
making the secondary zone the new primary zone and vice versa.
The time zone settings on the watch are identified as T1 and T2
during peeking.
Setting the Time of Day
SETTING TIME OF DAY MANUALLY
NOTE: To set the secondary time zone, you must make it the
primary zone by holding the START/SPLIT button until the two
zones are swapped. After setting, repeat this step to return to
your original time zone, if desired.
1. Press and hold SET/FORMAT until SET TIME appears on the display and the hours value starts flashing.
1-22
2. Press DISPLAY (+) to increase or STOP/RESET (–) to decrease
the value. If the watch is in 12-hour format be sure to set the
AM/PM indication correctly.
3. Press SET/FORMAT (SELECT) to select (in order) minutes, year,
month, date and 12- or 24-hour format. In each case, press DISPLAY (+) to increase or STOP/RESET (–) to decrease the value.
4. Press MODE (DONE) to save your changes and return to the
Time of Day display.
Note that the seconds value is not adjustable and the day of the
week is automatically calculated based on the date.
UTC TIME SYNCHRONIZATION
When receiving GPS data from the Speed + Distance Sensor, the
watch will automatically correct the time for both time zones
based on the time information from the GPS satellites.
• The first time you use the Speed + Distance Sensor, both time
zone values will be synchronized to UTC time. You may then
adjust the time for your local time zone.
• If you had set the watch before using the Speed + Distance
Sensor for the first time, your hour and date settings are
maintained, and only the minute and seconds values are set
to UTC time.
1-23
• Each time you use the Speed + Distance Sensor, the watch will
correct itself for any drift from UTC time since you last used the
Speed + Distance Sensor.
Here are a few tips regarding time synchronization:
• When using the Speed + Distance Sensor, the time on the
watch is updated when the Sensor locks onto the satellites and
then every fifteen minutes thereafter as long as the watch is
receiving data from the Speed + Distance Sensor.
• The primary purpose of Time Synchronization is to correct for
any drift or inaccuracy in the watch timekeeping – it will not
adjust the watch for Daylight Savings Time, if observed in your
area.
• Once the watch has been synchronized with UTC, you may
adjust the watch “ahead” or “behind” the correct time and still
keep the benefits of drift correction. For example, you may
want to adjust the time so that it is 10 minutes ahead of the
actual time in your area. No problem – manually set the time
ahead 10 minutes and the watch will stay exactly 10 minutes
ahead of the correct local time.
1-24
Viewing Performance Data
When using the Speed + Distance Sensor or the Heart Rate
Sensor, you can monitor your performance data in the bottom line
of the display. Viewing this data is simply a matter of pressing and
releasing the DISPLAY button until you see the data that you want:
• Current Speed
• Current Pace
• Overall Distance traveled for your current workout. This data is
somewhat dependent on the state of the Chronograph. Please
see the complete description for “Overall Distance” in the
Summary Mode section of this manual.
• Current Heart Rate
TIP: If you don’t want to view any performance data at all, you
may elect to “hide” these data and view the day of the week
instead; this selection is always available when selecting the
performance data to view. This setting will be maintained the
next time you use the Bodylink® system, so it might appear that
you are not receiving any sensor data since the day of the week
is still visible. Keep this in mind when electing to view
the day of week.
1-25
Chronograph Mode
The Chronograph (Chrono) mode allows you to record the elapsed
time and other information for an event, up to 100 hours. Up to
100 laps may be stored, with the following data for each lap:
• Lap number, lap time, and split time
• Average speed, average pace, and distance for each lap (if the
Speed + Distance Sensor is in use)
• Average heart rate (if the Heart Rate Sensor is in use)
You can press MODE to switch the watch display to any other
INDIGLO
View
performance
data
Swap upper
& middle
display lines
To Lap Data/
Hold to
go to Time
of Day
1-26
Stop Chrono/
Hold to reset
Start Chrono/
Take a split
mode, such as Time of Day, while the Chrono is running without
disrupting its operation. The stopwatch icon will appear to indicate
that the Chrono is running.
A Note About Laps and Splits
Throughout this section we will talk about “laps” and “splits.”
When describing time, “lap time” is the time for one segment (lap)
of an event. “Split time” is the total time since the start of the
event. We use the term “taking a split” and “taking a lap” interchangeably; they both refer to the action that causes the Chrono
to stop timing the current segment and start timing a new one.
This can be done manually (with the START/SPLIT button) or automatically (when using the Speed + Distance sensor).
Chrono Operation
1. Press START/SPLIT to begin timing.
If you are not using any Bodylink® sensors, the watch displays
lap time, split time, and lap number. If you are using a Heart-Rate
Sensor, Speed + Distance Sensor, or both, the watch displays
information from those devices, such as heart rate, pace, and
distance.
2. Press START/SPLIT while the Chrono is running to take a split.
This will store the current lap and split data and start a new lap.
1-27
The watch will show the lap and split time for the lap that you just
completed. If you are viewing HRM or Speed + Distance data, the
watch will then display the average statistics for the lap (depending on the data you are viewing). The watch will then return to the
running Chrono timing the current lap. The watch will store the
last 100 laps worth of data.
TIP: You may press MODE, SET/FORMAT, or DISPLAY at any time to
cancel the lap hold and immediately return to the running Chrono.
3. Press STOP/RESET to stop timing. The display shows the data
for the final lap and split, if splits were taken.
4. Press START/SPLIT to resume timing, or press and hold
STOP/RESET to reset the display to zero.
NOTE: When using the Chrono with either the Speed + Distance
or Heart Rate Sensor, the Chrono time and lap information will
appear on the display for four seconds after starting, stopping or
resetting the Chronograph. During this time, the stopwatch icon
will be flashing, and all buttons will function normally. This feature
was included to allow you to view the Chrono data for these
timing actions even if you have selected to view only performance data (not time data) in the Chrono mode.
1-28
Hands-Free Operation
You can configure the Chrono to start when you start moving and
stop when you do. In addition, you can have splits taken automatically based on either the distance covered or elapsed time. See
the section for Configure mode for the setting details.
Viewing Performance Data
When using the Speed + Distance Sensor or the Heart Rate Sensor,
you can monitor your performance data. Viewing this data is simply a matter of pressing and releasing the DISPLAY button until
you see the data that you want. Refer to inside front cover for a
chart that shows the data combinations available in this mode.
When viewing performance data, press and release SET/FORMAT
to swap the positions of the data in the upper and middle display
line.
NOTE: Average data values and distance traveled are only accumulated while the Chrono is running.
1-29
Lap Data Mode
scan quickly to a particular lap; release the button to view the
data for that lap number.
Lap Data mode allows you to review stored lap information at any
time, whether the Chrono is running, stopped or reset.
All lap data is erased when the Chrono is started from reset.
INDIGLO
Next data
value
If you were using a Speed + Distance Sensor, or a Heart Rate
Sensor, each recalled lap will have three displays of data; the
lower line of each will always show the lap number (labeled “RCL”
for “Recall”).
If you were not using any of the sensors, each recalled lap will
consist of one display only (lap and split time).
Data Stored For Each Lap
Lap and Split Time – The first data stored are the lap and split
times for the lap. The lap time is displayed in the upper display
line and the split time is displayed in the middle line.
To Summary/
Hold to
go to Time
of Day
Previous data
value
Mode Operation
Press DISPLAY ( ¶ ) or STOP/RESET ( Ä) to navigate through the
lap data forward and backward, respectively. Hold the button to
1-30
Lap Average Speed and Pace – Next, you can view the average
speed and pace for the current lap, if you are using the Speed +
Distance Sensor. These values are based on the distance traveled
for the lap and the time for the lap.
If you are using the HRM only, you will still see this display, but no
performance data will be displayed.
Lap Average Heart Rate and Lap Distance – Last, the average
heart rate for the lap and the distance traveled for the lap are
displayed. If you are using the HRM only, the distance traveled
data is blank.
1-31
Summary Mode
Mode Operation
This mode displays a summary of all the aggregate performance
data recorded by the watch while the Chrono was running. This
mode will not show the data recorded for each lap; refer to the
section for Lap Data mode elsewhere in this manual.
Like the data in Lap Data mode, when the Chrono is started from
reset, all the data in Summary mode are cleared, with the exception of the Odometer data. This can only be cleared manually as
described in the following section.
VIEWING THE DATA
Press DISPLAY ( ¶ ) or STOP/RESET ( Ä) to navigate through the
summary data forward and backward, respectively. Hold the button
to scan quickly through the data; release the button to view the
specific data for that data group.
RESETTING THE ODOMETER
While viewing the Odometer value, press and hold START/SPLIT
to set this value back to 0.
What Data Is Stored?
INDIGLO
Next data
value
To Summary/
Hold to
go to Time
of Day
Previous data
value
NOTE: The data is not updated while it is being displayed.
Hold to clear
Odometer
1-32
The following data is available for review in Summary mode. Most
of these data rely on information from either the HRM or Speed +
Distance Sensor, so if you were not using either of these devices
in your workout, most of the displays in Summary mode will show
no interesting data.
Average Speed – The average speed while the Chrono was running,
computed by dividing distance traveled by the total Chrono time.
Maximum Speed – The largest velocity value received by the
watch while the Chrono was running.
1-33
Average Pace – The average pace calculated while the Chrono
was running. This value is simply the average speed expressed in
terms of minutes per unit distance.
Best Pace – This is the fastest (smallest) pace value calculated
while the Chrono was running.
Event Distance – The accumulated distance traveled while the
Chrono was running.
Overall Distance – The accumulated overall distance traveled,
irrespective of the state of the Chronograph. This distance total
will account for any distance you may travel when the Chrono is
stopped; the “Event Distance” value previously described will
ignore this distance information.
Odometer – This works like the trip odometer in your car. It will
accumulate distance, irrespective of Chrono usage, until you manually reset it. The odometer value is not cleared automatically
between workouts, as is the case with the other distance data, so
you can use this value to keep track of your total distance over a
period of a week, month, etc.
Average Heart Rate – The average heart rate calculated while
the Chrono is running.
Time in Zone – The amount of time that the displayed heart rate
was within your heart rate target zone. See the section for
1-34
Configure mode for detailed instructions for setting your target
heart rate zone.
Average Heart Rate in Zone – This is the average heart rate calculated only using the heart rate values that were within the limits
of your target heart rate zone. This data can give you an idea of
where your heart rate typically falls when working out in your
target zone.
Event Time – This is equivalent to the Chrono total time.
Overall Time – This is the total time that the watch has been
receiving Speed + Distance data, irrespective of the state of the
Chronograph. This data does not take HRM usage into account.
GPS Battery Level – This display is only accurate while the watch
is receiving data from the Speed + Distance Sensor. The voltage
level of the batteries is displayed in a bar graph format; when the
battery image is empty, the Speed + Distance Sensor’s batteries
are critically low. Consider changing the batteries when the bar
graph shows one remaining segment, as there should be at least
one hour of battery life left.
TIP: The watch will display a battery icon in the upper portion of
the watch display to remind you to replace the batteries in the
Speed + Distance Sensor.
1-35
Timer Mode
Timer Operation
Timer mode allows you to set a time from which the watch
counts down to zero, making this feature useful for fixed-time
events. The Timer can be set to stop, repeat the countdown continuously, or switch to Chrono mode at the completion of the
countdown.
You can press MODE to switch the watch display to any other
mode, such as Time of Day, while the Timer is running without disrupting its operation. The Timer icon will appear to indicate that
the Timer is operating.
INDIGLO
View
performance
data
Set Timer
To Alarm/
Hold to
go to Time
of Day
Stop Timer/
Reset, If
stopped
1. Press START/SPLIT to start the Timer counting down.
2. Press STOP/RESET to stop the countdown.
3. With the Timer stopped, press START/SPLIT to resume the
countdown or STOP/RESET to reset the Timer to the start
time.
4. When the timer reaches zero, it sounds an alert. The backlight
will also activate to allow you to see the watch in a darkened
environment.
• If the Timer was set to stop, it will be stopped after the alert.
• If the Timer was set to repeat, it resets to the start time and
immediately begins another countdown. It continues repeating
until STOP/RESET is pressed. The repeat count is displayed in
the lower line of the display. The watch will count up to 99 repetitions, after which it will rollover to 0 and continue.
• If the Timer was set to start the Chrono, the watch will automatically switch to the Chrono and start it.
Start Timer
1-36
1-37
NOTE: This feature will work only if the Chrono is reset when the
Timer reaches “0”. If the Chrono is not reset at that point, the
Timer will simply stop at the end of it’s countdown and the
Chrono will not be started. It is important, therefore, to check
that the Chrono is reset before starting the Timer with this
action at the end of the countdown.
5. Press SET/FORMAT (SELECT) once again to advance to the
ending action setting, then press DISPLAY (+) or STOP/RESET
(–) to choose STOP, REPEAT, or Chrono.
6. Press MODE (DONE) to save your settings and return to Timer.
Note that the Timer will be reset after you exit the setting
mode.
Viewing Performance Data
Setting the Timer
1. Press SET/FORMAT to begin the setting procedure.
2. After the setting reminder display, the watch will display the
Timer countdown time with the tens value of the hours digit
flashing. Press DISPLAY (+) or STOP/RESET (–) to increase or
decrease the value, respectively. You may hold the keys down
to quickly advance through the value.
3. When the value is set correctly, press SET/FORMAT (SELECT) to
move to the next digit, in this case the ones value of the hour
setting.
4. Continue through minutes and seconds in the same way until
the desired time is set.
1-38
When using the Speed + Distance Sensor or the Heart Rate
Sensor, you can monitor your performance data in the bottom
line on the display. Viewing this data is simply a matter of pressing
and releasing the DISPLAY button until you see the data that
you want:
• Current Speed
• Current Pace
• Distance traveled since the Timer was running. If the Timer is
not running, this value will not increase. The distance data is
cleared when the Timer is started from reset.
• Current Heart Rate
1-39
Alarm Mode
Selecting an Alarm
This mode allows you to set up to five alarms to alert you at a preset
time. When an alarm is ON, the alarm clock icon appears in the Time
of Day display. Alarms can be set to sound every day, on weekdays
or weekends only, or one time only (for an appointment, for example).
When the day and time of an alarm are reached, the alarm tone
sounds, INDIGLO® night-light flashes, and the alarm entry is displayed for 20 seconds. You can silence the alarm by pressing any
button. If you don’t silence the alarm before the alert finishes, a
backup alarm is set to produce one more alarm in five minutes.
INDIGLO
Next
Alarm
Push to set
When viewing an Alarm setting, press DISPLAY (¶ ) or STOP/
RESET (Ä) to navigate through the five different Alarm settings.
Arming/Disarming an Alarm
While an Alarm setting is displayed, it can be turned on (“armed”)
or off (“disarmed”) without entering the setting state by pressing
and releasing the START/SPLIT button.
Setting an Alarm
1. Select the Alarm setting you wish to modify as described in the
previous section.
2. Press SET/FORMAT to enter the setting state. The watch will
display a brief setting reminder and then proceed to setting the
selected Alarm.
3. The first data to set is the Alarm type, which will be flashing.
Press DISPLAY (+) or STOP/RESET (–) to choose either WEEKDAYS, WEEKENDS, ONCE, or DAILY:
• DAILY – The Alarm will occur every day at the selected time.
To Configure/
Hold to
go to Time
of Day
Previous
Alarm
• WEEKDAYS – The Alarm will occur at the selected time
Monday through Friday.
Alarm ON/OFF
1-40
1-41
• WEEKENDS – The Alarm will occur at the selected time on
Saturday and Sunday only.
Configure Mode
• ONCE – The Alarm will sound one time only, at the selected
time and then disarm itself.
Configure mode allows you to set a number of options that make
operations in the other modes easier and more useful. The settings in this mode are divided into four groups:
4. Press SET/FORMAT (SELECT) to begin setting the Alarm time,
starting with the hour value. Note that the AM/PM value is also
flashing (if the watch is set for 12-hour display format) and is
set concurrently with the hour value.
5. Press DISPLAY (+) or STOP/RESET (–) to set the hours, then
press SET/FORMAT (SELECT) to move to the tens of minutes and
minutes digits, setting them in the same way.
6. Press SET/FORMAT (SELECT) to set the alarm either ON or OFF.
7. Press MODE (DONE) to save your changes and exit the setting
state.
NOTE: If you changed any of the Alarm settings, the Alarm will
automatically arm itself.
• WATCH SETTINGS – Night-Mode, Hourly Chime, Button Beep
and Length Unit settings are in this group.
• HRM SETTINGS – Set up your heart rate target zone.
• S+D SETTINGS – Configure speed or pace smoothing, speed/
pace zone alerts and the distance alert feature.
• HANDS-FREE SETTINGS – Want the Chrono to start, stop and
take splits automatically when using the Speed + Distance
Sensor? This is where you’d go to configure that feature.
Navigating Through the Options
The options in this mode are arranged in a two-tier, menu-like
hierarchy. We’ve provided a map depicting the layout of the mode
on the inside back cover. Check it out if you want to see the relationship of all the parameters in the mode. Navigating through the
options is straightforward:
• Press DISPLAY ( ¶ ) or STOP/RESET ( Ä) to move to the next or
previous option display or group heading.
1-42
1-43
• Press SET/FORMAT (SELECT) to go “down” to the next level in
the hierarchy, or to enter the setting state for the option that
you are looking at.
• Press MODE (DONE) to go back “up” to the group selection.
INDIGLO
Next
option
Select this
item
Done
viewing
options
Previous
option
“Quick Set” function
“Quick-Set” Option Settings
Many of the options have a default setting that may be changed
without having to enter setting state simply by pressing the
START/SPLIT button while viewing the option. This “quick-set”
1-44
feature is indicated by the presence of the “+” symbol on the
display above the START/SPLIT button – when it is visible, a
“quick-set” feature is present. For example, in HRM settings, when
viewing the target zone setting, pressing the START/SPLIT button
will change the zone preset. “Quick-Set” is used only for option
settings that don’t need numeric data to be changed. If you need
to change your Auto-Split interval, for instance, you would have to
enter a set mode. However, you have the option to turn the feature on and off with a “quick-set.”
The “Quick-Set” feature for each of the options is indicated in the
following sections.
Changing the Option Settings
1. Press SET/FORMAT (SELECT) to begin the setting procedure for
the option that you have selected.
2. The first data value will begin flashing. Press DISPLAY (+) or
STOP/RESET (–) to increase or decrease the value, respectively.
You may hold the keys down to quickly advance through the
value.
3. Press SET/FORMAT (SELECT) to advance to the next value, and
so on, until the option is set to your liking.
4. Press MODE (DONE) to exit the setting state.
1-45
Option Descriptions
The preset zones are based on the following percentages of your
maximum heart rate (HR MAX ):
HRM SETTINGS
These settings allow you to set a target zone for your heart rate
and an out-of-zone alert when using the Heart Rate Sensor. You
may select from a set of 5 preset zones, or enter a manual upper
and lower limit value.
HEART RATE TARGET ZONE
Lower
Target Zone
Limit
Selected
Zone
Upper
Target Zone
Limit
Alert Type
QUICK SET: Target Zone selection.
You may select one of the five preset zones (based on your HR MAX )
or select MANUAL to set your upper and lower limits to any
desired value.
1-46
Zone 1 – 50% - 60% HR MAX
Zone 2 – 60% - 70 % HR MAX
Zone 3 – 70% - 80% HR MAX
Zone 4 – 80% - 90% HR MAX
Zone 5 – 90% - 100% HR MAX
NOTE: If you select a preset zone, the only other option you can
change is the alert type; the limit settings for the preset zones
cannot be changed. If you wish to enter specific target zone
limits, first select MANUAL as the target zone, and then set the
limits as desired.
NOTE: When setting the manual limits, the lower limit is the
value to the left of the separator and the upper limit is to the
right of it. If the limits are set to “nonsense” values (for example,
the lower limit is set higher than the higher limit), the watch will
change them to more logical values when you press DONE.
These corrections may yield unexpected results, so be sure to
double-check your settings when using the MANUAL limits.
1-47
TIP: The MANUAL settings are maintained independently of the
preset zones, so you can use them for certain workouts and use
a preset zone for others and not have to re-enter your manual
settings each time.
MAX HR (HRMAX )
QUICK SET: None
Enter your Maximum Heart Rate. This value is used to calculate
your five preset target zones.
TIP: You can determine your HRMAX either through controlled testing or by one of the various estimation methods available. One
widely-used age-based method is 220-age, though this method
yields results which may not be accurate since HRMAX depends on
many physiological factors such as fitness level and genetic makeup and not simply your age.
S + D Settings
These settings affect the watch’s response to data from the
Speed + Distance Sensor. Here, you may set speed or pace limits,
a distance alert and enable or disable smoothing for the speed
and pace information.
1-48
SPEED/PACE ZONE
QUICK SET: Alert type (NONE, SILENT, AUDIBLE)
The watch allows you to set speed or pace limits and set the
watch to warn you if you are moving too fast or too slowly; this is
analogous to the heart rate target zone but based on speed
instead.
NOTE: If the limits are displayed in terms of speed (i.e. 4 mph or
6 kph) then the watch is checking your current speed against
the zone limit settings. If the limits are displayed in terms of
pace (minutes and seconds) then the watch is checking your
current pace against the zone limit settings.
TIP: You can set the speed and pace limits independently. For
instance, you may set the pace limits to help you control your
speed for your run and set the speed limits to values that are
useful for cycling. Then you can simply switch between the settings when you do each event.
1-49
UNITS ARE IN
TERMS OF SPEED
Fastest Speed
UNITS ARE IN TERMS OF
TIME PER DISTANCE
Slowest Pace
DISTANCE ALERT
QUICK SET: Alert on/off
You can set the watch to alert you when you have traveled a specific
distance or multiples of that distance. For example, when this setting is set to “1 mile” the watch will sound an alert when you have
traveled one mile, and then again at two, three and four miles, etc.
NOTE: This feature is only enabled when using the Chronograph
as it uses the distance accumulated while the Chronograph is
running.
Alert Type
Slowest Speed
Alert Type
Fastest Pace
TIP: Use this feature to alert you when you’ve reached the
halfway point in your workout.
When changing the zone limits, the settings are in the following order:
• Zone type – Choose either SPEED or PACE.
• SLOWEST SPEED (or FASTEST PACE).
Alert Interval
• FASTEST SPEED (or SLOWEST PACE).
• Alert type – If your speed or pace fall outside of the limits you set,
the watch will produce either no alert (NO ALRT), an alert indication on the watch display (SILENT), or an alert tone (AUDIBLE).
1-50
Alert Setting
1-51
SPEED AND PACE SMOOTHING
QUICK SET: Smoothing On/Off
These settings determine if “smoothing” is applied to the displayed speed or pace values. Smoothing is useful if you feel that
the displayed speed or pace values appear to be too erratic or
“jittery”, though smoothing may cause the speed or pace values
to be slow to respond changes in your speed. Smoothing can be
applied separately to speed and pace – experiment with these
settings to see what combination works best for you.
AUTO-SPLIT
QUICK SET: By Distance/By Time/Off
This feature will enable the Chronograph to automatically take
splits based on time or distance traveled. While this feature is
enabled you may still take splits manually and manual splits will
not effect the criteria for automatic splits.
Auto-Split Type
Hands-Free Settings
These settings provide options for having the Chronograph automatically start, stop and take splits. These features are only functional when using the Timex Speed + Distance Sensor.
Interval
AUTO-START AND AUTO-STOP
QUICK SET: On/Off
These settings enable the Chronograph to start when you begin
moving (i.e. your velocity changes from zero to non-zero) and stop
when you stop moving (i.e. your velocity returns to zero).
While these features are enabled, you may still start and stop the
Chronograph manually.
1-52
When configuring the auto-split feature, the settings are in the
following order:
• Type – OFF, BY DIST or BY TIME
• Interval
1-53
Watch Settings
Changing the Battery
These settings provide various options for customizing the general
operation of the watch.
TO AVOID THE POSSIBILITY OF PERMANENTLY DAMAGING THE
WATCH, TIMEX STRONGLY RECOMMENDS TAKING YOUR WATCH
TO A RETAILER OR JEWELER TO HAVE THE BATTERY REPLACED.
NIGHT MODE
QUICK SET: On/Off
When enabled, the INDIGLO® night-light is turned on whenever
any button is pressed. NIGHT-MODE®
operation is automatically disabled after 8 hours.
HOURLY CHIME
QUICK SET: On/Off
When enabled, the watch will chime at the top of every hour.
BUTTON BEEP
QUICK SET: On/Off
When enabled, the watch will emit a beep whenever a button is
pressed.
LENGTH UNITS
QUICK SET: Miles/Kilometers (KM)/
Nautical Miles (NM)
You can select your preferred unit of distance for speed, pace and
distance values, either miles, kilometers, or nautical miles. This
setting also affects the displayed units for any options that process
speed, pace or distance data. This setting can be changed during
a workout and the speed, pace and distance statistical data will
be correct for the newly selected units.
1-54
If you choose to replace the battery yourself, check the back of
the Watch (caseback) for the specific battery type and size
required for your Watch. Carefully follow the steps below:
1. Place the watch face-down on a flat work surface.
2. Remove both halves of the watch band using a small flat screwdriver. Note the orientation of the caseback before proceeding;
it must be reinstalled in the same orientation or the buzzer
element will not function after reassembly.
3. Using a 00 Phillips-head screwdriver, remove the four screws
that secure the caseback and put them aside. Carefully remove
the caseback and set it aside.
DO NOT TURN THE WATCH OVER TO REMOVE THE SCREWS OR
CASEBACK – THERE ARE SMALL ELECTRICAL CONNECTORS
INSIDE THE WATCH THAT CAN FALL OUT. ALWAYS KEEP THE
WATCH FACE DOWN ON THE WORK SURFACE.
4. Carefully open the battery clamp and remove the battery.
5. Place a new battery cell in the battery compartment making
sure the side with the “+” marking is facing you.
6. Reattach the battery clamp.
1-55
7. Replace the caseback making sure that the black gasket
material is seated in the groove in the case. Also be sure that it
is aligned properly (as you noted in step #2) so that the buzzer
will line up with the internal connections.
8. Carefully reattach the straps. The shorter piece with the buckle
is attached to the upper set of lugs.
INDIGLO® night-light
electroluminescent
technology used in the INDIGLO® night-light illuminates
entire watch face at night and in low light conditions.
Water-Resistance
Your 50 Meter Water-Resistant watch withstands water pressure
up to 86 p.s.i. (equals immersion to 164 feet or 50 meters below
sea level).
WARNING: THIS UNIT WILL NOT DISPLAY SPEED AND DISTANCE OR
HEART RATE DATA WHEN OPERATED UNDER WATER.
WARNING: TO MAINTAIN WATER RESISTANCE, DO NOT PRESS ANY
BUTTONS UNDER WATER.
1. Watch is water-resistant only as long as lens, pushbuttons and
case remain intact.
2. Even though the watch may be water-resistant to a significant
depth (100 or 200 meters), it is not a diver watch and should
not be used for diving.
1-56
3. Timex recommends rinsing your watch with fresh water after
exposure to salt water.
Common Questions
Q: When using the Auto-Split “by distance” feature, sometimes the
distances for the splits are a little less than my setting (e.g.
“0.244 km” when the setting is “0.25 km”); how can this happen?
A: This is due to the way the watch uses current speed and distance to predict the actual split point in your run. Occasionally,
the watch will over-estimate, creating a slightly “longer” split
distance first, followed by a “short” split. This shorter split distance is required so that the watch can compensate for these
slight over-estimations and to prevent them from accumulating over the course of your workout.
So, for the example given here, the previous split should have
displayed a distance value slightly longer than the Auto-Split
setting of 0.25 km.
Q: Why won’t my Hands-Free or Distance Alert features work
when using just a Heart Rate Sensor?
A: These features rely on information provide by the Timex®
Speed + Distance Sensor.
Q: Why don’t I see any information for Overall Time or Distance
when using just a Heart Rate Sensor?
1-57
A: The Overall Time and Overall Distance data are based only on
data received from the Timex® Speed + Distance Sensor.
Q: I am already monitoring data from one Timex® sensor and I
want to also view data from a second one that I just turned
on. What do I do?
A: Press and hold the DISPLAY button for about two seconds
(you must be in Time of Day, Chrono or Timer modes). The
watch will beep and the antenna icon will flash, indicating that
the watch is searching for a second Timex® sensor. Within a
few seconds, the antenna icon should stop flashing and the
new data should appear on the watch face (you may have to
press and release DISPLAY to select the new data in Time of
Day or Timer modes).
Q: Occasionally I see “NO DATA FROM HRM” or “NO DATA FROM
GPS;” what do these messages mean?
A: These messages will appear on the watch display when the
watch is not receiving signals from the designated sensor.
Sometimes these messages pop-up when you might expect
them, such as a few seconds after you’ve shut your Speed +
Distance Sensor off, for example. Other times, you might see
them during your workout unexpectedly. In that case, the
most common causes of these messages are severe radio
interference or too much distance between the watch and the
sensor. Most of the time, the watch will correct the problem
1-58
Q:
A:
Q:
A:
itself, with no action on your part. However, if these messages
are becoming a problem, here are a few things to try:
• Keep the watch on the same arm as the Speed + Distance
Sensor.
• Check the batteries in the sensors. Low battery voltage will
reduce the radio transmission power.
• Reposition the sensor(s) closer to the watch, if possible.
• Move away from potential sources of interference.
When using the Heart Rate Monitor function, why do I sometimes see a flashing question mark or dash marks next to the
heart rate display?
These are indications that the Heart Rate Sensor is having difficulty calculating your heart rate. This may be due to:
• Poor or loose fit of the Sensor on your chest
• The Sensor being worn upside-down on your chest
• The conductive material on the underside of the Sensor is
not sufficiently moistened
How can I reduce the SEARCHING time?
The Speed + Distance Sensor will lock to the GPS satellites
more quickly if you keep motion during this period to a minimum, and stay in an open area. Also, avoid leaving the Sensor
on for long periods of time while indoors.
1-59
Q: How often is the GPS data calculated and updated?
A: The Speed + Distance Sensor calculates your velocity and distance traveled once per second, and transmits this information to the watch every 3.5 seconds.
INTERNATIONAL WARRANTY
(U.S. LIMITED WARRANTY)
Your watch is warranted against manufacturing defects by Timex
Corporation for a period of ONE YEAR from the original purchase
date. Timex and its worldwide affiliates will honor this
International Warranty.
Please note that Timex may, at its option, repair your watch by
installing new or thoroughly reconditioned and inspected components or replace it with an identical or similar model. IMPORTANT:
PLEASE NOTE THAT THIS WARRANTY DOES NOT COVER DEFECTS
OR DAMAGES TO YOUR PRODUCT:
1) after the warranty period expires;
2) if the product was not originally purchased from an authorized
retailer;
3) from repair services not performed by the manufacturer;
4) from accidents, tampering or abuse; and
5) Case, attachments or battery. You may be charged for replacing any of these parts.
1-60
THIS WARRANTY AND THE REMEDIES CONTAINED HEREIN ARE
EXCLUSIVE AND IN LIEU OF ALL OTHER WARRANTIES, EXPRESS OR
IMPLIED, INCLUDING ANY IMPLIED WARRANTY OF MERCHANTABILITY OR FITNESS FOR PARTICULAR PURPOSE. TIMEX IS NOT LIABLE
FOR ANY SPECIAL, INCIDENTAL OR CONSEQUENTIAL DAMAGES.
Some countries and states do not allow limitations on implied
warranties and do not allow exclusions or limitations on damages,
so these limitations may not apply to you. This warranty gives you
specific legal rights and you may also have other rights which vary
from country to country and state to state.
To obtain warranty service, please return your watch to the manufacturer, one of its affiliates or the retailer where the product was
purchased, together with a completed original Product Repair
Coupon or, in the U.S. and Canada only, the completed original
Product Repair Coupon or a written statement identifying your
name, address, telephone number and date and place of purchase.
Please include the following with your watch to cover postage and
handling (this is not a repair charge): a US$ 7.00 check or money
order in the U.S.; a CAN$6.00 cheque or money order in Canada;
and a UK£ 2.50 cheque or money order in the U.K. In other countries, you will be charged for postage and handling. NEVER
INCLUDE ANY ARTICLE OF PERSONAL VALUE IN YOUR SHIPMENT.
1-61
For the U.S., please call 1-800-328-2677 for additional warranty information. For Canada, call 1-800-263-0981. For Brazil, call 0800168787.
For Mexico, call 01-800-01-060-00. For Central America, the
Caribbean, Bermuda and the Bahamas, call (501) 370-5775 (U.S.).
For Asia, call 852-2815-0091. For the U.K., call 44 020 8687 9620.
For Portugal, call 351 212 946 017. For France, call 33 3 81 63 42 00.
For Germany, call +43 662 88 92130. For the Middle East and Africa,
call 971-4-310850. For other areas, please contact your local Timex
retailer or Timex distributor for warranty information.
TIMEX INTERNATIONAL WARRANTY — WATCH REPAIR COUPON
Service
If your watch should ever need servicing, send it to Timex as set
forth in the Timex International Warranty or addressed to:
HotLine Watch Service
P.O. Box 2740
Little Rock, AR 72203.
Street address:
HotLine Watch Service
1302 Pike Ave.
North Little Rock, AR 72114
(Name, address and telephone number)
For your convenience in obtaining factory service, participating
Timex retailers can provide you with a pre-addressed Watch
Repair Mailer. See the Timex International Warranty for specific
instructions on the care and service of your watch.
Place of Purchase:
For service questions, call 1-800-328-2677.
Original Purchase Date:
(Attach copy of sales receipt, if available)
Purchased by:
(Name and address)
Reason for Return:
Should you need a replacement strap or band, call
1-800-328-2677.
THIS IS YOUR WATCH REPAIR COUPON. PLEASE KEEP IT IN A SECURE PLACE.
1-62
1-63
FCC Notice (U.S.) / IC Notice (Canada)
Timex Corporation declares that the following products, which
include all components of the Timex® Bodylink® System, are
compliant to the relevant FCC Part 15 and Industry Canada rules
for Class B devices as follows:
Product Name:
Speed + Distance Sensor - GPS Transceiver Series M8xx/M5xx
Heart Rate Monitor Sensor – HRM Transmitter Series M8xx/M5xx
Product Type: Intentional Radiator
Model
FCC ID No.
IC Certification No.
M515 Heart Rate Monitor
EP9TMXM515
3348A-M515
M850 Speed + Distance Monitor
EP9TMXM850
3348A-12181
These devices comply with Part 15 of the FCC rules. Operation is
subject to the following two conditions: (1) The device may not
cause harmful interference, and (2) the device must accept any
interference received, including interference that may cause undesired operation.
1-64
Product Name:
Watch Receivers – HRM/Speed+Distance Series M8xx/M5xx
Data Recorders – HRM/Speed+Distance Series M5xx
Product Type: Unintentional Radiator
This equipment has been tested and found to comply with the
limits for a Class B digital device, pursuant to Part 15 of the FCC
rules. These limits are designed to provide reasonable protection
against harmful interference in a residential environment. This
equipment generates, uses, and can radiate radio frequency energy
and, if not used in accordance with the instruction manual, may
cause harmful interference to radio communications. If this equipment does cause harmful interference to radio or television reception, which can be determined by turning the equipment off and
on, the user is encouraged to try to correct the interference by
reorienting or relocating the receiving antenna; or by increasing
the separation between the equipment and receiver.
Caution: Any changes or modifications to the equipment listed
above, not expressly approved by Timex Corporation, could void
the user’s authority to operate this equipment.
Industry Canada Notice: This Class B digital apparatus complies
with Canadian ICES-003. Cet appariel numérique de la classe B est
conforme à la norme NMB-003 du Canada.
1-65
DECLARATION OF CONFORMITY
Manufacturers Name:
Timex Corporation
Manufacturers Address:
555 Christian Road
Middlebury, CT 06762
United States of America
declares that the following products, which include all components of the Timex Bodylink
System, are compliant to the relevant EU Directives as follows:
Product Name:
Speed + Distance System — GPS Transceiver Series M8xx/M5xx
Heart Rate Monitor System — HRM Transmitter Series M8xx/M5xx
conforms to the following product specifications:
Product Name:
Watch Receivers – HRM/Speed+Distance Series M8xx/M5xx
Data Recorders – HRM/Speed+Distance Series M5xx
conforms to the following product specifications:
Generic Emissions Standard EN 55022: 1998
Generic Immunity Standard EN 55024: 1998
Supplemental Information: The above products comply with the requirements of
Electromagnetic Compatibility (EMC) Directive 89/336/EEC (including amendments 92/31/EEC,
93/68/EEC, and 98/13/EEC) and carry the
marking accordingly. Conformity Assessment Body
(CAB) – Underwriters Laboratories Inc., CAB# 0983; 1285 Walt Whitman Road, Melville, NY
11747.
Timex Corporation declares that these low power electronic devices are in compliance with the
essential requirements and other relevant provisions of the EMC Directive.
LVD: 72/23/EEC
Safety: IEC 60950
EMC: 89/336/EEC and amendments 92/31/EEC, 93/68/EEC, and 98/13/EEC
Emissions:
EN300-330-1, -2
Radiated Emission 9kHz to 30MHz H-Field (magnetic
Radiated Emission 30MHz to 1000MHz E-Field (electric),
Ref. EN55022
Immunity:
EN300-683
Radiated Immunity 80MHz to 1000MHz, Ref. EN61000-4-3
ESD Electrostatic discharge, Ref. EN61000-4-2
Agent: ___________________________
Brian J. Hudson
Director, Test Engineering and Module Development
Date: 28 April 2003, Middlebury, Connecticut, U.S.A.
Supplemental Information: The above products comply with the requirements of the LowVoltage Directive 72/23/EEC and the EMC Directive 89/336/EEC (including amendments
92/31/EEC, 93/68/EEC, and 98/13/EEC) and carry the
0983(!) marking accordingly. Notifying
Body – Underwriters Laboratories Inc., CAB# - 0983; 1285 Walt Whitman Road, Melville, NY
11747.
Bodylink is a registered trademark of Timex Group, B.V.
Timex Corporation declares that these low power radio equipment devices are in compliance with
the essential requirements and other relevant provisions of R&TTE Directive 1999/5/EC.
INDIGLO is a registered trademark of Indiglo Corporation in the U.S. and other countries.
TIMEX and NIGHT-MODE are registered trademarks of Timex Corporation in the U.S. and other
countries.
©2005 Timex Corporation.
1-66
1-67