1
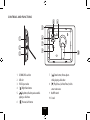
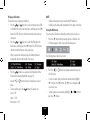
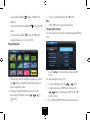
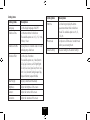
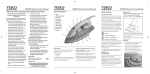
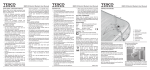
User Guide T70 Digital picture frame This symbol indicates that dangerous voltage constituting a risk of electric shock is present within this unit. This symbol indicates that there are important operating and maintenance instructions in the literature accompanying this unit. IMPORTANT SAFETY INFORMATION Read these instructions. Keep these instructions. Heed all warnings. Follow all instructions. Do not use this apparatus near water. Clean only with a slightly damp lint free cloth. Do not block any ventilation openings. Install in accordance with the manufacturer’s instructions. Do not install or operate near any heat sources such as radiators, stoves, or other apparatus that produce heat. Unplug this apparatus during lightning storms or when unused for long periods of time. Refer all servicing to qualified service personnel. Servicing is required when the apparatus has been damaged in any way, such as the power-supply cord or plug is damaged, liquid has been spilled or objects have fallen into the apparatus, the apparatus has been exposed to rain or moisture, does not operate normally, or has been dropped. Warning: To reduce the risk of fire or electrical shock, do not expose this product to rain or moisture. The product must not be exposed to dripping and splashing and no object filled with liquids such as a vase of flowers should be placed on the product. No naked flame sources such as candles should be placed on the product. Caution: Changes or modifications not expressly approved by the manufacturer could void the user’s authority to operate this device. Caution: Usage of controls or adjustments or performance of procedures other than those specified herein may result in hazardous exposure. IMPORTANT Use this appliance with the supplied AC convertor. Using non-approved power supplies will void the warranty. This equipment generates, uses and can radiate radio Page 2 frequency energy and, if not installed and used in accordance with the instructions, may cause harmful interference to radio communication. However, this is no guarantee that interference will not occur in a particular installation. If this equipment does cause harmful interference to radio or television reception, which can be determined by turning the equipment off and on, the user is encouraged to try to correct the interference by one of the following measures: - Reorient or relocate the receiving antenna. - Increase the separation between the equipment and receiver. - Connect the equipment into an outlet on a circuit different from that to which the receiver is connected. - Consult the dealer or an experienced radio/TV technician for help. INTRODUCTION UNPACKING Your Digital Picture Frame (DPF) enables you to view digital pictures from either a memory card or from a USB drive. The DPF is compatible with the following card formats: SD™ (Secure Disk), MMC™(Multimedia Card), and MS™ (Memory Stick). The Frame will also support a USB 2.0 or 1.1 drive. The box should contain: • The Picture Frame • External Power Adapter • Stand • User Guide If any items are missing or damaged, contact your nearest TESCO store for a replacement. Have your receipt ready when you call. Retain the packaging. If you dispose of it, do so having regard to any recycling regulations in your area. Before using the Picture Frame carefully remove any protective film covering the screen. Take care not to press on the screen. PICTURE FORMATS The DPF will play pictures conforming to the .jpg (jpeg) standard. Other picture formats must be converted to jpgs via photo editing software (not supplied). FILES AND FOLDERS You may have your pictures grouped into Albums (folders) with several pictures inside each album. The DPF will read the pictures and play them in sets but you cannot identify or select individual folders. The DPF will take time to load and display pictures. Lots of high resolution pictures will slow loading times considerably. Page 3 FITTING THE STAND Locate the stand in the slot at the rear. Rotate the stand once to put the frame into horizontal (landscape) view. Rotate once more to put the frame into vertical (portrait) view. Stand the frame on a level solid surface where it is unlikely to fall or get knocked over. WALL MOUNTING As an alternative the frame can be wall mounted via the slots in the rear of the frame. a ?b Use the two holes annotated a (78mm apart) to mount the DPF in the horizontal (landscape) view. Use the two holes annotated b (78mm apart) to mount the DPF in the vertical (portrait) view. Page 4 CONTROLS AND FUNCTIONS e a b c h f d g i 1 2 3 4 5 SD/MMC/MS-card slot USB slot 5V DC Input socket [ ] Right/Next button [ ] Up button; Back to preview while playing a slideshow 6 [ ] Previous/Left button 1) 7 [ ] Down button; Rotate photo while playing a slideshow 8 [] Play/Pause; Confirm/Enter; hold to enter main menu 9 On/Off switch 10 Stand Page 5 GETTING STARTED CONNECTING THE POWER SUPPLY If the DPF is being switched on for the first time, or after a default setting reset, you must first select a display language. Use the ( ) or ( ) buttons to make your selection and press the () button to confirm. Plug the DC power jack of the adapter into the DC socket in the DPF. Plug the power adapter into the mains socket. Switch on at the mains. Switch the ON /OFF switch to the ON position. Page 6 INSTALLING A USB DEVICE OR MEMORY CARD To insert a memory card. Position the card with the cropped corner facing down and press gently in. To release a memory card. Grip both sides of the card and gently pull out. When first switched on the pictures will display as a Slide Show. Thereafter the display will depend on the setup you have customised. NOTES: You should only insert one media source at any time. • If you switch on the DPF with a USB drive and a memory card inserted in the frame, the memory card photos will be displayed. • If you have a USB drive inserted then insert a media card the DPF will play the media card and vice versa. Page 7 VIEWING PHOTOS Main menu In the main menu, you can select the connected memory device to view photos, change frame settings, or play the photos immediately. 1 When pictures are being displayed press and hold the () button to access the main menu. In this menu Connected sources (USB or Card), “Setup” and “Now Playing” icons are displayed. USB 2 Use the ( ) or ( ) buttons to navigate between the options in the main menu. Press the () button to confirm or enter the selected submenu. NOTES: • While in the main menu, if you insert a SD/MMC/MS card or a USB device, the DPF will start a slideshow automatically. • There is a button indicator on the right of the screen, indicating which button you are pressing. Highlighted when you select a USB flash drive. SD/MMC/MS Highlighted when you select a SD/MMC/MS card. Setup Allows you to customize the settings of the DPF. Now Playing Allows you to play a slideshow immediately. Page 8 Playing a slideshow There are two ways of playing a slideshow: 1 Press the ( ) or ( ) buttons to select a memory device (USB or SD/MMC/MS card) in the main menu, and then press the () button. The DPF will start a slideshow from the memory device connected. 2 Press the ( ) or ( ) buttons to select Now Playing in the main menu, and then press the () button. The DPF will start a slideshow from the memory device connected.. • When you enter the slideshow mode, the following menu is temporarily shown on the bottom of the screen: • Press the ( ) button to see a preview of all the photos in the folder (refer to Viewing thumbnails on page 10). • Use the ( ) or ( ) button to move to the previous or next photo. • To rotate a photo, press the ( ) button, the options are: once = 90° twice = 180° three times = 270°. NOTE: • If there are memory devices inserted in the DPF before it is switched on, the frame will automatically start to play a slideshow. Using the OSD menu You can use the OSD menu to manually view the photos one by one. 1 Press the () button during viewing a photo or slideshow. The OSD menu appears on the screen and slideshow pauses. The following menu will also be shown: 2 Press the ( ) or ( ) button to navigate between the icons on the OSD menu. • To start or resume slide show from the current photo, highlight () and press the () button. The () icon is changed to (ll) icon or vice versa. • To skip to previous or next photo, highlight ( ) or ( ), and then press the () button. Page 9 • To rotate a photo, highlight ( ) and press the () button repeatedly. • To return to thumbnail mode, highlight ( ) and press the () button. • To zoom in a photo, highlight and press the () button repeatedly, the options are: X2, X4, X8 and X16. Viewing thumbnails 1 While playing a slideshow or viewing a single photo, you can use the ( ) button to enter preview (thumbnail mode). Up to 12 photos are displayed at a time. 2 To navigate through the thumbnails or move to the next or previous page of thumbnails, press the ( ), ( ), ( ) or ( ) button. 3 To view a selected thumbnail, press the () button. Note: • Hold the () button to return to the main menu. Changing Frame Settings The system settings let you customise and configure your Digital Picture Frame. 1. Select the Setup icon in the main menu and press the () button. The Setup Menu appears on the screen. 2. To select a setting option, press the ( ) or ( ) button. 3. To alter the option, press the () button. Then, press the ( ), ( ) button to select the new setting. Press the () button to confirm. 4. Press and hold the () button to return to the main menu. Page 10 Setting items Setting Items Description Hint time Set the interval time for slideshow The available options are: 3s, 5s, 15s, 1 min, 15mins, 1 hour. Set how long to display the button operation window while in slideshow mode. The available options are: 0s, 5s, 15s, 20s. Photo mode Slideshow shuffle To play photos in a random order or in order while playing a slideshow. Set photos to Full mode or Standard mode when you are viewing them. Default settings Reset all settings to the default settings. Transition Effect Set the style of transition. The available options are: , None, Bottom To Top, Top To Bottom, Left To Right, Right To Left, Close Door, Open Door, Horiz. Cross, Vert. Cross, Random, Fading, Vexpand Top, Vexpand Bottom, Vexpand Middle. Now Playing To play a slideshow immediately. Brightness Adjust the brightness of the screen Contrast Adjust the contrast of the screen. Saturation Adjust the saturation of the screen. Setting Items Description Language Set the display language of the DPF. Slideshow Time Page 11 After Use Switch the set off via the POWER switch. Unplug the adaptor from the mains and then unplug the adaptor from the DPF. Unplug any memory card or USB stick. Store the unit and power adaptor in a cool dry place, out of the reach of children and pets. Further Information The screen resolution is 480x234 pixels. This is a total resolution of 112,500 pixels (0.125MP). High resolution pictures will slow loading times without improving viewability. After extended use, the frame may get warm. This is normal and not a cause for concern. Contrary to popular belief, if you leave a static picture on the screen for a long time you may leave a permanent ‘after image’ on the screen. Slide show mode stops this from occurring. Care and Cleaning Care and cleaning operations should be carried out with the unit unplugged from the mains. Clean the plastic parts with a barely damp cloth and then dry carefully. Do NOT touch the screen with bare fingers, hard or pointed objects. Clean the screen carefully with a special cloth, such as a Calotherm cloth available from chemists and opticians. Warranty Your Tesco appliance is covered by a warranty for 12 months from the date of purchase. If a fault develops during this period, please contact the TESCO electrical help line on 0845 456 6767. Please have your original purchase receipt with you when you call. This warranty in no way affects your consumer rights. Specifications Power Supply: DC 5V 1.0A Power adaptor: DC 5V1.0A/AC100-240V 0.18A Screen Resolution: 480x234 pixels Colours: 16M USB Compliance: USB 1.1or higher Memory Card: SD/MMC/MS Weight: 381 grams UK: Waste electrical products should not be disposed of with household waste. Separate disposal facilities exist, for your nearest facilities see www.recycle-more.co.uk or in-store for details. ROI: Produced after 13th August 2005. Waste electrical products should not be disposed of with household waste. Please recycle where facilities exist. Check with your Local Authority or retailer for recycling advice. Tesco Stores Ltd, Delamare Road, Cheshunt, Herts, EN8 9SL