1
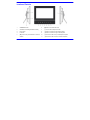
MODEL NO. 07EF119 User’s Manual 7” Digital Photo Frame with Touch Sensor Keys Touch Sensor Key Technology View Digital Photos Easy-to-Use Menu www.electrohome.ca TABLE OF CONTENTS Introduction .......................................................................................................................................................................................................................................1 Important Safety Precautions...........................................................................................................................................................................................................1 Important Safety Precautions...........................................................................................................................................................................................................2 Features .............................................................................................................................................................................................................................................4 Location of Controls .........................................................................................................................................................................................................................5 Getting Started ..................................................................................................................................................................................................................................6 Attaching the Stand ........................................................................................................................................................................................................................6 Connecting Power ..........................................................................................................................................................................................................................6 Inserting Media...............................................................................................................................................................................................................................7 Main Screen ...................................................................................................................................................................................................................................7 Main Screen ...................................................................................................................................................................................................................................8 Viewing Photos..................................................................................................................................................................................................................................9 Viewing Thumbnails .......................................................................................................................................................................................................................9 Browsing a Single Picture...............................................................................................................................................................................................................9 Playing a Slideshow .....................................................................................................................................................................................................................10 Changing Frame Settings ............................................................................................................................................................................................................... 11 Settings menus............................................................................................................................................................................................................................. 11 Frequently Asked Questions ..........................................................................................................................................................................................................13 Specification....................................................................................................................................................................................................................................15 i Introduction Congratulations on your purchase of this Electrohome Digital Photo Frame (DPF). Before operating your Digital Photo Frame, please read this manual thoroughly and keep it for future reference. This manual will help you to use and explore all of the exciting features of your new Digital Photo Frame. This Digital Photo Frame is compatible with SD, MMC and MS memory card formats, which enables you to view digital photos directly from your camera’s memory card. This manual contains important safety instructions and correct operation information. Please read and adhere to all information advised in the manual prior to operating this Digital Photo Frame. The instruction manual is subject to change for improvements without notice. Electrohome assumes no responsibility for loss of data caused by improper use of this product. 1 Important Safety Precautions Please follow the following safety precautions when using this Digital Photo Frame. This will reduce the risk of fire, electric shock, product damage and personal injury. y Warning: To reduce the risk of electric shock, do not remove the cover or back. There are no user-serviceable parts inside. Refer servicing to qualified personnel. y Warning: To prevent fire or electric shock hazard, do not expose the unit to rain or moisture. y Do not expose the Digital Photo Frame to water (dripping or splashing) and no objects filled with liquids, such as vases, should be placed on the unit. y Keep this Digital Photo Frame away from direct sunlight and heat sources such as radiators or stoves. y Do not block the ventilation openings. Slots and openings on this unit are provided for ventilation. The openings should never be blocked by placing this Digital Photo Frame on a cushion, sofa or other similar surface y Do not place this Digital Photo Frame on an unstable cart, stand, tripod, bracket or table. The unit may fall, resulting in possible damage or injury. y Never place heavy or sharp objects on the LCD panel or frame. y Only use the AC adapter included with this Digital Photo Frame. Using any other adapter will void your warranty. y Protect the power cord from being walked on or pinched particularly at plugs, receptacles and the point where the cord attached to the Digital Photo Frame. y 2 Unplug the power from the outlet when the unit is not in use. Cleaning y Before cleaning the product make sure it is turned off. y Never spray or pour liquid directly onto the screen or plastic casing. y To clean the LCD screen, wipe the screen with a clean, soft, lint-free cloth. This removes dust and other particles. If it still is not clean, apply a y To clean the plastic casing, use a soft, dry cloth. If it still is not clean, apply a small amount of non-ammonia, non-alcohol based, mildly small amount of non-ammonia, non-alcohol based glass cleaner on a clean, soft, lint-free cloth to clean the screen. non-abrasive detergent on a clean, soft, lint-free cloth to clean the surface. y To clean the frame, use a soft, dry cloth. Disclaimer: Electrohome does not recommend the use of any ammonia or alcohol-based cleaners on the LCD screen or plastic casing. Some chemical cleaners have been reported to damage the screen and/or display case. Electrohome will not be liable for damage resulting from the use of any ammonia or alcohol-based cleaners. 3 Features y Touch buttons on the front panel of the frame for convenient operation y Displays digital pictures (JPEG) without a computer y Automatic slide show with multiple transition effects and desired interval. y Compatible with SD/MMC/MS memory cards y USB Jack for connecting to a USB mass storage device 4 Location of Controls 1. SD/MMC/MS-card slot 6. [M] Touch to return to the main screen. 2. USB JACK for connecting the USB device directly. 7. [2] Touch to return to the previous screen. 3. DC 5V 1A Port 8. [g] Touch to move the cursor left or rotate the picture 4. Frame base 9. [h] Touch to move the cursor right or rotate the picture. 5. [X] Touch to start, pause slideshow or confirm the 10. [i] Touch to move the cursor up or select the previous picture selection. 11. [j] Touch to move the cursor down or select the next picture. 5 Getting Started Attaching the Stand 1. Match the stand to the slot on the back of the frame. 2. Rotate anticlockwise until the stand clicks into a landscape position or portrait position. 3. Push the stand up or down to set a comfortable viewing angle and place it on a flat surface. Connecting Power 1. Use the supplied power adapter to connect the digital photo frame to an electrical outlet. 2. Slide the power switch on the back of the photo frame from OFF to ON. 3. To turn off the power of the Digital Photo Frame completely, slide the power switch from ON to OFF. 6 Inserting Media Remove the rubber cover on 3-in-1 card slot and insert an SD, MMC or MS card with the metallic contacts facing towards the display. Insert a USB drive into the USB Jack slot as shown. Note: y Do not force the memory card into the memory card slot. y The 3-in-1 card slot only reads one memory card at a time. Do not insert more than one card into the memory card slot. y To remove the cards, pull out the card slowly. 7 Main Screen Once you switch on the Digital Photo Frame, the main screen appears. When a memory device is inserted into the Digital Photo Frame, the corresponding icon appears on the main screen. USB Appears when you inserted a USB device. SD CARD Appears when you insert a SD card. MS Card Appears when you insert a MS card. MMC CARD Appears when you insert a MMC card. SETUP To customize the settings of this Digital Photo Frame. Note: The main screen can also be accessed by touching [M] at any time. 8 Viewing Photos Viewing Thumbnails The pictures on the selected memory source can be displayed on the screen as thumbnails. (Up to 12 pictures are displayed at a time). 1. Touch [g] or [h] to select a memory source (e.g. USB or SD CARD) in the main screen and touch [X] to confirm. The pictures are displayed on the screen as thumbnails. 2. To navigate through the thumbnails, touch [g], [h], [i] or [j]. Note: You can also touch [2] from a slideshow or a single view to return to the thumbnails view. Browsing a Single Picture You can select a single picture to display on the screen, without a slideshow. 1. Select a picture in the thumbnail view, and touch [X]. The selected picture is displayed on the full screen. y To view the previous or next photo, touch [i] or [j]. y To rotate a picture, touch [g] or [h]. 2. To return to the thumbnail view, touch [2]. 3. To start slide show from the current picture, touch [X]. 9 Playing a Slideshow While browsing a single picture, touch [X] to start the slideshow from the current picture. y To pause the slideshow and browse a single picture, touch [X] again. y To return to the main screen, touch [M]. y To return to the thumbnail view, touch [2]. Note: If you insert a memory card or a USB device, the Digital Photo Frame will go to slideshow directly. 10 Changing Frame Settings The system settings let you customize and configure your Digital Photo Frame. 1. Select the SETUP icon in the main screen and touch [X] to confirm. The Setup Menu and software version appear on the screen. 2. To select a setting option, touch [i] or [j] 3. To change the value, touch [g] or [h] and touch [X] to confirm. 4. Touch [2] to exit. Settings menus Setting options Description LANGUAGE Choose the on-screen language. SLIDESHOW TIME Specify how long each picture is displayed in the slideshow. The available options include: 3s, 5s, 15s, 1 min, 15mins, 1 hour. Specify the transition effect between pictures in the slideshow. TRANSITION EFFECT The available options include: Random, Fading, Vexpand_Top, Vexpand_Bottom, Vexpand_Middle, Off, Bottom_To_Top, Top_To_Bottom, Left_To_Right, Right_To_Left, Door_Close, Door_Open, Hori_Cross, and Verti_Cross. 11 TFT Brightness TFT Contrast TFT Saturation DEFAULT 12 Adjust the brightness of the TFT screen. The available options include: -3, -2, -1, 0, +1, +2, +3. Adjust the contrast of the TFT screen. The available options include: -3, -2, -1, 0, +1, +2, +3. Adjust the saturation of the TFT screen. The available options include: -3, -2, -1, 0, +1, +2, +3. Reset all settings to the default setting. Frequently Asked Questions 1. Why can’t the Digital Photo Frame display some files from my Flash card or USB device? • Some memory cards are not compatible with this Digital Photo Frame. Use a card that matches with the Digital Photo Frame features. • The file formats on your card or USB device might not be supported (only JPEG pictures are supported). 2. There is a memory card inserted in the Digital Photo Frame, but the device is not able to read the card. What can I do? • First, make sure that you are using a memory card type that is supported by the Digital Photo Frame. • Secondly, make sure that the memory card is inserted correctly. • Thirdly, check if the USB device is inserted into the unit. This Digital Photo Frame always reads the files on the USB device if the USB device • The file formats on your card might not be supported (only JPEG pictures are supported). and a memory card are inserted simultaneously. Note: Some digital cameras save images into non-standard formats. Please consult the operating manual of your camera for assistance. 3. Why do some pictures load faster than others? • Higher resolution pictures load slower. Use pictures with lower resolution to speed up loading times. Note: This Digital Photo Frame supports images up to 16 mega-pixels. 13 4. Why does the screen not show anything? • The device might not have been turned ON or the adapter is not well connected. 5. Can I rotate a picture on the screen? • YES. Touch [g] or [h] to rotate a picture. Note: The rotated picture will return to its original orientation after you power off the Digital Photo Frame. 6. What is the best picture resolution displayed on the screen? • The best resolution is 480*234 pixels, however, this Digital Photo Frame supports images up to 16 mega-pixels. 14 Specification Digital TFT LCD Display Panel size: 7 inches Screen aspect ratio: 16:9 Resolution: 480*234 pixels Input DC in Power adaptor Input: 100~240V AC, 50/60Hz Output: 5V 1A DC USB port USB 2.0 Supports USB flash media Supported peripheral devices SD™ (Secure Digital Card), MMC™ (MultiMedia Card), MS™ (Memory Stick) Supported photo format JPEG, Maximum resolution:16 mega-pixels Operating temperature 5℃ ~ 35℃ Dimension 210*160*28.3mm Weight 448.8g 15