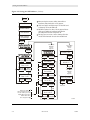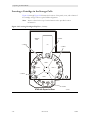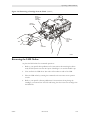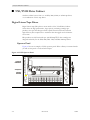
1
StorageTek
TIMBERWOLF™ 9740
Tape Library
Hardware Operator’s Guide
95693
Revision: P
TimberWolf 9740
Tape Library
Hardware Operator’s Guide
Copyright 2006 Sun Microsystems, Inc., 4150 Network Circle, Santa Clara, California 95054, U.S.A. All rights reserved.
Sun Microsystems, Inc. has intellectual property rights relating to technology that is described in this document. In particular, and without
limitation, these intellectual property rights may include one or more of the U.S. patents listed at http://www.sun.com/patents and one
or more additional patents or pending patent applications in the U.S. and in other countries.
This document and the product to which it pertains are distributed under licenses restricting their use, copying, distribution, and
decompilation. No part of the product or of this document may be reproduced in any form by any means without prior written
authorization of Sun and its licensors, if any.
Third-party software, including font technology, is copyrighted and licensed from Sun suppliers.
Parts of the product may be derived from Berkeley BSD systems, licensed from the University of California. UNIX is a registered
trademark in the U.S. and in other countries, exclusively licensed through X/Open Company, Ltd.
Sun, Sun Microsystems, the Sun logo, Java, AnswerBook2, docs.sun.com, and Solaris, StorageTek, VolSafe, TimberWolf, TimberLine, and
RedWood are trademarks or registered trademarks of Sun Microsystems, Inc. in the U.S. and in other countries.
All SPARC trademarks are used under license and are trademarks or registered trademarks of SPARC International, Inc. in the U.S. and in
other countries. Products bearing SPARC trademarks are based upon an architecture developed by Sun Microsystems, Inc.
The OPEN LOOK and Sun™ Graphical User Interface was developed by Sun Microsystems, Inc. for its users and licensees. Sun
acknowledges the pioneering efforts of Xerox in researching and developing the concept of visual or graphical user interfaces for the
computer industry. Sun holds a non-exclusive license from Xerox to the Xerox Graphical User Interface, which license also covers Sun’s
licensees who implement OPEN LOOK GUIs and otherwise comply with Sun’s written license agreements.
U.S. Government Rights—Commercial use. Government users are subject to the Sun Microsystems, Inc. standard license agreement and
applicable provisions of the FAR and its supplements.
DOCUMENTATION IS PROVIDED "AS IS" AND ALL EXPRESS OR IMPLIED CONDITIONS, REPRESENTATIONS AND
WARRANTIES, INCLUDING ANY IMPLIED WARRANTY OF MERCHANTABILITY, FITNESS FOR A PARTICULAR PURPOSE OR
NON-INFRINGEMENT, ARE DISCLAIMED, EXCEPT TO THE EXTENT THAT SUCH DISCLAIMERS ARE HELD TO BE LEGALLY
INVALID.
Copyright 2006 Sun Microsystems, Inc., 4150 Network Circle, Santa Clara, Californie 95054, Etats-Unis. Tous droits réservés.
Sun Microsystems, Inc. a les droits de propriété intellectuels relatants à la technologie qui est décrit dans ce document. En particulier, et
sans la limitation, ces droits de propriété intellectuels peuvent inclure un ou plus des brevets américains énumérés à http://
www.sun.com/patents et un ou les brevets plus supplémentaires ou les applications de brevet en attente dans les Etats-Unis et dans les
autres pays.
Ce produit ou document est protégé par un copyright et distribué avec des licences qui en restreignent l’utilisation, la copie, la
distribution, et la décompilation. Aucune partie de ce produit ou document ne peut être reproduite sous aucune forme, par quelque
moyen que ce soit, sans l’autorisation préalable et écrite de Sun et de ses bailleurs de licence, s’il y en a.
Le logiciel détenu par des tiers, et qui comprend la technologie relative aux polices de caractères, est protégé par un copyright et licencié
par des fournisseurs de Sun.
Des parties de ce produit pourront être dérivées des systèmes Berkeley BSD licenciés par l’Université de Californie. UNIX est une marque
déposée aux Etats-Unis et dans d’autres pays et licenciée exclusivement par X/Open Company, Ltd.
Sun, Sun Microsystems, le logo Sun, Java, AnswerBook2, docs.sun.com, et Solaris, StorageTek, VolSafe, TimberWolf, TimberLine, and
RedWood sont des marques de fabrique ou des marques déposées de Sun Microsystems, Inc. aux Etats-Unis et dans d’autres pays.
Toutes les marques SPARC sont utilisées sous licence et sont des marques de fabrique ou des marques déposées de SPARC International,
Inc. aux Etats-Unis et dans d’autres pays. Les produits portant les marques SPARC sont basés sur une architecture développée par Sun
Microsystems, Inc.
L’interface d’utilisation graphique OPEN LOOK et Sun™ a été développée par Sun Microsystems, Inc. pour ses utilisateurs et licenciés.
Sun reconnaît les efforts de pionniers de Xerox pour la recherche et le développement du concept des interfaces d’utilisation visuelle ou
graphique pour l’industrie de l’informatique. Sun détient une license non exclusive de Xerox sur l’interface d’utilisation graphique Xerox,
cette licence couvrant également les licenciées de Sun qui mettent en place l’interface d ’utilisation graphique OPEN LOOK et qui en outre
se conforment aux licences écrites de Sun.
LA DOCUMENTATION EST FOURNIE "EN L’ÉTAT" ET TOUTES AUTRES CONDITIONS, DECLARATIONS ET GARANTIES
EXPRESSES OU TACITES SONT FORMELLEMENT EXCLUES, DANS LA MESURE AUTORISEE PAR LA LOI APPLICABLE, Y
COMPRIS NOTAMMENT TOUTE GARANTIE IMPLICITE RELATIVE A LA QUALITE MARCHANDE, A L’APTITUDE A UNE
UTILISATION PARTICULIERE OU A L’ABSENCE DE CONTREFAÇON.
We welcome your feedback. Please contact the Sun Learning Services Feedback System at:
[email protected]
or
Sun Learning Services
Sun Microsystems, Inc.
One StorageTek Drive
Louisville, CO 80028-3256
USA
Please include the publication name, part number, and edition number in your correspondence if they are
available. This will expedite our response.
ii
Revision P
95693
Summary of Changes
EC
Date
Revision
Description
111257
November 1999
H
Changes as noted in this revision.
111486
May 2000
J
Changes as noted in this revision.
111516
August 2000
K
Changes as noted in this revision.
111545
October 2000
L
Changes as noted in this revision.
111714
December 2001
M
Changes as noted in this revision.
114111
September 2005
N
Changes as noted in this revision.
114166
September 2006
P
Covers and Title Page: Replaced the information with
Sun Microsystems, Inc. information.
Summary: Removed the List of Pages.
Preface: Replaced Additional Information verbiage with
Sun boilerplate verbiage.
Notices: Replaced the verbiage with Sun boilerplate
verbiage.
Chapter 1: Removed the model number from Figure 1-1.
Chapter 5: Replaced the verbiage with Sun boilerplate
verbiage.
Appendix A: Replaced the “Ordering Cartridge Tapes
and Labels” section with “Ordering Media.”
Glossary: Removed the feature code 99DR.
95693
Revision P
iii
iv
Revision P
95693
Contents
Summary of Changes . . . . . . . . . . . . . . . . . . . . . . . . . . . . . . . . . . . . . . . . . . . . . . . . . . . . iii
Contents . . . . . . . . . . . . . . . . . . . . . . . . . . . . . . . . . . . . . . . . . . . . . . . . . . . . . . . . . . . . . . . . v
Figures . . . . . . . . . . . . . . . . . . . . . . . . . . . . . . . . . . . . . . . . . . . . . . . . . . . . . . . . . . . . . . . viii
Tables . . . . . . . . . . . . . . . . . . . . . . . . . . . . . . . . . . . . . . . . . . . . . . . . . . . . . . . . . . . . . . . . . ix
Preface . . . . . . . . . . . . . . . . . . . . . . . . . . . . . . . . . . . . . . . . . . . . . . . . . . . . . . . . . . . . . . . . . xi
Organization . . . . . . . . . . . . . . . . . . . . . . . . . . . . . . . . . . . . . . . . . . . . . . . . . . . . . . . . . . . . . . . . . . . . . . .xi
Alert Messages . . . . . . . . . . . . . . . . . . . . . . . . . . . . . . . . . . . . . . . . . . . . . . . . . . . . . . . . . . . . . . . . . . . . xii
Related Publications . . . . . . . . . . . . . . . . . . . . . . . . . . . . . . . . . . . . . . . . . . . . . . . . . . . . . . . . . . . . . . . xii
Additional Information . . . . . . . . . . . . . . . . . . . . . . . . . . . . . . . . . . . . . . . . . . . . . . . . . . . . . . . . . . . . .xiii
Sun’s External Web Site . . . . . . . . . . . . . . . . . . . . . . . . . . . . . . . . . . . . . . . . . . . . . . . . . . . . . . . . . .xiii
Customer Resource Center . . . . . . . . . . . . . . . . . . . . . . . . . . . . . . . . . . . . . . . . . . . . . . . . . . . . . . .xiii
Partners Site . . . . . . . . . . . . . . . . . . . . . . . . . . . . . . . . . . . . . . . . . . . . . . . . . . . . . . . . . . . . . . . . . . .xiii
Hardcopy Publications . . . . . . . . . . . . . . . . . . . . . . . . . . . . . . . . . . . . . . . . . . . . . . . . . . . . . . . . . .xiii
Notices . . . . . . . . . . . . . . . . . . . . . . . . . . . . . . . . . . . . . . . . . . . . . . . . . . . . . . . . . . . . . . . . xv
United States FCC Compliance Statement . . . . . . . . . . . . . . . . . . . . . . . . . . . . . . . . . . . . . . . . . . . . . . xv
CISPR 22 and EN55022 Warning . . . . . . . . . . . . . . . . . . . . . . . . . . . . . . . . . . . . . . . . . . . . . . . . . . . . . xv
Japanese Compliance Statement . . . . . . . . . . . . . . . . . . . . . . . . . . . . . . . . . . . . . . . . . . . . . . . . . . . . . .xvi
Taiwan Warning Label Statement . . . . . . . . . . . . . . . . . . . . . . . . . . . . . . . . . . . . . . . . . . . . . . . . . . . . .xvi
Internal Code License Statement . . . . . . . . . . . . . . . . . . . . . . . . . . . . . . . . . . . . . . . . . . . . . . . . . . . . . xvii
. . . . . . . . . . . . . . . . . . . . . . . . . . . . . . . . . . . . . . . . . . . . . . . . . . . . . . . . . . . . . . . . . . . . .xviii
1: General Information . . . . . . . . . . . . . . . . . . . . . . . . . . . . . . . . . . . . . . . . . . . . . . . . . . .1-1
Library Storage Module Components . . . . . . . . . . . . . . . . . . . . . . . . . . . . . . . . . . . . . . . . . . . . . . . . .
Robot . . . . . . . . . . . . . . . . . . . . . . . . . . . . . . . . . . . . . . . . . . . . . . . . . . . . . . . . . . . . . . . . . . . . . . .
Cartridge Access Port . . . . . . . . . . . . . . . . . . . . . . . . . . . . . . . . . . . . . . . . . . . . . . . . . . . . . . . . . .
Storage Cells . . . . . . . . . . . . . . . . . . . . . . . . . . . . . . . . . . . . . . . . . . . . . . . . . . . . . . . . . . . . . . . . .
Cartridge Exchange Mechanism . . . . . . . . . . . . . . . . . . . . . . . . . . . . . . . . . . . . . . . . . . . . . . . . .
Cartridge Drives and Cabinets . . . . . . . . . . . . . . . . . . . . . . . . . . . . . . . . . . . . . . . . . . . . . . . . . . . . . . .
LSM Safety Features . . . . . . . . . . . . . . . . . . . . . . . . . . . . . . . . . . . . . . . . . . . . . . . . . . . . . . . . . . . . . . .
Controlling Software . . . . . . . . . . . . . . . . . . . . . . . . . . . . . . . . . . . . . . . . . . . . . . . . . . . . . . . . . . . . . .
LSM Specifications . . . . . . . . . . . . . . . . . . . . . . . . . . . . . . . . . . . . . . . . . . . . . . . . . . . . . . . . . . . . . . .
1-1
1-2
1-4
1-4
1-4
1-5
1-5
1-5
1-6
2: Controls and Indicators . . . . . . . . . . . . . . . . . . . . . . . . . . . . . . . . . . . . . . . . . . . . . . . 2-1
Power Switch . . . . . . . . . . . . . . . . . . . . . . . . . . . . . . . . . . . . . . . . . . . . . . . . . . . . . . . . . . . . . . . . . . . . 2-1
95693
Revision P
v
Contents
Tape Drives and Cabinets . . . . . . . . . . . . . . . . . . . . . . . . . . . . . . . . . . . . . . . . . . . . . . . . . . . . . .
Controller Transport Units . . . . . . . . . . . . . . . . . . . . . . . . . . . . . . . . . . . . . . . . . . . . . . . . . . . . .
Operator Panel . . . . . . . . . . . . . . . . . . . . . . . . . . . . . . . . . . . . . . . . . . . . . . . . . . . . . . . . . . . . . . . . . . .
Setting the SCSI Address . . . . . . . . . . . . . . . . . . . . . . . . . . . . . . . . . . . . . . . . . . . . . . . . . . . . . . . . . . .
2-2
2-2
2-3
2-3
3: Operating the LSM . . . . . . . . . . . . . . . . . . . . . . . . . . . . . . . . . . . . . . . . . . . . . . . . . . . 3-1
Powering-on or IPLing the LSM . . . . . . . . . . . . . . . . . . . . . . . . . . . . . . . . . . . . . . . . . . . . . . . . . . . . 3-1
Powering-off the LSM . . . . . . . . . . . . . . . . . . . . . . . . . . . . . . . . . . . . . . . . . . . . . . . . . . . . . . . . . . . . . 3-1
Operating the LSM in Automated Mode . . . . . . . . . . . . . . . . . . . . . . . . . . . . . . . . . . . . . . . . . . . . . . 3-2
Loading Cartridges through the CAP . . . . . . . . . . . . . . . . . . . . . . . . . . . . . . . . . . . . . . . . . . . . . 3-2
Ejecting Cartridges through the CAP . . . . . . . . . . . . . . . . . . . . . . . . . . . . . . . . . . . . . . . . . . . . . 3-4
Cleaning Drives in the LSM . . . . . . . . . . . . . . . . . . . . . . . . . . . . . . . . . . . . . . . . . . . . . . . . . . . . . . . . 3-5
SCSI Interface . . . . . . . . . . . . . . . . . . . . . . . . . . . . . . . . . . . . . . . . . . . . . . . . . . . . . . . . . . . . . . . . 3-5
AUTO CLEAN Feature . . . . . . . . . . . . . . . . . . . . . . . . . . . . . . . . . . . . . . . . . . . . . . . . . . . . 3-5
Setting the Cleaning Cartridge Usage Count . . . . . . . . . . . . . . . . . . . . . . . . . . . . . . . . . . . . . 3-6
Replacing Cleaning Cartridges . . . . . . . . . . . . . . . . . . . . . . . . . . . . . . . . . . . . . . . . . . . . . . . 3-7
Serial Interface . . . . . . . . . . . . . . . . . . . . . . . . . . . . . . . . . . . . . . . . . . . . . . . . . . . . . . . . . . . . . . . . 3-8
Setting the Cleaning Cartridge Usage Count . . . . . . . . . . . . . . . . . . . . . . . . . . . . . . . . . . . . . 3-8
Replacing Cleaning Cartridges . . . . . . . . . . . . . . . . . . . . . . . . . . . . . . . . . . . . . . . . . . . . . . . . 3-8
Unlocking the CAP and Removing Non-cleaning Cartridges . . . . . . . . . . . . . . . . . . . . . . . 3-8
Replacing Expired Cleaning Cartridges . . . . . . . . . . . . . . . . . . . . . . . . . . . . . . . . . . . . . . . . . 3-9
Operating in Manual Mode . . . . . . . . . . . . . . . . . . . . . . . . . . . . . . . . . . . . . . . . . . . . . . . . . . . . . . . . 3-10
Opening the LSM Front Doors . . . . . . . . . . . . . . . . . . . . . . . . . . . . . . . . . . . . . . . . . . . . . . . . . 3-10
Moving the Robot . . . . . . . . . . . . . . . . . . . . . . . . . . . . . . . . . . . . . . . . . . . . . . . . . . . . . . . . . . . 3-12
Raising and Lowering the Z Carriage . . . . . . . . . . . . . . . . . . . . . . . . . . . . . . . . . . . . . . . . . 3-12
Rotating the Z Column . . . . . . . . . . . . . . . . . . . . . . . . . . . . . . . . . . . . . . . . . . . . . . . . . . . . 3-13
Locating a Cartridge in the Storage Cells . . . . . . . . . . . . . . . . . . . . . . . . . . . . . . . . . . . . . . . . . 3-14
Mounting and Dismounting Cartridge Tapes . . . . . . . . . . . . . . . . . . . . . . . . . . . . . . . . . . . . . . 3-19
Mounting a Cartridge into a 9490 or SD-3 CTU . . . . . . . . . . . . . . . . . . . . . . . . . . . . . . . . 3-20
Dismounting a Cartridge from a 9490 or SD-3 CTU . . . . . . . . . . . . . . . . . . . . . . . . . . . . 3-20
Mounting a Cartridge into a DLT Drive . . . . . . . . . . . . . . . . . . . . . . . . . . . . . . . . . . . . . . 3-21
Dismounting a Cartridge from a DLT Drive . . . . . . . . . . . . . . . . . . . . . . . . . . . . . . . . . . . 3-23
Mounting a Cartridge into a T9840 Drive . . . . . . . . . . . . . . . . . . . . . . . . . . . . . . . . . . . . . 3-24
Dismounting a Cartridge from a T9840 Drive . . . . . . . . . . . . . . . . . . . . . . . . . . . . . . . . . . 3-25
Mounting a Cartridge into a T9940 Drive . . . . . . . . . . . . . . . . . . . . . . . . . . . . . . . . . . . . . 3-26
Dismounting a Cartridge from a T9940 Drive . . . . . . . . . . . . . . . . . . . . . . . . . . . . . . . . . . 3-26
Removing a Cartridge from the Hand . . . . . . . . . . . . . . . . . . . . . . . . . . . . . . . . . . . . . . . . . . . . 3-27
Standard Door Procedure . . . . . . . . . . . . . . . . . . . . . . . . . . . . . . . . . . . . . . . . . . . . . . . . . . 3-27
Expansion Door Procedure . . . . . . . . . . . . . . . . . . . . . . . . . . . . . . . . . . . . . . . . . . . . . . . . . 3-28
Returning the LSM Online . . . . . . . . . . . . . . . . . . . . . . . . . . . . . . . . . . . . . . . . . . . . . . . . . . . . . 3-29
4: Drives . . . . . . . . . . . . . . . . . . . . . . . . . . . . . . . . . . . . . . . . . . . . . . . . . . . . . . . . . . . . . 4-1
vi
Revision P
95693
Contents
Controller Transport Units . . . . . . . . . . . . . . . . . . . . . . . . . . . . . . . . . . . . . . . . . . . . . . . . . . . . . . . . .
9490 . . . . . . . . . . . . . . . . . . . . . . . . . . . . . . . . . . . . . . . . . . . . . . . . . . . . . . . . . . . . . . . . . . . . . . . .
SD-3 . . . . . . . . . . . . . . . . . . . . . . . . . . . . . . . . . . . . . . . . . . . . . . . . . . . . . . . . . . . . . . . . . . . . . . . .
Power Switch . . . . . . . . . . . . . . . . . . . . . . . . . . . . . . . . . . . . . . . . . . . . . . . . . . . . . . . . . . . . .
Operator Panel . . . . . . . . . . . . . . . . . . . . . . . . . . . . . . . . . . . . . . . . . . . . . . . . . . . . . . . . . . . .
9741/9741E Drive Cabinet . . . . . . . . . . . . . . . . . . . . . . . . . . . . . . . . . . . . . . . . . . . . . . . . . . . . . . . . .
Digital Linear Tape Drives . . . . . . . . . . . . . . . . . . . . . . . . . . . . . . . . . . . . . . . . . . . . . . . . . . . . . .
Operator Panel . . . . . . . . . . . . . . . . . . . . . . . . . . . . . . . . . . . . . . . . . . . . . . . . . . . . . . . . . . . .
T9840 and T9940 Tape Drives . . . . . . . . . . . . . . . . . . . . . . . . . . . . . . . . . . . . . . . . . . . . . . . . . .
Operator Panel . . . . . . . . . . . . . . . . . . . . . . . . . . . . . . . . . . . . . . . . . . . . . . . . . . . . . . . . . . . .
4-1
4-2
4-2
4-2
4-2
4-4
4-4
4-4
4-5
4-6
5: Service . . . . . . . . . . . . . . . . . . . . . . . . . . . . . . . . . . . . . . . . . . . . . . . . . . . . . . . . . . . . 5-1
Customer Services Support Center . . . . . . . . . . . . . . . . . . . . . . . . . . . . . . . . . . . . . . . . . . . . . . . . . . . 5-1
Customer-initiated Maintenance . . . . . . . . . . . . . . . . . . . . . . . . . . . . . . . . . . . . . . . . . . . . . . . . . . . . . 5-1
Sun’s Worldwide Offices . . . . . . . . . . . . . . . . . . . . . . . . . . . . . . . . . . . . . . . . . . . . . . . . . . . . . . . . . . . 5-2
A: Cartridge Tape Information . . . . . . . . . . . . . . . . . . . . . . . . . . . . . . . . . . . . . . . . . . . A-1
Cartridge Requirements . . . . . . . . . . . . . . . . . . . . . . . . . . . . . . . . . . . . . . . . . . . . . . . . . . . . . . . . . . . . A-1
Handling a Cartridge . . . . . . . . . . . . . . . . . . . . . . . . . . . . . . . . . . . . . . . . . . . . . . . . . . . . . . . . . . . . . . A-1
Inspecting a Cartridge . . . . . . . . . . . . . . . . . . . . . . . . . . . . . . . . . . . . . . . . . . . . . . . . . . . . . . . . . . . . . A-2
Storing Cartridges . . . . . . . . . . . . . . . . . . . . . . . . . . . . . . . . . . . . . . . . . . . . . . . . . . . . . . . . . . . . . . . . A-5
Cleaning the Cartridge Exterior . . . . . . . . . . . . . . . . . . . . . . . . . . . . . . . . . . . . . . . . . . . . . . . . . . . . . A-5
Using Cleaning Cartridges . . . . . . . . . . . . . . . . . . . . . . . . . . . . . . . . . . . . . . . . . . . . . . . . . . . . . . . . . . A-5
Repairing a Detached Leader Block . . . . . . . . . . . . . . . . . . . . . . . . . . . . . . . . . . . . . . . . . . . . . . . . . . A-6
Ordering Media . . . . . . . . . . . . . . . . . . . . . . . . . . . . . . . . . . . . . . . . . . . . . . . . . . . . . . . . . . . . . . . . . . A-6
Applying Labels . . . . . . . . . . . . . . . . . . . . . . . . . . . . . . . . . . . . . . . . . . . . . . . . . . . . . . . . . . . . . . . . . . A-7
Non-DLT Cartridges . . . . . . . . . . . . . . . . . . . . . . . . . . . . . . . . . . . . . . . . . . . . . . . . . . . . . . . . . . . A-7
DLT Cartridges . . . . . . . . . . . . . . . . . . . . . . . . . . . . . . . . . . . . . . . . . . . . . . . . . . . . . . . . . . . . . . A-11
Setting the Write-Protect Switch . . . . . . . . . . . . . . . . . . . . . . . . . . . . . . . . . . . . . . . . . . . . . . . . . . . . A-12
9490 Write-Protect Switch . . . . . . . . . . . . . . . . . . . . . . . . . . . . . . . . . . . . . . . . . . . . . . . . . . . . . A-12
SD-3 Write-Protect Switch . . . . . . . . . . . . . . . . . . . . . . . . . . . . . . . . . . . . . . . . . . . . . . . . . . . . . A-14
DLT Write-Protect Switch . . . . . . . . . . . . . . . . . . . . . . . . . . . . . . . . . . . . . . . . . . . . . . . . . . . . . A-15
T9840 Write-Protect Switch . . . . . . . . . . . . . . . . . . . . . . . . . . . . . . . . . . . . . . . . . . . . . . . . . . . . A-16
T9940 Write-Protect Switch . . . . . . . . . . . . . . . . . . . . . . . . . . . . . . . . . . . . . . . . . . . . . . . . . . . . A-17
Environmental Specifications . . . . . . . . . . . . . . . . . . . . . . . . . . . . . . . . . . . . . . . . . . . . . . . . . . . . . . A-18
Glossary . . . . . . . . . . . . . . . . . . . . . . . . . . . . . . . . . . . . . . . . . . . . . . . . . . . . . . . . . Glossary-1
Index . . . . . . . . . . . . . . . . . . . . . . . . . . . . . . . . . . . . . . . . . . . . . . . . . . . . . . . . . . . . . .Index-1
95693
Revision P
vii
Figures
Figure 1-1. External Components . . . . . . . . . . . . . . . . . . . . . . . . . . . . . . . . . . . . . . . . . . . . . . . . . . . . . . . 1-2
Figure 1-2. Robot Components . . . . . . . . . . . . . . . . . . . . . . . . . . . . . . . . . . . . . . . . . . . . . . . . . . . . . . . . . 1-3
Figure 2-1. LSM Power Switch . . . . . . . . . . . . . . . . . . . . . . . . . . . . . . . . . . . . . . . . . . . . . . . . . . . . . . . . . . 2-1
Figure 2-2. 9490 and SD-3 Cartridge Drive Power Switch Location . . . . . . . . . . . . . . . . . . . . . . . . . . . . 2-2
Figure 2-3. Operator Panel Function Keys, Indicators, and Displays . . . . . . . . . . . . . . . . . . . . . . . . . . . 2-4
Figure 2-4. Symbol Definitions for Menu Block Diagram . . . . . . . . . . . . . . . . . . . . . . . . . . . . . . . . . . . . 2-5
Figure 2-5. Setting the SCSI Address . . . . . . . . . . . . . . . . . . . . . . . . . . . . . . . . . . . . . . . . . . . . . . . . . . . . . 2-6
Figure 3-1. Loading a Cartridge into the Cartridge Access Port . . . . . . . . . . . . . . . . . . . . . . . . . . . . . . . . 3-3
Figure 3-2. Setting the Usage Count of the Cleaning Cartridge . . . . . . . . . . . . . . . . . . . . . . . . . . . . . . . . 3-6
Figure 3-3. Opening Front Doors . . . . . . . . . . . . . . . . . . . . . . . . . . . . . . . . . . . . . . . . . . . . . . . . . . . . . . 3-11
Figure 3-4. Raising and Lowering the Z Carriage . . . . . . . . . . . . . . . . . . . . . . . . . . . . . . . . . . . . . . . . . . 3-12
Figure 3-5. Rotating the Z Column . . . . . . . . . . . . . . . . . . . . . . . . . . . . . . . . . . . . . . . . . . . . . . . . . . . . . 3-13
Figure 3-6. Locating Cartridges–Top View . . . . . . . . . . . . . . . . . . . . . . . . . . . . . . . . . . . . . . . . . . . . . . . 3-14
Figure 3-7. Locating Cartridges–Panels, Cells, Rows, Cartridge Drive . . . . . . . . . . . . . . . . . . . . . . . . . . 3-15
Figure 3-8. Locating Cartridges–Panels, Cells, Rows, Drive Cabinet . . . . . . . . . . . . . . . . . . . . . . . . . . . 3-16
Figure 3-9. Locating Cartridges–Panels, Cells, Rows, CEM . . . . . . . . . . . . . . . . . . . . . . . . . . . . . . . . . . 3-17
Figure 3-10. Diagnostic and Cleaning Cartridge Cell Locations . . . . . . . . . . . . . . . . . . . . . . . . . . . . . . . 3-18
Figure 3-11. DLT Handle and Hub Positions . . . . . . . . . . . . . . . . . . . . . . . . . . . . . . . . . . . . . . . . . . . . . 3-21
Figure 3-12. Mounting a DLT Cartridge . . . . . . . . . . . . . . . . . . . . . . . . . . . . . . . . . . . . . . . . . . . . . . . . . 3-22
Figure 3-13. Mounting a Cartridge into a T9840 Drive . . . . . . . . . . . . . . . . . . . . . . . . . . . . . . . . . . . . . . 3-25
Figure 3-14. Mounting a Cartridge into a T9940 Drive . . . . . . . . . . . . . . . . . . . . . . . . . . . . . . . . . . . . . . 3-27
Figure 3-15. Extending the Gripper . . . . . . . . . . . . . . . . . . . . . . . . . . . . . . . . . . . . . . . . . . . . . . . . . . . . . 3-28
Figure 3-16. Removing a Cartridge from the Hand . . . . . . . . . . . . . . . . . . . . . . . . . . . . . . . . . . . . . . . . . 3-29
Figure 4-1. Power Control Panel . . . . . . . . . . . . . . . . . . . . . . . . . . . . . . . . . . . . . . . . . . . . . . . . . . . . . . . . . 4-3
Figure 4-2. Library Operator Panel . . . . . . . . . . . . . . . . . . . . . . . . . . . . . . . . . . . . . . . . . . . . . . . . . . . . . . . 4-3
Figure 4-3. DLT Operator Panel . . . . . . . . . . . . . . . . . . . . . . . . . . . . . . . . . . . . . . . . . . . . . . . . . . . . . . . . . 4-4
Figure 4-4. T9840/T9940 Operator Panel . . . . . . . . . . . . . . . . . . . . . . . . . . . . . . . . . . . . . . . . . . . . . . . . . 4-6
Figure A-1. Inspecting a 9490 (3480-style) Cartridge . . . . . . . . . . . . . . . . . . . . . . . . . . . . . . . . . . . . . . . . A-2
Figure A-2. Inspecting an SD-3 Helical Scan Cartridge . . . . . . . . . . . . . . . . . . . . . . . . . . . . . . . . . . . . . . A-3
Figure A-3. Inspecting a DLT Cartridge . . . . . . . . . . . . . . . . . . . . . . . . . . . . . . . . . . . . . . . . . . . . . . . . . . A-3
viii
Revision P
95693
Tables
Table 1-1. LSM Specifications . . . . . . . . . . . . . . . . . . . . . . . . . . . . . . . . . . . . . . . . . . . . . . . . . . . . . . . . . . . 1-6
Table 3-1. Playground Cartridge Locations . . . . . . . . . . . . . . . . . . . . . . . . . . . . . . . . . . . . . . . . . . . . . . . 3-19
Table A-1. 9490 Cartridge Environmental Specifications . . . . . . . . . . . . . . . . . . . . . . . . . . . . . . . . . . . A-18
Table A-2. SD-3 Cartridge Environmental Specifications . . . . . . . . . . . . . . . . . . . . . . . . . . . . . . . . . . . A-18
Table A-3. DLT Cartridge Environmental Specifications . . . . . . . . . . . . . . . . . . . . . . . . . . . . . . . . . . . A-18
Table A-4. T9840 Cartridge Environmental Specifications . . . . . . . . . . . . . . . . . . . . . . . . . . . . . . . . . . A-19
Table A-5. T9940 Cartridge Environmental Specifications . . . . . . . . . . . . . . . . . . . . . . . . . . . . . . . . . . A-19
ix
Revision P
95693
Tables
x
Revision P
95693
Preface
This guide describes how to operate the TimberWolf 9740 Library Storage
Module (LSM). Most of the information in this guide pertains to the hardware.
Note: Refer to the appropriate publications for specific information about the
controller transport units, tape drives, software commands, and console
messages.
This guide is intended primarily for data center operators who operate the LSM. System
programmers and computer system administrators might also find the information in this
guide useful.
■ Organization
This guide has the following organization:
95693
Chapter 1
“General Information” describes the LSM hardware.
Chapter 2
“Controls and Indicators” shows the locations of the power switch and
operator panel, and describes their functions. This chapter also shows
how to set the SCSI address and maximum usage count for the cleaning
cartridge.
Chapter 3
“Operating the LSM” contains operating procedures. The procedures
include how to power-on and power-off the LSM, perform automated
operations (enter and eject cartridges through the cartridge access
port), cleaning the tape drives, and perform manual operations (mount
and dismount cartridges).
Chapter 4
“Drives” contains an overview about the different types of controller
transport units and tape drives that attach to the LSM.
Chapter 5
“Service” describes how to contact Customer Support for assistance if
the LSM has a problem.
Appendix A
“Cartridge Tape Information” describes how to prepare, inspect, store,
clean, and repair cartridges. It also lists cartridge specifications.
Glossary
The Glossary defines new or special terms and abbreviations used in
this publication.
Index
The Index assists in locating information in this publication.
Revision P
xi
■ Alert Messages
Alert messages call your attention to information that is especially important or that has a
unique relationship to the main text or graphic.
Note: A note provides additional information that is of special interest. A note might
point out exceptions to rules or procedures. A note usually, but not always,
follows the information to which it pertains.
CAUTION:
A caution informs you of conditions that might result in damage to
hardware, corruption of data, or corruption of application software. A
caution always precedes the information to which it pertains.
WARNING:
A warning alerts you to conditions that might result in long-term health
problems, injury, or death. A warning always precedes the information to
which it pertains.
■ Related Publications
Additional information is contained in the following publications, some of
which are delivered with this product.
Publication
Part Number
Cartridge Drive Publications
9490 Operator’s Guide
9634
SD-3 Operator’s Guide
9787
Tape Drive Publications
xii
Quantum DLT 4000 Cartridge Subsystem Product Manual
3131276xx
Quantum DLT 7000 Cartridge Subsystem Product Manual
3131345xx
Quantum DLT 8000 Cartridge Subsystem Product Manual
81-60118-xx
T9840 Tape Drive User’s Reference Manual
95739
T9940 Tape Drive Operator’s Guide
95989
Revision P
95693
■ Additional Information
Sun Microsystems, Inc. (Sun) offers several methods for you to obtain additional
information.
Sun’s External Web Site
Sun’s external Web site provides marketing, product, event, corporate, and service
information. The external Web site is accessible to anyone with a Web browser and an
Internet connection.
The URL for the external Web site is: http://www.sun.com
The URL for StorageTek™ brand-specific information is:
http://www.sun.com/storagetek/
Customer Resource Center
The StorageTek product Customer Resource Center (CRC) is a Web site that enables
members to resolve technical issues by searching code fixes and technical documentation
for StorageTek brand products. CRC membership entitles you to other proactive services,
such as HIPER subscriptions, technical tips, answers to frequently asked questions,
addenda to product documentation books, and online product support contact
information. Customers who have a current warranty or a current maintenance service
agreement may apply for membership by clicking on the Request Password button on the
CRC home page. employees may enter the CRC through the SunWeb PowerPort.
The URL for the CRC is http://www.support.storagetek.com
Partners Site
The StorageTek Partners site is a Web site for partners with a StorageTek Partner
Agreement. This site provides information about products, services, customer support,
upcoming events, training programs, and sales tools to support StorageTek Partners.
Access to this site, beyond the Partners Login page, is restricted. On the Partners Login
page, employees and current partners who do not have access can request a login ID and
password and prospective partners can apply to become StorageTek resellers.
The URL for the StorageTek Partners site is:
http://members.storagetek.com
The URL for partners with a Sun Partner Agreement is:
http://www.sun.com/partners/
Hardcopy Publications
Contact a sales or marketing representative to order additional paper copies of this
publication or to order other StorageTek brand product customer publications in paper
format.
95693
Revision P
xiii
xiv
Revision P
95693
Notices
Please read the following compliance and warning statements for this product.
CAUTION:
Potential equipment damage: Cables that connect peripherals must be
shielded and grounded; refer to descriptions in the cable instruction
manuals. Operation of this equipment with cables that are not shielded
and not correctly grounded might result in interference to radio and TV
reception.
Changes or modifications to this equipment that are not expressly
approved in advance by StorageTek will void the warranty. In addition,
changes or modifications to this equipment might cause it to create
harmful interference.
■ United States FCC Compliance Statement
The following compliance statement pertains to Federal Communications Commission
Rules 47 CFR 15.105:
Note: This equipment has been tested and found to comply with the limits for a Class
A digital device pursuant to part 15 of the FCC Rules. These limits are designed
to provide reasonable protection against harmful interference when the
equipment is operated in a commercial environment. This equipment generates,
uses, and can radiate radio frequency energy and, if not installed and used in
accordance with the instruction manual, may cause harmful interference to radio
communications. Operation of this equipment in a residential area is likely to
cause harmful interference in which case the user will be required to correct the
interference at his or her own expense.
■ CISPR 22 and EN55022 Warning
This is a Class A product. In a domestic environment this product may cause radio
interference in which case the user may be required to take adequate measures.
95693
Revision P
xv
■ Japanese Compliance Statement
The following compliance statement in Japanese pertains to VCCI EMI regulations:
English translation: This is a Class A product based on the Technical Requirement of
the Voluntary Control Council for Interference by Information Technology (VCCI). In a
domestic environment, this product may cause radio interference, in which case the user
may be required to take corrective actions.
■ Taiwan Warning Label Statement
The following warning label statement pertains to BSMI regulations in Taiwan, R.O.C.:
English translation: This is a Class A product. In a domestic environment, this product
may cause radio interference, in which case, the user may be required to take adequate
measures.
xvi
Revision P
95693
■ Internal Code License Statement
The following is the Internal Code License Agreement from Sun StorageTek:
NOTICE
INTERNAL CODE LICENSE
PLEASE READ THIS NOTICE CAREFULLY BEFORE INSTALLING AND OPERATING THIS EQUIPMENT. THIS
NOTICE IS A LEGAL AGREEMENT BETWEEN YOU (EITHER AN INDIVIDUAL OR ENTITY), THE END USER,
AND STORAGE TECHNOLOGY CORPORATION (“STORAGETEK”), THE MANUFACTURER OF THE
EQUIPMENT. BY OPENING THE PACKAGE AND ACCEPTING AND USING ANY UNIT OF EQUIPMENT
DESCRIBED IN THIS DOCUMENT, YOU AGREE TO BECOME BOUND BY THE TERMS OF THIS AGREEMENT.
IF YOU DO NOT AGREE WITH THE TERMS OF THIS AGREEMENT, DO NOT OPEN THE PACKAGE AND USE
THE EQUIPMENT. IF YOU DO NOT HAVE THE AUTHORITY TO BIND YOUR COMPANY, DO NOT OPEN THE
PACKAGE AND USE THE EQUIPMENT. IF YOU HAVE ANY QUESTIONS, CONTACT THE AUTHORIZED
STORAGETEK DISTRIBUTOR OR RESELLER FROM WHOM YOU ACQUIRED THIS EQUIPMENT. IF THE
EQUIPMENT WAS OBTAINED BY YOU DIRECTLY FROM STORAGETEK, CONTACT YOUR STORAGETEK
REPRESENTATIVE.
1.
Definitions: The following terms are defined as followed: 2.
a.
“Derivative works” are defined as works based upon
one or more preexisting works, such as a translation
or a musical arrangement, or any other form in
which a work may be recast, transformed, or
adapted. A work consisting of editorial revision,
annotations, elaboration, or other modifications
which, as a whole, represent an original work of
authorship, is a Derivative work.
3.
b.
“Internal Code” is Microcode that (i) is an integral
part of Equipment, (ii) is required by such
Equipment to perform its data storage and retrieval
functions, and (iii) executes below the user interface
of such Equipment. Internal code does not include
other Microcode or software, including data files,
which may reside or execute in or be used by or in
connection with such Equipment, including, without
limitation, Maintenance Code.
c.
“Maintenance Code” is defined as Microcode and
other software, including data files, which may reside
4.
or execute in or be used by or in connection with
Equipment, and which detects, records, displays,
and/or analyzes malfunctions in the Equipment.
d.
95693
“Microcode” is defined as a set of instructions
(software) that is either imbedded into or is to be
loaded into the Equipment and executes below the
external user interface of such Equipment.
Microcode includes both Internal Code and
Maintenance Code, and may be in magnetic or other
storage media, integrated circuitry, or other media.
The Equipment you have acquired by purchase or lease is
manufactured by or for StorageTek and contains
Microcode. By accepting and operating this Equipment,
you acknowledge that StorageTek or its licensor(s)
retain(s) ownership of all Microcode, as well as all copies
thereof, that may execute in or be used in the operation or
servicing of the Equipment and that such Microcode is
copyrighted by StorageTek or its licensor(s).
StorageTek hereby grants you, the end user of the
Equipment, a personal, nontransferable (except as
permitted in the transfer terms below), nonexclusive
license to use each copy of the Internal Code (or any
replacement provided by StorageTek or your authorized
StorageTek distributor or reseller) which license
authorizes you, the end user, to execute the Internal Code
solely to enable the specific unit of Equipment for which
the copy of Internal Code is provided to perform its data
storage and retrieval functions in accordance with
StorageTek’s (or its licensor’s) official published
specifications.
Your license is limited to the use of the Internal Code as
set forth above. You may not use the Internal Code for
any other purpose. You may not, for example, do any of
the following:
(i) access, copy, display, print, adapt, alter, modify, patch,
prepare Derivative works of, transfer, or distribute
(electronically or otherwise) or otherwise use the Internal
Code;
(ii) reverse assemble, decode, translate, decompile, or
otherwise reverse engineer the Internal Code (except as
decompilation may be expressly permitted under
applicable European law solely for the purpose of gaining
information that will allow interoperability when such
Revision P
xvii
information is not otherwise readily available); or
(iii) sublicense, assign, or lease the Internal Code or permit
another person to use such Internal Code, or any copy of
it.
If you need a backup or archival copy of the Internal
Code, StorageTek, or your authorized StorageTek
distributor or reseller, will make one available to you, it
being acknowledged and agreed that you have no right to
make such a copy.
5.
Nothing in the license set forth above or in this entire
Notice shall convey, in any manner, to you any license to 8.
or title to or other right to use any Maintenance code, or
any copy of such Maintenance Code. Maintenance Code
and StorageTek’s service tools and manuals may be kept at
your premises, or they may be supplied with a unit of
Equipment sent to you and/or included on the same
media as Internal Code, but they are to be used only by
StorageTek’s customer service personnel or those of an
entity licensed by StorageTek, all rights in and to such
Maintenance Code, service tools and manuals being
reserved by StorageTek or its licensors. You agree that you
shall not use or attempt to use the Maintenance Code or
permit any other third party to use and access such
Maintenance Code.
6.
You, the end user, agree to take all appropriate steps to
ensure that all of your obligations set forth in this Notice
are extended to any third party having access to the
Equipment.
7.
You may transfer possession of the Internal Code to
another party only with the transfer of the Equipment on
which its use is authorized, and your license to use the
Internal Code is discontinued when you are no longer an
owner or a rightful possessor of the Equipment. You must
give such transferee all copies of the Internal Code for the
transferred Equipment that are in your possession, along
with a copy of all provisions of this Notice. Any such
transfer by you is automatically (without further action on
the part of either party) expressly
xviii
subject to all the terms and conditions of this Notice
passing in full to the party to whom such Equipment is
transferred, and such transferee accepts the provisions of
this license by initial use of the Internal Code. You cannot
pass to the transferee of the Equipment any greater rights
than granted under this Notice, and shall hold StorageTek
harmless from any claim to the contrary by your
transferee or its successors or assigns. In addition, the
terms and conditions of this Notice apply to any copies of
Internal Code now in your possession or use or which you
hereafter acquire from either StorageTek or another party.
You acknowledge that copies of both Internal Code and
Maintenance Code may be installed on the Equipment
before shipment or included with the Equipment and
other material shipped to you, all for the convenience of
StorageTek’s service personnel or service providers
licensed by StorageTek, and that during the warranty
period, if any, associated with the Equipment, and during
periods in which the Equipment is covered under a
maintenance contract with StorageTek or service
providers licensed by StorageTek, both Internal Code and
Maintenance Code may reside and be executed in or used
in connection with such Equipment, and you agree that
no rights to Maintenance Code are conferred upon you by
such facts. StorageTek or the licensed service provider
may keep Maintenance Code and service tools and
manuals on your premises but they are to be used only by
StorageTek’s customer service personnel or those of
service providers licensed by StorageTek. You further
agree that upon (i) any termination of such warranty
period or maintenance contract period; or (ii) transfer of
possession of the Equipment to another party, StorageTek
and its authorized service providers shall have the right
with respect to the affected Equipment to remove all
service tools and manuals and to remove or disable all
Maintenance Code and/or replace Microcode which
includes both Internal Code and Maintenance Code with
Microcode that consists only of Internal Code.
Revision P
95693
General Information
1
This chapter describes the library storage module (LSM) for an automated
cartridge system (ACS). An ACS is a removable media, robotic system that
mounts cartridges into storage cells, tape drives, cartridge access port (CAP), or
cartridge exchange mechanism (CEM).
Figure 1-1 on page 1-2 and Figure 1-2 on page 1-3 show the location of the major
components for the LSM.
■ Library Storage Module Components
The LSM has four major components:
•
•
•
•
A robot
A cartridge access port (CAP) that holds up to 14 cartridges
Storage cells for 326 or 494 cartridges
An optional cartridge exchange mechanism (CEM)
Attached to the rear of the LSM is either:
•
•
•
A cartridge drive that houses 9490 or SD-3 controller transport units
A 9741 or 9741E Drive Cabinet that houses DLT and/or T9840 drives
An expanded 9741 Drive Cabinet with T9940 drives
Supported tape drives for this LSM include:
•
•
•
•
95693
9490 or SD-3 cartridge transport units (CTUs)
DLT drives
T9840 or T9940 tape drives
A combination of DLT and T9840 or T9940 tape drives
Revision P
1-1
Library Storage Module Components
Figure 1-1. External Components (C62619)
CARTRIDGE
DRIVE OR
9741 DRIVE
CABINET
LOCATION
OPERATOR
PANEL
DOOR
LATCHES
2ND LSM
LOCATION
FOR A CEM
INSTALLATION
EXPANSION
DOOR
POWER
SWITCH
LOCATION
CARTRIDGE
ACCESS
PORT
RIGHT
FRONT
DOOR
C62619
Robot
Figure 1-2 on page 1-3 shows the robot components. The robot is a mechanism that
moves cartridges between storage cells, CTUs, tape drives, CAP, or CEM. The robot
consists of the Z column assembly, hand, and camera assembly.
The Z column assembly contains a Z column, theta motor, and Z carriage. The
Z column attaches to the floor and ceiling of the LSM. The theta motor rotates
the Z carriage to allow access to all of the cells in the LSM.
The hand consists of a reach mechanism and gripper assembly that mount and
dismount the cartridge tapes. The hand attaches to the Z carriage which moves
the hand vertically along the Z column.
1-2
Revision P
95693
Library Storage Module Components
Figure 1-2. Robot Components (C62012)
Z MOTOR
THETA
MOTOR
CAMERA
HAND
STORAGE
CELLS
Z COLUMN
Z CARRIAGE
C62012
The camera assembly on the hand reads the cartridge volume serial numbers
(VOLSERs) during audits, but is not used to locate cartridges during robotic
moves. An audit occurs when:
•
•
•
•
You power-on the LSM.
You open and close an LSM door.
You press the IPL (initial program load) button on the LSM.
A host request is made at the customer console to audit the LSM.
The VOLSER information is stored on the library controller card. You must
request a host update to add the information to the host memory.
Note: The camera does not read the VOLSERs of cartridges in the CTUs or
tape drives. If you manually mount a cartridge, the host memory will
retain the VOLSER that was last automatically requested for that CTU or
tape drive.
95693
Revision P
1-3
Library Storage Module Components
Cartridge Access Port
The cartridge access port (CAP) is a storage area where you add cartridges to or remove
cartridges from an LSM. The CAP is located on the right front door.
LSMs are shipped with the type of CAP that allows you to place 14 cartridges, one at a
time, into the cells, or with a CAP that allows you to place a preloaded 10-cartridge
magazine into the CAP.
Note: The 10-cell cartridge magazine holds DLT cartridges.
Storage Cells
The LSM contains storage cells for 326 or 494 cartridges. The number of cells is
determined by whether the LSM has the standard left front door or the
expansion door.
Cartridges are stored in cell arrays that hold 6 or 14 cartridges. The cell arrays
are stacked in columns and the columns are arranged in a circle around the
robot assembly.
CAUTION:
Equipment problems: The cartridges must be inserted into the storage
cells with the customer label on top and the VOLSER facing the person
doing the inserting. If the cartridges are inserted into the cells upside
down, the LSM will stop during operation.
Cartridge Exchange Mechanism
The cartridge exchange mechanism (CEM) is an optional feature that allows a
robot to pass a cartridge from one LSM to another. For instance, when the host
software makes a mount request, and all the drives in the LSM are busy, with
this feature the robot can place the cartridge to the next LSM. The robot in that
LSM can then place the cartridge into one of its drives.
You can connect up to six LSMs together using the CEM. The LSMs are
numbered from left to right as you face the front of the LSMs. LSM0 is always at
the far left and all other LSMs are numbered consecutively and in ascending
order toward the right as you face them (to LSM5).
Note: The CEM does not support libraries using a SCSI interface.
1-4
Revision P
95693
Cartridge Drives and Cabinets
■ Cartridge Drives and Cabinets
The cartridge drive attaches to the rear of the LSM and contains:
•
•
Two or four 9490 (TimberLine) CTUs
One to four SD-3 (RedWood) CTUs
The 9741 or 9741E drive cabinets attach to the rear of the LSM and contains:
•
•
•
One to ten Digital Linear Tape (DLT) drives
One to ten T9840 Tape Drives
One to ten T9940 Tape Drives
Each CTU or tape drive holds the cartridge for read/write operations. For more
specific information, refer to your CTU or tape drive publications.
Notes:
•
Only two of the three drive types that can be installed in a 9741 or
9741E Drive Cabinet are allowed to be mixed in the same cabinet.
•
The T9940B drive cannot be installed in a 9740 LSM if the library uses a SCSI
control path.
See Chapter 4, “Drives” for more information about these drives.
■ LSM Safety Features
Safety features are incorporated into the LSM. If the front doors to the LSM are
opened, electrical interlocks remove power from the robot assembly.
Behind the right front door, covers are placed over the library controller card
and the LSM power supply to prevent contact with the hazardous voltages and
sensitive electronics.
■ Controlling Software
Controlling software is the interface between the host operating system and the
LSM. The software determines where the cartridge is located by tracking the
VOLSER and cell location during audits, then allocates which CTU or drive
receives the cartridge.
If the LSM goes offline for any reason, you can mount and dismount cartridges
manually, as described in Chapter 3, “Operating the LSM.”
95693
Revision P
1-5
LSM Specifications
■ LSM Specifications
Table 1-1 lists the LSM specifications:
Table 1-1. LSM Specifications
Description
Specification
Power cable
US/Canada
100-120 VAC UL/CSA power cable
International
200 to 240 VAC HAR power cable
Input voltage range
Nominal voltage
100 or 240 VAC
100 to 254 VAC
Power configuration
US/Canada:
100-120 VAC, single phase, 47 to 63 Hz, 20 a
Service, 3-wire
International:
200 to 240 VAC, single phase, 47 to 63 Hz, 10 a
Service 3-wire
Power consumption
200 W
Maximum heat output
683 Btu/hr
Temperature
Operating
Storage
Shipping
15º to 32ºC (59º to 90ºF)
10º to 40ºC (50º to 104ºF)
-40º to 60ºC (-40º to 140ºF)
Relative Humidity
Operating
Storage
Shipping
20% to 80% (noncondensing)
10% to 95% (noncondensing)
10% to 95% (noncondensing)
Wet Bulb Maximum
Operating
Storage
Shipping
29.2º C (84.5ºF)
35º C (95ºF)
35º C (95ºF)
Altitude
Operating
Storage
Shipping
1-6
0 to 3.05 km (0 to 10,000 ft.)
0 to 3.05 km (0 to 10,000 ft.)
0 to 15.24 km (0 to 50,000 ft.)
Revision P
95693
Controls and Indicators
2
This chapter shows and describes the power switch and operator panel for the
LSM. It also describes how to set the SCSI address as well as the maximum
usage count of the cleaning cartridges. Refer to the controller transport unit or
tape drive operator guides for information about operating those units.
■ Power Switch
The LSM power switch is a circuit breaker located in the lower right corner of the right
front door of the LSM. The switch provides power to the LSM only. Figure 2-1 shows
the LSM power switch location.
Figure 2-1. LSM Power Switch (C62018)
POWER
SWITCH
DETAIL A
A
C62018
95693
Revision P
2-1
Power Switch
Tape Drives and Cabinets
Drives that are housed in the standard and expanded (9741 and 9741E) Drive
Cabinet each have their own power supply that attaches to a power strip at the
base of the cabinet. To power down drives in the 9741/9741E Drive Cabinet the
circuit breaker that provides power to the drives must be switched off. Do the
same to power off the LSM.
Controller Transport Units
The controller transport units also have their own power supplies, but they
have a power switch on they outside of the cartridge drive that the operator is
allowed to use. If you need to power down the LSM and drives, toggle down
the LSM power switch and push the cartridge drive power switch. Figure 2-2 on page 2-2
shows the power switch location for 9490 and SD-3 Cartridge Drives.
Figure 2-2. 9490 and SD-3 Cartridge Drive Power Switch Location (C62019)
A
POWER
SWITCH
VIEW A
(9490 or SD-3)
C62019
2-2
Revision P
95693
Operator Panel
■ Operator Panel
The operator panel is mounted to the right front door of the LSM. The panel
contains function keys (also referred to as softkeys) and indicators, plus a twoline display. The operator panel displays LSM status, configuration, test
sequences, and error information.
Figure 2-3 on page 2-4 shows the panel and describes each item.
Use the operator panel to:
•
Resolve machine problems
If an error occurs, a fault symptom code (FSC) is displayed. Forward this
code to your service representative to help resolve the problem. Write down
the FSC as soon as it appears to retain an accurate history of what
happened.
The display also instructs you to close the door or cartridge access port.
•
Set the SCSI address.
See Figure 2-4 on page 2-5 and Figure 2-5 on page 2-6 for this procedure.
•
Set the maximum usage count of the cleaning cartridges.
See Figure 3-2 on page 3-6 for this procedure.
■ Setting the SCSI Address
You set the SCSI address from the operator panel. See Figure 2-4 on page 2-5 and
Figure 2-5 on page 2-6 for the menu block diagrams that describe how to set the SCSI
address to 0 through 7 if you have the PRS card, or 0 through 15 if you have the PRW
card.
CAUTION:
Initialization errors: During this procedure, the panel displays Press
Execute to Enter Lib Size. This is not normally an operator
function. Altering the library size can cause initialization errors if the
size is set incorrectly to full size and the library only holds 326
cartridges instead of 494 cartridges. Press the MENU button and
continue through the choices as shown in the block diagram.
95693
Revision P
2-3
Setting the SCSI Address
Figure 2-3. Operator Panel Function Keys, Indicators, and Displays (C62014)
IPL
SERVICE REQ
(OPERATOR PANEL DISPLAY)
MENU
PROCESSOR ACTIVE
INTERFACE ACTIVE
RESET
EXECUTE
IPL
Initiates the download from the diskette. The IPL sequence consists of
PROM tests, boot tests, and machine initialization.
RESET
DESIGNED FOR CSE USE ONLY! NOT an operator activity. Initiates
a dump.
OPERATOR
PANEL
DISPLAY
Displays machine status and menu information. It also prompts the operator
to perform certain functions.
When the display shows "ONLINE - PRESS EXE TO UNLK CAP," and you want
to unlock the CAP so that you can place a cartridge into it, press EXECUTE
to send a message to the robot to unlock the CAP.
When the display shows "ONLINE CAP UNLK DISABLD," the CAP is locked by
the host. To open the CAP for entering cartridges, enter the "open"
command from the system console. The display will change to "ONLINE
PRESS EXECUTE TO UNLOCK CAP." Once you have pressed EXECUTE, the
display will change to "ONLINE CAP UNLK PENDING." The robot will then
unlock the CAP and the display will show "ONLINE CAP UNLOCKED."
When the display shows "ONLINE CAP UNLOCKED," and you want it locked,
open and close the CAP. The display will show "ONLINE CAP LOCKED."
SERVICE
REQ
Lights when the LSM requires service. The display indicates "INOP" and
the fault symptom code.
PROCESSOR
ACTIVE
Solid light until the functional code is active, then flashes on and off every
second while the controller card is active.
INTERFACE
ACTIVE
Flashes whenever I/O is performed across a host interface or CSE
port.
MENU
Used to set SCSI address and cleaning cartridge usage.
EXECUTE
Used to unlock the CAP. When the display shows "ONLINE CAP LOCKED,"
press EXECUTE to send a message to the robot to unlock the CAP. Also
used to set SCSI address and cleaning cartridge usage.
C62014
2-4
Revision P
95693
Setting the SCSI Address
Figure 2-4. Symbol Definitions for Menu Block Diagram (C62015)
Symbol Definitions for Menu Block Diagrams
= display screen with actual display screen text from a top level menu
Press Execute to
Enter 9740
= display screen and type of information screen is displaying
Test Screens
EXECUTE
PRESSED
= display screen with actual display screen text
MENU
PRESSED
bullet ( )
a bullet ( ) plus
a number and a
multiplication symbol
(Example:
3X)
= operator panel softkey operations used in menu sequences
= repeat previous menu action
= the number of times a previous menu action is repeated
between the first and last option in a sequential menu set
How Used....
Press Execute to
Dmnt to Drive 1
EXECUTE
PRESSED
MENU
PRESSED
PATH
INDICATORS
95693
This configuration
indicates a display
screen and its
softkey options.
C62015
Revision P
2-5
Setting the SCSI Address
Figure 2-5. Setting the SCSI Address (C62016)
IPL
PRESSED
After pressing the execute softkey, there will be a
momentary delay before this screen appears.
Test Screens
Download BT0.X
SCSI host options are ID 0 through 7 for the PRS card
or 0 through 15 for the PRW card.
Q Off/On Bus options for drives 1-9 only appear if those
drives are installed and configured and after the
preceding drive has been assigned an ID.
Execute BT0.X
Pressing menu accesses screens showing off/on bus
and SCSI ID information for each drive installed and
Next Sequence
of Tests Begin
EXECUTE
PRESSED
Press Menu
Until This
Screen
Appears
MENU
PRESSED
Drv X: XXX Bus
SCSI ID = XX
EXECUTE
PRESSED
EXECUTE
PRESSED
MENU
PRESSED
MENU
PRESSED
QPress Execute if
Drv X Off Bus
Press Execute to
Enter 0 as ID
EXECUTE
PRESSED
MENU
PRESSED
Press Menu
Until This
Screen
Appears
EXECUTE
PRESSED
MENU
PRESSED
SCSI Host
SCSI ID = X
MENU
PRESSED
MENU
PRESSED
QPress Execute if
Press Menu
Until This
Screen
Appears
Drv X On Bus
6X
Press Execute to
Enter 7 as ID
EXECUTE
PRESSED
MENU
PRESSED
EXECUTE
PRESSED
MENU
PRESSED
Press Execute if
Drv X is ID 0
EXECUTE
PRESSED
Press Execute to
Store Cfg in NVR
EXECUTE
PRESSED
MENU
PRESSED
MENU
PRESSED
Exit to IPL
14X
When more than one
drive is installed, pressing
execute returns you to the
Off/On Bus menu option
until all drives have
been assigned an ID.
Press Execute if
Drv X is ID 15
EXECUTE
PRESSED
MENU
PRESSED
C62016
2-6
Revision P
95693
Operating the LSM
3
This chapter contains the procedures for:
•
•
•
•
Powering-on or IPLing the LSM
Powering-off the LSM
Operating in automated mode
Operating in manual mode
When the machine is controlled by the host, refer to your software publications
and enter the command from the operator console to do the desired activity.
■ Powering-on or IPLing the LSM
To power-on or IPL the LSM, lift the power switch at the bottom right corner of
the right front door of the LSM. When the LSM has been powered-on, you can
press the IPL function key located on the operator panel to IPL the LSM.
When you do either activity:
•
•
The operator panel displays PROM, boot, and initialization information.
The operator panel displays “ONLINE - PRESS EXE TO UNLK CAP.
Note: If the LSM does not power-on, contact the Central Support Remote
Center and report the problem.
■ Powering-off the LSM
To power-off the LSM, enter the command at the operator console to place the
LSM and controller transport units (CTUs) and drives offline.
Push down the power switch on the bottom right corner of the right front door
of the LSM.
If this is an emergency, press the power switch on the cartridge drive to the off
position. This is only applicable to 9490 and SD-3 Cartridge Drives.
If you have a standard or expanded (9741 or 9741E) Drive Cabinet with DLT, T9840, or
T9940 drives and you have an emergency, you must switch the circuit breaker off to kill
power to the drives.
95693
Revision P
3-1
Operating the LSM in Automated Mode
■ Operating the LSM in Automated Mode
When the LSM is online and operating in automated mode, it performs many
tasks that you would otherwise perform manually. However, to keep the LSM
operating efficiently while the robot is mounting and dismounting cartridges,
you may need to do the following:
•
Monitor your operator console and the LSM operator panel for messages
and respond appropriately
•
Load cartridges into the LSM through the cartridge access port (CAP)
•
Eject cartridges from the LSM through the CAP
•
Replace cleaning cartridges
The instructions on the following pages describe how to perform these
activities.
Loading Cartridges through the CAP
If the operator panel displays ONLINE CAP UNLK DISABLD, the CAP is
locked by the host. Issue the command at the operator console to allow the
CAP to be unlocked.
When the operator panel displays ONLINE - PRESS EXE TO UNLK CAP,
follow the steps below.
To unlock the CAP:
1. Press EXECUTE on the operator panel.
a.
The operator panel displays ONLINE CAP UNLK PENDING.
b. The hand unlocks the CAP.
c.
The operator panel displays ONLINE CAP UNLOCKED.
2. Open the CAP to gain access to the cells.
The operator panel displays ONLINE CAP UNLOCKED.
CAUTION:
Potential equipment damage: You must enter the cartridges properly or
you might damage the robot, CTU, or tape drive, or cause the LSM to
stop operating.
3. Enter the cartridges so that they lie flat, with the customer label on top and
the tape leader block cutout on the right-hand side, or insert the cartridges
into a magazine and insert the magazine into the CAP.
See Figure 3-1 on page 3-3 for an example of how to load the cartridges.
3-2
Revision P
95693
Operating the LSM in Automated Mode
4. Close the CAP. The lock automatically engages.
Notes:
•
The host software determines what happens when you enter a cartridge
upside down or with an unreadable label. Under normal conditions, the
camera on the hand audits the CAP and recognizes that a cartridge is
present, but the hand does not move it. You must remove the cartridge from
the CAP and correct the problem.
•
For some systems, you are prompted to type in a label number when no
VOLSER is read. If you do type in a label number, you might cause a
problem during an audit, because the camera still cannot read an
unreadable VOLSER on the cartridge.
Figure 3-1. Loading a Cartridge into the Cartridge Access Port (C62735)
TAPE
CARTRIDGE
CUSTOMER
LABEL
VOLUME
SERIAL
NUMBER
95693
Revision P
C62735
3-3
Operating the LSM in Automated Mode
Ejecting Cartridges through the CAP
Refer to your specific software publications for instructions about having the
robot insert the desired cartridges into the CAP.
To eject cartridges through the CAP:
1. Enter the VOLSERs of the cartridges you want ejected at the operator
console. The robot will retrieve them and insert them into the CAP.
2. If the operator panel displays ONLINE CAP UNLK DISABLD, the CAP is
locked by the host. Issue the command at the operator console to change
the LSM to the ONLINE - PRESS EXE TO UNLK CAP mode.
3. When the operator panel displays ONLINE - PRESS EXE TO UNLK CAP,
press EXECUTE on the operator panel.
a.
The operator panel displays ONLINE CAP UNLK PENDING.
b. The hand unlocks the CAP.
c.
The operator panel displays ONLINE CAP UNLOCKED.
4. Open the CAP to gain access to the cells.
5. Remove the cartridges and store them outside the LSM, or
6. Remove the magazine from the CAP, remove the cartridges from the
magazine, and store them outside the LSM.
7. Close the CAP. The lock automatically engages.
8. Repeat these steps until the robot has inserted all of the desired cartridges
into the CAP and you have removed them.
3-4
Revision P
95693
Cleaning Drives in the LSM
■ Cleaning Drives in the LSM
Drive cleaning can be initiated either by the operator or by the backup
application. The following information describes the functions the operator
needs to perform to clean the drives.
Operator-initiated cleaning is handled in one of two ways:
•
•
For a SCSI interface
For a serial interface
Before attempting to clean any drives in the LSM, make sure you know what
type of interface (control path) is installed at your site: SCSI or serial. If you do
not know, ask your service representative.
Note: The T9940 drive cannot be installed in a 9740 LSM if the library uses a SCSI
control path. Thus, the section entitled “SCSI Interface” does not apply to
T9940 drives.
SCSI Interface
If your control path is SCSI, these items are true:
•
You have the option of using the AUTO CLEAN function or cleaning the
drives manually.
•
All drive cleaning is set up and controlled through the operator panel.
•
The LSM automatically tracks the number of cleaning cycles performed by
the AUTO CLEAN function on any particular cleaning cartridge.
AUTO CLEAN Feature
The AUTO CLEAN feature can be enabled when your LSM is configured during
installation. When a drive requires cleaning, the robot receives a message
telling it to retrieve the cleaning cartridge from the cleaning cell in the LSM and
place it into the drive.
If AUTO CLEAN is not enabled, you must periodically look at the lights on the
drive. When the Use Cleaning Cartridge light is on, you must manually place a
cleaning cartridge into the drive.
See “Setting the Cleaning Cartridge Usage Count” on page 3-6 for more information and
procedures.
95693
Revision P
3-5
Cleaning Drives in the LSM
Setting the Cleaning Cartridge Usage Count
You can use the operator panel to set the maximum number of times a cartridge can be
used to make sure that it is effective. Remember that each drive’s cartridge has a
maximum number of cleans, and must be replaced when it expires.
See Figure 3-2 for the menu block diagrams to set the usage count.
Figure 3-2. Setting the Usage Count of the Cleaning Cartridge (C62017)
Online Cap
Unlk Disabld
MENU
PRESSED
Press Menu
Until This
Screen
Appears
9840 Count = XXX
Limit = XXX
Press Execute to
Change Limit
EXECUTE
PRESSED
EXECUTE
PRESSED
MENU
PRESSED
Q Press Execute to
Press Execute to
Show 9840 Data
EXECUTE
PRESSED
MENU
PRESSED
Set to 100
EXECUTE
PRESSED
MENU
PRESSED
19X
Press Execute to
Show DLT Data
EXECUTE
PRESSED
MENU
PRESSED
DLT, 3490 (9490), or Redwood (SD-3) data
appears here when the LSM is configured for those
drives only.
Press Execute to
Set to 1
EXECUTE
PRESSED
MENU
PRESSED
Online CAP
Unlk Disabld
This menu option only appears when the LSM is
configured for a mixed drive environment of 9840s
and DLTs or CTU environment of 9490s (3490) and
Q 9840 limits decrease from 100 to 1 in decrements
of 5; DLT from 20 to 1 in decrements of 1; 3480
from 500 to 1 in decrements of 25; Redwood from
100 to 1 in decrements of 5.
3-6
Revision P
C62017
95693
Cleaning Drives in the LSM
Replacing Cleaning Cartridges
When an LSM operating in an SCSI control path environment is in AUTO CLEAN
mode, the only method to use to replace an expired cleaning cartridge is by selecting the
Change Cln Cart utility from the main operator panel menu and following these
instructions.
Notes:
•
Do not load cleaning cartridges through the door of the LSM because the cleaning
usage will not increment. You must use the Change Cln Cart utility and then load
the cleaning cartridge through the CAP.
•
In an LSM having both DLT and 9840 drives, make sure you specify the proper type
of cleaning cartridge when asked by the Change Cln Cart utility.
With microcode version 1.9.xx and lower:
The clean counter increments for each clean. When the clean counter is equal to the
set clean limit value (for example, 20 cleans for DLT cleaning cartridge), a
Cleaning Cartridge Used Up message is displayed on the LSM operator
panel. This message disappears with the next operator panel message or SCSI
command.
If a drive indicates that it needs cleaning, the LSM continues to use an expired
cleaning cartridge, incrementing the clean counter for each cleaning mount. When an
expired cleaning cartridge is inserted into the drive, the drive will run the cleaning
tape to the end and detect that the cleaning cartridge is expired but will not reset the
clean indicator on the drive.
If the next tape successfully loads the drive clean indicator will disappear. Executing
Change Cln Cart from the operator panel resets the library’s clean counter to 0.
With microcode version 1.10.xx and higher, same as above except:
When the clean counter is equal to the clean limit value, an asterisk (*) is displayed on
the right side of the top line on the operator panel to indicate that the cleaning
cartridge is expired. The asterisk remains on the display, even when other messages
display, until you execute Change Cln Cart.
During early portions of a library initialization, the asterisk temporarily does not
display. However, once the library has been initialized, the asterisk reappears if the
clean counter exceeds the set clean limit.
95693
Revision P
3-7
Cleaning Drives in the LSM
Serial Interface
If your control path is serial, these items are true:
•
You do not have the option of using the AUTO CLEAN function from the
operator panel.
•
All drive cleaning is managed by and controlled through the host. The
manner which ACSLS (Automated Cartridge System Library Software)
handles automatic cleaning operations is defined in the ACSLS 5.3x System
Administrator’s Guide, PN 34767.
This guide explains that the LSM alerts ACSLS of the cleaning request and
ACSLS schedules the operation. The next time a mount request is received
for the given transport, a cleaning tape is first mounted to the transport and
the cleaning cycle completes before the requested data tape is mounted as
requested.
•
ACSLS automatically tracks the number of cleaning cycles performed by any
particular cleaning cartridge.
Setting the Cleaning Cartridge Usage Count
In the event that all cleaning cartridges are expired, the original mount request
will be honored without the prior cleaning operation. For that mount and for
each subsequent mount to the uncleaned drive, a message will be posted in the
event log: No Cleaning Cartridge Available for the specified drive.
The ACSLS Messages document, PN 20177, explains the meaning of the message
in detail, recommending required action to add more cleaning cartridges.
Replacing Cleaning Cartridges
The “Cleaning Transports” section in the ACSLS 5.3 System Administrator’s
Guide, PN 34767 explains how to enter cleaning tapes into the library and how
to define them as cleaning tapes using the Set Clean command. This command
allows the user to specify maximum usage for the cleaning tape.
Unlocking the CAP and Removing Non-cleaning Cartridges
If the operator panel displays ONLINE CAP UNLK DISABLD. The CAP is
locked by the host.
Issue the command at the operator console that puts the LSM in the ONLINE PRESS EXE TO UNLK CAP mode. Then perform the steps below.
When the operator panel displays ONLINE - PRESS EXE TO UNLK CAP, go
directly to the steps below.
You must remove all cartridges that might be in the CAP, or the operator panel
will display CAP BUSY. To open the cap so that you can remove cartridges
from it, you must first unlock it.
3-8
Revision P
95693
Cleaning Drives in the LSM
To unlock the CAP:
1. Press EXECUTE on the operator panel.
a.
The operator panel displays ONLINE CAP UNLK PENDING.
b. The hand unlocks the CAP.
c.
The operator panel displays ONLINE CAP UNLOCKED.
2. Open the CAP to gain access to the cells.
3. Remove the cartridges and store them outside the LSM, or remove the
magazine from the CAP. Then remove the cartridges from the magazine and
store them outside the LSM.
4. Close the CAP. The lock automatically engages.
Replacing Expired Cleaning Cartridges
1. Press MENU until the operator panel displays PRESS EXECUTE TO
REPLACE CLN CART.
2. Press EXECUTE.
The operator panel displays PRESS EXECUTE TO REPLACE 3480 CART.
•
If you want to replace the 3480 cleaning cartridge, press EXECUTE.
•
If you want to replace the helical cleaning cartridge, press MENU.
PRESS EXECUTE TO REPLACE HELICAL CART.
•
If you want to replace the DLT cleaning cartridge, press MENU again.
PRESS EXECUTE TO REPLACE DLT CART.
•
If you want to replace the 9840 cleaning cartridge, press MENU again.
PRESS EXECUTE TO REPLACE 9840 CART.
3. Press EXECUTE and wait until the CAP unlocks.
The hand takes the old cleaning cartridge from its cell and inserts it into the
CAP and then unlocks the CAP.
4. Open the CAP and remove and discard the old cartridge.
5. Insert one new cleaning cartridge into a CAP cell and close the CAP.
a.
The robot performs a brief audit.
b. The operator panel displays MOVING CLEANING CART TO CELL.
c.
The hand inserts the cartridge into its cell.
d. The operator panel displays ONLINE CAP UNLK DISABLD or ONLINE
- PRESS EXE TO UNLK CAP. Exit menu.
95693
Revision P
3-9
Operating in Manual Mode
■ Operating in Manual Mode
When an LSM is offline, you might be:
•
•
•
•
•
•
Opening the LSM front doors
Moving the robot
Locating a cartridge in the storage cells
Mounting and dismounting a cartridge
Removing a cartridge from the hand
Returning the LSM to online status
The following information describes how to perform these activities.
Opening the LSM Front Doors
You must open the right front door, then the left front door to perform manual
operations. See Figure 3-3 on page 3-11.
1. Make sure that all jobs have ended and place the LSM offline.
2. Open the LSM right front door by using the door key to unlock the top and
bottom latches. Turn the key counterclockwise.
CAUTION:
Components are Sensitive to Static Electricity: Even a small
electrostatic discharge (ESD) can damage an electrical component
inside the LSM. A damaged component may not fail immediately, but
over time, it will become worse, possibly causing an “intermittent”
problem. Make sure you touch gray, unpainted metal or wear an
antistatic wrist strap before reaching inside the LSM.
After you have opened the door to the LSM:
•
With your finger, touch a gray, unpainted metal surface, such as the LSM
frame, just inside the front door of the unit.
•
Keep your body movement to a minimum as you touch the drives or
library components.
3. Open the LSM left front door. For the standard door, pull gently from the
top right corner. For the expansion door, pull from the recessed area on the
right side.
3-10
Revision P
95693
Operating in Manual Mode
Figure 3-3. Opening Front Doors (C62021)
TOP
LATCH
A
BOTTOM
LATCH
LSM with Expansion Door
LSM with Standard Door
LATCH
KEY
LATCH
(REF)
DETAIL A
95693
Revision P
C62021
3-11
Operating in Manual Mode
Moving the Robot
After opening the LSM doors, you might need to move the robot to make it
easier to access the stored cartridges or the drives.
Read and observe the following caution before attempting to move any portion
of the robot.
CAUTION:
Potential equipment damage: Do not touch exposed electrical parts
when moving any part of the robot.
To prevent damage to the hand or Z carriage, make sure that the reach
mechanism on the hand is fully retracted before moving any part of the
robot. Turn the belt drive to retract the reach mechanism.
If the LSM goes offline because of a power failure, the reach mechanism
might extend into a storage cell or drive. If the robot is rotated in this
condition, the hand will be damaged.
Move the Z column and Z carriage only, as shown in Figure 3-4 and
Figure 3-5 on page 3-13.
Raising and Lowering the Z Carriage
If you need to raise or lower the hand, slowly and carefully push down or push
up by placing your fingers on the Z carriage as shown in Figure 3-4.
Figure 3-4. Raising and Lowering the Z Carriage (E62022)
LOWERING THE Z CARRIAGE
RAISING THE Z CARRIAGE
E62022
3-12
Revision P
95693
Operating in Manual Mode
Rotating the Z Column
CAUTION:
Potential equipment damage: The Z column does not rotate a full 360
degrees. If you meet resistance when rotating it, do not force it. Rotate
the Z column in the opposite direction.
If you need to rotate the Z column, grasp it and carefully rotate it, as shown in Figure 3-5.
If the Z column meets resistance and stops before the desired position is reached, it has
contacted a stopping mechanism. Rotate the Z column in the opposite direction.
Figure 3-5. Rotating the Z Column (E62023)
E62023
95693
Revision P
3-13
Operating in Manual Mode
Locating a Cartridge in the Storage Cells
Figure 3-6 through Figure 3-9 illustrate the locations of the panels, rows, and columns of
the cartridge storage cells in a typical LSM configuration.
Note: There is a decal at the top of each column that also provides location
information.
Figure 3-6. Locating Cartridges–Top View (C62024)
CARTRIDGE
DRIVE
COLUMN 0
CTU
COLUMN 0
COLUMN 0
PANEL 1
PANEL 2
PANEL 0
COLUMN 0
PANEL 3
COLUMN 0
9740 with Expansion Door
3-14
Revision P
C62024
95693
COLUMN
0
COLUMN
1
0
0
PANEL 1
PANEL 0
COLUMN
2
COLUMN
3
0
COLUMN
0
0
COLUMN
1
0
0
COLUMN
2
COLUMN
3
0
PANEL 2
COLUMN
0
COLUMN
0
COLUMN
1
0
0
COLUMN COLUMN
2
3
0
0
T
T
T
T
T
T
T
T
CTU 0
T
T
T
T
T
T
AREA
RESERVED
FOR
CAP
LATCH
T ASSEMBLY
T
CTU 1
Revision P
T
T
T
T
T
T
T
T
T
T
CTU 2
T
T
CTU 3
T
T
T
T
T
T
T COLUMN COLUMN COLUMN
0
1
2
36
36
36
T
T
41
41
41
41
41
41
41
41
41
41
T = ARRAY TARGET
CUSTOMER CARTRIDGE CAPACITY CHART
CTUs
BASE
4
326
EXPANSION
168
CAP
TOTAL
14
494
41
41
41
T
T
41
NOT A STORAGE CELL
CLEANING CARTRIDGE CELL
DIAGNOSTIC CARTRIDGE CELL
EMPTY/DROPOFF CELL
C62013
3-15
Operating in Manual Mode
T
Figure 3-7. Locating Cartridges–Panels, Cells, Rows, Cartridge Drive (C62013)
95693
PANEL 3
(EXPANSION)
0
0
COLUMN
2
COLUMN
3
0
COLUMN
1
COLUMN
0
0
0
0
COLUMN
2
COLUMN
3
0
PANEL 2
COLUMN
0
0
COLUMN
0
0
T
COLUMN COLUMN
2
3
COLUMN
1
0
0
DRIVE 9
T
T
T
T
T
T
T
T
DRIVE 8
T
T
T
T
T
T
T
AREA
RESERVED
FOR
CAP
LATCH
T ASSEMBLY
DRIVE 7
T
DRIVE 6
T
DRIVE 5
T
Revision P
T
T
T
T
T
T
T
DRIVE 4
T
T
T
DRIVE 3
T
DRIVE 2
T
T
DRIVE 1
T
DRIVE 0
T
T
T
T
T
T
T
T
41
41
41
41
41
41
41
41
T = ARRAY TARGET
CUSTOMER CARTRIDGE CAPACITY CHART
DRIVES
BASE
10
326
EXPANSION
168
CAP
TOTAL
14
494
COLUMN COLUMN COLUMN
2
1
0
36
36
36
41
41
41
T
T
41
41
T
T
41
NOT A STORAGE CELL
CLEANING CARTRIDGE CELL
DIAGNOSTIC CARTRIDGE CELL
EMPTY/DROPOFF CELL
95693
C62377
Operating in Manual Mode
COLUMN
1
COLUMN
0
PANEL 1
PANEL 0
Figure 3-8. Locating Cartridges–Panels, Cells, Rows, Drive Cabinet (C62377)
3-16
PANEL 3
(EXPANSION)
COLUMN
1
COLUMN
0
PANEL 1
PANEL 0
COLUMN
2
COLUMN
3
COLUMN
1
COLUMN
0
COLUMN
2
COLUMN
3
PANEL 2
COLUMN
0
COLUMN
0
0
0
0
0
0
0
0
0
0
T
T
T
T
T
T
T
T
T
COLUMN COLUMN
2
3
COLUMN
1
0
Revision P
T
T
T
T
T
T
T
T
T
T
T
T
AREA
RESERVED
FOR
CAP
LATCH
T ASSEMBLY
DRIVE PLENUM
(4 OR 10-DRIVE
CONFIGURATION)
T
0
T
T
T
T
T
T
T
T COLUMN COLUMN COLUMN
2
1
0
36
36
36
T
T
41
41
41
41
41
41
41
41
41
41
T = ARRAY TARGET
CUSTOMER CARTRIDGE CAPACITY CHART
DRIVES
BASE
4 or 10
318
EXPANSION
168
CAP
10 or 14
TOTAL
486
41
41
41
T
T
41
NOT A STORAGE CELL
CLEANING CARTRIDGE CELL
DIAGNOSTIC CARTRIDGE CELL
EMPTY/DROPOFF CELL
CARTRIDGE EXCHANGE MECHANISM
3-17
C62524
Operating in Manual Mode
T
Figure 3-9. Locating Cartridges–Panels, Cells, Rows, CEM (C62524)
95693
PANEL 3
(EXPANSION)
Operating in Manual Mode
Figure 3-10. Diagnostic and Cleaning Cartridge Cell Locations (C62733)
ROW 22
Do Not Use
CALIBRATION
BLOCK
ROW 24
ROW 23
ROW 26
ROW 25
ROW 27
(Drop off Cell)
PANEL 2
COLUMN 3
C62733
Figure 3-10 shows the cell locations of cartridges stored in the playground. These cells
are used to store diagnostic and cleaning cartridges, and to provide an empty/dropoff cell
for the robot if the LSM loses power while a cartridge is in the hand.
Table 3-1 on page 3-19 designates where the respective cartridges for each drive type are
located in the playground.
CAUTION:
Proper operation: Do not insert cartridges into the reserved cells or the
LSM will not be able to complete its initialization routines. If the LSM
does not initialize, it cannot be placed online.
3-18
Revision P
95693
Operating in Manual Mode
Table 3-1. Playground Cartridge Locations
Drive Combinations
Diagnostic Cell
Cleaning Cell
9490
25
23
SD-3
26
24
9490
SD-3
25
26
23
24
DLT
26
24
T9840
25
23
T9940
25
23
T9840
DLT
25
26
23
24
T9940
T9840
25
26
23
24
T9940
DLT
25
26
23
24
Note: No more than two drive types can be mixed in the 9741/9741E Drive
Cabinet.
Mounting and Dismounting Cartridge Tapes
When you are operating in manual mode, you may need to mount and
dismount cartridge tapes from different types of CTUs and tape drives.
To mount and dismount cartridge tapes:
1. Open the right front door of the LSM by using the door key to unlock the
top and bottom latches. See Figure 3-3 on page 3-11.
2. Open the LSM left front door.
•
•
For the standard door, pull gently from the top right corner.
For the expansion door, pull from the recessed area on the right side.
3. To mount a cartridge obtain the VOLSER, location, and drive number from
the operator console. Locate the cartridge and mount it into the drive.
4. To dismount a cartridge, locate the CTU or drive. Remove the cartridge from
the drive and place it outside the LSM.
The following information details the mount and dismount procedures for each
cartridge and device type. Proceed to the appropriate section for information
about the specific drive installed in the LSM.
Note: See Chapter 4, “Drives” for examples of operator panel displays.
95693
Revision P
3-19
Operating in Manual Mode
Mounting a Cartridge into a 9490 or SD-3 CTU
See “Controller Transport Units” on page 4-1 for more information.
WARNING:
Personal injury: To avoid injury to your hand, keep your fingers out of
the transport; the elevator lowers automatically when a cartridge is
inserted.
To mount a cartridge into a transport when the LSM is offline:
1. Follow the steps in “Mounting and Dismounting Cartridge Tapes” on page 3-19.
2. Make sure that the transport elevator is up. If it is not, wait until the
previous job is finished, then remove the cartridge from the drive and place
it outside the LSM.
CAUTION:
Potential equipment damage: You must insert the cartridge properly or
you will damage the drive.
Use standard, ETape, or EETape 9490 cartridges for 9490 transports.
Use DATA D3 helical tape cartridges for SD-3 transports.
3. Insert the cartridge with the customer label on top and the VOLSER toward
you.
Note: If a transport has been running, it might not accept the tape unless you
place the transport into manual mode. To do this:
1. Press the READY button on the CTU panel to turn the Ready light
off.
2. Press the UNLOAD button to reset the carriage on the transport to
allow the transport to be loaded in manual mode.
Dismounting a Cartridge from a 9490 or SD-3 CTU
To dismount a cartridge from a transport when the LSM is offline:
1. Press the READY button on the CTU to make it not ready.
2. Press the UNLOAD button on the CTU.
3. Remove the cartridge from the raised elevator.
4. Store the cartridge outside the LSM.
3-20
Revision P
95693
Operating in Manual Mode
Mounting a Cartridge into a DLT Drive
Use Figure 3-11 and “Digital Linear Tape Drives” on page 4-4 for the following
procedures:
Figure 3-11. DLT Handle and Hub Positions
DRIVE
SHUTTLE
A,B
DRIVE
CARTRIDGE
HOOK (UP)
HUB
(UP)
HANDLE
VIEW A
HANDLE DOWN POSITION
CARTRIDGE
HOOK (DOWN)
OPERATE
HANDLE
INDICATOR
HUB
(DOWN)
HANDLE
VIEW B
HANDLE UP POSITION
UNLOAD
BUTTON
E62378
95693
Revision P
3-21
Operating in Manual Mode
CAUTION:
Potential equipment damage: Before mounting a cartridge into the drive,
make sure that power is on, and that the Operate Handle indicator is on.
Use the drive shuttle to operate, not the drive handle.
A safety mechanism protects the drive if you try to operate it in an
incorrect state. The shuttle will not operate if this mechanism is
activated. To reset the safety mechanism, wait for the Operate Handle
indicator to turn on. Pull firmly on the shuttle, then push the shuttle in
completely. If the cartridge did not eject, or if the handle did not rise, pull
and push again.
To mount a cartridge into a DLT drive:
1. Follow the steps in “Mounting and Dismounting Cartridge Tapes” on page 3-19.
2. Make sure that the DLT handle is up and the cartridge handle hook and hub
are down. (See Figure 3-11 on page 3-21 for more information.)
CAUTION:
Potential equipment damage: Insert the cartridge properly or you will
damage the drive. Use only DLT cartridges for DLT drives.
3. Hold the cartridge so that the VOLSER is facing you and the write protect
switch is on the right side of the cartridge, as shown in Figure 3-12.
Figure 3-12. Mounting a DLT Cartridge (E62379)
DLT
CARTRIDGE
DRIVE
3-22
Revision P
E62379
95693
Operating in Manual Mode
4. Insert the cartridge into the shuttle and push the cartridge into the back of
the drive until it is firmly seated.
5. Push the shuttle completely back, pause for about two seconds, then
release the shuttle.
CAUTION:
If the cartridge has been ejected from the drive, you must remove it from
the shuttle before you can reload it into the drive. Otherwise, the shuttle
will become jammed by simultaneously holding on to the cartridge and
lowering the handle.
If this happens, release the cartridge from the shuttle latch under the
right side of the cartridge. Then push the cartridge into the drive and
lower the handle.
Dismounting a Cartridge from a DLT Drive
To dismount a cartridge from a DLT drive:
1. Make sure that the Operate Handle indicator is on.
2. Push the shuttle completely back, pause for about two seconds, then
release the shuttle.
Note: If the cartridge does not come out of the drive, remount the
cartridge by releasing it from the shuttle latch under the right side of
the cartridge. Then push the cartridge into the drive and lower the
handle. If this fails, the tape leader might be dislodged and require
rethreading.
3. Remove the cartridge from the drive.
4. Store the cartridge outside the LSM.
95693
Revision P
3-23
Operating in Manual Mode
Mounting a Cartridge into a T9840 Drive
Important: T9840A/B and T9840C VolSafe cartridges are not interchangeable. T9840C
tape drives can read the 20-GB VolSafe tape cartridges used in T9840A and T9840B
drives, but cannot write to them. The 40-GB VolSafe tape cartridges used in T9840C
drives cause a load error when mounted in a T9840A or T9840B drive.
See “T9840 and T9940 Tape Drives” on page 4-5 for more information.
To load the cartridge in a T9840 drive:
1. Follow the steps in “Mounting and Dismounting Cartridge Tapes” on page 3-19.
2. Insert the cartridge into the drive using the direction shown in Figure 3-13.
3. Wait for one of the following messages to display and take the appropriate
action, if necessary:
3-24
•
The Ready A message displays when the drive is VolSafe-enabled and
loaded with a write-enabled VolSafe cartridge.
•
The Ready F (File Protected) message displays when a write-protected
cartridge loads successfully.
•
The Ready U (File Unprotected) message displays when a cartridge
that is not write-protected loads successfully.
•
The NTReady message displays when the tape in the cartridge has lost
tension. Follow the instructions outlined in the T9840 Tape Drive User’s Reference
Manual to correct this condition.
•
The LOADxxxx message displays when the cartridge unsuccessfully
loads, where the xxxx is a fault symptom code.
Revision P
95693
Operating in Manual Mode
Figure 3-13. Mounting a Cartridge into a T9840 Drive (E62446)
9840
CARTRIDGE
DRIVE
E62446
Dismounting a Cartridge from a T9840 Drive
To unload the cartridge from a T9840 drive:
1. Ensure that the drive is not selected.
CAUTION:
Loss of data: Pressing the Unload switch during a write operation
causes the drive to try to write the remaining data before the tape
unloads. An operator display of “UnWrxxxx” (unwritten data, where xxxx
is the fault symptom code) means the write failed and some data is not
written to the tape.
2. Press the Unload switch.
One of the following conditions can occur:
95693
•
After the tape rewinds, the cartridge ejects from the drive. Remove the cartridge
from the drive and place it outside of the LSM.
•
The cartridge fails to eject after the tape rewinds. Refer to the T9840 Tape Drive User’s
Reference Manual to correct this condition.
•
If the Unload switch is pressed during a write operation, the drive tries to write the
remaining data before the cartridge unloads. If the UnWrxxxx (Unwritten Data)
message displays, where xxxx is the fault symptom code, the attempt failed and
some data remains unwritten to the tape. For more information about recovering
from an Unwritten Data condition, refer to the T9840 Tape Drive User’s Reference
Manual.
Revision P
3-25
Operating in Manual Mode
Mounting a Cartridge into a T9940 Drive
See “T9840 and T9940 Tape Drives” on page 4-5 for more information.
To load the cartridge in a T9940 drive:
1. Follow the steps in “Mounting and Dismounting Cartridge Tapes” on page 3-19.
2. Insert the cartridge into the drive as shown in Figure 3-14 on page 3-27.
3. Wait for one of the following messages to display and take the appropriate action, if
necessary:
•
The Ready F (File-protected, write protected) message displays when a writeprotected cartridge tape loaded successfully.
•
The Ready U (File-unprotected, write-enabled) message displays when a
cartridge that is not write-protected loads successfully.
•
The LOADxxxx message displays when the cartridge unsuccessfully loads,
where the xxxx is a fault symptom code.
Dismounting a Cartridge from a T9940 Drive
To unload the cartridge from a T9940 drive:
1. Ensure that the T9940 drive is not selected.
CAUTION:
Loss of data: Pressing the Unload switch during a write operation
causes the drive to try to write the remaining data before the tape
unloads. An operator display of “UnWr xxxx” (unwritten data, where xxxx
is the fault symptom code) means the write failed and some data is not
written to the tape.
2. Press the Unload switch. One of the following conditions can occur:
3-26
•
After the tape rewinds, the cartridge ejects from the T9940 drive. Remove the
cartridge from the T9940 drive and place it outside of the LSM.
•
The cartridge fails to eject after the tape rewinds. Refer to the T9940 Tape Drive
Operator’s Guide, PN 95989, to correct this condition.
•
If the Unload switch is pressed during a write operation, the T9940 drive tries to
write the remaining data before the cartridge unloads. If the UnWrxxxx (Unwritten
Data) message displays, where xxxx is the fault symptom code, the attempt failed
and some data remains unwritten to tape.
Revision P
95693
Operating in Manual Mode
Figure 3-14. Mounting a Cartridge into a T9940 Drive (C62732)
T9940
CARTRIDGE
DRIVE
C62732
Removing a Cartridge from the Hand
If the LSM goes offline because of a power failure, a cartridge might be left in the hand.
If you need the cartridge to complete a job request, you can manually remove it from the
hand and mount it into a drive for a read/write operation.
CAUTION:
Potential equipment damage: Follow the procedures described in
“Moving the Robot” on page 3-12. Failing to do so could damage the
hand.
Standard Door Procedure
To remove a cartridge from the hand when your LSM has a standard door:
1. Rotate the Z column until the hand is located on the left, top side of the LSM (Panel
0 Column 0).
2. If a cartridge is in the top cell, remove it so you have more room to perform the next
step.
3. Rotate the reach mechanism drive belt until the gripper is extended to its full
position, as shown in Figure 3-15 on page 3-28.
4. Hold the reach mechanism drive belt with one hand and grasp the cartridge with the
other. Gently pull on the cartridge until it is released from the gripper, as shown in
Figure 3-16 on page 3-29.
95693
Revision P
3-27
Operating in Manual Mode
5. Turn the reach mechanism drive belt until the gripper is fully retracted.
6. If a cartridge was in the top cell, re-insert it properly into the cell.
Expansion Door Procedure
To remove a cartridge from the hand when your LSM has an expansion door:
1. Rotate the Z column until the hand is facing the expansion door location.
2. Rotate the reach mechanism belt drive until the gripper is extended to its full
position, as shown in Figure 3-15 on page 3-28.
3. Hold the reach mechanism belt drive with one hand and grasp the cartridge with the
other. Pull gently on the cartridge until it is released from the gripper, as shown in
Figure 3-16 on page 3-29.
CAUTION:
Potential equipment damage: Make sure that the gripper is fully
retracted. If it is left extended and you turn the robot, the gripper will
strike a storage cell. If it is left extended and the hand is facing the LSM
door when it is closed, the door will strike the gripper.
4. Turn the reach mechanism belt drive until the gripper is fully retracted.
Figure 3-15. Extending the Gripper (C62026)
REACH
MECHANISM
BELT
DRIVE
TAPE
CARTRIDGE
(SHOWN
RETRACTED)
C62026
3-28
Revision P
95693
Operating in Manual Mode
Figure 3-16. Removing a Cartridge from the Hand (C62027)
REACH
MECHANISM
(SHOWN
EXTENDED)
GRIPPER
MECHANISM
REACH
MECHANISM
BELT
DRIVE
TAPE
CARTRIDGE
C62027
Returning the LSM Online
To place the LSM online for automated operations:
1. Refer to your specific drive publications for instructions about making the drives
ready. For DLT, make sure that the Operate Handle light is on and the handle is up.
2. Close and lock the LSM doors. The robot will conduct an audit of the LSM.
3. Place the LSM online by entering the command at the customer server operator
console.
4. Refer to your specific software publications for instructions about placing the
cartridges you removed into the CAP and having the robot insert the cartridges into
the LSM cells.
95693
Revision P
3-29
Operating in Manual Mode
3-30
Revision P
95693
Drives
4
This chapter contains an overview about the controller transport units (CTUs)
and tape drives for the 9740 Library Storage Module (LSM).
Note: See Appendix A for information about the cartridge tapes.
CTUs mount in cartridge drives that attach to the rear of the LSM. Each cartridge
drive can contain:
•
•
Two or four 9490 (TimberLine) CTUs
One to four SD-3 (RedWood) CTUs
Tape drives mount inside the 9741 or 9741E Drive Cabinets that attach to the
rear of the LSM. These drive cabinets can contain:
•
•
•
•
One to ten Digital Linear Tape (DLT) drives
One to ten T9840 Tape Drives
One to ten T9940 Tape Drives
A combination of DLT, T9840, or T9940 drives
Note: Only two of the three drive types that can be installed in a 9741/9741E
Drive Cabinet are allowed to be mixed in the same cabinet.
■ Controller Transport Units
Controller transport units (CTUs) are independent subassemblies within the cartridge
drive. Each CTU consists of a separate controller and transport and provides a 1-by-1
architecture. Because of this 1-by-1 architecture:
•
Operation of one CTU does not effect the operations of any other CTUs in
the cartridge subsystem.
•
Maintenance on a CTU does not disrupt operations of any other CTUs in the
cartridge drive or cartridge subsystem.
The controller contains all the circuit cards required for operation, such as: the
interface card, read and write cards, and microprocessors.
The transport contains the electrical, mechanical, and pneumatic components
required for tape motion, read and write operations, loading and unloading of
the cartridge tape.
There are two types of CTUs that attach to the LSM: 9490 and SD-3.
95693
Revision P
4-1
Controller Transport Units
9490
The 9490, also known as TimberLine, is a high-performance information storage and
retrieval system that uses Extended Enhanced tape (called EETape), Enhanced Capacity
cartridge tape (called E-Cart or E-Tape), and standard length cartridges as the storage
medium.
The 9490 supports three tape-recording formats:
•
•
•
36-track, extended (read and write)
18-track, extended (read only)
18-track, standard (read only)
All three recording formats are compatible with the American National Standards
Institute (ANSI) and European Computer Manufacturers Association (ECMA)
specifications.
SD-3
The SD-3, also called RedWood, is a high-performance helical-scan information
storage and retrieval system.
The subsystem reads and writes on half-inch magnetic tape cartridges in
American National Standards Institute compatible helical-scan recording format.
These cartridge tapes are not compatible with linearly recorded cartridges and
are available in the following types:
•
•
•
•
•
10 gigabyte “A” cartridge = 91 meters (298 feet)
25 gigabyte “B” cartridge = 204 meters (668 feet)
50 gigabyte “C” cartridge = 392 meters (1,286 feet)
50 gigabyte VolSafe “C” cartridge = 392 meters (1,286 feet)
Cleaning “D” cartridge for cleaning the tape path
Power Switch
Figure 4-1 on page 4-3 shows the power switch. This switch is located on the upper rear
panel of the cartridge drive.
Operator Panel
Figure 4-2 on page 4-3 shows the location of the library operator panel. When a library is
in manual mode this panel provides the operators with the same information as the
overhead display and controls as the front control panel.
4-2
Revision P
95693
Controller Transport Units
Figure 4-1. Power Control Panel
C42052
Figure 4-2. Library Operator Panel
OPERATOR
OFFLINE
CLEAN
CRTG LOADED
REWIND
UNLOAD
READY
SELECT
C42431
95693
Revision P
4-3
9741/9741E Drive Cabinet
■ 9741/9741E Drive Cabinet
The drive cabinet houses from 1 to 10 DLT, 9840, T9840, or T9940 tape drives
or a combination of these tape drives.
Digital Linear Tape Drives
Digital Linear Tape (DLT) drives mount inside a 9741/9741E Drive Cabinet.
These drives are high-performance, large-capacity, streaming cartridge tape
products. The tape drive design includes a quad-channel read/write head with
high-efficiency data compression to maximize data throughput and to minimize
access time.
DLT products use half-inch wide tape. The DLTtape™ IV data cartridges are
designed exclusively for the DLT 4000, DLT 7000, and DLT 8000 tape drives.
Operator Panel
Figure 4-3 shows an example of a DLT operator panel. When a library is in manual mode
you will use this panel to load and unload tapes.
Figure 4-3. DLT Operator Panel
W
Pr rite
ot
ec
te
d
Ta
in pe
Us
e
Capacity
Indicators
U
Cl se
e
Ta a
pe nin
g
O
p
Ha er
nd ate
le
Compress
Density
Overide
Se
le
ct
4-4
Un
lo
ad
Revision P
95693
9741/9741E Drive Cabinet
T9840 and T9940 Tape Drives
The T9840 Tape Drives are small, modular, high-performance tape drives. These drives
are designed for fast-access tape storage of data. Three models are currently available,
T9840A and T9840B, which are 20-GB drives and T9840C, which is a 40-GB drive.
The T9840 Tape Drives use cartridge tapes that have the same physical size as 3490 or
T9940 cartridge tapes; however, they are not interchangeable. These cartridge tapes have
the supply and take-up reels inside the cartridge which permits midpoint loading and fast
access. The media identification labels for T9840 cartridge tapes have unique letters:
•
R identifies T9840 standard and VolSafe data cartridge tapes.
Note: T9840A/B and T9840C VolSafe cartridges are not interchangeable. T9840C
tape drives can read the 20-GB VolSafe tape cartridges used in T9840A and
T9840B drives, but cannot write to them. The 40-GB VolSafe tape
cartridges used in T9840C drives cause a load error when mounted in a
T9840A or T9840B drive.
•
U identifies T9840 cleaning cartridges.
The T9940 Tape Drive is a small, modular, high-performance tape drive for highcapacity storage applications. Two models are currently available, T9940A and T9940B.
T9940 is a 60-GB drive and T9940B is a 200-GB drive. The T9940 media identification
labels for the cartridge tapes have unique letters:
•
•
95693
P identifies data cartridges.
W identifies cleaning cartridges.
Revision P
4-5
9741/9741E Drive Cabinet
Operator Panel
Figure 4-4 is an example of the operator panel:
Figure 4-4. T9840/T9940 Operator Panel
ACTIVITY
INDICATOR
POWER
INDICATOR
LOADING
SLOT
4-6
UNLOAD
SWITCH
SERVICE
INDICATOR
CLEAN
INDICATOR
DISPLAY
MENU
SWITCH
Revision P
IPL
SWITCH
SELECT
SWITCH
MANUAL
UNLOAD
DEVICE
CARTRIDGE
TAPE
C62772
95693
Service
5
This chapter describes what to do if problems occur with the 9740 Library
Storage Module. In some cases, you might be able to correct the problem. In
other cases, you must contact your service provider to correct the problem.
Notes:
•
Refer to Appendix A, “Cartridge Tape Information” when the problem is caused by
a cartridge.
•
Refer to your drive publications for additional information when the
problem is caused by a controller transport unit or tape drive.
Most of the time, a fault symptom code (FSC) appears on the library operator
panel display. Write down the FSC information and give the information to your
service representative or to the staff at the Customer Services Support Center (CSSC).
■ Customer Services Support Center
Customer support is available 24 hours a day, seven days a week, to customers with Sun
or StorageTek maintenance contracts and to Sun employees. You can find additional
information about customer support on the Customer Resource Center (CRC) Web site
at:
http://www.support.storagetek.com
■ Customer-initiated Maintenance
Customer-initiated maintenance begins with a telephone call from you to Sun
Microsystems StorageTek Support. You receive immediate attention from qualified Sun
personnel, who record problem information and respond with the appropriate level of
support.
To contact Sun Microsystems StorageTek Support about a problem:
1. Use a telephone to call the StorageTek Customer Services Support Center at:
☎1-800-525-0369 (from within the United States) or
☎303-673-4056 (from outside the United States) or
See “Sun’s Worldwide Offices” on page 5-2 for information about International
customer support centers.
95693
Revision P
5-1
Sun’s Worldwide Offices
2. Describe the problem to the call taker. The call taker will ask several
questions and will either route your call to a trained support technician or
dispatch a service representative.
If you have the following information when placing a service call, the process
will be much easier:
Account name
Site location number
Contact name
Telephone number
Equipment model number
Device address
Device serial number
(if known)
Urgency of problem
Fault Symptom Code (FSC)
Problem description
■ Sun’s Worldwide Offices
You may contact any of Sun’s worldwide offices to discuss complete storage, service, and
support solutions for your organization. You can find address and telephone number
information on Sun’s external Web site at:
http://www.sun.com/worldwide/
5-2
Revision P
95693
Cartridge Tape Information
A
This appendix contains information about the cartridge tapes used in the
controller transport units (CTUs) and tape drives for the LSM.
■ Cartridge Requirements
Cartridges must meet specifications defined in American National Standard
Magnetic Tape and Cartridge for Information Interchange, ACS X3B5.
Refer to your drive vendor’s publication and Web site for specific cartridge
requirements and specifications.
Colored cartridges are approved only if the measured reflection density is
greater than 0.1 as measured by an X-rite 404G color reflection densitometer.
For more information about colored cartridges, contact your StorageTek
marketing representative.
■ Handling a Cartridge
Improper handling of cartridges can result in a loss of data or damage to a
library component. To handle a cartridge correctly:
95693
•
Make sure the leader block is latched every time you pick up a cartridge.
•
Keep cartridges clean.
•
Inspect a cartridge before each use, and never put a damaged cartridge into
a drive or library.
•
Never release a leader block and pull tape from a cartridge.
•
Never open a cartridge.
•
Do not handle tape that is outside the cartridge; the tape edge might be
damaged.
•
Do not expose the tape or cartridge to direct sunlight or moisture.
•
Do not expose a recorded cartridge to magnetic fields; this might destroy
data on the tape.
Revision P
A-1
Inspecting a Cartridge
■ Inspecting a Cartridge
A defective or dirty cartridge can damage a drive. Always inspect a cartridge
before inserting it into a drive or a library.
Look for:
•
•
•
•
•
•
•
Cracked or broken cartridge
Broken leader block
Broken leader block latch
Damaged write-protect selector or write-protect switch
Liquid in the cartridge
Labels not firmly attached or extending over the cartridge edge
Any other obvious damage
Figure A-1. Inspecting a 9490 (3480-style) Cartridge (C62454)
LABEL
LOCATIONS
(TYPICAL)
EETape
LEADER
BLOCK
(TYPICAL)
E-CART
or
E-TAPE
FILE
PROTECT
SELECTOR
STANDARD
TAPE
FILE
PROTECT
SELECTOR
FILE
PROTECT
SELECTOR
A-2
C62454
Revision P
95693
Inspecting a Cartridge
Figure A-2. Inspecting an SD-3 Helical Scan Cartridge
LABELS
DETENT
SPRINGS
WRITEPROTECT
SWITCH
LEADER
BLOCK
C62030
Figure A-3. Inspecting a DLT Cartridge
WRITEPROTECT
SWITCH
TAPE
LEADER
95693
Revision P
C62380
A-3
Inspecting a Cartridge
Figure A-4. Inspecting a T9840 Cartridge (C62715)
CUSTOMER
LABEL
AREA
MANUFACTURER
LABEL
AREA
MEDIA ID
LABEL
FINGER
GRIPS
VOLSER
LABEL
REAR VIEW
WRITE
PROTECT
SWITCH
(FORWARD
POSITION IS
WRITE PROTECTED)
C62715
Figure A-5. Inspecting a T9940 Cartridge (C62727)
MANUFACTURER
LABEL
AREA
WRITE
PROTECT
SWITCH
TAPE
LEADER
BLOCK
CUSTOMER
LABEL
AREA
MEDIA
ID
VOLSER
LABEL
AREA
FRONT VIEW
FINGER
GRIPS
REAR VIEW
C62727
A-4
Revision P
95693
Storing Cartridges
■ Storing Cartridges
When storing a cartridge:
•
Do not take a cartridge out of its protective wrapping until you are ready to
use it. Use the tear string, not a sharp instrument, to remove the wrapping.
•
Store cartridges in a clean environment that duplicates the conditions of the
room in which they are used.
•
Before using a cartridge, make sure that it has been in its operating
environment for at least 24 hours.
■ Cleaning the Cartridge Exterior
CAUTION:
Possible equipment damage: The following solvents can damage the
cartridge. Do not use them to remove labels or to clean cartridges:
acetone, trichloroethane, toluene, xylene, benzene, ketone, methylethyl
ketone, methylene chloride, ethyldichloride, esters, ethyl acetate, or
similar chemicals.
Wipe all dust, dirt, and moisture from the cartridge with a lint-free cloth.
Use StorageTek Tape Cleaner Wipes, PN 4046289-01, to clean the cartridges.
These wipes are saturated with isopropyl alcohol. Do not let any solution touch
the tape or get inside the cartridge.
■ Using Cleaning Cartridges
Cleaning cartridges have a VOLSER prefix of DG CLN or CLNxxx. These
cartridges cannot be used as scratch cartridges or initialized by software utilities.
When a transport needs to be cleaned, the 9740 and CTU interact automatically;
no host software interaction is required. During a dismount, the 9740 software
polls the CTU to determine if the transport needs to be cleaned. If it does, the
hand removes a cleaning cartridge from its cell and inserts it into the transport.
If the LSM has no cleaning cartridges, you are prompted to enter a cleaning
cartridge into the CAP.
CAUTION:
Do not re-enter a cleaning cartridge that has been ejected from an LSM.
When you enter a cleaning cartridge, the software considers it to be new
and sets the usage counter to zero.
95693
Revision P
A-5
Repairing a Detached Leader Block
When a cleaning cartridge is used the specified number of times, it is automatically placed
into the CAP, and the operator panel displays “(3480, SD-3, DLT, T9840, or T9940)
CLEANING CART USED UP.” See “Replacing Cleaning Cartridges” or “Replacing
Cleaning Cartridges” in Chapter 3, “Operating the LSM,” for this procedure.
■ Repairing a Detached Leader Block
When a tape is damaged, use a backup tape. If a leader block is detached and
there is no obvious damage to the cartridge or tape, and you have no backup
tape, you may repair the leader block using a repair kit provided by your
supplier. You can use the tape one time to copy the data onto another tape.
■ Ordering Media
Contact your authorized selling agent for Sun-approved labeled cartridges. You must
select the volume serial number (VOLSER) range and other label options when ordering
cartridges. If you choose to order additional labels, order them from any standard media
vendor.
Labels used in StorageTek libraries can be made by any vendor that produces a label that
meets the Sun Label Specification. Some vendors (not all inclusive) are:
•
EDP/Colorflex http://www.colorflex.com
•
NetC http://www.netcllc.com
•
WrightLine/American Eagle Systems http://www.americaneaglesys.com
•
Dataware http://www.datawarelabels.com
These Web sites contain links to third party sites. These links are provided as a
convenience to you and not as an endorsement by Sun. Sun is not responsible for the
content of these linked Web sites and does not make any representations regarding the
content or accuracy of any content on such Web sites.
For technical questions, contact the Sales Support at:
Telephone: 1.800.ask4stk (1.800.275.4785)
E-mail: [email protected].
A-6
Revision P
95693
Applying Labels
■ Applying Labels
Cartridge labels reflect the cartridge media and usage. The types of cartridge labels you
might need to apply are:
•
•
•
•
•
Customer
VOLSER
Cleaning
Diagnostic
Media labels
Notes:
•
•
•
•
Make sure that the labels are not placed elsewhere on the cartridge surface.
Make sure that the edges of the labels do not curl up.
Use labels that do not leave a residue when removed.
Make sure that the label contains a VOLSER.
The following information describes how to apply labels to the cartridges.
CAUTION:
Potential equipment problems: Applying labels in the wrong location,
curling edges, or leaving excess residue could cause the cartridge to
stick in the hand, drive, or cell.
Non-DLT Cartridges
The labels must be within the indented area of the cartridge so that the edges of the label
are parallel to the edges of the cartridge. The label should be close to the inside edge of
the indented area but must never overlap.
See Figure A-6 through Figure A-11 for the proper location of the labels.
To apply the labels:
1. Make sure that the cartridge has been at room temperature for at least 24 hours.
2. Clean the surface where the labels will be placed using a cleaning solution made for
this purpose. See “Cleaning the Cartridge Exterior” on page A-5.
3. Peel the backing from the VOLSER label.
4. Hold the cartridge so that the leader block is above the write-protect selector and is
facing away from you.
5. Position the label with the VOLSER characters to the left, so you can read them
from top to bottom. Press the label into place.
6. If the cartridge requires a media label, peel the backing from it and place the label in
the recessed area to the left of the VOLSER. Press into place.
95693
Revision P
A-7
Applying Labels
Figure A-6. 3480 Cartridge Label Locations (C62031)
CUSTOMER
LABEL
VOLSER
LABEL
C62031
Figure A-7. ETape Cartridge Label Locations (C62528)
CUSTOMER
LABEL
MEDIA
LABEL
VOLSER
LABEL
A-8
C62528
Revision P
95693
Applying Labels
Figure A-8. EETape Cartridge Label Locations (C62526)
CUSTOMER
LABEL
MEDIA
LABEL
“Z”
VOLUME/
SERIAL
NUMBER
(VOLSER)
LABEL
C62526
Figure A-9. Helical Scan Cartridge Label Locations (C62032)
WRITEPROTECT
SWITCH
CUSTOMER
LABEL
TAPE
LENGTH
LABEL
95693
VOLUME/
SERIAL NUMBER
(VOLSER)
LABEL
C62032
Revision P
A-9
Applying Labels
Figure A-10. T9840 Cartridge Label Locations (C62444)
CUSTOMER
LABEL
WRITEPROTECT
MEDIA
ID LABEL
VOLSER
LABEL
C62444
Figure A-11. T9940 Cartridge Label Location (C62731)
MANUFACTURER
LABEL
AREA
MEDIA
ID
CUSTOMER
LABEL
AREA
VOLSER
LABEL
AREA
C62731
A-10
Revision P
95693
Applying Labels
DLT Cartridges
The DLTtape VOLSER letter located next to the last number in the VOLSER reflects
the media. Cleaning cartridges have CLN in the VOLSER, diagnostic cartridges have DG
in the VOLSER.
See Figure A-12 and insert the label into the recessed area on each cartridge:
1. Make sure that the cartridge has been at room temperature for at least 24 hours.
2. Clean the surface where the labels will be placed using a cleaning solution made for
this purpose. See “Cleaning the Cartridge Exterior” on page A-5.
3. Locate the label that you need:
•
•
•
•
•
DLTtape III has a “C” next to the far left number, bar code down.
DLTtape IIIXT has an “E” next to the far left number, bar code down.
DLTtape IV has a “D” next to the far left number, bar code down.
Diagnostic cartridge has “DG” at the beginning of the VOLSER.
Cleaning cartridge has “CLN” at the beginning of the VOLSER.
4. Hold the cartridge so that the write-protect switch is toward you.
5. See Figure A-12 and slide the label under the slots in the recessed area. If desired,
peel the backing from the label and then slide it under the slots. Press it into place.
Figure A-12. DLT Cartridge Label Locations (C62381)
VOLSER
LABEL
C62381
95693
Revision P
A-11
Setting the Write-Protect Switch
■ Setting the Write-Protect Switch
Write-protect, also called file-protect, is a setting on cartridge tapes that prevents data
form being written on the tape but reading data is still possible.
Write-enable is a setting that allows data to be written on the tape.
Notes:
•
The write-enable setting is recommended when entering cartridges into the LSM.
•
Some software features a virtual thumbwheel that allows read-only access to a
cartridge that is not physically write-protected.
9490 Write-Protect Switch
To write-enable the 9490 cartridges:
1. Hold the cartridge with the write-protect switch towards you.
2. Locate the write-protect switch on the front of the cartridge.
3. Rotate the switch to the desired setting:
•
To write-enable the standard cartridge, turn the thumbwheel until the white dot icon
above the wheel disappears.
•
To write-enable the ETape cartridge, turn the thumbwheel until the white padlock
icon above the wheel disappears.
•
To write-enable the EETape cartridge, slide the switch to the unlock symbol.
Figure A-13. Setting the 3480 Write-Protect Selector (C62033)
WRITEPROTECTED
POSITION
UNPROTECTED
POSITION
C62033
A-12
Revision P
95693
Setting the Write-Protect Switch
Figure A-14. Setting the ETape Write-Protect Selector (C62529)
WRITEPROTECTED
POSITION
UNPROTECTED
POSITION
C62529
Figure A-15. Setting the EETape Write-Protect Selector (C62523)
LABEL
LOCATIONS
(TYPICAL)
LEADER
BLOCK
(TYPICAL)
WRITEPROTECTED
POSITION
(WRITE
DISABLED)
WRITEPROTECTED
POSITION
(WRITE
ENABLED)
95693
C62523
Revision P
A-13
Setting the Write-Protect Switch
SD-3 Write-Protect Switch
To write-enable an SD-3 cartridge:
1. Hold the cartridge with the write-protect switch towards you.
2. Locate the write-protect switch on the front of the cartridge.
3. Slide the write-protect switch to the right so that the pencil icon is joined.
To write-protect this cartridge, slide the switch to the left so that the pencil icon is
split.
Figure A-16. Setting the Helical Scan Write-Protect Switch (C62034)
LABELS
WRITE-ENABLE POSITION
WRITE-PROTECT POSITION
DETENT
SPRINGS
LEADER
BLOCK
A-14
Revision P
C62034
95693
Setting the Write-Protect Switch
DLT Write-Protect Switch
To write-enable a DLT cartridge:
1. Hold the cartridge with the rear VOLSER label toward you.
2. Locate the write-protect switch on the front of the cartridge.
3. Slide the write-protect switch to the right so that the orange indicator is not visible.
To write-protect this cartridge, slide the switch to the left so that the orange indicator
is visible.
Figure A-17. Setting the DLT Write-Protect Switch (C62382)
ORANGE
INDICATOR
WRITE-PROTECTED POSITION
WRITE-ENABLED
POSITION
C62382
95693
Revision P
A-15
Setting the Write-Protect Switch
T9840 Write-Protect Switch
To write-enable a T9840 cartridge:
1. Hold the cartridge with the customer label side up and rear VOLSER label toward
you.
2. Locate the write-protect switch on the right side of the cartridge.
3. Slide the write-protect switch to the back of the cartridge (towards you).
To write-protect this cartridge, slide the write-protect switch to the front of the
cartridge (away from you).
Figure A-18. Setting the T9840 Write-Protect Switch (C62445)
WRITE ENABLE POSITION
WRITE PROTECT
POSITION
C62445
A-16
Revision P
95693
Setting the Write-Protect Switch
T9940 Write-Protect Switch
1. Hold the cartridge with write-protect switch towards you.
2. Locate the write-protect switch on the front of the cartridge.
3. Slide the write-protect switch to the left so the arrow points to the unlocked padlock
icon.
To write-protect this cartridge, slide the write-protect switch to the right so the arrow
points to the locked padlock icon.
Figure A-19. Setting the T9940 Write-Protect Switch (C62728)
WRITE
PROTECT
SWITCH
UNPROTECTED
PROTECTED
C62728
95693
Revision P
A-17
Environmental Specifications
■ Environmental Specifications
The following tables list the different cartridge environmental specifications:
Table A-1. 9490 Cartridge Environmental Specifications
Operating Environment
Temperature
15.6º to 32.2ºC (60º to 90ºF)
Relative humidity
20% to 80%
Wet bulb temperature
25.6ºC (78ºF) maximum
Cartridge Storage Environment
Temperature
4.4º to 32.2ºC (40º to 90ºF)
Relative humidity
5% to 89%
Wet bulb temperature
26.7ºC (80ºF) maximum
Table A-2. SD-3 Cartridge Environmental Specifications
Operating Environment
Temperature
15º to 27ºC (59º to 81ºF)
Relative humidity
30% to 60%
Wet bulb temperature
25ºC (77ºF) maximum
Cartridge Storage Environment
Temperature
5º to 32ºC (41º to 90ºF)
Relative humidity
5%-80%
Wet bulb temperature
26ºC (80°F) maximum
Table A-3. DLT Cartridge Environmental Specifications
Operating Environment
Temperature
10º to 40ºC (50º to 104ºF)
Relative humidity
20% to 80% noncondensing
Wet bulb temperature
25ºC (77ºF) maximum
Cartridge Storage Environment
A-18
Temperature
16º to 32ºC (61º to 90ºF)
Relative humidity
20% to 80% noncondensing
Wet bulb temperature
26ºC (79ºF) maximum
Revision P
95693
Environmental Specifications
Table A-4. T9840 Cartridge Environmental Specifications
Operating Environment
Temperature
15.6º to 32.2ºC (60º to 90ºF)
Relative humidity
20% to 80%
Wet bulb temperature
26ºC (78.8ºF)
Cartridge Storage Environment
Temperature
Archive
Non-archive
5º to 25.5ºC (41º to 78ºF)
5º to 32ºC (41º to 90ºF)
Relative humidity
Archive
Non-archive
40% to 60%
5% to 80%
Wet bulb temperature
26ºC (78.8ºF)
Table A-5. T9940 Cartridge Environmental Specifications
Operating Environment
Temperature
15.6º to 32.2ºC (60º to 90ºF)
Relative humidity
20% to 80%
Wet bulb temperature
26ºC (78.8ºF)
Cartridge Storage Environment
95693
Temperature
Archive
Non-archive
18º to 26ºC (65º to 79ºF)
5º to 32ºC (41º to 90ºF)
Relative humidity
Archive
Non-archive
40% to 60%
5% to 80%
Wet bulb temperature
26ºC (78.8ºF)
Revision P
A-19
Environmental Specifications
A-20
Revision P
95693
Glossary
This glossary defines terms and abbreviations used
in this publication.
Many of the definitions are taken from other
sources. The letters in the parentheses that follow
some definitions indicate the source of the
definition:
(A). The American National Standard Dictionary for
Information Systems, ANSI X3.172-1990, copyright
1990 by the American National Standards Institute
(ANSI).
(E). The ANSI/Electronic Industries Association
(EIA) Standard-440-A, Fiber Optic Terminology.
(I). The Information Technology Vocabulary, developed
by Subcommittee 1, Joint Technical Committee 1,
of the International Organization for
Standardization and International Electrotechnical
Commission (ISO/IEC/JTC1/SC1).
(IBM). The IBM Dictionary of Computing, copyright
1994 by IBM.
(T). Draft international standards committee
drafts, and working papers being developed by the
ISO/IEC/JTC1/SC1.
Numeric
9490 A device that reads from or writes to a 3480
tape, ETape, or EETape. Also referred to as
TimberLine.
9741 A drive cabinet that attaches to the rear
of the LSM. It contains DLT drives, T9840 drives,
or both.
9741E A drive cabinet that attaches to the rear of
the LSM. It holds DLT, T9840, and T9940 drives.
A
ACSLS Automated Cartridge System Library
Software.
audit (1) For an LSM, a part of its IPL
sequence that catalogs all cartridge locations within
the LSM cells and retains the data in the library
controller card's memory.
(2) For a host, its request to catalog the cartridges
in an LSM by LSM number, panel, row, and
column.
automatic mode A relationship between an LSM
and all attached hosts. An LSM operating in
automatic mode handles cartridges without
operator intervention. This is the normal operating
mode of an LSM that has been placed online to all
host CPUs.
C
CAP See cartridge access port.
cartridge The plastic housing around the tape. A
plastic leader block is attached to the tape for
automatic threading when loaded in a drive. The
spine of the cartridge contains a VOLSER label
listing the volume identification number. The
media ID label allows cartridge capacity to be
identified.
cartridge access port (CAP) A device in the
library that allows an operator to insert or remove
cartridges during library operations.
cartridge drive (CD) A device containing two or
four cartridge transports with associated power
and pneumatic supplies.
cartridge exchange mechanism (CEM) A
mechanism that allows a cartridge to pass from
one library storage module (LSM) to another in a
multiple LSM automated cartridge system.
95693
Revision P
Glossary-1
Glossary
cartridge tape A composite of the plastic
housing and the magnetic tape.
fault symptom code (FSC) A four-character
hexadecimal code generated in response to an
error to help isolate failures within the device.
catalog The inventory of all cartridge storage
locations in an LSM; this inventory is by LSM
number, panel, row, column.
field replaceable unit (FRU) An assembly that
is replaced in its entirety when any one of its
components fails.
cell A slot in the LSM that is used to store a
cartridge.
FRU See field replaceable unit.
CEM See cartridge exchange mechanism.
FSC See fault symptom code.
CIM Customer initiated maintenance. The
customer calls Customer Services Support Center
(CSSC) to report a problem.
I
client A functional unit that receives shared
services from a server. (T)
initial program load (IPL) A process that
activates a machine reset and loads system
programs to prepare a computer system for
operation. Processors with diagnostic routines
activate these routines at IPL execution.
configuration The physical description of a
library listing the panel types, cartridge capacity,
type of host connection, and number of drives.
controller transport unit (CTU) The functional
area, within a cartridge drive, that contains control
logic and an associated electromechanical device
for threading tape from a cartridge, moving the
tape across a read/write head, and writing data
onto or reading data from the magnetic tape.
CSSC See Customer Services Support Center.
Customer Services Support Center (CSSC)
Sun StorageTek’s customer services organization.
Customers with Sun and StorageTek maintenance
contracts may contact the CSSC.
diagnostic programs Automated offline tests
that a service representative uses to evaluate and
troubleshoot equipment.
Digital Linear Tape (DLT) A type of magnetic
tape storage device marketed by several companies.
DLT cartridges are ½-inch wide and come in
several sizes ranging from 20 to over 80 GB.
F
Glossary-2
L
library One or more Sun StorageTek automated
cartridge systems (ACSs), together with the
attached transports or tape drives and the ACSLS
software that controls and manages the ACSs.
library storage module (LSM) A housing that
contains tape cartridges and a robot that moves the
tapes between storage cells and the attached
transports or drives. Synonymous with tape library.
M
D
dismount To remove a cartridge from a drive.
ID Identifier or identification.
manual mode A relationship between a library
and all attached hosts. Libraries operating in
manual mode are placed offline to all host CPUs
and require human assistance to perform cartridge
operations.
mount To place a cartridge tape in a drive or
transport and make it accessible to the host
system.
O
Revision P
95693
Glossary
T
offline (1) Neither controlled by, nor
communicating with, a computer. Contrast with
online. (IBM)
(2) Not active or available for access in a system.
online (1) Pertaining to the operation of a
functional unit when under the direct control of
the computer. Contrast with offline. (T)
T9840 A two-reel (supply and take-up reels) tape
drive that reads from and writes to magnetic tapes.
T9940 A single-reel tape drive that reads from and
writes to magnetic tapes..
T9x40 A term used to denote T9840 and/or
T9940 when the specific drive or tape cartridge is
not important.
(2) Active and available for access in a system.
R
robot Electromechanical device for locating and
moving cartridges.
S
tape drive An electromechanical device that
moves magnetic tape and includes the mechanisms
for writing and reading data to and from the tape.
V
VolSafe A Sun StorageTek feature that provides
write once, read many (WORM) technology to
VolSafe-designated tape cartridges. VolSafe only
permits new data to be appended to date currently
on the tape. Once written, the data cannot be
overwritten.
SCSI See small computer systems interface.
SD-3 A high-performance information storage
and retrieval system that reads and writes in
helical-scan format. Also referred to as RedWood.
servo A device that uses closed-loop feedback to
govern physical positioning.
small computer systems interface (SCSI) A
local interface operating over a wide range of
transfer rates using a common command set for all
devices attached to the interface. It connects host
computer systems to a variety of peripheral
devices.
VOLSER See volume serial label.
volume A data carrier that mounts and dismounts
as a unit; for example, a reel of magnetic tape or a
disk pack.
volume serial label (VOLSER) An
alphanumeric label that host software uses to
identify a volume. It attaches to the spine of a
cartridge and is both human- and machinereadable.
Z
Z column assembly The column that allows the
hand mechanism in the LSM to move vertically.
95693
Revision P
Glossary-3
Glossary
Glossary-4
Revision P
95693
Index
Numerics
9490
cartridge specifications, A-18
cartridges, A-2
dismounting a cartridge, 3-20
mounting a cartridge, 3-20
operator panel, 4-2
overview, 4-2
power switch, 4-2
recording formats, 4-2
types of tapes, 4-2
write-protect switch, A-12
9741/9741E drive cabinet, 4-4
A
agreement, internal code, xvii
alert messages, description of, xii
antistatic wrist strap, 3-10
applying labels, A-7
audit, 1-3
AUTO CLEAN feature, 3-5
automated mode, 3-2
C
camera assembly, 1-3
CAP
ejecting cartridges, 3-4
loading cartridges, 3-2
overview, 1-4
cartridge
tape, ordering, A-6
cartridge access port, 1-4
cartridge drives, 1-5
cartridge exchange mechanism, 1-4
cartridges
cleaning, A-5
cleaning them, A-5
environmental specifications, A-18
handling, A-1
inspecting, A-2
repair, A-6
95693
requirements, A-1
storing, A-5
types of, A-2
caution, description of, xii
cautions
applying labels, A-7
DLT shuttle jam, 3-23
DLT, loading tapes, 3-22
loading cartridges in the CAP, 3-2
moving the robot, 3-12
moving the Z column, 3-13
placing cartridges in cells, 1-4
reserved cells, 3-18
sensitive components, 3-10
shielded cables, xv
CE compliance statement, xv
cell arrays, 1-4
CEM, 1-4
cleaning cartridge
cell locations, 3-19
Change Cln Cart utility, 3-7
replacing, 3-7
usage count, 3-6
VOLSER prefix, A-5
cleaning drives, 3-5
cleaning the cartridge, A-5
cleaning transports, 3-8
colored cartridges, A-1
compliance statements
CE, xv
FCC, xv
Japanese, xvi
Taiwan, xvi
components, 1-1
controller, 4-1
controller transport units
overview, 4-1
power switches, 2-2
types of, 4-1
controls, 2-1
Customer Resource Center (CRC), 1-xiii
Customer Services Support Center (CSSC), 5-1
Customer-initiated maintenance, 5-1
Revision P
Index-1
Index
D
H
dismounting cartridge tapes, 3-19
display, 2-4
DLT
cartridge labels, A-11
cartridge specifications, A-18
cartridges, A-3
cleaning, 3-5
dismounting a cartridge, 3-23
hub locations, 3-21
media labels, A-11
mounting a cartridge, 3-21
operator panel, 4-4
overview, 4-4
shuttle location, 3-21
types of drives, 4-4
types of tapes, 4-4
write-protect switch, A-15
DLTtape IV tapes, 4-4
drive cabinet
power switches, 2-2
types of, 1-5
drive cleaning, 3-5
hand
assembly, 1-2
removing a cartridge, 3-27
handling cartridges, A-1
hardcopy publications from StorageTek, 1-xiii
E
EETape Cartridge, A-9
ejecting cartridges through the CAP, 3-4
environmental specifications, cartridges, A-18
ETape Cartridge, A-8
expansion door, 1-4
extending the gripper, 3-28
F
fault symptom code, 2-3
FCC compliance statement, xv
file-protect, A-12
FSC, 2-3
function keys, 2-3
G
I
indicators, 2-1
inspecting a cartridge, A-2
internal code license, xvii
IPL, 3-1
J
Japanese compliance statement, xvi
L
labels
applying, A-7
locations of, A-7
types of, A-7
labels, ordering, A-6
leader blocks, repairing, A-6
license, internal code, xvii
loading cartridges, 3-2
locating cartridges, 3-14
lower the hand, how to, 3-12
LSM
cartridge access port, 1-4
cartridge exchange mechanism, 1-4
components, 1-1
moving the robot, 3-12
number of drives, 1-5
online, 3-29
opening doors, 3-10
placing online, 3-29
power switch, 2-1
robot, 1-2
safety features, 1-5
storage cells, 1-4
gripper assembly, 1-2
gripper, extending, 3-28
Index-2
Revision P
95693
Index
M
S
magazine, CAP, 1-4
maintenance, 5-1
manual mode, 3-10
media, See cartridges
mounting cartridge tapes, 3-19
moving the robot, 3-12
moving the Z column, 3-13
safety features, 1-5
SD-3
cartridge labels, A-9
cartridge specifications, A-18
cartridges, A-3
cleaning, 3-5
dismounting a cartridge, 3-20
mounting a cartridge, 3-20
operator panel, 4-2
overview, 4-2
power switch, 4-2
recording format, 4-2
types of tapes, 4-2
write-protect switch, A-14
service, 5-1
setting the cleaning cartridge usage count, 3-6
softkeys, 2-3
specifications
cartridge tapes, A-18
LSM, 1-6
storage cells, 1-4
storage cells, locating, 3-14
StorageTek
Customer Resource Center (CRC), 1-xiii
hardcopy publications, 1-xiii
Partners site, 1-xiii
Web site, 1-xiii
storing cartridges, A-5
Sun
Customer Resource Center (CRC), 1-xiii
Partners Web site, 1-xiii
Web site, 1-xiii
worldwide offices, 5-2
support, 5-1
supported drives, 1-1
N
notes, description of, xii
number of drives, 1-5
O
opening the LSM doors, 3-10
operating in automated mode, 3-2
operating in manual mode, 3-10
operator panel, 2-3
organization of information in this manual, xi
P
panel, operator, 2-3
Partners Web site, 1-xiii
playground, diagnostic cell locations, 3-19
power-off the LSM, 3-1
power-on the LSM, 3-1
problems, what to do, 5-1
R
raise the hand, how to, 3-12
reach mechanism, 1-2
RedWood, See SD-3
related publications, list of, xii
removing a cartridge from the hand, 3-27
repairing leader blocks, A-6
robot
how to move, 3-12
overview, 1-2
rotating the Z column, 3-13
95693
T
T9840
cartridge labels, A-10
cartridge specifications, A-19
cartridges, A-4
cleaning, 3-5
dismounting a cartridge, 3-25
mounting a cartridge, 3-24
operator panel, 4-6
Revision P
Index-3
Index
overview, 4-5
types of tapes, 4-5
VolSafe cartridges, 3-24, 4-5
write-protect switch, A-16
T9940
cartridge labels, A-10
cartridge specifications, A-19
cartridges, A-4
cleaning, 3-5
dismounting a cartridge, 3-26
mounting a cartridge, 3-26
operator panel, 4-6
overview, 4-5
types of tapes, 4-5
write-protect switch, A-17
Taiwan warning statement, xvi
tape drives
cleaning, 3-5
overview, 4-1
power switch, 2-2
tapes, See cartridges
telephone numbers
support, 5-1
theta motor, 1-2
thumbwheel, A-12
TimberLine, See 9490, 4-1
transport, 4-1
Index-4
U
usage count, cleaning cartridge, 3-6
use cleaning cartridge light, 3-5
V
virtual thumbwheel, A-12
VolSafe data cartridges, 3-24, 4-5
volume serial numbers, 1-3
W
warning statement, Taiwan, xvi
warning, description of, xii
write-enable, A-12
write-protect switch, A-12
Z
Z carriage, 1-2
Z column, 1-2
Z motor, 1-3
Revision P
95693
Sun Microsystems, Inc. 4150 Network Circle, Santa Clara, CA 95054 USA Phone 1-650-960-1300 or 1-800-555-9SUN Web sun.com
ARGENTINA: 5411-4317-5636 • AUSTRALIA: 1-800-550-786 • AUSTRIA: 43-1-601-26-0 • BALKANS: 301-6188-111 • BELGIUM: 32 2-704 89 83 • BRAZIL: 55-11-51872100 • BRUNEI: 65-216-8333 • CANADA: 1-800-422-8020 (GENERAL); 416-964-2001 (LEARNING MANAGEMENT SYSTEM SALES,TORONTO) • CHILE: 562-372-4500 • COLOMBIA: 571-629-2323
CZECH REPUBLIC: 420 2 33009311 • DENMARK: 45 4556 5040 • EGYPT: 00 202 570 9442 • FINLAND: 358-9-525-561 • FRANCE: 33-1-41-33-17-17 • GERMANY: 49-89-460-08-2788 • GREECE: 30-01-6188101 • HONG KONG: 852-2877-7077 • HUNGARY: 361-202-4415 • INDIA: 91-80-229-8989 • INDONESIA: 65-216-8333 • IRELAND: 353-1-668-4377
ISRAEL: 972-9-9710500 • ITALY: 39-02-9259511 • JAPAN: 81-3-5779-1820 • KOREA: 82-2-3453-6602 • MALAYSIA: 603-2116-1887 • MIDDLE EAST: 00 9714 3366333 • MEXICO: 525-261-0344 • NETHERLANDS: 31-33-4515200 • NEW ZEALAND: 0800-786-338 • NORTH WEST AFRICA: 00 9714 3366333 • NORWAY: FROM NORWAY: 47-22023950, TO NORWAY:
47-23369650 • PAKISTAN: 00-9714-3366333 • PEOPLE'S REPUBLIC OF CHINA: 8610-6803-5588 • PHILIPPINES: 632-885-7867 • POLAND: 48-22-8747848 • PORTUGAL: 351-21-413-4000 • RUSSIA: 7-095-935-8411 • SAUDI ARABIA: 00 9714 3366333 • SINGAPORE: 65-216-8300 • SOUTH AFRICA: 27-11-256-6300 • SPAIN: 34-902-210-412 • SRI LANKA:
65-2168333 • SWEDEN: 46-8-631 22 00 • SWITZERLAND: 41-1-908-90-50 (GERMAN) 41-22-999-0444 (FRENCH) • TAIWAN: 886-2-25185735 • THAILAND: 662-344-6855 • TURKEY: 90 212 335 22 00 • UNITED KINGDOM: 44-1276-416-520 • UNITED STATES: 1-800-422-8020 • VENEZUELA: 582-905-3800 • VIETNAM: 65-216-8333 • WORLDWIDE
HEADQUARTERS: 1-650-960-1300
NETWORK IS THE COMPUTER
SUN™ THE
United States and other countries.
©2006 Sun Microsystems, Inc. All rights reserved. Sun, Sun Microsystems, and the Sun logo are trademarks or registered trademarks of Sun Microsystems, Inc. in the