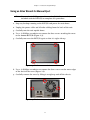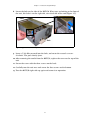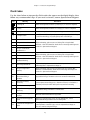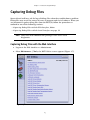
1
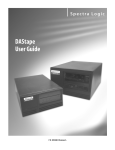
Spectra® RXT™
Troubleshooting Guide
• Spectra RXT150
• RXT Media
PN 90960005 Revision A
Notices
Notices
Except as expressly stated herein, Spectra Logic Corporation makes available its products and associated documentation on an “as is” basis,
without warranty of any kind, either expressed or implied, including but not limited to the implied warranties or conditions of merchantability and
fitness for a particular purpose. In no event shall Spectra Logic be liable for any loss of profits, loss of business, loss of use of data, interruption of
business, or for indirect, special, incidental, or consequential damages of any kind, even if Spectra Logic has been advised of the possibility of such
damages arising from any defect or error.
Information furnished in this guide is believed to be accurate and reliable. However, no responsibility is assumed by Spectra Logic for its use.
Because of continuing research and development, Spectra Logic may revise this publication from time to time without notice, and reserves the
right to change any product specification at any time without notice.
RXT is a trademark of, and Spectra, SpectraGuard, SpectraLogic, and the Spectra Logic logo are registered trademarks of Spectra Logic
Corporation. Some products or services mentioned in this guide are provided by companies other than Spectra Logic. Inquiries about one or more
of these products or services should be sent directly to the company in question. These brand or product names, registered trademarks, and
trademarks are property of their respective owners. These trademarks may be registered in this country, other countries, or both.
Spectra RXT Troubleshooting Guide
Copyright © 2007 Spectra Logic Corporation. All rights reserved.
License
You have acquired Spectra Logic products that include software owned by or licensed by Spectra Logic from one or more software licensors
(Software Suppliers). Such software products, as well as associated media, printed materials and “online” or electronic documentation (Software)
are protected by copyright laws and international copyright treaties, as well as other intellectual property laws and treaties. The Software is
licensed, not sold.
If you do not agree to this End User License Agreement (EULA), do not use the Spectra Logic product. Instead, promptly contact Spectra Logic
for instruction on return of the product for a refund. Any use of the Software, including but not limited to use of the product, will constitute your
agreement to this EULA (or ratification of any previous consent).
GRANT OF LICENSE. The Software is licensed, not sold. This EULA grants you the following rights to the Software:
• You may use the Software only on the Product with which it was sold.
• Not fault tolerant. The Software is not fault tolerant. Spectra Logic has independently determined how to use the Software in the
product, and suppliers have relied upon Spectra Logic to conduct sufficient testing to determine that the Software is suitable for
such use.
• No warranties for this software. The Software is provided “as is” and with all faults. The entire risk as to satisfactory quality,
performance, accuracy, and effort (including lack of negligence) is with you. Also, there is no warranty against interference
with your enjoyment of the Software or against infringement. If you have received any warranties regarding Software, those
warranties do not originate from, and are not binding on, Software Suppliers.
• Note on Java support. The Software may contain support for programs written in Java. Java technology is not fault tolerant and is
not designed, manufactured, or intended for use of resale as online control equipment in hazardous environments requiring
fail-safe performance, such as the operation of nuclear facilities, aircraft navigation or communication systems, air traffic
control, direct life support machines, or weapons systems, in which the failure of Java technology could lead directly to death,
personal injury, or severe physical or environmental damage.
• No liability for certain damages. Except as prohibited by law, Software Suppliers shall have no liability for any indirect, special,
consequential or incidental, damages arising from or in connection with the use or performance of the Software. This limitation
shall apply even if any remedy fails of its essential purpose. In no event shall Software Suppliers, individually, be liable for any
amount in excess of U. S. two hundred fifty dollars (U.S. $250.00).
• Limitations on reverse engineering, decompilation, and disassemly. You may not reverse engineer, decompile, or disassemble the
Software, except and only to the extent that such activity is expressly permitted by applicable law notwithstanding this
limitation.
• Software transfer allowed with restrictions. You may permanently transfer rights under this EULA only as part of a permanent sale
or transfer of the Product, and only if the recipient agrees to this EULA. If the Software is an upgrade, any transfer must also
include all prior versions of the Software.
• Export restrictions. Export of the Software from the United States is regulated by Export Administration Regulations (EAR, 15 CFR
730-744) of the U. S. Commerce Department, Bureau of Export Administration. You agree to comply with the EAR in the export
of re-export of the Software: (i) to any country to which the U.S. has embargoed or restricted the export of goods or services,
which as of May 1999 include, but are not necessarily limited to Cuba, Iran, Iraq, Libya, North Korea, Sudan, Syria, and the
Federal Republic of Yugoslavia (including Serbia, but not Montenegro), or to any national or any such country, wherever
located, who intends to transit or transport the Software back to such country; (ii) to any person or entity who you know or
have reason to know will utilize the Software or portion thereof in the design, development or production of nuclear, chemical,
or biological weapons; or (iii) to any person or entity who has been prohibited from participating in U.S. export transactions by
any federal agency of the U.S. government. You warrant and represent that neither the BXA nor any other U.S. federal agency
has suspended, revoked or denied your export privileges. For additional information see: http://www.microsoft.com/exporting.
2
Notices
Spectra Logic Corporation: Contact Information
United States Office
European Office
Mailing
Address
Spectra Logic Corporation
1700 N 55th Street
Boulder CO 80301
USA
Mailing
Address
Spectra Logic Europe Limited
Magdalen Centre
Robert Robinson Avenue
Oxford Science Park
Oxford
UK OX44 7 RW
Phone
(800) 833-1132 or (303) 449-6400
Phone
+44 (0) 870 112 2150
Fax
(303) 939-8844
Fax
+44 (0) 870 112 2175
Web Site
http://www.SpectraLogic.com
3
Notices
Product Warnings
AC Power
Warning: Risk of electrical shock. To remove AC power from the Spectra
RXT150, unplug the power cord from the power inlet. There are
no user-serviceable parts within the unit.
High Voltage
Warning: The Spectra RXT150 contains high-voltage components that can
cause injury or death. Only service personnel should replace or
install high-voltage components.
4
Contents
Chapter 1. Introduction
7
About This Guide . . . . . . . . . . . . . . . . . . . . . . . . . . . . . . . . . . . . . . . . . . . . . . . . . . 7
Chapter 2. Troubleshooting the RXT150
8
Ejecting RXT Media . . . . . . . . . . . . . . . . . . . . . . . . . . . . . . . . . . . . . . . . . . . . . . . . 8
Checking Messages and Flash Codes . . . . . . . . . . . . . . . . . . . . . . . . . . . . . . . . . . 13
Capturing Debug Files . . . . . . . . . . . . . . . . . . . . . . . . . . . . . . . . . . . . . . . . . . . . . 15
Resetting the RXT150 . . . . . . . . . . . . . . . . . . . . . . . . . . . . . . . . . . . . . . . . . . . . . . 20
Chapter 3. Troubleshooting RXT Media
22
Before Replacing Disk Drives . . . . . . . . . . . . . . . . . . . . . . . . . . . . . . . . . . . . . . . . 23
Replacing a Disk Drive in
Silver and Green RXT Media . . . . . . . . . . . . . . . . . . . . . . . . . . . . . . . . . . . . . . . . 25
Replacing a Disk Drive in Gold RXT Media . . . . . . . . . . . . . . . . . . . . . . . . . . . . . . 34
Finish . . . . . . . . . . . . . . . . . . . . . . . . . . . . . . . . . . . . . . . . . . . . . . . . . . . . . . . . . 36
5
Contents
Chapter 4. Warranty and Repair
37
RXT Media Recommendation . . . . . . . . . . . . . . . . . . . . . . . . . . . . . . . . . . . . . . . . 37
Contacting SpectraGuard Support . . . . . . . . . . . . . . . . . . . . . . . . . . . . . . . . . . . . . 37
RMA Returns . . . . . . . . . . . . . . . . . . . . . . . . . . . . . . . . . . . . . . . . . . . . . . . . . . . . 38
RXT150 Repair Policy . . . . . . . . . . . . . . . . . . . . . . . . . . . . . . . . . . . . . . . . . . . . . . 39
RXT Media Repair Policy . . . . . . . . . . . . . . . . . . . . . . . . . . . . . . . . . . . . . . . . . . . 42
6
1 Introduction
About This Guide
This guide describes the troubleshooting procedures for the Spectra RXT150 and
Spectra RXT media.
Intended Audience
This guide is written for Spectra RXT150 users, who should already be familiar with
the technical tasks associated with the maintenance and operation of backup systems.
Related Publications
The following publications related to the Spectra RXT150 are also available from
Spectra Logic at www.spectralogic.com:
• The Spectra RXT150 User Guide describes the configuration and use of the Spectra
RXT150, including installation, configuration, and use.
• The Spectra RXT150 Release Notes provides the most up-to date information about
the RXT150, including information about the latest firmware releases.
• The Spectra RXT SCSI Differences Guide outlines differences between RXT SCSI
commands and LTO-2 (Ultrium-TD2) commands.
Conventions Used In This Guide
This guide highlights important information with the following conventions:
Note: Provides additional points or suggestions.
Caution: Provides information about how to avoid damage to equipment.
Warning: Describes ways to avoid personal injury.
This guide uses a caret (>) to describe a series of menu selections.
For example:
Select Configuration > Network.
means:
Select Configuration, then select Network.
7
2 Troubleshooting the RXT150
This chapter covers the following information:
• Ejecting RXT Media, below
• Checking Messages and Flash Codes on page 13
• Capturing Debug Files on page 15
• Resetting the RXT150 on page 20
Ejecting RXT Media
Note: Before you attempt to eject media in one of the following ways, be
sure to call SpectraGuard Technical Support. They may want to
have you gather logs or traces first so that they can analyze the
problem.
When an RXT media pack is stuck in a drive (that is, if a problem prevents the pack
from ejecting), try one of the following procedures:
• First, try using the Force Eject utility, as described on page 9.
• Next, try holding the Load/Unload button, as described on page 10.
• If the Load/Unload button has no effect, you can try using an Allen wrench for a
manual eject, as described on page 11.
Caution: If the RXT media pack fails to eject after attempting these
methods, contact SpectraGuard Technical Support for assistance.
Do not try other methods of forcing the RXT media out of the
RXT150.
8
Chapter 2. Troubleshooting the RXT150
Using the Force Eject Utility
1. Log in to the RLC as a user with Administrative privileges.
2. Select Maintenance > Tools. The RXT Utilities screen appears (Figure 2-1).
Figure 2-1 The RXT Utilities screen, showing the Load/Unload RXT Media Pack utility.
3. Select Load/Unload Media Pack. The screen refreshes to show the details of the
utility (Figure 2-1).
4. Select Unload RXT Media pack, then select force.
5. Select Run.
• If this operation is successful, the RXT media pack ejects from the RXT150,
and the Load/Unload RXT Media Pack screen appears, confirming that the
pack is not longer loaded.
• If this operation is not successful, the RLC presents an error. Proceed to
Holding the Load/Unload Button on page 10.
6. Select Finish to complete the operation.
9
Chapter 2. Troubleshooting the RXT150
Holding the Load/Unload Button
Hold down the Load/Unload button (Figure 2-2) for approximately 15 seconds.
Note: This action causes the drive to reboot, which in turn causes a
forced eject. As a result of the reboot process, the host temporarily
loses contact with the drive.
Load/Unload
Figure 2-2 The Load/Unload button.
If this operation is not successful, proceed to Using an Allen Wrench for Manual Eject
on page 11.
10
Chapter 2. Troubleshooting the RXT150
Using an Allen Wrench for Manual Eject
Note: You need a #2 Phillips screwdriver and a 5/64 Allen wrench (not
included with the RXT150) to complete this procedure.
1. Stop any backups running to the RXT150 and power the unit down.
2. Unplug the power cable and all other cabling from the back of the unit.
3. Carefully turn the unit upside down.
4. Use a #2 Phillips screwdriver to remove the four screws attaching the cover
to the bottom RXT150 (Figure 2-3).
5. Carefully turn over the RXT150 again so that it is right side up.
Figure 2-3 The four screws on the bottom of the unit.
6. Use a #2 Phillips screwdriver to remove the three screws on the outer edges
of the back of the cover (Figure 2-4).
7. Carefully remove the cover by lifting it straight up and off the chassis.
Figure 2-4 The three screws on the back of the unit.
11
Chapter 2. Troubleshooting the RXT150
8. Locate the hole on the side of the RXT150. When you are looking at the front of
the unit, this hole is on the right side, near the back of the unit (Figure 2-5).
Front
Back
Figure 2-5 The hole on the right side of the unit.
9. Insert a 5/64 Allen wrench into the hole, and rotate the wrench counterclockwise. The pack slowly ejects.
10. After removing the media from the RXT150, replace the cover on the top of the
unit.
11. Secure the cover with the three screws on the back.
12. Carefully turn the unit over and secure the four screws on the bottom.
13. Turn the RXT150 right side up again and return it to operation.
12
Chapter 2. Troubleshooting the RXT150
Checking Messages and Flash Codes
The Spectra RXT150 proactively provides information to users in two different ways:
through the Web Interface and through the front panel’s digital display. The Web
interface provides messages, and the digital display provides flash codes. The
following sections describe how to use these helpful tools:
• Messages, below
• Flash Codes on page 14
Messages
The Messages icon appears on the status bar of the Web interface (Figure 2-6).
Messages Icon
Figure 2-6 The Messages icon on the status bar.
The Messages icon shows RXT150 and RXT media status, using these designations:
Symbol
Description
Meaning
A check mark in green
Functioning correctly.
An i in blue
Check messages for information.
An exclamation point in yellow
Check messages for status.
An X in red
Check messages for error.
When you select the Messages icon on the status bar (Figure 2-6), the System Messages
screen appears. Read the message(s), and follow any recommended steps. If you need
assistance, contact SpectraGuard Support.
13
Chapter 2. Troubleshooting the RXT150
Flash Codes
Use the chart below to interpret the flash codes that appear on the digital display, then
follow any recommended steps. If you need assistance, contact SpectraGuard Support.
Code
Meaning
Resolution
Powering On
Status message that the drive is powering on; no action is required.
Booting
Status message that the drive is booting up; no action is required.
Waiting
Status message that the drive is processing; no action is required.
1
Cooling Problem
It could be the RXT media pack; try removing the pack and reloading.
It could be the RXT150; try cycling the power on the RXT150.
2
Firmware Error
3
RXT150 Hardware Error
4
Media Hardware Error
5
RXT150 or RXT Media
Hardware Error
6
RXT150 Hardware Warning
7
Media Hardware Warning
8
RXT150 or RXT Media
Hardware Warning
9
Media Degraded Mode
Before rebooting, determine which drive is impaired and send trace
and debug files to SpectraGuard Support.
A
RXT150 Configuration
Warning
Before rebooting, gather traces and debug files through the Web
interface or serial interface. Send the error message and diagnostic
results it to SpectraGuard Support.
B
Media Firmware more
current than RXT150
Firmware
Upgrade the RXT150 firmware to the more current firmware level.
C
Media Reformatting
Necessary
D
Media Reconstructing
E
RXT150 Firmware Upgrade
Necessary
Upgrade the RXT150 firmware to current level.
F
RXT150 Firmware Upgrade In
Progress
Wait until the firmware file has upgraded.
G
RXT150 Firmware Upgrade
Failed
Attempt to upgrade again. If the second attempt fails, e-mail
SpectraGuard Support with trace and debug files.
H
Communication Application
Failed
Debug logs about the application failure are located on the RXT media;
you may want to save the logs to send to SpectraGuard Support.
You can continue using the RXT150.
Before rebooting, gather traces and debug files using the Web
interface or the serial interface. Send the error message and diagnostic
results it to SpectraGuard Support.
Before rebooting, gather traces and debug files using the Web
interface or the serial interface. Send the error message and diagnostic
results it to SpectraGuard Support.
Contact SpectraGuard Support to determine if there is a hardware or
firmware problem; the RXT media pack may need reformatting.
14
Chapter 2. Troubleshooting the RXT150
Capturing Debug Files
SpectraGuard staff may ask for logs of debug files when they troubleshoot a problem.
Debug files may reveal the source of errors in program code or in hardware. When you
are instructed to gather debug files from the RXT150, follow the procedures as
outlined in one of the following sections:
• Capturing Debug Files with the Web Interface, below
• Capturing Debug Files with the Serial Interface on page 18
Note: Only users with administrator privileges have access to all
diagnostics.
Capturing Debug Files with the Web Interface
1. Log on to the Web interface as Administrator.
2. Select Maintenance > Tools; the RXT Utilities screen appears (Figure 2-7).
Figure 2-7 The RXT Utilities screen.
15
Chapter 2. Troubleshooting the RXT150
3. Select Get Debug Files. The screen refreshes to show the utility’s description.
4. Select Run. The Get Debug Files Utility screen appears (Figure 2-8).
Figure 2-8 The Get Debug Files Utility screen.
5. Select the type(s) of files to download.
6. Select Next. The screen refreshes to indicate that the file or files are ready to
download.
7. Click on the link to start the process.
8. In the File Download window that appears, select the location to which you
want to save the file(s), then select Save.
This creates a zip file with debug information that you can send to SpectraGuard
support.
If you want to see the debug file information, see Viewing Debug Files on the
Web Interface on page 17.
16
Chapter 2. Troubleshooting the RXT150
Viewing Debug Files on the Web Interface
If you want to review debug files for the last configured trace, follow these steps.
Note: Debug files run constantly, and this screen can be viewed at any
time. Each debug file contains up to 5MB of trace information.
1. Log on to the Web interface as an Administrator.
2. Select Maintenance > Traces; the System Trace screen appears (Figure 2-9).
Figure 2-9 The System Trace screen.
3. To configure a new debug trace, see Capturing Debug Files with the Web
Interface on page 15.
17
Chapter 2. Troubleshooting the RXT150
Capturing Debug Files with the Serial Interface
Before You Begin
Before using the serial interface, make sure that:
• You have a properly configured terminal emulator, such as TeraTerm.
(HyperTerminal is not recommended for use with the RXT-150.)
• You have a standard DB9 serial cable.
• The terminal emulation settings are set to:
• 115200 bps
• 8 data bits
• No parity
• 1 stop bit
• No flow control
Capturing Debug Files
1. Connect a serial cable from the host to the RXT150.
2. Open TeraTerm, or a similar terminal emulation program.
You may need to press the Enter key on your keyboard to display a command
prompt.
3. Type cnDiagnosticShell, then press the Enter key on your keyboard. The
RXT Drive Diagnostics Main Menu (Figure 2-10) displays.
Figure 2-10 The RXT Drive Diagnostics Main Menu.
18
Chapter 2. Troubleshooting the RXT150
4. Type 4, then press the Enter key on your keyboard; the Diagnostics Tracing
Menu displays (Figure 2-10).
Figure 2-11 The Diagnostics Tracing Menu.
5. Type 1 or 2 (as instructed by SpectraGuard Support), the press Enter.
The trace should take less than two minutes to run.
6. Copy the trace information.
7. Paste the trace information into an e-mail for SpectraGuard Support.
19
Chapter 2. Troubleshooting the RXT150
Resetting the RXT150
Resetting the RXT150 allows a soft reboot of the drive.
Caution: Never reset the drive while data is being written to RXT media.
Only reset the drive on the recommendation of SpectraGuard
Technical Support. A drive reset erases valuable log information
that SpectraGuard Support staff can use to diagnose problems.
Proceed to one of the following:
• Resetting the RXT150 with the Digital Display, below
• Resetting the RXT150 with the Serial Interface on page 21
Resetting the RXT150 with the Digital Display
1. Make sure that an RXT media pack is not loaded.
2. Make sure that the display is in ready mode; the display
blank is and the LED in the lower right corner flashing
slowly and steadily.
Display
3. Press Select to display A, then press Load/Unload
repeatedly to
display J.
Select
4. Press Select to continue with the task. The next character
to
display is a question mark (?).
Load/
Unload
5. Press Load/Unload; an N for No displays.
6. Press Load/Unload; a Y for Yes displays; press Select.
The reset takes several minutes. During this time, the display shows a
sequence of characters, then the RXT150 reboots. The RXT150 is
reset and ready to use when the display returns to ready mode.
20
Chapter 2. Troubleshooting the RXT150
Resetting the RXT150 with the Serial Interface
Before You Begin
Before using the serial interface, make sure that:
• You have a properly configured terminal emulator, such as TeraTerm.
(HyperTerminal is not recommended for use with the RXT-150.)
• You have a standard DB9 serial cable.
• The terminal emulation settings are set to:
• 115200 bps
• 8 data bits
• No parity
• 1 stop bit
• No flow control
Resetting the RXT150
1. Connect a serial cable from the host to the RXT150.
2. Open TeraTerm, or a similar terminal emulation program.
(HyperTerminal is not recommended for use with the RXT150.
3. Press the Enter key on your keyboard to display a command prompt.
4. Type cnDiagnosticShell, then press the Enter key on your keyboard. The
RXT Drive Diagnostics Main Menu (Figure 2-10) displays.
Figure 2-12 The RXT Drive Diagnostics Main Menu.
5. Type 6, then Enter; a prompt appears, asking you to confirm the reset.
6. To confirm the reset, type Y, then Enter. In less than 30 seconds, the RXT150
reboots; it should come to ready mode again in the normal time frame of 20
seconds to two minutes.
To escape the reset process, type N, then Enter.
21
3 Troubleshooting RXT Media
This chapter reviews how to replace a failed hard drive inside of an RXT media pack.
Caution: Only replace a disk drive in an RXT media pack under the
direction of SpectraGuard support staff.
Caution: A RAID 0 RXT media pack requires reformatting. Reformatting
the RXT media pack destroys any user data that currently exists
on the disks in the RXT media pack.
Before you begin, be sure to read the following:
• Before Replacing Disk Drives on page 23, and
• Preparing to Replace a Failed Disk Drive on page 24.
Media Pack Types
Before replacing a disk drive in an RXT media pack, note the type of media pack you
have: Gold, Silver, or Green.
Specifications
Specifications a
Gold RXT Media
Silver RXT Media
Green RXT Media
Height
2.4 in. (6.1 cm)
2.4 in. (6.1 cm)
2.4 in. (6.1 cm)
Width
4.6 in. (11.7 cm)
4.6 in. (11.7 cm)
4.6 in. (11.7 cm)
Depth
10.1 in. (25.7 cm)
10.1 in. (25.7 cm)
13.8 in. (35.1 cm)
Disk Drives
Twelve 2.5-inch Drives
Two 3.5-inch Drives
Four 3.5-inch Drives
a.
Specifications are subject to change at any time without notice.
22
Chapter 3. Troubleshooting RXT Media
Before Replacing Disk Drives
Cautions
Caution: Only replace a disk drive on the direction of SpectraGuard
Support. Contact SpectraGuard Support if the Web interface or
an LED indicates that a disk drive has failed.
.
Figure 3-1 System message indicating an RXT media disk drive problem.
Caution: Only use Spectra-Logic-approved drives for replacement. To
order new drives, see Contacting SpectraGuard Support on
page 37.
Caution: Hard drives are extremely vulnerable once removed from an
RXT media pack. Electro-static discharge (ESD) is a risk, and the
drives are very susceptible to shock and vibration damage.
When handling the disk drives, be sure to use care.
Always set them down gently on flat surfaces, and place them
flat-side-down to keep them from being knocked over.
23
Chapter 3. Troubleshooting RXT Media
Preparing to Replace a Failed Disk Drive
To prepare for the replacement of the failed disk drive, follow these steps.
1. Log on to the RXT150 Web interface
2. Select Maintenance > Tools > Get RXT Media Pack Drive Status; the Get RXT
Media Pack Drive Status Utility screen displays (Figure 3-2).
Drive
Serial
Number
Color
indicates
status
12 disk drives
in this pack
(Gold Media)
Figure 3-2 The Get RXT Media Pack Drive Status Utility screen.
The display indicates the number of disk drives in the pack and their serial
numbers.
The expected mapping of the disk drives should be green (Optimal). If you have
a disk drive error, the disk drive background is Red (Failed), Yellow (Missing),
or Orange (Incorrect Size).
3. Write down the serial number of the disk drive with a problem.
4. Contact SpectraGuard Support, as outlined on page 37.
5. Proceed only after support has directed you to replace a failed drive, and after
you have procured an approved drive from Spectra Logic.
6. Shut down all backups to the RXT150.
7. Eject the RXT media from the RXT150.
8. Depending on your RXT media type:
• For Silver or Green RXT media, proceed to Replacing a Disk Drive in Silver
and Green RXT Media on page 25.
• For Gold RXT Media, proceed to Replacing a Disk Drive in Gold RXT Media
on page 34.
24
Chapter 3. Troubleshooting RXT Media
Replacing a Disk Drive in
Silver and Green RXT Media
Use this process to replace a 3.5-inch disk drive in Silver and Green RXT media.
Opening the Media Pack
1. Carefully turn the RXT media pack upside-down.
2. Use a #1 Phillips screwdriver to remove the screws that secure the pack’s bottom
(Figure 3-3 and Figure 3-4).
Figure 3-3 An Silver RXT media pack with four screws to remove.
Figure 3-4 An Green RXT media pack with six screws to remove.
3. Remove the bottom panel and set it aside.
25
Chapter 3. Troubleshooting RXT Media
4. Remove the electro-static discharge (ESD) panel (Figure 3-5) by lifting up first
from the end with the overlapping tab (A), then sliding the panel out from the
other end of the media pack (B).
A
B
Figure 3-5 Removing the ESD panel (Silver media pack shown).
5. Carefully turn the RXT media on its side so that you have access to one side of
the pack.
6. Proceed to Disconnecting the Disk Drive on page 27.
26
Chapter 3. Troubleshooting RXT Media
Disconnecting the Disk Drive
1. Use a #2 Phillips screwdriver to remove the two screws closest to the open side
of the pack (Figure 3-6).
Figure 3-6 The screws on one side of a Silver RXT media pack.
On Green RXT media, do this only for the drive—or the drive above the drive—
that you are replacing (see Figure 3-7).
If you are removing this drive or the one
beneath it, remove these two screws.
If you are removing this drive or the one
beneath it, remove these two screws.
Figure 3-7 The screws on one side of a Green RXT media pack.
2. Carefully turn the pack over to its other side and repeat Step 1.
Caution: The disk drive comes loose immediately when you loosen the
last two screws; be sure to keep one hand on it so that it does
not fall out of the pack.
3. Gently lay the RXT media pack down, with the open side facing up.
27
Chapter 3. Troubleshooting RXT Media
4. Use a #2 Phillips screwdriver to loosen the ESD resistor screw on the side of the
disk drive (Figure 3-8).
Figure 3-8 The ESD screw (Silver media shown).
On Green RXT media, you may get to skip this step. See Figure 3-9.
If you are replacing a
disk drive on this end,
you need to remove the
ESD screw.
Display
If you are replacing a
disk drive on this end,
you do not need to
remove an ESD
screw; it is only
present on the other
drive.
Pogo Pad
Figure 3-9 Green RXT media.
28
Chapter 3. Troubleshooting RXT Media
5. Use a #2 Phillips screwdriver to loosen the screw on the bracket that secures the
connector to the disk drive (Figure 3-10).
Caution: Take care not to
damage the
flex circuit;
keep the cable
as straight as
possible.
Figure 3-10 The bracket screw (Silver media shown).
6. Carefully remove the bracket from the disk drive, sliding it first down the cable,
then off (Figure 3-11).
o
Figure 3-11 Sliding the bracket off the connector.
29
Chapter 3. Troubleshooting RXT Media
7. Disconnect the disk drive connector (Figure 3-12) from the loose drive, then
remove the disk drive from the pack.
o
Figure 3-12 Disconnecting the disk drive connector.
Note: If the failed disk drive is still in the pack (underneath the drive you
just removed), then repeat Step through Step 7 for the other disk
drive. The only step you do not have to repeat is the removal of
the resistor cable; that is only on the one drive.
30
Chapter 3. Troubleshooting RXT Media
Installing the New Disk Drive in Silver and Green RXT Media
1. Replace the failed disk drive with the new disk drive and plug in the disk drive
connector.
2. Carefully replace the bracket that secures the connector to the disk drive, sliding
it first up the cable, then into place. It must sit flush against the disk drive
(Figure 3-13).
o
Figure 3-13 Replacing the bracket on the connector.
3. Use a #2 Phillips screwdriver to tighten the screw that secures the bracket to the
disk drive (Figure 3-14).
Caution: Take care not to
damage to the
flex circuit;
keep the cable
as straight as
possible.
Figure 3-14 Securing the bracket to the disk drive.
31
Chapter 3. Troubleshooting RXT Media
4. If the disk drive you replaced is the first drive that you could access when you
removed the bottom of the pack, proceed to Step 5 below.
If the drive you replaced is the drive underneath:
• Carefully place the disk drive into the media pack.
• Use a #2 Phillips screwdriver to tighten the four screws (two on each side)
that attach it to the pack; make sure that the heads of the screws are flush
with the side of the pack.
• Repeat Step 2 and Step 3 for the next drive.
5. Use a #2 Phillips screwdriver to tighten the ESD resistor screw on the side of the
disk drive, then put the disk drive into place inside the RXT media pack.
(This may not apply for Green media, depending on the drive you replaced.)
Figure 3-15 Tightening the ESD screw.
6. Secure the disk drive by tightening the screws in the side panels of the RXT
media pack.
Caution: Make sure that all side panel screws are flush with the side of
the RXT media pack so that they do not interfere with loading
and unloading the RXT media.
7. Carefully turn the RXT media pack so that the open side faces up.
32
Chapter 3. Troubleshooting RXT Media
8. Replace the ESD panel:
• Slide the end with the cut-outs (Figure 3-16) into its place at the pogo-pad
end of the pack (A in Figure 3-17).
• Pinch the sides of the panel in (B in Figure 3-17) while pushing down (C in
Figure 3-17) until the entire ESD panel lays flat in the pack.
B
B
C
A
Figure 3-16 The cut-outs.
Figure 3-17 Replacing the ESD panel.
9. Replace the bottom plate on the pack, making sure that it matches up with the
tabs on the ESD panel (Figure 3-18).
Figure 3-18 Matching the bottom plate to the ESD panel.
10. Use a #1 Phillips screwdriver to tighten the four or six screws that secure the
bottom plate to the media pack.
11. Proceed to Finish on page 36.
33
Chapter 3. Troubleshooting RXT Media
Replacing a Disk Drive in Gold RXT Media
Use this process to replace a 2.5-inch disk drive in Silver and Green RXT media.
1. Remove the two screws on the side panel of the RXT media (Figure 3-19).
Figure 3-19 The two side panel screws.
2. Slide the side panel out.
3. Locate the failed disk drive, which is labeled with the serial number you wrote
down from the Get RXT Media Pack Drive Status Diagnostic screen (Figure 3-2 on
page 24).
4. Pull the disk drive out by its tab (Figure 3-20).
o
Figure 3-20 Pulling out the failed disk drive.
5. Replace the failed disk drive with the new disk drive.
34
Chapter 3. Troubleshooting RXT Media
6. Slide the side panel’s metal tabs into the media pack’s slots (Figure 3-21).
Caution: These tabs play a structural role in providing proper pressure
on each of the disk drives in the RXT media pack.
Confirm the orientation of the tabs before pressing the side
panel into place; this way you can avoid damaging the disk
drives or the tabs.
B
A
Figure 3-21 The tabs on the side panel (A) match the slots inside the media pack (B).
7. Gently push the side panel into place so that the screw holes all line up.
8. Hold it in place while using a #1 Phillips screwdriver to tighten the screws
(Figure 3-22).
Figure 3-22 The cover in place.
9. Proceed to Finish on page 36.
35
Chapter 3. Troubleshooting RXT Media
Finish
1. Load the RXT media pack into the RXT150.
2. Select Maintenance > Tools > Get RXT Media Pack Drive Status. The RXT media
drives should report as Optimal (green), as shown in Figure 3-23.
All drives should
appear green
(unless spare).
Figure 3-23 The Get RXT Media Pack Drive Status Utility screen.
The RXT media pack automatically rebuilds itself when placed back into the
RXT150. Note that the rebuild process can be lengthy, depending on the amount
of data. During the rebuild, read/write operations will be slower than normal.
Note: A RAID 0 RXT media pack requires reformatting; see below.
Reformatting a Disk Pack
Caution: Reformatting the RXT media pack destroys any user data that
currently exists on disks in the RXT media pack.
1. Select Maintenance > Tools; the RXT Utilities screen appears.
2. Select Reformat RXT Media Pack, then select Run; the Reformat RXT Media Pack
Utility screen appears.
3. Select Next; the reformatting process may take several minutes to complete.
4. Select Finished; the RXT Utilities screen reappears.
36
4
Warranty and Repair
This chapter reviews the RXT150 warranty and Spectra Logic’s repair policies and
processes:
• Contacting SpectraGuard Support on page 37
• RMA Returns on page 38
• RXT150 Repair Policy on page 39
Note: This warranty applies only to the RXT150. It does not include RXT
media.
RXT Media Recommendation
Spectra Logic recommends storing spare RXT media on site for facilities requiring
immediate access to spare media to accommodate data growth or replace failed media.
This practice is recommended for all media, including RXT media and tape cartridges.
Contacting SpectraGuard Support
United States and Canada
800.227.4637 or 303.449.0160
[email protected]
Mexico, Central America, and South America
Asia, Australia, and New Zealand
303.449.0160
[email protected]
Europe, Africa, and the Middle East
+44 (0) 870 112 2185
[email protected]
Note: Product documentation and knowledge base articles are available
on Spectra Logic’s Web site at www.SpectraLogic.com/Support.
37
Chapter 4. Warranty and Repair
RMA Returns
Your technical support representative may ask you to return a problem component to
Spectra Logic for servicing. To return an RXT150 or component for service:
1. Obtain a Return Materials Authorization (RMA) number from a technical support
representative; this number identifies the part on its arrival.
2. Pack the component in its original shipping materials and as instructed by
Spectra Logic.
Note: If the component is improperly packed, the warranty is void.
3. Send the component to the following address:
Spectra Logic Corporation
Attn: [RMA number]
Suite B
5571 Arapahoe Avenue
Boulder, Colorado 80303
USA
Note: Be sure to reference the RMA number on your RXT150 or
component, or its repair will be delayed.
4. For follow-up on RMA items, contact SpectraGuard Support as listed under
Contacting SpectraGuard Support on page 37.
Shipping Information
The following table lists the physical specifications for shipping purposes.
RXT150
Gold
RXT Media
Silver
RXT Media
Green
RXT Media
Height
5.9 in. (15.0 cm)
2.4 in. (6.1 cm)
2.4 in. (6.1 cm)
2.4 in. (6.1 cm)
Width
9.8 in. (24.9 cm)
4.6 in. (11.7 cm)
4.6 in. (11.7 cm)
4.6 in. (11.7 cm)
Depth
13.5 in. (34.3 cm)
10.1 in. (25.7 cm)
10.1 in. (25.7 cm)
13.9 in. (35.3 cm)
Weight
15 lbs. (6.8 kg)
6-Drive Pack: 4.1 lbs (1.9 kg)
12-Drive Pack: 5.6 lbs (2.5 kg)
4.7 lbs (2.1 kg)
8.4 lbs (3.8 kg)
Caution: Do not ship the RXT150 with RXT media in the drive.
38
Chapter 4. Warranty and Repair
RXT150 Repair Policy
Limited Warranty
Spectra Logic warrants the RXT150 to be in good working order for a period of one full
year from the date of shipment from Spectra Logic or an authorized Spectra Logic
dealer. Should this product fail to be in good working order at any time during this
one-year period, Spectra Logic will, at its option, repair or replace this product at no
additional charge except as follows:
Suspect parts sent to Spectra Logic will be repaired or replaced. Exchanged parts will
be either reconditioned or new at the option of Spectra Logic. This limited warranty
does not include:
• Service to repair damage resulting from:
•
•
•
•
Accident
Disaster
Misuse
Abuse
• Non-Spectra Logic modification of the product including, but not limited to,
product expansion through plug-in additions except as provided by Spectra Logic
• Removal of serial number tags
• Physical damage caused by inadequate packaging
If any of the above conditions exist, Spectra Logic reserves the right to repair the unit
at the current fixed price of repair.
Warranty service can be acquired during the one-year period by shipping the product
to Spectra Logic with an invoice and Return Materials Authorization (RMA) number.
Note: No return can be accepted without an RMA number from Spectra
Guard technical support. Returns must be shipped prepaid in their
original packing containers; damage incurred in transit is not
covered by Spectra Logic’s warranty.
Spectra Logic makes no other warranties, expressed or implied, and specifically
disclaims any warranty of merchantability or fitness for a particular purpose or use. If
this product is not in good working condition as warranted above, your sole remedy
shall be replacement or repair as provided above. In no event will Spectra Logic be
liable to you for any damages, including any lost profits, lost savings, or other
incidental or consequential damages arising out of the use of or inability to use such
product, even if Spectra Logic has been advised of the possibility of such damages, or
for any claim by any other party.
39
Chapter 4. Warranty and Repair
Warranty Shipping
The RXT150 unit must be returned in the original carton and packed with the original
packing material. Failure to do so will void the warranty. See the label on the inside lid
of the shipping container for instructions on packing the RXT150.
The purchaser is responsible for paying the shipping and insurance charges for
warranty goods to Spectra Logic. Spectra Logic will pay for shipping the repaired item
back to the purchaser.
International warranty repairs must be accompanied by a commercial invoice, a
packing slip, and a carrier waybill. The following must be written on the invoice:
GOODS OF U.S. ORIGIN, RETURN FOR WARRANTY REPAIR, VALUE FOR CUSTOMS USE ONLY.
Import duties assessed on incoming shipments will be prorated to the customer's
account if proper documentation does not accompany the shipment.
Warranty Turnaround Time
A standard repair turnaround time is two weeks from receipt of the product. Spectra
Logic shall reserve the right to replace the unit if it cannot be repaired within the two
week time frame. Advanced service options can be purchased for an additional fee.
Warranty Provisions for Units Located in Europe
Spectra Logic has implemented special arrangements for honoring warranties on
libraries located in Europe. Please contact SpectraGuard Support for details.
Out-of-Warranty Repairs
Contact technical support for the current fixed repair price for the RXT150. The repair
is warranted for ninety days from the date the unit is shipped to a customer.
Out-of-Warranty Shipping
All non-warranty units will be shipped back to the purchaser as determined by the
purchaser. Shipping charges to and from Spectra Logic are the responsibility of the
purchaser. International customers with non-warranty units are responsible for
customs and duties charges coming into the United States as well as charges on
returned products into their own countries.
Out-of-Warranty Turnaround Time
The non-warranty turnaround time is two weeks from receipt of the unit. Spectra Logic
reserves the right to either repair or replace the unit.
40
Chapter 4. Warranty and Repair
Standard Repair Service for the RXT150
The standard return-to-factory service supplied with the standard warranty, as it
applies to the United States and the European Union, includes telephone access to a
Technical Support representative from 8:00am to 5:00pm local time Monday through
Friday, excluding Spectra Logic holidays.
Advanced Service Options for the RXT150
You may wish to purchase more advanced service options that go above and beyond
the standard one-year return-to-factory warranty that is provided with the RXT150. The
following options are available in the United States and the European Union. For more
information about these options, contact SpectraGuard Support.
Four-Hour Response On-Site Service
This service includes 24-hour telephone access to a Support representative seven days
a week, 365 days a year. Once a Support representative determines that the RXT150
requires repair, an on-site service provider will be dispatched and will arrive on site
within four hours.
Same Business Day On-Site Service with Four-Hour Response
This service includes 24-hour telephone access to a Support representative seven days
a week, 365 days a year. Once a Support representative determines that the RXT150
requires repair, an on-site service provider will be dispatched, Monday through Friday
from 8:00 a.m. to 5:00 p.m. Once dispatched, a field service representative will arrive
on site within four hours. Dispatches must be made by 1:00pm local time to assure
same business day response; otherwise, the response will be the next business day.
Next Business Day On-Site Service
This service includes telephone access to a Support representative from 8:00am to
5:00pm local time Monday through Friday, excluding Spectra Logic holidays. If the
Support representative determines that the RXT150 requires repair, an on-site service
provider will be dispatched for the following business day. Confirmation that on-site
repair is necessary must be established by 5:00pm (customer local time) for a field
service representative to be dispatched for arrival on the following business day.
41
Chapter 4. Warranty and Repair
RXT Media Repair Policy
Limited Warranty for RXT Media
RXT media is warranted for three years return-to-factory. The standard turn-around
time is two weeks from receipt of the product. Upon completion of repair, Spectra
Logic will return the unit via two-day shipment.
Note: Spectra Logic will return a fully functioning media pack with the
appropriate RAID level; however, all data on the media will be lost
due to the re-manufacturing process.
Next Business Day Replacement Service for RXT Media
Next Business Day Replacement Service enables the customer to receive a replacement
unit quickly if the unit requires repair. Next Business Day Replacement is available
throughout North America and the European Union. Contact your local Spectra Logic
sales representative for locations outside of North America or the European Union.
Next Business Day Replacement Service Highlights
Telephone Support Telephone support for RXT media is defined in the Telephone
Support section of the appropriate RXT150 support contract. Please reference the
RXT150 contract for specific days and times.
Individual SATA Disk Drive Replacement Upon verification that a disk drive within the
media pack requires repair, a replacement disk drive will be shipped the same day for
delivery the next business day. Confirmation that Spectra Logic hardware requires
repair must be established by 2:30pm MST for next day delivery. Customers do not
receive same-day onsite service for replacement components. If an individual disk
drive is shipped, the customer is responsible for replacing the faulty disk in the RXT
media pack and rebuilding the RAID volume. Spectra Logic is available during the
hours listed in the RXT150 contract for telephone support to assist with the installation
of replacement components if needed.
RXT Media Pack Replacement If the entire RXT media pack requires replacement, three
days build time may be necessary. Once the replacement RXT media pack has been
built and tested, it will be shipped for next business day delivery.
Online Support www.SpectraLogic.com/Support provides extensive product
documentation and online training for customer reference.
42
Chapter 4. Warranty and Repair
Express Repair Service for RXT Media
Express Repair Service enables the customer to exchange an entire RXT media pack if it
requires repair. Express Repair Service is available throughout North America and the
European Union. Contact your Spectra Logic sales representative for other locations.
Express Repair Service Highlights
Telephone Support Telephone support for RXT media is defined under Telephone
Support in the RXT150 support contract; reference that contract for days and times.
Online Support www.SpectraLogic.com/Support provides extensive product
documentation and online training for customer reference.
Express Repair Service Instructions
• Upon verification of required repair, customer ships the media pack to Spectra Logic.
• If the failure was in a SATA drive, Spectra Logic removes the faulty drive, rebuilds the
RAID, and returns the media pack to the customer within 48 hours of receiving it.
• If the entire RXT media pack requires replacement, allow for three days build time.
Once the replacement is built and tested, it is shipped next-business-day delivery.
Note: Spectra Logic will return a fully functioning media pack with the
appropriate RAID level; however, all data on the media will be lost
due to the re-manufacturing process.
Assisted Self-Maintenance for RXT Media
Assisted Self-Maintenance (ASM) is a type of technical support that saves time and
money, since customers control general maintenance issues themselves. ASM can be
purchased to supplement Next Business Day Replacement or Express Repair Service.
ASM allows for a select group of parts to be stocked at the customer’s site, allowing
customers to make immediate repairs with telephone support from Spectra Logic.
Assisted Self-Maintenance Service Highlights
Basic elements of ASM include field-replaceable parts stocked onsite, one spare drive for
each drive type utilized in RXT media, and special tools needed to perform repairs.
Telephone Support Telephone support for ASM is defined under customer’s primary
hardware support plan. Reference the existing contract for specific days and times.
Onsite Support Onsite support for ASM is defined under customer’s primary hardware
support plan. Reference the existing contract for specific days and times.
Online Support Online training for two individuals each year, as well as access to
www.SpectraLogic.com/support, which provides extensive product documentation.
43