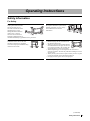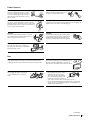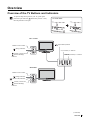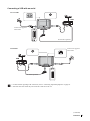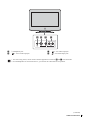
1
2-148-999-52(1) LCD Colour TV PDP Colour TV Quick Start Guide Operating Instructions Before operating the TV, please read the “Safety Information” section of this manual. Retain this manual for future reference. KLV-L32M1 KE-P42M1 2004 Sony Corporation Quick Start Guide Operating Instructions 1 NOTICE FOR CUSTOMERS IN THE UNITED KINGDOM A moulded plug complying with BS1363 is fitted to this equipment for your safety and convenience. Should the fuse in the plug supplied need to be replaced, a 5 AMP fuse approved by ASTA or BSI to BS 1362 (i.e. marked with or ) must be used. When an alternative type of plug is used it should be fitted with a 5 AMP FUSE, otherwise the circuit should be protected by a 5 AMP FUSE at the distribution board. If the plug supplied with this equipment has a detachable fuse cover, be sure to attach the fuse cover after you change the fuse. Never use the plug without the fuse cover. If you should lose the fuse cover, please contact your nearest Sony service station. FUSE How to replace the fuse Open the fuse compartment with a blade screwdriver, and replace the fuse. IMPORTANT If the plug supplied is not suitable for the socket outlets in your home, it should be cut off and an appropriate plug fitted in accordance with the following instructions: The wires in this mains lead are coloured in accordance with the following code: Green-and-yellow Earth Blue Neutral Brown Live As the colours of the wires in the mains lead of this apparatus may not correspond with the coloured markings identifying the terminals in your plug, proceed as follows: The wire which is coloured green-and-yellow must be connected to the terminal in the plug which is marked by the letter E or by the safety earth symbol I or coloured green or green-and-yellow. The wire which is coloured blue must be connected to the terminal which is marked with the letter N or coloured black. The wire which is coloured brown must be connected to the terminal which is marked with the letter L or coloured red. WARNING • To prevent the risk of electric shock, do not insert the plug cut off from the mains lead into a socket outlet. This plug cannot be used and should be destroyed. • To prevent the risk of fire or electric shock, do not expose the unit to rain or moisture. • Dangerously high voltages are present inside the unit. Do not open the cabinet. Refer servicing to qualified personnel only. Introduction Thank you for choosing this Sony LCD/PDP Colour Television. Before operating the TV, please read this manual thoroughly and retain it for future reference. Symbols used in the manual ........ Important information. ........ Information on a feature. 1, 2 .......... Sequence of instructions. ...... Shaded buttons on the remote control show you the buttons you have to press to follow the sequence of instructions. ......... Informs you of the result of instructions followed. The illustrations used in this manual are of the KLV-L32M1 unless otherwise stated. 2 Table of Contents Quick Start Guide ......................................................................................................................................4 Operating Instructions Safety Information ............................................................... 13 Precautions ........................................................................... 18 Overview Overview of the TV Buttons and Indicators ........................ 21 Overview of the Remote Control Buttons ........................... 23 Installation Inserting Batteries into the Remote Control ........................ 25 Connecting an Aerial and a VCR ........................................ 26 Preventing the TV from Falling Down ................................ 29 First Time Operation Switching On the TV and Tuning the TV Automatically ... 30 Menu System .......................................................................................................13 Other Functions Sleep Timer Function ...........................................................44 Picture Off Function (KE-P42M1 only) ..............................44 Screen Memo Function ........................................................45 Teletext ................................................................................46 NexTView ............................................................................47 Additional Information Connecting Optional Equipment .........................................50 Using Optional Equipment ..................................................57 Remote Control Configuration for VCR/DVD ....................58 Specifications .......................................................................60 Troubleshooting ...................................................................61 Television Channel Number Guide for the United Kingdom ................................................64 Introducing and Using the Menu System ............................ 32 Picture Adjustment .............................................................. 33 Sound Adjustment ............................................................... 34 Screen Control ..................................................................... 36 Features ................................................................................ 38 Set Up .................................................................................. 40 Table of Contents 3 Quick Start Guide Thank you for purchasing this Sony product. After following this step by step guide you will be able to: – Insert batteries into the remote control. – Connect an aerial, VCR, and mains lead to your TV. – Select the language of the menu screens. – Select the country/region in which you want to operate your TV. – Tune your TV. – Change the broadcast channels into a different order. 1 Checking the Accessories Supplied Remote Control RM-Y1102 (KLV-L32M1) (1) or RM-Y1002 (KE-P42M1) (1): Size AA Batteries Coaxial Cable (1): (R6 Type) (2): Do not remove ferrite cores. Mains Lead (Type BF) (1): KLV-L32M1 KE-P42M1 Refer to “NOTICE FOR CUSTOMERS IN THE UNITED KINGDOM” on page 2 when using this mains lead. Cleaning Cloth (KE-P42M1 only) (1) Clamp screws (2) Plug Holder (KE-P42M1 only) (1) 4 Quick Start Guide 2 Inserting Batteries into the Remote Control • Make sure you insert the supplied batteries observing the correct polarity. • Always remember to dispose of used batteries in an environmentally friendly way. • Do not use different types of batteries together or mix old and new batteries. Quick Start Guide (continued) Quick Start Guide 5 3 Connecting an Aerial, VCR, and Mains Lead to the TV • Use the supplied mains lead. • Use the supplied coaxial cable for aerial connection. Do not connect to the mains before all connections are complete. Connecting an aerial KLV-L32M1 Connect the supplied mains lead. Connect the supplied coaxial cable. KE-P42M1 Connect the supplied coaxial cable. 6 Quick Start Guide Connect the supplied mains lead. Connecting a VCR with an aerial KLV-L32M1 VCR OUT IN Connect the supplied mains lead. (SMARTLINK) Scart lead is optional. 3 / Quick Start Guide Connect the supplied mains lead. KE-P42M1 VCR OUT IN 3 / (SMARTLINK) Scart lead is optional. • For more details regarding VCR connection, refer to “Connecting Optional Equipment” on page 50. • Note that some Scart leads may not fit into the connector on the TV. (continued) Quick Start Guide 7 4 Bundling the Cables (KLV-L32M1 only) You can store the cables in the back of the TV. Bundle the mains lead and the coaxial cable and secure them with the clips on the TV. When you install the coaxial cable, loop it as shown in the illustration. Clips 4 Securing the mains plug (KE-P42M1 only) You must secure the mains plug to the TV’s AC IN jack. 1 Attach the mains plug holder (supplied) to the mains lead. AC IN (power supply input) jack of the TV Mains lead (supplied) 2 Clip on the AC IN jack until you hear a click. To unplug the mains lead pull down the plug holder while pushing on both sides of the holder, then pull out the plug. 8 Quick Start Guide Plug holder (supplied) 5 Switching On the TV 1 Connect the TV to the mains (220–240 V AC, 50 Hz). 2 Press the (Power) switch on the TV to switch it on. Quick Start Guide (continued) Quick Start Guide 9 6 Selecting the Language of the Menu Screens and the Country/Region This TV works with menu screens. By following the instructions below, you can select the desired language of the menu screens, and the country/region in which you want to operate the TV. The first time you switch on the TV, the Language menu appears automatically on the screen (Auto Startup). Language Select Language English Nederlands Français Italiano Deutsch Türkçe Ελληνικά Español Português Polski Česky Magyar Русский Бьлгарски Suomi Dansk Svenska Norsk m 1 Press / / or on the remote control to select the language, then press OK to confirm your selection. From now on, all the menus will appear in the selected language. 2 The Country menu appears automatically on the screen. Press or to select the country/region in which you will operate the TV, then press OK to confirm your selection. If the country/region in which you want to use the TV does not appear in the list, select “–” instead of a country/region. Country Select Country – United Kingdom Ireland Nederland België/Belgique Luxembourg France Italia Schweiz/Suisse/Svizzera Deutschland Österreich The Auto Tuning menu appears automatically on the screen. m Do you want to start automatic tuning ? Yes No To perform Auto Startup later, press 0 on the rear panel of the TV. KLV-L32M1 KE-P42M1 Y PB/ CB CENTRE SPEAKER IN 180W (6 ) MAX PR/ CR L/G/ S/I L/G/S/I R/D/ D/D R/D/D/D (SMARTLINK) 2 / 10 Quick Start Guide 3 / 7 Tuning the TV Automatically You must tune the TV to receive channels (TV Broadcast). If you follow the instructions below, the TV automatically searches and stores all available broadcast channels. 1 2 Do you want to start automatic tuning ? Yes No m Auto Tuning Programme : System : Channel : 01 I C23 Searching... m Press OK to select Yes. The TV starts searching and storing all available broadcast channels. • This procedure could take some minutes. Please be patient and do not press any buttons, otherwise the auto tuning will not be completed properly. • If no channels are found during the auto tuning process, a new menu appears automatically on the screen asking you to connect the aerial. Please connect the aerial (see page 6) and press OK. The auto tuning process will start again. Quick Start Guide When the auto tuning is finished, the Programme Sorting menu appears automatically on the screen. Programme Sorting Select Channel 01 02 03 04 05 06 07 08 09 10 11 TVE TVE2 TV3 C33 C27 C58 S02 S06 S08 S12 S14 Exit: MENU (continued) Quick Start Guide 11 8 Changing the Programme Order of the Broadcast Channels By following the instructions below, you can rearrange the order in which the broadcast channels appear on the screen. A) If you want to keep the broadcast channels in the tuned order Press MENU to exit and return to the normal TV screen. Programme Sorting Select Channel 01 02 03 04 05 06 07 08 09 10 11 TVE TVE2 TV3 C33 C27 C58 S02 S06 S08 S12 S14 Exit: MENU B) If you want to store the broadcast channels in a different order Programme Sorting 1 Press or to select the programme number with the channel you want to rearrange, then press . 2 Press or to select the new programme number position for your selected channel, then press . Select Channel 01 02 03 04 05 06 07 08 09 10 11 TVE TVE2 TV3 C33 C27 C58 S02 S06 S08 S12 S14 The selected channel now moves to its new programme position and the other channels move accordingly. Exit: MENU m Programme Sorting 3 Repeat steps 1 and 2 if you want to change the order of the other channels. 4 Press MENU to exit and return to the normal TV screen. Select new position 01 02 03 04 05 06 07 08 09 10 11 TVE TVE2 TV3 C33 C27 C58 S02 S06 S08 S12 S14 01 TVE Exit: MENU Your TV is now ready for use. 12 Quick Start Guide Operating Instructions Safety Information For Safety Mains lead Medical institutions Unplug the mains lead when moving the unit. Do not move the unit with the mains lead plugged in. It may damage the mains lead and result in fire or electric shock. If the unit has been dropped or damaged, have it checked immediately by qualified service personnel. Do not place this unit in a place where medical equipment is in use. It may cause malfunction of medical instruments. Installation Carrying Installation of the unit on the wall should be carried out by qualified servicemen. Improper installation may render the unit unsafe. • Before carrying the unit, disconnect all the cables from the unit. • When you carry the unit by hand, hold the unit as illustrated on the right. As the rear cover comes off easily, the unit may fall and be damaged or cause serious injury. • When transporting it, do not subject the unit to shocks or excessive vibration. The unit may fall and be damaged or cause serious injury. • When you carry the unit in for repair or when you move it, pack it using the original carton and packing material. • Carrying the unit requires two or more people. (continued) Safety Information 13 Installation and Moving Ventilation Outdoor use Never cover the ventilation holes in the cabinet. It may cause overheating and result in fire. Unless proper ventilation is provided, the unit may gather dust and get dirty. For proper ventilation, observe the following: • Do not install the unit turned backwards or sideways. • Do not install the unit turned over or upside down. • Do not install the unit on a shelf or in a closet. • Do not place the unit on a rug or bed. • Do not cover the unit with cloth, such as curtains, or items such as newspapers, etc. Do not install this unit outdoors. If the unit is exposed to rain, it may result in fire or electric shock. If the unit is exposed to direct sunlight, the unit may heat up and this may result in damage to the unit. Vehicle or ceiling Ships and other vessels Do not install this unit in a vehicle. The motion of the vehicle may cause the unit to fall down and cause injury. Do not hang this unit from the ceiling. Do not install this unit on a ship or other vessel. If the unit is exposed to seawater, it may cause fire or damage the unit. Water and moisture To prevent the unit from falling Do not use this unit near water – for example, near a bathtub or shower room. Also do not expose to rain, moisture or smoke. This may result in fire or electric shock. Do not use this unit where insects may enter. Place the unit on a secure, stable stand. Do not hang anything on the unit. If you do, the unit may fall from the stand or wall-mount bracket, causing damage or serious injury. Do not allow children to climb on the unit. Optional accessories Observe the following when installing the unit using a stand or wall-mount bracket. If you do not do so, the unit may fall and cause serious injury. • Be sure to follow the instructions supplied with your stand or wall-mount bracket when installing the unit. • Be sure to attach the brackets supplied with your stand. 14 Safety Information Power Sources Overloading Mains lead protection This unit is designed to operate on a 220– 240 V AC supply only. Take care not to connect too many appliances to the same mains socket as this could result in fire or electric shock. Pull out the mains lead by the plug. Do not pull on the mains lead itself. Mains Wiring Do not use a poor fitting mains socket. Insert the plug fully into the mains. If it is loose, it may cause arcing and result in fire. Contact your electrician to have the mains socket changed. Unplug the mains lead when wiring cables. Be sure to unplug the mains lead for your safety, when hooking up. Moisture Cleaning Do not touch the mains lead with a wet hand. If you plug/unplug the mains lead with a wet hand, it may cause electric shock. Clean the mains plug regularly. If the plug is covered with dust and it picks up moisture, its insulation may deteriorate and result in fire. Unplug the mains plug and clean it regularly. Lightning storms For your own safety, do not touch any part of the unit, mains lead, or aerial lead during lightning storms. Use Damage requiring service Ventilation holes If the surface of the unit cracks, do not touch it until you have unplugged the mains lead. Otherwise electric shock may result. Do not insert anything in the ventilation holes. If metal or something flammable is inserted in these holes, it may result in fire or electric shock. Servicing Moisture and flammable objects Do not open the cabinet. Entrust the unit to qualified service personnel only. • Do not let this unit get wet. Never spill liquid of any kind on the unit. If any liquid or solid object does fall through openings in the cabinet, do not operate the unit. It may result in electric shock or damage to the unit. Have it checked immediately by qualified service personnel. • To prevent fire, keep flammable objects or naked lights (e.g. candles) away from the unit. (continued) Safety Information 15 Additional Safety Information Electric shock Broken glass Do not touch the unit with wet hands. Doing so may cause electric shock or damage the unit. Do not throw anything at the unit. The screen glass may explode by the impact and cause serious injury. Protruding location Oils Do not install the unit in locations where it may protrude. If you install the unit in the following locations, it may result in injury. • Do not install the unit in a location where the unit protrudes, such as on or behind a pillar. • Do not install the unit in a location where you might bump your head on it. Do not install this unit in restaurants that use oil. Dust absorbing oil may enter the unit and damage the unit. Placement Corrosion Never place the unit in hot, humid or excessively dusty places. Do not install the unit where insects may enter. Do not install the unit where it may be exposed to mechanical vibration. If you use this unit near the seashore, salt may corrode metal parts of the unit and cause internal damage or fire. It may also shorten the life of the unit. Steps should be taken to reduce the humidity and temperature of the area where the unit is located. Accessories Cleaning Secure the unit properly. If the unit is not secured properly, it may fall and cause injury. Take measures to prevent this by using a stand or other apparatus on the floor or wall in the specified manner, referring to the operating instructions supplied with your stand. Unplug the mains lead when cleaning this unit. If you do not do so, it may result in electric shock. Disposal of the unit (KLV-L32M1 only) Recommended place for the unit • Do not dispose of the unit with general household waste. • The LCD contains a small amount of liquid crystal and mercury. The fluorescent tube used in this unit also contains mercury. Follow your local ordinances and regulations for disposal. Place the unit on a stable, level surface. Otherwise, the unit may fall and cause injury. 16 Safety Information LCD Screen (KLV-L32M1 only) Mains lead • Although the LCD screen is made with high-precision technology and 99.99% or more of the pixels are effective, black dots may appear or bright points of light (red, blue, or green) may appear constantly on the LCD screen. This is a structural property of the LCD panel and is not a malfunction. • Do not expose the LCD screen surface to the sun. Doing so may damage the screen surface. • Do not push or scratch the front filter, or place objects on top of this unit. The image may be uneven or the LCD panel may be damaged. • If this unit is used in a cold place, a smear may occur in the picture or the picture may become dark. This does not indicate a failure. These phenomena disappear as the temperature rises. • Ghosting may occur when still pictures are displayed continuously. It may disappear after a few moments. • The screen and cabinet get warm when this unit is in use. This is not a malfunction. If you damage the mains lead, it may result in fire or electric shock. • Do not pinch, bend, or twist the mains lead excessively. The core lines may be exposed or cut, causing a shortcircuit which may induce fire or electric shock. • Do not convert or damage the mains lead. • Do not put anything heavy on the mains lead. Do not pull the mains lead. • Keep the mains lead away from heat sources. • Be sure to grasp the plug when disconnecting the mains lead. If the mains lead is damaged, stop using it and ask your dealer or Sony service centre to exchange it. Fluorescent lamp (KLV-L32M1 only) When not in use This unit uses a special fluorescent lamp as its light source. If the screen image becomes dark, flickers, or does not appear, the fluorescent lamp has run down and should be replaced. For replacement, consult qualified service personnel. For environmental and safety reasons, it is recommended that the unit be switched off when not in use – not left in standby mode. Disconnect it from the mains. Heat Cable wiring Do not touch the surface of the unit. It remains hot, even after the unit has been turned off for some time. Take care not to catch your feet on the cables. It may damage the unit. Cleaning the screen surface Installation The screen surface is finished with a special coating to prevent strong light reflections. Be sure to observe the following precautions to avoid damaging the finish. • To remove dust from the screen surface, wipe gently with a soft cloth. If dust is persistent, wipe with a soft cloth slightly moistened with a diluted mild detergent solution. You can wash and repeatedly use the soft cloth. • Never use any type of abrasive pad, alkaline/acid cleaner, scouring powder, or strong solvent such as alcohol, benzine or thinner. Do not install optional components too close to the unit. Keep optional components at least 30 cm away from the unit. If a VCR is installed in front of the unit or beside the unit, the picture may become distorted. Safety Information 17 Precautions Precautions concerning ventilation Leave space around the unit. Otherwise, adequate air-circulation may be blocked causing overheating, which may cause fire or damage to the unit. When installing the unit on the wall 30 cm 10 cm 10 cm Leave at least this much space. 10 cm When installing the unit using a stand 30 cm 10 cm 10 cm Leave at least this much space. Never install the unit as follows: Air circulation is blocked. Wall 18 Precautions Air circulation is blocked. Wall Viewing the TV comfortably • To view the TV comfortably, the recommended viewing position is from four to seven times the screen’s vertical length away from the TV. • View the TV in moderate light, as viewing the TV in poor light taxes your eyes. Watching the screen continuously for long periods of time can also tax your eyes. Installing the unit Use the specified wall-mount bracket or stand. • Do not install the unit in places subject to extreme temperature, for example in direct sunlight, or near a radiator, or heating vent. If the unit is exposed to extreme temperature, the unit may heat up and this may cause deformation of the casing or cause the unit to malfunction. • To obtain a clear picture, do not expose the screen to direct illumination or direct sunlight. If possible, use spot lighting directed down from the ceiling. • The unit is not disconnected from the mains when the unit is switched off. To disconnect the unit completely, pull the plug from the mains. Volume adjustment • Adjust the volume so as not to trouble your neighbours. Sound carries very easily at night time. Therefore, closing the windows or using headphones is suggested. • When using headphones, adjust the volume so as to avoid excessive levels, as hearing damage may result. Handling the remote control • Handle the remote control with care. Do not drop or step on it, or spill liquid of any kind onto it. • Do not place the remote control in a location near a heat source, or in a place subject to direct sunlight, or in a damp room. Handling and cleaning the screen surface of the unit To avoid screen degradation, follow the advice given below. Do not push on the screen or scratch it with hard objects, or throw anything at it. The screen may be damaged. • Be sure to unplug the mains lead before cleaning the unit. • Do not touch the display panel after operating the unit continuously for a long period as the display panel becomes hot. • We recommend that the screen surface be touched as little as possible. • Clean the screen with a soft cloth. • Never use any type of abrasive pad, scouring powder, or solvent, such as alcohol or benzine. Using such materials may result in damage to the screen surface. Cleaning the cabinet • Be sure to unplug the mains lead before cleaning the cabinet. • Clean the cabinet with a soft cloth. • Note that material deterioration or screen coating degradation may occur if the unit is exposed to a volatile solvent, such as alcohol, thinner, benzine or insecticide, or if prolonged contact is maintained with rubber or vinyl materials. • The ventilation holes can accumulate dust over a period of time. To ensure proper ventilation, we recommend removing the dust periodically (once a month) using a vacuum cleaner. (continued) Precautions 19 On the PDP (Plasma Display Panel) (KE-P42M1 only) On image • Please note that the PDP screen is made with high-precision technology. However, black points or bright points of light (red, blue, or green) may appear constantly on the PDP screen, and irregular coloured stripes or brightness may appear on the PDP screen. This is not a malfunction. • With extensive use of this TV set in 4:3 mode, the 4:3 screen area might become darker within a 16:9 panel. To avoid this problem, the “Smart” picture mode should be used (see page 37). On image retention • If the following images are displayed for an extended period time, image retention (afterimage) in areas of the screen may result due to the characteristics of the Plasma Display Panel. – Black bars at the top and bottom that appear with a wide video source (Letterbox picture). – Black bars to the left and right that appear with a 4:3 video source (conventional TV broadcasts). – Video game sources – DVD on-screen menu displays – On-screen menus, channel numbers, etc., of connected equipment such as Set top box, Cable modem, VCR, etc. The risk of this is higher if the set is in “Live” mode or has a high contrast setting. This image cannot be removed once burnt onto the screen. To avoid the risk of image retention do not leave the TV set operating on such a picture, or programme for a long time, use the “Screen Saver” function (page 39) or lower the contrast setting. Repeated extended daily usage of the same image, or programme can also result in this occurrence. IMAGE RETENTION IS NOT COVERED BY THE SONY WARRANTY. • To reduce image retention, this TV set has the “Screen Saver” function. The default setting of the “Orbit” function in “Screen Saver” is “On” (page 39). • The “Screen Saver” function prevents and reduces image retention. For more details, see page 39. On altitude When used at an altitude of greater than 1900m or 6248 feet (air pressure less than 800hPa), this Plasma Display Panel may generate a low buzzing sound as a result of the difference between the interior and exterior air pressure of the panels. This is not considered a defect and is not covered under by the Sony Warranty. This buzzing sound is an inherent characteristic of any Plasma Display Panel. 20 Precautions Overview Overview of the TV Buttons and Indicators To open the drop-down panel of your TV, push up the panel door just under the mark until you hear a click, then the panel door will open. TV Front Panel KLV-L32M1 (Input Select) button Remote control sensor (Sleep) indicator 2 (Volume) +/– buttons (Power) switch and (Power/Standby) indicator PROG (Channel) +/– buttons PROG KE-P42M1 Remote control sensor (Sleep) indicator (Picture Off) indicator (Power) switch and (Power/Standby) indicator (continued) Overview 21 Status of the indicators (Power/Standby) indicator lights up in green The power of the TV is on. (Power/Standby) indicator lights up in red The TV is in the standby mode. (Power/Standby) indicator flashes in red The TV is receiving remote control signals. (Power/Standby) indicator flashes in red repeatedly There is a problem with the TV. For more details, refer to “Self-diagnosis function” on page 61. (Sleep) indicator lights up in red The Sleep Timer function is on when the TV is turned on. For more details, refer to “Sleep Timer Function” on page 44. (Picture Off) indicator lights up in blue (KE-P42M1 only) The picture is switched off. Only the picture is switched off (the sound remains unchanged). Press again to cancel. For more details, refer to “Picture Off Function (KE-P42M1 only)” on page 44. For the connectors on the rear panel of the TV, refer to “Connecting Optional Equipment” on page 50. 22 Overview Overview of the Remote Control Buttons a Switching the TV to the standby mode: * Press this button to temporarily turn off the TV and switch it to the standby mode (the (Power/Standby) indicator on the TV lights up in red). Press it again to switch on the TV from the standby mode. To save energy, we recommend switching the TV off completely when the TV is not in use. If no signal is received or no operation is performed in the TV mode for 10 minutes, the TV automatically switches to the standby mode. b Switching the VCR or DVD on/off: Press this button to switch your VCR or DVD on or off. c Selecting the VCR, TV or DVD (Media Selector): With this remote control you can operate not only this TV but also the main functions of your VCR or DVD. Switch on the equipment you want to operate and press this button repeatedly to select VCR, TV, or DVD. The green light just above the selected equipment lights up momentarily. An initial setup is required to synchronise this remote control to your VCR or DVD. This setup depends on the manufacturer. For more details, refer to “Remote Control Configuration for VCR/DVD” on page 58. * Remote control of the KE-P42M1 d Selecting the input source: Press this button repeatedly until the input symbol of the desired source appears on the screen. e Turning on the Sleep Timer function: Press this button to set the TV to automatically switch to the standby mode after a specified time period. For more details, refer to “Sleep Timer Function” on page 44. f Selecting channels: Press this button to select channels. For double-digit programme numbers, enter the second digit within 2.5 seconds. g a) If the TV is selected: Press this button to watch the last channel selected (the last channel watched for at least five seconds). b) If the VCR is selected: For Sony’s VCR double-digit programme numbers, e.g. 23, press this button first then press the 2 and 3 buttons. h Selecting a screen format: Press this button repeatedly to change the screen format. For more details, refer to “Screen Control” on page 36. i Programming the remote control: Use this button to programme the remote control to operate your VCR or DVD. For more details, refer to “Remote Control Configuration for VCR/DVD” on page 58. j Selecting Teletext: Press this button to switch on Teletext. For more details, refer to “Teletext” on page 46. k / / / /OK buttons a) If the TV is selected: • When the menu is displayed, use these buttons to operate the menu system. For more details, refer to “Introducing and Using the Menu System” on page 32. • When the menu is turned off, press OK to show an overview of all TV channels. Then press or to select the channel and press OK to watch the selected channel. b) If the VCR or DVD is selected: Use these buttons to control the main functions of your VCR or DVD. l Displaying the menu system: Press this button to display the menu on the screen. Press it again to remove the menu display from the screen. m Displaying NexTView: For more details, refer to “NexTView” on page 47. (continued) Overview 23 n Selecting channels: Press these buttons to select the next or previous channel. o Adjusting the TV volume: Press these buttons to adjust the volume of the TV. p Recording programmes on your VCR: If the VCR is selected, press this button to record programmes. q Selecting the TV mode: Press this button to switch off Teletext or video input. r Selecting a picture mode: Press this button repeatedly to change the picture mode. For more details, refer to “Picture Adjustment” on page 33. s Selecting a sound effect: Press this button repeatedly to change the style of sound used by your TV. For more details on the styles available, refer to “Sound Adjustment” on page 34. t Displaying on-screen information: Press this button to display all on-screen indicators. Press it again to cancel. u Turning on the Screen Memo function: Press this button to temporarily freeze the picture on the screen. For more details, refer to “Screen Memo Function” on page 45. v (KLV-L32M1) Turning on the Power Saving function: Press this button to turn on the Power Saving function. “Power Saving” appears on the screen for a few seconds. Press this button again to cancel. For more details, refer to “Features” on page 38. (KE-P42M1) Switching off the picture: Press this button to switch off the picture. Only the picture is switched off; the sound remains on. Press this button again to cancel. For more details, refer to “Picture Off Function (KE-P42M1 only)” on page 44. * This button is marked with on the remote control of the KE-P42M1. w Muting the sound: Press this button to mute the sound from the TV. Press it again to restore the sound. In addition to the TV functions, the coloured buttons (except for the TV &/ and VIDEO &/ buttons) are used for Teletext operations. The buttons with green symbols (except for the button) are also used. For more details, refer to “Teletext” on page 46. 24 Overview Installation Inserting Batteries into the Remote Control • Make sure you insert the supplied batteries observing the correct polarity. • Always remember to dispose of used batteries in an environmentally friendly way. • Do not use different types of batteries together or mix old and new batteries. Installation 25 Connecting an Aerial and a VCR • Use the supplied mains lead. • Use the supplied coaxial cable for aerial connection. Do not connect to the mains before all connections are complete. Connecting an aerial KLV-L32M1 Connect the supplied mains lead. Connect the supplied coaxial cable. KE-P42M1 Connect the supplied coaxial cable. 26 Installation Connect the supplied mains lead. Connecting a VCR with an aerial KLV-L32M1 VCR OUT IN Connect the supplied mains lead. (SMARTLINK) Scart lead is optional. 3 / Connect the supplied mains lead. KE-P42M1 VCR OUT IN 3 / (SMARTLINK) Scart lead is optional. • For more details regarding VCR connection, refer to “Connecting Optional Equipment” on page 50. • Note that some Scart leads may not fit into the connector on the TV. (continued) Installation 27 Bundling the cables (KLV-L32M1 only) You can store the cables in the back of the TV. Bundle the mains lead and the coaxial cable and secure them with the clips on the TV. Install the coaxial cable (shown on the right) when you store the coaxial cable with the clip. Clips Securing the mains plug (KE-P42M1 only) You must secure the mains plug to the TV’s AC IN jack. 1 Attach the mains plug holder (supplied) to the mains lead. AC IN (power supply input) jack of the TV Mains lead (supplied) 2 Clip on the AC IN jack until you hear clicking. To unplug the mains lead pull down the mains plug holder by pushing in both sides of the holder, then pull out the plug. 28 Installation Plug holder (supplied) Preventing the TV from Falling Down After aerial and other equipment connections are completed, be sure to attach the supplied clamp screws to the rear of the TV, and thread a sturdy cord or chain through it and attach it to a wall or pillar. 1 Remove one of the two screws on the rear of the TV, then install the supplied clamp screw in the screw hole. KLV-L32M1 KE-P42M1 Attached screw clamp screw (supplied) 2 Repeat step 1 to install the other clamp screw. 3 Attach a sturdy cord or chain securely to each clamp screw, and attach the cord or chain to a wall or pillar. Installation 29 First Time Operation Switching On the TV and Tuning the TV Automatically The first time you switch on your TV, a sequence of menu screens appear on the TV enabling you to: 1) choose the language of the menu screen, 2) choose the country/region in which you want to operate the TV, 3) search and store all available channels (TV Broadcast), and 4) change the order in which the channels (TV Broadcast) appear on the screen. However, if you need to change any of these settings at a later date, you can do so by selecting the appropriate option in the “Set Up” menu (see page 40). 1 Connect the TV to the mains (220–240 V AC, 50 Hz). 2 Press the (Power) switch on the TV to switch it on. The first time you switch on the TV, the Language menu appears automatically on the screen (Auto Startup). To perform Auto Startup later, press 0 on the rear panel of the TV. 3 4 Press / / or on the remote control to select the language, then press OK to confirm your selection. From now on, all the menus will appear in the selected language. The Country menu appears automatically on the screen. Press or to select the country/region in which you will operate the TV, then press OK to confirm your selection. If the country/region in which you want to use the TV does not appear in the list, select “–” instead of a country/region. 5 Language Select Language English Nederlands Français Italiano Deutsch Türkçe Ελληνικά Español Português Polski Česky Magyar Русский Бьлгарски Suomi Dansk Svenska Norsk Country Select Country – United Kingdom Ireland Nederland België/Belgique Luxembourg France Italia Schweiz/Suisse/Svizzera Deutschland Österreich The Auto Tuning menu appears automatically on the screen. Press OK to select Yes. Do you want to start automatic tuning ? Yes 30 First Time Operation No 6 The TV starts searching and storing all available broadcast channels. • This procedure could take some minutes. Please be patient and do not press any buttons, otherwise the auto tuning will not be completed properly. • If no channels are found during the auto tuning process, a new menu appears automatically on the screen asking you to connect the aerial. Please connect the aerial (see page 26) and press OK. The auto tuning process will start again. 7 When the auto tuning is finished, the Programme Sorting menu appears automatically on the screen. Auto Tuning Programme : System : Channel : 01 I C23 Searching... No channel found. Please connect aerial Confirm Programme Sorting Select Channel A) If you want to keep the broadcast channels in the tuned order, go to step 8. B) If you want to store the broadcast channels in a different order: 1 Press or to select the programme number with the channel you want to rearrange, then press . 2 Press or to select the new programme number position for your selected channel, then press . The selected channel now moves to its new programme position and the other channels move accordingly. 01 02 03 04 05 06 07 08 09 10 11 TVE TVE2 TV3 C33 C27 C58 S02 S06 S08 S12 S14 Exit: MENU Programme Sorting Select new position 01 02 03 04 05 06 07 08 09 10 11 TVE TVE2 TV3 C33 C27 C58 S02 S06 S08 S12 S14 01 TVE Exit: MENU 3 Repeat steps 1 and 2 if you want to change the order of the other channels. 8 Press MENU to turn off the menu. Your TV is now ready for use. First Time Operation 31 Menu System Introducing and Using the Menu System Your TV uses an on-screen menu system to guide you through the operations. Use the following buttons on the remote control to operate the menu system. 1 Press MENU to switch the first level menu on. 2 Do the following to operate the menu. • To highlight the desired menu or option, press or . • To enter the selected menu or option, press OK. • To return to the last menu or option, press . • To alter the settings of your selected option, press / • To confirm your selection, press OK. 3 32 Press MENU to turn off the menu. Menu System / or . Picture Adjustment Picture Adjustment Select: The “Picture Adjustment” menu allows you to alter the picture adjustments. Picture Adjustment Mode : Contrast : Brightness : Colour : Hue : Sharpness : Backlight : NR : Dynamic Picture : C olo u r Tone : Reset Set: Personal 50 50 25 0 25 5 Auto On Cool Mode : Contrast : Brightness : Colour : Hue : Sharpness : Backlight : NR : Dynamic Picture : C olo u r Tone : Reset , End: MENU OK Select: Set: Personal 50 50 25 0 25 5 Auto On Cool OK Back: End: MENU To do this: After selecting the item you want to alter, press OK, then press / / or repeatedly to adjust it. This menu also allows you to customise the picture quality for the “Personal” mode based on the programme you are watching. Mode Live For enhanced picture contrast and sharpness. Movie For a finely detailed picture. Personal For your own custom settings. Contrast Press Press or or to reduce picture contrast. to enhance picture contrast. Brightness Press Press or or to darken the picture. to brighten the picture. Colour Press Press or or to decrease colour intensity. to increase colour intensity. Hue Press Press or or to decrease the green tones. to increase the green tones. Hue can only be adjusted for an NTSC colour signal (e.g. U.S.A. video tapes). Sharpness Press Press or or to soften the picture. to sharpen the picture. Backlight (KLV-L32M1 only) Press Press or or to darken the backlight. to brighten the backlight. NR (Noise Reduction) Auto/Off Select to reduce the noise level. NR (Noise Reduction) cannot be adjusted for an input signal from the Y, PB/CB, PR/CR jacks of 4. Dynamic Picture On/Off Select to enhance the picture contrast. Colour Tone Cool/Normal/Warm Select to give bright colours a red tint (setting is variable from Cool to Warm). Reset Cancel/OK Select OK to reset the picture to the factory preset levels. Only “Mode,” “Contrast,” and “Reset” can be adjusted when “Mode” is set to “Live” or “Movie.” Menu System 33 Sound Adjustment The “Sound Adjustment” menu allows you to alter the sound adjustments. Picture Adjustment Mode : Contrast : Brightness : Colour : Hue : Sharpness : Backlight : NR : Dynamic Picture : C olo u r Tone : Reset Select: Set: Personal 50 50 25 0 25 5 Auto On Cool OK To do this: After selecting the item you want to alter, press OK, then press / / or repeatedly to adjust it. End: MENU m Sound Adjustment Sound Adjustment Effect : Treble : Bass : Balance : Auto Volume : Dual Sound : Volume : Dual Sound : Reset Select: Set: Dolby Virtual 0 0 0 On Stereo 50 Stereo OK Effect : Treble : Bass : Balance : Auto Volume : Dual Sound : Volume : Dual Sound : Reset , End: MENU Select: Effect * Set: Dolby Virtual 0 0 0 On Stereo 50 Stereo OK Back: End: MENU Off No effect. Natural Enhances clarity, detail and presence of sound by using the “BBE High Definition Sound system.” Dynamic Intensifies clarity and presence of sound for better intelligibility and musical realism by using the “BBE High Definition Sound system.” Dolby Virtual Uses the TV speakers to simulate the surround effect produced by a multi channel system. • If you set “Auto Volume” to “On” when Dolby Virtual is selected, the Effect option automatically changes to Natural. • The sound from the headphones is not effected when the Effect option is set to Natural, Dynamic or Dolby Virtual. * Licensed by BBE Sound, Inc. under USP4638258, 4482866. “BBE” and the BBE symbol are trademarks of BBE Sound, Inc. Manufactured under licence from Dolby Laboratories. “Dolby” and the double-D symbol are trademarks of Dolby Laboratories. Treble Press Press or or to decrease higher-frequency sounds. to increase higher-frequency sounds. Bass Press Press or or to decrease lower-frequency sounds. to increase lower-frequency sounds. Balance Press Press or or to emphasise the left speaker. to emphasise the right speaker. Auto Volume On/Off Volume level of the channels will stay the same, independent of the broadcast signal (e.g. in the case of advertisements). If you set “Effect” to “Dolby Virtual,” Off is selected automatically. When the “Speaker” option in the “Features” menu is set to “Centre in,” the options in the “Sound Adjustment” menu cannot be adjusted. 34 Menu System Dual Sound Stereo/Mono For a stereo broadcast, select Stereo or Mono. A/B/Mono For a bilingual broadcast, select A for sound channel 1, B for sound channel 2, or Mono for a mono channel, if available. If you select other equipment connected to the TV, set the Dual Sound option to Stereo, A, or B. i Volume Press Press or or to turn the volume of the headphones down. to turn the volume of the headphones up. Even if headphones are connected to the TV, you can hear the sound from the TV speakers. i Dual Sound Select the “Dual Sound” option of the headphones. Stereo/Mono For a stereo broadcast, select Stereo or Mono. A/B/Mono For a bilingual broadcast, select A for sound channel 1, B for sound channel 2, or Mono for a mono channel, if available. • If you select other equipment connected to the TV, set the i Dual Sound option to Stereo, A, or B. • i Dual Sound works in conjunction with “Dual Sound.” Reset Cancel/OK Select OK to reset the sound to the factory preset. Only “Treble,” “Bass,” and “Balance” are restored to the factory settings when you reset the sound. Menu System 35 Screen Control The “Screen Control” menu allows you to alter the screen adjustments. Picture Adjustment Mode : Contrast : Brightness : Colour : Hue : Sharpness : Backlight : NR : Dynamic Picture : C olo u r Tone : Reset Select: Set: Personal 50 50 25 0 25 5 Auto On Cool OK End: MENU m Screen Control Screen Control Auto Format : Screen Format : Screen Shift Select: Set: On Smart OK End: MENU Auto Format , Auto Format : Screen Format : Screen Shift Select: Set: On Smart OK Back: End: MENU The “Auto Format” option allows you to automatically change the aspect ratio of the screen. To do this: 1 After selecting this option, press OK. 2 Press or to select On (if you want the TV to automatically switch the screen format according to the video input signal) or Off (if you want to keep your preference). • Even if you have selected On or Off in the Auto Format option, you can always modify the format of the screen by pressing repeatedly on the remote control. • Auto Format is available for PAL signal and SECAM signal only. 36 Menu System Screen Format The “Screen Format” option allows you to modify the format of the screen. To do this: 1 After selecting this option, press OK. 2 Press or to select the desired screen format and press OK. Smart Imitation of the wide screen effect for a 4:3 broadcast. 4:3 Conventional 4:3 picture size, full picture information. 14:9 Compromise between 4:3 and 16:9 picture size. Zoom Wide screen format for letterbox movies. Smart 4:3 14:9 Zoom Wide For a 16:9 broadcast. Wide You can adjust the position of the image when Smart, 14:9, or Zoom is selected. If parts of the top and bottom of the screen are cut off, press or to move the image up or down (e.g. to read subtitles). Screen Shift The “Screen Shift” option allows you to adjust the position of the picture for each screen format. To do this: 1 After selecting this option, press OK. 2 Press or to select the desired option and press OK. Then press to adjust the position of the picture. or / / V Shift (Vertical Shift) Press to move the screen up. Press to move the screen down. H Shift (Horizontal Shift) Press to move the screen to the left. Press to move the screen to the right. Reset Select OK to reset to the factory settings. When “Screen Format” is set to “4:3” or “Wide,” V Shift (Vertical Shift) cannot be adjusted. Menu System 37 Features The “Features” menu allows you to alter various adjustments of the TV. Picture Adjustment Mode : Contrast : Brightness : Colour : Hue : Sharpness : Backlight : NR : Dynamic Picture : C olo u r Tone : Reset Select: Set: Personal 50 50 25 0 25 5 Auto On Cool OK End: MENU m Features Features Power Saving : Speaker : Phase AV3 Output : Select: Set: Standard Centre in Normal Auto OK End: MENU Power Saving , Power Saving : Speaker : Phase: AV3 Output : Select: Set: Standard Centre in Normal Auto OK Back: End: MENU The “Power Saving” option allows you to reduce the power consumption of the TV. To do this: 1 After selecting this option, press OK. 2 Press or to select Reduce. If you switch the TV off then on again when the Power Saving option is set to Reduce, the setting remains unchanged. Speaker The “Speaker” Option allows you to select if you want to listen the TV from the TV speakers or from an external audio equipment connected to the audio output jacks . To do this: 1 After selecting this option, press OK. 2 Press or to select the desired output. Main: The sound of the TV is output through the TV’s speakers. Centre in: When an external amplifier is connected to the TV’s CENTRE SPEAKER IN terminals, the centre speaker sound from the external amplifier is output through the TV’s speakers. Off: The sound of the TV is output through the external audio equipment. If you have selected Centre in, the volume of the centre speaker can be altered by pressing the 2 +/– buttons of the remote control. If you have selected Off, the volume of the external equipment can be altered by pressing the 2 +/– buttons of the remote control. In either case, when the volume buttons are pressed, the % will appear indicating that the volume you are altering is from external equipment. Phase The “Phase” option allows you to adjust the phase of sound when using the TV’s speakers as the centre speaker. If sound from the TV’s speaker (as centre speaker) sound unnatural, adjust the “Phase” option. To do this: 1 After selecting this option, press OK. 2 Press or to select Reverse. Sound from the TV’s speakers is phase-reversed. Phase can be adjusted only when the “Speaker” option is set to “Centre in.” 38 Menu System Screen Saver (KE-P42M1 only) The “Screen Saver” option allows you to reduce image retention. • • • • • If the following images are displayed for an extended period time, image retention (afterimage) in areas of the screen may result due to the characteristics of the Plasma Display Panel. Black bars at the top and bottom that appear with a wide video source (Letterbox picture). Black bars to the left and right that appear with a 4:3 video source (conventional TV broadcasts). Video game sources DVD on-screen menu displays On-screen menus, channel numbers, etc., of connected equipment such as Set top box, Cable modem, VCR, etc. To do this: 1 After selecting this option, press OK. 2 Press or to select the following option and press OK. Then press or to move the picture position (Orbit), or turn the screen to white (All White) to reduce image retention. All White: Select On to turn the screen to white. Orbit: Select On to move the position. • All White function finishes automatically after 30 minutes. If image retention is still present, repeat the above. • To cancel All White function halfway, press any buttons (except the soundrelated buttons) on the remote. AV3 Output The “AV3 Output” option allows you to select the source to be output from the Scart connector / S 3. You can record from this Scart any signal coming from the TV or from external equipment connected to the other connectors. If your VCR supports SmartLink, this procedure is not necessary. To do this: 1 After selecting this option, press OK. 2 Press or to select the desired output signal: Auto, TV, AV1, AV2 or AV5. • If you select Auto, the output signal will always be the same one that is displayed on the screen. • If you have connected a decoder to the Scart connector / S 3 or to a VCR connected to this Scart, please remember to set AV3 Output to TV for correct unscrambling. 4 are not output from • Even if AV3 Output is set to Auto, signals input through Y, PB/CB, PR/CR jacks of Scart connector / S 3. Menu System 39 Set Up The “Set Up” menu allows you to alter various options on the TV. Picture Adjustment Mode : Contrast : Brightness : Colour : Hue : Sharpness : Backlight : NR : Dynamic Picture : C olo u r Tone : Reset Select: Set: Personal 50 50 25 0 25 5 Auto On Cool OK End: MENU m Set Up Set Up Language : English Country : – Auto Tuning Programme Sorting Programme Labels AV Preset Manual Programme Preset Select: Set: OK End: MENU Language , Language : English Country : – Auto Tuning Programme Sorting Programme Labels AV Preset Manual Programme Preset Select: Set: OK Back: End: MENU The “Language” option allows you to select the language that the menus are displayed in. To do this: 1 After selecting this option, press OK. 2 Follow step 3 of “Switching On the TV and Tuning the TV Automatically” on page 30. Country The “Country” option allows you to select the country/region in which you want to operate the TV. To do this: 1 After selecting this option, press OK. 2 Follow step 4 of “Switching On the TV and Tuning the TV Automatically” on page 30. Auto Tuning The “Auto Tuning” option allows you to automatically search and store all available channels (TV Broadcast). To do this: 1 After selecting this option, press OK. 2 Follow steps 5 and 6 of “Switching On the TV and Tuning the TV Automatically” on page 30. Programme Sorting The “Programme Sorting” option allows you to change the order in which the channels (TV Broadcast) appear on the screen. To do this: 1 After selecting this option, press OK. 2 Follow step 7 B) of “Switching On the TV and Tuning the TV Automatically” on page 31. 40 Menu System Programme Labels The “Programme Labels” option allows you to name a channel using up to five characters (letters or numbers). To do this: 1 After selecting this option, press OK. or to select the programme number with the channel you want to name, 2 Press then press OK. 3 Press / / or to select the character, then press OK. 4 When you have finished, press / / or to select the word “End” on the screen and press OK to exit the character input screen. • If you input a wrong character, select the character using or on the screen. Then press / / or to select the correct character and press OK. • For a blank, select on the screen and press OK. AV Preset The “AV Preset” option (A-B) allows you to: A) Designate a name for any external equipment you have connected to the TV. To do this: 1 After selecting this option, press OK. 2 Press or to select the input source you want to name, then press OK. 3 A label automatically appears in the label column. to select the a) If you want to use one of the predefined labels, press or desired label: AV1/AV2/AV3/AV4/AV5, VIDEO, DVD, CABLE, GAME, CAM or SAT, then press OK. b) If you want to set a different label, select Edit and press OK. Then with the first element highlighted, press / / or to select the character, then press OK. When you have finished, press / / or to select the word “End” on the screen and press OK to exit the character input screen. • If you input a wrong character, select the character using or on the screen. Then press / / or to select the correct character and press OK. • For a blank, select on the screen and press OK. B) Skip any input sources that are not connected to any equipment, when you select the input source with the / buttons. To do this: 1 After selecting this option, press OK. 2 Press or to select the input source you want to skip, then press OK. 3 Press or to select Skip, then press OK. When an input signal is detected at Scart connectors / 1, 2 and / S 3, the Skip setting is automatically cancelled. / (continued) Menu System 41 Manual Programme Preset The “Manual Programme Preset” option (A–E) allows you to: A) Preset channels, one by one, in the programme order of your choice. To do this: 1 After selecting this option, press OK. 2 Highlight the Programme option and press OK. 3 Press or to select a programme number for which you want to preset the channel, then press . If you do not want to preset other options for the channel, press OK instead of and go to step 8. 4 After selecting the System option, press OK. Depending on the country/region you have selected in the “Country” option, this option may not be available (see page 40). 5 Press or to select the TV Broadcast system (B/G for western European countries/regions, D/K for eastern European countries/regions, I for the United Kingdom, or L for France), then press . If you do not want to preset other options for the channel, press OK instead of and go to step 8. 6 After selecting the Channel option, press OK. 7 Press or to select the type of channel to be tuned (S for cable channels or C for terrestrial channels), then press . After that, press the number buttons to enter the channel number of the TV Broadcast directly. If you do not know the channel number, press or to search for it. When you have tuned the desired channel, press OK. 8 Highlight the Confirm option and press OK. Then press to select OK and finally press OK to store your channel selection. Repeat all the above steps to tune and store other channels. B) Label a channel using up to five characters (letters or numbers). To do this: 1 Press PROG +/– to select the programme number with the channel you want to name. You cannot select the programme number set to skip in the “Skip” option (see step D on page 43). 2 3 4 5 When the programme you want to name appears on the screen, select the Label option and press OK. Press / / or to select the first character, then press OK. When you have finished, press / / or to select the word “End” on the screen and press OK to exit the character input screen. Highlight the Confirm option and press OK. Then press to select OK and finally press OK to store your choice. • If you input a wrong character, select the character using or on the screen. Then press / / or to select the correct character and press OK. on the screen and press OK. • For a blank, select 42 Menu System C) Normally the automatic fine tuning (AFT) option will give the best possible picture, however you can manually fine-tune the TV to obtain a better picture if the picture is distorted. To do this: 1 Press PROG +/– to select the programme number with the channel you want to finetune manually. You cannot select the programme number set to skip in the “Skip” option (see step D on page 43). 2 3 4 When the programme you want to fine-tune appears on the screen, select the AFT option and press OK. Press or to adjust the fine tuning between –15 and +15 and press OK. Highlight the Confirm option and press OK. Then press to select OK and finally press OK to store your choice. To restore automatic fine tuning, select On in step 3 above. D) Skip any unwanted programme numbers when they are selected with the PROG +/– buttons. To do this: 1 Highlight the Programme option and press OK. Then press or to select the programme number you want to skip. 2 When the programme you want to skip appears on the screen, select the Skip option and press OK. 3 Press or to select Yes and press OK. 4 Highlight the Confirm option and press OK. Then press to select OK and finally press OK to store your choice. To cancel this function afterwards, select No instead of Yes in step 3 above. E) View and record scrambled channels when using a decoder connected to the Scart connector / S 3 either directly or via a VCR. Depending on the country/region you have selected in the “Country” option, this option may not be available (see page 40). To do this: 1 Press PROG +/– to select the programme number with the scrambled channel you want to view. You cannot select the programme number set to skip in the “Skip” option (see step D on page 43). 2 3 4 When the programme you want to view appears on the screen, select the Decoder option and press OK. Press or to select On and press OK. Highlight the Confirm option and press OK. Then press to select OK and finally press OK to store your choice. To cancel this function afterwards, select Off instead of On in step 3 above. Menu System 43 Other Functions Sleep Timer Function The Sleep Timer function allows you to set the TV to switch itself automatically to the standby mode after a specified time period. You can select the time period from among 30 minutes, 60 minutes, 90 minutes, and 120 minutes. To set the Sleep Timer function Press on the remote control repeatedly until the desired time period (“30 min,” “60 min,” “90 min,” or “120 min”) appears on the screen. When the Sleep Timer function is on, the (Sleep) indicator on the TV lights up in red. To cancel the Sleep Timer function Press repeatedly until “Off” appears on the screen. • If you switch off the TV and switch it on again, the Sleep Timer function is reset to “Off.” • The message “Sleep timer will end soon. Power will be turned off.” appears on the screen one minute before the TV switches to the standby mode. • If you press / on the remote control, the remaining time in minutes before the TV switches to the standby mode is displayed on the screen. Picture Off Function (KE-P42M1 only) The Picture Off function allows you to listen to the sound from TV or DVDs with the picture on TV screen switched off. To switch off the picture Press on the remote control. The picture is switched off and the sound remains unchanged. When the Picture Off function is on, (picture off) indicator on the TV lights up in blue. To cancel the Picture Off function Press any button (except the sound related buttons) on the remote control. 44 Other Functions Screen Memo Function The Screen Memo function allows you to temporarily freeze and review the picture on the screen. This is useful to check and make a note of information displayed on the screen, such as a mail address or a recipe. To use the Screen Memo function When the picture you want to freeze appears on the screen, press Memo function and return to the normal TV picture. on the remote control. Press again to cancel the Screen • If you change the input source or the channel, the Screen Memo function is cancelled. • When the Screen Memo function is on, the picture remains still on the screen but the sound continues to play. • When the Screen Memo function is on, the MENU, (Screen format), (Picture mode), (Teletext), and (NexTView) buttons do not work. • The Screen Memo function is cancelled after 5 minutes to prevent image retention (KE-P42M1 only). • The Screen Memo function is cancelled when (picture off) button is pressed during Screen Memo (KE-P42M1 only). Other Functions 45 Teletext Teletext is an information service transmitted by most TV stations. The index page of the Teletext service (usually page 100) gives you information on how to use the service. To operate Teletext, use the remote control buttons as indicated below. Make sure you use a channel (TV Broadcast) with a strong signal, otherwise Teletext errors may occur. To switch on Teletext After selecting the TV channel which carries the Teletext service you want to view, press . Each time you press , the screen changes cyclically as follows: Teletext mode t Teletext Superimpose mode t TV mode t Teletext mode t (repeat). TELETEXT Index Programme News Sport Weather 25 153 101 98 To select a Teletext page Input three digits for the page number, using the number buttons. • If you make a mistake, retype the correct page number. • If the counter on the screen continues searching, it is because this page is not available. In this case, input another page number. To access the next or preceding page Press PROG + ( ) or PROG – ( ). To superimpose Teletext on to the TV Whilst you are viewing Teletext, press . Press it again to cancel the Teletext mode. To freeze a Teletext page Some Teletext pages have sub-pages which follow on automatically. To stop them, press freeze. / . Press it again to cancel the To reveal concealed information (e.g. answers to a quiz) Press / . Press it again to conceal the information. To select a sub page A Teletext page may consist of several sub pages. In this case, the page number that appears on the upper left corner will change from white to green and one or more arrows will appear next to the page number. Repeatedly press or on the remote control to watch the desired page. To switch off Teletext Press . Fastext The Fastext service lets you access pages with one push of a button. Whilst you are in the Teletext mode and Fastext is broadcast, a colour coded menu appears at the bottom of the Teletext page. Press the colour button (red, green, yellow or blue) to access the corresponding page. 46 Other Functions NexTView* * Depending on availability of service. NexTView is an on-screen electronic programme guide, providing you with programme information for different broadcasters. When looking for information, you can search by theme (sports, art, etc.) or date. When you are viewing the NexTView service, wrong characters appear on the screen if the language used in the NexTView service does not match the language set on your TV. To resolve this problem, select the “Language” option in the “Set Up” menu and set the same language as that used in the NexTView service. Also select the “Country” option in the “Set Up” menu and set the country/region in which the NexTView service is provided (see page 40). Displaying NexTView 1 Select a broadcast channel providing the NexTView service. In this case, the indication “NexTView” is displayed as soon as data is available. 2 To see the NexTView service, you have two different NexTView interface types, depending on the percentage of available data. a) “Programme List” interface Whilst you are watching TV, and after the indication “NexTView” in orange is displayed on the screen, press remote control to see the “Programme List” interface (see fig. 1 on page 48). on the b) “Overview” interface Whilst you are watching TV, and after more than 50% of NexTView data is available (100% data may not be available depending on your area), the indication “NexTView” in black is displayed on the screen. Then press on the remote control to see the “Overview” interface (see fig. 2 on page 48). As soon as you enter the NexTView service, the lower left corner of the screen will show the percentage of NexTView data available. Once you have entered this service, the percentage of data available will not increase. 3 To navigate through NexTView: • Moving right or left, press or . • Moving up or down, press or . • Confirming a selection, press OK. 4 To switch off NexTView, press on the remote control. (continued) Other Functions 47 “Programme List” interface (fig. 1) 1 2 3 01 Mon T V1 T V2 T V3 T V4 T V5 T V6 T V7 T V8 02 Tue 00 01 05 06 07 08 09 10 03 Wed 04 Thu : : : : : : : : Songs fr om the shows We a t h e r f o re c a s t informat i A1 news m a g a z i ne Ar t s show Oc l o c k news We a t h e r f o re c a s t informat i A1 news m a g a z i ne Ar t s show 30 30 30 30 30 30 30 30 05 Fri 06 Sat Songs fr om the shows TV 1 0 0 : 3 0 - 01 : 3 0 Th u r s d a y P ro g r a m m e d e s c r i p t i o n Record 07 Sun 7 : 07 : 01 04 Remind 5 4 “Overview” interface (fig. 2) 1 2 3 01 Mon T V1 T V2 T V3 T V4 T V5 T V6 T V7 T V8 02 Tue 03 Wed 9 : 00 04 Thu 05 06 Fri S at 9 : 30 Songs fr om the shows TV 1 0 0 : 3 0 - 01 : 3 0 Th u r s d a y Pro g r a m m e d e s c r i p t i o n Record 4 A Icons for different themes Refer to “Icon key” on page 49. B Date C Programme list 07 Sun 9 : 15 : 0 3 10 : 0 0 | Songs fr om the shows Magazine | Mike's show We a t h e r For ecast | Fa n t a s y f i l m | E u ro n e w s S t a r Wa r s | Home Shopping Eur ope E u ro S p o r t s | News | Arts show Magazine Larry King's live | E u ro S p o r t s E u ro m a g a z i n e | E u ro S p o r t s Home Shopping Eur ope | E u ro n e w s D 04 Remind 5 Record This function only works if you have connected a VCR which supports SmartLink and Timer Programming features. If you want to record the selected programme, press the red button on the remote control. E Remind If you want to be reminded when the selected programme is broadcast, press the green button on the remote control. At the time that programme should be broadcast a reminder message is displayed on the TV. • The “Record” and “Remind” options will be shown on the screen as soon as a programme has been selected, but they will not be shown if you are watching the NexTView service on a TV channel which is not a NexTView provider. • The “Record” and “Remind” options will not be available if the programme that you have selected has already started. 48 Other Functions Icon key Full selection list All the programme information is listed by time and broadcast channels order. Entertainment Children Arts Sports News Channel selection If the NexTView provider sends information on more than eight broadcast channels, you can select eight of them to create a personal list. After you have created your personal list, the default list can be restored. To restore it, select “Auto B” by pressing on the remote control. Remind list Shows you a list with all the programmes (maximum of five programmes) that you have selected to be reminded about. Movies Music Other Functions 49 Additional Information Connecting Optional Equipment Using the following instructions, you can connect a wide range of optional equipment to your TV. (Connecting cables are not supplied.) Connecting to the front of the TV To open the drop-down panel of your TV, push up the panel door just under the mark until you hear a click, then the panel door will open. TV Front Panel (MONO) L/G/S/I R/D/D/D 5 Headphones S VHS/Hi8/DVC camcorder 50 Additional Information A B C D (MONO) L/G/S/I R/D/D/D 5 A B i: Headphones jack S 5: AV5 S Video input jack C D 5: AV5 Video input jack 5: AV5 Audio input jacks • To avoid a noisy picture, do not connect external equipment to connectors B and C at the same time. • Even if headphones are connected to the TV, you can hear the sound from the TV speakers. (continued) Additional Information 51 Connecting to the rear of the TV KLV-L32M1 DVD player with component output Compact AV System/Amplifier Hi-Fi 4 R/D/D/D L/G/S/I R/D/D/D L/G/S/I Y PB/CB PR/CR CENTRE SPEAKER IN 180W (6 ) MAX (SMARTLINK) 1 2 3 / / DVD recorder/player “PlayStation 2”* VCR VCR Decoder Decoder * “PlayStation 2” is a product of Sony Computer Entertainment, Inc. * “PlayStation” is a trademark of Sony Computer Entertainment, Inc. Do not connect a Decoder to the Scart connector / 2. When you connect or disconnect optional equipment such as an audio amplifier, check that it is switched off before connecting or disconnecting. 52 Additional Information KE-P42M1 DVD player with component output 1 / 2 3 / (SMARTLINK) 4 Compact AV System/Amplifier / Y PB/ CB CENTRE SPEAKER IN 180W (6 ) MAX PR/ CR L/G/ S/I L/G/S/I R/D/ D/D R/D/D/D DVD recorder/player “PlayStation 2”* Hi-Fi VCR VCR Decoder Decoder * “PlayStation 2” is a product of Sony Computer Entertainment, Inc. * “PlayStation” is a trademark of Sony Computer Entertainment, Inc. Do not connect a Decoder to the Scart connector / 2. When you connect or disconnect optional equipment such as an audio amplifier, check that it is switched off before connecting or disconnecting. (continued) Additional Information 53 E F KLV-L32M1 G 4 H R/D/D/D I R/D/D/D L/G/S/I Y PB/CB PR/CR CENTRE SPEAKER IN 180W (6 ) MAX L/G/S/I J (SMARTLINK) 1 2 3 / K 54 Additional Information / L M N E F KE-P42M1 H / 1 2 3 / (SMARTLINK) 4 J / Y PB/ CB CENTRE SPEAKER IN 180W (6 ) MAX PR/ CR K E F G H I Connect the supplied mains lead. Connect the supplied coaxial cable. 4: AV4 Audio input jacks 4: AV4 Y PB/CB PR/CR jacks : Audio output jacks L L/G/ S/I L/G/S/I R/D/ D/D R/D/D/D M G I J K L M N N 5 CENTRE SPEAKER IN terminals / 1: AV1 Scart connector AV1 Scart connector outputs the video signal from the TV tuner. / 2: AV2 Scart connector AV2 Scart connector outputs all the video signals for the TV (not only from the TV tuner). / S 3: AV3 Scart connector (SmartLink) 0: Auto Startup button Note that some Scart leads may not fit into the connector on the TV. (continued) Additional Information 55 Connecting a VCR To connect a VCR, refer to “Connecting an Aerial and a VCR” on page 26. We recommend you connect your VCR using a Scart lead. If you do not have a Scart lead, tune in the VCR test signal to the TV programme number “0” by using the “Manual Programme Preset” option. For details on how to manually programme these presets, see page 42, step A. Refer to the instruction manual of your VCR to find out how to find the output channel of your VCR. Connecting a VCR or a DVD recorder that supports SmartLink SmartLink is a direct link between the TV and a VCR or a DVD recorder. For more information on SmartLink, refer to the instruction manual of your VCR or DVD recorder. If you use a VCR or a DVD recorder that supports SmartLink, please connect the VCR or the DVD recorder using a Scart lead to the Scart connector / S 3 (M). 4 ( H) If you connect a DVD recorder to Y, PB/CB, PR/CR jacks of Some DVD recorders may have component signal format. If you wish to input the component signal connect the DVD recorder to 4 (H) and the audio input jacks 4 (G). Y, PB/CB, PR/CR jacks of Connecting a decoder If you have connected a decoder to the Scart connector this Scart / S 3 (M), or through a VCR connected to Select the “Manual Programme Preset” option in the “Set Up” menu and, after entering the “Decoder” option, select “On” (using or ). Repeat this option for each scrambled signal. Depending on the country/region you have selected in the “Country” option, this option may not be available (see page 40). Connecting external audio equipment To listen to the sound from the TV on Hi-Fi equipment Connect your Hi-Fi equipment to the audio output jacks (I) if you want to amplify the audio output from the TV. Next, using the menu system, select the “Features” menu and set “Speaker” to “Off” (see page 38). When you switch on or off your TV, turn down the volume of the Hi-Fi equipment connected to the audio output jacks If the volume is set too high, it may damage the Hi-Fi equipment. . How to use the CENTRE SPEAKER IN terminals You can connect an external amplifier’s centre output to the TV’s CENTRE SPEAKER IN terminals (J). Centre speaker sound, such as 5.1 ch surround, will then play back through the TV’s speakers. Select the “Features” menu using the menu system and set “Speaker” to “Centre in” (see page 38). 56 Additional Information Using Optional Equipment 1 Connect your equipment to the designated TV socket, as indicated on pages 50 to 56. 2 Switch on the connected equipment. 3 To watch the picture of the connected equipment, press the input symbol appears on the screen. Symbol 2 or 1 or S 4 3 2 • Audio/video input signal through the Scart connector K, L or M. • RGB input signal through the Scart connector K or L. This symbol appears only if an RGB source has been connected. 3 • S video input signal through the Scart connector M. 4 • Component input signal through the Y, PB/CB, PR/CR jacks H and audio input signal through G. 5 • Video input signal through the phono jack C and audio input signal through D. 5 • S video input signal through the S video input jack B and audio input signal through D. Press the • • button on the remote control repeatedly until the correct Input Signals 1, S / button on the remote control to return to the normal TV picture. / / 1 Scart connector (K) outputs the video signal from only the TV tuner. 2 Scart connector (L) outputs all the video signals for the TV (not only from the TV tuner). For mono equipment Connect the phono plug to the L/G/S/I jack and press / repeatedly until the input symbol screen. Select the “Sound Adjustment” menu and set “Dual Sound” to “A” (see page 35). 5 or S 5 appears on the Additional Information 57 Remote Control Configuration for VCR/DVD This remote control is set by default to operate the basic functions of this Sony TV, most Sony DVDs and Sony VCRs when batteries are initially installed. To control VCRs and DVDs of other major brands, and certain Sony VCR models, please complete the following steps: Before you start, look up the three digit code for your brand of DVD or VCR from the list on page 59. For those brands that have more than one code, enter the first code number. 1 Press the Media Selector button on the remote control repeatedly until the required VCR or DVD green light lights up. If the Media Selector is in the TV position, code numbers will not be stored. 1 2 Before the green light goes out, press and hold the yellow button for approximately six seconds until the green light starts flashing. 3 Whilst the green light is flashing, enter all three digits of the code for your brand (see page 59) using the number buttons on the remote control. If your selected code is entered correctly, all three green lights will be lit momentarily. 4 58 Turn on your VCR or DVD and check that the main functions work. • If your equipment is not working or some of the functions do not work, please check to be sure you entered the correct code set or try the next code listed against the brand (see page 59). • Your brand codes may be lost if weak batteries are not replaced within a few minutes. To reset your DVD or VCR code number, please repeat the above steps. A small label is attached inside the battery cover to allow you to record your brand codes. • Not all brands are covered and not all models of every brand are covered. Additional Information 3 2 VCR Brand List DVD Brand List Brand Code Brand Code SONY (VHS) 301, 302, 303, 308, 309, 362 SONY 001 SONY (BETA) 303, 307, 310 AIWA* 021 SONY (DV) 304, 305, 306 DENON 018, 027, 020, 002 AIWA* 325, 331, 351 GRUNDIG 009, 028, 023, 024, 016, 003 AKAI 326, 329, 330 HITACHI 025, 026, 015, 004 DAEWOO 342, 343 JVC 006, 017 GRUNDIG 358, 355, 360, 361, 320, 351 KENWOOD 008 HITACHI 327, 333, 334 LG 015, 014 JVC 314, 315, 322, 344, 352, 353, LOEWE 009, 028, 023, 024, 016, 003 354, 348, 349 MAGNAVOX 009, 028, 023, 024, 016, 003 LG 332, 338 MATSUI 013, 016 LOEWE 358, 355, 360, 361, 320, 351 MICROMEDIA 009 MATSUI 356, 357 MITSUBISHI 010 MITSUBISHI 346, 347 ONKYO 022 ORION 328 OPTINUS 004 PANASONIC 321, 323 PANASONIC 018, 027, 020, 002 PHILIPS 311, 312, 313, 316, 317, 318, 358, 359 PHILIPS 009, 028, 023, 024, 016, 003 PIONEER 004 SAMSUNG 339, 340, 341, 345 RCA 005 SANYO 335, 336 SAMSUNG 011, 014 SHARP 324 SANYO 007 THOMSON 319, 350 SHARP 019, 027 TOSHIBA 337 THOMSON 012 TOSHIBA 003 YAMAHA 018, 027, 020, 002 Additional Information 59 Specifications Display Unit: (KLV-L32M1) Power Requirement: 220–240 V AC, 50 Hz Screen Size: 32 inches Approx. 80.0 cm measured diagonally Display Resolution: 1,366 dots (horizontal) × 768 lines (vertical) Power Consumption: 145 W Standby Power Consumption: 0.6 W or less Dimensions (w × h × d): Approx. 835 × 670.5 × 287.5 mm (with stand) Approx. 835 × 603.5 × 110 mm (without stand) Weight: Approx. 19.7 kg (with stand) Approx. 17.4 kg (without stand) (KE-P42M1) Power Requirement: 220–240 V AC, 50 Hz Screen Size: 42 inches Approx. 107.4 cm measured diagonally Display Resolution: 852 dots (horizontal) × 480 lines (vertical) Power Consumption: 365 W Standby Power Consumption: 0.6 W or less Dimensions (w × h × d): Approx. 1,075 × 826 × 312 mm (with stand) Approx. 1,075 × 750 × 110 mm (without stand) Weight: Approx. 45 kg (with stand) Approx. 39.5 kg (without stand) Panel System: (KLV-L32M1) Terminals: / 1 21-pin Scart connector (CENELEC standard) including audio/video input, RGB input, and TV audio/video output. / 2 21-pin Scart connector (CENELEC standard) including audio/video input, RGB input, and audio/video output. / S 3 (SMARTLINK) 21-pin Scart connector (CENELEC standard) including audio/video input, S video input, selectable audio/video output, and SmartLink interface. 4 Y: 1 Vp-p, 75 ohms, 0.3V negative sync PB: 0.7 Vp-p, 75 ohms PR: 0.7 Vp-p, 75 ohms 4 Audio input (phono jacks) 500 mVrms Impedance: 47 kilo ohms S 5 S video input (4-pin mini DIN) 5 Video input (phono jack) 5 Audio input (phono jacks) Audio output (Left/Right) (phono jacks) i Headphones jack 5 CENTRE SPEAKER IN: Max. 180 W (6-ohms) Sound Output: 10.0 W + 10.0 W Accessories Supplied: Depending on your country/region selection: B/G/H, D/K, L, I • Remote control RM-Y1102 (KLV-L32M1) (1) RM-Y1002 (KE-P42M1) (1) • Size AA batteries (R6 type) (2) • Coaxial cable (1) • Mains lead (Type BF) (1) • Cleaning cloth (KE-P42M1 only) (1) • Clamp screws (2) • Plug holder (KE-P42M1 only) (1) Colour System: Optional Accessory: LCD (Liquid Crystal Display) Panel (KE-P42M1) Plasma Display Panel TV System: PAL, SECAM NTSC 3.58, 4.43 (only Video In) Aerial: 75 ohm external terminal for VHF/UHF Channel Coverage: VHF: UHF: CATV: HYPER: D/K: L: I: 60 E2–E12 E21–E69 S1–S20 S21–S41 R1–R12, R21–R69 F2–F10, B–Q, F21–F69 UHF B21–B69 Additional Information • Wall-Mount Bracket SU-LW1 (KLV-L32M1 only) • Wall-Mount Bracket SU-PW2 (KE-P42M1 only) • TV stand SU-PG3 Other Features: • Teletext, Fastext • Sleep Timer • SmartLink (Direct link between your TV and a compatible VCR or DVD recorder. For more information on SmartLink, please refer to the instruction manual of your VCR or DVD recorder.) • TV system autodetection • Auto Format • Screen Memo • NexTView (depending on availability of service) • Picture Off (KE-P42M1 only) Troubleshooting Self-diagnosis function This TV is equipped with a self-diagnosis function. If there is a problem with your TV, the (Power/Standby) indicator will flash in red repeatedly. Writing down the duration of flashes and interval between flashes helps you inform your dealer or Sony service centre of the TV’s condition. (Power/Standby) indicator (flashing in red) 1 Measure how long the (Power/Standby) indicator flashes and stops flashing. For example, the indicator flashes for two seconds, stops flashing for one second, and flashes for two seconds. 2 Press the (Power) switch on the TV to switch it off, disconnect the mains lead, and inform your dealer or Sony service centre of how the indicator flashes (duration and interval). Trouble symptoms and remedies • Here are some simple solutions to problems which may affect the picture and sound. • If you continue to experience problems, have your TV serviced by qualified service personnel. Never open the casing yourself. Problem Possible remedies No picture No picture (screen is dark) and no sound • Check the aerial connection. • Connect the TV to the mains, and press the (Power) switch on the TV. (Power/Standby) indicator lights up in red, press TV &/ on • If the the remote control. The TV turns off automatically (the TV enters the standby mode). • Check if the Sleep Timer function is activated (page 44). • If no signal is received or no operation is performed in the TV mode for 10 minutes, the TV automatically switches to the standby mode. No picture or no menu information from equipment connected to the Scart connector • Check that the optional equipment is on and press / on the remote control repeatedly until the correct input symbol is displayed on the screen. • Check the connection between the optional equipment and the TV. (continued) Additional Information 61 Problem Possible remedies Poor picture/Unstable picture Double images or ghosting • Check aerial/cable connections. • Check the aerial location and direction. Only snow and noise appear on the screen. • Check if the aerial is broken or bent. • Check if the aerial has reached the end of its serviceable life (three to five years in normal use, one to two years at the seaside). Dotted lines or stripes • Keep the TV away from electrical noise sources such as cars, motorcycles, or hair-dryers. No colour on colour programmes • Using the menu system, select the “Picture Adjustment” menu and select “Reset” to return to the factory settings (page 33). • If you set the “Power Saving” option to “Reduce,” picture colours may become dimmer (page 38). No colour or irregular colour when viewing a signal from the Y, PB/CB, PR/CR jacks of 4 4. • Check the connection of the Y, PB/CB, PR/CR jacks of • Make sure that the Y, PB/CB, PR/CR jacks of 4 are firmly seated in their respective sockets. Some tiny black points and/or bright points on the screen • The picture of a display unit is composed of pixels. Tiny black points and/or bright points (pixels) on the screen do not indicate a malfunction. 62 In the screen appears an image retention (afterimage). (KE-P42M1 only) • Using the menu system, select the “Screen Saver” option in the “Features” menu and set the “All White” option to “On” to reduce the image retention. The screen flickers when turning on the TV (KE-P42M1 only). • This is inherent in the Plasma Display Panel, and does not indicate a malfunction. The picture is too bright. • Using the menu system, select the “Picture Adjustment” menu and select “Mode.” Then select the desired picture mode (page 33). Picture (stripe) noise • Make sure that the aerial is connected using the supplied coaxial cable. • Keep the aerial cable away from other connecting cables. • Do not use 300-ohm twin lead cables as interference may occur. Poor picture (white saturation) when viewing a signal from the Scart connector / S3 • Make sure that the output signal of the equipment connected to the Scart connector / S 3 is not an RGB signal. If it is an RGB signal, please connect the equipment to the Scart connector / 1 or / 2. Distorted picture and noisy sound • Check if any connected optional equipment is installed in front of the TV or beside the TV. When installing optional equipment, leave some space between the optional equipment and the TV. Stripe noise during playback/recording of a VCR • Video head interference. Keep your VCR away from the TV. • Leave a space of 30 cm between your VCR and the TV to avoid noise. • Avoid installing your VCR in front of the TV or beside the TV. Poor or no picture (screen is dark), but good sound • Using the menu system, select the “Picture Adjustment” menu and select “Reset” to return to the factory settings (page 33). • If the (picture off) indicator lights up in blue, press (picture off) on the remote control (KE-P42M1 only). Noisy picture when viewing a TV channel • Using the menu system, select the “Manual Programme Preset” option in the “Set Up” menu and adjust “AFT” (Automatic Fine Tuning) to obtain better picture reception (page 43). • Using the menu system, set the “NR” (Noise Reduction) option in the “Picture Adjustment” menu to reduce the noise in the picture (page 33). Additional Information Problem Possible remedies Distorted picture when changing programmes or selecting Teletext • Turn off any equipment connected to the Scart connector on the rear of the TV. Wrong characters appear when viewing Teletext. • Using the menu system, select the “Language” and “Country” options in the “Set Up” menu and set the language and country/region in which you view Teletext (page 40). For Cyrillic languages, we recommend that you select Russia in case your own country/region does not appear in the list. Wrong characters appear when viewing NexTView. • Using the menu system, select the “Language” and “Country” options in the “Set Up” menu and set the language and country/region in which NexTView is provided (page 40). Some input sources cannot be selected. • Using the menu system, select the “AV Preset” option in the “Set Up” menu and cancel the “Skip” setting of the input source. No sound/Noisy sound Good picture, no sound • Press 2 +/– or % (Mute) on the remote control. • Check that the “Speaker” option is set to “Main” in the “Features” menu (page 38). Audio noise • Make sure that the aerial is connected using the supplied coaxial cable. • Keep the aerial cable away from other connecting cables. • Do not use 300-ohm twin lead cables as interference may occur. Menu item is not displayed. • Some items cannot be selected depending on the signal or other settings. Refer to the instructions on each menu item. Strange sound The TV cabinet creaks. • Changes in room temperature sometimes cause the TV cabinet to expand or contract, which can make slight noises. This does not indicate a malfunction. The TV ticks. • An electrical circuit inside the TV is activated when the TV is turned on. This does not indicate a malfunction. The TV buzzes. • There might be a surge sound when turning on the TV. This does not indicate a malfunction. Remote control does not function. • Check that the remote control is set correctly for the device you are using (VCR, TV, or DVD). • If the remote control does not operate the VCR or DVD even when the remote control has been set correctly to VCR or DVD, enter the necessary code set as explained in “Remote Control Configuration for VCR/DVD” (page 58). • Replace the batteries. The (Power/Standby) indicator on the TV flashes. • Refer to “Self-diagnosis function” (page 61) and contact your nearest Sony service centre. Additional Information 63 Television Channel Number Guide for the United Kingdom Only the main transmitters are listed. Information regarding the regional sub-relay channel numbers can be obtained by contacting the BBC Engineering Information Dept., Telephone Number 020 7852 5040. 64 Additional Information http://www.sony.net/ Sony España, S.A. Printed in Spain