1
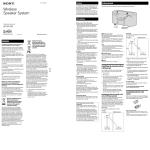
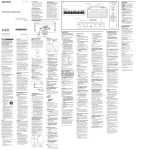
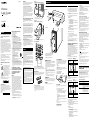
CAUTION You are cautioned that any changes or modifications not expressly approved in this manual could void your authority to operate this equipment. For the wireless transceiver (EZW-RT10A) This equipment must not be co-located or operated in conjunction with any other antenna or transmitter. Wireless Audio System Main unit (ATS-SW10Ti / Wireless Audio Transmitter) STAN DBY This equipment complies with FCC radiation exposure limits set forth for uncontrolled equipment and meets the FCC radio frequency (RF) Exposure Guidelines in Supplement C to OET65. This equipment should be installed and operated with at least 20cm and more between the radiator and person’s body (excluding extremities: hands, wrists, feet and ankles). GB Operating Instructions Notice for the customers in Canada For the wireless transceiver (EZW-RT10A) This Class B digital apparatus complies with Canadian ICES-003. AIR-SW10Ti iPod TUNER TUNING Printed in China To reduce the risk of fire or electric shock, do not expose this apparatus to rain or moisture. To reduce the risk of fire, do not cover the ventilation opening of the apparatus with newspapers, tablecloths, curtains, etc. Do not place the naked flame sources such as lighted candles on the apparatus. To reduce the risk of fire or electric shock, do not expose this apparatus to dripping or splashing, and do not place objects filled with liquids, such as vases, on the apparatus. As the main plug is used to disconnect the unit from the mains, connect the unit to an easily accessible AC outlet. Should you notice an abnormality in the unit, disconnect the main plug from the AC outlet immediately. The unit is not disconnected from the mains as long as it is connected to the AC outlet, even if the unit itself has been turned off. Do not install the appliance in a confined space, such as a bookcase or built-in cabinet. Do not expose batteries or apparatus with batteryinstalled to excessive heat such as sunshine, fire or the like. The nameplate is located on the bottom exterior of the main unit (ATS-SW10Ti). Notice for the customers in the U.S.A. This symbol is intended to alert the user to the presence of uninsulated “dangerous voltage” within the product’s enclosure that may be of sufficient magnitude to constitute a risk of electric shock to persons. This symbol is intended to alert the user to the presence of important operating and maintenance (servicing) instructions in the literature accompanying the appliance. The following indications are located on the bottom exterior of the main unit (ATS-SW10Ti). Owner’s Record The model and serial numbers of the main unit are located on the bottom of the main unit, and those of the subwoofer are located at the rear of the subwoofer. Record these numbers in the space provided below. Refer to them whenever you call upon your Sony dealer regarding this product. Model No. Serial No. 1) 2) 3) 4) 5) 6) 7) Read these instructions. Keep these instructions. Heed all warnings. Follow all instructions. Do not use this apparatus near water. Clean only with dry cloth. Do not block any ventilation openings. Install in accordance with the manufacturer’s instructions. 8) Do not install near any heat sources such as radiators, heat registers, stoves, or other apparatus (including amplifiers) that produce heat. 9) Do not defeat the safety purpose of the polarized or grounding-type plug. A polarized plug has two blades with one wider than the other. A grounding type plug has two blades and a third grounding prong. The wide blade or the third prong are provided for your safety. If the provided plug does not fit into your outlet, consult an electrician for replacement of the obsolete outlet. 10)Protect the power cord from being walked on or pinched particularly at plugs, convenience receptacles, and the point where they exit from the apparatus. 11)Only use attachments/accessories specified by the manufacturer. 12)Use only with the cart, stand, tripod, bracket, or table specified by the manufacturer, or sold with the apparatus. When a cart is used, use caution when moving the cart/ apparatus combination to avoid injury from tip-over. 13)Unplug this apparatus during lightning storms or when unused for long periods of time. 14)Refer all servicing to qualified service personnel. Servicing is required when the apparatus has been damaged in any way, such as power-supply cord or plug is damaged, liquid has been spilled or objects have fallen into the apparatus, the apparatus has been exposed to rain or moisture, does not operate normally, or has been dropped. The following FCC statement applies only to the version of this model manufactured for sale in the U.S.A. Other versions may not comply with FCC technical regulations. NOTE: This equipment has been tested and found to comply with the limits for a Class B digital device, pursuant to Part 15 of the FCC Rules. These limits are designed to provide reasonable protection against harmful interference in a residential installation. This equipment generates, uses and can radiate radio frequency energy and, if not installed and used in accordance with the instructions, may cause harmful interference to radio communications. However, there is no guarantee that interference will not occur in a particular installation. If this equipment does cause harmful interference to radio or television reception, which can be determined by turning the equipment off and on, the user is encouraged to try to correct the interference by one or more of the following measures: Reorient or relocate the receiving antenna. Increase the separation between the equipment and receiver. Connect the equipment into an outlet on a circuit different from that to which the receiver is connected. Consult the dealer or an experienced radio/TV technician for help. Main unit You can easily establish the connection by setting the same S-AIR ID for the main unit and the subwoofer. 1 Check that the wireless transceivers are inserted B or Recent times have seen the rapid spread of DVD media, Digital Broadcasting, and other high-quality media. To ensure that the subtle nuances of these high-quality media are transmitted with no deterioration, Sony has developed a technology called “S-AIR” for the radio transmission of digital audio signals with no compression, and has incorporated this technology into the EZW-RT10A. This technology transfers digital audio signals with no compression using the 2.4 GHz band range of ISM band (Industrial, Scientific, and Medical band), such as wireless LANs and Bluetooth applications. subwoofer as follows: Main unit A C Subwoofer (SA-WA10R / Wireless Speaker System) Press SYSTEM MENU . EZWRT10A Press / repeatedly until “S-AIR” appears, then press ENTER . Wall socket Press / repeatedly until “S-AIR ID” appears, then press ENTER . Press / repeatedly to select “A,” “B” or “C,” then press ENTER . Subwoofer Subwoofer Set the S-AIR ID selector on the rear panel to the same S-AIR ID as the main unit. A B C S-AIR ID PAIRING Tip The S-AIR ID is set at the factory to “A.” Once connection between the main unit and the subwoofer is established, the S-AIR indicator on the subwoofer lights up. A Tip You can also connect up to 10 optional sub units to the main unit. In this case, set the S-AIR ID to the same ID as the main unit. For details on the S-AIR ID of the sub unit, refer to the Operating Instructions supplied with the sub unit. The subwoofer can be placed with the speaker side up. Remote (RM-ANU066) Identifying the subwoofer with your main unit (Pairing operation) A B S-AIR C ID It is easy to set the same S-AIR ID for the main unit and the subwoofer to establish the connection. However, if a neighbor has an AIR-SW10Ti system with the same S-AIR ID as your S-AIR main unit, the neighbor may be able to hear the audio transmitted from your main unit on the neighbor’s subwoofer. Also, you may be able to hear the audio transmitted from your neighbor’s main unit on your subwoofer. To prevent this, you can identify the subwoofer with your main unit by performing the pairing operation. PAIRING C Wall socket FM lead antenna (extend horizontally) White side for North American model Brown side for other models Wireless transceiver (EZW-RT10A) Wireless transceiver This manual mainly explains operations using the remote, but the same operations can also be performed using the buttons on the unit having the same or similar names. To use the remote Slide and remove the battery compartment lid, and insert the two supplied R03 (size AAA) batteries, side first, matching the polarities shown below. Insert the supplied wireless transceiver (EZW-RT10A) securely into the EZW-RT10A slot on the rear panel of main unit and the subwoofer. Check the orientation of the mark when inserting the supplied wireless transceivers (EZW-RT10A). Failure to do so may result in damage to the main unit and subwoofer. Notes Make sure to turn off the main unit and the subwoofer when inserting or removing the supplied wireless transceivers (EZWRT10A). Failure to do so may result in damage to the main unit and subwoofer. Do not touch the terminals of the supplied wireless transceivers (EZW-RT10A). Do not insert any device other than the supplied wireless transceivers (EZW-RT10A) into the EZW-RT10A slot. Before pairing Connection is established by the S-AIR ID (example). To use the iPod/iPhone Insert a Universal Dock Adapter into the Dock before use. Use the supplied Universal Dock Adapter with the main unit for iPhone and iPhone 3G as follows. The adapter number is shown on the bottom of Dock Adapter. ‒iPhone : ‒iPhone 3G : When you use other iPod models, use the adapter supplied with your iPod model, or purchase a compatible Dock Adapter from Apple Inc. To remove the Dock Adapter, pull it up with your fingernail or a flat object using the slot inside the adapter. ID: A ID: A ID: A Main unit Main unit After pairing Connection is established between the subwoofer and your main unit. Neighboring AIR-SW10Ti system Your AIR-SW10Ti system Connector To set the clock Subwoofer Subwoofer ID: A ID: A Use buttons on the remote to set the clock on the main unit. 1 Press / to turn on the main unit. 2 Select the clock set mode. Press CLOCK/TIMER to select the clock set mode. If “PLAY SET” flashes, press / repeatedly to select “CLOCK,” and then press ENTER . 3 Set the time. Press / repeatedly to set the hour, then press ENTER . Use the same procedure to set the minutes. When you turn off the unit, the clock display appears in the display. Note The clock settings are lost when you disconnect the power cord or if a power failure occurs. To adjust the volume Press VOLUME +/– . To cancel pairing Change the S-AIR IDs of the main unit and the subwoofer to different S-AIR IDs. To stop the pairing operation midway It takes a few seconds to complete the pairing of the main unit and subwoofer after pressing PAIRING on the rear panel of the subwoofer in step 4. You can undo the pairing setting before completing the pairing. If you have done the pairing operation of only the main unit, repeat to of step 4 again. If you have done the pairing operation of both the main unit and subwoofer, repeat to of step 4 and press PAIRING on the rear panel of the subwoofer. Tip You can also pair the main unit with optional sub units. For details on turning on the pairing function, refer to the Operating Instructions supplied with the sub unit. Since the S-AIR product uses radio waves that share the same frequency (2.4 GHz) as other wireless systems, such as wireless LAN or Bluetooth devices, interference or poor transmission may result if you use other wireless devices near the system. In this case, the connection may be improved by changing the RF CHANGE (Radio Frequency Change) setting on the main unit. 1 Press SYSTEM MENU . 2 Press / repeatedly until “S-AIR” appears, then press ENTER . 3 Press / repeatedly until “RF CHANGE” appears, then press ENTER . 4 Press / repeatedly to select the desired setting. The default setting is underlined. AUTO Normally select this setting. The main unit changes the RF CHANGE setting to “ON” or “OFF” automatically. ON The main unit transmits sound by searching for the best channel for transmission. OFF The main unit transmits sound using a fixed channel for transmission. When you select this setting, select the S-AIR ID that provides the best connection. 5 Press ENTER to exit the system menu. Turning the subwoofer on/off in sync with the main unit VOLUME Power With normal use, the batteries should last for about six months. Do not mix an old battery with a new one or mix different types of batteries. If you do not intend to use the remote for a long period of time, remove the batteries to avoid damage from battery leakage and corrosion. Subwoofer ID: A TUNING Find a location and an orientation that provide good reception, and then set up the antenna. Keep the antenna away from the power cord to avoid picking up noise. Notes on using the remote Subwoofer Dock Adapter FM antenna Connect the power cord to a wall socket. Neighboring AIR-SW10Ti system Your AIR-SW10Ti system Subwoofer Press PAIRING on the rear panel of the subwoofer using a pointed object. When pairing is performed, “COMPLETE” is displayed on the main unit for 2 seconds and the PAIRING indicator on the subwoofer lights up. If the S-AIR connection is unstable 4 Confirm the connection status. Features S-AIR (Sony Audio Interactive Radio frequency) 3 Set the same S-AIR ID for the main unit and the ANT ENN A License and Trademark Notice AIR-SW10Ti is an “S-AIR” compatible packaged product that consists of one S-AIR main unit and one subwoofer. You can enjoy high quality sound by connecting the subwoofer wirelessly. The subwoofer can be used only with this main unit. In addition, connecting the S-AIR main unit (hereafter called “main unit”) to optional S-AIR sub units (hereafter called “sub units”) using “S-AIR” technology, you can use each unit in a remote location. For example, you can install optional sub units, one in a study room and the other in a bedroom, and install the system in the living room. You can then listen to music from the system located in the living room by controlling the sub units. Up to 10 optional sub units can be connected to a main unit. turn them on. FM 75 COA XIAL * Touch sensitive buttons Operation using the touch sensitive button that beeps. This equipment should be installed and operated with at least 20 cm and more between the radiator and person’s body (excluding extremities: hands, wrists, feet and ankles). “S-AIR” and its logo are trademarks of Sony Corporation. iPod is a trademark of Apple Inc., registered in the U.S. and other countries. iPhone is a trademark of Apple Inc. The Bluetooth word mark and logos are owned by the Bluetooth SIG, Inc. and any use of such marks by Sony Corporation is under license. Other trademarks and trade names are those of their respective owners. All other trademarks and registered trademarks are of their respective holders. In this manual, TM and ® marks are not specified. 2 Press / on the main unit and the subwoofer to EZW-RT10A WARNING Establishing the S-AIR connection securely in the main unit and the subwoofer. This equipment complies with IC radiation exposure limits set forth for uncontrolled equipment and meets the RSS-102 of the IC radio frequency (RF) Exposure rules. Important Safety Instructions Hooking up the system VOLUME Operation is subject to the following two conditions: (1) this device may not cause interference, and (2) this device must accept any interference, including interference that may cause undesired operation of the device. ©2009 Sony Corporation Getting Started STAN DBY 4-125-804-11(1) Not connected Pairing ID: A ID: A Main unit Main unit 1 Place the main unit near the subwoofer. 2 Check that the power of the main unit and the subwoofer is turned on. 3 Check that the S-AIR ID of the main unit is the same as the S-AIR ID of the subwoofer. 4 Perform the pairing operation of the main unit and the subwoofer as follows: Main unit Press SYSTEM MENU . Press / repeatedly until “S-AIR” appears, then press ENTER . Press / repeatedly until “PAIRING” appears, then press ENTER . “OK?” flashes. Press ENTER again. “PAIRING” flashes and the main unit is ready for pairing with the subwoofer. When the subwoofer is on or in power save mode, press / on the main unit to begin using the system. By pressing / on the main unit to turn it off, the subwoofer will enter power save mode. Each time you press / on the main unit, the subwoofer will be turned on/off in sync with the main unit. You can check the power status of the subwoofer by the / indicator on the subwoofer. Subwoofer status indication / indicator Status Green Power on Orange Power save mode You can turn on the subwoofer by pressing / on the main unit. Red Standby mode You cannot turn on the subwoofer by pressing / on the main unit. To turn on the subwoofer, press / on the subwoofer. Operations Troubleshooting Presetting radio stations Playing the iPod/iPhone Use buttons on the remote to preset stations. 1 Select the iPod function. Press FUNCTION repeatedly (or iPod on the unit) . 1 Tune in the desired station. 2 Press SYSTEM MENU . 3 Press / repeatedly until “TUNER” appears, then press ENTER . 2 Place the iPod/iPhone on the iPod/iPhone connector. 4 Press / repeatedly until “MEMORY” appears, then press ENTER . Turning off the beep sound When you press a touch sensitive button, a beep sounds. The following steps show you how to disable the beep. 1 Press SYSTEM MENU . 2 Press / repeatedly until “SYSTEM” appears, then press ENTER . 3 Press / repeatedly until “BEEP” appears, then press ENTER . 4 Press / to select “OFF,” then press ENTER . TUNING VOLUME When you enable the beep, select “ON” in step 4. Preset number 5 Press / repeatedly to select your desired preset number. If another station is already assigned to the selected preset number, that station is replaced by the new station. 3 Start playback. Press . To control the iPod/iPhone You can control your iPod/iPhone with the following buttons on the main unit. To Press Pause playback . To resume playback, press again. Select a menu or track for playback / . You can scroll up or down the iPod/iPhone menus. Skip a track / . Find a point in a track Hold down / during playback, and release the button at the desired point. Choose the selected item ENTER . You can choose the selected item much like the center button on the iPod. Return to the previous menu iPod MENU/RETURN . You can return to the previous menu much like the Menu button on the iPod/ iPhone. To use the unit as a battery charger You can use the main unit as a battery charger for the iPod/iPhone. Charging begins when the iPod/iPhone is placed on the iPod/iPhone connector. The charging status appears on the iPod/iPhone display. For details, refer to the user’s guide of your iPod/iPhone. To stop charging the iPod/iPhone Remove the iPod/iPhone. Notes While playing the tuner in the PARTY mode, you cannot operate the iPod/iPhone. When placing or removing the iPod/iPhone, handle the iPod/iPhone in the same angle as that of the iPod/iPhone connector on the system and do not twist or sway the iPod/iPhone to prevent connector damage. Do not carry the main unit with an iPod/iPhone set on the connector. Doing so may cause a malfunction. When placing or removing the iPod/iPhone, brace the main unit with one hand and take care not to press the controls of the iPod/ iPhone by mistake. Before disconnecting the iPod/iPhone, pause playback. The volume level of the main unit does not change even if adjusted on the iPod/iPhone. The main unit is designed for iPod/iPhone only. You cannot connect any other portable audio players. Depending on the iPod/iPhone model you are using and its status, operations using the main unit may not be accepted or the wrong operations may be performed. Sony cannot accept responsibility in the event that data recorded to an iPod/iPhone is lost or damaged when using the iPod/iPhone with this S-AIR product. Listening to the radio 1 Select “FM.” Press FUNCTION repeatedly (or TUNER on the unit) . 2 Perform tuning. 6 Press ENTER . 7 Repeat steps 1 through 6 to store other stations. You can preset up to 20 FM stations. The preset stations are retained for about half a day even if you disconnect the power cord or if a power failure occurs. To call up a preset radio station Press PRESET +/– repeatedly. Adjusting the sound The main unit’s DSP (Digital Signal Processor) system provides the following optional sound settings. CROSSOVER You can set the frequency that is output by the subwoofer. A lower setting value will provide deeper bass. 1 Press SYSTEM MENU . 2 Press / repeatedly until “SOUND” appears, then press ENTER . 3 Press / repeatedly until “CROSSOVER” appears, then press ENTER . 4 Press / to change the crossover frequency (Hz) from “80,” “100,” “120,” “140” or “160,” then press ENTER . The default setting is “120.” 5 Press SYSTEM MENU to exit the system menu. SUBWOOFER PHASE In some cases, main unit and subwoofer sound integration may be unsatisfactory due to phase cancelation, which can be remedied by reversing the subwoofer’s phase, as follows. 1 Press SYSTEM MENU . 2 Press / repeatedly until “SOUND” appears, then press ENTER . 3 Press / repeatedly until “SW PHASE” appears, then press ENTER . 4 Press / to select “NORMAL” or “REVERSE,” then press ENTER . The default setting is “NORMAL.” 5 Press SYSTEM MENU to exit the system menu. PAE+ This function restores the treble frequencies lost during sound compression, naturally recreating the original sound. 1 Press SYSTEM MENU . 2 Press / repeatedly until “SOUND” appears, then press ENTER . 3 Press / repeatedly until “PAE+” appears, then press ENTER . 4 Press / to select “ON” or “OFF,” then pressing ENTER . The default setting is “OFF.” 5 Press SYSTEM MENU to exit the system menu. BASS BOOST You can boost the lower frequencies of sound sources (for deeper sound). For automatic tuning Press and hold TUNING +/– until the frequency indication changes and then release. Press BASS BOOST repeatedly to select “ON” or “OFF.” The default setting is “OFF.” “AUTO” lights up. Scanning stops automatically when a station is tuned in, and then “TUNED” and “ST” (for FM stereo programs only) appear. You can select the sound effect. PRESET EQ Press EQ repeatedly to select “FLAT,” ”ROCK,” ”POP,” or “JAZZ.” The default setting is “ROCK.” SUBWOOFER LEVEL When tuning in an FM station, if “TUNED” does not appear and the scanning does not stop, press TUNING +/– repeatedly to tune in the desired station. For manual tuning Press TUNING +/– repeatedly to tune in the desired station. Tip To reduce static noise on a weak FM stereo station, press FM MODE repeatedly until “MONO” appears to turn off stereo reception. You can adjust the subwoofer’s level. Press SUBWOOFER LEVEL +/- repeatedly to switch the level “-3”(-6dB), “-2”(-4dB), “-1”(-2dB), “0”(0dB), “+1”(+2dB), “+2”(+4dB), “+3”(+6dB). The default setting is “+1.” Enjoying the music in multiple rooms using the optional sub units When you listen to music from an optional sub unit, you can use the following functions. Selecting the S-AIR mode (PARTY mode / MULTI SOURCE mode) When connecting to multiple sub units, you can listen to different sound sources on each sub unit (MULTI SOURCE mode), or the same sound source on each sub unit (PARTY mode), by selecting the S-AIR mode accordingly. You can change the information in the display. Press S-AIR MODE repeatedly to select “MULTI” or “PARTY.” The selected S-AIR mode appears. While the main unit is on The default setting is underlined. Changing the display Press DISPLAY . Each time you press the button, the display changes as follows: Frequency Clock* * When an optional sub unit is connected to the unit, the sub unit can display the same information except for the clock. While the main unit is off The clock is displayed. You can turn off the clock display to minimize the amount of power consumed (power save mode). Press DISPLAY when the clock is displayed. Press the button again to display the clock. Note When displaying the menu, no information appears in the display. Using the timers The system offers two timer functions. If you use both timers, the Sleep Timer has priority. Sleep Timer You can fall asleep to music. This function works even if the clock is not set. Press SLEEP repeatedly to select the setting time (OFF 90min ...... 30min 20min 10min OFF) Play Timer You can wake up to iPod/iPhone or tuner at a preset time. Make sure you have set the clock. 1 Press VOLUME +/– to adjust the volume. 2 Press CLOCK/TIMER . 3 Press / repeatedly until “PLAY SET” appears, then press ENTER . “ON TIME” appears, and the hour indication flashes. 4 Set the time to start playback. Press / repeatedly to set the hour, then press ENTER . The minute indication flashes. Use the same procedure above to set the minutes. “OFF TIME” appears and the hour indication flashes. 5 Use the same procedure in step 4 to set the time to stop playback. 6 Select the sound source. Press / repeatedly to select “iPod” or “TUNER,” then press ENTER . The display shows the timer settings. lights up. 7 Turn off the system. Press / . The system turns on 15 seconds before the preset time. If the system is on at the preset time, the Play Timer will not function. Do not operate the system from the time the system turns on until playback starts. To check the setting 1 Press CLOCK/TIMER . “SELECT” flashes. 2 Press ENTER . 3 Press / repeatedly until “PLAY SEL” appears, then press ENTER . To cancel the timer Repeat the same procedure above until “OFF” in step 3, and then ENTER . To change the setting Start over from step 1. Notes for the iPod/iPhone user Make sure the iPod/iPhone is not playing when using the Play Timer. The Play Timer may not be activated depending on the status of the connected iPod/iPhone. Tip The Play Timer setting remains as long as the setting is not canceled manually. MULTI SOURCE Select this setting to listen to different sound sources on each sub unit. 1 Make sure the power cord is correctly and firmly connected. 2 Find your problem in the checklist below, and take the indicated corrective action. If the issue persists, contact your nearest Sony dealer. When bringing the product in for repairs, be sure to bring in the entire system (main unit, subwoofer and wireless transceivers). This product is a system product, and the entire system is needed to determine the section requiring repair. If the STANDBY indicator on the main unit (/ indicator on the subwoofer) flashes. Press / on the main unit or the subwoofer to turn it off, then unplug the power cord. After checking that there is no indication on the display, reconnect the power cord and press / to turn on the main unit or the subwoofer. If the issue persists, contact your nearest Sony dealer. PARTY Select this setting to listen to the same sound source on multiple sub units. General Notes Remove any obstacles between the remote and the remote sensor, and position the unit away from fluorescent lights. Point the remote at the remote sensor . Move the remote closer to the unit. When you change the S-AIR mode, the iPod channel is automatically selected for the connected sub units. When connecting the main unit to a sub unit that is not compatible with the MULTI SOURCE mode, set the main unit to the PARTY mode. You can then select the S-AIR channel from the sub unit. When you select the PARTY mode, select the function (iPod or TUNER) by pressing PARTY CH repeatedly. Using sub units when the main unit is off (S-AIR STANDBY mode) You can stream the setting information and music to a sub unit from a unit via S-AIR even when the main unit is turned off. 1 Press SYSTEM MENU . 2 Press / repeatedly until “S-AIR” appears, then press ENTER . 3 Press / repeatedly until “STANDBY” appears, then press ENTER . 4 Press / to select “ON.” When you set S-AIR STANDBY to “ON,” you can listen to music from a sub unit, even if the main unit is turned off. When the main unit is turned on, you can listen to music from the main unit, subwoofer and sub unit. If you set the S-AIR STANDBY to “ON,” “S-AIR” in the display on the main unit is as follows: –Lights up when the sub unit is turned on. –Flashes when the sub unit is turned off. Note The remote does not function. The S-AIR indicator on the main unit does not light up and the S-AIR indicator on the subwoofer flashes. Check that the power cords are connected securely and the main unit and the subwoofer are turned on. Check that the supplied wireless transceivers are inserted securely in the main unit and subwoofer. Connecting the main unit and the subwoofer is not possible. (The S-AIR indicator on the main unit is turned off and/or the S-AIR indicator on the subwoofer flashes.) Check that the supplied wireless transceivers are inserted securely in the main unit and subwoofer. If you use another S-AIR unit, place it more than 8 m away from the main unit. Confirm the S-AIR IDs of the main unit and subwoofer. The main unit is paired with another subwoofer. Pair the main unit with the subwoofer you are using. The main unit is paired with another subwoofer. Cancel pairing. Place the main unit and subwoofer away from other wireless devices. Stop using any other wireless devices. The main unit or the subwoofer is turned off. Make sure the power cord are connected and turn on the main unit and subwoofer. If you set S-AIR STANDBY to “ON,” no sound will be output from the main unit or the subwoofer when the power of the main unit is off. There is no sound from the main unit. Using the coupling operation with the optional sub unit and optional S-AIR remote commander There is no sound from the subwoofer. This system is compatible with the coupling operation. The coupling operation establishes a connection between the optional sub unit and optional S-AIR remote commander. For details, refer to the Operating Instructions of the optional S-AIR remote commander. Turn off the main unit and then turn it on again. Check that the power cord is connected securely and the main unit is turned on. Increase the volume of the main unit. If you use another main unit, place it more than 8 m away from the main unit. Confirm the S-AIR IDs of the main unit and the subwoofer. Check the pairing setting. Place the main unit and subwoofer closer together. Stop using any equipment that generates electromagnetic energy, such as a microwave oven. Place the main unit and subwoofer away from other wireless devices. Stop using any other wireless devices. Change the S-AIR ID settings of the main unit and the subwoofer. Turn off the main unit and the subwoofer and then turn them on again. Check that the power cord is connected securely and the main unit and subwoofer are turned on. Increase the volume of the main unit. Change the RF CHANGE setting on the main unit. The subwoofer does not work effectively for music without lower frequencies. There is no sound from an optional sub unit. For details on the sub unit, refer to the Operating Instructions supplied with the sub unit. There is noise or sound skips. If you use another main unit, place it more than 8 m away from the main unit. Place the main unit and subwoofer closer together. Stop using any equipment that generates electromagnetic energy such as a microwave oven. Place the main unit and subwoofer away from other wireless devices. Stop using any other wireless devices. Change the S-AIR ID settings of the main unit and subwoofer. Change the RF CHANGE setting on the main unit. The S-AIR channel fails to change , when you connect the main unit to an optional sub unit. Check that the main unit and sub unit are connected properly. If you are using a sub unit which is not compatible with the MULTI SOURCE mode, set the main unit to the PARTY mode. iPod/iPhone There is no sound. Make sure the iPod/iPhone is connected securely. Make sure the iPod/iPhone is playing music. Adjust the volume of the main unit. Update your iPod/iPhone to use the latest software. The iPod/iPhone cannot be operated by the main unit. Check that the iPod/iPhone and main unit are connected properly. Depending on the iPod/iPhone model you are using and its status, it may not be possible to operate the iPod/iPhone using the main unit. Update your iPod/iPhone to use the latest software. The sound is distorted. Turn down the volume of the main unit. Set the “EQ” setting of the iPod/iPhone to “Off ” or “Flat.” The iPod/iPhone cannot be charged. Make sure the iPod/iPhone is connected securely. Check that the power cord is connected securely. Tuner Severe hum or noise, or stations cannot be received. (“TUNED” or “ST” flashes on the display.) Connect the antenna properly. Find a location and an orientation that provide good reception, and then set up the antenna again. Keep the antenna away from the power cord to avoid picking up noise. Connect a commercially available external antenna. Turn off nearby electrical equipment. To reset the main unit to factory settings If the main unit still does not operate properly, reset the main unit to factory settings. 1 Disconnect and reconnect the power cord, then turn on the main unit. 2 Press SYSTEM MENU . 3 Press / repeatedly until “SYSTEM” appears, then press ENTER . 4 Press / repeatedly until “RESET” appears, then press ENTER . “RESET OK?” appears. 5 Press ENTER again to confirm the setting. All user-configured settings, such as preset radio stations, timer, and the clock, are deleted. To reset the subwoofer to factory settings If the subwoofer still does not operate properly, reset the subwoofer to factory settings. 1 Disconnect and reconnect the power cord, then turn on the subwoofer. 2 Press PAIRING on the rear panel of the subwoofer and / for 3 seconds on the subwoofer at the same time. The pairing setting you configured is deleted. On placement General On heat buildup Subwoofer (SA-WA10R / Wireless Speaker System) Do not place the unit and subwoofer in an inclined position or in locations that are extremely hot, cold, dusty, dirty, or humid or lacking adequate ventilation. Also, do not place in a location subject to vibration, direct sunlight or bright light. Be careful when placing the unit and the subwoofer on surfaces that have been specially treated (for example, with wax, oil, polish), as staining or discoloration of the surface may result. Heat buildup of the unit and subwoofer during operation is normal and no cause for alarm. Cleaning the cabinet Clean the cabinet with a soft dry cloth. Do not use any type of abrasive pad, scouring powder, or solvent, such as thinner, benzine, or alcohol. Specifications Main unit (ATS-SW10Ti / Wireless Audio Transmitter) AUDIO POWER SPECIFICATIONS POWER OUTPUT AND TOTAL HARMONIC DISTORTION: (The United States model only) With 8 ohm loads, both channels driven, from 200 15,000 Hz; rated 5 watts per channel minimum RMS power, with no more than 10% total harmonic distortion from 200 milliwatts to rated output. Amplifier section DIN power output (rated): 5 + 5 watts (8 ohms at 1 kHz, DIN) Continuous RMS power output (reference): 5 + 5 watts (8 ohms at 1 kHz, 10% THD) Wireless transceiver (EZW-RT10A) Notes on use of the S-AIR product As the S-AIR product transmits sound by radio waves, sound may skip if radio waves are obstructed. This is a characteristic of radio waves and is not a malfunction of the system. As the S-AIR product transmits sound by radio waves, equipment that generates electromagnetic energy, such as a microwave oven, may interfere with sound transmission of the system. As the S-AIR product uses the radio waves that share the same frequency as other wireless systems, such as wireless LAN or Bluetooth devices, interference or poor transmission may result. In this case, take the following steps: Do not install S-AIR products near other wireless systems. Do not use S-AIR products and other wireless systems at the same time. The transmission distance differs depending on the usage environment. Find a location where transmission between the unit and subwoofer is most effective, and install the unit and subwoofer there. iPod/iPhone section Compatible iPod/iPhone models: iPhone iPod nano 1st generation On safety Completely disconnect the power cord from the wall socket if the main unit and subwoofer are not going to be used for an extended period of time. When unplugging them, always grip the plug. Never pull the cord itself. Should any solid object or liquid get into the main unit or a subwoofer, unplug the unit in question, and have it checked by qualified personnel before operating it again. The power cord should only be changed by a qualified service facility. iPod mini iPod nano 2nd generation (aluminum) iPod 4th generation (color display) Speaker system: Woofer, 100 mm, cone type, bass-reflex Rated impedance: 6 ohms General Halogenated flame retardants are not used in the certain printed wiring boards. Speaker system: Full-range, 60 mm, cone type Rated impedance: 8 ohms iPod touch 1st generation Speaker Design and specifications are subject to change without notice. Speaker section iPod nano 3rd generation (video) Communication System: S-AIR Specification version 1.0 Frequency band: 2.4000 GHz 2.4835 GHz Modulation method: DSSS Power requirements: DC 3.3 V, 350 mA Dimensions (w/h/d): 50 × 13 × 60 mm Mass: 24 g Wireless transceiver EZW-RT10A (2) Remote commander (RM-ANU066) (1) R03 (size AAA) batteries (2) FM lead antenna (1) Universal Dock Adapters for iPhone (2) FM stereo, FM superheterodyne tuner Tuning range: 87.5 108MHz (100kHz step) Antenna: FM lead antenna Antenna terminals: 75 ohms unbalanced Intermediate frequency: 10.7 MHz Precautions DIN power output (rated): 40 watts (6 ohms at 60 Hz, DIN) Continuous RMS power output (reference): 50 watts (6 ohms at 60 Hz, 10% THD) Supplies accessories Tuner section iPod nano 4th generation (video) Amplifier section Power requirements: 120V AC, 60Hz Power consumption: 17 watts Dimensions (w/h/d): Approx. 123 × 282 × 375 mm Mass: Approx. 4.3 kg Communication System: S-AIR Specification version 1.0 Frequency band: 2.4000 GHz 2.4835 GHz Modulation method: DSSS Power requirements: DC 3.3 V, 350 mA Dimensions (w/h/d): 50 × 13 × 60 mm Mass: 24 g iPod touch 2nd generation AUDIO POWER SPECIFICATIONS POWER OUTPUT AND TOTAL HARMONIC DISTORTION: (The United States model only) With 6 ohm loads, from 50 120 Hz; rated 50 watts minimum RMS power, with no more than 10% total harmonic distortion. Wireless transceiver (EZW-RT10A) Messages CANCEL : Time out without pairing. COMPLETE : Pairing is completed. PAIRING : Pairing is in progress. TIME NG: The Play Timer start and end times are set to the same time. Power requirements: 120V AC, 60Hz Power consumption: 15 watts Dimensions (w/h/d): Approx. 310 × 121 × 162 mm Mass: Approx. 1.7 kg iPhone 3G iPod classic iPod 5th generation (video) iPod 4th generation