1
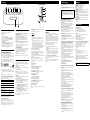
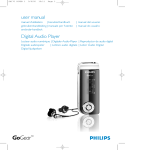
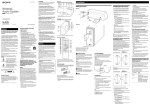
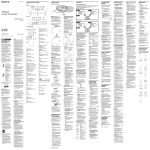
4-117-794-31(1) Features The AIR-SA15R is an “S-AIR” compatible product. It is also called the “S-AIR sub unit.” Connecting this unit with an S-AIR main unit using “S-AIR” technology, you can use each unit in a remote location. For example, you can install this unit in the bedroom, and then install an S-AIR main unit in the living room. You can then listen to the music from the S-AIR main unit located in the living room by controlling this unit. Wireless Speaker System Getting Started Connect the unit and S-AIR main unit to listen to sound from the S-AIR main unit. Precautions Notes on use of the S-AIR product Operating Instructions AIR-SA15R © 2009 Sony Corporation Printed in China WARNING To reduce the risk of fire or electric shock, do not expose this apparatus to rain or moisture. To reduce the risk of fire, do not cover the ventilation opening of the apparatus with newspapers, tablecloths, curtains, etc. Do not place the naked flame sources such as lighted candles on the apparatus. To reduce the risk of fire or electric shock, do not expose this apparatus to dripping or splashing, and do not place objects filled with liquids, such as vases, on the apparatus. As the main plug is used to disconnect the unit from the mains, connect the unit to an easily accessible AC outlet. Should you notice an abnormality in the unit, disconnect the main plug from the AC outlet immediately. The unit is not disconnected from the mains as long as it is connected to the AC outlet, even if the unit itself has been turned off. Do not install the appliance in a confined space, such as a bookcase or built-in cabinet. Do not expose batteries or apparatus with batteryinstalled to excessive heat such as sunshine, fire or the like. The nameplate is located on the bottom exterior. Excessive sound pressure from earphones and headphones can cause hearing loss. Notice for customers: the following information is only applicable to equipment sold in countries applying EU Directives The manufacturer of this product is Sony Corporation, 1-7-1 Konan Minato-ku, Tokyo, 108-0075 Japan. The Authorized Representative for EMC and product safety is Sony Deutschland GmbH, Hedelfinger Strasse 61, 70327 Stuttgart, Germany. For any service or guarantee matters, please refer to the addresses given in separate service or guarantee documents. Disposal of Old Electrical & Electronic Equipment (Applicable in the European Union and other European countries with separate collection systems) This symbol on the product or on its packaging indicates that this product shall not be treated as household waste. Instead it shall be handed over to the applicable collection point for the recycling of electrical and electronic equipment. By ensuring this product is disposed of correctly, you will help prevent potential negative consequences for the environment and human health, which could otherwise be caused by inappropriate waste handling of this product. The recycling of materials will help to conserve natural resources. For more detailed information about recycling of this product, please contact your local Civic Office, your household waste disposal service or the shop where you purchased the product. Applicable accessories: Wireless Transceiver (EZWRT10/EZW-RT10A) Disposal of waste batteries (applicable in the European Union and other European countries with separate collection systems) As the S-AIR product transmits sound by radio waves, sound may skip when radio waves are obstructed. This is a characteristic of radio waves and is not a malfunction. As the S-AIR product transmits sound by radio waves, equipment that generates electromagnetic energy, such as a microwave oven, may interfere with sound transmission. As the S-AIR product uses the radio waves that share the same frequency as other wireless systems, such as wireless LAN or Bluetooth devices, interference or poor transmission may result. In this case, take the following steps: Do not install the S-AIR product near other wireless systems. Do not use the S-AIR product and the other wireless systems at the same time. The transmission distance differs depending on the usage environment. Find a location where transmission between the unit and the S-AIR main unit is most effective, and install the unit and the SAIR main unit there. On safety This symbol on the battery or on the packaging indicates that the battery provided with this product shall not be treated as household waste. On certain batteries this symbol might be used in combination with a chemical symbol. The chemical symbols for mercury (Hg) or lead (Pb) are added if the battery contains more than 0.0005% mercury or 0.004% lead. By ensuring these batteries are disposed of correctly, you will help prevent potentially negative consequences for the environment and human health which could otherwise be caused by inappropriate waste handling of the battery. The recycling of the materials will help to conserve natural resources. In case of products that for safety, performance or data integrity reasons require a permanent connection with an incorporated battery, this battery should be replaced by qualified service staff only. To ensure that the battery will be treated properly, hand over the product at endof-life to the applicable collection point for the recycling of electrical and electronic equipment. For all other batteries, please view the section on how to remove the battery from the product safely. Hand the battery over to the applicable collection point for the recycling of waste batteries. For more detailed information about recycling of this product or battery, please contact your local Civic Office, your household waste disposal service or the shop where you purchased the product. “S-AIR” and its logo are trademarks of Sony Corporation. The Bluetooth word mark and logos are owned by the Bluetooth SIG, Inc. and any use of such marks by Sony Corporation is under license. Other trademarks and trade names are those of their respective owners. Completely disconnect the power cord from the wall socket (mains) if it is not going to be used for an extended period of time. When unplugging the unit, always grip the plug. Never pull the cord itself. Should any solid object or liquid get into the unit, unplug the unit, and have it checked by qualified personnel before operating it again. The power cord can be changed only by a qualified service facility. Wall socket EZW-RT10/EZW-RT10A Wireless transceiver Wireless transceiver Insert the supplied wireless transceiver (EZW-RT10 or EZW-RT10A) securely into the EZW-RT10 slot on the rear panel of the unit. Check the orientation of the mark when inserting the supplied wireless transceiver (EZW-RT10 or EZWRT10A). Failure to do so may result in damage to the unit. Make sure to turn off the unit when inserting or removing the supplied wireless transceiver (EZW-RT10 or EZW-RT10A). Failure to do so may result in damage to the unit. Do not touch the terminals of the supplied wireless transceiver (EZW-RT10 or EZW-RT10A). Do not insert any device other than the supplied wireless transceiver (EZW-RT10 or EZW-RT10A) into the EZW-RT10 slot. S-AIR ID selector Set the same S-AIR ID for this unit and the S-AIR main unit to be connected. For details on setting the S-AIR ID, see “Establishing the connection with an S-AIR main unit.” 2 Set the S-AIR ID of the unit to the same S-AIR ID as Clean the cabinet with a soft dry cloth. Do not use any type of abrasive pad, scouring powder, or solvent, such as thinner, benzine, or alcohol. S-AIR (Sony Audio Interactive Radio frequency) Recent times have seen the rapid spread of DVD media, Digital Broadcasting, and other high-quality media. To ensure that the subtle nuances of these highquality media are transmitted with no deterioration, Sony has developed a technology called “S-AIR” for the radio transmission of digital audio signals with no compression, and has incorporated this technology into the EZW-RT10/EZW-RT10A. This technology transfers digital audio signals with no compression using the 2.4 GHz band range of ISM band (Industrial, Scientific, and Medical band), such as wireless LANs and Bluetooth applications. This unit ID A Pairing ID A ID A S-AIR main unit S-AIR main unit 1 Place the S-AIR main unit to be paired near this main unit to be connected are turned on. On heat buildup Cleaning the cabinet Neighboring system 2 Check that the power of the unit and the S-AIR Establishing the connection with an S-AIR main unit This speaker system is not magnetically shielded, and the picture on nearby TV sets may become magnetically distorted. In this situation, turn off the TV, wait about 15 to 30 minutes, and turn it back on. If there is no improvement, move the unit far away from the TV. Your system unit. Power Connect the power cord to a wall socket. Do not place the unit in an inclined position or in locations that are extremely hot, cold, dusty, dirty, or humid or lacking adequate ventilation, or subject to vibration, direct sunlight or a bright light. Be careful when placing the unit on surfaces that have been specially treated (for example, with wax, oil, polish) as staining or discoloration of the surface may result. On the speaker system The connection is established between the paired unit and S-AIR main unit. Notes On placement Heat buildup on the unit during operation is normal and is not cause for alarm. Do not touch the cabinet if it has been used continuously at a high volume because the cabinet may have become hot. Do not obstruct the ventilation holes. After pairing You can easily establish the connection by setting the same S-AIR ID for this unit and S-AIR main unit. 1 Turn on the unit. 3 Check that the S-AIR ID of the unit is the same as the S-AIR ID of the S-AIR main unit. 4 Operate the S-AIR main unit to turn on the pairing function. For details on turning on the pairing function, refer to the Operating Instructions supplied with the SAIR main unit. 5 Press the PAIRING button on the rear panel of the Press . the S-AIR main unit to be connected. For details on setting the S-AIR ID of the S-AIR main unit, refer to the Operating Instructions supplied with the S-AIR main unit. 3 Operate the S-AIR main unit to turn on the S-AIR function. For details on turning on the S-AIR function, refer to the Operating Instructions supplied with the S-AIR main unit. Once the connection is established, the S-AIR indicator on the unit lights up and “LINKED” appears in the display for about 2 seconds. Identifying the unit with a specific S-AIR main unit (Pairing operation) It is easy to set the same S-AIR ID for the unit and SAIR main unit to establish the connection. However, if a neighbor has an S-AIR main unit with the same S-AIR ID as your S-AIR main unit, you may be able to hear the audio transmitted from your neighbor’s S-AIR main unit on your system. To prevent this, you can identify the unit with a specific S-AIR main unit by performing the pairing operation. unit using a pointed object. When pairing is performed, the S-AIR indicator on the unit flashes and the display changes as follows: “PAIRING” “COMPLETE” To cancel pairing Change the S-AIR IDs of the unit and the S-AIR main unit to different S-AIR IDs. To stop the pairing operation midway Press the PAIRING button again. Inserting the batteries to the remote Slide and remove the battery compartment lid , and insert the two supplied R03 (size AAA) batteries, side first, matching the polarities shown below. Before pairing The connection is established by the S-AIR ID (example). Your system Neighboring system This unit ID A ID A ID A S-AIR main unit S-AIR main unit Notes on using the remote With normal use, the batteries should last for about six months. Do not mix an old battery with a new one or mix different types of batteries. If you do not use the remote for a long period of time, remove the batteries to avoid damage from battery leakage and corrosion. Troubleshooting Operations Unit (AIR-SA15R/Wireless Speaker System) Remote (RM-ANU046) 1 Make sure the power cord is correctly and firmly connected. 2 Find your problem in the checklist below, and take the indicated corrective action. If the issue persists, contact your nearest Sony dealer. When bringing this unit in for repairs, be sure to bring in the entire system (this unit, the S-AIR main unit and wireless transceivers). This product is a system product, and the entire system is needed to determine the location requiring repair. If the STANDBY indicator flashes Immediately unplug the power cord, and check if anything is blocking the ventilation holes on the rear panel of the unit. After the STANDBY indicator stops flashing, reconnect the power cord, and turn on the unit. If the issue persists, contact your nearest Sony dealer. The remote does not function. Setting the clock Changing the display Use buttons on the unit to set the clock. To change the information on the display while the unit is on 1 Turn on the unit. Press . 2 Select the clock set mode. Press CLOCK/TIMER MENU . If the current mode appears on the display, press / repeatedly to select “CLOCK,” and then press CLOCK/TIMER ENTER . 3 Set the time. Listening to the sound of the connected S-AIR main unit You can use the S-AIR function to listen to the sound of an S-AIR main unit in a remote location. 1 Perform the procedure described in “Establishing the connection with an S-AIR main unit” and check that the S-AIR indicator is lit. 2 Press S-AIR CH repeatedly to select the desired S-AIR channel of the S-AIR main unit. When the unit is connected to an S-AIR main unit: Sound from the connected S-AIR main unit is output. However, an alarm sounds in the following cases. When communication with the S-AIR main unit is cut off. When no sound is output from the S-AIR main unit or the audio signal level is too low. When the S-AIR main unit is not ready for playback at the set start time. Note that the alarm continues to sound even if the S-AIR main unit becomes ready after the start time has passed. Information of the connected S-AIR main unit1) Model name of the connected S-AIR main unit2) Clock2) ... “S-AIR” “UNLINKED”2) Clock2) ... The displayed information depends on the connected S-AIR main unit. Up to 16 characters can be displayed. Displayed for about 8 seconds. 1) 2) To turn off the display When the unit is turned off, the clock is displayed. You can turn off the clock display to minimize the amount of power consumed (Power Saving Mode). Press DISPLAY on the unit when the clock is displayed. Press the button again to display the clock. Note The STANDBY indicator on the unit lights up when the unit is off. Using the Timers Sleep Timer: The S-AIR channels that can be selected depend on the S-AIR main unit. For details, refer to the Operating Instructions supplied with the S-AIR main unit. 3 Press VOLUME +/ to adjust the volume. To operate the S-AIR main unit from the unit You can perform the following operations using the buttons on the remote or unit. To Start playback of a CD/DVD, etc. Stop playback of a CD/DVD, etc. Pause playback of a CD/DVD, etc. Select a track, file or chapter of a CD/DVD, etc. Select a preset station when listening to the radio Change the FM/AM band when listening to the radio. Press . /CANCEL . . / . PRESET +/ . Hold down S-AIR CH until the band changes. Depending on the connected S-AIR main unit, the operation may differ. Refer to the Operating Instructions of the S-AIR main unit. To listen with headphones Connect headphones (not supplied) to the (headphones) jack located on the rear panel of the unit. Note The elapsed playing time or remaining playing time of the CD/DVD, etc. being played on the S-AIR main unit may not be displayed on this unit. In this case, “.” appears. ALARM: Press DISPLAY on the unit. Each time you press the button, the display changes as follows: The unit offers two timer functions. If you use the Daily Timer with the Sleep Timer, the Sleep Timer has priority. Use buttons on the unit to set the timers. Wireless strength option. The default setting is underlined. An alarm is output. When the unit is not connected to an S-AIR main unit: Press / repeatedly to set the hour, and then press CLOCK/TIMER ENTER . Use the same procedure to set the minute. The clock settings are lost when you disconnect the power cord or if a power failure occurs. 6 Press / repeatedly to select the desired You can fall asleep to music. This function works even if the clock is not set. Press SLEEP repeatedly. Note Even if you set the timer, no sound is output from the unit if playback on the connected S-AIR main unit ends within the set time period or if communication with the S-AIR main unit is cut off. Daily Timer: You can wake up to the sound of the connected S-AIR main unit at a preset time. Make sure you have set the clock. 1 Press VOLUME +/ repeatedly to adjust the volume level while viewing the volume level indication on the display. 2 Press CLOCK/TIMER MENU . 3 Press / repeatedly to select “TIMER,” then press CLOCK/TIMER ENTER . “ON TIME” appears, and the hour indication flashes. 4 Set the time to start playing. Press / repeatedly to set the hour, and then press CLOCK/TIMER ENTER . The minute indication flashes. Use the procedure above to set the minute. 5 Use the same procedure as in step 4 to set the time to stop playing. AUTO: 7 Press CLOCK/TIMER ENTER . The display shows the timer settings. 8 If you selected “ALARM” in step 6, go to step 9. If you selected “AUTO” in step 6, prepare the sound source on the S-AIR main unit. For details on preparing the sound source, refer to the Operating Instructions supplied with the S-AIR main unit. 9 Press to turn off the unit. The unit turns on about 45 seconds before the preset time. If the unit is on at the preset time, the Daily Timer will not play. To stop the alarm Press any button. To activate or check the timer again 1 Press CLOCK/TIMER MENU . “SELECT” flashes in the display. 2 Press CLOCK/TIMER ENTER . 3 Press / repeatedly to select “TIMER.” 4 Press CLOCK/TIMER ENTER . To cancel the timer 1 Press CLOCK/TIMER MENU . “SELECT” flashes in the display. 2 Press CLOCK/TIMER ENTER . 3 Press / repeatedly to select “OFF.” 4 Press CLOCK/TIMER ENTER . To change the setting Start over from step 1. Tip The Daily Timer setting remains as long as the setting is not canceled manually. Turning off the remote control function In addition to the unit you already have, you can connect other S-AIR sub units to a single S-AIR main unit and use them together. However, when using multiple S-AIR sub units near each other, all the S-AIR sub units may receive the same signal from the remote and the connected S-AIR main unit may not function properly. To prevent this, you can turn off the remote control function of the S-AIR sub units. Use buttons on the S-AIR sub unit whose remote control function you want to turn off. 1 Press to turn off the unit. 2 Press DISPLAY repeatedly until the clock is displayed. 3 Press while holding down CLOCK TIMER/ ENTER . “RMT OFF” appears in the display and the unit is turned on. If you try controlling the unit using the remote, “RMT OFF” appears in the display and the unit will not accept the signal from the remote. To turn on the remote control function Perform steps 1 and 3 above and check that “RMT ON” appears in the display. Note Even when the remote control function is turned off, and VOLUME +/ on the remote will continue to function. Remove any obstacles between the remote and the remote sensor on the unit, and position the unit away from fluorescent lights. Point the remote at the remote sensor on the unit. Move the remote closer to the unit. The remote control function is off. Turn on the remote control function. The S-AIR indicator is turned off. Check that the power cord is connected securely and the unit is turned on. Check that the supplied wireless transceiver is inserted securely to the unit. Connecting the unit and S-AIR main unit is not possible. (The S-AIR indicator flashes.) Check that the supplied wireless transceiver is inserted securely to the unit. If you use another S-AIR main unit, place it more than 8 m away from the S-AIR main unit you are using. Confirm the S-AIR IDs of the unit and the S-AIR main unit. The unit is paired with another S-AIR main unit. Pair the unit with the S-AIR main unit you are using. The unit is paired with another S-AIR main unit. Cancel pairing. Place so that the unit and the S-AIR main unit are separated from other wireless devices. Stop using any other wireless devices. The connected S-AIR main unit is turned off. Make sure the power cord is connected and turn on the SAIR main unit. The S-AIR channel fails to change. Check that the unit and the S-AIR main unit are connected properly. There is no sound. If you use another S-AIR main unit, place it more than 8 m away from the S-AIR main unit you are using. Confirm the S-AIR IDs of the unit and the S-AIR main unit. Check the pairing setting. Place so that the unit and the S-AIR main unit are closer. Stop using any equipment that generates electromagnetic energy such as a microwave oven. Place so that the unit and the S-AIR main unit are separated from other wireless devices. Stop using any other wireless devices. Change the S-AIR ID settings of the unit and the SAIR main unit. Turn off the unit and S-AIR main unit and then turn them on again. Check that the power cord is connected securely and the unit is turned on. Increase the volume of the unit. Check that headphones are not connected to the (headphones) jack on the rear panel of the unit. There is noise or the sound skips. If you use another S-AIR main unit, place it more than 8 m away from the S-AIR main unit you are using. Place so that the unit and the S-AIR main unit are closer. Stop using any equipment that generates electromagnetic energy such as a microwave oven. Place so that the unit and the S-AIR main unit are separated from other wireless devices. Stop using any other wireless devices. Change the S-AIR ID settings of the unit and the SAIR main unit. Do not place a mobile phone near the unit and the S-AIR main unit, as this may result in noise. To reset the unit to factory settings If the unit still does not operate properly, reset the unit to factory settings. 1 Disconnect and reconnect the power cord, and then turn on the unit. 2 Press /CANCEL , DISPLAY and on the unit at the same time. All user-configured settings, such as timer, clock, etc. are deleted. Messages CANCEL : Time out without pairing. COMPLETE : Pairing is completed. ID A : Sets the S-AIR ID to “A.” ID B : Sets the S-AIR ID to “B.” ID C : Sets the S-AIR ID to “C.” LINKED : The unit is connected to the S-AIR main unit. PAIRING : Pairing is in progress. RMT OFF : The unit is not accepting signals from the remote because the remote control function is set to “RMT OFF.” S-AIR : Displayed from the point power of the unit is turned on until connection with the S-AIR main unit is established. TIME NG : The Daily Timer start and end times are set to the same time. UNLINKED: The connection with the S-AIR main unit is cut off. Specifications Amplifier section DIN power output (rated): 3 + 3 watts (3 ohms at 1 kHz, DIN) Continuous RMS power output (reference): 4 + 4 watts (3 ohms at 1 kHz, 10% THD) Output (stereo mini jack): Accepts headphones with an impedance of 8 ohms or more Speaker section Speaker system: Full range, bass-reflex type Speaker units: 65 mm, cone type (2) Nominal impedance: 3 ohms Wireless transceiver (EZW-RT10/EZW-RT10A) Communication System: S-AIR Specification version 1.0 Frequency band: 2.4000 GHz 2.4835 GHz Modulation method: DSSS Power requirements: DC 3.3 V, 350 mA Dimensions (w/h/d): 50 × 13 × 60 mm Mass: 24 g General Power requirements: 230 V AC, 50/60 Hz Power consumption: 15 watts Dimensions (w/h/d): Approx. 300 × 136 × 115 mm Mass: Approx. 2.2 kg Supplied accessories: Wireless transceiver (EZW-RT10 or EZW-RT10A) (1)/Remote commander (RM-ANU046) (1)/R03 (size AAA) batteries (2) Design and specifications are subject to change without notice. Halogenated flame retardants are not used in the certain printed wiring boards.