1
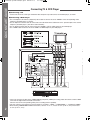
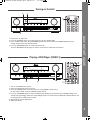
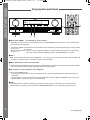
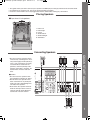
RD-6504(AG)-Quick:RD-6504(AG)-Quick 2009-02-12 오
9:11 페이지 2
• This guide shows you how to connect your speakers and DVD player and enjoy multi-channel surround sound.
• For full details on using this unit, refer to the main operating instructions.
• Please be certain that this unit is unplugged from the AC outlet before making any connections.
Placing Speakers
■ If you have 5.1 ch speakers
1. Front Left
2. Front Right
3. Center
4. Surround Left
5. Surround Right
6. Subwoofer
Connecting Speakers
■ Caution
• Be sure to use the speakers with
the impedance of 6 ohms or above.
• Do not let the bare speaker wires
touch each other or any metal part
of this unit. This could damage this
unit and/or the speakers.
• Never touch the speaker terminals
while the AC input cord is connected to the wall AC outlet. Doing so
could result in electric shocks.
QUICK START GUIDE
• Be sure to connect speakers firmly
and correctly according to the channel (left and right) and the polarity (+
and -). If the connections are faulty,
no sound will be heard from the
speakers, and if the polarity of the
speaker connection is incorrect, the
sound will be unnatural and lack
bass.
1
QUICK START GUIDE
RD-6504(AG)-Quick:RD-6504(AG)-Quick 2009-02-12 오
2
9:11 페이지 3
Connecting TV & DVD Player
■ Connecting a TV
• Connect the TV to the same type of Monitor video output that you did connect to the DVD player, as shown.
■ Connecting a DVD Player
• Use a Component, S-video or (composite) video cable to connect this unit's VIDEO 2 to the corresponding video
output on your DVD player, as shown.
• Use an Optical or Coaxial cable to connect this unit's OPTICAL IN or COAX IN 2 to the optical output or the coaxial
output on your DVD player. (You don't need to do both.)
• Use an Audio (analog) cable to connect this unit's VIDEO 2 (L/R) to audio output on your DVD player.
• Use a HDMI cable to connect this unit's HDMI 2 to HDMI output on your DVD player.
• There are two types of video jacks (COMPONENT,(composite) VIDEO) for analog video connections and the HDMI
connector for digital video and audio connections.
Connect them to the corresponding video jacks according to their capability.
• For your reference, the exellence in picture quality is as follows : "HDMI" > "COMPONENT" > "(composite) VIDEO".
• When making COMPONENT VIDEO connections, connect "Y" to "Y", "PB/CB" to "CB" (or "B-Y", "PB") and "PR/CR"
to "CR" (or "R-Y", "PR").
RD-6504(AG)-Quick:RD-6504(AG)-Quick 2009-02-12 오
9:11 페이지 4
Turning on the Unit
Playing a DVD Player (VIDEO 2)
6
QUICK START GUIDE
1. Connect the AC input cord.
2. Press the [POWER] switch on the front panel to enter the standby mode.
3. In the standby mode, press the [ON/STANDBY] button on the front panel or [POWER ON] button on the
remote control to enter the operating mode.
4. Press the [SPEAKER] button to switch the speakers on.
Then the SPEAKER indicator lights up and the sound can be heard from the speakers.
6
1. Turn on your DVD player and TV.
2. Select the appropriate input on your TV.
3. Press the [VIDEO] button on the front panel to select [VIDEO 2] input source.
On the remote control, press the [VIDEO 2] button directly.
4. Press the [D/A MODE] button to select the digital input ([o(optical)], [c2(coaxial 2)] or [H(HDMI audio)]) or the
analog input ([A(analog)]). When the selected digital input is not connected, the [DIGITAL] indicator flickers and
the analog input is automatically selected.
5. Start playback on your DVD player.
6. Adjust the volume.
3
QUICK START GUIDE
RD-6504(AG)-Quick:RD-6504(AG)-Quick 2009-02-12 오
9:11 페이지 1
Enjoying Surround Sound
■ When CD or VIDEO 1 ~ 2 is selected as an input source
1. Depending on how to select a surround mode, press the [SURROUND] button to select the auto surround mode
or the manual surround mode.
Auto Surround Mode : The optimum surround mode will be automatically selected depending on the signal format
([AUTO]) lights up)
being input.
Manual Surround Mode : You can select the desired of different surround modes selectable for the signal being
([AUTO]) goes off)
input with using the [MULTI CONTROL] knob or the [SURROUND </>] buttons.
■ Note :
• When the input source other than CD and VIDEO 1 ~ 2 is selected, you cannot select the auto surround mode and
can select the surround mode as desired (the manual surround mode).
■ When selecting the manual surround mode.
2. Rotate the [MULTI CONTROL] knob or press the [SURROUND </>] buttons to select the desired surround mode.
• Then the surround mode changes depending on the input signal format.
■ To cancel the surround mode for stereo operation.
3. Press the [STEREO] button.
• Then either the stereo mode or the 2 CH downmix mode is selected depending on the signal format which is
being input.
• To cancel either the stereo mode or the 2 CH downmix mode, rotate the [MULTI CONTROL] knob or press the
[SURROUND </>] buttons to select the surround mode.
■ Note :
• You should adjust the speaker settings for the optimum sound acoustics according to your environment and
speaker layout. (For details, refer to "SETTING THE SPEAKER SETUP" on the main operating instructions.)
4
5227-00000-086-0S