1
OWNER'S
Kenmore
how
as well
L
Automatic
MANUAL
Air Conditioner
Read
this bookt
It will tell you
to use and care for your air conditioner
as
how
to get
the
most
efficient
cooling.
.....
l
Mode|Number
[
I
SeriatNumbe'l
l
P/N93SR-D02
l
Table
of Contents
10
I
12
13"15
16
16
i
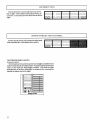
CAUTIONS
There
are
only
a few
cautions,
t If you turn your air conditioner
off; wait at least 3
minutes
before
turning
it back on to avoid possible
blown
fuses,
2. Do not run air conditioner
tive cover in place, to avoid
within the air conditioner.
3. Do not use air conditioner
liquids, such as gasoline.
with outside
protecmechanical
damage
near
flammable
4o When
handling
air conditioner,
be careful to
avoid cuts from sharp
metal fins on front and tear
coiis.
but
they
are
quite
important.
6, If you plan to install the air conditioner
yourself
at any time, see the Installation
Instructions
and Electrical
Requirernents.
sure to read local codes.
7_ Do not try to use this
air conditioner
on direct
current
(DC). Make sure
the outlet ls wired
to 60Hertz alternating
current
ofvoltagecalled
for in the
Electrical
Requirements
in "Things
You Ought
to
Know."
8. Use only time-delay
ors of the size shown
ments
Shoot.
5. Do not alter or changethe
plug on the power
changes
would
make
it unsafe,
could
cause
serious
damage
to
the air conditioner,
and
may void the
warranPy_
2
Be
fuses
or circuit breakin the Electrical
Require
cord.
9. DO not use an extension
cord plug adapter.
cord
or power
!
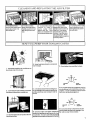
IMPORTANT
MAN(
INSTALLATION
_At. VERTIC_.[\i'F.R
1
INSTRUCTIONS
AD,I! LqTMF.NT
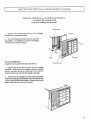
Complete this adjustment
before installing front panel
Verlical Louver
1. Adjust
the vertical
louvers
position
by using the handle,
to the
2., The control
panel and knobs
separately.
To install them, refer
"Front to Unit" in this manual.
are packed
to installing
straight
Unit Cover
Screw
Fronl
Handle
Front
install
Panel
InstalLation
the front
panel
with filter as follows:
Horizonta{ Louver
1. Adjust
the horizontal
louvers
to the straight
position.
Hold the front straight
until the vertical
louver
handle
lines
up between
the bottom
horizontal
louver and the discharge
opening.
2o Press the front stralght
onto the cabinet
until the
holes in the flangeofthe
plasticfront
lineupwlth
the
screw
holes in the metal cabinet.
Fasten
the front in
place with the two screws
provided°
3
i
i,lll,ll,llllllllll
i i i lll i i
Step
i i
1"
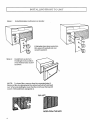
INSTALLING
i
lnstaU
dial plate
and
buttons
FRONT
TO
UNIT
or knobs:
\
If dial plate has clear
film, peel off carefully
scratch
surface),
Step
2:
protective
(do not
Install front as shown:
Holding
front in position
over shell as each screw
is driven,
NOTE:
To clean filter, remove
front by reversing
step 2.
Remove
filtei by grasping
at the sides,
push down
and pull
out, When reinstalling
be sure that the notch is at the top left
cornel
Reinstall
front using step 2,
TOP LEFT
FILTER FROM THE BACK
4
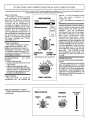
STARTING
First make
sure
AND
the 'FAN CONTROL'
match
sets
FILTER
MONITOR
(on
some
models)
To Check
Filter Monitor:
1o Set fancontrolinCONSTANT
FAN
'HI" position.
2. If filter needs
cleaning,
a RED
INDICATOR
will appear
in the filter
monitor
wtndow.,
A dean
ftlterwlll
help reduce
operating
costs
and
increase
cooling
efficiency,
(A) turns
(B) adjusts
Side Air Dial Plate Controls
Follow the directions
above
control
use,,
NEW
AIR
VENT CONTROL
OPEN
CLOSE
MED.
the
degree
of room
coolness.
The
higher
the number
the cooler
the
temperature.
Numbers'
1" through
"4" will help conserve
energy_
For
maximum
cooling
turn the indicator
to the highest
number_
...................
,,,,,,,,,,,i;
FAN CONTROL
This
one
knob
conditioner
off.,
YOUR
Is set on 'OFF' and then plug the air conditioner
the type shown in the Electrical
Requirements
VENT CONTROL
The 'VENT
CONTROL,"
on your
new
Kenmore
Air
Conditioner
operates
two
different
functions.
when
the
arrow
points
toward
"CLOSE,"
the
air conditioner
is
working
its regular
operation
of
moving
and cooling
room
air° when
the arrow
is turned
toward
the word
•OPEN,"
the
air
conditioner
is
removing
stale air from the room° Air
exhaust
canbe
increased
by moving
the air louvers
to a more
closed
position.
To use these
functions
with
the
least
cooling,
set
'TEMP.
CONTROL"
to • 1 _"
'TEMP_ CONTROL"
The 'TEMP.
CONTROL'
USING
air
fan
for
MED.
LO
LO
CONSTANT
POWER
FAN
SAVER
FAN
]
CONDITIONER
ln_ The power
.Sheet.
cord
(C) sets
FAN
(on
some
CONSTANT
FAN.
OFF- The entire
receplacle
musl
POWER
SAVER
models)
or
air conditioner
is
off.
POWER
SAVER
FAN FEATURE(On
some
models)
is indicated
by gold
lettering
on the =HI," 'MED" and "LO"
The
air
conditioner
(compressor
fan) will not run unless
the "TEMP, CONTROL,"
is set colder
than
room
temperature°
(See
temperature
instructions).
When
control
is set colder
lhan the room
temperature,
the air conditioner
will
begin
to circtzlate
the air in the room_
Coolingwill
begin in about 3 minutes.
The air conditioner
turns
off when
the room
gets
cool.
'HI" is for fast
cool, 'MED" for normal,
and "L,O" for
quiet
cool.
The 'POWER
SAVER
FAN' settings
can save energy.
The
fan wlU turn on only when
the fan is
cooling
BEFORE RESTARTING,WAft THREE M_NUTES
CONSTANT
FAN
Hi- Low and on some
speed.
The air conditioner
1
8
models
Med.
fan runs
all the
time, circulating
room
air.
Cooling
starts only if the air is warm and stops
If It gets
cool
(See
temperature
instructions)°
This setting
gives
the
most
even room
temperatures.
'HI'
iS for fast cool, "MED" for normal
cool
- 'LO' for quiet cool,
TEMP. CONTROL
Kenrnore
=_,o_m_'r_,_
W,I_ TNItg mk"u't_
CONSTANT
FAN
POWER
SAVERFAN
OFF
HI
MEDo
LO
VENTCONTROL
CLOSED
TEMP.CONTROL
4
HI
MEDo
LO
OPEN
5
[
AIR
DIRECTION
i
ii
i lllll
i ii
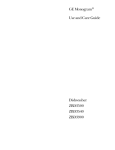
The air direction
can be adjusted
up, down,
left ol right The outside
tabs adjust the air up
or down,
The center
levers
direct the air left or
g.-'N,_N
right.
Lm) _,,,,,-/
SUPER
THRUST
AIR CONTROL
For' the most thrust, fully close the right bank
(with outside
tabL Set desired
fan speed.
Air Directional
Louvers
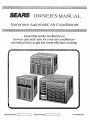
6-way Louvers
The 6-waylouvers
permit upward
or straight
out air flow and
air flow direction
from sidetoside,
Thls type of louver Is found
only on the side
air discharge
models,
The side
to side
adjustment
of air flow direction
Is achieved
by moving
the
handle
to either the left or right
.....
• .....
114::,_,:i
u, ,,,,,
r
...............
--,:7::,i:, _----
........
6-Way Louver
6
ZZZZTZI7
1
CLEANING
I. To remove front,
remove one screw from
each slde of unlt, Pull
front off of unit
AND
2., To remove
REPLACING
filter.
grasp
each slde at the
middle,
push down on
filter and pull out until
free,
THE
3. To dean
filter, simply
vacuum
or
wash
In
warm,
sudsy
water.
Rinse
and
dry
New
filters are available
from
yournearestSears
store,
AIR
FILTER
lop until It stops.
When
Installed,
filter remains
bowed
postllon_
,HOW
TO
LOWER
YOUR
5.. To replace front, hold
front In position on untt
and replace one screw
on each side
To replace
filter,
grasp
each side at the
middle,
Insert bottom
of
filter first, Push down
and flex filter out at the
middle,,
Push filter in at
COOLING
in
COSTS
\
\
4_ Keep heat Inlets dosed so cooled air
won't escape.
l, Ifposslble
Install the air conditioner
the shady slde of the house,
7, Check
often to be sure filter Is dean
on
OFF
Ht_HI
CONSTANT
FAN
S.
2. Close drapes and shades on all other
windows to keep direct stmllght out
A vent fan In areaswhero
dry or bathing
out the extra
source.
cookJng,
laun,
ts done can be used to pull
heat and moisture
near Its
POWER
SAVER FAN
8. Ifyoffll be away for a long time, turn the
air conditioner FAN CONTROL, to the'OFF'
posttlon_ The air conditioner will not come
on If room temperature gets hot,
OFF
FAN
9_
3. See that draperies
block the air flow.
or fiJmtture do not
6, Check to make sure lights, television.,
radios, and appliances aretumed offwher
not needed. Try not to use heat-producing
appllancesduringthehottestpart
oftheday.
If you'll
SAVER FAN
be away
a short
i gold POWER
SAVER
fan will run only when
tlme
use
FAN settings,
needed,
the
The
7
I
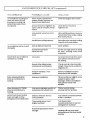
AVOID
SERVICE
CHECKLIST
,
Before
calling
common
problems
for service,
review
this list. It may
that are not the result of defective
POSSIBLE
OCCURRENCE
Air conditioner
will not
save you both
workmanship
CAUSE
time and expense,
This list includes
or materials
in this appliance.
SOLUTION
Wall plug disconnected.
Push
plug firmly
into wall outlet.
operate.
House
fuse
breaker
Air from
cold
unit does
enough
not feel
on Cool
setting
blown
Adjust
number
number
Selector
in FAN
Turn switch
clockwise
COOL position.
too warm
Turn
switch
position.
Thermostat
below
70°F
thermostat
colder
setting
(higher
Outdoor
temperature
70OF (20oc).
TO defrost
thermostat
position_
below
restricted,
clean
set too cold
_cooling.
Dirty air filter-air
to
for
numberL
restricted.
so it does
filter'.
Clean
the coil, set
to a normal
"_
air filter.
Refer
Cleaning"
to "Care
section.
Thermostat
set
(lower number).
too warm
Turn thermostat
clockwise
colder
temperature,
Selector
COOL.
set on LOW
Turn
switch
position
cooling.
(some
models)
position.
Air directional
louvers
tioned
Improperly.
posi-
Turn
not
the coil,, set
to a warmer
To defrost
thermostat
position.
and
switch
to
Cooling
may not occur until
temperature
at thermostat
rises above
70°F (20°CL
temperature
(20°CL
Dirty air filter-air
higher
lower
clockwise
Straighten
tube
touch coil,
Vent control
set at OPEN
8
thermostat
to
for
cooling,
for heating.
"temperature
sensing
tube
touching
cold coil, located
behind
air filter (some
rnodels
onlyL
Thermostat
_night-time
Air conditioner
cooling
but
room too warm-NO
ice
forming
on cooting
coil
behind
decorative
front,
Replace
fuse with time delay
type or reset circuit breaker.
Thermostat
set too warm
for
cooling
or too cool for heating.
Thermostat
set
(lower numberL
Air conditioner
cooling,
but room is too warmice forming
on cooling
coil behind
decorative
front.
or circuit
tripped°
to HIGH COOL
for maximum
control
position
cooling
to
to CLOSED
for maximum
Position
louvers
distribution.
for better
air
AVOID
SERVICE
CHECKLIST
{
(continued)
_JJ
OCCURRENCE
POSSIBLE
Air conditioner
cooling
but
room too warrn-NO
ice
forming
on cooling
coil
behind
decorative
front.
(continued)
Front of unit is blocked
by
drapes,
blinds, furniture,
etc,
Restricts
air distribution_
Clear
Doors, windows,
registers,
etco
open -cold air escapes;
hot air
enters.
Close doors,
windows,
registers,
etc
Unit recently
room.
Allow
Insufficient
Air conditioner
turns
on and
CAUSE
turned
SOLUTION
on in hot
blockage
in front
additionaltime
to remove
"stored
heat" from walls,
floor and furniture.
cooling
Dirty air filter-air
capacity.
of unit.
ceiling,
Reconfirm
the required
cooling
capacity
with your dealer.
clean air filter,
restricted°
off rapidly
Noise when
air conditioner
operates
on cooling,
Outside
temperature
extremely
hot.
Set fan on high speed
to bring
air past
cooling
coils
more
frequently,
Air sound.
Air sound
is normal.
turn selector
switch
If too loud,
to lower
fan setting.
Sound
of fan hitting watermoisture
removal
system.
This is normal
is high. Close
registers,
etc
Window
vibrationo
installation.
Refer to installation
instructions.check
with installer.
Water dripping
INSIDE
when
air conditioner
is
cooling
Improper
Water
when
Unit removing
moisture
from
dripping
OUTSIDE
air conditioner
is
Poor
installation,
when
doors,
Tilt air conditioner
outside
to allow
dralnage,
Refer
instructions-check
installer.
large quantity
humid room.
of
humidity
windows,
slightly to the
water
to installation
with
is normal during
excessively
humid days.
This
cooling,
Air from
warm
setting
unit does
enough
(some
not feel
on Heat
models
only),
Selector
COOL
switch
in FAN or
position.
Thermostat
set too cool
(higher
number).
Turn switch counterclockwise
to HEAT position.
Turn thermostat
counterclockwise
setting
Room
temperature
enough,
(lower
to warmer
numberL
Is warm
Heating
willnot occur until
temperature
at the thermostat
Is lower,
9
AVOID
OCCURRENCE
Air conditioner
room too cool
only).
SERVICE
CHECKLIST
POSSIBLECAUSE
heaiing
but
(some models
Dirty air filter-air
(continued)
SOLUTION
restricted.
Thermostat
set too cool
(hlgher
number)_
clean
air filter.
Turn thermostat
counterclockwise
setting
(lower
to warmer
number).
Exhaust
vent control
set at
OPEN/EXHAUST
position;
Set control
to CLOSED
for maximum
heating
Air directional
Position
louvers
distribution_
positioned
louvers
improperly_
Clear
Doors,
windows,
registers,
etco open-hot
air escapes;
cold air enters.
Close doors,
windows,
registers,
etc,.
Unit recently
cool room.
Allow
walls,
turned
on in
blockage
position
for' better
Front of unit is blocked
by
drapes,
blinds,
furniture,
etc.restricts
air distribution.
Insufficient
heating
capacity
for area to be heated.
10
1
in front
air
of unit.
additional
time to heat
ceiling, floor and furniture.
Reconfirm
the required
heating
capacity
with your dealer°
R OUT!NE
CLEANING
.'-_.W;,,'UAL, MA[NTENA!_.;CE
THE
CABINET
FRONT
TO _N SURE
,
Removeffont.
washwith
warm, mild sudsywater
Rinse and dry with a soft cloth. Never use solvents,
cleaning
fluids,
abrasive
cleaners
or strong
detergents.
1fthepackagetapeleaves
gum, remove
with cloth dipped
in rubbing
alcohol
REPAIRING
PAINT
DAMAGE
6
Inspect
weather
exposed
mounting
hardware
[if used],
year, especially
in areas
near
is a problem°
If needed,
touch
of exterior
paint.
parts
(cabinet
shell,
etco) once or twice a
oceans
or where
rust
up with a good grade
CLEANING
THE
CONDITIONER
OF YOUR
INSIDE
AIR
DANGER-SHOCK
OR INJURY HAZARD
-before
performing
any service
unplug
power
cord from
outlet,
CAUTION:
No liquid should
get into the motor,
electrical
control
box
or compressor
electrical
termlnals_
To clean the inside of your air conditioner:
A) Remove
front panel.
B) With help and using proper
lifting methods
to avoid personal
injury, remove
chassis
from cabinet
shell.*
*When movingtheaircondltionerffomcabinetshell
or window
there may be water inside
may spill on the floor_
2.
Be careful to avoid cuts
the front and rear coils.
.,
4_
from sharp
After cleaning,
remove
plastic
protection.
Wait
24 hours before
starting
the unit again
This
allows
time for all areas
to dry out
NOTE:
Water from rainfall or from normal
use
does
not harm these
components
since the
water is not as forcefully
driven into parts as a
stream
of water from a garden
hose_
While the cabinet
is removed,
this is a good
to oil the fan motor (see instructions
below)
After servicing,
reverse
the above
to reinstall
the air conditioner.
metal
procedure
l. To oil fan motor:
A) Remove
front panel.
B) Slide chassis
partway
out of the cabinet
shell to expose
fan motor oil plugs ( be
careful not to slide chassis
out to far)° If your
conditioner
is not equipped
with a slide-out
chassis,
remove
the cabinet.
air
Oil the fan motor per instructions
on the
motor_ To add oil, pull out the oil plug at each
end of the motor.
An easy to use one-ounce
capsule
ofoiI (Part Number
10943)
is
available
through
your nearest
Sears
Service
Center.
Replace
oil hole plugs after oiling°
After servicing,
reverse
the above
reinstall the air conditioner.
the base
time
OILING
OF THE
FAN
MOTOR
DANGER
- SHOCK
OR INJURY HAZARDbefore performingany
service
unplugthepower
cord from the outlet
,
HANDLE
NOTE: lfyour air conditioner
has a chassis
handle,
it is NOT Intended
for lifting the unit. It is for
sliding
the chassis
WITHIN
the cabinet
shell only
(to aid in cleaning
maintenance,
etc.).
1
LO N G L.I FE
procedure
to
that
fins on
Liquid should
not get into electrical
parts; wrap
the fan motor, electrical
control box and electrical
terminals
in plastic. This will keep water or other
liquid from gettinginsidewhereitcould
damage
the inst_ation
and cause
serious
trouble.
Clean
and
hose
out the base,
coils,
and
water
pans. Clean at least once a year or more often, If
the coils and pans collect dirt, sand, leaves,
algae
or insects.
Also clean if you detect
an odor from
the air conditioner.
11
I
H EA VY-D
L;'T"_ C O _',"E R
If you decide
to leave your air conditioner
installed
over' the winter months,
a Sears
Heavy Duty Cover
will help protect
your unit and reduce
drafts,
The cover protects
against
cold drafts through
your air
conditioner's
air passages
and will protect
your ai_ conditioner
cabinet
against:,
Snow ,.Rain- Sleet.Rust. Dust,
The Sears
Heavy-Duty
Cover is easy to install. It is equipped
with cords
to hold securely
throughout
winter months_
It is made
of vinyl coated,
durable
fabric, 'The cover is water prool_ tear resistant
and
lightweight
for easy
storage,
it is easily
cleaned
with soap
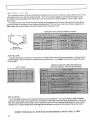
WINDOW
and
watei.
AIR CONDITIONER
COVERS
Measure Your
Air Conditioner Cabinet
AIR FILTER
A good clean
cleaned
lightly
once
filter is important
for the most cooling
with lowest
energy
with a vacuum
or washed
in soap and water,
We suggest
consumption,
Filtels
that they be replaced
can be
about
a year,
RIGID FRAME
FILTERS
FOR SEARS
DELUXE
MODEL
AIR CONDrIIONERS
CUT TO FIT
KIT PARTS
Parts
Installation
Kits are
not included
with your
air conditioner.
'They
have
been
made
available
only as an aid to help you install the air conditioner
where
special
needs
may require
them.
Kits available (not applicable
to all models)
are an Outside
Suppoft
Kit, an Outside
Silt Bracket
Kit, and a Wide
Window
Kit_ Further
details
and ordering
instructions
are contained
in the Repair
Parts List sheet,
KEEP
12
THIS
MANUAL
FOR
READY
REFERENCE
NOW
AND
LATER.
NOTES
13
NOTES
14
NOTES
15
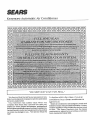
Kenmore
Automatic
"WE
Air Conditioner
SERVICE
WHAT
WE
1
SELL"
I,
to you
TO further
that you can depend
on Sears
for service,
and sears
sere'ice
is nationwide_
Your
Kenmore
has
added
value
when
you
consider
that Sears
has a service
unit near
you,
"We Service
What
We Sell _'is our assulance
conditioner,
staffed
by Sears
trained
technicians_professional
technicians
specifically
trained on Sears Appliances,
having
the parts, tools, and equipment
to ensure
that
we meet
our pledge
to you_.o _We Service
What We
Sell."
add
to the
buy
value
a Sears
of your
air
maintenance
agreement,
sears
air conditioners
are designed,
tested
for years of dependable
operation.
modern
appliance
may require
service
to time.
The Sears
Warranty
plus
maintenance
agreement
provides
from unexpected
repair bills_
made
and
Yet any
from time
the Sears
protection