1
OWNER'S MANUAL
SEA/RS
SEWING
MODI
MACHINE
SEARS,
ROEBUCK
AND CO,
Dear Customer:
You
have just
invested
in a very fine
please pause for a moment
and care for your
Specific
obtain
are given
best sewing
results
on threading,
and avoid
machine.
and care of your
Please remember,
have questions
if you
number
and serial number
tension
Before
which
machine
about
using your
contains
new Kenmore
instructions
when you
in space
number
of
this
provided
appliance.
are located on the
this booklet.
machine,
on how to operate
No. 385.
Retain
these numbers
THIS MODEL
available
machine
etc. This wiff
at your
or need parts
beyond
nearest
below
the
The model
model
number
number
Sears Retail
and serial
and seria! number
plate,
as identified
Serial
No.
on Page 3 of
reference.
NEEDLE,
hetp you
our control.
and service, always
Sewing Machine
for future
IS A CENTER
_salways
oiling,
for conditions
inquire.
nomenclature
Model
cleaning,
servtce expense
your
Kenmore
Record
adiustments,
unnecessary
AdvEce on the operation
the model
sewing
read th_s booklet
machine.
mstructions
the
zigzag
and carefully
LOW BAR SEWING MACHINE.
Store.
mention
TABLE
SECTION
KNOW YOUR MACHINE
1.
Darning
Straight
A Portable Case or Cabinet is Available ..............
Locate and Identify the Parts ..................
Identify the Accessories ........................
SECTION
2.
PREPARE
YOUR
MACHINE
FOR
............................
Stretch
..........................
25
25
2
2_3
3
Zigzag Stitches ..........................
• Basic Zigzag ............................
, Satin Stitch .........................
a Applique
..............................
• Bar Tacking .............................
° Sew a Button
...........................
26_30
26
27
28
28
29
4_6
o Overcasting
Stitch .......................
•
Rick-R ack Stretch
........................
• Three-Step
Zigzag ........................
• Overcasting
Stretch Stitching
.................
• Serging or Pine Leaf Stretch Stitching
............
Blind Hemming
............................
Lace Work ............................
Buttonholes
.........................
30
30
31
32
32
33
34
35_36
Sew in a Zipper
.........................
Shell Stitching
...........................
Smocking
............................
Elastic Stretch Stitch ......................
37_38
39
39
40
SEWING
Set Up the Machine ......................
• Plug in the Machme and Switch on the Power
•
Foot Control
Use ........................
.......
Setting Spool Pins .........................
Adjust the Presser Foot Lever ..................
Free Arm Sewing:
the Removable
Extension
Table
........................
Know What the Presser Feet Will Do
............
Choose Your Needle and Thread
..............
• Check Your Needle ......................
4
4
5
5
•
o
Fabric, Needle, Thread and Stitch Length Chart
• To Change Your Needle .....................
Prepare the Bobbin
.......................
, To Remove the Bobbin Case from the Machine
• Wind the Bobbin
.....................
•
Insert the Bobbin into the Bobbin Case ..........
Prepare Your Top Thread ...................
, Thread Your Needle
...................
Pick Up Your Bobbin Thread
.................
Adjust the Top Thread Tension
...........
Stitch Selector
.............................
Stitch Length Control
.....................
Adjusting
Stretch Stitch Balance
..............
Reverse Stitch Control
......................
Starting
SECTION
OF CONTENTS
3.
LEARN
Practical
To Sew
THE
Stitch
.......................
.....
.....
10
10
11_13
11
11_12
13
14_15
14_15
15
16_17
1B
18
18
18
Box Stitching
SECTION
SECTION
4.
Chart
...................
Turn a Square Corner
.....................
Use the Darning Plate
......................
Topstitching
..........................
Left Needle Position
.......................
23_24
23
23
23
24
24
24
PROBLEMS
What to Do When
.......................
CARE
FOR YOUR
40
CHART
•
Oil under the Top Cover
...................
Oil the Underside
.........................
PARTS
LIST
...................................
INDEX
.......................................
41_42
MACHINE
Replacing the Light Bulb .................
Cleaning the Machine
...............
• Clean the Feed Dogs ......................
a Clean the Shuttle
Race .....................
• Oil behind the Face Cover Plate ...............
t9
20_22
..........................
PERFORMANCE
5.
STITCHES
Straight Stitches
...................
• Straight Stitch
..........................
• Use the Seam Guides .......................
•
•
•
,
5_6
7"--8
9_10
9
43
43_46
43
44
45
45
46
47
48
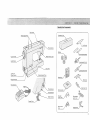
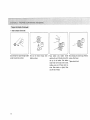
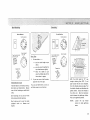
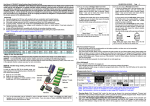
: Locate and identify theParts
A
full
nearest
line of
Sears
sewing
retail
cabinets
store
or
is available
through
our
at your
general
•catalog,
Another
your
option
Kenmore
, , , buy
a Carrying
goes anywhere,
Case , , , then
can be stored
any-
Take-up
Stitch
Lever
Selector
_obbin Winder Tension Disc
where.
Upper Thread Gu_de
Top Thread Tension Control
Stitch
Length
Control
Reverse
Stitch
Control
Face Cover Plate
Need le Ple te
X,,
\
Extension
Table
Shuttle
Cover
Top
Cover
Thread
Spool
Pins
Accessory
box
"
Thread
_'_.,,,,,Lint
brush
Guide
Bobbin
Buttonhole
Clutch
Knob
Presser Foot
Hand W heel
(_Large
Free Arm
L_ght end
Power Switch
Nomenclature
Af# 9
Plate
Plug Connector
FOOt
opener
Lever
Control
Thread
Gupde
Thread
Guide
Needle
Clamp
Straight
stitch foot
footSatm
stitch
/_
screw
driver
•
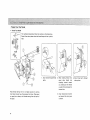
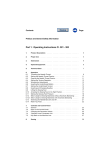
Plug in the Machine
and Switch
on the Power
Power
supply
Foot Control
Use
Plug
Power
switch
\
supply
/
Foot control
Sewing {igh _/_p{
!__
, J
Machine
socket
4_
Push the
light
on the power
and power
and sewing
switch
to turn
light.
foot
which
Machine
plug
SAFETY
The
To
FEATURE:
control
you
Before
inserting
machine,
OFF,
1.
2.
be
Check your outlet
Volt AC outlet.
Insert
the
machine
machine
socket,
the
sure
plug
the
power
into
switch
to be sure )t isa 110to
increase
speed,
Insert
is
120
machine
will
light/power
switch
interrupted
or
light/power
switch
children,
not
operate
is turned
stop
sewing,
to
unless
the
If you
are
on.
turn
prevent
off
the
injury
to
To
into
as shown,
the
It will
three-prong
only
fit
one
supply
plug
into the outlet.
at
decrease
gently
press down
with
speed,
release
your
foot
control
is sensitwe
pres-
sure slightly.
NOTE:
The
foot
wilt
increase
or
decrease
speed
Practice
on
regulate
your
your
the power
speed
foot,
sewing
plug
way,
3.
Your
your
the
sew,
the ball of your
NOTE:
regulates
and
your
immediately.
a scrap
sewing
taste and needs.
of
fabric
to
speed
to
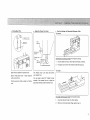
Setting Spool Pins
Adjust
Spool
pin
the Presser Foot
= Free*Arm Sewing: the Removable Extension Table
To remove:
Lever
tell
High
posHion
\
..~
pOSitiOn
,/
Presser toot _--_'_;
lever
Normal up
High
posilion
To Remove
the
1.
Grip
2,
Pull gently
Extension
the table with
Table
your
to the
(for free-arm
index
finger
sewing)
and thumb,
left. The extension
table will
as shown.
snap out,
To Attach:
Spool
Pins are packed
Screw
with
thread
spool
in accessory
pins
in
pface
box.
securely
a screw driver,
Position
tion.
spool
pin felts
as shown
in iflustra-
The
Presser
your
presser foot.
You
can
remova_
Foot
Lever
raise it about
of
the
presser
ptace heavy fabrics
under
raises
and
1/4"
higher
foot
or to
lowers
for
easy
help you
the presser foot.
To Attach
the Extension
1.
Insert
the tab and the pin into
2.
With
your thumb
Table
and index
(for flat-bed
their
finger,
sewing)
catches.
gently
snap m.
¸,
_, i_Z_':i_!i_i_!_::
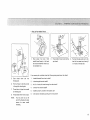
*
_i_y'_'_,i'_}_i_:_;!,:_!_.:_i_::j_:_
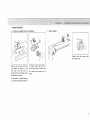
Free-Arm
Your
Sewing
sewing
This feature
(Continued)
machine
makes
_<_?_'_:AI_'!_;_I!I_!_?_:;',!<_:_,_L _
can do free arm sewing.
sewing
easy for:
$
*
bar
tacking
belt
foops
to
and
made
or
avoid
fabric
needle,
reinforce
waistline
homemade
bunching
pockets,
on ready-
garments
to
around
the
*
stitching
sleeves,
legs, or any circular
waistbands,
garment
pant
area.
*
darning
socks
elbows,
or
ren's clothes,
or
mending
areas of wear
knees,
in child*
*
sewing
buttons
bands, etc,
on
sleeves,
waista-
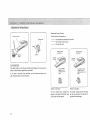
ThePresser
feetareanimportant
feature
ofthismachine.
Youneedtoknowwhateach
=
Change the Presser Foot
Use the
you
correct
wish
Stitch
to
sew.
Chart
detailed
presser
on
foot
for
Consult
pages
directions
various
•
the
20
for
the
_
stitch
does in order
to use them
effectively.
Types
Foot
Straight
Foot
practical
22
sewing
Presser Foot
Zigzag
foot
and
with
the
the
presser feet.
Zigzag
fooI
Straight
stitch
loot
I
0
Use this
foot
for
both
Uses:
Straight
stitching
Straight
Zigzag
stretch
Button
the various
bar to
the
presser
foot
thumb
insert
using
the
the foot
its highest
foot
lever.
screw,
from
presser
the
position
Loosen
choose
bottom,
the
Tighten
large screw driver
is secure.
feet,
raise the
by lifting
the
proper
the
to make
presser
Rick-rack
(see P,2i88),
Overcast
(see p,30),
zigzag {see p.31),
stretch
Serging
{see p.32),
(see p.3__22),
foot,
Blind
Lace work
hemming
(see p.3_33),
(see p.34),
stitching
Smocking
Elastic
(see p.29),
stretch
Three-step
Shell
(see p.2_66),
sewing
screw
certain
(see p.25),
(see p.28),
Bar tacking
J
(see p.23),
Isee p.24),
stitching
Appllque
presser
and
zigzag
Use this foot
using center
Topstitching
To change
straight
stitching.
(see p.399},
(see p.39),
stretch
Box stitching
(see p.4__O),
(see p.4_O).
Uses:
exclusively
needle
Straight
stitching
Topstitching
Straight
for straight
position
only.
(see p.23),
(see p.244),
stretch
(see p.255)
stitching
Presser Foot Types
Buttonhole
Guide
(Continued}
Foot
Zipper
f
r
Buttonhole
guide
Satin
Foot
foot
to measure
Uses:
for
your
Buttonhole
buttonholes.
buttonholes
making
Foot
Satin
_'oot
Zipper
Use this
Stitch
It is marked
accurately,
{see p.3__55)
This
foot
your
zipper.
foot
foot
can be set to sew on each side of
The edges of the foot
zipper
and keep the seam straight.
Uses:
Zipper
application
stitch
guide the
(see p.3Z7)
Use this
transparent
outlining
appiique.
Uses:
Satin
stitch
Applique
foot
for satin stitch
(see p.2Z7),
(see p.2_88)
and
Yourchoiceofneedle
andthreaddepends
onthefabricyouaresewing.
tnyourneedle
case,
youwillfindthefollowingcolor-coded
needles:
Blue(11)...........
forstretch
fabrics
Orange
(11).........
for lightweight
fabrics
Red(14)...........
formedium
ormedium-heavy
weightfabrics
Purple(16) .......
for medium-heavy
weightanddecorative
topstitching
onthesefabrics
(Thisneedlehasa largerthreadholefor
thickertopstitch_ng
thread.)
Green
(18) ..........
for heavy
weightfabricsanddecorative
topstitching
on these fabrics
Specialty
needles
Denim
are also available.
Needle
.......
for
sewing
dense
fabrics
such
as denim
or
canvas,
Topstitching
Leather
Needle
Needle
When
buying
length
and shape of the
skip stitches
=
Check
....
its larger eye wilt
.......
needles
other
punches
than
needle
tiny
Kenmore
shown
needles,
above.
hotd heavier
holes in leather
thread.
and suede.
be sure the needle
A longer
or shorter
fits the
needle will
or break.
Your
Needle
1.
Look for barbed
2.
A damaged
needle
and silk-like
fabrics.
Always
buy
smooth
and consistent
a good
or blunt
point.
can cause
quality
permanent
thread,
in thickness.
tt should
snags or runs in knits,
resist
tangling
fine silks
and be strong,
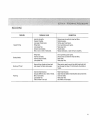
Fabric, Needle, Thread and Stitch Length Chart
FABRIC
Lightweight:
Batrste= Dimity,
Chiffon.
Silks, Fine Lace, Organza,
Crepe, Taffeta.
Voile,
Organdy
NEEDLE
SIZE AND
COLOR
11-ORANGE
Medium
Weight:
Cotton,
Cotton
B_ends,
Percale, Gingham,
Shantung,
Pique,
Seersucker.
Satm. Knits.
Vinyl Suitings.
Linen,
Wool Crepe. Leather
14-RED
Medium
Heavy Weight:
Corduroy,
Denim, Wool,
Sailcloth.
Wool Flannet,
Gabardine, Velvets,
Leather
14-R ED
or
16-PURPLE
Heavy Wmght;
Coatings, Upholstery
Cotton
Duck, Heavy
Twi!ls.
Canvas
Oecorative
top-stttchlng
On all types of fabric
Stretch Fabric:
Polyester
Double Knits,
Nylon Tricot,
Jersey,
Stretch Terry, Spande×,
Cite Tricot
= To Change Your Needle
R ECOi'_MENDED
STITCH
LENGTH
SETTING
THREADSIZE
Polyester Core/Cotton
Wrap
Fine Mercerized
Cotton
Silk A
12 stitches per
_neh
50 Mercerized
Cotton
Polyester Core/Cotton
Wrap
Silk A
10 _ 12 stitches
per inch
Needle
-'4
50 Mercerized
Heavy
Cotton
18-GREEN
IS*PURPLE
18oGREEN
Cotton
Mercerized
Heavy-Duty
Polyester Core/Cotton
Wrap
Silk A
Duty
PoJyester
Wrap
Siik A
Fiat
s_de
away
tfore
8 _ 10 stitches
per inch
8 stitches
inch
per
NOTE:
Raise
tion
Twist
thread
onJy}
6 _ 8 stitches
inch
Polyester
Core/Cotton
Wrap
50 Mercerized
Cotton
the
by
1.
Loosen
the
toward
you.
bar to
the
its
highest
hand
wheel
screw
by
posi-
toward
needle
clamp
turning
it
10 _ 12 stitches
per inch
2.
3.
Remove
Insert
with
the needle
the
new
by pulling
needte
into
the flat side away from
it downward.
the
Push the needle up as far as it will
5.
Tighten
the needle
clamp
from
your
needle
clamp
you.
4.
large screwdriver
10
needle
turning
you.
per
11-BLUE
(STR ETCH
FABRIC
NEEDLE)
with "Q FOOT"
screw
Mercerized
Core/Cotton
Buttonhole
(Use as top
clamp
"g:%" ""
go.
screw firmly
accessory
with
box.
the
:: Prepare the Bobbin:
=
To Remove
= Wind the Bobbin
the Bobbin Case from the Machine
Release
knob
Remove
the
the
machine
left,
Open
pulling
extension
by
the
down
table
pulling
shuttle
the embossed
from
it to
the
cover
by
part on
To
remove
tie, pull
Pull
bobbin
open
bobbin
case from
shut-
latch
of
case.
case
straight
bobbin
out
clutch
toward
by
turning
clutch
you.
of
shuttle.
the left side of the cover.
Raise
needle
by rotating
to its highest
hand
position
wheel toward
you.
1!
,_i!P_areith_¸gob_niliCo.ti._ed
_i_!
__, !_i!i;!i:_!_i:_i;i_
:; _ <': _:," _ _i!_;i !:_i _ :!i!;:_:_:i
Wind the Bobbin
_ :_:-
• i i _'!'i i_I! i: :! :: _ x: ;
(Continued)
7
Draw
winder
thread
tension
from
spool
through
disc as shown.
bobbin
Pull end of thread
bobbin as shown.
through
hole
in
Place
bobbin
spindle
with
the
top
winder
Holding
chine.
snip off
12
of
onto
the
bobbin.
shaft to the
onto
When
bobbin
end of thread
end
right
of
bobbin
end of thread,
winder
coming
Push
bobbin
until
thread,
from
it dicks.
start
is slightly
mafiIled,
Wind
thread
untif
winder
bobbin.
Clip thread.
Tighten
clutch
knob.
stops,
Remove
Insert the Bobbin
into the Bobbin
Case
"
r
.......... J
Place
making
bobbin
in
sure thread
bobbin
leeds
wlse
and
is coming
bobbin as shown.
case
clockfrom
Pull
thread through
as shown,
slot
of case
Pull
thread
spring
and through
as shown
above,
under
tension
the opening
Holding
case
latch.
into
latch
open,
shuttle
and
position
re|ease
Case
when
should
lock
into
latch is released.
place
Thread Your Needle
@
The numbered
Dotted
steps below
lines show
follow
places where
the numbers
the thread
on the illustrations.
loops end then
is pulled
tight.
__
J
1, Draw
thread
through
thread
2, While
guide.
holding
spoo]0
draw
threading
you
making
Raise
thread
hand
wheel
on
spool
the spool
14
take-up
toward
]ever to
you.
pin as shown,
its highest
Raise
with
position
presser foot
thread
coming
into
toward
sure the thread
firmly
between
the
discs,
by turning
lever, Place spool
from
near
thread
channel
is pulled
tenston
thread
the back
of
3.
Draw
and
thread
around
as shown,
down
the
channel
spring
wire
4.
Draw
take-up
thread
lever,
J
up &
through
Pick Up Your Bobbin Thread
®
Raise
presser
foot
needle
thread
loosely
and
rotate
5.
Draw
thread
6.
thread
Pul! the thread
it through
7.
Thread
Thread
NOTE:
and
to the left
the thread
then
bar thread
8,
down
into
guide,
front
want
end of the thread
smssors
for
toward
Bring
24
bobbin
thread
up by pulling
top thread.
3,
Pull both
back
you
threads
under
and to the
of the presser foot,
to 4 inches of thread
leaving
3
clear,
turn,
pick up bobbin
1,
Is needle threaded
2.
Is thread
3,
Are 3 to 4 inches of thread
4,
Is thread
5.
Is bobbin
6.
Is the machine
tangled
from
thread
front
around
by following
steps gwen above, then
check:
to back?
needle?
coming
from
the shuttle?
from
shuttle
tangled?
into needle
guide.
may
hand
guide,
is slipped
needle from
You
and slip
Hold
in left
handwheel
one complete
tf you cannot
lever.
to
to back,
cut
with
eas_er
properly
installed
threaded
in the bobbin
according
case?
to the Instructions?
the
sharp
needle
threading,
15
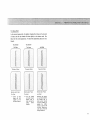
Choose the Correct
Top
side of fabric
The best tension
Setting
mark
Tension:
will
depend
on;
the stiffness
and thickness
the number
of fabric
the type
of the fabric
layers
of stitch
koose__.%
thread
The top thread
ts too loose,
The top thread
_s toe t}ght
Tighten
thread
For Straight
The
ideal
fabric,
If you
Stitch
straight
as shown
look
gaps, that
stitch
will
have threads
above, magnified
at the
each stitch
stitch,
front
is smooth
locked
between
the
two
layers
of
The top thread
appears on the
underside of the
fabric.
to show detail.
and back,
you
will
notice
that
there
are no
and even,
®
Tension
is too
loose:
The top thread shows through
bottom of the fabric, The bottom
of the stitch will feel bump%
16
The bobbin thread
appears on the
upper surface of the
fabric,
Tension
the
side
is too tight:
The bobbin thread will come through
the top of the fabric. The top side of
the stitch will feel bumpy.
For Zigzag Stitch
In the
of
correct
fabric
below
zigzag
and
for the
the
top
correct
stitch,
the bobbin
threads
will
appearance.
threads
show
will
slightly
To match
this
not show on the top side
on the
bottom
appearance,
adjust
side.
your
See
top
tension.
Top tension
Top tension
Tdo Tight
Top sJde of Fabric
Bottom
side of Fabric
Just Right
Too Loose
Top
Bottom
s_de of Fabric
side of Fabric
Top s_de of Fabric
Bottom
stde of Fabric
Too
Tight:
Too
Loose:
Just Right:
--
Corner
ol
each
zigzag
will
pull
together
on
the
top side of fabrics,
--
The
top
thread
will
loop through
bottom
s_de
o_
fabric
and will be
pulled
atmost
together,
Minimize
the amount
of top thread visible on
the
bottom
rode of
labrlc
without
causing
excessive
puckering
or
causing
the
bobbin
thread
to show on the
toP side.
Resuhs vary
with _abrtc, thread and
sewing conditions.
17
=Adj us¼ing Stretch Stitch
Reverse: Stitcl_ €o'trot
_
f
Setting mark
6
8 12240
I
k
i
I
The
stitch
selector
determines
also
the
regulates
regular
stitches.
control
stitch
zigzag
not
you
the
stitch
and
rick
only
select,
but
width
for
rack
stretch
The
length
stitch
length
of the
The higher
the number,
stitch.
0 means no feed.
The
different
designated
Straight,
types
of
stitches
are
by color.
Zigzag
and
Utility
Stitches
control
regulates
the
stitch.
the shorter
the
in stretch stitch sewing, Stitch Length
Control
should be in the detent
position between S and L ( T position)
for
most
materials.
Depending
upon the
type of fabric used, you may need to
adjust
this control
to match
forward
stitches
of stretch
sewing with reverse
motion
stitches.
To shorten
stretch
stitches,
turn the control
ward
"S". To Jengthen,
,JL
_, '
are orange.
Stretch
Stitches
Buttonhole
NOTE:
To
S.
are gold.
Settings
avoid
damage,
,T.-L
are blue.
needle
or
fabric
be sure your
needle
is up and out
of fabric
adjusting
control.
this
when
Smock ing stretch
Rickrack stretch
18
slightly
toturn toward
To
reverse
stitch,
trol
during
sewing,
hotd
Release to sew forward
down
again.
this
con-
Nowthatyouarefamiliarwiththecontrols
onyourmachine
andwiththeaccessories
provided
forthemachine,
youarereadytostarttosewwithyournew
Kenmore
sewing
machine_
Belowaresome
goodhabits
to followeach
t_meyousitdownto sew;
1. Inspect
theneedle.
It shouldbestraight,
properlysetandsharponthepoint._tshouldbethecorrectsizeforthefabricandthreadbeing
used.Donotbe
afraidto change
yourneedle
frequently.
Manyof thenewfabrics
made
of synthetic
blends
tendtodulltheneedles
moreeasilythanfabrics
made
ofnatural
fibers.
2. Before
placing
thematerial
onthemachine,
seethattheendsofthethreads
havebeendrawnabout4 inches
totherearofthemachine.
Holdonto threads
duringthesewing
ofthefirst3 or4 stitches
of theseam,
3. Testthemachine
stitchonascrapoffabricyouplantouse.Thefabricshouldbedoublethickness,
Adjustthemachine
forthelengthofstitchandtension
suitable
toyourfabric.
4. Fabricshouldbeplaced
underthepresser
footwiththebulkof thematerial
to theleftoftheneedle
andtherightedge
ofthematerial
placed
onthe5/8"
seam
marking
ontheneedle
platewhenmaking
asimple
seam.
5. Runthemachine
ataslowevenspeed.
Themorepressure
youputonthefootcontrol,thefasterthemachine
willsew.
6. Fasten
eachseam
bybacktacMng
atthebeginning
andendoftheseam.
7. Always
fimshsewing
eachseam
withtheneedle
atitshighest
point,
8. Guidethefabricgentlywithyourhandinfrontoftheneedle.
Never
pullorholdthefabricinsuchawaythatthenormalfeeding
isaltered.
9. When
turningthehandwheelmanually,
always
turnit towardyou,
19
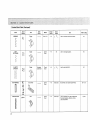
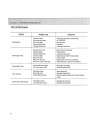
Other
Attach.
Needle
Darning
prate
Check
Chert
2~6
Check
Chart
2_6
Zigzag
Check
Chert
2~5
RICK-RACK
STR ETCH
1_4
Zigzag
Check
Chert
THREE-STEP
ZIGZAG
Zigzag
Check
Chart
1_4
Stitch
STRAIGHT
I
Stitch
Selector
(_
Foot
Straight
_
Zigzag
Thread
Tension
Stitch
Length
Uses
6~t2
Refer
Regurar saems_ z_ppers, topstitchlng,
mvtslble z3pper, cording, etm
darning,
to Page
23 ~ 25,
37 _ 38,
39
t
1
I
I
I
i
l
STRAIGHT
STRETCH
lit
Ill
ltt
Straight
Zigzag
ZIGZAG
S •
L,
Usa on knits and other stretch
for toPstitehlng.
6 _ 24
Fnish edges, buttons,
bar tacks.
satin
fabrics,
stitch,
good
25
sewing
26 _ 30
i.............................
S T
Decorate
Blue Zone
~ 24
2O
L
garments
Use tot finishing
l
with
seams.
one row or several.
30
'
3_
Stitch
Selector
Stitch
Other
Attach.
Foot
........
SMOCKING
Zigzag
STITCH
Needle
Thread
Tension
Check
Chart
1 _ 4
Check
Chart
1 _4
Stitch
Length
Uses
Refer to Page
i .....
S
T
/_
Use m smock;ng
or as a decorative
stitch.
39
xJ_
BLIND
HEM
8~24
Use tot woven
overcasting_
fabrics:
bl_nd
hem and
8~24
Wide blind hem with elatlmty,
Lace work on blouses, lingerie and table
linens.
33
STITCH
I .................
BLIND
HEM
STITCH
(STRETCH)
OVERCAST
STRETCH
Check
Chart
1 _4
Zigzag
Check
Chart
t_4
Zigzag
Check
Chart
3 _ 9
!
S
T
L
33, 34
Use tot sw]mweer,
ski pants end other
garments that require stretch.
32
Fimsh hems, steeve and neck opemngs,
Use on nylon tricot and other lingerie to
overcast and seam.
Do shelI tucking on btouses and lingerie,
39
<,
SHELL
STITCH
12 _ 24
21
Needle
Thread
Tension
Zigzag
Blue (11)
1_4
Zigzag
Check
Chart
1 -- 4
Check
Chart
!~4
Buttonhole
Check
Chart
1_ 5
Blue Zone
Buttonholes:
Satin
Check
Chart
I _ 4
Blue Zone
Use for applique
work, also as decorat=ve
finish for placemats,
blankets,
collars,
cuffs and pockets,
Stitch
Stitch
Selector
Foot
SERGING
k
BOX
STITCHING
>
>
ELASTIC
STRETCH
Zigzag
!/
>
)
BUTTONHOLE
,[]
,[]
Other
Attach.
Use paper
underneath
Stitch
Length
S
T
Uses
L
24
S T
L
Use
for
sw_mwear
Use
for
overlapping
Use for applying
and
Refer to Page
stretch
velour.
4O
seams,
4O
elastic,
also corded
32
buttonholes,
35 ~ 36
E]_
SATIN
22
STITCH
27, 28
= Straight
• Use the Seam Guides
Stitch
Set the Machine
Cornering Guide
Top thread [enslon
control
2 to 6
Stitch length
controf 6 to 12
The
!
1,
2.
Raise the presser
Raise
the
foot.
needle
7,
to
its
highest
3.
Place
to
Zigzag foot
the
edge
a stitching
needle
of
the fabric
guide
plate
line
(5/8"
the
width.
Raise the
presser foot
and remove
9.
on
help
the
you
needle
plate
measure
seam
The lines are 1/8'"
and 7/8"
apart,
with
lines marked.
Turn a Square Corner
the fabric.
next
on
is
At the end of the seam. you may
want to reverse to lock the stitch.
guides
to
the 5/8"
8.
position.
Straight toot
seam
are there
Cut the threads.
most
common).
4.
Draw
back
5.
6,
the
threads
and lower
Press the foot
Hold
the fabric
guide
that
it
along
towards
the presser
the
control.
Ioose]y
the
and gently
guide
line,
so
it feeds naturally.
Do
not
pull
it tight.
force
guide
foot•
the fabric
To turn
fabric
or try
to
1.
a square corner
Stop
stitching
by
turning
toward
you
when
facing
you
lines
Raise
the
guide,
the
form
Lower
stitching
to
lower
hand
the
time
up
the
wheel
fabric
edge
with
the
as shown.
presser
fabric
the 5/8"
3.
and
needle
cornering
2.
5/8"
edge:
foot
line the
and
turn
edge with
seam guide,
the
presser foot
and begin
in the new direction.
23
•
Use the Darning Plate
Left Needle
Topstitching
Position
Set the Machine
Stitch selector
]
Sometimes
to control
when
sew,
you
want
1,
Plate covers the feed dogs
they do not touch
To Put on the
Darning
2.
the fabric.
NOTE:
The rectangular
holes
Darning
match
the
darning
holes
are slightly
plate,
to
these
plate
with
.......................
Fit
edges fiat
needle
will
plate holes.
show
the
The feed dogs
through
the
darning
plate holes.
Use the darning
ways:
Darning
Button
plate
in the
following
(P, 25)
Sewing
(P_ 2__99)
Accent
J
and Its Uses
Topstitching
your
plate pins into
Evenly
NOTE:
the left
The Stttch
darning
the darning
the
the
edge
of the
right
edge
guide
the fabric
to
produce
topstitching
the pins on the bottom.
2.
Keep
edge
In
of center,
24
3.
the
in the needle plate.
the
the presser foot.
of
fabric
the
next
presser
Zigzag foot
in the
holes
Position
Selector
foot,
Plate:
Plate
Lower
to
Stratght toot
1.
Stitch
Here's How
the fabr=c youse_f.
The Darning
so that
you
St=tch length control
6to t2
Top thread tension
t
control 2 to 6
emphasizes
garment
and
keeps
or
b_ouses
needle
the
lines
seams
of
and
your
from
can easily
from
topstitching
fabric
this
left
©
of
the edge.
adjust
to right
without
from
zigzag presser foot.
your
for
moving
under
the
Use
Left
with
one
or
Needle
control
while
stitching
difficutt
NOTE:
and crisp.
suits
You
3/8"
along
an even row
for
more
or
edge
fabrics.
Use
only
foot
for
Sewing.
two
rows of topstitching
around
the
outer edges of cuffs, lapels or collars,
Position
topstitching
ztgza9
presser
Left
Needle
Darning:
Set the Machine
Set the Machine
Stich selector
Stitch selector
!
@
Top thread tension
control
'i to 4
@
Stitch length
Any number
Top thread tension
control 2 to 6
Stitch length
1
to adjust)
(not
necessary
Here's How
Put
footNO
presser
the
darning
plate
on
the
needle
plate
(see p.24).
Darning plate
2_
3.
Remove
presser
foot,
embroidery
hoops
Draw
the
bobbin
fabric
by holding
one
stitch
at
stretch
with
thread
the
the
fabric
up
top
spot
through
thread
Lower
the
where
the
you
wish
bar and
sew
at
a slow
6.
Move
the fabric
back
and forth
you have covered
the darning
Turn
half
the
fabric
layer of stitching
NOTE:
If
your
damaged,
under
turn
slowly
and
is
use a separate
or
badly
piece of fabric
the hole to reinforce
it,
is the
the
stitch,
straight
ed for knits
stitch
topstitching
stretch
especially
and stretch
can
variation
of
develop*
also
on all fabrics.
be
used
be used on
fabrics
as weW.
It works
curved
seams
garments
that
deal
fabrics,
for
When you finish
p(ate,
darning,
remove
the darning
fabrics
tt can
of
and
will
well on
on
receive
strata
(ie.
and
other
any
a great
children's
clothes).
The
stretch
sewn,
but
back
the
so
a
that
fabrmc
not
is being
stitched
called
stitch},
when
Instead
is
does
as it
and
(sometimes
gtve
stitch
stretch
forward
action"
7.
was developed
knits,
actually
layer,
thin
and Its Uses
Th_s stitch
Thts
sew another
over the first
fabric
until
area.
stitching
to be used on stretch
to
speed.
5.
Stretch
The Stitch
presser
Zigzag foot
and taking
start darning.
4.
Straight foot
between
hole centered.
in
a
motion
"reverseit
will
stretches
of breaking.
25
Basic Zigzag
SettheMachine
Stitch selector
Stitch _ength
6 to 24
Top thread tension
control 2 to 5
Here's How
There are many
ways to sew a zigzag stitch.
ConsuEt the specific
Satin
Stitch
AppJique
Button
and Its Uses
The zigzag stitch
is one of the most
common and most versatile stitches on
your
for
machine.
sewing
ming,
ing,
It can be a utility
buttons,
overcasting,
It
can
also
stitch
buttonhofes,
mending
be
used
hem-
and darnto
decorate
with trims, appliques
and cut-out
or as a decorative
stitch.
26
work
p. 28
p. 28
Sewing
Overcasting
The Stitch
po 27
Work
Bar Tacking
variations
p. 2_99
p. 30
for detailed
directions.
Satin Stitch
Stitch
Set the Machine
length :
24
Stitch selector
I
t2
Stitch tength
Blue zo n e <::_
Top thread tension
control 1 to 4
Close to 0
v
The Stitch
and Its Uses
The Satin
stitch
used decorative
Here's
is a versatile and often
Once
stitch,
of the fabric
but
it can also
be used to overcast
a raw edge (for ex-
ample,
linens,
blankets,
How
tabrecloths
weight
your
machine
is set up to stitch,
you are planning
you may want
to use. Too tight
to experiment
a satin stitch
on a fragment
may pucker
some light
fabrics.
Otherwise,
stitch
as usual.
and napkins).
The Satin
stitch
is especially
attractive
in applique.
27
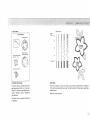
Applique
Bar Tacking
Set the Machine
Set thaMachine
Stitch se{ector
Stitch
selector
[
Top thread tension
control I to 4
Stitch length
Blue Zone'C_to
24
Top thread tension
control I to 4
Baste
{or
joiner)
applique
Stitch
sure
Satin
st{tch
toot
around
the
with
iron-on
pieces
on
the
needle
the
applique
falls
along
the
fabric
This
fabric.
satin
stitch
making
points
of
pockets
and straps on lingerie.
outer
When
sewing
down
into
corners,
the fabric.
pivot
the
stitch
is similar
and
strain
to
is used
such
Zigzag foot
edge of the applique.
foot and
or left.
28
fuse
Stitch length
glue zone_
Sew 4 to 6 zigzag stitches,
lower
the needle
Raise the presser
fabNc
to the right
a very
to
short
reinforce
as corners
or
Sew a Button
Set _he Machine
Sli"_eh
selector
I
2"
Top thread _ens}on
control
! to 4
Stitch
length
Any number
to adjust)
!
(not necessary
Use the darmng
plate for button
1.
Set the pattern
selector
2.
A_ign the
holes
sewing
at "
_
To
(see p.24),
"',
the
Zigzag
foot
both
hole of the button
_
Darning
#fate
3.
Lower
the
foot
of the button
iust
below
and turn
comes just above the right
4.
Sew about
5.
Set the
thread.
five stitches
pattern
selector
with
the slot of the foot
and place
the left
the needle point.
the
pattern
hole of the
strengthen
threads
selector
leaving
the
shank,
a 20 cm (8")
needle
thread
down
hole in the
button
and wind
cut
tail.
through
the
Bring
the
it around
the shank,
to ztgzag until
the
needle point
button.
Draw
the
thread
to the wrong
side and
knot,
and raise needie,
at
"
_
" again and sew a few stitches
to lock
29
=
Overcasting
Stitch
R ick-R ack Stretch
Set the Machine
set the Machine
Stitch selector
Stitch selector
Stitch length
12 to 24
Top thread tension
Top threa_ tension
control 1 to 4
Helpful
Start
raw
right
Zigzag
foot
up
overcasting
This
and its Uses
zigzag
garment
variation
is very
construction
raw edges of any sewing
30
and
useful
in finishing
project.
in
about
of your
1/8"
seam.
inside the
If you
at the edge, the fabric
and
tangled.
The Stitch
The Stitch
Hints
corner
Stieh _angth
the
stitches
will
will
start
bunch
become
and its Uses
Sew on stretch
fabrics
in any area that
you m_ght use a z_gzag stitch.
This
stitch
top stitch
can be used as a decorative
as well.
t_i
_-:':
_:
-¸
Zigzag Stitches
Three-Step
-,'_:
L-
(Continued)
Zigzag
Set the Machine
Stitch
selector
Stitch {ength
Top thread tension
control I to _4
Blue Zone<::r'_ta 24
Mending
Seam Finishing
Place
the fabric
so that
the right
Zigzag toot
Guide
under
the edge will
the presser foot
be slightly
inside
Position
the tear under the needle so
that the stitching will catch both sides.
hand side of the presser foot.
the
stitches fall
work
so
the
right
hand
at the edge of the fabric.
J
The Stitch
and Its Uses
The three-step
zigzag
zigzag and straight
the
three-step
would
has
flatter
The
zigzag
use the
more
a regular
three-step
ly usefu]
basic
strength,
than
is a combination
stitch.
You
may use
everywhere
zigzag
you
stitch.
elasticity,
It
and
is
zigzag,
zigzag stitch
is especial-
for:
--
mending
-
sewing
patches
smoothly
and
securely,
--
repairing,
straight
--
finishing
seams.
tears.
31
= Overcast
Stretch
Stitching
= Serglng
or Pine Leaf Stretch
Sat the Machine
Set the Machine
St=tch selector
Top thread tension
Stitch selector
Stitch lenglh
thread tens=on _L_
control I to 4
/,
Stitch length
_L
° o
O
TOp
Here's How
°
control I to 4
Stitching
°
__,x
Place
the
the
LEFT
Stitch
Zigzag _oot
raw
edge
of the
of the needle
so the needle
just short
Or, place
seam,
pierces
of the outside
your
then
fabric
fabric
trim
to
as shown,
the fabric
Here's
Place
foot
to allow
Or, place
seam,
a 5/8"
This
stitch
seam with
and Its Uses
can
can
be used for
an overcast
finish,
is formed
and
sewing
a
seam
one
operation,
It can be used when
you
are making
swimwear,
stretch.
32
other
garments
finished
that
ski
in
pants
require
overcast
to
prevent
further
The Stitch
Use
Use
a blue
needle,
prevents
stretch
which
skipped
fabric
effectively
stitches.
the
stitches
presser
are
your
then
fabric
trim
to allow
seam
made
a 5/8"
allowance
When
using
fabric,
use a bfue
and Its Uses
fabric
needle
stitch
effectively
garments
raveling.
NOTE:
The
and
be
edges of older
under
the
after.
allowance
N OTE:
Raw or worn
fabric
Zigzag foot
after,
The Stitch
the
so that
over the edge,
edge.
seam
How
narrow
press
seams
this
open
on
heavyweight
want
when
seam that
fiat.
It
knits
or
woven
a narrow
for making
is ideal
want
a
need to
for
1/4"
on
medium
to
fabrics
where
you
seam,
elastic
you
you do not
swim
It
ts also great
wear.
stretch
ski pped stitches.
knit
stretch
which
prevents
Blind Hemming
Set the Machine
?q
Top thread tension
control _ to 4
Stitch length
Heavy
Weight
8 to 24
_Zigzag
Set the Machine
_-. Fabric
are two
blind
wider
and will
"gwe"
1.
Finish
2.
Measure,
hem stitches
the raw edge of your
turn
up your
For light
3.
Fold
the material
blind
hem)
4.
should
5.
After
NOTE:
iust
weight
hemming,
The stretch
and stretch
hem any way
fabrics,
(wrong
under
catch
machine.
._
The regular
blind
hem is used for woven
fabrics.
The stretch
blind
hem Is
fabrics,
you desire.
{See Overcasting,
p,30_)
hem and pino
you
fold.
press both
as shown,
leaving
t/8"
{regular
blind
hem)
to 1/4"
(stretch
hem edge showing.
presser foot
the fold
blind
may need a double
side out) on the edge to be stitched,
of the finished
Place garment
_........
on your
and is used for knit
NOTE:
Stitch selector
Top thread tension
Contro_
"i[o 4
_
There
m such a manner
that
straight
stitches
wi!l
be sewn on extended
edge.
The zigzag stitch
of the garment_
sides of the finished
hem stitch
hem. The right
side of the garment
also can be used for Lace Work.
will
show
only
the blind
stitches.
(See P.3i4)
Stitch length
33
Set the Machine
Stitch selector
v
Top
thread
tension
Stitch length
24
control I to 4
Lace
to
a fanclfu],
and
lingerie,
and
when
pillows
trimmed
Turn
raw edge of fabric
1/2"
Place
stitch
using stretch
Trim
34
adds
blouses
feminine
become
more
with lace.
under
face underneath
excess fabric
touch
Table
linens
elegant
at least
and
bEind hem stitch.
close to stitching.
top-
Buttonholes
Set the Machine
tE3
4
2[-J_
Stitch length
Blue Zone _::_
Top _hread tension
comrol "_to 5
//_
_.
1. a. Carefully
_
length
mark
on your
b. Change
to
the
the
buttonhole
buttonhole
._ButtOnhole
guide foot
slider
guide
the
with
ing running
garment
the
under
buttonhole
toward
you,
foot
the
slider
(A) toward
the top
mark
up
the
markings
with
the
top
mark-
c, Lower
the Stitch
own
upon
may
alter
density
in
For
the
less
toward
2.
For
NOTE:
blue
length
density,
c, Stop
sewing
of your
button-
at the left stitch.
The
markings
on the
slider
m centimeters,
you
stitch
buttonhole
dial.
turn
the
dial
the
dial
Q
@
Coarse
for heavy
stitches
fabrics
Fine
_
_
for
light
st}tches
fabrics
"24",
more
toward
on your
until you reach the
marking
or your
buttonhole
range on the stitch
1,
fabric
buttonholes,
the
within
the
front
hole.
Density
your
preference
on
b. Sew forward
•
the presser foot.
are engraved
Depending
mark
(B),
3. a. Set the stitch selector at tlr]
garment.
NOTE:
Adjusting
you
(C) on the
meets the start mark
b. Line
Insert
foot
the
so that
foot.
c.
2. a, Move
garment.
density,
turn
"0",
Always
make
tonhole
on a scrap fabric
plan
use to find
to
suitable
stitch
a practice
length,
the
butyou
more
35
B tto.
Co.ti.. d
4. a. Set the stitch
selector
at _:_,
b. Sew 4 to 6 stitches.
c, Stop
sewing
at the
5.
a. Set the stitch
b, Sew until
right
you
reach
at [_3
the back of
Stop sewing
6. a. Set the stitch
selector
at 2_::_,
b. Sew 4 to 6 stitches,
7.
Remove
open with
your
the buttonhole.
stitch.
c,
36
selector
c. Stop sewing
at the right
stitch,
at the left stitch,
the fabric
and cut the hole
the buttonhoEe
accessory
box.
opener
in
Sewin a
ZiPper
Sat the Machine
Stitch setec_or
Zipper
t 18"}
open_ng
teeth
Zipper
tape
ot fabric
Top thread tension
control 3 to 6
Stitch
_ength
12
Top edge o_ fabric
Fabric
Put
Preparation:
the
gether
Zipper
toot
right
and
the
length
at "3 "',
at
sides
of
the
sew to the end
per opening,
the stitches.
Sew
To Sew:
Use the
to-
1.
to
lock
2.
Turn
opening
and
top
with
thread
stitch
tension
To sew the
back the left seam allowance
under
the
rtght
a 1/8"
Place the zipper
1/8"
fold
side of the zipper,
foot
on the left side
of the needle,
seam allow-
5,
Lower
side
fold.
the zipper
at the
so that
3.
left
set the zipper
as shown.
of the zip-
reverse
Fold
ance to form
zipper
"6"
fabric
4_
teeth
next
to the
the
6,
the
fold
per tape
the
point
Lower
to
the
zipper
the fold
tape.
Sew through
slider
7.
on the right
of
needle pierces
and the zipper
and pin in place.
foot
bottom
and the zipwhere
the
begins.
the needle
to
hold the feb*
tic and raise the presser foot.
37
8.
Open thezipper.
9.
Lower
the
10.
presser foot
and stitch
Close
fabric
the
right
zipper
and
turn
the
11.
To
sew the
per,
side up.
12.
Stitch
tom
13.
ZIPPER
AND
CORDING
INVISIBLE
ZIPPER
Adjust the foot so the needle is sewing through
the center hole of the foot and one groove of
the foot _sr_ding on the teeth of the zEpper as
shown. Follow the z_pper manufacturer's
instructions. After z_pper has been inserted, fimsh
sewing seam by sh}ftmg foot to side position
sewing through
side notch_
\
CORDING
Foot can also be used to make cording for slapcovers etc. Cover a cord w_th a strip ot bias
fabric and sew as shown,
NOTE:
Use *'Low Bar Sewing Machine
Z_PPER FOOT"
(6757)
for "invisible
zipper"
and "cording",
which can be obtained at any Sears retait store,
38
right
the
side
zipper
of
the zip-
foot
on
Turn
across
and
corner
guide
the
teeth,
as shown.
Stitch
zipper
foot
through
tape.
zipper,
t5.
below
the
bot-
and continue
to
of the zipper.
the
14. Stop about 2" from the top of the
the
rwght side of the needle.
the rest of the seam.
INVISIBLE
set
the
zipper
Remove
open
t7.
Lower
of
the
fabrfc
and
the
needle
into
and raise the presser
t6.
along
Lower
the
basting
the
fabric
foot.
stitches
and
the zipper.
the
foot
and stitch
the rest
the seam. Make sure the fold
even.
is
_i
Sheii
Stitching
Set the Machine
Set the Machine
Stitch selector
Stitch selector
1 cm (3/8")
Stitch
lenglh
12 to 24
Top thread tension
contro{ 3 to 9
Top thread tension
control t to 4
Here's How
1.
Stitch length
For best effect-set
the
stitch
length
as you
desire,
--Zigzag
you may need to tighten
foot
top thread
--allow
the
clear the
fabric
2.
The Stitch
Stitch
blind
hem
rows
of
is formed
over folded
shell
stitching
by sewing
fabric.
a
Several
are called
shell
tucks.
Shell
you
sew rows
You
can sew Shell
soft silky
wovens
the
slightly,
needle
folded
when
space the rows
and Its Uses
The Shell
If
tension
to
Zigzag toot
just
edge of the
it zigzags.
of shell stitches,
1/2"
Stitch
on
With
knits
m any direction.
or
apart
can
be used
to
finish
tucking
scalloped
lingerie.
can
tucks
be
on
used
to
blouses
length
at
lines
3/8"
across
the
area to
gathers
evenly,
other
stitch
Secure
end.
between
Sew
the
create
and
"6",
sew
(1 cm)
be smocked.
NOTE:
Loosen
tension
at
decorative
stitches.
stitches.
the
to
Pull
the
the threads
the
gathering
Pull out the gathering
hems, sleeve and neck openings,
Shell
stitch
stitching
Knot the threads along one edge.
the bobbin
threads
and distribute
the
stitching
the
straight
apart.
top
make
thread
gathering
easier.
39
Set the Machine
Set the Machine
Stitch
Stitch
selector
se}ector
Stitch length
"Fop thread tension
control
_ to 4
Top thread tension
control "i _o 4
.j._
Use
this
stitch
to
iota
heavy
weight
inteHining.
Overlap
two
use th_s stitch
Zigzag
Zigzag foot
foot
Choose
this
stitch
to attach
elastic
to
garments,
1.
2.
Mark
the elastic
back and side seams.
Place
the
middle
of
the
elastic
under
the
center
of
the
presser
stitch
sure the elastic
the
into
center
and
center
and
to
quarters
these
foot
40
into
match
place,
front,
making
is very distributed.
raw
edges together
to join
them,
and
W
t :Do
PROBLEM
PROBABLE CAUSE
incorrect
size needle.
Improper
threading.
Loose upper thread
Irregular
Stitches
Choose correct size needle
Rethread machine.
tension.
Bunching
Puckering
Needle
of Thread
for thread
and fabric.
Tighten
upper thread tension.
Do not pull fabric; guide it gently.
Reset presser foot.
Rewind bobbin.
Pulling fabric.
Loose presser foot.
Unevenly
wound bobbin,
Nicks or burrs at hole of needle
Breaking
CORRECTION
plate.
Replace
needle plate,
or polish
off
burrs
completely.
Pulling fabric.
Incorrect
size needle.
Do not pull fabric; guide it gently.
Choose correct size needle for thread
Incorrect
setting of needle.
Loose presser foot.
Reset needle.
Upper and lower threads not drawn back
under presser foot before starting seam.
When starting a seam be sure to draw both threads under and
back of presser foot about 4" and hold until a few stitchs are
formed,
Incorrect thread tension (s),
Using two different
sizes or kinds
Bent or blunt needle.
Reset thread tension(s).
Upper thread and bobbin
Insert new needle.
Loose presser foot.
Fabric too sheer or too
soft.
and fabric.
Reset presser foot.
of thread,
thread
should
be same size and kind.
Reset presser foot.
Use underlay
of t_ssue paper.
41
PROBLEM
PROBABLE
Incorrect
Skipping
CAUSE
size needle.
Certain knits and synthetics,
Bent or blunt needle,
Stitches
incorrect setting of needle.
Tight upper thread tension.
Breaking
Upper
Starting to stitch too fast.
Improper
threading.
Tight upper thread tension,
Incorrect
size needle.
Thread
Sharp eye in needle.
Nicks or burrs on shuttle.
Nicks
Breaking
Fabric
Machine
42
Bobbin
Thread
not Moving
Jamming
Knocking
Noise
or burrs
at hole of needle ptate.
CORRECTION
Choose correct s_ze needle for thread
Use "Q NEEDLE',',,.
insert new needle.
Reset needle.
Loosen
upper
thread
tension.
Start to stitch at a medium
Rethread machine.
speed.
Loosen upper thread tension.
Choose correct size needle for thread
Insert new needle.
Replace
Replace
and fabric.
shuttle, or polish off burrs completely,
needle plate, or polish off burrs completely.
Improper
bobbin case threading.
Lint in bobbin case or shuttle.
Check bobbin case threading.
Clean bobbin case and shuttle.
Darning plate in place.
Stitch Length set at 0.
Thread knotted
under fabric.
Remove darning plate.
Adjust Stitch Length Control.
Place both threads back under
to stitch.
Thread caught
Lint in bobbin
Disassemble
and clean shuttle.
Clean bobbin case and shuttle.
in shuttle.
case or shuttle.
and fabric.
presser foot
before
beginning
To insure that
The feed
your
dogs and
machine
shuttle
operates
at its best, you need to keep the essential
race areas can attract
dust and lint,
Your
machine
parts
clean at all times.
can become
sluggish
or knock
loud{y
if a thread
iscaught,
Check
and clean those areas about
if you sew frequently,
_
clean more
every three
months
under
normal
use.
often.
t
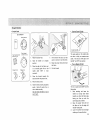
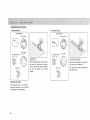
Clean the Feed Dogs
/
Io
Unplug
the
machine
and open the
face cover.
The
CAUTION!
light
HOT.
fingers
handle
it.
bulb
up
bulb
will
be
Protect
your
when
you
FoIIow
1.
2.
Push
bulb
the
counter-clockwise
and
turn
the
these direction:
Using
a
screw
needle p_ate,
driver,
remove
2.
Use a lint'brush
and clean the feed
3.
Replace
needle plate
intopos_tion.
dogs,
to remove
it.
3.
Put the
new
up and turning
bulb
in by pushing
it
it clockwise.
43
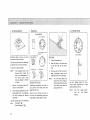
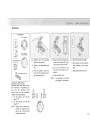
= Clean the Shuttle Race
ThJs area must
about
every three
Center
pm
the shuttle
be kept
free of
dust,
lint
and occasional
tangled
thread.
Clean
the shuttle
race area
months.
et
Shuttle
driver
Lever
Shuttle
Lever
Shuttle
Race
ever
Shuttle
Cover
case
To Clean the Shuttle
1.
2.
3.
Raise
the
Area:
needle
point
and remove
Push
shuttle
race cover
Clean
the
To Replace
to
its
the bobbin
race
shuttle
bar
levers
highest
case.
aside.
race
with
out.
a
Put a drop
of oil
and
over-oil.
44
is forming
race
half
as illustrated
so that
moon
left
on the
shuttle
side of the
2,
Hold
shuttle
to form
lint
by center p=n and position
a half moon
shuttle
on the right
side°
Pointed
cover
place
over
so as
hook
wifl be on the bottom.
the
shuttle
Assembly:
shuttle
machme.
brush,
4,
Shuttel
Position
driver
Lift
and take shuttle
shuttle
I,
Race
on the
shuttle
center
race.
pin of
3.
Place
shuttle
race
rote
assembly.
Do not
4.
Snapthe
levers back
into the ongmat
position.
shuttle
=ii'ioiii ii G M
:i iiiiiiiii
¸¸
Oil the
machine
in all areas shown
use the
machine
frequently,
before
sewing,
Kenmore
NOTE:
•
Use good
sewing
Unplug
machine
on the next two
oil the
quality
machine
under
sewing
machine
oil is available
at your
the machine
before
pages at least once a year; otherwise
the top
oil.
face cover
Use only
a drop
plate
and
of oil; do not
oil
points
over-oil,
One or two
nearest
about
drops
Sears retail
every
three
the machine
months.
of oil is sufficient.
can become
In case machine
Remove excess
sluggish
or will
knock
loudly,
is not used for an extended
oil, otherwise
If you
time,
oil it
cover
plate,
it may stain fabric.
store.
oiling.
Oil behind the Face Cover Plate
Open
cover
•
f
Jn iHustrat_om
Oil under the Top
Remove
loosen
top
up two
cover
Cover
plate
to oil points
top screws and lift
indicated
in top
of machine
head,
To remove
the cover plate as illustrated,
45
Oil the Underside
t
!,iI¸¸¸
_ii_i_iiiii
_,
i_ _'_!,_i_i_iil
B
c
__
Oil the underside
Tilt
machine
To remove
46
head back and remove
bottom
J
at least once a year.
covers,
remove
bottom
screws
covers.
(A),
Oil points
indicated
(B) and (C) as shown.
on underside
of machine.
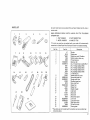
PARTSLIST
Aii parts listed herein may be ordered from any Sears, Roebuck and Co. store or
service
1
center.
WHEN ORDERING
INFORMATION:
2
REPAIR
PARTS,
1. PART NUMBER
3. MODEL NUMBER
ALWAYS
7
8
t4
9
15
21
10
16
11
!7
22
23
12
!8
13
19
1
2
3
4
5
6
7
20
9
8
9
10
11
12
13
14
15
16
17
18
19
20
21
22
23
Part No,
47
6510
*6862
1939
8286
1024032O2
813404013
6551
6552
6553
6554
*6746
36353
648801005
650802003
40390
6870
593401008
*6757
*6864
6797
40164
33379
6830
802424004
820832005
41669
*6889
649802009
THE
FOLLOWING
2. PART DESCRIPTION
4. NAME OF ITEM
If the parts you need are not stocked locally,
transmitted to a Sears Repair Parts Distribution
Ref. No.
GIVE
your order will be electronically
Center for expedited handling.
Description
Shuttle
Bobbin case
Bobbin box with 10 bobbms
Bobbin winder rubber ring
Thread spool pin
Spool pin felt
No. 11 Stretch fabric needles(BLU)
No, 11 Single needles (ORG)
No. !4 Single needles (RED)
No. 16 Single needles (PUR)
No. 18 Single needles (GRN)
"Q NEEDLES%
Needle clamp with screw
Buttonhole guide foot
Straight stitch foot
Standard zigzag foot
Satin stitch foot
Zipper foot
Zipper foot
Needle threader
Light bulb
Motor belt
Motor beit
Buttonhole opener
Lint brush
Large screw driver
Smal_ screw driver
Oil and lint brush
Darning plate
*These items are not furnished with the machine, but may be ordered per
instructions above.
47
INDEX
A
Appliqueing
H
...................
20, 28
B
Bar tacking ...................
Base ............................
Basic zigzag ..................
Blind hemming
.................
Bobbin ....................
Bobbin case ..............
Bobbin thread ..................
Bobbin winding ...............
Box stitching .................
Buttonhole
..............
Buttonhole guide foot ....
Buttonhole opener .............
Button sewing .................
S
Hand wheel ....................
3, 15
I
20, 28
2
20, 26
21, 33
11_13,47
11, t3, 44,47
15_16
11_12
22, 40
22, 35_36
3, 8, 22, 35, 36, 47
3, 36, 47
20, 29
Invisible zipper ..................
38
L
Lace work
................
Light and power switch
Light bulb ..................
Lint brush ...................
21, 34
.............
3, 4
4, 43, 47
3, 43, 47
N
Needle
....................
Needle clamp .................
Needle plate
....................
Needle, thread and fabric
chart
.........
9, 10
3, 47
2, 43
t 0
Satin
stitch
foot
.......
3, 22, 27, 28, 47
Satin stitching
............
Seam guides ....................
Sarging .......................
Sewing light ......................
SheI1 stitching
.................
Shuttle
......................
Shuttle cover .....................
Shuttle race ....................
22, 27, 28
23
22, 32
4
21, 39
44, 47
11
44
Smocking
.....................
Spool pin fett ................
Spool pins ....................
Stitch length adjustment
.............
Stitch length control
................
Stitch selector
....................
Straight
Straight
Straight
stitching
.....
stitch foot ........
stretch stitching
21, 39
3, 5, 47
3, 5, 47
18
18
18
20, 23_25,
37"-38, 39
3, 8, 20, 23_25
...........
20, 25
C
Cabinet .........................
Changing presser foot ..............
Cleaning feed dogs and shuttle race ,
Clutch knob ...................
Cording .......................
Cornering guide .................
2
7
. 43, 44
3, 11
38
23
T
O
Oiling .....................
Overcasting stitch ...............
Overcast stretch stitching ..........
45_46
30
21, 32
P
D
Darning ....................
Darning plate ..........
Parts list
20, 25
3, 24_25, 29, 47
E
Elastic stretch stitching
...........
Extension
table
...............
22, 40
2, 5
.......................
Performance
problems
............
Pine leaf stretch stitching
...........
Plug connector
...............
Portable case ..................
Power switch
..................
Practical
stitch chart ............
Presser foot ....................
Presser foot fever ..................
47
41_42
22, 32
3_4
2.
3_4
20_22
3, 7_8
3, 5
F
Fabric, needle, thread and
stitch length chart .............
Face cover plate .................
Feed dogs ...................
Foot control ...................
Free arm sewing .................
48
10
2, 45
43
3_4
5_6
R
Replacing bobbin case ............
Reverse stitch control ..............
Rick rack stretch stitching ......
11, 13
18, 23
20, 30
Thread guide ..............
Thread take-up lever ..............
Thread tensions
................
Three-step
zigzag
.........
Top cover
....................
Topstitching
..................
Top thread
....................
Top thread tension
................
Turmng
a square corner ............
3, 14, 15
2, 14
16_17
: ....
20, 31
3, 45
20, 24
14_17
16_17
23
Z
Zigzag
Zigzag
Zigzag
Zipper
Zipper
foot .....
8, 20_26, 28_34, 39_40, 47
stitching
............
20, 26_32
overcasting ..................
30
application
..............
37 _83
foot ............
3, 8, 37_38.47
WARRANTY
FULL
25-YEAR
WARRANTY
For 25 years from
_-
in the mechanical
_:
FULL
For
TWO
two
appear
the
m the
date of purchase.
components
YEAR
vears
ON SEWING
the
electrical
Sears will,
of the sewing
WARRANTY
from
date
MACHINE
free of charge,
machine
purchase.
equipment
of
the
defects
in material
or workmanship
which
appear
free
machine,
of
OF SEWING
charge,
including
repair
MACHINE
defects
electronic
m material
components,
or workmanship
motor,
wiring,
which
switch
and
speed control.
FULL
90-DAY
#
WARRANTY
For 90 days from
necessary for proper
WARRANTY
SERVICE
CENTER/DEPARTMENT
_)
This warranty
#
{)
EQUIPMENT
Sears will,
sewing
repair
head.
ON ELECTRICAL
of
HEAD
gives you
ON ALL
the date
operation
specific
AND
MECHANICAL
ADJUSTMENTS
of purchase.
Sears wilt. free of charge, replace anv parts
of the sewing machine,
except for normal
maintenance.
IS AVAILABLE
IN THE
PARTS
UNITED
BY RETURNING
THE
SEWING
MACHINE
and
TO THE
provide
NEAREST
mechanical
SEARS
STATES.
legal r_ghts, and you
service
SERVICE
#
#
may also have other
rights which
vary from
state to state.
e:
#
#
SEARS,
ROEBUCK
AND
CO., Dept.
698/731A.
Sears Tower.
Chicago.
IL 60684
SEWING MACHINE
Now
that
or service,
you
have
_imply
contact
y
you call or visit.
The model number of your Sewing Machine will be shown on your nomenclature
your Sewing Machine. See page 3 for location.
WHEN ORDERING
*MODEL
REPAIR PARTS, ALWAYS
NUMBER*NAME
OF iTEM *PART
GIVETHE
FOLLOWtNG
iNFORMATiON:
DESCRIPTION
If the parts you need are not stocked locally, your orde_ will be efectronically
Repair Parts Distribution Center for handling.
SEARS, ROEBUCK AND CO,, Chicago, IL60684
S-385
plate on the back of
Printed in Talwan
transmitted
to a Sears
U.S.A.
Part No. 649800133