1
OWNER'S MANUAL
S _A/RS
SEWING
MACHINE
MODEL 385.
1884180
SEARS CANADA
|NC,
Dear Customer:
You
have just
invested
m a very
please pause for a moment
and care for your
Specific
fine
zigzag sewing
and carefully
read this
machme.
booklet
Before
which
using your
contains
new Kenmore
instructtons
on how
machine,
to operate
machine.
instructions
are given
obtain
the best sewing
Advice
on the
results
operation
on threading,
and avoid
and care
Please remember,
if you
the model
and seria_ number
number
of your
have questions
tension
adjustments,
unnecessary
machine
about
when
cleamng,
service expense
is always
your
available
machine
oiling,
etc_ Th_s wilt help you
for conditions
at your
or need parts
beyond
nearest
Kenmore Sewing Machine
Record
_n space
number
of
are located
provided
this appliance.
on the
betow
the
The model
nomenclature
mode_
number
number
and
and serial
plate,
as identified
Serial
No,
serial
number
on Page 3 of
th_s booklet,
Model
No..385.
Retain
these numbers
THIS
MODEL
for future
IS A CENTER
reference,
NEEDLE,
LOW BAR
SEWING
Sears Retail
and service,
you inquire.
MACHINE.
our control.
always
Store,
mentton
TABLE
SECTION
1.
KNOW YOUR MACHINE
A Portable Case or Cabinet _sAvailable .............
Locate and Identify the Parts .................
Identify the Accessories .......................
SECTION
2.
PREPARE
YOUR
MACHINE
FOR
3.
LEARN
Practical
THE
Stitch
• Quilting
............................
Darning
..............................
Stralght Stretch
........................
Zigzag Stitches ...........................
o Basic Zigzag .............................
• Satin Stitch
............................
- Applique
...............................
• Bar Tacking ...........................
• Monogramming
........................
o Embrmdery
.............................
• Sew a Button
............................
• Overcasting
Stitch ........................
o Rick-Rack
Stretch
......
_ .............
• Three-Step
Zigzag ........................
• Overcast Stretch Stitching
..................
® Serging or Pine Leaf Stretch Stitching
............
Blind Hemming
........................
Lace Work ................................
Buttonhole
Making
......................
•
Learning to Sew Buttonholes
.................
• Built-in
System
....................
o Using Buttonhole
Attachment
...............
Sew in a Zipper
...........................
Shell Stitching
............................
Two-Point
Shell Stitching
......................
Smocking
.............................
Stretch Patching
............................
Fagoting Stitch
.............................
Herring Bone Stretch ........................
Elastic Stretch Stitch .........................
Box Stitching
..............................
Two-point
Box Stitch
........................
Overedg_ng Stitch ..........................
Decorative
Stretch Patterns
....................
Decorate w_th Geometric
Patterns
................
2
2_3
4
SEWING
Set Up the Machine .......................
o Plug in the Machine and Switch on the Power
.......
u Foot Control
Use .....................
• Set the Speed Range Switch
...................
• Set the Pressure Dial .......................
• Setting Spool Pins ..........................
o Adjust the Presser Foot Lever ..................
• Thread Cutter
............................
• Accessory
Storage Box
.......................
o Free-Arm Sewing:
the Removable
Extension
Table.
Know What the Presser Feet Will Do ............
e Check Your Presser Foot
....................
e Change the Presser Foot ..................
o Presser FootTypes
......................
Choose Your Needle and Thread
...............
• Check Your Needle ........................
o Fabric, Needle, Thread and Stitch Length Chart .....
a To Change Your Needle .....................
Prepare the Bobbin
......................
e To Remove the Bobbin from the Machine
.........
o Wind the Bobbin
........................
•
Insert the Bobbin into the Bobbm Holder .........
Prepare Your Top Thread ...................
o Thread Your Needle
..................
o Pick Up Your Bobbin Thread
.................
e Adjust the Top Thread Tension ..............
Stitch Selector
............................
Stitch Length ControI
.....................
Adjusting
Stretch Stitch Balance
................
Stitch Width Contro_ ......................
• Three Needle Position
..................
Reverse Stitch Control ........................
Starting To Sew ............................
SECTION
OF CONTENTS
5_9
5
5
6
6
7
7
7
8
o 8_9
t0_14
t0
t0
t!_14
14"15
t4
15
15
16_t7
t6
16
17
18_21
18
19
20_2t
21
22
22
23_24
23_24
25
25
SECTION
4.
Straight Stitches
• Straight Stitch
• Use the Seam
• Turn a Square
Use the Daring
• Topstitching
......................
........................
.........................
Guides .....................
Corner
.....................
Plate
....................
...........................
SECTION
5.
CAREFORYOUR
PARTS LIST
INDEX
...................................
........................................
61_62
MACHINE
Replace the Light Bulb
......................
C_ean the Bobbin Holder
....................
Clean the Hook Race and Feed Dogs
Oiling the Machine
........................
26_30
31_33
31
31
3t
32
32
PROBLEMS CHART
What to Do When .........................
STITCHES
Chart
PERFORMANCE
33
34
34
35_42
35
36
37
37
38
38
39
40
40
41
42
42
43
44
45_5t
45
46_47
48_51
52_53
54
54
55
55
56
56
57
57
58
58
59
60
.............
63
63
64
64
65_66
67_68
SECTION
1.
KNOW YOUR MACHINE
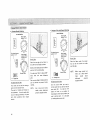
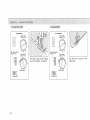
Locate and Identify the Parts
A Portable Case or Cabinet is Available
A
full
line
nearest
of
Sears
sewing
retail
cabinets
store
or
is available
through
our
at your
general
catalog.
Another
your
option
Kenmore
, ,
buy
a Carrying
goes anywhere,
Case
: = then
can be stored
Thread
Spool
Pins
any-
where.
Bobbin
Upper
Take-up
Thread
Face Cover
Needle
Spindle
Stitch
Width
Control
Spee_
Range
Lever
Top Thread
Control
Thread
Winding
Guide
Tension
Plate
Cutter
Plate
Reverse Stitch
Extension
{Accessory
Table
storage
box}
Switch
Control
Carrying
Arm
Cover
Hand
Handle
Presser
Thumb
Foot
Screw
Presser
Foot
Wheel
Push-Pull
Clutch
Snap-on
Stitch
Strelch
Thread
Guide
Needle
Clamp
Plate
Presser Foot Lever
SeSector
Stitch
Light and
Power Swttch
P_ug Connector
Adjuster
Free Arm
Nomenclature
Plate
Foot
Control
Button
Bobbin
Buttonhole
opener
\
Darmng
plate
Needle
Large st:rew dr_ver
Quilter
Smell
Lint
Blind
stitch
foot
/
Spool
Satin
foot
hem
foot
-%,
Buttonhole
Overedge
brush
driver
Straight
stitch foot
Sliding
buttonhoSe
Zipper
screw
set
pin telt
stitch
%
foot
Buttonhole
foot
loot
gutde
p,a,o
/
_'_. _
Base plat
Buttonh
o_e templates
...........
J
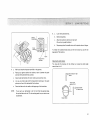
Plug in the Machine
and Switch
Power
Foot
on the Power
supply plug
/
Control
Use
Power
supply
J
Sewing ligh_
_
Power
sw_Ich
and power
switch
.J
4.
Plug
connector
Before
inserting
machine,
be
the
sure
plug
the
power
SAFETY
into
Your
your
Volt
your
outlet
light,
The
switch
is
to be sure it is a 110to
120
witl
llght/power
switch
interrupted
or
light/power
switch
stop
toot
which
FEATURE:
machine
children.
Check
and sewing
to turn
To
OFF
t.
light
on the power
Machine
plug
NOTE:
Push the
control
operate
_s turned
sewing,
to
unless
the
To
If you
are
sure slightly.
on,
turn
prevent
off
mllury
speed,
decrease
speed,
3.
Insert
the
machine
plug
outlet,
as shown,
tt will
Insert the power
supply
into
only
the
three-prong
fit one way.
plug into the outlet.
at
gently
press down
with
release
your
foot
control
is sensitive
pres-
the
to
NOTE:
The
foot
will
increase
regulate
your
or
decrease
speed
Practice
2.
speed
foot.
sewing
AC outlet,
the
you sew.
increase
the ball of your
not
regulates
on
immediately.
a scrap
your
and
your
sewing
taste and needs.
of
fabric
to
speed
to
Set the Pressure
Dial
j
Your
machine
work
and
will
sew no
even when
has two
a high
ranges
one for faster,
faster
the foot
than
control
of speed--a
low
general
On the low setting the machine
approximately
is fully
work.
two4hird
range
for slower,
the speed of the
intricate
high
one,
depressed.
Setting
mark
NOTE:
It is advisable not
machine is running.
to
change the
speed range
switch while
The pressure
Set the dial
control
aligning
3 .....
most
2 .....
applique
1 .....
basting,
dial is located
the setting
mark
on the dial with the groove
as follows.
sewing
and Cut-Out
sewing
Also for vetours
NOTE:
inside the face cover plate,
chiffon,
work
lace, organdy
and knits
(with
more
and other
lightweight
fabrics.
stretch),
The pressure dial should be reset at 3 after changing pressure, so
the machine is ready for most normal sewing the next time you use
it.
=
Setting
Spool Pins
=
Adjust
the Presser Foot
= Thread Cutter
Lever
r
_poo_
The
p,N
fe,t_
spool
spools
pros
of thread
are used
in order
for
holding
to feed thread
You
the
to
the machine.
To use, pult
spool
storage,
felt
up the spool
on
the
pros.
pins,
Push
Place _he
down
for
The
Presser
Foot
Lever
raises
and
lowers
your
You can raise it about
to help
foot_
you
for
1/4"
higher
easy removal
place heavy
than
the normal
of the presser foot
fabrics
under
or
the presser
need a pair of scissors to cut the
after you finish
handy
thread
The threads
starting
presser foot.
up position
don't
thread
sewing.
Just use the
cutter,
are cut
the
the next seam,
proper
length
for
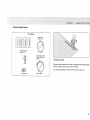
o Accessory
Storage
Box
= Free-Arm Sewing: the Removable Extension Table
Your
To remove:
To Remove
the Extension
(for free-arm
J
The
lid
of
open toward
the
accessory
storage
box
you.
Sewing accessories
inthe
box.
are conveniently
Grip the table
as sh own.
2.
Pull gently
located
machine
makes
with
toward
The ex_nsion
your
index
finger
to reinforce
pockets,
and thumb,
you.
table will
snap out,
and
To Attach:
• :_,
_;_,i!:i_ii_:,
_,_
i_:_ii_!ii_ii_;i
!_i
:i_
=_ii!_:';_
the Extension
Table
sewing)
1.
Fit the tabs into
2.
With
your
thumb
the slot,
as shown.
and index
finger,
gently
waistlines
on
made garments
to
around the needle.
Extension table
(for flat-bed
easy for:
Table
Bar tacking
To Attach
can do free arm sewing.
sewing
sewing)
1.
lifts
sewing
This feature
snap in.
plackets
ready-made
or home-
avoid
bunching
fabric
* Stitchingsleeves,
waistbands,
pantlegs,
oranycirculargarment
area.
* Darning
socksor mending
knees,
elbows,
orareas
ofwearinchildren's
clothes.
* Sewingbuttonsonsleeves,
waistbands,
etc.
o
The Presser feet are an important feature of this machine.
what each foot does in order to use them effectively.
Your presser foot is held in place by a Foot Holder.
snaps on the foot holder, which is seldom removed.
You need to know
Changethe
Use the
Stitch
Each presser foot merely
Presser Foot
correct
presser foot
Pattern
Chart
for
the
and the detailed
stitch
you
directions
wish
for
to sew.
sewing
with
Consult
the
the various
presser feet,
If you need to remove or attach the foot holder, here is what you do:
To Remove:
Foot _
holder
To Attach:
To
To Attach:
To Snap Off the Presser Foot:
Snap Off:
!
SCrew
To Remove:
Turn
the
screw
the machine.
driver,
toward
Use the
the
back
large
of
1.
Match
holder
screw
the
the presser
2.
Fit
hole
with the
the
in
the
threaded
foot
1.
hole in
bar.
foot
holder
screw
into
the hole.
3.
Tighten
toward
10
Raise
the
screw
by turning
it
needle
bar to
Raise the presser foot.
3.
Press the
will
_ts hlghest
position
by turning
the hand
wheel
you.
2.
foot
you.
the
toward
snap-on
drop
off.
button
on the
back
of
the foot
holder.
The presser
•
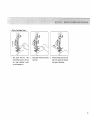
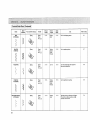
PresserFoot Types
Straight
Zigzag Foot
f
%
To Snap On
Use
this
foot
A:
for
both
Zigzag foot
straight
and zigzag
Zigzag stitching
Bar tackir_g
G
Button
Place the
presser
foot
zontal
pin
on
under
the
groove
the
foot
of
lies
the
just
foot
holder.
2.
the
presser
foot
lock the presser foot
holder
to
If
you
presser
press
foot
do
foot
down
holder
not
hear
snap
in place,
on
firmly
hear the snap.
the
the
presser
until
you
Use this foot exclusively
Straight
foot
for straight stitching
Uses:
Straight stitching
lsee page 31),
Topstitching {see page 32),
Straight stretch (see page 34),
Quilting (see page 33),
(see page 41},
(see page 42),
Lace work
(see page 44),
shell stitching
(see page 54),
Smocking
(see page 55),
patching
Fagoting
{see page 555),
(see page 56),
Herring
in place.
(see page 40_1,
Two-point
Elastic
NOTE:
stretch
Stretch
Lower
(see page 39),
zigzag
Overcast
so the hori-
(see page 37),
stretch
Three-step
1.
{see page 35),
sewing
Rick-rack
To Snap On the Presser Foot;
H:
using center needle position only,
stitching_
Uses:
Feot
bone stretch
stretch
Box stitching
Two-point
tsee page 56),
(see page 5_7),
(see page 57),
box stitching
Overedging
stitch
Decorative
stretch
(see page 58),
(see page 58),
stitching
(see page 59).
1t
o Presser
Foot
Types (Continued)
Sliding Buttonhole
Foot
%
Sliding
Zipper
buttonhole
Satin Stitch Foot
Foot
foot
E:
Zipper
foot
F:
Satin
stitch foot
J
Use
this
system.
It
buttonhofes
Uses:
foot
for
is
buttonholes
marked
to
of
buift-ln
measure
accurately.
Buttonhole
making
{see page 45).
your
This
foot
your
zipper.
can be set to sew on each side of
The edges of the foot
zipper
and keep the seam straight.
Uses:
Zipper
application
guide the
(see page 52).
Use this
transparent
outJining
applique.
Uses:
Satin
foot
stitch
Applique
{see page 36),
Shell stitching
(see page 3_88),
(see page 5__44),
decorative
(see page 60).
12
stitch
{see page 37),
Monogramming
Geometric
for satin
stitching
and
Blind
Hem
Stitch
Foot
Overedge
G;
stitch
Blind
Foot
Qu liter
C: Overedge
foot
hem
foot
Quilter
J
Use
this
foot
for
The foot
has ridges
the fabric
from
perfect
on the
hemming.
bottom
to
keep
This
foot
stitching
and a guide screw on
small
top to guide the folded
edge of your
fabric,
Uses:
(see page 43}
Blind
slipping
blind
hemming
hem.
from
knit
Uses:
is
especially
and/or
brush
overcasting
and Wire guides
constructed
for
This attachment
seams.
The
a quilting
help control
the
ho_d the raw edge in place
puckering,
especially
when
and keep it
sewing
Uses;
turns
your
zigzag foot
into
foot.
Straight
stitching
{see page 33)
on
fabrics.
Overcasting
Serging
stitch
(see page 40),
tsee page 42)
13
= Presser Foot Types
Buttonhole
(Continued)
Foot
Buttonhole
foot
Your
Use this foot
buttonhole
Uses:
when
making
attachment
Buttonhole
buttonholes
with
tn your
system.
making
choice
tsee page 48)
of needle
needle
and thread
case, you will
depends
find
on the fabric
the following
Btue (t 1 ) ..........
for stretch
Orange
for
(11 ) ........
Red (14)
Purple
...........
(16)
color-coded
for
topstitching
(18)
........
for
•
14
Check
Your
has
a larger
topstitching
heavy
stitching
weight
wetght
and
fabrics
decorative
on these fabrics
needle
thicker
Green
fabrics
or medium-heavy
medium-heavy
(This
needles:
fabrics
_ightweight
for medium
........
you are sewing.
weight
thread
hole
for
thread.)
fabrics
and decorative
top-
on these fabNcs
Needle
1.
Look for barbed
2.
A damaged
needle
and silk-like
fabrics.
Always
buy
smooth
and consistent
a good
or blunt
point.
can cause permanent
quality
thread.
in thickness.
It should
snags or runs _n knits,
resist
tangling
fine
silks
and be strong.
Fabric,
Needte,
Thread
: ;titch
and
NEEDLE
SIZE AND
COLOR
FABRIC
Lightweight:
Batiste, Dimtty,
Chiffon,
Silks, Fine Lace° Organza,
Crepe, Tar{eta, Voile,
Organdy
11.ORANGE
Medium
Wetght:
Cotton,
Cotton
Blends,
Percale_ G ingham_
Shantung,
Pique,
Seersucker,
Satin. Kmts,
Vinyl Su_tings_ Linen,
Wool Crepe, Leather
Medium
Heavy Wmght:
Corduroy,
Detain, Wool,
Sailcloth,
Wool Flannel,
Gabardine,
Velvets,
Leather
14-RED
THREAD
Your Needle
RECOMMENDED
STITCH
LENGTH
SETTtNG
SIZE
Polyester
CorelCotton
Wrap
Fine Mercerized
Cotton
Silk A
50 Mercerized
Cotton
Polyester CorelCotton
Wrap
Silk A
2
(t2 stitches per
inch]
2--2.5
(1 0.12 stitches
per inch)
C,
"" "--4 ,/'
l
1
14-RED
or
• 16-PURPLE
Heavy Weight:
Coat rags, Upholstery
Cotton
Duck
Heavy
Twitls, Canvas
To Change
Length Chart
18-G R E EN
Decorative
top-stitching
on aH types of fabric
16-PURPLE
18-GREEN
Stretch Fabrtc:
Polyester Double
Kmts_
Nylon Tricot,
Jersey,
Stretch Terry, Spandex,
Cire Tricot
11 -BLUE
(STRETCH
FABRtC
NEEDLE)
50 Mercerized
Cotton
Mercerized
Heavy-Duty
Polyester
Core/Cotton
Wrap
SHk A
Heavy Duty Mercerized
Cotton
Polyester
Core/Cotton
Wrap
Silk A
Buttonhole
Twist
(Use as top thread
onSy)
Polyester CoretOotten
Wrap
50 Mercerized
Cotton
Flat
2--3
(8-10 stitches
per inch)
s_de
away
lrom
you
3
(8 stitches
tnch)
per
NOTE:
Raise
tion
3-4
{6-8 stitches
per inch)
2--2.5
(1 O-12 stitches
per inch}
the
by
needle
turning
bar to
the
its highest
hand
wheel
screw
by
posttoward
you,
1.
Loosen
the
toward
you.
2.
Remove
3.
insert
with
needle
the needle
the
new
clamp
by pulling
needle
into
the fiat side away from
the
5.
Tighten
the needle
needle
go,
clamp screw firmly
from
your
ciamp
you.
Push the needle up as far as it will
screwdriver
it
it downward.
4.
large
turning
accessory
with
the
storage
box.
15
= To Remove the Bobbin from the Machine
1.
Gently
push
=t towards
2.
Set aside.
3.
Lift
down
on the
bobbin
cover plate
= Wind the Bobbin
and slide
you.
out the bobbin,
3lurch
as shown.
I.
Put your
spool
of
thread
onto
spool
pin,
with
the thread
winding
in the direction
shown.
2.
Pull
the
clutch
winding
3.
Draw thread from
4.
Place
out
away
from
the
machine
to
stop
the
needle
from
moving
the
spool
threaded
through
bobbin
on
bobbin
winder
tension
you
the bobbin
winding
to the right
until
disc as shown,
spindle
so that
the thread
comes
on top.
5,
Push the bobbin
6,
Holding
7,
When
onto
winder
spindle
end of thread,
the bobbin
is slightly
depress
filled,
it clicks,
the foot
control.
stop the
machine
and cilp
the thread
the bobbin.
16
while
the bobbin,
8.
Slowly
start
the machine
9.
Push the
10.
Remove
11.
Push in the clutch
bobbin
winder
again and wind
spindle
the thread
to the left
and clip
the bobbin.
for normal
sewtng operation.
until
the bobbin
the thread.
stops.
coming
from
Insertthe
Bobbin into the Bobbin
Hotder
7
®
J
1.
Put
the
holder
bobbin
so that
counter-clockwise
into
the
the
thread
(left)_
bobbin
feeds
2_
Pull
about
toward
slot
@.
you
4
inches
through
of
the
thread
tension
3.
Then
pull
the
toward
the
back
through
the slot
thread
clockwise
of the
@
.
machine
4.
Slide
the
bobbin
pushing
it down
bobbin,
Allow
thread
to
show
cover plate
slightly
about
above
while
over
the
4 inches of
the
needle
plate.
t7
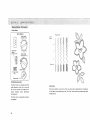
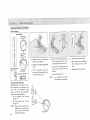
o Thread Your Needle
II
]
I
,,PI,
7
II
--I l
II
l
I
I
Raise take-up
lever to its highest
Raise presser foot
Place spool
The numbered
steps above follow
the numbers
position
by turning
hand
wheel toward
you.
lever.
on spoot pin as shown,
1.
Draw thread
into thread
2.
While
holding
check
spring holder.
3.
Firmly
draw thread
4.
Draw thread
down
5.
Thread
then
is slipped
6,
Thread
needle from
thread
with
thread coming
guide using
near spool,
both
draw
up and through
from
the back of the spool.
hands.
thread
take*up
down
into
the
tension
lever from
right
to left.
area and then
on the illustrations.
Dotted
loops
lines
and then
show
places
is pulled
tight.
where
the
NOTE:
18
and slip it through
the thread
guide,
thread
You may want
into needle bar thread
front
guide.
to back.
to cut the end of thread
with
sharp scissors for easier needle threading.
around
the
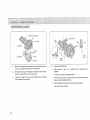
Pick Up Your Bobbin Thread
Raise
presser
foot
needle
thread
loosely
and
rotate
lever.
handwheet
you one complete
Hold
in left hand
toward
2.
Bring
bobbin
top thread,
thread
up by pulling
3.
Pull both
back
threads
of the
under
presser foot,
to 6 inches of thread
and to the
leaving
4
clear.
turn,
19
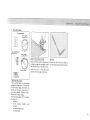
m Adjust
the Top
Thread Tension
Choose
Top side of fabric
the Correct
The best tension
SelUng
mark
---
Tension:
will
depend
on;
the stiffness
and thickness
the number
of fabric
of the fabric
layers
the type of stitch
Top ___
thread
The top thread
_s too loose.
Tighlen
The top thread
_s 1oo tigh_
Top
For Straight
The
ideal
fabric,
If you
Stitch
straght
as shown
look
gaps, that
o_ Ta
stttch
witl
have threads
above, magnified
at the
each stitch
When adjusting
side
stitch,
top thread
between
the
two
layers
of
The top thread
appears on the
undemde of the
fabric.
to show detail.
front
is smooth
locked
and backt
you
will
notice
that
there
are no
The
bobbin
lhread
appears
on
upper
_abrlc.
sudace
the
o_ the
and even.
tension,
the higher
the number,
the tighter
the top
thread,
Tension
The
bottom
_s too loose:
top
thread
of the
of the stitch
20
will
Tension
shows
fabric.
through
The bottom
feel bumpy.
the
s_de
ts too tight:
"The bobbin
the
top
the stitch
thread
of the
will
fabric.
come
The top
wi]l fee] bumpy.
through
side of
For Zigzag Stitch
in the
of
correct
fabric
below
and
for
zigzag stitch,
the
top
the correct
the bobbin
threads
will
appearance.
threads
show
will
slightly
To match
this
not show
on
the
on the top side
bottom
appearance,
adjust
side.
your
See
top
tension.
Top tension
Top tension
Too Tight
Too Loose
Just Right
The stktch selector
Simply
turn
on
stitch
the
stitch
Top
s_de of Fabric
Top
side of Fabric
this
control
control
indicator
length control
determines
until
panel.
the stitch
the desired
The bottom
is set at the stretch
you
stitch
row
stitch
select.
is indicated
by the
of stitches
red indicator
is selected
when
the
posit'=on.
Top side of Fabric
NOTE:
To avoid
fabric
Stitch
patterns
needle
when
or fabric
selecting
are color-coded
damage,
be sure your
needle is up and out
of
a stitch.
to
recommend
setting
zones
at the stitch
length
control
ZONES
Bottom
sCde of Fabric
Bottom
side of Fabric
Bottom
side of Fabric
Too Tight:
Too
Loop;
Just Right:
--Corner
ot
each
zigzag
will
pull
together
on
the
top side of fabrics,
--The
top
thread
will
loop through
bottom
side
ot
fabric
and will be
pulled
almost
together,
Minimize
the
amount
of top thread visible on
the
bottom
side
of
fabric
w_thout
causing
excessive
puckering
or
eausmg
the
bobbin
thread
to show on the
top side.
Results vary
with
fabric,
thread and
sewing conditions,
= Orange ........
o Green .........
Straight, Zigzag and Utility Stitches
Geometric Decorative Stitches
= Blue .........
= Yellow ......
Built-in Buttonhole
Stretch Stitches
Making
21
V Length
Stremh
The stitch
stitches
length
controt
Stitch
regulates
the
length
of stitch,
and also has a stretch
setting.
The higher
the number,
the longer the stitch.
stitch
sewing,
adjuster
{n stretch
should
usually
position
(between
position),
may
0 means no feed.
To select Stretch
Stitches,
NOTE :
you
set this
control
at Stretch
need
(blue),
"Stretch
Study
control.
coded
select
decorative
make sure that
you
stitches
do not
(green)
or built-in
set the stitch
to
buttonhole
length
control
at
Stitch".
the
orange,
These
green,
yeIlow
are recommended
to the stitches
pictured
and
zones
on the stitch
blue
section
of stitch
indicator
around
length
this
and color-
panel.
toward
"'-"
until
center
design.
the
the
design
right
conllol
desire.
this
"-"
or
design
to
sake.
to
control
looks
until
slightly
like the
be c_osed as in
illustrations,
"'+"
you
controt
like the illustrations
the
appears
hand
toward
and
for appearance
seems open
stitch
in a neutral
some fabrics,
adjust
adjust
you
22
to
left,
If
the
"+'"
the stitches
If design
When
be
When sewing
balance
Stitch.
the stretch
turn
stitching
the
_s as
:',Stitch WidthControl
= Three Needle Position
f
V Width
_ 2 3_4
f
The stitch
of the stitch
The htgher
width
control
regulates
the width
you select.
the number,
The stitch
width
the wider
]
control
needle positions
s
also regulates
for straight
the
stitching.
the stitch.
.....
LEFT
(_
.....
CENTER
(_
.....
RIGHT
First
select
straight
stitch
selector
desired
needle
width
control.
You
can easily
to
right
under
NOTE:
needle position
needle position
needle position
stitch
control,
position
without
adjust
by
turning
the
then
select
the
by turning
your
moving
the stitch
needle from
your
fabric
left
from
the presser foot.
Setting
0
the
position
needle
stitch
also
width
gives
control
you
at
center
position.
23
Three Needle
Position
_
3
45
o 1
Left
Needle
Set the dial
sewing
23
Position
at left needle position
the edge of the fabric.
Right
when
Set
for
Needle
the
top
of jacket
24
45
B
dial
Position
at
stitching
etc.
Right
when
needle
sewing
position
on collar
Now that
you
you
each time
1.
are famillar
are ready
to start
you sit down
Inspect
the
2.
inches
placing
to the
your
tt should
and thread
on your
machine
and wlth
the accessories
new
Kenmore
sewing
be straight,
properly
set and sharp on the point,
being used.
made of synthetic
Before
the controls
machine.
Below
provided
for the machine,
are some good habits
to follow
to sew:
needle,
for the fabric
fabrics
with
to sew with
the
blends
material
rear of the
Do not
tend
on the
be afraid
to du!l the needles more
machine,
machine,
to change
Hold
see that
the
on to threads
your
easily
ends
during
than fabrics
of the
the
It should
be the correct
needle frequently,
made
threads
sewing
Many
of natural
fibers.
have been drawn
of the first
size
of the new
3 or 4 stitches
about
4
of the
seam.
J
To reverse
stitch,
trol
sewing.
during
hold
Release to sew forward
down
3.
Test the machine
the machine
this con4,
Fabric
should
the right
again.
stitch
on a scrap of fabric
for the length
be placed
of stitch
under
edge of the material
you
plan to use, The fabric
and tension
the presser
placed
suitable
foot
on the
with
5/8"
to your
the
bulk
should
be double
thickness,
Adiust
fabric.
of the material
seam marking
to
the left of the needle and
on the needle plate when
making
a simple
se_m,
5.
Run the machine
machine will sew.
6.
Fasten
each seam by back tacking
7.
Always
finish
8,
Guide
9.
sewing
the fabric
that the normal
When turning
at
a slow
even speed.
gently
with
your
more
at the beginning
each seam with
feeding
The
pressure
in front
put
on the foot
contro!,
the faster
the
and end of the seam.
the needte at its highest
hand
you
point.
of the needle.
Never pull
or hold
the fabric
in such a way
is altered,
the hand wheel
manually,
always
turn
it toward
you,
25
Stitch
STRAIGHT
)
I
l
I
I
Stitch
Selection
Foot
and Other
Attach.
Straight
I
I
I
I
Straight
Zigzag
%
Refer to Page
Check
Chart
2_6
Yellow
Stretch
Stitch
Position
0
or
Check
Chart
on p. 1__5
3_8
Orange
Zone
1~6
Finish edges, buttons,
satin stitch, applique,
monogram, embroidery,
sewing bar tacks.
Check
Cha_
2_6
Yellow
Stretch
Stitch
Position
2~6
Decorate
2_6
Orange
Zone
2_3
Use for finishing
Orange
Zone
0
or
Uses
2~6
Regular searms,
etc.
zippers,
topstitching,
darning,
31 _ 32,
52 ~ 53
(3D
Zigza9
on p. 15
26
Stitch
Width
Check
Chart
onp. 15
on p. 1_55
ZIGZAG
BLIND HEM
STtTCH
Stitch
Length
Zipper
foot
II1
III
111
ill
RICK-RACK
STRETCH
Thread
Tension
_ilter_'?
Darning
Plate
STRAIGHT
STRETCH
Needle
Blind
hem stitch
Check
Che_
on p. 15
Use on knits and other stretch
for topstitching.
garments
fabrics, good
with one row
seams.
or several.
34
35 ~ 39
40
43
Stitch
Stitch
Selection
Foot
and Other
OVERCAST
STRETCH
Zigzag
Attach.
Needle
Check
Chart
Thread
Tension
2_6
<
<
Zigzag
o_
%
SMOCKING
STITCH
Zigzag
(_
SHELL
STITCH
Stitch
Width
Yellow
Stretch
Stitch
Position
Uses
Refer to Page
3_6
Use for swimwaar,
skipants and other
garments that require stretch.
42
5~6
Use for finEshing
seams.
41
or as a decorative
on p_ 15
THREE-STEP
ZIGZAG
<
Stitch
Length
2_6
Check
Chart
onp+
0.5_
1
t5
Cheek
Chart
2_6
Yellow
Stretch
Stitch
Position
3_6
Use in smocking
stitch.
55
4_9
Orange
Zone
3~6
Fimsh hems, sleeve and neck openings.
Use on nylon tricot and other |ingerte to
overcast and seam.
Do shell tucking on blouses and tlnger_e,
54
3_6
Yellow
Stretch
Stitch
Position
3N6
Finish hems, sleeve and neck opemngs.
Use on nylon tricot
and other lingerie to
overcast and seam.
42
on p. 15
Satin
Check
Chart
onp.
SERGING
Overedge
!
%
Blue (11 )
on p. 15
Do shell
tucking
on blouses
end flngerie.
27
J)
Stitch
Stitch
Selection
BOX
STITCHING
Foot
and Other
Zigzag
Attach.
Needle
Check
Chert
Thread
Tension
Stitch
Length
Stitch
Width
Uses
Refer to Page
seams.
57
3 _ 8
Orange
Zone
3 _ 6
Use for overlapping
3 _ 6
Yellow
Stretch
Stitch
Posltlon
3-6
Use for apply=ng
0.5~2
5_6
Join two folded edges for decorative
open-work
appearance.
56
55
on p.15
ELASTIC
STRETCH
Check
Chart
onp._
elastic,
57
<
/
FAGOTING
Check
Chart
onp.
3~8
STRETCH
PATCH IN G
Check
Chart
onp, 15
2 _ 6
Ye!tow
Stretch
Stitch
Position
5~6
Use for patchwork
Check
Chart
3-8
Orange
Zone
3-6
Do shell tucking
on blouses and llnger=e.
This stitch can also be used as e single
ovedock st=tch as well.
<
<
<
TWO-POINT
SHE LL
STITCHING
Zigzeg
onp.
L>
28
quilting,
L>
15
54
Stitch
Stitch
Selection
HERRING
BONE
STRETCH
Foot
and Other Attach.
Zigzag
%
TWO-POINT
BOX STITCH
Zigzag
L
C_
C_
r3
%
Needle
Thread
Tension
Stitch
Length
Stitch
Refer to Page
Uses
Width
Check
Chart
on p. 155
2_6
Yellow
Stretch
Stitch
Positron
3~6
Use as hemming
and draperies.
Check
Chart
on p. 15
3~8
Orange
3~6
Use for overlapping
Check
Chart
3~8
Orange
Zone
3N6
Use for overedging_
2~6
Yellow
Stretch
Stitch
Position
3~6
Use m smocking
3-8
Green
Zone
3~6
Decorate garments with one row
one stitch or a comblnatton.
stitch
for blankets,
tablecloth
56
58
seams.
Zone
r_
OVEREDGE
STITCH
Zigzag
%
STRETCH
STITCH
DECORATIVE
DECORATIVE
GEOMETRICS
Zigzag
%
Satin
%
58
on p.155
Check
Chart
onp. 15
Check
Cha_
or as a decorative
stitch,
59
or several,
6O
on p. 15
29
Foot
and Other Attach.
Sliding
buttonhole
Needle
Check
Cha_
Thread
Tension
2 _ 6
Stitch
Length
Stitch
Width
Blue
Zone
3 _ 6
Uses
Buttonholes:
also corded
Refer
buttonholes,
to Page
46 _ 47
on p. 15
BUTTONHOLE
17
D
Buttonhole
Check
Cha_
on p. 1__55
2_6
Check
Chart
on p. 155
3_8
4
Straight
buttonholes
buttonholes,
end keyhole
48 _ 51
Q
tl,
SATIN
3O
STITCH
Satin
0.5~
1
2~6
Use for applique
work, also as decoratwe
finish for ptacemats, blankets,
collars,
cuffs and pockets.
36
Straight
Stitch
Use the Seam Guides
Set the Machine
Stitch width
control 0 or(_D
13
5
Cornering
lop thread tension
control 2 to t3
The
Stitch length
control orange
Before
zone
foot,
sewing
always
control
to
with
the straight
stitch
set
the
width
0 or (_
stitch
to avoid
1.
2.
Raise the presser foot.
the
3.
H: Straight foot
Place
to
Best
sewing
stitch
results
with
foot,
foot
the
but
will
also
be
for
positions.
all
its
highest
9.
may
want
and
end
of
to reverse to
needle
4.
zigzag
and
can
needle
plate
seam
width.
lines are 1/8"
with
The
the 5/8"
and 7/8"
apart,
lines marked.
the stitch.
Raise the presser foot
the fabric.
and remove
•
Turn a Square Corner
Cut the threads,
the
edge
a stitching
of the fabric
guide
plate
line
(5/8"
next
on
is
the
most
common),
Draw
the
and lower
provide
results,
used
are
straight
the
acceptable
to
beginning
the
to help you measure
guide
needle
obtained
needle
the
on
are engraved
position.
Stretch Stitch
NOTE:
lock
8,
Raise
At
seam, you
breaking
the needle.
4.
7.
seam guides
guide
threads
toward
5.
Press the footcontroI.
6.
Hold
the fabric
guide
that
Do
it
the back
the presser foot.
along
1.
loosely
the
To turn
fabnc
and gently
guide
line,
so
it feeds naturally,
not
force
pull it tight_
the fabric
or try
a square corner
Stop
stitching
2.
by
turning
toward
you
when
facing
you
lines
Raise
the
guide,
the
fabric
the 5/8"
3.
and
needle
cornering
to
5/8"
from
the
edge:
Lower
stitching
lower
hand
the fabric
up
with
the
wheel
edge
the
as shown,
presser
foot
to
the
edge with
foot
and begin
line
and
turn
seam guide.
the
presser
in the
new direction,
31
Use the Darning
Plate
Topstitching
Darning
Set the Machine
plate
Stitch width
control 0 grog
2
3
,_
o
lop thread tension
control 2 to 6
6
Stitch length
control orange
Here's How
zone
2
1.
Sometimes
when
you
The
Plate
covers
Darning
To Put on the Darning
NOTE:
The
right
2.
you
the feed
want
to
control
dogs so that
the
fabric
they do not touch
plate.
2.
the fabric.
in the
In the
darning
the darning
Fit
darning
mark.
Darning
plate,
plate with
plate
The feed
pins
Plate
match
these holes
the holes
are slightly
tn the
Stretch Stitch
the
show
needle
through
plate
holes
the darning
Button
at the
The Stitch
32
and Its Uses
Topstitching
plate in the following
(see page 34),
Sewing
edge
of
the fabric
right
edge
guide
the fabric
ways:
your
(see page 39)
emphasizes
garment
Accent
and
keeps
the
lines
seams
of
and
and crisp.
suits
of
or
to
topstitching
H: Strmght foot
plate
Evenly
edge
edges fiat
Darning
3.
to the
the pins on the bottom.
into
dogs will
holes.
Use the darning
the
the
of
the
next
presser
fool
holes
Position
the
the presser foot.
Keep
to
of center.
5/8"
Lower
yourself.
Plate:
rectangular
needte
1.
sew,
blouses
two
rows
topstitching
outer
edges of cuffs,
with
one
around
lapels or collars.
or
the
produce
5/8"
along
this
an even row
from
the
of
edge.
Straight Stitches
=
Quilting
Set the Machine
Stitch width
contro_ 0 or
I _
Quilter
holding
_'_
JW
£xorew
Stitch length
control orange
zone
Top thread tension
control 2 to 6
Here's How
To do quilting
e
1.
Loosen the quilter
2.
Slide
the
between
Stretch
The Stitch
and
A: Zigzag foot
Its Uses
Quilting
is stitching
together
dimension
with
batting
and warmth.
Traditionally,
covers,
You
can
parts
of
cuffs
and collars.
fashions.
quilting,
stitches
you
on entire
such
into
the
stitches
opening
under
the
screw
to
the
width
you desire.
Tighten
Sew the first
the screw.
5.
Sew other
row of stitching.
rows,
When
basting
guiding the quilting
you
are quilting
stitch.
large
Then
quilt
from
rows
of straight
guide
over the previous
areas, tack
the
layers
row of stitching.
together
with
the
the center out.
add
quilt
or stitch pattern
to
or
pockets,
of
quilting
with
stitches,
you
can bartack
your
quilt
at
intervals.
Set up the
you fabric
machine
as if you
were going
to sew a button
(see page 39).
Position
and bartack.
for table
straight
with
Instead
regular
garments
as yokes,
It is also popular
addition
can
lines of quilting
3.
fabric
to
has been used for bed
use qu[Itlng
In
of
between
it _sused everywhere.
garments,
guide
as shown.
An other qu iltlng variation:
quilting
but now
layers
in
screw on the back of the presser foot
quilting
4,
NOTE:
two
these simple steps:
Stitch
or
H: Straight foot
successfully, follow
stitch
decorative
combinations.
33
"; i ; , __ =;_i:i :, _. ! :ii:i::,:_; ;_i i_! _iil
,i _:i,
Sat the Machine
Set the Machine
Stitch width
control 0 or C_
Stitch width
control 0 or C_)
! IH I
Top thread
tension
contro_
2to6
Stitch length
control any number
(not necessary to
adjust}
2
,
Top thread tension
controJ
2 to 6
Stitch length
control
yellow
stretch stitch
poslt_on
Here's How
1.
Put
the
darning
plate
on the
needle
plate
(see page 32).
No presser
foot
2.
(see
Stretch Stitch
3.
Darning
Remove
plate
presser
page
foot
!_00), stretch
ernbroidew
hoops
Draw
bobbin
the
fabric
and
with
stitch
at
start
darning.
the
the
holder
fabric
between
hole centered.
thread
by holding
one
foot
top
spot
up
thread
where
Stretch
through
the
the
presser
bar
and
and taking
you
wish
to
sew at
a slow
speed,
5.
Move
the fabric
back
you have covered
6.
Turn
the
fabric
hatf
layer of stitching
NOTE:
If your
and forth
the darning
turn
fabric
use a separate
hole to rmnforce
is thin
slowly
until
area.
The Stitch
or badly
the straight
ed for knits
This
stitch
damaged,
under
and Its Uses
is the
stretch
variation
of
stitch,
especially developand stretch fabrics.
can
also
on all fabrics.
be
used
for
knits.
It
fabrics
as well.
the
it,
garments
that
deal
34
of
When you finish darning, remove the darning
plate and replace foot holder and foot.
on other
tt works
seams
and
will
well on
on
receive
strain
(ie.
any
a great
children's
clothes},
The
stretch
actually
stitch
stretch
but
forward
the
does
as it
back
fabric
in
motion
a
so that
of breaking.
not
is being
stitched
called
stitch),
when
instead
_s
and
(sometimes
action"
gwe
7.
can be used
curved
sewn,
layer,
p_ece of fabric
stitch
topst_tching
and sew antother
over the first
Stretch
stitching
was developed
to be used on stretch fabrics and
H: Straight foot
This
Lower
Stitch
"reverseit
will
stretches
a
: Zigzag Stitches
:
Basle Zigzag
Set the Machine
Stitch w_dth
contro_ I to 6
_3
Top thread tension
control
3 to 8
Stitch }ength
control
Or'e rtge
Zone
Here's How
There are many
Consult
4
Satin
the specific
Stitch
Applique
Stretch Stitch
J
The Stitch
The
zigzag
common
your
stitch
machine,
for sewing
ming,
is one
and most versatile
It
with
trims,
can
the
also
mending
be used
appliques
or as a decorative
directions.
page 37,
page 38,
page 38,
Sewing
page 39,
page 40.
most
stitches
buttonholes,
overcasting,
ing.
of
it can be a utility
buttons,
Button
Overcasting
and Its Uses
for detailed
page 37,
Monogramming
Embroidery
variations
page 36,
Work
Bar Tacking
A: Zigzag foot
ways to sew a ztgzag stitch.
on
stitch
hem-
and darnto decorate
and cut-out
work
stitch.
35
¸:¸
Satin
Stitch
Set the Machine
Zigzeg
Stitch width
length
e
€
_controf2tO_l
2
3
width
Slllch
:
2
4- s
Top thread
teRston
(_3
contro_ 3 to 8
t
Stitch tenglh
control 0.5 to 1
Close
to 0
Stretch Stitch
F: Satin stitch
foot
Pressuredial:
The Stitch
1 or
and Its Uses
The Satin
stitch
used decorative
is a versatile
stitch,
but
and often
be used to overcast
a raw edge (for
ample0
linens,
blankets,
ex-
tablecloths
in applique.
36
stitch
Once
is espematly
How
attracUve
your
machine
of the fabric
weight
and napkinsh
The Satin
Here's
_t can a]so
fabrics.
is set up to stitch,
you are planning
you may want
to use. Too
tight
satin
to experiment
stitch
on a fragment
may pucker
some light
Applique
=
Set the Machine
Bar Tacking
Set the Machine
Stitch width
control 2 to 6
Stitch wtdth
control 2 to 6
2
1
Top thread tens=on
control 2 to 6
;f
Stitch length
controt 0.5 to 1
2
Top thread tens=on
control
2 to 6
J
Baste
ior
joiner)
apptique
Stitch
around
sure
Stretch Stitch
F:
Satin sttteh
toot
Pressure dial:2
the
fuse
with
iron-on
pieces
on
the
needte
applique
falls
along
Stitch length
control 0.5 to 1
fabric
the
fabric.
making
the
outer
edge of the applique,
When
sewing
down
into
foot and
or _eft.
corners,
the fabric.
pivot
the
lower
Stretch Stitch
the needle
]
ThL5 stitch
is similar
satin
stitch
and
points
of
pockets
and straps on lingerie.
strain
to a very short
is used
such
to
reinforce
as corners
or
Sew 4 to 6 zigzag stitches,
Raise the presser
fabric
to the
right
A: Zigzag foot
37
iii
Monogramming
=
Embroidery
Set the Machine
Set the Machine
Stitch width
control 5 to 6
Stitch width
2
I
a
Top thread tension
control 2 to 6
Fop thread tension
control 2 to 6
Stitch length
control 0.5 to
6
Stitch length control
Any number Inot
necessary to adjust)
Here's How
1.
1,
Set the same as satin
stitch.
2.
Back
Herc:'s
How the
fabric
with
paper
or
{nterfacing.
Stretch Stitch
3.
Draw
with
F_ Satin stitch
foot
4,
the
letters-on
tailor's
the
fabric
the
stitch
chalk.
Satin
stitch,
adjusting
width
as necessary
to
form
each
No presser
foot
2.
Remove
foot
3,
Adjust
the
Stretch Stitch
If using
when you
carefully
have finished
remove
sewing.
holder
on
the needle
{see page 10),
stitch
4.
Draw
the design
with tailor's chalk.
5.
Stretch
the
dory
paper,
plate
width
as desired
on
the
(see page 23).
pattern.
5,
darning
plate (see page 3_22).
4
0_;_
Put the
fabric
to
between
hoops-and
place
fabric
embrm-
under
the
needle.
it
6.
Lower
the
presser
foot
lever
to
engage the top thread tension.
7.
Holding
hand,
the top
rotate
thread
the
hand
you one complete
turn.
Pull
the
bobbin
in your
wheel
left
toward
top
thread
to
thread
through
to the surface
draw
the
of the fabric.
8.
Using
the
38
fabric
a medium
marked
carefully
speed,
outline,
by hand.
stitch
guiding
along
the
Sew a Button
Set the Machine
Stitch w=dth control
0
Top thread tension
control 2 to 6
_
co
Stitch length control
Any number inot
Use the darning
._
necessary;o
plate for button
sewing
(see page 32).
To
adjust)
1.
Match
the center
of the
button
holes
to the center
of the slot
on the presser
needle
in the
foot,
Stretch
Stitch
2.
Adjust
the stitch
3.
Lower
the foot
Turn
A:
the
hand
width
to hotd
wheel
so that
needle wilt drop
the button
by
hand
so
in each hole.
needle
Draw
will
enter
thread
button
the
shank,
a 8"
tail,
cut
the
Bring
the
down through
the hole
and wind it around the
shank.
in place.
that
leaving
either
hole
of the
the
thread
to
the
bottom
side
and knot.
button.
Zigzag foot
Darning plate
strengthen
threads
4.
Stitch
several times.
39
= Rick-Rack Stretch
Set the Machine
Set the Machine
Stitch w{dth
controi 2 to 6
2
Stitch width
control 3 to 6
2
1
Top thread tension
control 3 to8
Top thread tension
control 2 to 6
_D
Stitch length
control orange
zone
2
Helpfut
Start
raw
right
up
Stretch Stitch
Hints
overcasting
corner
about
of your
the
st=tches
Stitch length
control yettow
stretch stitch
position
If you
wil!
witt
you might
start
bunch
Thts
become
top
tangled.
Stretch
C:
Overedga
The Stitch
and Its Uses
ThLs zigzag
garment
A:
foot
variation
is very
construction
raw edges of any sewing
4O
and
useful
in finishing
project.
m
The Stitch
and Its Uses
Sew on stretch
118" inside the
seam,
at the edge, the fabric
and
(2£)
Zigzag toot
Stitch
?abr=cs in any area that
use a zigzag stitch.
stitch can be used as a decorative
stitch
as wetl,
Three-Step
Zigzag
Set tha Machine
Stitch width
control 5 to 6
Stitch length
control 0.5 to 'i
Seam Finishing
Piace
so that
(Overcasting)
the fabric
the
under
edge will
Mending
the presser toot
be slightly
inside
Pos_t_on
that
the
tear
the stitching
under
witl
the
catch
neec_le so
both
sides_
the r_ght hand side of the presser foot,
Stretch Stitch
A:
zigzag
zigzag and straight
has
flatter
The
fail at the edge of the fabric.
work
so
the
right
hand
and its Uses
The three-step
would
the
stitches
Zigzag foot
]-he Stitch
the
Gu=de
three-step
basic
strength,
than a regular
three-step
You
may use
z_gzag ever¥whe_e
use the
more
is a combination
stitch.
zigzag
zigzag
you
stitch.
elasticity,
and
It
_s
zigzag,
stitch
is especial-
Iy usefut for:
-
mending
--
sewing
patches
smoothly
and
securely,
-
repairing
straight
-
finishing
seams,
tears.
41
Overcast Stretch Stitching
Sarging or Pine Leaf Stretch Stitchin[
Set the Machine
Sat the Machine
Stitch width
control 3 to 6
s 3
Top thread tension
controt
2 to 6
Stitch width
control
3 to 6
2
1
the
Stitch
Stretch Stitch
raw edge
of
the
lust short
of the outside
Or, place
your
and Its Uses
The
seam
one
operation.
It
you
are making
swimwear,
stretch.
42
trim
ts formed
and
sewtng
or worn
finished
that
ski
In
when
pants
require
foot
to allow
seam
to
Use
a blue
needle,
prevents
the
fabric
so that
under
the
the
stitches
presser
are made
edge.
a 5/8"
Stretch
further
stretch
skipped
Overed£a foot
fabric
effectively
stitches.
When
using
fabric,
use a blue
stretch
fabric
needle
effectively
garments
prevent
which
NOTE :
Stitch
allowance
edges of older
overcast
How
over the edge.
the fabric
raveling,
NOTE:
can be used
garments
a
Place
C:
cat_ be
This stttch
can be used for
seam wtth an overcast finish.
other
then
fabric
to
after,
Raw
and
fabric
Here's
as shown.
so the needle pierces
seam,
Zi£rzegfoot
yellow
st=tch
pos_t_on
Here's How
the LEFT. of the needle
The Stitch
Stitch length
control
stretch
Place
A:
c_b
Top thread tension
contro_ 3 to 6
Stitch length
control yellow
stretch stitch
position
2
The Stitch
and Its Uses
Use
stttch
narrow
th_s
when
seam that
you
press open
flat.
It
seams
kmts
or
on
heavywewght
want
woven
a narrow
for making
skipped
_s ideal
want
a
need to
for
1/4"
on
medium
to
fabrics
where
you
seam.
elastic
you
do not
swim
It _s also great
wear.
kmt
stretch
whzoh
prevents
stitches.
Set the Machine
Stitch width
control 2 to :3
2
3
I/4"
#
0
_
Light
Weight
Fabric
Fop thread tension
control
2 to 6
Stitch length
control orange
zone
2
Stretch
Stitch
t/4"
Heavy
Weight
Fabric
1.
Finish
2.
Measure,
NOTE:
Blind Hem
Stitch Foot G
'_L,JWhen the
_,I
needle
,'_
,_
comes
_;
to the
the raw edge of your
turn up your
For light
weight
material
hem any way you
desire.
(See overcasting
hem and pin,
fabrics,
(bottom
you
out)
on
the
4.
Place garment under presser foot in such a manner
stitch should just catch the fold of the garment.
that
5.
After
The top
sides of the finished
edge
fold.
Fold the
showing.
press both
side
may need a double
3.
hemming,
page 40).
hem.
to
be stitched,
straight
as shown,
stitches
wilt
leaving
the
finished
be sewn on extended
edge.
side of the garment
will
1/4"
of
show only
the blind
hem
edge
The zigzag
stitches.
43
ilili!!ii!iiilji
Set the Machine
Stitch width
control 2 to 3
1
Fop thread tension
2 to 6
controt
Z
3
4-
5
c_
Stitch _ength
control !
2
Stretch Stitch
Lace
A:
to
Zigzag foot
pillows
wh_,m trimmed
Turn
and
feminine
_ingerie.
become
touch
Table
more
linens
elegant
w_th _ace.
raw edge of fabric
5/8",
Place
stitch
using stretch
Tnm
44
a fanciful,
blouses
and
J
adds
under
lace underneath
excess fabric
blind
at least
and
hem stitch.
close to stitching,
top-
=
Learningto Sew Buttonholes
With your
Kenmore
buttonholes.
snap-in
sewing
You
automatic
may
machine
use the
buttonhole
you have two
built-in
system
attachment
system,
methods
or you
of making
Tips on buttonholing
may use the
Always
use.
Always
Choose the buttonhole
1.
Built-in
Choose this
2.
Round
Choose
st'_le for waistband,
end buttonholes
this
style
Tissue
(rectangular).
need only one or two
for
a practice
buttonhole
with
use an interfacing
on a scrap of fabric
the button
you will
in area of garment
you
plan to
use,
where
buttonholes
are
placed.
style
bottonholes
make
Try the buttonhole
cuffs,
belt slots or where you w_ll
paper
(Template
of
No. 213504005,
buttonholes
or regular
interfacing
can be used.
Tear paper
away after
if it is used..
For heavier
buttons.
series
stitching,
weight
fabrics,
loosen
y'our
top thread
tension
slightly.
213505006_,
on dresses,
blouses,
vests, jacke_s or coats.
Keyhole
Choose
buttonholes
this
need more
(Template
style for tailored
room
for button
No. 213506007),
vests, iackets,
coats
or any time
you
shank.
45
Set the Machine
r
_
Stitch w_dth
control 3 to 6
"_
Stitch length
controt
Blue zone F==_
_31
1, a. Carefully
mark
length on your
b, Change
the
buttonhole
to the sliding
buttonhole
b.
c. _nser_
Stiding buttonhole
foot
foot
the
with
ing runnmg
__
garment
the
under
buttonhole
toward
the
so that
foot,
top thread tension
controt 2 to 6
2. a. Move
garment.
the
you.
(A)
the Stitch
Depending
upon
c.
NOTE.
own
preference
may
alter
density
Density
your
in
the
withm
For
the
less
toward
2.
For
46
blue
length
density,
you
stitch
buttonhole
dial.
turn
the
diat
turn
the
dial
"" 1"
more
toward
NOTE;
or your
buttonhole
range on the stitch
t.
fabric
buttonholes,
dens=ty,
_._s
"0",
Always
make
tonhole
on
plan
use to find
to
suitable
a practsce
a scrap tabric
stitch
length.
butyou
the more
Slrelch Stitch
you
(C) on the
slider
meets the start
Lme
up
the
markings
foot
with
the
top
Lower
mark
mark
{B).
on
the
on your
the presser loot.
The
markings
are engraved
Ad usting
toward
mark
garment,
mark-
Stretch Stitch
slider
the top
on
the
slider
in centimeters.
3, a, Set the stttch
selector
b. Sew forward
front
undl
markmg
of
at
you
your
_
button-
holm
c. Stop sewmg
,
reach the
at the left stitch,
m
4. a. Set the stitch
selector
at
[1
I_!
5° a.
b. Sew 4 to 6 stitches.
c.
Stop sewing
Set the stitch
b. Sew until
at the right
selector
you
at
reach the
I_l
6. a. Set the stitch
c. Stop
sewing
at
b. Sew 4 to 6 stitches.
back of
7.
Remove
hole
opener
the buttonhole.
stitch.
selector
c. Stop
at the right
sewing
at the left stitch.
the
open
fabric
with
in your
the
and
cut
the
buttonhole
accessory
storage
box.
stitch.
NOTE:
When
sliding
sewing
at the edge of fabric,
buttonhole
foot
set
as illustrated
k._
--
........
j
47
Buttonhole
Buttonhole
For
more
Attachment
varied
and
hole attachment
your
machine
attachment
Style
and Size
System
accurate
buttonholes,
and templates.
properly.
You
you
will
enjoy using
Know the parts read carefully
will
need
these
items
for
the
buttonRound End
Buttonhole
how to set up
the
Keyhole
Buttonhole
buttonhole
system.
Guide slot
t
Measuremen t
ark_ng
Catch
Buttonhole
0
Template
213504005
213505006
213506007
3/8"
t/2"
15/16"
7/8"
5/8"
13/t6"
lq/4"
guide plate
NOTE:
!llustrations
buttonhole
tength
of
templates
Base plate
Buttonhole foot
48
buttonhole
to be sewn,
easily
by
on the template.
Buttonhole
1-1/16"
1-1/16 ''
Sizes
on
You will
matching
!-t/2"
template
find
the button
1-1/4"
show
actual
the most suitable
with
the
proper
1-3/8"
length
of
buttonhole
illustration
Set the Machine
Stitch w_dth
Pins (A)
a
_
Lever
Round
Tol
thread
Top thread tension
control 2 to 6
Stitch length
control 4
2
Hook
Rectangular
Stretch Stitch
Buttonhole
Helpful
toot
Hints
You
can
#60
_
bobbin
NOTE:
obtain
#80
best
light
results
weight
to
use
threads
as
thread.
It
a.
Remove
b.
Raise the needle to its highest
c.
Remove
d,
Pull bobbin
thread
e.
Insert hook
of base plate
f.
Pull
g.
Snap
two
is advisable
fabric
sewing
knits
the extension
the foot
lever back
holes
hole
table.
position.
holder.
out about
3" straight
into rectangular
to align the hook
base p_ate down
round
Release
stretch
Base ptate
v
to
fit
two
with
pins
back toward
rear of machine.
hole of needle plate°
the rectangular
(A) at the back
hole.
of base plate
into
(B) on needle plate.
tever,
to use a blue
needle
and
when
synthetic
fabrics.
4g
Buttonh_e
guide ptete
; toot
!
_,T_--
G_d
Top
thread
Template
Gear _._,//Slot
_
l
Gu de bock "'"
_'_
II. "_
_
""Catch
I /
Setting Mark
_"
_,-.-----
a.
When
you
have selected
b,
Pull
catch
toward
hole size you
C.
insert
gear of
into the center
you
while
have chosen
base pfate
Bobbin
thread
Base plate
the template
hole you need, slide the template
Starting
point
Gear
'=::: "
2o
\
with
into
slidin!]
the size and style button-
the guide plate.
the template
until
the
3,
a,
Attach
b.
Adjust
slot
of template
position
of
foot.
gear
so
The lever can be used to change
and fit
guide
block
c.
of the guide slot.
Pul] the bobbin
toward
d.
you while
Place the bobbin
thread
holding
is aligned
with
the
starting
point
of
gear position.
up through
guide
slot
by turning
the hand
top thread.
and top threads
Leave 3 to 4 inches of thread.
5O
it
template.
button-
is at the s_,_tting mark.
into
the buttonhole
to the left side of guide plate.
wheel
Marked
buttonhole
a.
Lower
b.
Start
c.
Allow
d.
Cerl[er
marking"
To
the buttonhole
sewing
foot.
slowly.
the machine
to do the work
(Do not try
to guide the fabric.)
Stop sewing
when the needle
release
the
base plate off
buttonhole
base plate,
by itself.
returns
pull
the
to the position
lever toward
where
you
it begins.
and lift
the
the machine.
Fabric
Measurement
markings
Adjusting
You
control
4.
ab
Mark
b.
Placing
your
buttonhole
your
garment
position
carefully
behind
the
foot
as shown.
C_
Align
marked
buttonhole
with
center
d.
Line
up
fabric
plate just
eL
NOTE:
your
in front
Pierce the fabric
tf
line
you
want
edge with
with
your
up the fabric
insert
foot
buttonhole
the 1/2
to
it between
on buttonhole
markings
the
closeness
of
the
stitches
by
turning
the
stitch
length
4 to 3.
the
guide
foot.
(_
be 1/2
inch
inch markings
Fine stitches
for
figh_
on the guide
Stitch length
control 4 "_o3
as shown,
the needle at the beginmng
with
alter
from
fabrics
marking
the measurement
of the buttonhole
may
density
on the garment.
machine,
plate and the buttonhole
the stitch
of the buttonhole.
from
the
each time
garment
edge,
you start
to sew
0 _'4
a buttonhole.
Stretch
L
-o-
Stitch
J
51
Fabric
Preparation:
Set the Machine
Put the top sides of the fabric
and
sew
opening.
to
the
Use the
end
of
reverse
Stitch wtdth
together
the
control
zipper
to lock
0
2
1/8")
/Zipper
_eelh
or
3
#
Zipper
the
tape
stitches.
Sew
the
length
zipper
at "4"'
opening
and
top
with
thread
stitch
tension
at °'3",
Top thread tension
control
2 to 6
Stitch length
controt 2
End ol opemng
To Sew:
1.
Reset
thread
Fold
4
Top stde
of fabric
4,
stitch
length
tension
back
at 2 and top
at 2 to 6.
5.
E: Zipper
toot
Top edge of fabric
3.
Turn under the right seam allowance to form a 1/8" fold.
Place the zipper
1/8"
fold
teeth
next
6.
to the
-
the zipper
To sew on the
attach
the
left
presser
on the zipper
•
foot:
attach
the
presser
on the zipper
side of the zipper,
bar to the right
pins
foot.
side of the zipper,
bar to the
left
pins
zipper
the
bottom
tape.
Sew
the
Lower
through
of
on the top
the
needle pierces
and the zipper
fabric
foot.
To sew on the right
foot
the
at the
slider
7.
To attach
Lower
zipper
and pin in place.
presser bar to the right
foot.
so that
Stitch
2,
the
pins on the zipper
side
the left seam allowance
as shown.
Stretch
Attach
fold
tape to the point
zipper
the fold
and
the
where the
begins.
the
needle
to
hold
and raise the presser foot.
the
8, Openthezipper.
10.C_osethe zipper
fabric top side up.
9, Lowerthepresser
footandstitch
therestof theseam,
and
turn
the
1,
Remove
attach
the
the
zipper
presser
foot
bar to
pins on the zipper
foot.
12.
Stitch
below
13.
Turn
across
and
and
bot-
corner
and continue
to
guide
the
teeth,
as shown,
Stitch
zipper
foot
through
the
the
fabric
zipper
and
2" from
the top
of the
Lower
the
needle
into
the
fabric
and raise the presser foot,
16,
along
about
z_pper.
15.
the
tom of the zipper.
the
14+ Stop
the left
Remove
the
basting
stitches
and
open the zipper.
17.
Lower
the foot
and stttch
of the seam. Make
the rest
sure the'fold
is
even.
tape.
53
:: :
::: :
;;
: ::
:;;;:
:
: :;}
; :
:.
:
Set the Machine
Set the Machine
Stitch width
Stitch width
control 3 to 6
2 3
o
Top thread tension
eontro|
4 to 9
Top thread tension
control 3 to 8
Stitch length
control orange
Here's
zone
1,
How
e
Stitch Iength
control orange
zone
3,
For best effect:
-
set the stitch
length
as you
desire,
--
you may need to tighten
top thread
Stretch
Stitch
-
a_low
fabric
_
J
The Stitch
and Its Uses
The Shell
Stitch
blind
hem over
rows
of
shell
is formed
forded
stitching
stitching
can
by sewing
fabric.
a
Several
are called
shell
be used
to
finish
to
create
hems, sleeve and neck openings.
Sheii
tucking
scalloped
lingerie,
54
can
tucks
be
on
2.
If
you
sew
space the
tucks.
Shell
the
clear the
F: Satin stitch
foot
used
blouses
and
You
folded
rows
to
Stretch Stitch
just
edge of the
A: Zigzag foot
it zigzags.
of shell stitches,
rows 5/8"
wovens
the
slightly.
needle
when
can sew Shell
sort silky
tension
Stitch
apart.
on knits
in any direction.
or
% .....
\
This
stitch
single overlock
can
also
stitch
be
as well
used
as
a
Smocking
Set the Machine
Set the Machine
Stitch width
control 3 to 6
2 3
Top thread tenston
:ontro! 2 to 6
Stitch width
control 5 to 6
2
Top thread tension
control 2 to 6
Stitch length
control yeitow
stretch stitch
_D
Stitch length controi
yellow stretch stitch
pos_oon
pOSJl[lOn
The Stitch
For
4
and its Uses
patching
worn
out
elbows
or
knees,
Stretch Stitch
Stretch
Stitch
A: Zigzag foot
A: Zigzag foot
With
the
stitch
length
at
"4",
straight
stitching
lines
3/8'"
across the area to be smocked.
Knot
the
the threads
bobbin
gathers
the
stitch
Pull
evenly.
other
along
threads
Loosen
tension
one edge.
and distribute
Pull
the
the
threads
Sew
the
decorative
the
gathering
out the gathering
NOTE:
apart
Secure
end.
between
sew
the
to
at
stitches.
stitches,
top
make
thread
gathering
easier.
55
Set the Machine
Sot the Machine
Stitch width
control 3 to 6
Stitch width
control 5 to 6
2
C_
Top thread tension
:ontrol 3 to 8
Top thread tansson
control 2 to 6
Stitch length
control 0.5 to 2
Here's
1.
How
Fold
under
each fabric
Stitch length
control yel_aw
stretch stitch
pos_on
Place
edge 5/8"
and press.
2.
Stretch
Stitch
Pin
the
tear-away
3.
Sew
The Stitch
Use this
fabric
to
appearance
56
needle
to iota
create
I/8"
guiding
catches
edge on each side.
to
paper
or
two
an
and add design
pieces of
open
interest.
work
the
apart,
the
fabric
the
folded
Stretch Stitch
A: Zigzag foot
Use
and Its Uses
as hemming
tablecloth
stitch
and draperies.
for
blankets,
fabric
top
3/8"
from
Trim
close to stitching.
prevent
The Stitch
and Its Uses
stitch
edges
backing
s_owly,
so the
A: Zigzag foot
two
...........
J
Here's How
side
up, and sew
the edge.
raveling.
The stitch
will
Stitch
Sot the
Sot the Machine
Machine
St_l;chwidth
control 3 to 6
Stitch width
contro_ 3 to 6
2
Top thread tension
control 3 to 6
_OO
GD
Fop thread tension
control 3 to 8
Stitch length
control yellow
stretchstitch
Stitch length
control orange
zone
2
position
Use
this
stitch
to
join
heavy
weight
interlining,
Overlap
two
use this
stitch
raw
edges together
and
to join them.
Stretch Stitch
Stretch
Stitch
A: Zigzag toot
A: Zigzag toot
Choose
this
stitch
to attach
elastic
to
garments.
1.
2.
Mark
the elastic
quarters
the
center
these
center
back and side seams.
Place
the
under
the
to
into
match
and
front,
middle
of
the
elastic
center
of
the
presser
foot
and stitch
sure
the
elastlc
into
place, making
is evenfy
distrt*
bu ted,
57
¸¸
i!iii
¸!iii:iii¸_i_i
i ...........
_
Set rite Machine
Stitch
z
width
3
(3D
Top thread tension
controJ 3 to 8
Thi,.;
to
58
Zigzag
foot
6
3 to 6
Stitch length
control
to2
Stretch
w_dth
o
e
control
A:
Stitch
,_
o
TOp thread tension
control 3 to B
Set the Machine
stitch
join
them
is useful
together.
for
elastic
(see page
c_D
Stitch length
control l to 3
This
fabrics
edging
577)
Stretch
Stitch
A:
Zigzag
toot
Stitch
stitch
stitch.
can
be
used
for
a over-
DecorativeStretchPatterns
Set the Machine
Stitch width
control 3 to 6
Top thread tenslon
controt 2 to 6
Stitch length controt
yellow stretch stitch
positron
The Stitch
Decorative
touch
and
stretch
patterns
can be used for
to the items you sew for your
You can decorate
A: Zigzag foot
Its Uses
ehi|dren's
clothes,
home
adding
creative
and personaiised
and family.
women's
blouses,
curtains,
etc.
Stretch Stitch
59
Set the Machirt_
Stitchw_dth
control 3 to 6
I
Top thread tension
control 3 to8
co
Stitch length
contro_ green
ZOn_
Here's
1.
How
Adjust
the
stitch
width
and
length
as
you desire.
F: Satin stitch
foot
The Stitches
and The,r
These stitches
You
special
Stitch
Uses
are pu rely decorative.
can sew
one
row
or severa[
or vary
the
stitch
width
and length
effects.
Experiment
6O
Stretch
on a scrap of fabric
for
2.
Practice
3.
Mark
the
fabric,
using
4.
Lower
the needle at the starting
5.
Lower
the presser foot.
6.
Gentty
maked
to see what
spemal effects
are possible.
the stitch
lines
for
decoration
a washable
guide
line.
on a scrap of fabric.
the
on the
fabric
fabric
marker.
point.
atong
the
;:Whatto
DO when
PROBLEM
PROBABLE
_ncorrect
Irregular
Stitches
CAUSE
s_ze needle.
Improper
threading,
Loose upper thread
Puiling fabric,
Loose presser foot,
Choose correct size needle
Rethread machine.
tension.
Unevenly
wound bobbin.
Nicks or burrs at hole of needle plate,
Breaking
Bunching
Puckering
Needle
of Thread
CORRECTION
Pulling fabric,
Incorrect
size needle,
incorrect
setting of needle,
Loose presser foot.
Tighten
upper
thread
Do not pull fabric;
Reset presser foot.
Rewind bobbin,
Replace
needie
it gently.
or polish
off
burrs completely.
Do not putl fabric; guide _t gently.
Choose correct size needle for thread
Reset needle.
Reset presser
and fabric,
tension.
guide
plate,
for thread
and fabric.
foot.
Upper and lower threads not drawn back
under presser foot before starting seam.
When starting a seam be sure to draw both threads under
back of presser foot about 4" and hold untii a few stitches
formed,
Incorrect
Using two different
s_zes or kinds of thread.
Bent or blunt needle,
Reset thread tension.
Upper thread and bobbin
Insert new needle.
Loose presser foot.
Fabric too sheer or too soft,
Reset presser foot,
Use underlay of tissue paper,
thread
tension.
thread
should
and
are
be same size and kind.
61
PROBLEM
PROBABLE
incorrect
SMpping
Stitches
Breaking
Upper
Breaking
Fabric
Machine
62
Thread
Bobbin
not
Thread
Moving
Jamming
Knocking
Noise
CAUSE
s_ze needle,
CORRECTION
Choose
correct
s_ze needle
Bent or blunt needle,
Incorrect
setting of needle.
Tight upper thread tension,
insert new needle.
Reset needle.
Loosen upper thread
Starting
to stEtch too fast.
improper threading.
Tight upper thread tension.
Incorrect
size needle.
Start to stitch at a medium
Rethread machine.
Sharp eye m needle.
Nicks or burrs at hole of needle plate.
Insert
Improper
bobbin threading.
Lint in bobbin holder or hook
Check bobbin
Clean bobbin
for thread
tension.
speed,
Loosen upper thread tension.
Choose correct s_ze needle for thread
race,
Replace
needle plate,
or polish
threading.
holder and hook
Remove darning plate.
Adjust Stitch Length Control.
Place both threads back under
to stitch.
Push-pull
Push in the clutch.
Thread caught
Lint m bobbin
is disengaged.
m hook race.
holder or hook
race,
and tabnc.
new needle.
Darning plate In place.
Stitch Length set at 0.
Thread knotted
under fabrfc,
clutch
and fabNc.
off
burrs
compfetely.
race.
presser foot
Disassemble and clean hook race,
Clean bobbin holder and hook race.
before
beginning
Bulb
To
insure
that
your
machrne
operates
at
its
best,
you
need
to keep
the
essential parts clean at all times.
The bobbin
or knock
1.
Unplug
the machine
area can attract
loudly
if a thread
dust and lint.
Your
machine
can become
sluggish
is caught,
and open the
face cover.
CAUTION_
The
_ight
HOT,
fingers
handle
2.
Push
bulb
the
butb
will
Protect
bulb
be
your
when
you
it,
up
counter-clockwise
Follow
and
turn
to
the
Put the
new bulb
in by pushing
it clockwise.
off
the power
Brush
or vacuum
the dust and lint
out of the bobbin
or uoplugthe
machine.
2.
up and turning
Turn
4.
5.
Replace
holder,
6,
Slide on the bobbin
pushing
it into
cover plate
by
the grooves,
the bobbin.
remove
it,
3.
1_
these directfons:
Remove
firmly
it
3,
Remove
the bobbin
pulling
cover plate
it toward
bv
you.
the bobbin.
63
Open face cover
two
drops
Remove
1.
Unplug
the
machine
the presser foot
2.
Remove
the
and
remove
and needle.
bobbin
face
5.
Take
out
bobbin
the bobbin.
holder
Lift
and remove
plate
and oil points as shown
below
at least once a year.
On or
of oil is sufficient.
excess oil, otherwise
it may stain fabrics,
up the
_t,
cover
plate.
3.
Remove
of
the
screw
the needle
on the teft side
w_th the large screw
driver.
In
4.
Remove
the needle plate.
case
machine
extended
time,
Use good
No other
Above
require
6,
Use
the
feed
dogs,
holder.
c1oth,
64
lint
brush
hook
Also
race
use
to
clean
the
and bobbin
a
soft,
dry
Line
up the
the bobbin
next
to
red marks
holder
the stopper
race, as shown
and place
so the knob fits
above.
in the
hook
quality
oiling
points
oiling
is not
oll
it
used
before
sewing
machine
for
an
sewing.
oil.
is required
are
on this
only
area
machine,
which
PARTS LIST
!
2
3
4
5
7
%
%
11
17
18
12
19
8
13
20
16
21
22
23
J
65
All
parts listed
herein
WHEN ORDERING
INFORMATION:
may be ordered
REPAIR
PARTS,
1.
2.
PART NUMBER
PART DESCRIPTION
3.
4.
MODEL NUMBER
NAME OF ITEM
If the parts you need are not stocked
transmitted
handling.
to
from
a
Sears
Repair
any Sears store or service center.
ALWAYS
locally,
Parts
your
Distribution
GIVE THE FOLLOWING
order
will
Center
be electronically
for
expedited
Ref.
No,
1
2
3
4
5
6
7
8
9
10
11
12
13
14
15
t6
17
18
t9
2O
21
22
23
Part No.
"2&B868
Description
Bobbin
102403202
813404013
655t
6552
6553
6554
652806003
685502008
825813005
823803006
822804118
820817015
822801001
802422002
*6864
6797
820832005
41669
Spool
802424004
6830
*6889
Lint
652804001
213502003
213501002
213504005
213505006
213506007
213503004
box
with
10 bobbins
pin felt
No. 11 Stretch
fabric
needles
No.
1 t Single needles
(ORG)
No,
14 Single needles
(RED)
No.
16 Single needles
(PUR)
No,
t8 Single needles
(GRN)
Straight
(BLU)
foot
Zigzag foot
Sliding
buttonhole
Zipper
foot
Satin
stitch
Blind
hem stitch
Overedge
foot
foot
foot
foot
Quilter
Needle
Light
threader
bulb
Large screw
Small
driver
screw driver
brush
Buttonhole
opener
Oil and lint
brush
Darning
plate
Buttonhole
guide plate
Base plate
Template
(Round
end small)
Template
(Round
end large)
Template
(Keyhole)
Buttonhole
foot
* These items are not furnished with the machine, but may be ordered per
instructions above+
66
INDEX
A
Accessory storage box ............
Appliqueing ...................
2, 8
26, 37
B
Bar tacking .................
Base ..........................
Base plate ................
4,
Basic zigzag .........
..........
Blind hemming ...............
Blind hem stitch foot
. . _ 4, 13, 26,
Bobbin .............
4, 16_17,
Bobbin holder ...............
Bobbin thread ..................
Bobbin winding ...................
Bobbin winding spindle .............
Box stitching ...................
Buttonhole
.....................
Buttonhole attachment
........
Buttonhole foot .......
4, 14, 30,
Buttonhole guide plate .....
4, 30,
Buttonhole making ...............
Buttonhole opener ..........
4,
Buttonhole template ......
4, 30,
Button sewing ................
C
Cabinet .........................
Changing needle .................
Changing presser foot ...........
Cleaning hook race and feed dogs
Cornering guide .................
48,
26,
43,
63,
t7,
30,
48,
48,
47,
48,
.......
D
Darning ..................
26,
Darning plate ......
4, 32, 34, 38_39,
Decorative geometirc patterns ......
Decorative stretch patterns ..........
26, 37
2
65_-66
26, 35
43_44
65_66
65_66
63~64
19_20
16
2, t6
28, 57
30, 45
45, 48
65_66
65_66
45_51
65_66
65_66
26, 39
2
15
10_11
64
3t
32, 34
65_66
29, 60
29, 59
E
Elastic
stretch
..............
Embroidery
.................
Extension
table
..................
28, 57
26, 38
2, 8
F
Fabric, needle, thread and stitch
length chart ..................
Face cover plate .............
Fagoting .....................
Feed dogs ......................
Foot control .....................
Free arm sewing ...............
!5
2, 6, 63_'64
28, 56
64
3, 5
6_9
H
Hand wheel ...................
Herring bone stretch .............
Hook race .....................
3, t9
29, 56
64
L
Lace work ......................
Large screw driver ............
Light and power switch ..............
Light bulb ................
Lint brush ................
44
4, 65_66
3, 5
63, 65"_66
4, 63_66
M
Monogramming
............
N
Needle ...............
Needle clamp ...............
Needle plate ...................
Needle, thread and fabric chart
Needle threading
................
26, 3B
14_15, 65_66
3, 15
2, 17
.........
15
!8_19
O
Oiling ........................
64
Overcasting stitch .................
40
Overcasting stretch ...............
27, 42
Overedge stitch
..................
29, 58
Overedge foot ......
4, 13, 27, 40, 42, 65_66
P
Parts list .....................
Performance problems .............
Plug connector ..................
65_66
61_62
3, 5
Portable case .....................
Power switch ...................
Practica] stitch chart ..............
Pressure control dial .................
Presser foot ..................
Presser foot lever ..................
Push-pull clutch .................
Q
Quil_r
.............
2
3, 5
26_'30
6
3, 10"-14
3, 7
3, 16
4,13,26,33,65_66
R
Reverse stitch control ..........
Rick-rack stretch stitching .........
2, 25, 31
26, 40
S
Satin
stitch
foot
, , , 4, 12, 27, 29, 30, 36_38,
54, 60,
Satin stitching
..............
Seam guides ......................
Sergmg .......................
Serging or pine leaf stretch
..........
Sewing light ......................
Shell stitching
.................
Sliding buttonhole
foot
.............
4, 12, 30, 46_47,
Small screw driver .............
4,
Smocking
.....................
Snap-on button
..................
Speed range switch
.................
Spool pin felt ...............
Spool pins .......................
Stitch length control
...............
Stitch selector
...................
66_66
65_66
27, 55
3, 10
2, 6
4, 7, 65_66
2, 7
2, 22
3, 21
Stitch width control
............
2,
Straight stitching
.............
26,
Straight stitch foot
, ; 4, 11, 26, 31_34,
Straight stretch stitching
...........
Stretch patching
.................
Stretch stitch adjuster
..............
T
Take-up lever ....................
65_66
30, 36
31
27, 42
27, 42
5
27, 54
23_24
31_33
65_66
26, 34
28, 55
3, 22
2, 18
67
Thread cutter .....................
Thread guide .................
Three-step zigzag ................
Topstitching
.................
Top thread ...................
Top thread tension ..............
Top thread tension control ......
Turning a square corner ..............
Two-point box stitching ............
Two-point shell stitching ..........
Z
Zigzag foot
Zigzag
Zigzag
Zipper
Zipper
68
........
2, 7
2_3, 18
27, 41
26, 32
18_21
20_2t
2, 20"_21
31
29, 58
28, 54
11, 26_29, 33,
39_42, 44, 54_59,
stitching .............
26,
overcasting ................
application
, ,. .........
26,
foot .......
4, t2, 26, 52_53,
35, 37,
6_r_66
35_40
40
52_53
65_66
SETTINGUPYOURMACHINE
1. You'll
cover,
find
spool
pins
on
Pull up the spool pins and
spool pin felt on the pins.
the
top
place
the
2
Plug
foot
control
into
machine
receptacle_
Then connect
cord into
any 1!0 -" t20 volt A.,C wall outlet.
3
Your
Kenmore
sewing machine
has
been thoroughly
oiled at the factory_
Be sure to wipe off'the
needle plate
area, bed plate and shuttle
carefully
before sewing a garment
tt is wise to
practice
on a scrap of fabric so any
surplus oil is absorbed.
Spool
pin felt
Spool
pin
STITCH SELECTOR
There are certain types of stitches that
construction.
Because of their frequent
are used more often than others in your
use, you will soon realise the convenience
garment
offered
to you by this control.
The desired stitch will be obtained
by turning
indicated
by the red line on the indicator
panel.
the Stitch
Selector
Dial until
c3 c3 c3 c3 E3 E3 C3 E3 C3 E3 C3 C3 O E3 E3 E_ E3 C3 C3 C3 []
I',I
st,.c.
tli
Selector
>
the stitch
is
CHART
i
BLIND
< "
MENDING
TENSION
ORANGE
ZONE
I TO6
I
3T08
N_,._
ORANGE
ZONE
2TO3
/
2TO6
5TO6
i
2TO6
/
0,5 TO 1
FOOT
_
2T06
VVV
*V^'v"%v
5. PRESSER
CONTROL
l
4.
[
l
DIAL
_
............
_
El
ORANG
!
l
3, WIDTH
DIAL
----
ii
......................
T
H
'G
STRA
ZIGZAG
LENGTH
SELECTOR
OR
2,
1.
O
'
STITCH
N
STITCH
zO
PRACTICAL
H'
'
A
!
G
A
_HE'L .... .............
--V-X-" ORANGEZ0"E
I 3TO0! 4T09 1 F
BOX
_
FAGOT,NG
ORANGE
! _
ZONE
3 TO 6
3 TO 8
"
A
O.0TO2
IOTO0! 3T°° I A
_O-PO,NTSHELL
f -V-V"_ ORANGEZONE
I3TO0 I 3TO8! A
TWO-POINT
OVE:R
BOX
/
EDGE
7U_LIMU T
l
'_VVV
_
ORANGE
ZONE
t
ORANGE
ZONE
!
3TO6
' ' "' '3"',,,tO"
_
t
3708
t
A
1
3TO8
1
A
,TRA,GHTSTRETOH
t "=----'=--=
YELLOWPOS,T,ON
t OOR®1 2TO0t
RICK-RAcK
I
'/_I_
YEL'LOWPOSITIONI
......
I
SMOCKING
ELASTIC
i
PATCHING
_
BU_ONHOLE
' "B UTTO
"..
SATIN
i
GEOMETR
/
A
POSITION
I
PosiT
ON'/
3 T06
3TO6
i
t
2TO6
2TO6
1
t
A
A
_
Y E LLOW
F'O'S'i"Ti'O N
,TO6
l
3TO6
l .......
A ......
YELLOW
PosiTioN
5T06
I_
_
POSITION
BLUE'ZONE
_
GREEN
i
3 T0
6
3 TO 6
4
ICS
VIII_II_I_II_VII_I_
VVV
2T06
A
YE_LOWPOS,T,O.
3TO0 1 2TO0 I A
YELLOW
_
N HO LE''"" i_l
DECORATIVE
2TO'
YELLow
YELLOW
DECORATIVE
I_
........ i
_
....
_
.....
"ERR,NG_ONE
......
_
STR ETCH
=T'°6
H
2
ZONE
o.s TO
3 TO 6
I ...............
2 TO 6
2 TO 6
1
A
2 TO"6 ....................................
2 TO6
3 TO 8
F
3 TO
F
8
y
WARRANTY
FULL
25-YEAR
WARRANTY
For 25 years from
_
in the sewing
FULL
For
two
years
WARRANTY
from
circuit
90-DAY
date of purchase,
MACHINE
Sears will,
HEAD
.-=
free of charge,
repair
defects
in material
OF SEWING
MACHINE
or workmanship
which
appear
#
head,
the
in the electrical
and printed
FULL
machine
TWO YEAR
appear
#
the
ON SEWING
ON ELECTRICAL
date
of
purchase,
and electromc
EQUIPMENT
Sears will,
equipment
free
of
of the sewing
charge,
machine,
repair
defects
including
in material
motor,
wiring,
or workmanship
switch
which
#
and speed control
boards.
WARRANTY
ON ALL
PARTS
AND
MECHANICAL
ADJUSTMENTS
#
For 90 days from
necessary for proper
To obtain
warranty
CANADA.
This warranty
This warranty
the date
operation
service
gives you
of purchase,
Sears will, free of charge, replace any parts
of the sewing machine,
except for normal maintenance.
described
applies
specific
only
above, SIMPLY
while
legal rights,
SEARS
this product
CONTACT
THE
SEARS
STORE
mechamcal
OR SERVICE
service
CENTER
IN
is in use in CANADA.
and you may also have other
CANADA
NEAREST
and prowde
INC.,
TORONTO,
rights which
ONT,
M5B
vary from
2B8
state to state.
i)
SEWING
Now
that
MACHINE
you
or service,
have purchased
simply
(:ontact
your
your
Kenmore
nearest
Sewing Machine,
Sears Serwce Center,
should
a need ever exist for repair
Be sure to pertinent
facts
when
parts
you call or
visit.
The model
your
WHEN
*MODEL
If
the
Repair
number
Sewing
ORDERING
NUMBER
parts
of your
Machi-,e.
you
Sewing
Machine
REPAIR
PARTS,
*NAME
OF ITEM
n_ed
Parts Distribution
are not
Center
stocked
ALWAYS
be shown
GIVE
THE
*PART
DESCRIPTION
on your
nomenclature
plate
on the back
of
_ocalty,
your
order
FOLLOWING
will
INFORMATION:
be electronically
transmitted
to a Sears
for handling.
SEARS CANADA
S-385
will
See page 3 for location.
INC., TORONTO,
ONT MSB 2B8
Printed in Taiwan
Part No. 652800122
(_