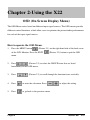
1
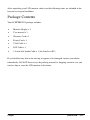
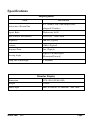
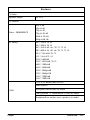
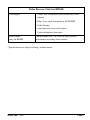
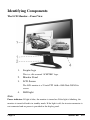
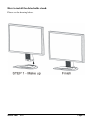
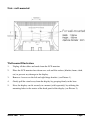
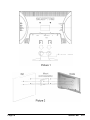
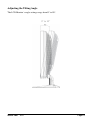
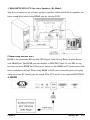
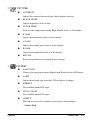
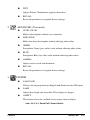
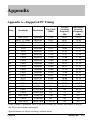
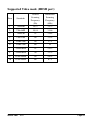
CONTENTS
ver 1.0
Getting Started ............................................................... 3
Your New LCD Monitor........................................................................................... 4
Unpacking ................................................................................................................ 4
Package Contents ..................................................................................................... 6
Specifications ........................................................................................................... 7
Opening the Package .............................................................................................. 10
Installation.............................................................................................................. 10
Important Safety Guidelines....................................................................................11
Identifying Components ......................................................................................... 14
The LCD Monitor-Front View ................................................................... 14
How to install the detachable stand: ............................................................. 15
Note: wall-mounted ...................................................................................... 17
Power Management System.......................................................................... 20
Video Source Explained................................................................................ 20
I/O Connector Definitions............................................................................. 21
Adjusting the Tilting Angle........................................................................... 23
Connecting AC Power and PC / VIDEO Cable ............................................ 24
Connecting [TO DEVICE] Ports .................................................................. 25
Connecting HDMI Port................................................................................. 26
Chapter 2-Using the X22............................................. 28
OSD (On Screen Display Menu) ............................................................................ 28
VGA-PC input .............................................................................................. 31
DVI input ...................................................................................................... 33
HDMI inputs ................................................................................................. 35
SCEPTRE
X22
Page1
Appendix ..................................................................... 38
Appendix A-Supported PC Timing...................................................................... 38
Supported Video mode (HDMI port)...................................................................... 39
Appendix B-Troubleshooting .............................................................................. 40
FCC Compliance Statement ................................................................................... 42
Page2
SCEPTRE
X22
Getting Started
Congratulations on your SCEPTRE X22 ” LCD Monitor purchase. Thank you for your
support of SCEPTRE and its LCD Monitor product line. The X22 is a precise electronic
product and you should read the following instructions carefully to maximize its
performance. It has passed regulatory safety certifications and you can be assured of the
highest quality display with the utmost reliability. After you have finished reading the
instructions, put them away in a safe place for future reference. Please also record the
X22’s part number and serial number as found on the label off the back of your LCD
Monitor set in the space provided below.
Monitor P/N:___________________________
Monitor S/N:___________________________
SCEPTRE
X22
Page3
Your New LCD Monitor
Your LCD Monitor has been designed to be versatile, ergonomic and user-friendly. The
LCD Monitor is capable of displaying most standards, from 640x400 VGA to 1680x1050
WSXGA+. The digital controls allow the user to easily adjust the Monitor’s display
parameters, and the LCD Monitor’s small footprint gives you more room in your
workspace for other peripherals. Being lightweight and compact, the LCD Monitor is the
perfect solution for users on the go. You can use the LCD Monitor for everything from
making business presentations to playing computer games.
The architecture of the LCD Monitor incorporates an LCD panel that produces a clear
display with low radiation emission and with its low power consumption, the LCD
Monitor helps you reduce your power bill.
Unpacking
Before unpacking your LCD Monitor, prepare a suitable workspace for your LCD
Monitor and computer.
Look for a stable, level and clean surface near a wall outlet.
Even though the LCD Monitor uses very little power, you should put it in a location,
which allows sufficient airflow to ensure that the LCD Monitor and your computer do not
overheat.
Set up your LCD Monitor so that the panel is not facing a window where
sunlight often comes in.
The glare caused by sunlight reflecting off of the LCD
Monitor’s screen will make it difficult to use the Monitor for viewing.
Page4
SCEPTRE
X22
Note: Using a computer for an extended period of time with a poor workstation
set-up and incorrect working habits can cause health problems.
The science of
ergonomics studies the relationship between health and a suitable working
environment.
For more information on ergonomics, contact your nearest computer
bookstore, or local library. The Internet also has information on this and other
subjects.
READ ME FIRST
If you previously were using a CRT monitor instead of a LCD monitor, please do not
connect the LCD monitor to your computer yet.
turn on your computer.
Please use the CRT monitor and
Make sure your video card’s refresh rate is at 60Hz in the
Display Setting’s Advance Menu under the Display Adapter tab. Once that is
achieved you can then turn off the computer and plug your new LCD monitor in.
SCEPTRE
X22
Page5
After unpacking your LCD monitor, make sure the following items are included in the
box and are in good condition:
Package Contents
Your SCEPTRE X22 package includes:
Monitor Display x 1
User manual x 1
Warranty Card x 1
Power Cord x 1
VGA Cable x 1
DVI Cable x 1
3.5 mm Jack Audio Cable x 1 (for Line In to PC)
If you find that any item to be missing or appear to be damaged, contact your dealer
immediately. DO NOT throw away the packing material or shipping carton in case you
need to ship or store the LCD monitor in the future.
Page6
SCEPTRE
X22
Specifications
Display panel
Item
Active Area / Screen Size
Illustration
473.76 mm x 296.1 mm Display Area
(diagonal 22 inches)
Aspect Ratio
Widescreen 16:10
Max.of Pixels (Resolution)
WXSGA+ – 1680*1050
Brightness
300 nits (Typical)
Contrast
1200:1 (Typical)
Response Time
5ms (Typical)
Viewing Angle
Lamp Life of Backlight
Typical 170/160 Degree
(Horizontal/Vertical)
> 50,000hrs
Monitor Display
Dimension
557(L)X115(W)X483(H)
Weight
11.46bs
Power input
100V to 240VAC @ 50/60 Hz
SCEPTRE
X22
max, 60W
Page7
Features:
(1)Audio
Speakers output
1w + 1w
(2) General
Video – HDMI/HDCP
PC timing
480i @ 60
480p @ 60
576p @ 50
720p @ 50, 60
1080i @ 50, 60
1080p @50, 60
640 * 350 @ 70 ,85
640 * 400 @ 70 ,85
640 * 480 @ 60 , 66 , 70, 72, 75, 85
800 * 600 @ 56 , 60 , 66, 70, 72, 75, 85
1024 * 768 @60, 70, 75
1152 * 864 @75, 85
1280 * 960@60
1280 * 1024@60, 70 ,75
1600 * 1200@60
1680 * 1050@60
1920 * 1080p@60
1920 * 1080p@50
1280 * 720P@60
1280 * 720P@50
VGA, DVI, HDMI (HDCP/DVI)
Audio Line In
(5)I/O
Microphone In/Out(side) by model
USB Upstream *1, Downstream*2 (side) by model
Headphone/Line out(for active speakers) by model
Page8
SCEPTRE
X22
Video Process (Only for HDMI)
Color Engine
1. Vivid Color /Skin/Green(Grass)/Blue(Sky) color
enhance
2. Edge : Low angle interpolation, DCTI/DLTI
3. 10 bit Gamma
4. color matrix for basic color adjust –
Contrast/brightness/tint/color
Picture mode
5 Picture modes for User to easily adjust picture
(only for HDMI)
performance according video content.
*Specifications are subject to change without notice.
SCEPTRE
X22
Page9
Opening the Package
The SCEPTRE X22 is packaged in a carton together with other standard accessories.
Since the glass can be easily scratched or broken, please handle the product gently. Never
place the unit on a surface with the glass facing downwards unless it is on protective
padding.
When opening the carton, check that the product is in good condition and that all
standard accessories and items are included.
Save the original box and all packing materials for future shipping needs.
Installation
Please read the user manual carefully before performing the installation.
The power consumption of the display is approximately 60 watts.
Please use the power cord designated for the product. When an extension cord is required,
use one with the correct power rating. The cord must be grounded and the grounding
feature must not be defeated.
The product should be installed on a flat surface to avoid tipping. Space should be
maintained between the back of the product and the wall for proper ventilation. If you
would like to mount the monitor to the wall, please see page 17-18, for additional
information.
Avoid installing the product in the kitchen, bathroom or other places with high humidity
dust or smoke, so as not to shorten the service life of the electronic components. Please
ensure the product is installed with the screen in landscape orientation. Any 90°
clockwise or counterclockwise installation may induce poor ventilation and successive
component damage.
Page10
SCEPTRE
X22
Important Safety Guidelines
This product is designed and manufactured to operate within defined design limits, and
misuse may result in electric shock or fire.
To prevent the product from being damaged, the following rules should be observed for
the installation, use and maintenance of the product. Read the following safety
instructions before operating the display. Keep these instructions in a safe place for future
reference.
To avoid the risk of electric shock or component damage, switch off the power
before connecting other components to the X22 LCD monitor.
Unplug the power cord before cleaning the X22 LCD monitor. A damp cloth is
sufficient for cleaning the X22 LCD monitor. Do not use a liquid or a spray
cleaner for cleaning the product. Do not use abrasive cleaners.
Always use the accessories recommended by the manufacturer to insure
compatibility.
When moving the X22 LCD monitor from an area of low temperature to an area of
high temperature, condensation may form on the housing.
Do not turn on the X22 LCD monitor immediately after, to avoid causing fire,
electric shock, or component damage.
Do not place the X22 LCD monitor on an unstable cart, stand, or table. If the X22
LCD monitor falls, it can injure a person and cause serious damage to the
appliance. Use only a cart or stand recommended by the manufacturer or sold with
the X22 LCD monitor.
Any heat source should maintain a distance of at least 5 feet away from the X22
LCD monitor, i.e. radiator, heater, oven, amplifier etc. Do not install the product
too close to anything that produces smoke or moisture. Operating the product close
to smoke or moisture may cause fire or electric shock.
Slots and openings in the back and bottom of the cabinet are provided for
ventilation. To ensure reliable operation of the X22 LCD monitor and to protect it
from overheating, be sure these openings are not blocked or covered. Do not place
SCEPTRE
X22
Page11
the X22 LCD monitor in a bookcase or cabinet unless proper ventilation is
provided.
Never push any object into the slot on the X22 LCD monitor cabinet. Do not place
any objects on the top of the product. It could short circuit parts causing a fire or
electric shock. Never spill liquids on the X22 LCD monitor.
The X22 LCD monitor should be operated only from the type of power source
indicated on the label. If you are not sure of the type of power supplied to your
home, consult your dealer or local power company.
The power cable must be replaced when using different voltage from that specified
in the User Manual. For more information, contact your dealer.
The X22 LCD monitor is equipped with a three-pronged grounded plug, a plug
with a third (grounding) pin. This plug will fit only into a grounded power outlet
as a safety feature. If your outlet does not accommodate the three-wire plug, have
an electrician install the correct outlet, or use an adapter to ground the appliance
safely. Do not defeat the safety purpose of the grounded plug.
Do not overload power strips and extension cords. Overloading can result in fire or
electric shock.
The wall socket shall be installed near the equipment and shall be easily
accessible.
Only the marked power source can be used for the product. Any power source
other than the specified one may cause fire or electric shock.
Do not touch the power cord during lightning. To avoid electric shock, avoid
handling the power cord during electrical storms.
Unplug the unit during a lightening storm or when it will not be used for long
periods of time. This will protect the X22 LCD monitor from damage due to power
surges.
Do not attempt to repair or service the product yourself. Opening or removing the
back cover may expose you to high voltages, the risk of electric shock, and other
hazards. If repair is required, please contact your dealer and refer all servicing to
qualified service personnel.
Keep the product away from moisture. Do not expose this appliance to rain or
Page12
SCEPTRE
X22
moisture. If water penetrates into the product, unplug the power cord and contact
your dealer. Continuous use in this case may result in fire or electric shock.
Do not use the product if any abnormality occurs. If any smoke or odor becomes
apparent, unplug the power cord and contact your dealer immediately. Do not try
to repair the product yourself.
Avoid using dropped or damaged appliances. If the product is dropped and the
housing is damaged, the internal components may function abnormally. Unplug
the power cord immediately and contact your dealer for repair. Continued use of
the product may cause fire or electric shock.
Do not install the product in an area with heavy dust or high humidity. Operating
the product in environments with heavy dust or high humidity may cause fire or
electric shock.
Hold the power connector when removing the power cable. Pulling the power
cable itself may damage the wires inside the cable and cause fire or electric shock.
When the product will not be used for an extended period of time, unplug the
power connector.
To avoid risk of electric shock, do not touch the connector with wet hands.
If any of the following occurs please contact the dealer:
○
The power connector fails or frays.
○
Liquid sprays or any object drops into the X22 LCD monitor.
○
The Display is exposed to rain or other moisture.
○
The Display is dropped or damaged in any way.
○
The performance of the Display changes substantially.
Operating environment: Temperature: 5°C ~ 35°C, Humidity: 10% to 90%
non-condensing, Altitude: 0~10,000 ft.
SCEPTRE
X22
Page13
Identifying Components
The LCD Monitor-
-Front View
1.
Sceptre logo
This is a silk screened “SCEPTRE” logo.
2.
3.
Monitor Stand
LCD Screen
The LCD monitor is a 22 inch TFT 1680 x 1050 Wide WSXGA+
screen.
4.
LED light
Note:
Power indicator: If light is blue, the monitor is turned on. If the light is blinking, the
monitor is turned off and is in standby mode. If the light is off, the inverter connector is
not connected and no power is provided to the display panel.
Page14
SCEPTRE
X22
How to install the detachable stand:
Please see the drawing below.
SCEPTRE
X22
Page15
Rear View
5.
Connection To Device Port
Includes two USB ports (USB 2.0) /
Headset port (can be used by a
headset or act as line out for external
speakers) / Microphone port
(by model)
Refer to page 22
6. LCD Monitor Control Panel
Refer to page 19 for more details.
7. Connection To PC & Power
Port
Includes AC Power,
USB-IN port (by model),
Line In port, HDMI port, DVI port
and VGA port.
Refer to page 21 for more details
Page16
SCEPTRE
X22
Note: wall-mounted
Wall-mount Illustration
1.
Unplug all the cables and cords from the LCD monitor.
2.
Place the LCD monitor face down on a soft and flat surface (blanket, foam, cloth,
etc) to prevent any damage to the display.
3.
Remove 4 screws on the left and right hinge bracket. (see Picture 1).
4.
Gently pull the stand away from the display by grasping firmly to the base.
5.
Now, the display can fit securely to a mount (sold separately) by utilizing the
mounting holes in the center of the back panel of the display (see Picture 2).
SCEPTRE
X22
Page17
Page18
SCEPTRE
X22
Side View
About control keys
Power On/Off and LED
LED – non : No A/C Power Plug-in
LED – Blue : A/C power Plug in , and operating mode
LED – Blue blinking: system under power saving mode
Press VOL buttons to adjust the audio volume.
Press this button to display the OSD (On-Screen Display) menu. Please
refer to page 28 for more details.
Press this button to change the input source from VGA D-Sub to DVI,
HDMI/HDCP/DVI.
The monitor will automatically adjust the video timing to get the best
display performance (VGA model only).
SCEPTRE
X22
Page19
Power Management System
This LCD Monitor complies with the VESA DPMS power management proposal.
When the LCD Monitor is in power-saving mode or detects an incorrect timing, the
monitor screen will be blank and the power LED indicator starts blinking.
Video Source Explained
HDMI
HDMI stands for High Definition Multimedia Interface.
This type of
connection is designed so that 1 single cable can handle both high definition
digital video and audio at the same time.
To view video and listen to audio
with this source you must have a HDMI to HDMI cable. This type of
connection is primarily used by satellite or digital cable boxes, up conversion
DVD players, and HD DVD players.
HDCP
HDCP stands for High-bandwidth Digital Content Protection. This type of
function is designed so that high definition video cannot be copied while
hooked up to a recording device. HDCP is enabled in HDMI and in HDCP
DVI mode. This type of connection is primarily used by satellite or digital
cable boxes and up conversion DVD players. Please note to get sound out of
HDCP mode you must connect an audio cable from your audio video device
to the audio port labeled “Line In”.
DVI
DVI stands for Digital Video Interface. This type of connection is designed
that so video can be digitally transferred to the television displaying the
colors of any video more accurately and vividly. This interface can be used
by PC only.
Please note that to get sound out of DVI mode, you must
connect an audio cable from your audio video device to the audio port
labeled “Line In”.
VGA-PC
VGA stands for Video Graphics Array. This type of connection is designed so
that people can use their PCs on the 22” LCD monitor.
connection is primarily used by personal computers.
This type of
Please note that to get
sound out of VGA mode, you must connect an audio cable from your audio
video device to the audio port labeled “Line In”.
Page20
SCEPTRE
X22
I/O Connector Definitions
AC Power
This connection is for providing power to the monitor.
This connection uses a standard
computer power cord.
HDMI (High Definition Capable)
This connection port receives audio and high definition signal through one single cable.
It also doubles as HDCP source and DVI source with the provided HDMI to DVI
conversion cable.
You can connect an up conversion DVD player, computer (via DVI
source), or set-top box through this cable.
If you are using DVI or HDCP you will need
to connect an audio connection to the “Line In” connection port to provide audio. This
connection uses a HDMI cable or a HDMI to DVI cable.
DVI (High Definition Capable)
This connection port is used for PCs only for digital display.
VGA (High Definition Capable)
This connection port is by PCs only for analog display.
◎TO PC
1. USB-IN (By Model)
This connection is for linking to the PC’s USB port so that the two (◎TO DEVICE)
USB 2.0 USB out ports on the monitor can function.
Note: due to the specification and limitation of USB 2.0, recommend not to use the cable
over 6ft when linking the monitor to PC. (USB A-B cable not included.)
2. MIC
This connection is for linking to the PC’s microphone port so that the (◎TO DEVICE)
Microphone port on the monitor can function.
DO NOT connect a microphone to this
port. (3.5mm Jack cable not included.)
SCEPTRE
X22
Page21
3. LINE IN
This connection is for linking to the PC’s line out port so that the (◎TO DEVICE)
Headset port on the monitor can function.
DO NOT connect a headset or external
speakers to this port.
◎TO DEVICE
1. USB 2.0 (By Model)
This port provides extra connections for your USB devices.
Please note you must
connect the (◎
◎TO PC) USB-IN port to your PC’s USB port first before these two ports
can function.
Note: recommend for linking to any USB devices (like USB mouse, flash drive, etc.)
except USB hub. If use for linking USB hub, it may not work properly due to the limit
power supply from USB hub itself.
2. HEADSET/LINE OUT (for Active Speakers) (By Model)
This connection allows users to connect their headset to the monitor.
Please note you
must connect the (◎TO PC) LINE IN port to your PC’s line out port first before this
connection can function. You also can connect a set of active speakers (speakers which
with built-in amplifier) for better sound effect when using HDMI port for viewing DVD.
3. MICROPHONE (By Model)
This connection allows users to connect their microphone to the monitor.
Please note
you must connect the (◎TO PC) MIC port to your PC’s microphone port first before
this connection can function.
Page22
SCEPTRE
X22
Adjusting the Tilting Angle
The LCD Monitor’s angle settings range from 0° to 10°.
0o to 10o
SCEPTRE
X22
Page23
Connecting AC Power and PC / VIDEO Cable
Note: Turn off your PC and the LCD monitor before connecting your LCD
monitor to the computer.
Page24
SCEPTRE
X22
Connecting [TO DEVICE] Ports
1. USB 2.0 (By Model)
This port provides extra connections for your USB devices.
Please note you must
connect the [TO PC] USB-IN port to your PC’s USB port first before these two ports
can function.
2. HEADSET and MICROPHONE (By Model)
This connection allows users to connect their headset and microphone to the monitor.
Please note you must connect the [TO PC] LINE IN and [TO PC] MIC port to your
PC’s line out port first before this connection can function.
SCEPTRE
X22
Page25
3. HEADSET/LINE OUT (for Active Speakers) (By Model)
You also can connect a set of active speakers (speakers which with built-in amplifier) for
better sound effect when using HDMI port for viewing DVD.
Connecting HDMI Port
HDMI is for connecting HD Satellite, HD Digital Cable Set-top Boxes or other device
with HDMI port. The HDMI port also doubles as HDCP/DVI port. If your HD set-top
box does not have HDMI but DVI instead, please use the HDMI to DVI conversion cable
that is included in the box. When using HDMI to DVI conversion cable please also plug
audio wires into PC Line In port for sound. Note: PC Line In is for sound on HDCP/DVI.
A.HDMI
Page26
SCEPTRE
X22
B.DVI
C.HDCP
SCEPTRE
X22
Page27
Chapter 2-Using the X22
OSD (On Screen Display Menu)
The OSD Menu varies based on different input signal sources. The OSD menus provide
different control functions, which allow users to optimize the picture/audio performances
for each of the input signal sources.
How to operate the OSD Menu:
1.
Press the MENU button
(Picture 2.1) on the right hand side of the back cover
of the LCD Monitor .Press the EXIT
(Picture 2.2) button to quit the OSD
menu.
2.
Press
(Picture 2.2) to select the GROUP items that are listed
horizontally on the OSD menu.
3.
Press
4.
Press
to enter the sub-menu. Press
5.
Press
to go back to the previous menu.
Page28
(Picture 2.3) to scroll through the function items vertically.
to adjust the setting.
SCEPTRE
X22
OSD Control keys:
SCEPTRE
X22
Page29
OSD screen instruction:
Group icon descriptions:
1.
GEOMETRY / VIDEO
2.
PICTURE / ADVANCED
3.
SYSTEM
Page30
SCEPTRE
X22
VGA-PC input
When VGA-PC is selected, the following OSD menu will be displayed when the MENU
button is pressed.
1.
GEOMETRY
AUTO
Auto fine tunes picture clock and position.
H-POSITION
Adjusts the display position left or right. Normally use Auto Adjust.
V-POSITION
Adjusts the display position up or down. Normally use Auto Adjust.
CLOCK
Adjusts the clock frequency to match video card. Normally use Auto
Adjust.
PHASE
Adjusts the phase frequency to match video card. Normally use Auto
Adjust.
RECALL
Resets the parameters to original factory settings.
SCEPTRE
X22
Page31
2.
PICTURE
CONTRAST
Adjusts the contrast between bright / dark graphics and text.
BLACK LEVEL
Adjusts brightness (DC Level) of the screen.
COLOR TEMP.
Selects color temperature among High, Middle, Low, or User modes.
R GAIN
Under User mode, adjusts how much red color is in the display.
G GAIN
Under User mode, adjusts how much green color is in the display.
B GAIN
Under user mode, adjusts how much blue color is in the display.
RECALL
Resets the parameters to original factory settings.
3.
SYSTEM
LANGUAGE
Chooses the language between English and French for the OSD menu
LAMP
Adjusts how bright you want the LCD to display its images
FORMAT
Makes the signal output conform to the window size and resolution of
the display. Resolution – 1024x768, 1280x768, 1360x768
How to setup: 1.Select the resolution under FORMAT. 2.Use the
AUTO feature under GEOMETRY to fine tune the picture.
AUTO COLOR
Auto adjusts for white balance of display.
Please choose a white background before activating the function.
Page32
SCEPTRE
X22
ASPECT
This button selects the available screen aspect ratio to display.
-Native, Full
Note:
Native-- The picture is displayed with the original size, resolution and
aspect ratio of the PC timing mode.
Full-- Full screen of the picture is displayed with the maximum default
size of 1680x1050 pixel.
VOLUME
Adjust the speaker volume level.
INFORMATION
This function displays related information on current display modes.
DVI input
When DVI input is selected, the following OSD menu will be displayed when the MENU
button is pressed.
1.
GEOMETRY
Not available under DVI input.
SCEPTRE
X22
Page33
2.
PICTURE
CONTRAST
Adjusts the contrast between bright / dark graphics and text.
BLACK LEVEL
Adjusts brightness of the screen.
COLOR TEMP.
Selects color temperature among High, Middle, Low, or User modes.
R GAIN
Adjusts how much red color is in the display.
G GAIN
Adjusts how much green color is in the display.
B GAIN
Adjusts how much blue color is in the display.
RECALL
Resets the parameters to original factory settings.
3.
SYSTEM
LANGUAGE
Chooses the language between English and French for the OSD menu
LAMP
Adjusts how bright you want the LCD to display its images
FORMAT
Not available under DVI input.
AUTO COLOR
Not available under DVI input.
ASPECT
This button selects the available screen aspect ratio to display.
-Native, Full
Page34
SCEPTRE
X22
Note:
Native-- The picture is displayed with the original size, resolution and
aspect ratio of the PC timing mode.
Full-- Full screen of the picture is displayed with the maximum default
size of 1680x1050 pixel.
VOLUME
Adjust the speaker volume level.
INFORMATION
This function displays related information on current modes.
HDMI inputs
1.
VIDEO
CONTRAST
Adjusts the contrast between bright / dark graphics and text.
BRIGHTNESS
Adjusts brightness of the screen.
SHARPNESS
Makes the picture sharper.
COLOR
Adjusts Picture Chrominance Gain/Ratio.
SCEPTRE
X22
Page35
TINT
Adjusts Picture Chrominance angle(or skin color).
RECALL
Resets the parameters to original factory settings.
2.
ADVANCED (User mode)
VIVID COLOR
Makes color brighter without over-saturation.
SKIN TONE
Makes the skin color brighter without affecting other colors.
GREEN
Strengthens Green (grass color) color without affecting other colors.
BLUE
Strengthens Blue (sky color) color without affecting other colors.
GAMMA
Adjusts screen visual transformation.
RECALL
Resets the parameters to original factory settings.
3.
SYSTEM
LANGUAGE
Chooses the language between English and French for the OSD menu
LAMP
Adjusts how bright you want the LCD to display its images
ASPECT
This button selects the available screen aspect ratio to display.
-Auto, 16:9, 4:3, Zoom Full, Zoom Subtitle
Page36
SCEPTRE
X22
VOLUME
Adjust the speaker volume level.
INFORMATION
This function displays related information on current modes.
SCEPTRE
X22
Page37
Appendix
Appendix A-
-Supported PC Timing
Item
1
2
3
4
5
6
7
8
9
10
11
12
13
14
15
16
17
18
19
20
21
22
23
Standards
Resolution
Dot Clock
(MHz)
NEC PC98
MAC 13" mode
MAC 17" mode
VGA
VGA
VGA
VESA
VESA
VESA
VESA
SVGA
VESA
VESA
VESA
XGA
VESA
VESA
VESA
VESA
VESA
Non-VESA
VESA
Non-VESA
640x400
640x480
1024x768
640x350
640x400
640x480
640x480
640x480
640x480
800x600
800x600
800x600
800x600
800X600
1024x768
1024x768
1024x768
1152X864
1280X1024
1280X1024
1280x720
1280x960
1680X1050
21.05
30.24
80.00
25.18
25.18
25.18
31.50
31.50
36.00
36.00
40.00
50.00
49.50
56.25
65.00
75.00
78.75
108.
108
135
74.02
108
146.250
Vertical
Scanning
Frequency
(Hz)
56.42
66.67
75.02
70.09
70.09
59.94
72.81
75.00
85.00
56.25
60.32
72.19
75.00
85.00
60.00
70.07
75.03
75.00
60
75
60
60
60
Horizontal
Scanning
Frequency
(kHz)
24.83
35.00
60.24
31.47
31.47
31.47
37.86
37.50
43.30
35.16
37.88
48.08
46.88
53.70
48.36
56.48
60.02
68.70
63.98
80
44.7
60
65.3
*Once a mode is optimized, there is no need to make any further adjustment as long as
the VGA card remains unchanged.
*Specifications are subject to change without notice.
Page38
SCEPTRE
X22
Supported Video mode (HDMI port)
Item
Standards
Vertical
Scanning
Frequency
(Hz)
1
720x480i
29.97
15.73
2
720x480P
59.94
31.46
3
720x576i
25
15.62
4
720x576P
50
31.25
5
1280x720P
50
37.5
6
1280x720P
60
45
7
1920x1080i
25
28.12
8
1920x1080i
30
33.75
9
1920x1080P
50
56.25
10
1920x1080P
60
67.5
SCEPTRE
X22
Horizontal
Scanning
Frequency
(kHz)
Page39
Appendix B-
-Troubleshooting
This LCD monitor comes pre-adjusted with standard VGA timing.
Due to output timing
differences among various VGA cards, you may initially experience an unstable or
unclear display when a new display mode or new VGA card is selected.
Before applying any of the following troubleshooting procedures, you should first apply
the Auto Adjust option in the OSD menu.
Problem
Possible solutions
Display is unclear and
To stabilize and clarify your display, open the OSD and
unstable
adjust the clock and phase to obtain a clear display or change
the resolution to the display’s optimal setting 1680 x 1050 at
60Hz.
Make sure you use auto adjust function after
changing the resolution.
There is no LCD
If there is no display on the LCD, refer to the following:
display
1. Make sure that the power indicator on the LCD monitor is
lit, that all connections are secure, and that the system is
running on the correct timing.
Refer to Appendix A for
information on timing.
2. Turn off the LCD monitor and then turn it back on again.
Press the OSD Menu button (refer to Chapter 2) once and
then press one of the Adjustment Control buttons several
times. If there is still no display, press the other
Adjustment Control button several times.
3. If step 2 does not work, connect your PC system to another
external CRT.
If your PC system functions properly with
a CRT monitor but it does not function with the LCD
monitor, and the LCD monitor’s power LED is blinking,
the output timing of the PC’s VGA card may be out of the
Page40
SCEPTRE
X22
LCD’s synchronous range. Change to one of the alternate
modes listed in Appendix A, or replace the VGA card and
repeat steps 1 and 2.
4. If the power LED is not lit, check that the AC power
connector is securely connected, and verify that the AC
adapter LED is lit. If the AC adapter LED is not lit, please
contact your dealer for assistance.
The LCD displays
1. If you have a CRT monitor, please connect the CRT
“signal out of range”
monitor to the computer and change the refresh rate down
error message
to 60Hz via your video card’s display settings menu.
After the setting of 60Hz has been change you can then use
the LCD on the computer.
2. If you do NOT have a CRT monitor, please make sure both
the X22 monitor and your computer is turned off.
Afterwards turn on the LCD and the computer.
3. While the computer is turned on, press the “F8” key on
your keyboard continuously until a selection menu appears
and select the “Safe Mode” option.
4. When you’ve entered Safe Mode please uninstall any
video card driver and monitor driver by using either the
“Add / Remove Programs” icon or going into “System
Properties” and manually removing anything under
“Monitors” and “Display Adapters”.
5. After removing all the drivers, please reboot your
computer and you should be able to see windows.
Please
install your monitor driver first, then your video card
driver.
Please remember to make sure your
refresh rate should be at 60Hz.
SCEPTRE
X22
Page41
FCC Compliance Statement
This device complies with Part 15 of the FCC Rules.
Operation is subject to the following two conditions:
(1)
This device may not cause harmful interference, and
(2)
This device must accept any interference received, including interference that my
cause undesired operation.
FCC WARNING
This equipment has been tested and found to comply with the limits for a Class B digital
device, pursuant to Part 15 of the FCC Rules. These limits are designed to provide
reasonable protection against harmful interference in a residential installation.
This equipment generates, uses and can radiate radio frequency energy and, if not
installed and used in accordance with the instructions, may cause harmful interference to
radio communications.
However, there is no guarantee that interference will not occur in a particular installation.
If this equipment does cause harmful interference to radio or television reception, which
can be determined by turning the equipment off and on, the user is encouraged to try to
correct the interference by one or more of the following measures:
Reorient or relocate the receiving antenna.
Increase the separation between the equipment and the receiver.
Connect the equipment into an outlet different from that to which the receiver
is connected.
Consult the dealer or an experienced radio/TV technician for help.
Caution:
To comply with the limits for an FCC Class B computing device, always use the shielded
signal cord supplied with this unit.
The Federal Communications Commission warns that changes or modifications of the
unit not expressly approved by the party responsible for compliance could void the user’s
authority to operate the equipment.
Page42
SCEPTRE
X22