1
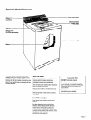
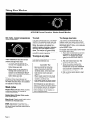
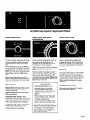
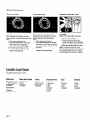
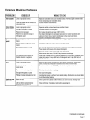
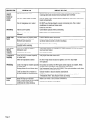
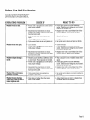
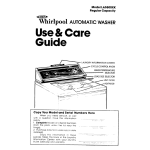
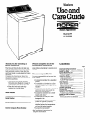
Washers
Useand
CareGuide
rnTM
Home Appliances
AL2121W
AL3132W
Thank you for choosing a
Roper appliance.
Please complete all of the
Installation Instruction
This Use and Care Guide will help you
operate and maintain your new, qualitybuilt automatic washer. Keep this Use
and Care Guide in a safe place for future
reference.
Complete the form below. Have this
information ready if you need service or
call with a question.
. Copy model and serial numbers
from plate (see diagram on page 3)
and purchase date from sales slip.
. Keep this book and sales slip
together in a handy place.
steps before attempting to operate your
washer.
Model Number
Serial Number
Purchase
Service
Date
Company
Phone Number
You are responsible for
It is your responsibility to be sure that
your washer:
l Is properly installed by a qualified
person.*
. Is installed and leveled on a floor
that can support the weight of the
washer.*
. Is properly connected to a grounded
electrical circuit that meets the
electrical requirements.*
. Is properly connected to a water
supply and drain. *
. Is used only for the job it was
designed to do.
. Is not used by children or anyone
unable to operate it properly.
. Is protected from the weather and
installed where the temperature
will not fall below freezing.
. Is properly maintained.*
*SeeInstallation Instructions for
complete
information.
Contents
Important Safety Instructions
Energy Saving Tips
Before You Wash
Special Model Features
Sort the load
Load the washer
Using Your Washer
AL2121W lame canacitv.
single-speed‘tvasher
AL3132W large capacity,
single-speed washer
Other Features
Rinse and spin
Drain and spin
Manual-clean lint filter
Laundry Load Guide
Common Washing Problems
Laundry Tips
Caring For Your Washer
Before leaving on vacation
To protect your washer from freezing _
Before You Call For Service
Warranty
How to get service or assistance
9
:i
10
:;
12
Important Safety Instructions
Reduce risk of fire, electrical shock, or personal injury when using your washer, by following basic precautions, including the following:
. Read all instructions before using
your washer.
. DO NOT wash items cleaned in,
washed in, soaked in or spotted
with gasoline, dry-cleaning
solvents, paint, wax or other
flammable or explosive substances
in the washer. The fumes can create
a fire or explosion. Always handwash and air-dry fabrics containing
these materials.
. DO NOT allow children to play on or
inside the washer. Close
supervision of children is necessary
when the washer is used near
them.
. Before the washer is removed from
service or discarded, remove the lid
to prevent accidental entrapment.
. DO NOT reach into the washer
basket while it is filling with water,
while agitator is moving or while
basket is spinning. If the lid is
opened while the basket is spinning, the basket will automatically
stop in a few seconds.
. DO NOT install or store washer
where it will be exposed to the
weather.
. DO NOT tamper with controls.
. You are responsible for making sure
that your washer is installed,
repaired and has parts replaced by
a qualified person.
. DO NOT add gasoline, dry-cleaning
solvents or other flammable or
explosive substances to the wash
water. The substances give off
vapors that could ignite or explode.
n
If hot water has not been used
recently (usually 2 weeks or
longer), hydrogen gas may build
up in the water heater and the hot
water pipes. HYDROGEN GAS IS
EXPLOSIVE. To prevent injury or
damage, before using your washer,
turn on all hot water faucets and
allow water to run for several
minutes. This will allow gases to
escape. DO NOT smoke or use any
open flame near the faucet while it
is open.
.SAVE THESE INSTRUCTIONS.
Energy Saving Tips
1. Use washer during non-peak
energy usage hours. (Contact your
power company for the most
energy-efficient times.)
2. Use hot water only when washing
whites or heavy or greasy soils.
3. Use cold water for washing light
soils.
4. Use cold rinses.
5. Adjust the water level when
washing small loads.
6. Avoid rewashing by:
- pretreating stains or heavy soils;
- properly sorting clothes;
- using enough detergent;
- not overloading;
- using proper cycles and wash
times.
Page 2
Before You Wash
1. Turn all pockets inside out and
empty.
2. Turn down cuffs. Brush away lint
and dirt.
3. Close zippers, snaps and hooks and
remove pins, buckles and other
hard objects to prevent scratching
laundry basket, agitator or
snagging other items.
4. Remove unwashable trim and
ornaments.
5. Tie strings and sashes to prevent
tangling.
6. Mend tears, loose hems and seams.
7. Treat spots and stains. Pre-soak if
necessary.
n
n
n
n
n
n
The washer must be electrically
grounded. SeeInstallation
Instructions.
Store detergent and laundry
products in a cool, dry place out of
children’s reach. A locked cabinet
is recommended.
Read and follow instructions on
detergent and laundry packages.
Pay special attention to warnings
and precautions.
DO NOT use chlorine bleach in the
same wash as ammonia, vinegar,
rust remover or other acids.
Hazardous fumes can form.
DO NOT machine-wash glass fiber
materials. Small particles can stick
to fabrics washed in following
loads and cause skin irritation.
DO NOT use or store dry-cleaning
solvents, kerosene or other
flammable or explosive
substances in or near your
washer. These substances give off
vapors that can create a fire
hazard or explosion.
Special Model Features
Cycle control knob
Water level
selector
(AL3132W)
Model and serial
number plate
(under lid)
Agitator
Manual-clean
lint filter
(AL3132W-not shown)
Tub
The drawings in this book may vary
slightly from your washer model. They
are designed to show the different
features of all the models covered by this
book. Your model may not include all the
features shown.
Sort the load
Sort items by lint-givers (chenille, bath
towels) and lint-takers (corduroy,
permanent press and synthetics).
Sort by fabric and construction (cottons,
knits and delicate items).
Sort by color (white, colorfast and noncolorfast).
Sort by amount of soil (heavy, normal
and light).
Laundry Tip
DO NOT overload washer.
Overloading or packing can cause
poor cleaning, increased wrinkling,
excessive lint and can wear out
items faster.
Use highest water level for the best
permanent press results.
Load the washer
Drop items into washer loosely and
evenly.
For best cleaning and wrinkle-free
results, items should move freely in
wash water. Permanent press and
synthetic knits should have more room
to move in the water than towels, jeans,
etc. (For specific
loading
recom-
mendations see page 6.)
Page 3
Set cycle, water temperature
and wash time
To start
To change load size
Pull cycle control knob out. The washer
will fill to the selected water level and
water temperature. Immediately after
filling, the washer will agitate for a
selected number of minutes. Agitation
can occur with the washer lid up or
down. The washer will pause briefly
throughout each cycle. These pauses are
normal for washer operation,
The washer will automatically fill for
highest water level when cycle control
knob is turned to 14 or 10 minutes in the
REGULARHEAVY Cycle, or to 6 minutes
in the SHORTCycle.
For smaller load sizes (and a lower water
fill), follow these steps:
1. Push cycle control knob in and turn
clockwise to 14 minutes (for hot
water) or 10 minutes (for warm
water) in the REGULARHEAVY
Cycle.
2. Pull cycle control knob out. The
washer will start to fill.
3. When the washer reaches the
desired water level, push cycle
control knob in and turn clockwise
until it points to 6 minutes in the
REGULARHEAVY Cycle.
4. Pull out cycle control knob to start
the washer.
To stop at any time
Water temperature and load size are
selected through wash time.
. Hot water can be selected by
turning cycle control knob to 14
minutes in the REGULARHEAVY
Cycle. Rinses are cold.
. Warm water can be selected by
turning cycle control knob to 10
minutes in the REGULARHEAVY
Cycle, or to 6 minutes in the SHORT
Cycle. Rinses are cold.
Push in cycle control knob and turn it
clockwise. Stop when indicator on
knob’s outer ring points to the number in
the wash cycle you want. The numbers
are minutes of wash time.
Wash cycles
Regular Heavy (14 min.) Wash sturdily
constructed fabrics (i.e. cotton) or
heavily soiled items.
Regular Heavy (10 min.) Wash moderately soiled fabrics.
Short (6 min.) Gently wash lightly soiled
delicates and washable knits.
NOTE: Use shorter wash times for
lightly soiled loads. Loads with only a
few small items need less wash time for
best results.
Page 4
Push cycle control knob in. To restart,
pull cycle control knob out.
Laundry Tip
For best cleaning results, use:
-Hot wash water for normally
soiled, permanent press and
synthetic items; white and colorfast cottons; heavy soils and
diapers.
-Warm wash water for knits; dark
or non-colorfast colors; washable
woolens; moderate soil.
-Cold wash water for lightly soiled
fabrics; some non-colorfast colors.
Dry detergents can spot-fade wet
laundry. If using cold water, dissolve
recommended amount of detergent
in one quart (1 L) of warm water
before adding it to the washer, or
use a liquid detergent,
Select water level
Select cycle and water
temperature
Select wash time
To set the correct water level, turn the
water level selector knob to the level
that describes the size of your wash
load.
The water level can be set to SMALL (a
few small items) or LARGE (a full load).
NOTE: For best results with permanent
press clothes, use the LARGE water
level.
Reduce wash time when using the
SMALL water level setting. Loads with
only a few small items need less wash
time for best results.
To set the water temperature, push in
the cycle control knob and turn it
clockwise to the area marked H (hot),
W (warm) or C (cold). Set water
temperature level according to fabric
label or the amount of soil to be washed.
NOTE: All rinses use cold water.
Start the washer by pulling out cycle
control knob. The washer will fill to the
level you set with wash water of the
selected temperature. After filling, stop
Select a wash time by stopping the
washer after filling. Turn cycle control
knob to the number in the wash cycle
you want. The numbers are minutes of
wash time. Restart the washer.
Wash cycles
Regular Heavy (14 min.) Wash sturdily
constructed fabrics (i.e. cotton) or
heavily soiled items.
Regular Normal (6 min.) Wash moderately soiled fabrics.
Permanent Press (10 min.) Wash
moderately soiled permanent press and
some synthetic fabrics. Cool-down rinse
helps to keep fabrics from wrinkling.
Permanent Press (6 min.) Wash lightly
soiled permanent press and some
synthetic fabrics. Cool-down rinse helps
to keep fabrics from wrinkling.
the washer by pushing in cycle control
knob. Select wash time
Laundry Tip
For best cleaning results, use:
-Hot wash water for normally
soiled, permanent press and
synthetic items; white and colorfast cottons; heavy soils and
diapers.
-Warm wash water for knits; dark
or non-colorfast colors ; washable
woolens; moderate soil.
-Cold wash water for lightly soiled
fabrics; some non-colorfast colors.
Dry detergents can spot-fade wet
laundry. If using cold water, dissolve
recommended amount of detergent
in one quart (1 L) of warm water
before adding it to the washer, or
use a liquid detergent.
To start
Pull cycle control knob out. The washer
will agitate for a selected number of
minutes. Agitation can occur with the
washer lid up or down. The washer will
pause briefly throughout each cycle.
These pauses are normal for washer
operation.
To stop at any time
Push cycle control knob in. To restart,
pull cycle control knob out.
Page 5
Other Features
Rinse and spin
Drain and spin
Manual-clean lint filter
Complete rinsing of fabrics washed with
extra detergent may require an extra
rinse and spin. To set for extra rinse and
spin:
1. Push cycle control knob in.
2. Turn knob clockwise to one of the
dots on the dial, as illustrated
above. (Seearrows in drawing.)
3. Pull cycle control knob out. The
washer will fill to selected level,
agitate, drain and spin.
A dram and spin may help shorten
drying times for some fabrics or handwashed items by removing excess
water.
1. Push cycle control knob in.
2. Turn clockwise to any bar located
just before an OFF area on the dial,
as illustrated above. (Seearrows in
drawing.)
3. Pull cycle control knob out. The
washer will drain and spin.
AL3132W
Clean the lint filter after every load.
1. Lift up agitator barrel.
2. Wash or wipe the filter clean
(located in bottom of the agitator
barrel). The filter is not removable.
3. Snap the agitator back into place.
NOTE: On Model AL2121W, lint is
washed out with existing wash water. If
your washer drams into a tub, remove
any lint collected in the tub or strainer.
Laundry Load Guide
Use highest water level for these
suggested full-size loads.
Mixed
Load
2 double sheets or
1 king-size sheet
4 pillowcases
6 T-shirts
6 pair shorts
2 shirts
2 blouses
6 handkerchiefs
Page 6
Heavy Work Clothes
2 pair pants
3 shirts
3 pair jeans
1 coverall
Towels
8 bath towels
8 hand towels
10 wash cloths
1 bathmat
Permanent Press
Knits
Delicates
1 double sheet
1 tablecloth
1 dress
1 skirt
2 blouses
2 slacks
3 shirts
2 pillow cases
2 slacks
2 blouses
4 shirts
4 tops
2 dresses
2 camisoles
4 slips
2 panties
2 bras
2 nighties
Common Washing Problems
PROBLEM
Dye transfer
CHECK IF
Load is properly sorted
Load has been left in washer for
extended time
Gray whites,
dingy colors
Load is properly sorted
Enough detergent is used
Water is hot enough
Water is too hard for soap or
detergent used
Greasy
spots
Undiluted fabric softener touches
fabric
Fabric softener added to wash
water
Enough detergent is used
Soil deposits are present on
basket interior or agitator
Lint
Load is properly sorted
Load is too big for capacity or
water level
Paper or tissue is in pocket
Enough detergent is used
Pilling is being mistaken for lint
Load too wet
after spin
Rinse is cold
Lid has been opened before
spinning has completed
WHAT TO DO
Separate colorfast from non-colorfast items. Prevent light-colored items
from contacting non-colorfast items.
Unload washer immediately.
Separate white, colored and non-colorfast items.
Increase amount of detergent.
Hot water should be at least 130°F (54°C).
Use liquid detergent in increased amounts for water hardness and
amount of soil. Use a water conditioner in the wash and rinse.
Install a mechanical water softener.
Dilute fabric softeners with l/2 to 1 cup (125 to 250 mL) warm water.
Add fabric softener only in rinse part of the cycle.
Use enough detergent to hold soil so it drains away with wash water.
Treat spots with heavy-duty liquid detergent.
Wash in warm or hot water with extra detergent.
Wash more than once; DO NOT dry between washings.
Wipe with a damp cloth or remove deposits by running a complete cycle
using hot water, 2 cups (500 mL) of detergent and 1 cup (250 mL) of
chlorine bleach.
Separate lint givers (towels) from lint takers (synthetics, permanent
press, corduroys). Separate synthetic items from cotton items.
Drop items in loosely; DO NOT pack clothes tightly into basket.
Check pockets before washing.
Use more detergent.
Laundering raises a surface fuzz called pilling. Synthetics are more likely
to pill than other fabrics.
Cold rinses leave loads colder/wetter, but save money, energy and
cause fewer wrinkles.
Close lid firmly. Complete cycle before opening lid.
Continued on next page
Page 7
PROBLEM
Overall
yellow;
brown or
yellow
stains
WHAT TO DO
CHECK IF
Chlorine bleach is used
Chlorine bleach can permanently yellow some fabrics. Read fabric
washing label and chlorine bleach package label carefully.
Iron is in water heater or pipes
Run hot water a few minutes before washing to clear lines. Drain water
heater occasionally.
Iron or manganese is in water
DO NOT use chlorine bleach in water containing iron. Use a water
conditioner in wash and rinse water.
Install an iron filter.
Fabric is poor quality
Shrinking
Fabric-care label directions were
followed
Check fabric quality before purchasing.
Follow fabric care label directions.
Chlorine bleach is properly used
Sharp articles are removed;
fasteners are fastened
Rips, broken threads and tears not
mended before washing
Follow chlorine bleach directions.
Remove sharp objects; fasten hooks and eyes, zippers and snaps; turn
synthetic fabrics inside out before washing.
Mend fabric before washing.
Stiff, harsh
fabrics
[usually
cottons)
Water is too hard for soap or
detergent used
Cottons are line-dried
Use proper amount of detergent for water hardness. Do not use soap if
you have hard water.
Dry cottons in dryer.
Twisting
tangling
Load too big for washer capacity
or water level
Items are improperly loaded
Use proper load and water level.
Snags, rips,
holes
or
DO NOT wrap items around the agitator. DO NOT slip straps
over agitator.
Wrinkling
Load is too big for washer capacity Drop items in loosely; DO NOT pack clothes tightly into basket. Wash
or water level
smaller loads of synthetic and permanent press items.
Setting allows for cool-down time Use Permanent Press Cycle (AL3132W). This cycle includes a cool-down
of the wash water before the spin.
Load has been left in washer or
Unload washer or laundry basket immediately.
laundry basket for extended time
NOTE: Since permanent press finishes may vary, items labeled
“Permanent Press” may require touch up ironing.
Yellow
areas
Make sure water is hot (at least 130”F/54”C).
Body oils may have stained
fabric-usually found on the middle
of pillowcases and sheets;
Increase the amount of detergent.
underarms of cotton clothing
Page 8
Laundry Tips
Stained or wet garments should be
washed promptly. Dry laundry
immediately after washing to prevent
wrinkling.
For best results when using soap,
detergent, chlorine or all-fabric bleach,
fabric softeners, pretreatment or enzyme
laundry products, packaged water
conditioners, bluing, ammonia or starch,
follow the package instructions.
Water hardness
Many poor washing results can be
traced to wash water hardness. To check
your water hardness __.
. City water-ask your city water
company.
. Well water-call your Cooperative
Extension Service.
Ask for the mineral content in grainsper-gallon or parts-per-million. If your
water is 9 or more grains-per-gallon or
more than 153 parts-per-million:
. Consider installing a water
softener.
. Use more detergent.
. Use a packaged water conditioner.
. Do Not use soap.
Fabric softeners
. Always dilute fabric softeners with
l/2 to 1 cup (125 to 250 mL) warm
water. Undiluted fabric softener can
stain fabrics.
. Add fabric softener after the washer
fills for the rinse part of the cycle.
(Seearrows in the illustration under
“Rinse and spin” on page 6.) Use
liquid fabric softener only in the
rinse part of the cycle.
. Fabric softeners should not be
mixed with other laundry products.
. Too much fabric softener can make
some items non-absorbent (diapers
and towels). If this happens, use
less fabric softener or do not use it
every time.
Soaking
Tints and dyes
When soaking in your washer:
. Always use detergent.
. If using chlorine bleach, also
add detergent.
n Vinegar or other acids should
not be used in your washer
because acids attack all
porcelain basket finishes and
can reduce the life of your
washer.
. Use only products labeled as
being washer safe.
Follow package directions for tints
and dyes.
. When you are finished
1. Put chlorine bleach and detergent
in the washer.
2. Run through a complete cycle using
hot water.
3. Repeat if staining occurs on
following loads.
NOTE: Washer parts such as agitator,
washer lid, etc. can be stained by the
dye color.
n
Stain removal guide
I
Fire Hazard
. Never put dry-cleaning solvents or
fluids directly into your washer.
. Never put items treated with
solvents in your washer until they
have been completely rinsed and
air dried. The fumes from these
solvents can create a fire or
explosion.
. Treat stains when they are fresh.
Old or set stains may not come out.
mBefore treating, check:
-type of stain.
- fabric label and how colorfast it is.
- how old the stain is.
. Use cold or warm water first. Hot
water can set some stains.
. Use a bleach that is safe for the
garment. Dilute chlorine bleach.
. Test stain remover products on
inside seam or hidden corner of item
to check colorfastness.
. Put stained area face down on paper
towel or white cloth. Apply stain
remover to back of stain to force the
stain off the fabric instead of
through it.
. Use meat tenderizer or enzyme
presoaks for easier removal of some
protein stains.
1 Use dry cleaning solvents in a well
ventilated room.
. For specific stain removal recommendations, ask your Cooperative
Extension Service Office or consult a
public utility home economist.
Page 9
Caring For Your Washer
To keep your washer looking like new:
. Wipe up detergent, bleach or other
spills with a soft, damp cloth as
they occur.
. Sharp or heavy objects should not
be put on or in your washer. Check
pockets for nuts, bolts, etc.
. If the washer interior needs
cleaning, put 1 cup of chlorine
bleach and 2 cups of detergent in
the washer. Run through a
complete cycle using hot water.
. When removing hard water
deposits, use only cleaners labeled
as being washer safe.
Before leaving on vacation
1. Shut off both water faucets.
2. Unplug power cord and turn off
electric power supply.
To protect your washer from
freezing
Install and store your washer where it
won’t freeze. Because some water stays
in the washer, freezing can damage it. If
your washer is stored or moved during
freezing weather, winterize it.
1. Shut off both water faucets.
2. Disconnect and drain water inlet
hoses.
3. Put a quart of R.V.-type antifreeze
in the washer basket.
4. Push cycle control knob in. Turn
knob clockwise to just beyond any
dot on the dial. See “Rinse and
spin” on page 6 for additional
information.
5. Pull knob out, and allow washer to
run for about 30 seconds to mix
antifreeze and water.
6. Unplug power cord and turn off
electric power supply.
7. Store where washer will not freeze.
To use washer again
1. Flush water pipes and hoses.
2. Reconnect water inlet hoses
according to Installation
Instructions.
3. Open both water faucets.
4. Plug power cord into electrical
outlet.
5. Clean out antifreeze by adding one
cup of detergent to basket and
running washer through a complete
cycle.
Page 10
Before You Call For Service
If you are having an operating problem,
check this chart to see what might be
the cause before you caIl for assistance.
IPERATING PROBLEM
Washer will not fill.
. Power cord is plugged into a live circuit
with proper voltage.
. Household fuse has blown or circuit
breaker has tripped. Check if time-delay
fuse has been used.
. Both hot and cold water faucets are
open.
. Water supply hoses are kinked.
. Cycle control knob is set and pulled out.
Washer does not spin.
. Lid is closed.
. Power cord is plugged into a live circuit
with proper voltage.
. Household fuse has blown or circuit
breaker has tripped. Check if time-delay
fuse has been used.
Washer stops during a
cycle.
WHAT TO DO
CHECK IF
. Washer pauses briefly at different times
in each cycle. These pauses are normal.
. Power cord is plugged into a live circuit
with proper voltage.
. Household fuse has blown or circuit
breaker has tripped. Check if time-delay
fuse has been used.
Washer fills and drains
without running.
. Cycle control knob is pointing to a
number in the cycle.
Washer drains during
wash and rinse cycles or
water siphons out.
. Drain hose is higher than the water
level in the washer.
. Firmly plug power cord into electrical
outlet. Check circuit voltage at your home’s
fuse/circuit breaker box.
. Replace fuse with a time-delay fuse of the
correct capacity. Reset circuit breaker.
n
Open both faucets.
n
Straighten hoses.
I Set cycle control knob and pull out firmly.
Close lid firmly.
Firmly plug power cord into electrical
outlet. Check circuit voltage at your home’s
fuse/circuit breaker box.
I Replace fuse with a time-delay fuse of the
correct capacity. Reset circuit breaker.
n
n
m Wait a minute to see if washer starts cycle
again.
Firmly plug power cord into electrical
n
outlet. Check circuit voltage at your home’s
fuse/circuit breaker box.
I Replace fuse with a time-delay fuse of the
correct capacity. Reset circuit breaker.
n
n
Set cycle control knob on correct number in
the cycle.
Adjust dram hose so that it is higher than
the water level in the washer.
Page 11
LIMITED WARRANTY
ROPERT”
Home Appliances
PRODUCTS COVERED
WHAT WE WILL PAY FOR
FULL ONE YEAR WARRANTY
All Roper Appliances
Replacement parts and repair labor to
correct defects in materials or
workmanship.
FULL FIVE YEAR WARRANTY
Refrigerators
Freezers
Air Conditioners
Dehumidifiers
Replacement parts and repair labor for
the sealed refrigeration system
(compressor, evaporator, condenser,
drier or connecting tubing) which we
find to be defective in materials or
workmanship.
LIMITED 2ND-5TH
WARRANTY
YEAR
Microwave Ovens
Repair or replacement of magnetron
tube which we find to be defective in
materials or workmanship.
LIMITED 2ND-5TH
WARRANTY
YEAR
Automatic Washers
Repair or replacement of any part of
the gear case assembly which we find
to be defective in materials or
workmanship.
LENGTH
OF WARRANTY
(From date of purchase)
WHAT WE WILL NOT PAY FOR
A. SERVICECALLS TO:
1. Correct the installation of your appliance.
2. Instruct you how to use your appliance.
3. Replace house fuses or correct house wiring or plumbing.
4. Replace owner accessible light bulbs.
B. Repairs when appliance is used in other than normal, single-family household use.
C. Pick up and delivery. Your appliance is designed to be repaired in the home.
D. Damage to appliance caused by accident, misuse, fire, flood, acts of God, or use of product not approved by us.
E. Any labor costs during the limited warranties.
This Roper appliance is warranted by Whirlpool Corporation. Under no circumstances shall it be liable under this warranty for
incidental or consequential damages and all implied warranties are limited to the same time periods stated in the express
warranties for Roper Brand Appliances. Some states do not allow the exclusion or limitation of incidental or consequential damages
or limitations of how long an implied warranty may last, so the above limitations or exclusions may not apply to you.
This warranty gives you specific legal rights, and you may also have other rights which vary from state to state.
Outside the United States, a different warranty may apply. For details, please contact your franchised Roper distributor or military
exchange.
HOW TO GET SERVICE OR ASSISTANCE
If you need service, first see the “Before You Call For Service” section of this book. If you still need service after checking this
section, additional help can be found if you:
. Contact your selling dealer for the authorized servicer in your area?
OR
.Phone l-800-44-ROPER (l-800-447-6737) between 8:00 a.m. and 4:30 p.m. Eastern Time, Monday through Friday’:
OR
.For further information, write to: Consumer Relations Dept., Roper Brand Appliances, 2000 M-63 North, Benton Harbor, MI 49022:
*When requesting assistance, please provide the model and serial numbers, date of purchase, and a complete description of the
problem. The model and serial numbers are located on a plate under the lid (see illustration on page 3).
If you are not satisfied with the service received, contact the Major Appliance Consumer Action Panel (MACAP). MACAP is a
group of independent consumer experts that voices consumer views at the highest levels of the major appliance industry.
Contact MACAP only when the dealer, authorized servicer or Roper Brand warrantor have failed to resolve your problem:
Major Appliance Consumer Action Panel
20 North Wacker Drive
Chicago, IL 60606
MACAP will in turn inform us of your action.
Part No. 3355695Rev. A
01991 Whirlpool Corporation
TM Trademark of Whirlpool Corporation
Printed in U.S.A.