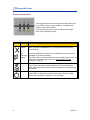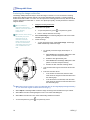
1
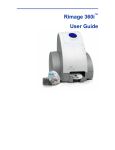
Rimage® 480i PrinterTM
User Guide
Corporate Headquarters:
Rimage Corporation
7725 Washington Avenue South
Minneapolis, MN 55439
USA
800 553 8312 (toll free US)
Service: +1 952 946 0004
(International)
Fax: +1 952 944 6956
European Headquarters:
Rimage Europe GmbH
Albert-Einstein-Str. 26
63128 Dietzenbach Germany
Tel: +49-(0) 6074-8521-0
Fax: +49-(0) 6074-8521-21
Rimage Corporation reserves the rights to make
improvements to the equipment and software
described in this document at any time without any
prior notice. Rimage Corporation reserves the right to
revise this publication and to make changes from
time to time in the content hereof without obligation of
Rimage Corporation to notify any person or
organization of such revisions or changes.
This document may contain links to web sites that
were current at the time of publication, but may have
moved or become inactive since. This document may
contain links to sites on the Internet that are owned
and operated by third parties. Rimage Corporation is
not responsible for the content of any such third-party
site.
©2007, Rimage Corporation
CD and DVD Recording Software
Disclaimer
This Product, Software, or Documentation may be
designed to assist you in reproducing material in
which you own the copyright or have obtained
permission to copy from the copyright owner.
Unless you own the copyright or have permission
to copy from the copyright owner, you may be
violating copyright law and be subject to payment
of damages and other remedies. If you are
uncertain about your rights, you should contact
your legal advisor. If you are neither in possession
of the copyright nor have authorization from the
owner of the copyright, unauthorized copying of
CDs violates national and international legislation
and can result in severe penalties.
Rimage™ is a trademark of the Rimage Corporation.
®
Rimage 480i Printer is a registered trademark of
®
Rimage Corporation. Dell is registered trademark of
Dell Computer Corporation.
All other trademarks and registered trademarks are
the property of their respective owners.
110761-000_C
Rimage 480i Printer
Support information
US, Asia/Pacific, Mexico/Latin America
Europe
Rimage Corporation
7725 Washington Avenue South
Minneapolis, MN 55439
USA
Attn: Rimage Services
Rimage Europe GmbH
Albert-Einstein-Str. 26
63128 Dietzenbach Germany
Contact Rimage Services:
FAX: +49-(0) 6074-8521-21
Email: http://www.rimage.com/support_form.cfm
Rimage Europe Technical Website:
Tel: +49-(0) 6074-8521-0
http://www.rimage.com/support.html
North America: 800-553-8312
Asia/Pacific, Mexico/ Latin America: 952-946-0004
FAX: 952-946-6956
Select the appropriate Support link to
learn more. If you cannot find a solution
on our website, email Rimage Services,
Europe at [email protected].
When you contact Rimage Services, please provide:
• Unit serial number and software version.
• Functional and technical description of the problem.
• Exact error message received.
Learn more online
At www.rimage.com/support.html, you can experience Rimage’s world-class Support and
Services.
1. Select your product family.
2. Select your product.
From your product page you can access:
•
Information about the latest software and firmware updates
•
Product specifications
•
Troubleshooting tips and FAQs
•
The latest documents
•
Printing tips
•
Current firmware and driver downloads
3. Learn more on your
product page.
Contents
Contents
Introduction ...................................................................................... 1
Operating System requirements............................................................................ 1
Media requirements............................................................................................... 1
Ink requirements.................................................................................................... 1
Rimage 480i Printer specifications ........................................................................ 2
Label design requirements .................................................................................... 2
Identify the parts of the Rimage 480i Printer ................................. 3
Side view ............................................................................................................... 3
Front view.............................................................................................................. 3
Operate the Rimage 480i Printer ..................................................... 5
Powering up the printer ......................................................................................... 5
Accessing the Power and USB Cables ................................................................. 5
Opening the Printer Service Door ......................................................................... 5
Changing ink cartridges......................................................................................... 5
Placing a disc on the printer tray ........................................................................... 7
Changing the fan filter ........................................................................................... 8
Setting up your printing preferences................................................................9
Navigating to Printing Preferences........................................................................ 9
Setting the print quality.......................................................................................... 9
Adding, editing, or deleting a watermark ............................................................. 10
Adjusting the ink volume used............................................................................. 11
Setting up color options....................................................................................... 11
Changing or enabling masking............................................................................ 12
Aligning the ink cartridges ................................................................................... 12
Centering the image on the disc.......................................................................... 14
Cleaning the ink cartridge nozzles ...................................................................... 15
Checking the ink levels........................................................................................ 15
Learn More ...................................................................................... 16
Safety information ............................................................................................... 16
Compliance testing.............................................................................................. 16
.
110761_C
i
Introduction
Introduction
This manual provides the information needed to operate the Rimage 480i Printer, identify the
parts, and configure the Rimage 480i printing preferences. To set up and install your Rimage 480i
Printer, refer to the Rimage 480i QuickStart Guide.
Operating System requirements
The Rimage 480i Printer runs only on Windows 2000 Professional and Windows XP Professional
and Home editions. It requires one USB port.
Media requirements
You must use discs that are coated with a surface that is designed for ink-jet printing. The media
that is in Rimage Media Kits™ is designed for optimum use in the Rimage 480i printer.
Ink requirements
The printer will work only with
the following printer cartridges.
The following cartridge combinations are supported.
Left Position
Right Position
Description
Rimage Part #
Color
Black
Black
RB1
Color
Photo
Color
RC1
Color
No cartridge
Photo
RP1
No cartridge
Black
n Warning!
•
Ink may be harmful if swallowed.
•
Avoid contact with eyes.
•
Ink contains nitrites. If ingested, seek immediate medical attention.
•
Keep out of reach of children.
•
Refilling ink cartridges may result in damage to the cartridge or printer.
•
Rimage ink cartridges are not licensed for modification.
- Important You can use only authentic Rimage ink cartridges in the Rimage 480i printer.
110761_C
1
Rimage 480i Printer
Rimage 480i Printer specifications
Print technology
Thermal inkjet printing
Print resolution
Up to 4800 dpi
Print driver
Microsoft Windows® 2000 Professional Service Pack 4 or XP
Professional Service Pack 2
Color spectrum
16.7 million
Droplet size
3 pico-liters
Pixel density
5.76 million pixels per square inch
Media types
Standard inkjet printable surface 120 mm CD-R/DVD-R
Power
100 – 240 VAC, 1.0 A, 50-60 Hz, auto-ranging
Physical size
Height – 6.00” (15.2 cm)
Width – 15.75” (40 cm)
Interface
USB 1.1
Depth – 15.00” (38.1 cm)
Weight 14 lb (6.35 kg)
Label design requirements
The 480i printer ships with the CD Designer™ label-editing program, which you can use to design
your labels.
If you have another software application that you prefer, you can create the label image and print
directly to the printer. If you create a Windows bitmap (.bmp) file, you can insert it into CD
Designer to create a label that prints with the Rimage software. To create a label with another
software application, use the following criteria when creating a label:
• Color Depth – Save the artwork for the label
with the color set to at least 256 colors; a higher
color setting is recommended.
• DPI – Use pictures or logos set to 300 DPI
(Dots Per Inch).
• Label Design Size – A full size disc is 120mm
(4.723”). The hole is 15mm (0.59”). The
printable area and hub sizes vary depending on
the disc manufacturer.
• Media – The media that is in Rimage Media
Kits™ has a hub area of 23 mm and a printable
area of 118 mm. Most labels print well with the
print settings set to 24 mm and 118 mm. To
eliminate the white areas that may appear at
the center and edge of the disc, you may want
to try settings of 23 mm and 119 mm.
• For more information about Rimage Media
Kits™ – convenient packages of inkjet-printable
discs and ink cartridges, all guaranteed by
Rimage – contact Rimage at 800-445-8288.
2
110761_C
Identify the parts of the Rimage 480i Printer
Identify the parts of the Rimage 480i
Printer
This section describes the Rimage 480i Printer hardware and its features. The Rimage 480i
Printer has some major parts that you need to know to operate and maintain the printer. These
features are shown in the Front and Side views.
Side view
Printer Service Door
USB
Connection
Ink Access
Door Grip
Fan
Power Cable
Front view
Printer Service Door
Ink Cartridge
Access Door
Printer Control Panel
Printer Tray
110761_C
3
Rimage 480i Printer
Printer control panel
The Rimage 480i Printer control panel has three buttons and
three LEDs to indicate certain conditions. The table below
explains each of these buttons.
LED: Light-emitting diode. A type of diode that emits light
when current passes through it.
Image
Name
Functionality
Cancel
When you press the Cancel button, it provides limited functionality to
cancel printing.
/
Ink
Cartridge
Status
4
The amber LED flashes when there is a hardware issue such as the ink
cartridges are incorrectly installed.
The amber LED is on continuously when an ink cartridge is low on ink. To
check the ink cartridge status, refer to the Checking the ink levels
procedure on page 15.
Tray
The Tray button is used to move the printer tray in and out and to load a
disc for manual printing or checking alignments. The tray LED lights
briefly when the button is pushed. A tray movement error causes the tray
LED to flash.
Power
When you press the Power button, the power turns off or on. The green
Power LED is on when there is power to the printer. The Power LED
flashes when the printer is printing or in an error state.
110761_C
Operate the Rimage 480i Printer
Operate the Rimage 480i Printer
This chapter provides the information that you need to use and maintain your Rimage 480i
Printer.
Powering up the printer
The printer can be in either the ON state (Power
LED on) or the sleeping state (Power LED off).
Press the Power button to bring the printer out of the
sleep state and into the ON state.
Accessing the Power and USB Cables
To access the power and USB cables, you must
remove the Cable Access Door as shown.
Opening the Printer Service Door
To open the Printer Service Door, press the tab and
lift the door as shown.
Changing ink cartridges
Use this procedure to change the ink cartridges on your Rimage 480i Printer.
- Important You must use the appropriate ink cartridges in one of the configurations as stated
on page 1 in this document.
1. Lift the Ink Cartridge Access
Door. The ink cartridge
carriage moves to an
accessible position on the
carriage guide.
Note: You must wait until the
cartridges are resting and
uncapped before proceeding.
110761_C
5
Rimage 480i Printer
2. Lift the ink cartridge latch to the open position.
Ink cartridge latch
3. If an ink cartridge is already installed, slide the
ink cartridge out of the ink cartridge cradle.
4. Remove a new ink cartridge from its
packaging and carefully remove the protective
tape that covers the ink nozzles.
- Important
Do not touch the nozzles or the
copper contacts on the ink cartridges. If you
touch these parts, clogs, ink failure, and poor
electrical connections are likely to occur. Do
not remove the copper strips.
5. Hold the ink cartridge so that the copper strip
is on the bottom and facing toward the printer
and slide the ink cartridge into the cradle.
6. Push down on the ink cartridge latch until it snaps closed.
7. Close the Ink Cartridge Access Door. The Ink Cartridge Status light flashes for a few seconds
and then stops flashing.
Note: If the ink cartridge is not securely seated in the cradle, the printer will not recognize
the ink cartridge. The printer may not reset properly or you may receive an “invalid ink
cartridge” message. If this happens:
a. Remove the cartridge and firmly reinsert it.
b. Make sure you are using the appropriate cartridge. Acceptable cartridges are listed in
the Ink requirements section on page 1.
c.
If the problem persists, replace the cartridge.
8. Using the Aligning the ink cartridges procedure on page 12, align the ink cartridges.
6
110761_C
Operate the Rimage 480i Printer
Placing a disc on the printer tray
To avoid scratching or damaging the recording surface of the disc, it is important to properly place
the disc on the printer tray. Use this procedure to properly place the disc on the printer tray.
Note:
If you select Print from your software application, the printer tray opens automatically.
1. To open the printer tray, press
. The printer tray opens.
2. Carefully place the disc on the printer tray, aligning the hole in the disc with the small pins on
the printer tray.
. The printer tray closes. You are ready to use the
3. To close the printer tray, press
appropriate software application to print your disc label!
110761_C
7
Rimage 480i Printer
Changing the fan filter
The fan filter is a consumable item, so you will need to change it after 20 printer cartridges. Use
this procedure to change the fan filter.
1. With a small screwdriver, gently pull on the fan grating. The protective grating and fan filter
should come off of the fan housing easily.
2. Gently pull the fan filter housing away from the back of the Rimage 480i.
3. Remove the white filter material.
4. Replace the filter with part number 304219-001.
5. Gently press the fan filter housing into place on the back of the Rimage 480i until it snaps into
place.
8
110761_C
Operate the Rimage 480i Printer
Setting up your printing preferences
Printing Preferences allows you to set up and run your Rimage 2000i to produce the best
possible label on your discs.
Through Printing Preferences, you can:
# Tip For additional information
about these features, access the
online help in Printing
Preferences.
Set the print quality
Adjust the ink volume used
Change or enable masking
Center the image on the disc
Check the ink levels
Add, edit, or delete a watermark
Set up color options
Align the ink cartridges
Clean the ink cartridge nozzles
Navigating to Printing Preferences
You must access the Disc Color Printer 480i Printing Preferences window to set up your printing
preferences. Use this procedure to navigate to the Disc Color Printer 480i Printing Preferences
window.
1. From the Windows Start menu, select Settings|Printers in Windows 2000 or select Printers
and Faxes in Windows XP.
2. Right-click on the Disc Color Printer 480i and select Printing Preferences from the dropdown menu. The Disc Color Printer 480i Printing Preferences window opens.
Setting the print quality
Use this procedure to change the print quality for your images, if necessary.
1. Navigate to Printing Preferences.
2. Select the Disc/Quality tab.
3. In the Disc Options box, select the appropriate Type from the drop-down list.
4. In the Print Quality box, select the desired print quality. When you select a print quality, the
following information about the quality displays:
•
Black render dpi
•
Color input dpi
•
Color output
5. When you have made the desired choices, select Apply.
6. To close the Preferences window, select OK.
110761_C
9
Rimage 480i Printer
# Tip For additional
information about these
features access the
online help in Printing
Preferences.
Adding, editing, or deleting a watermark
This functionality allows you to create a new watermark or edit a
currently existing watermark that you can print on your disc. You
can also delete a current watermark that you created from this
tab.
1. Navigate to Printing Preferences.
2. Select the Effects tab.
3. From the Watermarks drop-down list, select the desired
watermark.
4. If desired, edit the watermark or create a new watermark.
a. Select Edit. The Watermark Details window opens.
b. To delete a watermark, highlight the desired watermark
and select Delete.
Note: You can delete only watermarks that you or
another user has created. You cannot delete any of
the default watermarks.
c.
To create a new watermark, select New. “Untitled”
displays in the Current Watermarks field.
d. Enter or change information in one or more of the
following fields to create your customized watermark:
•
Watermark Message – Enter the desired message.
•
Message Angle – Select the appropriate radio
button to provide the desired angle. If you select the
Angle radio button, you can set the angle.
•
Options – Select the Justified Across Page radio
button to center and justify the text.
•
Font Attributes – Select the desired font attributes
from the drop-down lists.
e. Select OK. The Watermark Details window closes.
5. If you want the watermark to print only on the first disc,
select the First Page Only checkbox.
6. When you have made the desired choices, select Apply.
7. To close the Preferences window, select OK.
10
110761_C
Operate the Rimage 480i Printer
# Tip For additional
information about these
features access the
online help in Printing
Preferences.
Adjusting the ink volume used
This functionality allows you to adjust the amount of ink that is
used.
1. Navigate to Printing Preferences.
2. Select the Basics tab.
3. Select Advanced Features. The Advanced Features
window opens.
4. With the Ink Volume and Dry Time sliders, you can increase
or decrease the desired ink volume and drying time.
Note: Do not select the Low Memory checkbox; leave it
unchecked.
5. Select OK. The Advanced Features window closes.
6. Select Apply.
7. To close the Preferences window, select OK.
Setting up color options
This functionality allows you to toggle between color and
grayscale printing, select the type of color space your labels
require, and adjust some color attributes.
1. Navigate to Printing Preferences.
2. Select the Color tab.
3. Turn Print in Grayscale on or off.
a. In the Color Options box, select or clear the Print in
Grayscale checkbox.
b. If you selected the checkbox, select the appropriate
radio button for your print type.
4. To adjust color attributes, move the Saturation,
Brightness, and/or Color Tone slider to the desired
position.
5. If necessary, select the appropriate Color Space from the
drop-down list.
6. When you have made the desired choices, select Apply.
7. To close the Preferences window, select OK.
110761_C
11
Rimage 480i Printer
# Tip For additional
information about these
features access the
online help in Printing
Preferences.
Changing or enabling masking
This functionality allows you to adjust the non-printable area, or
mask, settings for standard CD/DVD 120 mm media. This allows
you to print a rectangular or square image without the edges
overlapping the disc edges. If you print on areas of the disc
where the surface is not suitable for printing, the ink can smear
or run.
1. Navigate to Printing Preferences.
2. Select the Mask Settings tab.
3. To enable mask settings, select the Enable Masking
checkbox.
4. Change the mask settings as desired.
5. When you have made the desired choices, select Apply.
Note: Select Default to return mask settings to the
factory settings.
6. To close the Preferences window, select OK.
Aligning the ink cartridges
For optimal print quality and maximum printing speed, use this
procedure to align the ink cartridges.
1. Navigate to Printing Preferences.
2. Load a disc in the printer.
a. To open the printer tray, press
opens.
. The printer tray
b. Place a 120 mm white disc on the tray.
3. Check the ink cartridge alignment.
a. On the Disc Color Printer 480i Printing Preferences
window, select the Service tab.
b. Select Align Cartridges. The Align Cartridges for Disc
Color Printer 480i dialog box opens.
c.
Select Reset. When the Rimage 2000i has reset the ink
cartridges, the buttons on the Align Cartridges for Disc
Color Printer 480i dialog box are enabled.
d. Select Print Pattern. The alignment pattern prints on
the disc. The tray opens to display the disc.
e. Examine the disc with the print pattern. You will see up
to four groups of lines on the disc. These groups of lines
correspond to the Parameters listed in the Align
Cartridges for Disc Color Printer 480i dialog box. Each
group of lines is numbered.
12
110761_C
Operate the Rimage 480i Printer
4. Adjust the cartridge alignment.
In this example, the +64
line is the straightest. To
align this parameter,
enter 64 in the Photo to
Color Vertical field.
a. Enter the number that corresponds to the straightest line for the following groups:
Color / Black Ink Cartridge Parameters
• Black to Color
• Black to Color Vertical
• Black Bidirectional (Bidi) Alignment
• Color Bidi Alignment
Color / Photo Ink Cartridge Parameters
• Photo to Color
• Photo to Color Vertical
• Photo Bidi Alignment
• Color Bidi Alignment
Notes:
•
If you have only the color ink cartridge loaded, the Color Bidi Alignment is the
only parameter that you can adjust.
•
If you have only the black ink cartridge loaded, the Black Bidi Alignment is the
only parameter that you can adjust.
•
If you enter a negative number, you must enter the minus (-) sign. If you enter a
positive number, enter only the number itself.
b. Select Save. The Disc Color Printer 480i – 480UIDLL progress box displays with the
progress of the alignment.
c.
Select OK to close the Align Cartridges for Disc Color Printer 480i dialog box.
5. Select OK to close the Disc Color Printer 480i Printing Preferences window.
6. To close the printer tray, press
110761_C
. The printer tray closes.
13
Rimage 480i Printer
Centering the image on the disc
The Rimage 2000i provides two ways to center the image on the disc. You can use the Auto Centering
method or the Manual Centering method. This process describes both processes. The Auto Centering
method is accurate to within +/- 0.5 mm. You can improve the centering position accuracy with the manual
centering adjustment to better than +/- 0.2 mm. For optimal print quality, use this procedure to center the
image on the disc.
# Tip: For additional
1.
information about these
2.
features, access the online
help in Printing
Preferences.
# Tip: Use the Center Image
functionality only if the
printed image is not
centered on the disc.
Image centering is set at
the time of manufacture
and usually does not need
to be recalibrated in the
field.
Navigate to Printing Preferences.
Load a disc in the printer.
a.
To open the printer tray, press
b.
Place a 120 mm white disc on the tray.
. The printer tray opens.
3.
Select Center Image. The Centering Margins for Disc Color Printer
480i dialog box displays.
4.
Center the image.
•
To Auto Center the image, select Center Image. The Rimage
2000i automatically centers the image.
•
To manually center the image, follow steps a - e
below.
a.
Select Print Test. The Rimage 2000i prints a test
pattern on the disc and opens the tray.
b.
Rotate the disc approximately 180°.
c.
Select Print Test. The Rimage 2000i prints a test
pattern on the disc and opens the tray.
d.
Examine the disc and enter centering values.
01 +
02 +
03 +
04 +
05 +
0
0504030201-
l aci t r e V
-50
-40
-30
-20
-10
0
+10
+20
+30
+40
+50
Horizontal
Horizontal
-50
-40
-30
-20
-10
0
+10
+20
+30
+40
+50
Vertical
-50
-40
-30
-20
-10
0
+10
+20
+30
+40
+50
i.
Look at where each long line crosses the set of index
lines.
ii.
Enter the correction values.
•
In the Vertical correction field, enter the index
value where the long line crosses the index line in
the Vertical group.
•
In the Horizontal correction field, enter the index
value where the long line crosses the index line in
the Horizontal group.
Note: Each line has a value of 5 units. The Horizontal value for the image displayed is approximately –
12. You must enter negative numbers with a minus sign (-).
4.
Select Adjust. The Rimage 2000i centers the image according to the information that you entered.
5.
Select OK to close the Centering Margins for Disc Color Printer 480i dialog box.
6.
Select OK to close the Disc Color Printer 480i Printing Preferences window.
7.
To close the printer tray, press
14
. The printer tray closes.
110761_C
Operate the Rimage 480i Printer
# Tip: For additional
information about
these features, access
the online help in
Printing Preferences.
Cleaning the ink cartridge nozzles
This functionality allows you to clean or open the ink cartridge
nozzles. The nozzles may become clogged from dried ink causing
poor print because one or more nozzles are not spraying the
appropriate quantity of ink.
1. Navigate to Printing Preferences.
# Tip: If the cartridge has
been unwrapped and
setting out, clean the
cartridges before you
print.
2. Select the Services tab.
3. Select Clean Cartridges. The Cleaning Cartridges window
opens.
4. Select Light to clean the ink cartridge nozzles with the least
amount of ink. The status field at the bottom of the Cleaning
Cartridges window displays a message when the cleaning is
complete.
5. Print a test disc after cleaning the ink cartridge nozzles. If print
quality is still poor, you can use this process and, in step 4,
select Medium or Heavy to clean the ink cartridge nozzles.
Checking the ink levels
# Tip: If you remove the
ink cartridges and
reinsert them, the
system resets to show
that the cartridges are
full, regardless of the
actual fill status.
110761_C
This functionality allows you to check the level of ink in the
cartridges.
1. Navigate to Printing Preferences.
2. Select the Service tab.
3. Select Check Ink Level. Information displays in the Printer
Status field.
4. To close the Preferences window, select OK.
15
Rimage 480i Printer
Learn More
Safety information
This manual and the indications on the product allow proper and safe operation. The indication marks below help protect
you and other persons from injury, and equipment from damage.
n Warning! Ignoring this symbol failing to take or avoid a specific action could result in physical harm to the user or
the hardware.
p Caution:
Ignoring this symbol could result in loss of data or incorrect operation of the hardware.
To ensure safety, please read the precautions in the User Guide and familiarize yourself with their meaning before using
the equipment.
n Warning! For continued protection against risk of fire, replace the fuse only with same type and rating. An
authorized technician should perform all service procedures.
n Warning! Ink may be harmful if swallowed. Avoid contact with eyes. Ink contains nitrites. If ingested, seek
immediate medical attention. Keep out of reach of children.
Compliance testing
Model: Disc Color Printer 480i
Product ID: CDPR4
Notice for USA
Tested to Comply with FCC Standards FOR HOME OR OFFICE USE.
This device complies with part 15 of the FCC Rules. Operation is subject to the following two conditions:
(1) This device may not cause harmful interference, and (2) this device must accept any interference
received, including interference that may cause undesired operation. Pursuant to Part 15.21 of the FCC
Rules, any changes or modification to this equipment not expressly approved by Rimage Corporation may
cause harmful interference, and void your authority to operate this equipment.
NOTE: This equipment has been tested and found to comply with the limits for a Class B digital device,
pursuant to Part 15 of the FCC Rules. These limits are designed to provide reasonable protection against
harmful interference in a residential installation. This equipment generates, uses and can radiate radio
frequency energy and, if not installed and used in accordance with the instructions, may cause harmful
interference to radio communications. However, there is no guarantee that interference will not occur in a
particular installation. If this equipment does cause harmful interference to radio or television reception,
which can be determined by turning the equipment off and on, the user is encouraged to try to correct the
interference by one or more of the following measures:
• Reorient or relocate the receiving antenna.
• Increase the separation between the equipment and receiver.
• Connect the equipment into an outlet on a circuit different from that to which the receiver is connected.
• Consult the dealer or an experienced radio/TV technician for help.
• This product complies with UL 60950 3 Edition.
rd
Notice for Canada
This Class B digital apparatus complies with Canadian ICES-003. Cet appareil numerique de la classe B
est conforme a la norme NMB-003 du Canada.
rd
This product complies with CAN/CSA-C22.2 No. 60950-00 3 Edition.
Notice for Europe
This product is in conformity with the EMC Directive (89/336/EEC) and the Low-Voltage Directive
(73/23/EEC) through compliance with the following European standards: EN 55022: 1998 + Amd 1: 2000
Class B Limit; EN 55024: 1998; EN 61000-3-2:2000; EN 61000-3-3:1995 + Amd 1: 2001;
EN 60950: 2000. The CE mark has been affixed in accordance with the CE Marking Directive 93/68/EEC.
16
110761_C