1
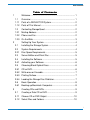
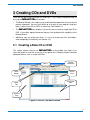
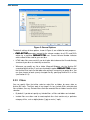
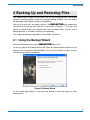
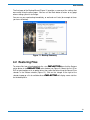
!
"
#
$!
% &"!
!
Copyright © 2005 StorageQuest Inc.
All rights reserved.
Specifications are subject to change without notice.
©2005 StorageQuest, Inc. All Rights Reserved. StorageQuest, the StorageQuest
logo and
are trademarks of StorageQuest, Inc. All other
trademarks are the property of their respective owners.
Document # REFLECTOR-UM-RIM-09
&"
1
#
!
Welcome............................................................................. 1
1.1
Overview............................................................................. 1
1.1.1 Parts of a REFLECTOR System ......................................... 2
1.1.2 Parts of This Manual........................................................... 2
1.2
Contacting StorageQuest.................................................... 2
1.2.1 Mailing Address .................................................................. 2
1.2.2 Phone and Fax ................................................................... 2
1.2.3 On the Web ........................................................................ 3
2
Setting Up Your System...................................................... 4
2.1
Installing the Rimage System ............................................. 4
2.2
System Requirements ........................................................ 4
2.2.1 Disc Space Requirements .................................................. 5
2.3
Server Edition and Client Pac ............................................. 5
2.4
Installing the Software ........................................................ 5
2.4.1 Activating your Software ..................................................... 6
2.5
Choosing Blank Optical Discs............................................. 6
2.5.1 CD or DVD.......................................................................... 6
2.5.2 Write-once or Erasable ....................................................... 7
2.5.3 Printing Surface .................................................................. 7
2.5.4 Loading the Rimage Disc Publisher .................................... 7
2.6
Basic Operation .................................................................. 8
2.6.1 Backing up Macintosh Computers ...................................... 8
3
Creating CDs and DVDs ..................................................... 9
3.1
Creating a Data CD or DVD................................................ 9
3.1.1 Choose CD or DVD Output............................................... 10
3.1.2 Select Files and Folders ................................................... 10
i
3.1.3 Label your Discs ............................................................... 10
3.1.4 Publish your Discs ............................................................ 11
3.1.5 Check Disc Status ............................................................ 11
3.2
Optional Features ............................................................. 11
3.2.1 Selecting REFLECTOR Options ....................................... 11
3.2.2 Filters................................................................................ 12
3.2.3 Scripts .............................................................................. 13
4
Backing Up and Restoring Files........................................ 15
4.1
Using the Backup Wizard.................................................. 15
4.2
Restoring Files.................................................................. 19
5
Labeling Your Discs.......................................................... 21
5.1
Defining a Label Layout .................................................... 21
5.2
Defining Variable Text Fields ............................................ 21
5.2.1 Basic Disc Property Settings............................................. 22
5.2.2 Selecting Variable Information .......................................... 22
5.2.3 Positioning Variable Text Fields........................................ 24
6
Script Language Reference .............................................. 30
6.1
Script Files........................................................................ 30
6.2
Script Commands ............................................................. 30
7
ii
REFLECTOR Information ................................................. 32
7.1
REFLECTOR Information ................................................. 32
7.2
Contacting StorageQuest.................................................. 32
7.3
Notes ................................................................................ 32
&"
#
!
Figure 1: Typical REFLECTOR Configuration ......................................................6
Figure 2: REFLECTOR Main Window...................................................................9
Figure 3: General Options...................................................................................12
Figure 4: Adding a Filter......................................................................................13
Figure 5: Recording a Script ...............................................................................14
Figure 6: Backup Wizard.....................................................................................15
Figure 7: Backup Job Options.............................................................................16
Figure 8: Backup File Filtering ............................................................................17
Figure 9: Backup Select Folders .........................................................................18
Figure 10: Backup Scheduling ............................................................................18
Figure 11: Backup Summary ..............................................................................19
Figure 12: Restore Window ................................................................................20
Figure 13: Disc Properties Dialog .......................................................................22
Figure 14: Label File Editor.................................................................................23
Figure 15: CD Designer Main Screen .................................................................24
Figure 16: Database Setup .................................................................................25
Figure 17: Database Wizard 1 ............................................................................25
Figure 18: Database Wizard 2 ............................................................................26
Figure 19: Database Wizard 3 ............................................................................26
Figure 20: Database Wizard 4 ............................................................................26
Figure 21: Database Wizard 5 ............................................................................27
Figure 22: Database Wizard Completion ............................................................27
Figure 23: Removing Header Line ......................................................................28
Figure 24: Adding Merge Fields to Label ............................................................28
iii
1 Welcome
Congratulations on your purchase of the StorageQuest
Network
Backup and Archive Manager. This software system makes it easy for multiple users
anywhere in a Windows Workgroup to create optical discs using a shared Rimage disc
publisher.
This document will assist you with installing, configuring, and using
You also have two additional sources of information:
.
•
While you are running
online help system.
•
We invite you to send your questions to us at [email protected].
StorageQuest is committed to making your
experience outstanding
and welcomes your feedback.
software, you can take advantage of our
1.1 Overview
Server Edition is the Network Backup & Archive Manager specifically
designed to support the complete line of Rimage CD & DVD duplication hardware,
expanding their functionality to now deliver automated, reliable, cost-effective backup
and archive protection for Small and Medium Businesses (SMBs) and the distributed
enterprise.
This unique combination of software and hardware enables businesses to utilize industry
standard optical media for all of its backup and archiving requirements. Features like
automated backup of servers and workstations, optimization of data recording to reduce
the number of discs required for a job, seamless spanning of files which are larger than
a single piece of media and the automatic printing of labels for all media, provide
businesses with greater ease of management and higher availability of their data.
The
Client Pac is an optional software application which requires the
Server Edition to be installed on a Rimage server network. The Client
Pac is designed for users needing the power and functionality of the Server Edition at
their desktops. Users can push data files to a Rimage server which is especially useful
with applications such as video editing, digital imaging or any application where large
amounts of data must be moved off primary storage to free up capacity for the next job.
Multiple users, each with a copy of
Client Pac, can share a single
Rimage system that serves all the computers of a networked Windows Workgroup.
The Rimage disc publisher includes one or more drives for reading and writing optical
discs, a printer to label the top surface of those discs, and a robotic mechanism to
automatically feed blank discs first to a drive, then to the printer, and finally to an output
stack.
1
Using
, you specify which files and folders to write to CD or DVD, either
once or on a regular basis for system backup.
automatically creates
multiple CDs or DVDs as necessary, with each disc clearly labeled.
You can also use
software to restore files to your computer’s hard disk
or network from a CD or DVD set written by
.
1.1.1 Parts of a REFLECTOR System
consists of software that runs on one or more computers of a
networked Windows Workgroup.
is compatible with Microsoft Windows
2000/XP and newer versions of Microsoft Windows.
Though
software requires Microsoft Windows, it can be used to back
up network-shared drives on computers that are running other operating systems.
1.1.2 Parts of This Manual
This manual has two main parts.
•
The first part tells you how to set up the
•
The second part describes how to use
to save your data to optical
disc, how to label your discs, and how to restore information you have saved.
1.2 Contacting StorageQuest
1.2.1 Mailing Address
StorageQuest, Inc.
127 Walgreen Road
Carp (Ottawa) Ontario
Canada K0A 1L0
1.2.2 Phone and Fax
Phone:
Fax:
2
(613) 831-6919
(613) 831-1785
software
1.2.3 On the Web
Website:
http://www.StorageQuest.com
E-Mail (Support):
[email protected]
E-Mail (Sales):
[email protected]
3
2 Setting Up Your System
2.1 Installing the Rimage System
Follow the instructions in the Rimage manual to install the Disc Publisher hardware and
software provided by Rimage. Some Rimage models connect directly to your Local Area
Network (LAN) and others connect to a computer attached to the LAN.
•
If your Rimage system is self-contained, connect it to your Local Area Network (LAN)
and initialize it as documented by Rimage.
•
If your Rimage system requires a host computer, connect it to the host using USB or
FireWire and install the Rimage server software on the host computer. Connect the
host computer to the LAN.
Rimage also supplies the Perfect Image CD Designer program, which can be used to
design custom labels that will be printed on CDs and DVDs by the Rimage printer.
•
You can use this program to design common label layouts, and distribute the label
definition files (.btw) to each
user.
•
You can also install Perfect Image CD Designer software on each computer licensed
to use Rimage and StorageQuest software.
2.2 System Requirements
To use the
Network Backup & Archiving Manager for Rimage, you will
require the Minimum System configuration:
4
•
Windows 2000™or Windows XP™
•
1.5Ghz Processor
•
256 MB System Memory
•
Network Interface Connection
•
CD/DVD Drive
•
At least 10 GB Available Free Disk Space (see 2.2.1 - Disc Space Requirements for
details)
•
A supported Rimage Server (360i, 2000i, DiscLab, Protégé II, Amigo II AutoStar II)
2.2.1 Disc Space Requirements
The hard disk space requirements for the Rimage Server with a single
user creating Rimage CDs or DVDs can be determined as follows:
Hard Disc Space Needed = (Number of discs + 1) * (Size of media)
Number of discs: The maximum number of unique discs submitted at the
same time from the
.
Size of media: For CD this is 650 MB, DVD is 4500 MB
2.3 Server Edition and Client Pac
The REFLECTOR Server Edition licensing model is hierarchical in that a specific license is
required for each Rimage model that you are connecting to since REFLECTOR is licensed
to a specific Rimage hardware model or models. For example; The Server Edition license
for a Rimage 2000i would support all 2000i’s and below models such as the 360i under this
license. It would not support any other Rimage Models such as Disk Lab, Amigo II, Protégé
II or the AutoStar II as they would require different licensing.
The
Client Pac is an optional software application and requires the
REFLECTOR Server Edition to be installed on a Rimage server network. The Client Pac is
designed for users needing the power and functionality of the Server Edition at their
desktops. Users can push data files to a Rimage server which is especially useful with
applications such as video editing, digital imaging or any application where large amounts of
date must be moved off primary storage to free up capacity for the next job. Multiple users,
each with a copy of
Client Pac, can share a single Rimage system that
serves all the computers of a networked Windows Workgroup. Contact StorageQuest or
your reseller to purchase additional licenses.
2.4 Installing the Software
To install
, load the
software CD into your computer’s
optical drive then use the Windows Explorer to navigate to the
folder
on the software CD. Double click on the Setup.exe program icon. The Installation Wizard
will guide you through the simple process of installing the
software.
You don’t have to install the
Server Edition on the same
server as the Rimage hardware – it can be installed anywhere on your
network!
5
Figure 1 illustrates a typical configuration with multiple
one Rimage disc publisher, which is attached to a server computer.
users sharing
Figure 1: Typical REFLECTOR Configuration
2.4.1 Activating your Software
When initially installed, the
software operates in a trial mode for a
maximum of 14 days. To continue to use the
software, you need an
individual license for each computer that runs
, even if those computers
share the same Rimage disc publisher. To activate your software:
•
Start the
•
When the introductory screen appears, press the Return key and follow the
instructions that are presented. The
software will calculate a Site
Code that you will send to StorageQuest at www.StorageQuest.com/Activate
•
After you have paid for the
software, enter the activation key that
StorageQuest sends to you in an email. This key will be valid only for the same
computer on which the Site Code was generated.
software on your computer.
2.5 Choosing Blank Optical Discs
Be sure to use only blank DVDs or CDs that are compatible with your model of Rimage
hardware. Read your Rimage documentation for details. The instructions here apply to
most models but yours may have specific requirements.
2.5.1 CD or DVD
First, choose whether to save your data to CDs or DVDs.
•
6
Some Rimage disc publishers can write only CDs. Others also write DVDs.
•
A full DVD holds about as much as seven full CDs. A blank write-once DVD costs
about the same as a blank write-once CD.
•
Some optical drives can read only CDs and not DVDs. If you want to read your discs
in a CD-only optical drive, you should use blank CDs.
•
Most writeable CDs hold about 700 Mbytes, but some hold only 650 Mbytes. Use the
pop-up CD Size button at the top of the
main window to select the
correct size for the CDs you are using.
2.5.2 Write-once or Erasable
Second, choose write-once or erasable blank discs.
•
Write-once blank CDs are labeled CD-R. Write-once DVDs are labeled as DVD-R or
DVD+R; chose a format compatible with your Rimage hardware. Once a write-once
disc has been written, there is no way to add more data to it or to reuse it for different
data.
•
Erasable blank CDs are labeled CD-RW. Erasable blank DVDs are labeled as DVDRW or DVD+RW; chose a format compatible with your Rimage hardware. When an
erasable disc has been written there is no way to add more data to it, but it is
possible to completely erase it and use it again.
•
Erasable discs cost more than write-once discs, have a slower maximum writing
speed, and cannot be read by some optical drives. They are seldom the best choice
for archival data, but may be useful for temporary storage.
2.5.3 Printing Surface
Third, choose printable blank discs if you will be printing labels on them.
•
Rimage models with an ink jet printer can print only on inkjet-printable discs with a
special matte white top surface.
•
Rimage models using thermal transfer can print on shiny disc surfaces.
•
Most printable discs are write-once. If you are using erasable discs that cannot be
printed by your Rimage disc publisher, be sure to label them using a marker pen
designed for CD and DVD labeling. Never use a ballpoint pen.
2.5.4 Loading the Rimage Disc Publisher
Most models of Rimage Disc Publisher hold a single stack of blank discs, either CD or
DVD. Ensure that the Disc Publisher is loaded with the correct blank discs.
•
If you have selected CD output and the Disc Publisher is configured and loaded with
blank DVDs, the CD submitted by
will be on hold until the unit is
7
configured to accept CDs. Use the Rimage System Manager to change the input bin
settings.
•
If you have selected DVD output and the Disc Publisher is configured and loaded
with blank CDs, the DVD submitted by
will be on hold until the unit
is configured to accept DVDs. Use the Rimage System Manager to change the input
bin settings.
2.6 Basic Operation
makes it easy to write and label CDs and DVDs using a Rimage Disc
Publisher.
•
You can choose files and folders to save, or you can specify simple rules to select
files and folders.
•
The
software automatically writes as many discs as your files
require, and can split large files across multiple discs.
•
also allows you to define once which files you want to write on
optical disc, and then use that definition repeatedly to save the latest versions of your
files.
•
You can print labels on the discs, with attractive graphics and titles to properly
identify each disc. The titles can contain variable information such as the date, time,
and user name or computer name.
For detailed instructions see Chapter 3 “Creating CDs and DVDs”, Chapter 4 “Backing
Up and Restoring Files”, and Chapter 5, “Labeling Your Discs”.
2.6.1 Backing up Macintosh Computers
is a Windows program that can back up any file or folder visible in a
Windows workgroup. Many operating systems, including Macintosh OS X, are able to
share files with Windows computers.
•
To back up files from a Macintosh computer, turn on Windows File Sharing in the
Macintosh computer’s Sharing Control Panel. In the Browser panel of
, select Network Shares then browse to find the Macintosh
computer by name. Click on its icon to see which shares are accessible.
•
You will then be able to select for backup any files or folders that have been made
available for sharing on the Macintosh.
Many other operating systems also provide file sharing for Windows workgroups.
8
3 Creating CDs and DVDs
There are two basic ways to create CDs and DVDs — by using the Backup Wizard, or
by using the
main window.
•
The Backup Wizard is the simplest way to define backup operations that you want to
perform repeatedly. You can easily back up all or part of your programs and your
data, using as many CDs or DVDs as necessary. See Section 4.1.
•
The
main window is the easiest way to create a simple data CD or
DVD. It also offers optional advanced features that go beyond the capability of the
Backup Wizard.
•
Whichever way you create your discs, it is easy to restore your files and folders,
either completely or selectively (see Section 4.2).
3.1 Creating a Data CD or DVD
This section explains how to use
’s main window (see Figure 2) to
select the folders or and files to transfer to an optical disc. Following sections describe
advanced features such as scripts and filters.
Menus
Action
Buttons
Volume
Information
Source
Pane
Destination
Pane
Mode
Tabs
Browser
Pane
Figure 2: REFLECTOR Main Window
9
3.1.1 Choose CD or DVD Output
Click the Rimage CD or Rimage DVD mode tab and ensure that the correct blank discs
are loaded in your Rimage Disc Publisher. If you have chosen Rimage CD, use the popup CD Size button in the Volume Info to select the correct capacity for the blank CDs
you are using. If you are not sure of the size, use the default 650 Mbytes.
3.1.2 Select Files and Folders
In the
you want to use filters.
Filters menu, select “Turn Off All Filters”. See Section 3.2.2 if
Simply drag the files and folders that you want to save to the Destination pane. It always
lists the files that will be saved when you write your optical discs.
•
To save entire folders with their contents (including files and folders inside the folders
you select), drag the folders from the Browser pane to the Destination pane. The
names of all files that will be saved appear in the Destination pane.
•
To save chosen files from a folder, first select the folder in the Browser pane, or drag
it to the Source pane. In the Source pane,
displays all the files and
folders inside the folder you have selected. Drag the files or folders you want to save
to the Destination pane, or select them in the Source pane and click the Add button
above the Destination pane.
•
To remove files from the Destination pane, so that they will not be saved to optical
disc, select them in the Destination pane and click the Remove button above the
Destination pane.
lists only files, not folders, in the Destination pane. However, it keeps
track of the original location of every saved file, and can restore both files and folders.
The Volume Information area at the top of the
window shows you how
many optical discs will be needed to hold the files you have selected. You can choose to
make multiple identical copies of each disc if you wish.
3.1.3 Label your Discs
Each of your discs can have two kinds of label: the Windows volume label that will be
written to the optical disc, and a printed label on the top surface of the disc.
10
•
Use the Volume Name field at the top of the
window to give each
optical disc a name that will remind you of its purpose when you see the mounted
disc in Windows Explorer. It may be helpful to include your name and the date in the
volume name.
•
Use printed labels to help identify discs for easy retrieval of their contents. See
Chapter 5.
3.1.4 Publish your Discs
Click the Create Data CD button (or Create Data DVD if you have chosen DVD output)
to send the files you have selected to the Rimage Disc Publisher.
In the Rimage Disc Properties dialog that appears (Figure 13) you can click in a check
box to select Simulated Write. Simulation is useful when you are trying the software, but
do not yet wish to write actual optical discs or print the labels.
3.1.5 Check Disc Status
Click on the Rimage Status mode tab (see Figure 2) to view the status of your disc
publishing job. Your job may be in progress, or completed, or queued waiting for
completion of other jobs that were submitted ahead of it.
To cancel a waiting job, right-click on its entry in the job queue and select the
appropriate option in the pop-up menu.
3.2 Optional Features
The options described in this section give you more control over the discs you create,
but are not necessary for basic operation.
3.2.1 Selecting REFLECTOR Options
The Options dialog, available in the
Tools menu, provides a wide
range of control over
operation. Click in the left panel to select a group
of options, then select options in that group using the right panel. Only a few important
General options are described here.
11
Figure 3: General Options
The default settings of these options, shown in Figure 3, are suitable for most purposes.
•
generates sequential disc volume numbers for all CDs and DVDs
written by a particular
user. Current Volume Number indicates
what number will be used for your next disc.
•
HTML index files are essential if you wish to be able to browse the file and directory
structure of your discs to selectively restore files.
•
Whenever you modify any file or folder, Microsoft Windows sets the “Archive Bit”
associated with that item. If you have checked this option,
will clear
the Archive Bit of each file and folder after writing it successfully to optical disc. You
can then choose to back up only changed files by specifying Archive Bit in a filter
(see Section 3.2.2).
3.2.2 Filters
You can specify filters that either select or reject files or folders by name, date, or
Archive Bit status. The filters work in two stages: first any Include filters select desired
files or folders, then any Exclude filters eliminate unwanted files or folders from the initial
selection.
12
•
By default, if you do not specify any Include filters, all files and folders are included.
•
Include filters are often used to create optical discs that contain only a particular
category of files, such as digital photos (*.jpg) or music (*.mp3).
•
If you have already saved the same kind of files to optical disc on an earlier
occasion, you may wish to use an Exclude filter based on date or Archive Bit to avoid
saving the same files again.
Select the Filter Editor in the
Filters menu to create, modify, and
choose filters. Figure 4 shows the creation of a new filter.
•
Use a descriptive name that will remind you of the purpose of this filter.
•
You can choose to make the filter include or exclude either files or directories
(folders).
•
Filtering by name is just like filtering by name in the Backup Wizard (see Section
4.1).
•
Filtering by Archive Bit Set allows you to choose only files modified since the last
run.
•
Date filters can specify a range of dates, or a first or last date of interest.
Figure 4: Adding a Filter
3.2.3 Scripts
You may want to save the same kinds of files and folders to optical disc on more than
one occasion. One way is to use the Backup Wizard (see Section 4.1). Another is to use
the main
window, with its more powerful filter capability, and record the
specification as a script that you can use repeatedly.
To use an existing script, choose “Open Script ...” in the
File menu.
13
To create a new script, choose “Record Script” in the File menu, and then define what
you want to save just as if you were going to create discs right away. When you have
finished selecting the files and folders to save, end the script.
•
A Script Recorder window appears, as shown in Figure 5. As you select files and
folders, and specify filters, the details are recorded in the script.
•
Click either the End Script button at top left, or the Stop Recording button in the
Script Recorder window, to stop recording the script and save it for use.
Figure 5: Recording a Script
Scripts are saved as ordinary text files, and the commands in them are simple to
understand. It is easy to use any text editor such as Notepad to update a script that
needs minor changes.
For more information on scripts, see section 6 - Script Language Reference.
14
4 Backing Up and Restoring Files
The simplest way to back up your data is to use the Backup Wizard. The Wizard
includes a convenient option to create an automatic backup schedule, such as a weekly
full backup plus daily backups with only changed files.
You can also select files and folders directly in the
main window and
send them to the Rimage disc publisher as described in Section 3.1. This gives you
access to a wider range of file selection filters than the Wizard offers. You can save a
backup definition as a named script file to use repeatedly.
The simple procedure for restoring files is described in Section 4.2.
4.1 Using the Backup Wizard
Select the Backup Wizard using the
Tools menu.
On the first page of the Backup Wizard (see Figure 6), choose whether to define a new
backup or run a previously defined backup. The rest of this section assumes that you
have chosen to create a new backup.
Figure 6: Backup Wizard
On the second page (Figure 7), give your new backup a name and specify its basic
characteristics.
15
The backup name is a required field. It names the script created by the Backup Wizard
so that you can choose it for future backup runs. It also acts as the Volume Title of all
the discs that are created. A meaningful volume title makes it easier to recognize discs
in Windows when you mount them for reading.
•
You can include brief shortcut codes in the name so that discs created on different
occasions are easy to distinguish. Click on the Shortcuts link to display a list of
available shortcut codes. For example, if you give a backup the name My Documents
%D, the title printed on the discs will include the day on which the backup is run.
The optional Description field lets you provide more details about the purpose of this
backup. Any commas in the description are removed, because it is included in a label
merge file whose fields are separated by commas (see Section 5.2.2).
The Writing Mode is either Rimage CD or Rimage DVD. See Section 2.5.
The Print Label File is a label definition (.btw) file created by the Perfect Image CD
Designer program, which is supplied by Rimage.
•
A label file can include merge fields to display information that varies in different
backup runs. See Chapter 5.
•
StorageQuest provides the label file StandardLabel.btw, which has merge fields for
Volume Name, Date, Time, Description, and User Name.
You can choose to make multiple copies of a backup. All copies of each disc are
identical in both contents and label.
Figure 7: Backup Job Options
16
The File Filtering page (Figure 8) allows you to specify which files will be backed up from
the folders that you select on the next page of the Backup Wizard.
•
Filters in the “Include Files” list usually have a format such as *.jpg or *.doc to select
all documents of a particular kind. In a filter, * represents 0 or more arbitrary
characters, and ? represents exactly one arbitrary character.
•
Filters in the “Exclude Files” list are often used to exclude temporary files (*.tmp) and
cache files. A simple filter consisting of the word “cache” (without the quotes) will
exclude most cache files.
•
If you provide both “Include” and “Exclude” filters, first files are selected using the
“Include” filters, then any that match an “Exclude” filter are removed from the list.
Figure 8: Backup File Filtering
The Select Folders page (Figure 9) allows you to select which folders should be saved.
When you click on the check box to the left of a folder, you select all the files and folders
inside that folder. You then have the option of deselecting some of them by clicking on
their selection boxes.
If you have provided file filters in the previous page of the Backup Wizard, those filters
are used to decide which files in the selected folders will be saved.
17
Figure 9: Backup Select Folders
Use the Backup Scheduling page of the Backup Wizard (Figure 10) if you wish to
schedule your new backup script to run at regular intervals. You can select full or
incremental backup at a particular time on particular days of the week.
If you select incremental backup, only files that have changed since your last backup will
be stored.
Backup uses the “Archive” status bit of each file (a standard
feature of Windows file systems) to keep track of changes.
For many computers, a scheduled backup will take place only if the computer is already
running at the scheduled time. Some computers will wake automatically if they are in a
low power “sleeping” mode at the time of a backup.
If you are using scheduled backups, be sure to keep your Rimage Disc Publisher
powered on, connected to the network, and loaded with the right blank discs.
Figure 10: Backup Scheduling
18
The final page of the Backup Wizard (Figure 11) provides a summary of the settings that
were made using the other pages. You can use the Back button to return to any page
whose settings you wish to change.
You can run your new backup immediately, or wait and run it later (for example at times
you have scheduled).
Figure 11: Backup Summary
4.2 Restoring Files
To restore files from a backup optical disc, start
then click the Restore
action button in the
main window (see Figure 2). Mount the first CD or
DVD of your backup set in an optical drive, then select that drive using the Source Drive
selector in the Restore window (Figure 12). Click on the triangle at the right of the
selector to pop up a list of available drives.
will display some statistics
for the backup disc.
19
Figure 12: Restore Window
Select the files or folders that you wish to restore by clicking their check boxes in the
Restore browser window. To display the files or folders inside a folder, click on the + box
to the left of a folder. It will change to – and a list of contents will appear.
By default, all restored files are written to their original locations and are given the same
file attributes (such as read-only) that they had when saved. You will be asked whether
or not to restore if a file would overwrite a current file with the same name.
You can change the three options by clicking on their check boxes.
•
If you do not restore files to the original locations, you can browse to a location
where you want the files restored. Even if only one file is being restored, a complete
folder path based on the file’s original location is created at the restore point.
•
If you do not restore original file attributes, the file is given new attributes as if you
were creating it for the first time.
•
If you specify Always Overwrite, any existing files with the same name will be replace
by restored files without any further questions.
A plain text log file called Restore.log is written listing the files that are restored, with full
path names.
You can use multiple CD/DVD drives for a faster restore
20
5 Labeling Your Discs
Printed labels make it much easier to find the right discs when you want to restore files.
makes it easy to automatically label each disc you create, with a
descriptive name plus specific details such as your name and the date and time when
you created the discs.
You define a printed label in two steps:
•
First, define the basic layout of the label. This includes any background image or
design, any additional graphics such as a corporate logo, and any fixed text that
should appear on all labels of this kind. The layout also includes placeholders for any
variable text.
•
Second, define the variable text that describes this particular disc.
provides a wide choice of information that you can insert into your disc labels to
identify the contents.
You will typically repeat these two steps a few times as you decide what variable text
you want to include, where it fits best on the label, and how you want it to look. Then,
having defined your label layout, you can continue to use it over and over.
A standard label file (StandardLabel.btw) as been provided for you. It may
be faster to edit this file than to design one from scratch.
5.1 Defining a Label Layout
To create or edit an initial label layout, use the program Perfect Image CD Designer,
which is supplied by Rimage. Documentation for CD Designer is included on the Rimage
software CD. It is very simple to add graphic elements or fixed text to a label, and only
slightly more difficult to add variable text.
StorageQuest provides a basic label format for simple backups, in the file
StandardLabel.btw. You can use it unchanged, or modify it, or create a completely new
design.
5.2 Defining Variable Text Fields
To start the process of defining your label information in
, click the
Create Data CD button (or Create Data DVD if you are using DVD media); see Figure 2:
REFLECTOR Main Window. If you are using the Backup Wizard, start a backup.
21
5.2.1 Basic Disc Property Settings
You will then see the Rimage Disc Properties dialog (Figure 13).
•
The Volume Name will be the one that you already set up in the
main window, or in the Backup Wizard. You may alter it if you wish.
•
You may enter a brief Description for this set of discs. Any commas will be removed
because commas are used as separators in the label file.
•
Click on the triangle to select from a pop-up menu any
Label File
(.lbl) that you previously created. This file contains a list of the variable information
needed for a particular kind of label. You can define as many of these files as you
wish; typically, you will have at least one to match each label layout that you define
with CD Designer.
•
If you are still working on the layout of your label, click the checkbox for Simulated
Write so that the CD or DVD will not actually be written.
•
The Copy Index File and Optimize Layout checkboxes should normally remain
checked.
Figure 13: Disc Properties Dialog
5.2.2 Selecting Variable Information
Click on Label Settings to edit the field list for an existing label file that you have chosen.
Click New… to create a new label file. In either case, the Label File Editor window opens
(Figure 14).
22
Figure 14: Label File Editor
Select a Rimage label layout file (.btw) that is to be used with this
content list. Use Perfect Image CD Designer to create or edit the layout file.
label
The Description field describes this label contents file, to help you choose the proper one
in the Disc Properties dialog (see Section 5.2.1). You may wish to give it a name similar
to the name of the label layout file that it uses.
Click the check boxes beside the variable data items that you want to include in your
label. There are fifteen standard items available:
1.
Volume Name
2.
Date
3.
Time
4.
Description
5.
User Name (Windows Login name)
6.
Computer Name
7.
Disc Number (ranging from 1 to set size)
8.
Set Size (number of discs)
9.
Number of Copies made.
10.
Number of Files
11.
Number of Folders
12.
First File Name
13.
Last File Name
23
14.
Size of CD or DVD
15.
Media Type (CD or DVD)
In addition, you can define up to ten custom fields. For each of them you can type in a
default value now, and you will have an opportunity to define a new value each time that
you create a set of discs. You can specify a maximum number of characters for each
custom field, to ensure that it will fit on the label.
This
label file defines a list of “merge” fields that will be passed on to
the Rimage software when discs are being written. You will also need to use the CD
Designer program to indicate where each of these fields should go on your label. It is
usually helpful to click the Generate Sample button, which will create a sample merge
file that you can use with CD Designer (see Section 5.2.3) to position the fields in the
label. Save the sample “merge.txt” file in an easy-to-remember place such as your
desktop.
Click the Save button to save your
use.
label contents (.lbl) file for future
5.2.3 Positioning Variable Text Fields
For each
run, you specify a
label file (.lbl) that tells
which label layout file to use, and which variable items to pass on in a
“merge” file for inclusion in the labels.
If you use the
Backup Wizard to define what will be written to disc, you
can also use special shortcut codes to specify some variable data values as part of the
volume name that is displayed by Windows Explorer whenever the optical disc is
mounted in a drive; see Section 4.1.
To position your variable text fields in a label, first use the Perfect Image CD Designer
program (provided by Rimage) to design the fixed part of your label. You may wish to
use the provided file StandardLabel.btw as a starting point.
Figure 15: CD Designer Main Screen
24
To add variable fields to your label, choose Database Setup in the File menu and follow
the steps of the Database Setup Wizard as described below.
Figure 16: Database Setup
CD Creator calls the
-generated file merge.txt a “database”. It is in fact
a plain text file with one line of text for each disc. Each line of text consists of one or
more “fields” such as title, date, and disc number, separated by commas. You can think
of it as a table of information. Each column in the table contains a particular kind of
information, and each row in the table contains all the data for a particular disc. Some
columns such as Date have the same value for every disc in a set; others such as the
Disc Number have a different value for each disc.
Click the Next button on the first Database Setup screen (Figure 17)
Figure 17: Database Wizard 1
25
On the second screen specify the type as Text File (Figure 18) and click Next.
Figure 18: Database Wizard 2
On the third screen (Figure 19), select the sample merge.txt file that you created in
(see Section 5.2.2) and click Next.
Figure 19: Database Wizard 3
On the fourth screen (Figure 20) select the Delimitation Type as Comma using the popup menu of choices, then click Next.
Figure 20: Database Wizard 4
26
On the fifth screen (Figure 21) click the Yes choice to indicate that the merge.txt file has
a header line with the names of the fields, then click Next.
Figure 21: Database Wizard 5
The final screen of the Database Setup Wizard now lists the fields in your merge.txt file
(Figure 22).
Figure 22: Database Wizard Completion
27
On this screen, turn off the “First Record Has Field Names” option, as regular merge
files will not contain a header. Select Text File 1, and uncheck the “First Record Has
Field Names” check box (Figure 23). Then click the OK button to complete the database
setup.
Figure 23: Removing Header Line
The CD Designer now knows what variable information fields you plan to use in this
label, and displays them as Data Sources in its main window (Figure 2).
Figure 24: Adding Merge Fields to Label
The final step is to position the fields in the label. Drag each field from the Data Sources
panel on the left to the place in the label image where you want it to be printed. You can
28
use the CD Designer’s tools to select a suitable font and size for each item. In the
example, the Volume Name field has just been positioned.
Use the Print Preview button to check the appearance of the label, then choose Save in
the CD Designer’s File menu to save your label definition.
Verify that your
label contents file (see Section 5.2.1) names this CD
Designer label file as its associated label layout file.
You should delete your original merge file (C:\merge.txt) so that Rimage does not use
this sample file when creating your discs.
29
6 Script Language Reference
6.1 Script Files
There are two types of script files used by the
software. The first is
known as a “File List” file which contains a plain-text listing of files to add to your CD or
DVD set, one per line. These files have the extension .fls
The second type of script files utilize the
scripting language and have
the extension .oam (recorded scripts) and .oab (backup scripts).
You can launch the REFLECTOR software by double-clicking on any of these three file
types. The software will execute the script or load the file list.
6.2 Script Commands
A script file (.oam or .oab) contains a series of script commands, one per line. The
following commands are available for use when writing script files:
30
Command
Description
; <some comments>
Lines beginning with a semi-colon are treated as
comments. They are ignored by the script
compiler.
SET VOLUMELABEL <label>
Sets the name of the disc set. The shortcut codes
for inserting the date and time can be used (%D
for day, %M for month, %Y for year, %h for hour,
%m for minute and %s for second).
SET SIZEMB <size>
Sets the size of the media in megabytes. CDs
should be set to 650 MB and DVDs to 4500 MB. If
this command is not specified the default size will
be used.
SET COPIES <number of copies>
Sets the number of copies to created. If this
command is not specified the default number of
copies will be used.
SET SIMULATED <1 | 0>
Set simulated writing on (1) or off (0).
SET MODE RIMAGEAPI_CD
Sets the current writing mode to Rimage CD.
SET MODE RIMAGEAPI_DVD
Sets the current writing mode to Rimage DVD.
SET DESCRIPTION <desc>
Set the description of the current disc.
SET PRINTLABEL <label>
Sets the print label to be the specified .lbl file in
the Labels directory. If <label> is left blank, no
label will be printed.
COPY <file or directory>
Copy the file or directory, not
subdirectories. Wildcards can be used.
COPYALL <file or directory>
Copy the file or directory and all subdirectories.
Wildcards can be used.
REMOVE <file>
Removes the file from the destination list.
FILTER ON <filter>
Activate the specified filter. For example, FILTER
ON Include all files where name matches *.doc
FILTER OFF <filter>
Deactivate the specified filter.
FILTER OFF ALL
Deactivate all filtering.
RUN <command>
Run the specified DOS command line.
MSG <message>
Display a message box in the program with the
specified message.
WRITE
Create the CD set.
EXIT
Exit the program.
including
Use the script recorder to record your actions and build scripts for you!
31
7 REFLECTOR Information
This page is provided for your convenience, to record your
number and notes on any questions you may wish to ask StorageQuest.
serial
7.1 REFLECTOR Information
Your
record it here.
serial number is located inside the CD case. You may wish to
Serial Number: ______________________________________________
7.2 Contacting StorageQuest
StorageQuest, Inc.
127 Walgreen Road
Carp (Ottawa) Ontario
Canada K0A 1L0
Phone:
(613) 831-6919
Fax:
(613) 831-1785
Website:
http://www.StorageQuest.com
E-Mail (Support):
[email protected]
E-Mail (Sales):
[email protected]
7.3 Notes
32