1
ncI!
Camcorder
Owner's Manual
Operating Instructions
Warranty Information
Please read completely
before attempting to
operate your new RCA
product.
Your Video Camcorder AC Adapter/Charger
will operate on 120 volts, 50/60 Hz only and has a polarized plug
Because one blade of the plug is wider than the other, the plug fits m the wall socket only one way Do not defeat the
safety feature of this plug. If you need an extension, use a polarized cord
Adapter/Charger
fully to prevent
with an extension cord, receptacle,
blade exposure
or other outlet unless the blades can be Inserted
MISE EN GARDE: Pour pr_vemr les chocs _lectnques. ne pas utlhser la fiche polans_e de cet appared
AUT1ON: To prevent electric shock, do not use the polarized plug on this Video Camcorder or AC
avec une rallonge, une prise de courant ou une autre sortie, a morns que les lames ne putssent _tre
inser_es/t fond sans qu'aucune partte ne SOlt latssc3e h d_couvert
_
CAUTION: To reduce the risk of electric shock, do not remove the cover or back No user-servaceable parts are inside
If you spill hquld on the Camcorder, disconnect the AC Adapter/Charger
power cord to prevent possible fire or shock
hazard and consult authorized service personnel Moisture can damage internal parts Refer all service to Authorized
RCA Camcorder Servlcenter personnel only.
CAUTION:
Read "Important
Safety Instructions below for AC Adapter/Charger'"
before use
CAUTION: Maintain electrical safety. Powerhne-operated
eqmpment or accessories connected to this flint should bear
the UL hstmg mark or CSA certification mark on the accessories themselves and should not have been modified so as
to defeat the safety features. Tlus will help avoid any potential hazard from electric shock or fire If m doubt, contact
qualified service personnel
I WARNING:
/_
To
fire or shock hazard,
expose Camcorder
and prevent
AC Adapter/Charger
to ram do
or not
moisture
flash symbol
wltlun aof triangle
is
The
a hghtnmg
intended to alert the user
to the presence of
unmsulated "'dangerous
voltage" witlun the
product's enclosure and
which may be of sufficient
magnitude to constitute a
risk of electric shock.
//_
An exclamation point
wtttun a mangle is
intended to alert the user
to the presence of
important operating and
maintenance (service)
instructions in the
literature accompanying
the product.
your
Mail Your Enrollment
Card Today
Attach Your Sales Receipt Here and File at
Home For Future Reference
• An RCA Owner's Club Enrollment Card is packed with
your camcorder. Please fill out the card and return it
immediately.
• To obtain warranty parts and service, you must show your
sales receipt (or other evidence of purchase) to your
Authorized RCA Servicenter.
• Your name then will be enrolled in the next drawing,
which takes place every three months. If your name is
drawn, you will be reimbursed for the full purchase price
of your new RCA product (restricted to residents of USA
only).
• Tape or staple your sales receipt to this manual so you
will have it handy should service ever be needed. Do not
mall your sales receipt to us. File it at home with your
owner's manual for future reference.
• Your prompt submission of this card confirms your right
to the protection available under the terms and conditions
of the warranty and also allows us to contact you in the
unlikely issuance of a safety modification•
Record Vital Information
Here
• With your card on file, we can also help you in the event
of loss or theft by verifying your ownership.
• No other camcorder has the same serial number as yours.
You will find the serial number and the model number on
the bottom of your camcorder (and pre-printed on your
Enrollment Card).
•
•
If you did not receive an RCA Owner's Club Enrollment
Card, please contact your dealer.
Make sure you record both numbers below so that you
will have them in case your camcorder is stolen or in case
you need a complete description for any other reason.
Model:
CC285
Serial:
Purchase Date:
Dealer Name/Address/Phone:
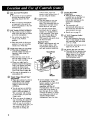
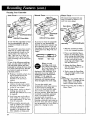
Safety Precautions ..................
Introduction
.........................................
Features ...........................................
Inside Front Cover
2
2-3
Unpacking Your Camcorder ..........................
Quick-Operation
Steps ................................
Location and Use of Controls ......................
4
5
6-13
Powering Camcorder
, • Using AC Adapter/Charger
.......................
• Using Rechargeable Battery ....................
• Using Optional DC Car Cord .....................
RCA Video Cassettes
• Recording Times ..................................
• Inserting/Removing
Cassettes .....................
• Erase Protection (Record-Protect
Tab) .............
• Cassette Care and Storage .........................
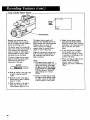
Detailed Recording Steps .........................
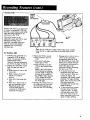
Recording Features
• Electronic Viewfinder .............................
• Eyepiece Focus Control ...........................
• Displays in Viewfinder ............................
• Date/Time
Display ...............................
• Zooming ..........................................
• Quick Review .....................................
• Focusing Camcorder (Auto/Manual/Macro)
• Adjusting AUTO IRIS ............................
• Fading In and Out of Scenes ......................
• DISPLAY
Button .................................
• Tape Counter with Memory .......................
• Time-Remaining
Display ..........................
• Variable Shutter Speeds ...........................
• Self-Timer Recording .............................
14
15-16
16
17
17
17
17
18-19
.......
20
20
21
22
23
23
24
25
25
26
27
27
28
29
•
•
•
•
*
Adjustable Time-Lapse Recordings ................
Animation Recording .............................
Electronic Indexing ...............................
NORMAL/WIND
MIC Switch ....................
Editing Features
• Flying Erase Head ...............................
• Edit Search ......................................
• Synchro Edit ....................................
• Audio Dubbing ..................................
• Video Dubbing ..................................
Quick-Reference
Connection Diagrams ...............
29
30
31
31
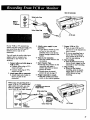
Recording From VCR or Monitor ....................
Playback Connections
• Standard TV (without audio/video input jacks) .....
• Video Monitor ....................................
• VCR .............................................
37
Playback Instructions
• Playing Tapes Thru Viewfinder ....................
• Playing Tapes Through TV or Video Monitor ......
• Playing Tapes Through VCR on a TV or Monitor..
• Copying Tapes on a Home VCR ..................
Making Better Videos ...............................
Care and Maintenance ...............................
Optional
Accessories
.............................
• Accessory
Order Form ............................
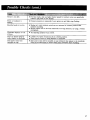
Trouble
Checks
..................................
Alphabetical
Index ...............................
Specifications ..............................
Limited Warranty ..........................
32
32
33
34
35
36
38
39
39
40
40
41
41
42
43
44-45
45
46-47
48-49
Back Cover
Back Cover
Thank
You For
Choosing
an RCA
You have selected a precisionengineered product designed to give
you years of performance and
enjoyment.
Although your camcorder is very
simple to use, it is important that you
read and carefully follow the
instructions in this guide until you are
completely familiar with the proper
operating procedures. This manual is
arranged in the order that we
Camcorder
Features
Camcorder Convenience
This lightweight, easy-to-use
camcorder has all the features of a
deluxe video camera and the
convenience of the VHS format. Shoot
up to 2 hours and 40 minutes* of
video (with a T-160 tape),
Play your tapes back either in the
camcorder or in any VHS VCR. You
can also use the camcorder as a video
player to play back rented or
prerecorded video tapes on any TV.
*For extended recording, camcorder
must be used with AC adapter or
additional optional batteries.
6x Power Zoom Lens with Macro
The CC285 features a fast fl.2, 6x
power zoom lens that allows you to
smoothly zoom from wide-angle to
telephoto shots. You can use the
power zoom, or use the manual zoom
ring when you need fast zooms to
follow the action.
Optional wide-angle and telephoto
adapters (shown on page 44) are
available to further increase either
wide-angle or telephoto range.
Built-in macro feature lets you shoot
dramatic close-ups (as close as 1/4").
Great for nature photography and
special effects.
1/2" Solid-State CCD Image Sensor
State-of-the-art
Solid-State CCD
(Charged Coupled Device) chip
converts the light into a video image
and produces pictures even in
exceptionally low light levels. Provides
sharp, vivid color pictures.
Flying Erase Head
A separate erase head is mounted on
the spinning headwheel (hence the
term "flying"). This allows you to
Camcorder.
anticipate you will use it to operate
your new camcorder. You'll find a
simplified quick-operation
guide on
page 5 and a complete index in the
back.
If you should experience a problem,
always refer first to the trouble-checks
section on pages 46 and 47. Many
times a simple solution is all that's
needed, and it could save you a costly
service call.
make clean edits without "glitches" or
the "rainbow noise" that occurs on
VCR's and camcorders without flying
erase heads.
Video/Audio Dub
Video and audio dubbing allow you
to simply and quickly insert new
video, new audio, or new video and
audio into existing tapes. (Some
eamcorders allow you to insert new
video or audio, but not both.) The
combination of video/audio dubbing
with the flying erase head gives you
dean, "glitch free" edits.
New video can be inserted from the
camcorder camera, or from another
VCR or camera. New andio can be
inserted from the camcorder's
microphone, an optional external
microphone, or an external audio
device (such as a tape deck, CD
player, etc.).
Edit Search
Edit Search means that you can use
the F.FWD, PEW, and PLAY buttons to
precisely position the tape even while
the camcorder is in the camera mode
(ready to record). Since you can do
this while the camcorder is in the
camera mode, without the tape
unloading, it is possible to precisely
position the tape for the next sceneeliminating the "between-scene
glitches" that are common on
camcorders without this feature.
"Synchro Edit"
Synchro edit allows your camcorder to
control a compatible VCR (one with a
Camera Pause Jack) while tapes are
being copied from the camcorder to
the VCR. The PAUSE button on the
camcorder causes the VCR to start
and stop recording. An optional
AVS010 synchro edit cable (shown on
page 44) is required.
High-Speed Shutter System
Standard video cameras have a shutter
speed of 1/60 second. This RCA
camcorder has a variable-speed
electronic shutter that allows you to
increase the shutter speed to 1/500 or
1/1000. This lets you "freeze" fastmoving action when the tape is played
back in slow motion or stop action on
a ¥CR with field-still or digital
special effects.
When you choose a high shutter
speed, you must consider the amount
of light available (higher shutter
speeds require more light). A flashing
shutter speed display alerts you when
more light is needed for the higher
shutter speed. See page 45 for lighting
accessories.
Constant Automatic White Balance
Built-in circuitry continuously adjusts
for proper color balance, indoors or
out.
Fade Button
Simply by pushing the FADE button,
you can fade out of or into a scene.
Provides professional-looking
scene
transitions. Fades both video and
audio.
Time-Lapse Recording
Camcorder can be programmed to
make a series of 1-sec. recordings that
occur 30 see., 1 min., 2 min., or 5
rain. apart. When played back, this
has the effect of compressing time, or
time lapse. Great for recording and
examining slowly developing action.
"Animation" Recording
Camcorder can also make a series of
"single shot" recordings. You can
create animation-type or cartoon-type
effects by shooting an object, moving
it, shooting it again, etc. When played
back at normal speed, this has the
effect of animating the object you
were shooting.
Index Recording
Camcorder automatically records
index marks at the beginning of new
recordings. These index marks can be
recognized by VCR's which use the
VHS Index Search System, making it
easier to locate program segments for
playback.
Electronic Viewfinder
Electronic viewfinder (EVF) displays
in black and white exactly what will
be recorded on the tape in color. Also
allows you to instantly view (in B&W)
what you've shot. Adjustable diopter
allows EVF focus to be changed
without affecting lens focus. Permits
most users who wear glasses to
remove them when watching the
viewfinder.
EVF On-Screen Displays
Tape Counter: Tape counter with
memory lets you locate specific parts
of your tape.
Battery Level: Lets you know the
status of the battery's charge.
Tape Remaining: Lets you know how
many hours and minutes are left on
your tape.
Clock/Calendar: Allows you to record
time and date on tape. Maintains
current time and date for
approximately one year using backup
battery (included).
Other displays include:
RECORD,
PAUSE,
NO TAPE,
FFWD,
REWIND,
and
TAPE
END warning.
Auto Focus
Sophisticated infrared system keeps
moving objects in focus, even in low
light. Automatically maintains a sharp
image-even during zooms. You can
also focus manually using the focus
ring.
Auto Iris
To assure correct exposure, the
camcorder automatically responds to
available light conditions and adjusts
the aperture accordingly. Manual
override is provided to correct for
unusual fighting conditions, such as
backlighting.
Video
Features
62mm Full Size Headwheel
Many camcorders
use a small 43mm
headwheel
(what the video heads are
attached
to). These small headwheels
are smaller and lighter than the
headwheels
used in home VCR's, but
can be less stable, can cause picture
degradation, and can sometimes affect
playback compatibility.
The CC285 features a full-size 62mm
headwheel-just
like those used in the
most expensive home VCR's.
Audio Features
Built-in Microphone with Wind Noise
Filter
The camcorder features a sensitive
built-in microphone to allow you to
record sound as well as video.
A wind noise filter is included to cut
down the rumbling background noise
that can occur on windy days.
Convenience
Features
Tally Light
A red light on the front of the
camcorder lets your subject know
when you are recording. Helps to
eliminate videos that start with, "Is
that recording yet?".
Self-Timer
The CC285 has a built-in self timer,
similar to a 35mm camera. The self
timer delays the start of the recording
for 10 seconds (so that you can get in
the picture), and can be set to record
for 30 seconds, or continue recording
until you stop it.
Earphone
An earphone is supplied for
monitoring the audio when you record
or play back tapes in your camcorder.
Quick Review
Automatically backs up the tape,
plays the last few seconds of video,
then recues the tape to the original
position. Good for refreshing your
memory of the last scene without
losing your place on the tape.
Padded Shoulder Pad
The padded shoulder pad helps
stabilize the camcorder, giving you
smooth, professional-looking shots.
Use your Camcorder on AC or DC
(battery) power.
An AC adapter/charger and a
rechargeable battery are packed with
your camcorder.
• The AC adapter/charger
lets you
power your camcorder from the
nearest AC outlet.
• The rechargeable battery allows you
to use your camcorder anywhere up
to two hours.
You can purchase an optional DC
cord and power your camcorder from
your car's cigarette lighter socket. See
pages 44 and 45 for optional
accessories.
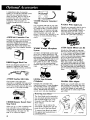
Optional Accessories
To further enhance your videos, a full
line of compatible accessories is
offered for your camcorder to increase
your creative range. Some optional
accessories are shown on pages 44 and
45.
What Your Camcorder
For You
Can Do
Your RCA camcorder combines the
features of a video camera and of a
VHS compact VCR in one
lightweight, easy-to-use unit. As a
result, you now can do all of the
following:
Produce professional videos.
Your camcorder has all the features
necessary to produce professionallooking videos quickly and easily.
• The power zoom lens lets you zoom
in and out at the touch of a button.
u The macro switch allows you to
focus as close as 1/4 inch from
your subject.
• Choose automatic focus or manual
focus when needed.
• Use automatic shutter speed or
select one of the other faster speeds
to record your favorite outdoor
sporting event or fast-moving
family action.
Choose automatic iris control or
manual control when you have an
unusual lighting situation.
The FADE button lets you fade in
and out of a scene.
Color balance is automatically
controlled indoors and out.
Check and review your recording
quickly and easily in the electronic
view finder.
Play back your tapes on a standard TV
or monitor.
Cables included with your camcorder
allow you to connect it to your TV or
monitor and view your tapes.
Make copies of your tapes to share.
Cables included in your camcorder
allow you to connect it to your home
VCR and copy your home videos.
3
• When you unpack the camcorder,
make sure you remove all the
accessories and information papers.
• Save the packing materials and box
in case you ever need to ship or
store your camcorder.
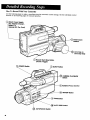
Camcorder
Model CC285
• The items shown below are packed
with your camcorder. If any of the
items are missing or appear
damaged, contact your RCA dealer
immediately.
/
I
!1l
i
AC Adapter/Charger
Stock # CPS09
Rechargeable 9.6-Volt Battery
Stock # BP96FL
Audio/Video Output Cable
Stock # 194128
Shoulder Strap
Stock # 184449
Audio/Video Input Cable
Stock # VAA004
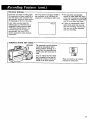
Installing
Earphone
RF Output Adapter
Stock # CRFO3O
Transformer (300-to-75 ohm)
Stock # AH055
Coaxial RF Cable
Stock # 177233
drugstores and camera
shops)
Battery
You may want to install the clock
battery immediately to prevent
misplacing it.
1. Locate the CLOCK BATTERY
compartment
on the back of
the camcorder.
2. Pull the tab to open the cover
and expose the compartment.
Battery
Compartment
-.
Pull
Tab
Down
1
CLOCK BATTERY
Compartment
____q__/x__
3. Insert the clock battery
securely under the shoulders
with the "+" terminal facing
out (as illustrated inside the
battery cover).
4. Gently push the cover closed
until it snaps into place.
Instructions for setting the time
and date are on page 22. You can
do that later if desired after you're
more familiar with your camcorder.
Even if you've never used a video
camera or camcorder before, you can
probably get your camcorder up and
running quickly by following the steps
below.
CAMERA/PLA
YBA CK Switch
EJECT Button
POWER Switch
Lens Cap on
Lens Cap Snap
Attach 9.6-Volt Power Source
t Eyepiece Focus Control
) Thumb Trigger
(Press to start
and stop i_cordlng)
AUTO IRIS Control
AUTOFOCUS
Attach power source to
camcorder (either adapter/charger
or battery).
A. Adapter/Charger:
1. Attach adapter/charger
camcorder. (Instructions
are on page 14.)
Insert a cassette tape.
1. Press EJECT to open door.
2. Insert cassette as shown on
page 17. Insert cassette only
one way with record-protect
tab facing up and the tape
windows facing out.
to
2. Plug power cord into an
AC outlet.
3. Gently close the cassette
with your hand.
B. Charged Battery:
1. Charge the battery as
described on page 15.
Charging takes about two
hours the first time.
2. Attach charged battery
camcorder. Instructions
on page 15.
(_)
B. Remove the lens cap and
snap it on the lens cap snap
on the hand strap.
Set controls to their automatic
positions.
A. Set the AUTOFOCUS switch to
C. If image in viewfinder is out
of focus, adjust the Eyepiece
Focus Control.
A UTO.
(_)
Turn on camcorder.
Slide the POWER switch to the
"on" position. The indicator
labeled ON will light.
door
Prepare camcorder to record.
A. Put the CAMERA/PLAYBACK
switch in the CAMERA
position for recording.
to
are
B. Set the AUTO IRIS control
AUTO (top center "click"
position).
Switch
Start recording.
Press the thumb trigger record
button to start and stop
recording. You do not have to
hold the trigger to record.
to
(_)
Review what you recorded.
I. Press the thumb trigger record
button to stop recording.
2. Move CAMERA/PLAYBACK
switch to PLAYBACK position.
3. Press REW button to rewind
tape.
4. Press PLAY and watch the
viewfinder to review what was
recorded.
Notes:
• To continue recording after your
review: press STOP, then move the
CA MERA / PLA YBA CK switch to
CAMERA, and press the thumb
trigger record button.
• Any material recorded on a cassette
tape will be automatically erased if
you record over it. So if you don't
want to keep what you just
recorded, press REW to rewind the
tape and then record over the
unwanted material. (The CAMERA/
PLAYBACK switch must be in the
PLAYBACKposition to rewind the
tape.)
• After using your camcorder for the
first time, be sure to read the rest
of the manual for full details of its
special features, connection
applications, accessories, and
proper care.
5
Camcorder Operating
and Their Functions
Controls
(_)
Pages 6 thru 13 show you where
cameorder controls are located and
what they do. As you read the
description of each control, find that
control on your own camcorder to
familiarize yourself with its location.
(_)
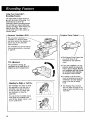
Accessory Shoe
This fitting is used to attach' a
light or other lightweight video
accessory to your camcorder.
CAUTION: Do not use this
shoe to mount a light on the
camcorder. Excessive heat from a
light could damage the
camcorder's case. RCA light
#VDC050 (shown on page 45) is
specially designed to be used
with your camcorder.
Tally Light
• This light will come on
whenever the camcorder
recording.
is
• The macro button (_) is
located on the zoom ring lever.
Use the macro button for
close-up shots up to 1/4 inch
from your subject.
®
®
• The zoom buttons are easily
controlled by your index and
middle fingers when you grasp
the camcorder properly using
the hand strap.
(_)
Macro Button (on Zoom Ring
Lever)
• This button lets you take shots
as close as 1/4 inch from your
subject.
• First push in and hold the
macro button while rotating
the zoom ring (_) to the
MACRO position. Then slowly
rotate the zoom ring until the
object is in sharp focus.
• Make surd you don't obstruct
this window when recording
with the camcorder in the
AutoFocus mode.
®
PUSH/A UTO Focus Switch
When this switch is depressed
and held in, automatic focus is
activated and remains activated
until the switch is released. This
is useful if you are shooting a
relatively static scene in MANUAL
FOCUS and need to adjust for a
change in scene by using AUTO
FOCUS quickly and momentarily.
UTOFOCUS
@ AAUTO)
®
switch
to the MAN
(manual) position when you
want to focus manually by
rotating the focus ring with
your fingers.
When switch is in its MAN
(manual) position, you can
also quickly change from
Manual Focus to AutoFocus
by pressing and holding the
PUSH]A UTO focUS switch. This
is useful if you are shooting a
relatively non-moving scene in
Manual Focus and want to
quickly and momentarily use
AutoFocus for a change in
scene. The camcorder will
return to manual focus when
you release the button.
Set
Focus Ring
• When the AUTOFOCUS switch
is in the MANUALposition, you
can grasp this ring and adjust
focus as desired,
®
LellS
Your carncorder is equipped with
an fl.2, 6:1 power zoom lens
which directs incoming light to
the solid-state CCD image
sensor. The image sensor
converts the optical image to a
video signal.
Auto Focus Window
• When the camcorder
is in the
AutoFocus
mode (A trrOFOCUS
switch in AUTO position),
this
window transmits
and receives
infrared light which is
reflected off the subject. This
allows the camera to focus
itself automatically
as the
distance between
the lens and
the subject changes.
Switch (MAN/
• Set this switch to the AUTO
position when you want the
camcordec to focus for you
automatically.
• When the AUTOFOCUS switch
is in the AUTO position, the
camcorder automatically
rotates and adjusts the focus
ring for the best picture focus.
Microphone
• The microphone picks up the
sound during a recording.
When an external microphone
is connected to the MtC jack,
this built-in microphone is
muted.
Power Zoom Buttons (W and /3
• Press the button labeled W to
move the zoom lens in the
Wide Angle direction.
• Press the button labeled T to
move the zoom lens in the
Telephoto (close-up) direction.
Zoom Ring
• You can adjust the zoom ring
manually by grasping the
zoom ring lever and slowly
rotating the zoom ring with
your fingers for wide-angle or
telephoto pictures.
• Pressing the power zoom
buttons (labeled W and T)
moves the zoom ring
automatically without you
touching it.
• You will find it especially
helpful during time-lapse and
self-timer recordings.
(_
Zoom Ring Lever
• When you want to zoom in or
out of a scene without using
the power zoom buttons Q_),
you can grasp this lever and
turn the zoom ring manually.
_-('_ Eyepiece Focus Control
• Use this control to adjust the
focus in the viewfinder.
It's
easiest to set the correct focus
by focusing on the viewfinder
on-screen
displays (such as the
date, battery level, etc.).
• These adjustments
will not
affect the focus of the image
recorded
by the camcorder.
•
This control permits most
users who wear glasses to
remove them while focusing
the camcorder.
Accessory Shoe
) Tally Light
BATTERY Eject Lever
Microphone
(_
Power Zoom Buttons
(W and T)
(_
Macro Button
(_
(on Zoom Ring Lever)_
Zoom Ring
Q
Zoom RIn!
, Electronic
Viewflnder
(EVF)
(_Focus
Q
Lens
(1_ Eyepiece Focus Control
Auto Focus Window
@
Electronic Viewfinder (EVF)
• The viewfinder displays what
the camcorder lens sees so you
know what you're recording.
• It also functions as a
convenient black-and-white
monitor during playback of
recorded video.
I_
PUSH/AUTO
Focus Switch
BA TTERY Eject Lever
Slide this lever to release the
battery or the AC adapter/
charger from the camcorder.
AUTOFOCUS
(MAN/AUTO)
Switch
(1@SELF
TIMER Button
• This button lets you timedelay the start of a recording
by about 10 seconds so you
can join the picture without
being seen walking into it.
@
@
• Details on using each display
are on pages 26 and 27.
RESET/T-160
Button
• When the tape counter
is
displayed
in the viewfinder,
pressing
this button resets the
counter
to "0000".
• When the time-remaining
read-out is displayed, pressing
this button changes the display
for extended length T-160
tapes.
• The indicator next to the
T-160 button will fight.
• Details are on page 27.
I(I_ REVIEW
Button
• Press this button while the
camcorder
is in the Record/
Pause mode to view the last
few seconds of a completed
recording
segment.
(_)
Date and CLOCK Set Buttons
(SELECT and ADVANCE)
• These buttons are used to set
the clock (time and date) in
your camcorder so it can be
recorded on your tapes for
future reference.
• Details are on page 22.
FADE Button
• During recording you can add
a professional touch to your
recordings by fading in and
out of scenes.
• Slide the SHUTTER speed
switch to the right a second
time to select a shutter speed
of 1/ 1000.
• Details for using this button
are on page 25.
• Press DISPLAY again to add
the memory feature to the
Tape Counter.
• Press D1SPLAY again to remove
the displays.
• Slide the SHUTTER speed
switch to the right once to
select a shutter speed of
1/500.
• Details are on page 22.
• Press D1SPLAY once to bring
the Battery Level and Tape
Counter displays to the
viewfinder.
• Press DISPLA Y again to change
the Tape-Counter display to
the Time-Remaining
Display.
SHUTTER
Speed Switch
• The shutter speed is
automatically set at the
normal shutter speed of 1/60
whenever the camcorder's
power is turned on.
(_
• Whenever the date and time
appear in the viewfinder, they
will be recorded on the tape.
• Details are on page 29.
(1([email protected] Y Button
• Pressing this button brings the
status indicators and displays
to the screen in the viewfinder.
DATE/ TIME Button
• Press this button to display
the date and clock in the
viewfinder.
Slide the
switch to
to return
speed of
• When you use the FADE
button to fade in and out, the
sound will also fade in and
out with the picture.
@.4
Higher shutter speeds are
displayed in the electronic
viewfinder. No shutter speed
indicator appears when the
normal (1/60) speed is
selected.
UTO IRIS Control
With this control in the center
"click" position,
the
camcorder
automatically
adjusts the lens opening for
the best picture.
• If you need more light, the
shutter speed indicator in the
viewfinder will flash.
The lens iris opening can also
be manually
adjusted
to
compensate
for these unusual
hghting situations:
• Details are on page 28.
Note: The higher the shutter
speed, the less blurred fastmoving recorded action will
appear during slow-motion
and stop-action. Also, more
light is required for higher
shutter speeds.
1. When the subject is in
bright light and the
background
is dark, turn
this control counterclockwise
to close the lens iris
opening.
2. When the background
is in
bright light and the subject
appears
too dark, adjust the
control clockwise
to open
the lens iris.
• Details are on page 25.
SHUTTER speed
the fight a third time
to the normal shutter
1/60.
2_
TIME LAPSE Button
• This button allows time lapse
and animation recording.
• Details are on pages 29 and
30.
TIME LAPSE
Button
SHUTTER Speed Switch
SELF TIMER Button
DISPLAY Button
RESET/To160 Button
REVIEW Button
(_
"_
DATE/TIME
FADE Button
AUTO IRIS Control
Date and CLOCK (SELECT/
ADVANCE) Buttons
Button
@MIC
(External Microphone
Jack)
• If you want to use an optional
external microphone during
recording, plug it into this
jack.
• When an external microphone
is connected to this jack, the
built-in microphone is shut off
automatically.
2(2(2_
MIC Switch (WIND/NORMA
L)
• This switch is used to reduce
wind noise that may be picked
up by the microphone.
• For normal use, place the
switch in the NORMAL
position.
• Place the switch in the WIND
position if you are recording
outside on a windy day.
(_)
Hand Strap with Lens Cap Snap
• This strap is designed to
provide comfort and ease of
operation while using the
camcorder.
POWER switch. This will
conserve your battery power if
you are using the battery.
_)
Cassette Door
• This door opens so you can
insert and remove cassette
tapes. The camcorder must be
connected to a power source
before the door will open.
To open the cassette door,
first attach the AC adapter/
charger or a charged battery
to the camcorder. Then press
the EJECT button _ on the
top control panel, insert a
VHS cassette, and gently dose
the door by hand.
• When your right hand is
properly inserted through the
strap, your fingers can easily
control the Power Zoom
buttons (_) and the Record
Start/Stop thumb trigger _.
for a
Thumb Trigger (Record Start/
Stop Button)
• When the CAMERA/PLAYBACK
switch _ is in the CAMERA
position, press this thumb
trigger to start and stop
recording.
• You do not have to hold the
thumb trigger to record. Just
press it once and release it.
The camcorder will continue
to record until you press the
trigger again.
• When you press the trigger to
stop recording, the camcorder
will enter the Record/Pause
mode. If you do not plan to
start recording again soon, you
may want to turn off the
camcorder by sliding the
10
3_
Tape
Windows
NEVER attempt to force open
the cassette door. If the
battery reaches its empty level
during recording, the
camcorder will shut off.
Normally there will be enough
power left in the battery to
eject the tape. If not, simply
recharge the battery or power
your camcorder with the AC
adapter/charger
before
attempting to eject the tape.
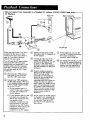
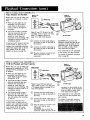
A V OUT Connector (Audio/
Video Output)
• Use this connector when you
want to send signals out from
the camcorder and into either
a TV or a VCR.
• Connection instructions
pages 36, 38, and 39.
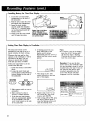
(_)
Record-Protect
Tab
CLOCK BATTERY
Compartment
• After the clock battery is
installed here as described on
page 22, you can set the
correct date and time in the
camcorder's viewfinder
display.
• The camcorder will
automatically keep track of
the correct day and time for
approximately one year.
• Details are on page 22.
Important Notes:
• Insert a tape cassette only one
way as shown below: with
record-protect
tab facing up
and tape windows facing out.
• Place the lens cover on the
lens cap snap to keep it out of
the way while recording.
• The strap is adjustable
personalized fit.
3_
are on
DC Power Jack (DC IN 9.61I)
• This jack lets you operate your
camcorder from the cigarette
lighter socket of a car, truck,
or RV (using the optional
DCC096 power cord).
MIC(ExternalMIcrophone
Jack)
9o6-volt DC Power
Jack
MIC Switch
WIND/NORMAL)
Hand Strap
with Lens
Cap Snap
AV OUT
Connector
(Audio/Video
Output Connection)
CLOCK BA TTERY
Compartment
Thumb Trigger
(Record Start/Stop
Cassette
Button)
Door
1!
POWER Switch
• This switch turns the
camcorder's power on and off.
The ON indicator _ will light
when the camcorder is on.
• To conserve battery power,
you may want to turn off
power between long breaks in
recording.
(_)
Power ON Indicator (Also Dew
Indicator)
• This indicator hghts whenever
the camcorder is turned on.
• The indicator will flash if
there is excessive moisture
(dew) inside your camcorder.
An internal protection feature
will prevent the camcorder
from operating until the
moisture is gone. Leave the
power on and when the fight
stops flashing, the camcorder
can be operated.
(_
EJECT Button
• Press this button to open the
cassette door for tape insertion
or removal.
• The camcorder must be
attached to a power source
(battery or AC adapter/
charger) to open the door.
playback speed. This is handy
after you've scanned
backwards to review parts of a
recent recording.
(_
STOP Button
• Press the STOP button to stop
the camcorder when it's
playing back a tape,
rewinding, or fast forwarding.
• This button has no effect
during recording. To stop
recording, press the thumb
trigger _ or press P.4USE
button @.
PA USE Button
• Press this button when the
camcorder is playing back a
tape to display a stop-action
"still" picture. To return to
normal play, press PAUSE
again.
• Press this button when the
camcorder is recording to
pause the recording.
• Pause is designed for
momentary interruptions and
should not be used for an
extended period of time. If the
camcorder remains in the
pause mode for more than five
minutes, the camcorder will
automatically move the tape
away from the spinning heads
to prevent excessive tape wear.
TRACKING Con_ol
• You will normally only use the
TRACKING control if you play
tapes in your camcorder that
were recorded on another
VCR.
3(3_ PLA Y Button
• To play back recorded
material, first slide the
CAMERA/PI_
YBACK switch to
the PL,4YBACK position, and
then press REW to rewind the
tape. Press PLAY to start
playback.
• When the CAMERA/PLA YB.,ICK
switch is in the CAMERA
position and the camcorder is
in the Record/Pause
mode,
pressing and holding PLAY will
play the tape at normal
12
• If you play a tape that was
not recorded on your
camcorder, streaks may appear
if the recorded tracks on the
tape don't align precisely with
the playback heads. To remove
the streaks and align the heads
with the tape tracks, slowly
turn the TRACKING control in
either direction until the
streaks disappear.
• The TRACKINGcontrol will
have to be adjusted back to its
original position when you
play your regular homerecorded tapes again.
• The TRACKINGcontrol has no
effect during recording.
@ EAR
(Earphone) Jack
• You can plug the supplied
earphone into this jack for
private hstening during
recording or playback.
FT_
VIDEO DUB Button
• This button is used to record
new video in place of existing
video without erasing the
audio.
• Details are on page 35.
AUDIO DUB Button
• This button is used to record
new audio in place of existing
audio without erasing the
video.
• Details are on page 34.
@
F.FWD (Fast Forward) Button
• When the CAMERA/pLAYBACK
switch is in the PLAYBACK
position and the camcorder is
stopped, pressing F.FWD will
quickly advance (fast forward)
the tape. No picture will
appear in the viewfinder.
• If you press and hold the
F.FWD button when the
camcorder is playing a tape,
you'll be able to visually scan
the tape in fast motion. To
return to normal playback,
release the F.FWD button.
• You can also visually scan
forward when the camcorder is
in Record/Pause
mode by
pressing and holding F.FWD.
(Rewind) Button
@ REW
• When tile CAMERA/PLAYBACK
switch is in the PLAYBACK
position and the carncorder is
stopped, pressing REW will
rewind the tape. No picture
will appear in the viewfinder.
• If you press and hold the PEW
button when the camcorder is
playing a tape, you'll be able
to visually scan the tape in
reverse fast motion. To return
to normal playback, release
the REW button.
• You can also visually scan
backwards when the
camcorder is in Record/Pause
mode by pressing and holding
REW. This lets you "back up"
the tape so that you can start
a new scene without a "gap"
in the tape.
POWER Switch
Power ON Indicator (Also Dew Indicator)
EJECT Button
PLAY Button
STOP Button
PAUSE BuUon
POWER--
",=CAMERA
EJECT
REW
PLAY
F.FWD
PAUSE
AUDIO
VIDEO
TRACKING
Control
TRACKING
PLAYBACKP
EAR (Earphone)
Jack
CAMERA/PLAYBAI
Switch
VIDEO DUB Button
4(_ REW Button
(Rewind)
--@
AUDIO DUB Button
4(4_ F.FWD
(Fast Forward)
AV IN Jack
(_
CAMERA/PLA YBA CK Switch
• Because your camcorder is
both a camera and a portable
VCR, it performs two
completely separate groups of
functions. This switch tells the
camcorder when you want to
record (with the camera
functions) and when you want
to play back tapes (with the
VCR functions).
• When you slide this switch to
the CAMERA position, the
camcorder prepares itself for
recording and enters the
record/pause
mode.
• When you slide this switch to
the PLAYBACK position, the
camcorder prepares itself to
playback tapes using the VCR
functions.
(4(4@A V IN Jack
• Use this connector jack when
you want to send signals from
another device into your
camcorder for recording.
• You will be able to record
from a TV monitor, VCR, or
another camcorder.
Connection instructions are on
pages 36 and 37.
13
How To Power Your Camcorder
You can power
your camcorder
three
different
ways:
A. C.
Optional
AC Adapter/Charger
Rechargeable
•
• The rechargeable 9.6-volt battery
lets you record outdoors or
anytime you're away from
electrical outlets.
The adapter/charger
connects
to
the camcorder
and plugs into a
wall outlet. It lets you power the
camcorder
off normal household
power (120 volts AC, 50/60 Hz).
CAUTION: If you wish to operate the
AC adapter/charger
on a power source
other than 120 volts, 50/60 Hz, use
only a transformer-type power converter.
Do not use "solid-state" or "switchingtype" power converters. They will
damage your AC adapter/charger.
An
optional CPS08 adapter/charger may
be purchased from your RCA dealer.
The CPS08 is designed for use on 100240 volts, 50/60 Hz. See pages 44-45
for optional accessories.
Using the Adapter/Charger
Ao
BATTERY
Eject Lever
POWER Indicator
Battery
• The supplied battery can be
charged and then connected to
the camcorder for portable use
indoors or outdoors.
to Power Your Camcorder
Attaching Adapter/Charger
Camcorder
to
1. Align the reference arrow on the
adapter/charger with the arrow
on the back of the camcorder.
2. While holding the adapter/
charger flush against the back of
the camcorder, slide it down in
the direction of the arrow as
shown.
3. Plug the adapter/charger into the
nearest AC outlet (120V, 50/60
Hz).
To AC
120V, 50/60
14
Hz
4. If the adapter/charger is properly
connected, its POWER indicator
should light.
5. To remove the adapter/charger,
first unplug it from the wall
outlet. Then slide and hold the
BATTERY Eject Lever while
sliding the adapter/charger
up
and off the camcorder.
DC Car Cord
• The optional DC car cord lets
you power the camcorder from
the cigarette fighter socket of a
car, truck, or RV.
• You can also use the DC car
cord to connect your camcorder
to a long-play battery.
• The DCC096 is specially
designed to convert 12-volts to
9.6-volts.
B.
Using
Battery
-Charging
to Power
Your
Camcorder
The Battery
You will have to charge the battery
before you use it the first time.
Initial charging will take
approximately two hours. When
fully charged, the battery should
supply about two hours of
operating time (depending on how
much you use zoom and pause).
Charge Indicator
Re_hargeable
I]v/
To AC Wall Outlet
_/
120V, 50/60Hz
l. Attach the battery to the
adapter/charger
as shown
above. Align the reference
arrow on the battery with the
arrow on the back of the
adapter/charger.
Then push
the battery flush with the
adapter/charger
and slide it
downward.
Note: You must remove the
adapter/charger
from the
camcorder to charge the
battery.
CAUTION: When a battery is
attached to the adapter/
charger, do not turn them
upside down. The battery may
fall off and be damaged or
cause injury.
2. Plug the adapter/charger
into
the nearest AC outlet (120V,
50/60 Hz).
3. The Charge Indicator will
light while the battery is being
charged. When the light goes
out, the battery is fully
charged.
4. Remove the battery from the
adapter/charger
by sliding the
battery up and off.
5. Attach the charged battery to
the camcorder as shown
below.
Notes:
• CAUTION: If you wish to
operate the AC adapter/charger
on a power source other than
120 volts, 50/60 Hz, use only a
transformer-type power converter.
Do not use "solid-state" or
"switching-type" power
converters. They will damage
your AC adapter/charger. An
optional CPS08 adapter/charger
may be purchased from your
RCA dealer. The CPS08 is
designed for use on 100-240
volts, 50/60 Hz. See pages 44-45
for optional accessories.
-Attaching Charged Battery-to Camcorder
BATTERY Eject
Lever
1.
2.
• Recharging takes approximately
two hours depending on the
battery's condition. After
repeated charging and use,
operation time will gradually
decrease. When operation time
becomes too short to be useful,
it's time to replace the battery.
• You cannot charge the battery
and operate the camcorder from
the adapter/charger
at the same
time. Remove the adapter/
charger from the camcorder to
charge the battery.
3.
4.
Align the reference arrow on
the battery with the arrow on
the back of the camcorder.
Push the battery flush against
the camcorder and slide it
downward as shown.
Slide the camcorder's POWER
switch to the on position. If
the battery is properly
connected, the ON indicator
will light.
To remove the battery, slide
and hold the BATTERY Eject
Lever while sliding the battery
up and off.
• When a battery (which has
become very hot) is attached to
the AC adapter/charger,
the
power indicator on the AC
adapter/charger
flashes. If this
happens, unplug the AC
adapter/charger
from the AC
wall outlet for approximately ten
seconds. After that period the
power cord may be plugged back
into the AC outlet. Attaching an
extremely hot battery to the AC
adapter/charger
is not
recommended;
it should be
allowed to cool down before
being attached.
15
Checking
Battery Power
When you are using a battery to
power your camcorder, you can see
how much battery power is left by
checking the Battery Level
Indicator (E---F) in the viewfinder.
recording because it will not be
recorded on the tape. To remove
the indicator, repeatedly press the
DISPLAY button until it disappears.
• When the battery is fully
charged, the display reads
"E---F".
• After several minutes only two
dashes appear.
Pressing the D1SPLAY button on the
side of the camcorder will display
the Battery Level Indicator. If
desired, you can keep this indicator
in the viewfinder while you are
-C.
Using the Optional
• When the battery is nearly
empty, only one dash remains.
• When the last dash starts
flashing, you should find an
alternative power source or
recharge the battery before
continuing to use your
camcorder.
DC Car Cord to Power Your Camcorder
To power your camcorder from the
cigarette lighter socket of a car, truck,
or RV, you will need the optional car
cord (model DCC096).
Car cord DCC096 is especially
designed to convert power from a
12-volt car battery to the 9.6-volt
input jack on the camcorder.
Important: Do not use RCA car cord
DCC012 with your camcorder. The
DCC012 is not capable of converting
12-volts to 9.6-volts and will damage
your camcorder.
Attaching
Car Cord
Cigarette
Lighter Socket
1. Remove the adapter/charger
or battery from the camcorder
if either is connected.
2. Connect the small plug on the
Car Cord to the DC IN jack
located on the back of the
camcorder.
3. Insert the other end of the car
cord into the vehicle's
cigarette lighter socket.
4. Slide the camcorder's POWER
switch to its on position. If the
car cord is properly connected,
the POWER ON indicator should
light.
Note: Your car does not have to
be turned on for the camcorder
to operate.
Optional DC
Car Cord
(DCC096)
DC IN Jack
(9.6 volts)
-Video
Cassettes
- Inserting/Removing
We recommend that RCA cassettes
be used with your camcorder. The
tape in these cassettes is of highquality formulation. It has been
manufactured
to our critical
specifications for excellent
performance. Use of tape not
meeting these specifications could
considerably reduce the
performance of your camcorder.
Use of poor quality tapes or tapes
that have been damaged or
mishandled can contaminate the
video heads, resulting in a snowy
picture or no picture at all during
playback. Because there is no
control over the type of tape
purchased or rented by consumers,
head cleaning is not covered under
warranty. It is considered normal
maintenance.
Playing a new RCA tape for
approximately
30 minutes will
often satisfactorily clean the heads
and improve your picture. If a
snowy picture or no-picture
condition persists, consider the use
of a chemical non-abrasive head
cleaning tape (RCA Stock No.
AV009W) available from your
dealer or many electronic supply
stores. Be sure to follow the
directions with the head cleaning
kit carefully. Improper use of a
head cleaner may damage your
camcorder.
tO
Cassettes
1. Attach power source to
camcorder (either the AC
Adapter/Charger
or a charged
battery).
2. Press EJECT button.
3. Insert or remove cassette.
CAUTION: Insert cassette
only one way with recordprotect tab facing up and tape
windows facing out. Tape
should fit easily in
compartment. Do Not Force.
Check position if insertion is
not easy.
4. Gently close cassette
compartment
with your hand.
, Erase Protection
Cassette
You can use your video cassettes
over and over again. To erase a
previous recording, just record
over it.
To prevent erasing a recording
you want to keep, remove the
record-protect
tab from the back
of the cassette as shown below.
Recording is impossible when
this tab is removed.
To record again on a cassette
that has the tab removed, simply
cover the hole with vinyl tape as
shown.
Recording
60 Min.
T-120
2 Hrs.
T-160
2 Hrs., 40 Min.
• When you are finished with a
cassette, rewind it and remove it
from the camcorder.
Store cassettes vertically in their
protective boxes at normal room
temperatures. Avoid extreme
heat and humidity. Extreme heat
can warp the cassette or cause
the tape to stretch excessively.
Keep away from strong magnetic
fields such as electric motors and
other devices.
Be especially careful to keep dust
from entering the cassette
compartment. All dust is
abrasive and it will cause
excessive wear of both the tape
and the camcorder's recording/
playback heads.
Time
The camcorder records and plays
back in VHS standard speed (SP).
Listed below are the maximum SP
recording times for popular
VHS cassettes.
T-60
Care and Storage--
Follow these directions for
continued high-quality performance
from your cassettes.
To prevent
accidental
erasure, break
the tab.
To record again,
cover the hole
with vinyl tape,
17
How To Record With Your Camcorder
Use the following steps to make a recording using the automatic control settings.
features on the following pages for manual operation.
See the individual
control
Attach Power Supply
Adapter/Charger,
) Power Zoom
Buttons
Lens Cap on
Lens Cap Snap
Record Start/Stop
(Thumb Trigger)
Button
' POWER Switch
'EJECT Button
CAMERA/PLA
Switch
YBACK
) Eyepiece Focus Control
REWEWButton
FADE Button
i AUTO IRIS Control
AUTOFOCUS
18
Switch
Once you've started recording,
you can pause recording by
either pressing the thumb
trigger again or by pressing
the PAUSE button.
To resume
recording, press PAUSE again
or press the trigger again.
Note: If the camcorder is
connected to a TV, you can
also watch what the camcorder
is recording and playing back
on the TV screen. Connection
instructions are on pages 36,
38, and 39.
Attach power source to
eamcorder.
Detailed instructions for
attaching the adapter/charger,
battery, or optional DC car cord
are on pages 14-16.
Set controls to their automatic
positions.
A. Set the AUTOFOCUSswitch to
AUTO.
B. Set the AUTO IP,IS control to
AUTO (top center "chck"
position).
Turn on camcorder.
Slide the POWER switch to the
"on" position. The indicator
labeled "'ON" will light.
Insert a cassette tape.
I. Press EJECT to open door.
2. Insert cassette as shown on
page 17. Insert cassette only
one way with record-protect
tab facing up and the tape
windows facing out.
3. Gently close the cassette door
with. your hand.
(_)
Prepare camcorder to record.
A. Put the CAMERA/PLAYBACK
switch in the CAMERA
position for recording.
B. Remove the lens cap, and
snap it on the lens cap snap.
Select your scene.
Put your eye to the viewfinder.
Remember to adjust the eyepiece
focus control for your vision.
(_)
(_)
3. Press REW (Rewind)
tape.
Note: If the camcorder is
connected to a TV, you can
also watch what the
camcorder is recording and
playing back on the TV
screen. Connection
instructions are on pages 36,
3g and 39.
• Press "W" to zoom out.
o
To fade out, bold FADE button
and press thumb trigger to
stop recording. After recording
stops, release FADE button.
To quick-review recording:
• You can review the last few
seconds of recorded material
by pressing the REVIEW button
while the camcorder is in the
pause mode.
• After your review, press the
thumb trigger (or PAUSE) to
continue recording.
to rewind
4. Press STOP to stop rewinding.
5. Press PLAY arid watch the
viewfinder to review what was
recorded.
Zoom in and out as desired.
• Press "T" to zoom in.
Fade in and out as desired.
* To fade in, hold FADE button
and press thumb trigger to
start recording. Then release
FADE button after a few
seconds.
To rewind and review recording:
1. Press the thumb trigger (or
PAUSE) to stop recording.
2. Move CAMERA/PLAYBACK
switch to PLAYBACKposition.
(_)
To complete recording:
• Press the thumb trigger to
pause recording (or if
camcorder is playing back
your tape, press STOP).
• Put CAMERA/PLAYBACK switch
in PLAYBACK position.
• Press REWIND to rewind tape.
• Press EJECT to eject tape.
Remove tape and gently close
the door with your hand.
• Slide POWER switch to turn off
camcorder. Power light will go
out.
Remember:. All of your camcorder's
special recording features are
described on the following pages.
These will give you detailed
information about using each of your
camcorder's recording displays and
special functions.
To start and pause recording:
• Press the record start/stop
button (thumb trigger) to start
recording. You do not have to
hold the trigger to record.
19
Using Your Camcorder's
Recording Features
The steps listed on pages 18 and 19
give you the basics of recording. You
should also get to know the
camcorder's special recording features
that will help you make professionallooking recordings. These features can
help you shoot like a pro-even if
you've never used a video camera or
recorder before.
-Electronic
Viewfinder
Eyepiece
(EVF)
The camcorder's electronic
viewfinder is a miniature blackand-white monitor that displays the
picture seen by the camcorder
when recording.
The viewfinder can also be used for
viewing tape playback as described
on page 40.
"_
• The Eyepiece Focus Control lets
you set the focus of the
viewfinder for your personal
vision.
Tilt Adjustment
For convenient viewing, the
viewfinder can be tilted about 90
degrees up and 45 degrees down.
!
Adjusting for Right or Left Eye
The viewfinder also slides out from
the camcorder so you can view it
with either your right or left eye.
To use your left eye, simply pull
the. viewfinder out from the
camcorder.
You can reverse the rubber eyecup
when using the viewfinder with
your left eye. Simply remove it and
turn it upside down.
ZO
Focus Control
If you wear eyeglasses, you can
probably operate the camcorder
without them if desired. Remove
your eyeglasses and look through
the viewfinder while adjusting
the Eyepiece Focus Control.
It's easiest to set the correct
focus by focusing on one of the
viewfinder's on-screen displays
(such as the date or battery
level).
• The Eyepiece Focus Control
does not affect the focus of the
image actually recorded by your
camcorder.
Displays
In Vlewflnder
Shutter Speed
Display
O
J
"S:1/1000
Audio/Video Dubbing
Displays and Index Display
INDEX /
A/V DUB
INTERVAL
-E---F
O000N
--
REC
0:30
"
IO:30AN
8/20/89"
.----_
---------_
r Level Indicator
Audio/Video Dubbing Displays
and Index Display
• Appear during dubbing to let
you know the original audio
and/or video tracks are being
erased and replaced. Details
are on pages 34 and 35.
•
O
Q
word
INDEX also appears
here during indexing. Details
are on page 31.
T_le
Interval Display for Time-Lapse
Recording
• This display is controlled by
the TIME LAPSE button which
allows intermittent recording.
Tape Counter (with Memory) and
Time-Remaining Display
• When you press the DISPLAY
button once, the Tape Counter
appears under the Battery
Level Indicator. Pressing
DISPLAy again adds the
memory feature to the Tape
Counter.
• To see the Time-Remaining
display, press the DISPLAY
button again.
• Complete information is on
pages 29 and 30.
• Pressing DISPLAY a fourth
time removes the displays.
Date and Time Display
n Press the DATE/TIME button
to bring this display to the
viewfinder.
• Details about using the Tape
Counter and Memory are on
page 27.
• Whenever the date and/or
time is displayed in the
viewfinder, it will be recorded
on your tape.
• Detailed information is on
page 22.
Camcorder Status Display
• One of the following displays
will appear here to let you
know what the camcorder is
doing.
• REC appears when the
camcorder is recording.
•
FAST
FWD appears
when
the
tape is fast forwarding.
• REWIND appears when the
tape is rewinding.
• PAUSE appears when either the
thumb trigger (or PAUSE
button) is pressed to stop
recording.
• Details about using the TimeRemaining display are on
page 27.
®
Battery Level Indicator
• The battery indicator appears
when the DISPLAY button is
pressed. It lets you know when
your battery needs to be
recharged.
• Details are on page 15.
®
Status Display
Display
• STANDBY may appear briefly
when eamcorder is preparing
itself to record.
®
Dele end Time Display
Cemcorder
Time-Remaining
O
Interval Display for
Time-Lapse Recordln9
• Slide the SHUTTERspeed
switch to the right a second
time to select a shutter speed
of !/1000.
• Slide the SHUTTER speed
switch to the right a third time
to return to the normal shutter
speed (1/60).
• When you select a shutter
speed of 1/500 or 1/1000, it
will be displayed in the
viewflnder. No shutter speed
appears when the normal
speed of 1/60 is being used.
• Higher shutter speeds require
more light. The shutter speed
display will flash when you
need more light.
• Details are on page 28.
Notes:
A flashing "'TAPE" display appears
briefly in the viewfinder when:
• There is no cassette in the
eamcorder and you put the
CAMERA/PLA YBACK switch in
the CAMERA position or press the
thumb trigger to begin recording.
• The record-protect tab has been
removed from the cassette and you
press the thumb trigger to begin
recording.
Shutter Speed Display
• This display is controlled by
the SHUTTER speed switch.
A flashing "'TAPE END" display
appears briefly in the viewflnder
when:
€ The speed is automatically set
to normal (1/60) whenever the
camcorder is turned on.
• There is less than five minutes
recording time left on the cassette.
• When the end of the cassette is
reached during recording.
• Slide the SHUTTER speed
switch to the fight once to
select a shutter speed of
1/500.
• When you press the thumb trigger
to record and have reached the end
of the cassette.
21
Installing
Battery for Time/Date
Display
1. Locate the CLOCK BATTERY
compartment on the back of
the camcorder.
2. Pull the tab to open the cover
and expose the compartment.
3. Insert the clock battery
securely under the shoulders
with the "+" terminal facing
out (as illustrated inside the
battery cover).
4. Gently push the cover closed
until it snaps into place.
Setting
Time/Date
Display
Battery
Comparbnent -
Compartment
Battery Type: 3-Volt Micro
Lithium Cell (such as
Maxell # CR202S available
from most Iocst din9 stores
and camera shops)
in Viewfinder
The time and/or date can be
recorded on your tape to act as a
handy reference for later viewing.
Whenever the time and/or date
appears in the viewfinder, it will be
recorded on the tape. You can
choose to record only the date,
both date and time, or neither.
6. A flashing cursor lets you
know which part of the
display you're setting.
Repeatedly press the ADVANCE
button until the correct month
appears.
Follow the steps below to set the
correct time and date.
I. Install the battery as described
above.
2. Locate the DATE/TIME and
CLOCK (SELECT and ADVANCE)
buttons located on the side of
the camcorder.
DATE/TIME
W,"
xl,2j:00AM
-gl%I -/I/89
7. Then press SELECT. The
cursor will move to the next
part of the display.
Notes:
• To correct a part of the display,
press the SELECT button until
the incorrect digit is flashing.
Then use the ADVANCEbutton to
enter the correct digit.
Remember: If you see the date
and/or time in the viewfinder while
you are recording a scene, it will be
recorded onto your tape. If you do
not want the date and/or time
recorded, repeatedly press the
DATE/TIME button until they
disappear from the viewfinder.
CLOCK
o )
SELECT
ADVANCE
3. Slide POWER switch to turn on
camcorder.
4. Slide CAMERA/PLAYBACK
switch to CAMERA position.
5. If the date and time display
does not automatically appear
in the viewfinder, press the
DATE/TIME button on the side
of the camcorder.
1.2
8. Repeat steps 6 and 7 to set
the correct day, year, hour,
minute, and AM/PM.
9. After setting AM or PM, press
the SELECT button again to
erase the flashing cursor and
start the internal clock.
One Time
Clock and Date
Two Times
Date Only
Three Times
No Display
Returns to C_ock and
Date
Four Times
- Zooming
Using Power Zoom Buttons
The zoom buttons are easily
controlled by your index and
middle fingers when you grasp the
camcorder properly through the
hand strap.
Zoom Buttons
T = Telephoto
W = Wide Angle
The 6: l motorized zoom lens
allows you to zoom in and out for
close-ups or wide-angle shots just
by pressing one of the Power Zoom
fingertip controls.
- Quick
Using Zoom
Ring Manually
When you want to zoom in or out
of a scene without using the Power
Zoom buttons, you can turn the
Zoom Ring manually with your
fingers. This lets you control the
speed of the zoom.
• Press the button labeled "T" to
move the lens in the "telephoto"
(close-up) direction.
• Press "W" to move the lens in
the "wide angle" direction.
Review
During a recording session (when
the camcorder is in the Record/
Pause mode), you can review the
last few seconds of a taped scene
by pressing the REVIEW button and
watching the viewfinder.
Most importantly, Quick Review
returns the tape to its previous
point after reviewing a scene. As a
result, you can use this feature and
then start recording again without
creating a "gap" or picture breakup between taped segments.
REVIEW
REVIEW
Button
Quick Review helps you recall the
last scene you recorded on a tape
and lets you set up the next scene.
After quick review playback, the
camcorder returns to the Record/
Pause mode.
/3
Focusing
Your Camcorder
- Auto Focus
-Manual
Focus
- Macro Focus
The macro focus feature lets you
focus on objects as close as 1/4
inch from your subject.
Macro Button
Zoom Ring
Auto FOCUS
Window
PUSH/AUTO
AUTOFOCUS
Switch
FOCus Switch
If you want the camcorder to focus
for you automatically, slide the
AUTOFOCUS switch to the AUTO
position.
The camcorder's auto-focus system
sends out an infrared light beam
and automatically focuses on the
nearest object that reflects this
light. Take care not to block the
camcorder's Auto Focus Window
while recording with the auto-focus
feature.
If any of the following conditions
exist, you may need to switch off
the auto-focus system and focus
manually by turning the focus ring.
To switch off auto-focus, slide the
AUTOFOCUS switch to the MAN
(manual) position.
• Sloping or inclined surfaces may
not be focused because the
reflected light will not be
returned to the auto-focus
window.
• When shooting through a
window, the auto-focus system
may focus on the window glass
instead of your subject.
• Dark objects, such as a subject's
clothing, may absorb the
infrare_t light. Manual focus may
be required.
• Auto
work
than
from
focus may not be able to
reliably on subjects more
approximately 35 feet away
the camcorder.
• When using the optional wideangle or telephoto lens adapters,
turn off the auto-focus system
and focus manually. It is not
possible to use autofocus when
these adapters are being used.
24
PUSH/AUTO
FOCUs Switch
If you do not want the camcorder
to focus for you automatically,
shde the AUTOFOCUS switch to the
MAN (manual) position. You can
then adjust the focus as desired by
turning the Focus Ring with your
fingers.
Zoom Fling
PUSH/AUTO
MAN-
*AUTO
recording, zoom in on
your
and adjust
O
Beforesubject
you start
the Focus Ring so that a
sharp, clear picture is
displayed in the viewfinder. (You
can zoom in on your subject by
holding the Power Zoom button
labeled "T".) By using this
procedure for manual focus, the
camcorder will maintain proper
focus throughout the zoom range.
You can also quickly and
momentarily switch from MANUAL
to AUTO focus by pushing the
PUSH/AUTO focus switch in while
the AUTOFOCUS switch is in the
MANUAL position. When the switch
is pressed in and held, automatic
focus is activated and remains
activated until the switch is
released. This is useful if you are
shooting a relatively static scene in
MANUAL focUS and need to quickly
and momentarily use AUTO focus to
adjust for a change in scene.
Switch
l. Slide the AUTOFOCUSswitch
to the MAN (manual) position.
2,
(czs:
AUTOFOCUS
Press in and hold the Macro
Button (on Zoom Ring Lever)
while rotating the Zoom Ring
to the MACRO position. (You'll
see the word MACRO on the
zoom ring scale. Make it align
with the white line.)
3. Release the Macro Button
after the Zoom Ring is in the
MACRO position.
4. Slowly rotate the Zoom Ring
with your fingers until you get
a sharp picture.
Notes:
• Zooming is not possible when in
Macro Focus. To change the size
of the subject, move the lens
closer or further away from it.
• The Focus Ring has no effect in
Macro Focus.
-Adjusting
A UTO IRIS
Unusual Lighting
For
AUTO IRIS
AUTO
CLOSE
OPEN
With the IRIS control in the AUTO
(center "click") position, your
camcorder electronically senses the
available light in a scene and
automatically opens or doses the
lens iris for the best possible
picture.
You also have the option of
manual iris adjustment to
compensate for unusual lighting,
using the IRIS control to vary the
amount of light entering the
camcorder.
CLOSE
IRIS
OPEN
Moving the AUTo IRIS control
toward the o/,g,v position (right)
allows more light to enter the
eamcorder. Try this position,
when the background is bright
but your subject appears too
dark. (For example, when you
are taping someone indoors who
is standing in front of a
window.)
CLOSE
OPEN
• Slowly moving the AUTo lSlS
control toward the CLOSE
position (left) allows less light to
enter the camcorder, Try moving
the knob in this direction when
your subject appears too bright.
- Fading In and Out of Scenes
This feature lets you add a
professional touch to your home
recordings. When you fade into a
scene, the recording will start with
a blank screen and the picture will
gradually appear. The picture
gradually disappears when fading
FADE
Fading In
out.
FADE Bullon
I. While the camcorder is in the
Record/Pause mode, press
and hold the FADE button.
2. Press the Record Start/Stop
button (thumb trigger) to start
recording.
3. Release the FADE button after
a few seconds. The picture will
gradually appear on a blank
screen.
Fading Out
• When using the FADEbutton,
both picture and sound will
gradually appear and disappear.
The fade speed is automatically
controlled by the camcorder.
1. While the camcorder is
recording, press and hold the
FADEbutton. The picture will
gradually disappear from the
screen.
2. Continue to hold the FADE
button, and press the Record
Start/Stop button (thumb
trigger) to stop recording.
3. After the recording has
stopped, release the FADE
button. The picture will
reappear in the viewfinder.
25
DISPLA
Y Button
_$P_.AY
Pressing the DISPLAY button lets you
check several special displays in the
viewfinder.
• Remaining
Battery Power
• Tape Counter
• Tape Counter
• Remaining
Memory
Time Left on Tape
DISPLAy
Button
The chart below shows the order the displays will appear in the viewfinder as
you repeatedly press the DISPLAY button. These displays will not appear on the
tape.
DISPLA
Y Button
One Time
Battery Level and
Tape Counter
Two Times
Battery Level and
Tape Counter with
Memory
Three Times
Chart
O000M
E---F
Battery Level and
Time-Remaining
Display
E_
Four Times
Removes Displays
Five Times
Returns to first display
Using Tape Counter
Pressing the DISPLAY button once
displays the 4-digit Tape Counter
Display in the viewfinder (below
the Battery Level Indicator).
Battery Level
Indicator
, Using
Tape Counter Memory-
The Tape Counter also provides
switchable "memory" feature.
When the memory is on (M
appears behind Tape Counter
Display), the tape automatically
stops when the counter reaches
0000 during Rewind and Fast
Forward.
a
-Using Time-Remaining
Display
The time-remaining display shows
the amount of recording or
playback time left on a tape while
it's inside the camcorder.
E::\
]
Time-Remaining
Display
Tape Count_'
Display
The tape counter acts as a handy
reference to help you locate tape
segments.
RESET
0
1-160
Tape Counter Display
With Memory On
This is useful if there is a section of
tape you want to review
immediately after recording, or if
you want to return to the same
point several times in a row.
To use the counter memory:
To use the Tape Counter, press the
RESET/T-160 button to set the
counter to 0000 before starting to
record or play at the beginning of a
tape. Then note the number on the
counter at the beginning and end
of each program you record or
play.
Noting the counter readings on the
tape label will allow you to use the
counter to quickly locate desired
programs. Just insert a tape, rewind
it to the beginning, reset counter to
zero, and then fast-forward the
tape until the counter reaches the
number you noted for the desired
segment.
1. Repeatedly press the DISPLAY
button until the tape counter
appears with an "M" behind
it.
2. When you reach the part of
the tape you wish to index,
press the RESET/T-160 button
to reset the counter to 0000M.
3. Continue to play or record the
tape. When you want to
return to the index point,
simply press STOP, then
REWIND. (The CAMERA/
PLAYBACK switch must be in
PLAYBACK position to rewind
the tape).
4. The tape will stop rewinding
when the counter reaches
000.
Note: Whenever the "'M" appears
behind the Tape Counter Display,
the camcorder will stop rewinding
or fast-forwarding when the
counter reaches 0000M. To
continue rewinding press REWIND
again, to continue fast-forwarding
press F.FWD again.
To bring this display to the
viewfinder, repeatedly press the
DISPLAy button until the TimeRemaining Display appears. (See
the D1SPLAY button chart on
page 26 to see how many times you
will have to press the DISPLAY
button.)
When you first start playing or
recording a tape, it will take the
camcorder a minute or two to
calculate the time-remaining. The
display will remain blank until the
camcorder has finished its
calculations. Once displayed, the
t_me-remaining display will be
automatically updated and readily
available when the DISPLAY button
is pressed-even
if you rewind or
fast forward the tape.
Notes:
• When using an extended length
T-160 cassette, you must press
the P,ESET/T-160 button (while
the Time-Remaining
Display is
present) to adapt the
camcorder's time-remaining
system for an accurate read-out.
• The T-160 indicator will light
when the display is set for a
T-I60 tape.
RESET
• If the Tape Counter Display is
present, pressing the RESET/T-160
button resets the counter to
0000.
27
-Using
Variable Shutter Speeds
S:1/1000
Shutter /
Display
E---F
OOOO
- SHUTTER Switch
Because your camcorder has a
variable shutter, you can choose
one of two higher shutter speeds to
record fast-moving action.
The shutter speed is automatically
reset to the normal shutter speed of
1/60 whenever the camcorder's
power is turned on. This speed is
recommended for indoor videos
and most of your recording.
To select a higher shutter speed,
slide the SHUTTER speed switch
located on the side of the
camcorder to the right.
SHUTTER
(.
---- )
• Slide the switch to the right once
to select a shutter speed of
1/500.
• Slide the switch to the right a
second time to select a shutter
speed of 1/1000.
• Slide the switch to the right a
third time to return to the
normal shutter speed of 1/60.
The higher shutter speeds will
appear in the viewfinder above the
Tape-Counter and Time-Remaining
Displays when you press the
DISPLAY button. No display
appears when the normal shutter
speed of 1/60 is being used.
Higher shutter speeds require more
light. The shutter speed display in
the viewfinder will flash if more
light is required.
Notes:
• The higher shutter speeds are
only recommended when you are
taping fast-moving action that
you plan to view in slow motion
or stop action on a good-quality
VCR that features "field-stili"
special effects (2 or 3-head
VCR's).
There is no advantage in using
the higher shutter speeds unless
you plan to play the tape back
in slow motion or stop action.
• Higher shutter speeds require
more fight. The Shutter-Speed
Display will flash when you need
more light. You should add more
light or decrease the shutter
speed.
• A tape recorded at the higher
shutter speeds may not show
movement and change of scenes
as smoothly as recordings at the
normal 1/60 speed.
• When recording at higher shutter
speeds, use of fluorescent,
mercury vapor, or sodium
lighting may cause a "flickering"
effect.
- Self-Timer
Recording
SELF _MER
Button
The SELF TIMER button lets you
time-delay the start of a recording
so you can join the picture without
being seen walking into it.
(1 23
-Adjustable
Recording
) SELFT,.E.
• First prepare the camcorder to
record. Instructions are on
pages 18 and 19.
• While the camcorder is in the
Record/Pause
mode, press the
SELF TIMER button once. The
camcorder will automatically
start recording after
approximately ten seconds and
will continue to record
approximately 30 seconds.
• If you want the camcorder to
record longer than 30 seconds,
press the SELF TIMER button
twice (instead of once) while the
camcorder is in the Record/
Pause mode. After ten seconds
the camcorder will start
recording and continue to record
until the Record Start/Stop
button (thumb trigger) or PAUSE
button is pressed.
Notes:
• The Tally Light on the front of
the camcorder will flash to let
you know the self-timer is
activated and the camcorder is
about to start recording.
• When the Tally light stops
flashing and lights continuously,
the camcorder is recording.
• Pressing the SELF TIMER button
three times during the Record/
Pause mode cancels the selftimer recording.
• If the Record Start/Stop button
(thumb trigger) is pressed while
a self-timer recording is in
progress, the recording will stop
and the camcorder will enter the
Record/Pause
mode.
• The SELF TIMER button has no
effect during normal recording.
Time-Lapse
INTERVAL
DISPLAY
Button
This feature lets you compress
slow-moving action (like nature or
photography studies) into clean,
quickly viewed videos. It allows
intermittent recording so you can
use a cassette efficiently.
1. Prepare the camcorder to
record as described on
pages 18 and 19.
2. Press the DISPLAy button to
bring the tape-counter (or
time-remaining) display to the
viewfinder, lhis will let you
see the INTERVAL display
when it appears.
3. Press the TIME LAPSE button
for approximately two
seconds. The first INTERVAL
display will appear in the
viewfinder.
0:30
4. Press the TIME LAPSE button
repeatedly until the length of
time you desire between
recordings appears in the
viewfinder. Refer to the chart
below.
0:30
30-Second Interval
1:00
l-Minute
Interval
2:00
2-Minute
Interval
5:00
5-Minute
MAN
Manual
Interval
Interval*
5. When the desired interval time
is displayed in the viewfinder,
press the PAUSE button or the
Record Start/Stop button
(thumb trigger) to start
interval recording. The
camcorder will record for
approximately one second
every interval. The time until
the next recording will be
displayed in the viewfinder.
6. To stop interval recording,
repeatedly press the TIME
LAPSE button until the word
INTERVAL disappears from the
viewfinder.
Notes:
• The Tally Light on the front of
the camcorder will light to let
you know when the camcorder is
recording.
*Manual
Interval means that
the camcorder
will record for
one second every time the
Record Start/Stop
button
(thumb trigger) is pressed.
This is used for animation
recording
as described
on the
next page.
• The interval time can be changed
any time (even during recording)
by pressing the TIME LAPSE
button.
Pressing TIME LAPSE again
when the MAN display is
showing will remove the
INTERVAL display from the
screen.
• Rainbow noise (a vertical
colored bar) may occasionally
appear in the picture during
playback.
• The time and/or date can be
recorded by displaying it in the
viewfinder during time-lapse
recording.
29
Animation
Recording
6. Continue shooting the object
in this position for a few more
l-second shots before moving
it.
Note: When preparing an
animated video, it's usually
best to get 3 to 5 shots of the
object in the same position.
You'll want to experiment
with how many shots you take
each time to get smooth
motion.
LAPSE
Button
DISPLA Y
Button
The adjustable time-lapse feature
also lets you create animation
recording-"car
tooning". For
example, you can make an object
appear to move by taking several
still shots of it in different
positions. When the tape is played
back, the object appears animated.
1. Prepare the camcorder to
record as described on
pages 18 and 19.
2. Press the DISPLAy button to
bring the tape-counter (or
time-remaining) display to the
viewfinder. Th_ will let you
see the INTERVAL display
when it appears.
3. Press the TIME LAPSE button
for approximately two
seconds. The first INTERVAL
display will appear in the
viewfinder.
4. Repeatedly press the TIME
LAPSE button until the word
MAN (manual interval) appears
in the viewfinder.
INTERVAL
5.
MAN.
When this display appears, the
camcorder will record for
approximately one second
each time you press the PAUSE
button or the Record Start/
Stop button (thumb trigger).
Position your object as desired
for the first shot, and then
press the thumb trigger (or
PAUSE button). The camcorder
will record briefly and then
pause. Don't move the object
yet.
Note: The optional CRM020 lets you remotely start and stop recording up
to 15 feet away from the camcorder. The plug on the CRM020 is specially
designed so you can attach both the CRM020 and the audio/video output
cable to the camcorder at the same time. You will find this application
especially convenient during animation recording or anytime you want to
control the camcorder from a distance. See pages 44 and 45 for optional
accessories.
CRM020 Remote
Record Start/Stop Switch
(optlorml)
7. Slightly move the object and
shoot a few 1-second shots of
it in this position. Continue
shooting and moving the
object(s) as desired.
8. To stop animation recording,
press the TIME LAPSE button
to remove the INTERVAL
display from the viewfinder.
Notes:
• The camcorder will automatically
move the tape away from the
heads if you do not record
within five minutes. This
prevents the tape heads from
wearing the tape. When you
begin to record after a long
pause, the word STANDBY will
appear briefly in the viewfinder
while the camcorder repositions
the tape against the headwheel.
• Rainbow noise (a vertical
colored bar) may occasionally
appear in the picture during
playback.
To Audio/Video
Inputs on
Audio/Video
Output Cable
(supplied)
TV Monitor
!I 1
Fl_t _nn_-'t
the CRMO20'a
plug to camcorder's AV OUT
Jack. Then plug the
audio/video output cable
Into back of CRM020 plug.
30
- Electronic Indexing
Each time you begin recording (after
the camcorder has been turned off at
least four hours), the camcorder will
automatically record an index mark at
the beginning of the new recording.
Later, when you play back the
indexed tape in a VCR that has a
compatible indexing feature called
"VHS Index Search System", the
invisible marks can be located
automatically. See your VCR's
owner's manual for index playback
instructions.
• NORMAL/WIND
MIC
The word INDEX will appear briefly in
the viewfinder to let you know the
camcorder is recording an index mark.
INDEX
• The camcorder automatically
records an index mark only onceat the start of each day's recording
session (or whenever it hasn't been
used for more than four hours).
• It does not automatically record
index marks each time you stop
and start recording-only
the first
time you turn on the camcorder
and start recording.
Switch
MIC
Switch
The camcorder records whatever
sound the microphone hears.
During outdoor shooting on a
windy day, the camcorder may
record noise that occurs due to
wind.
You can reduce the wind noise
that's recorded on the tape by
sliding the NORMAL/WIND MIC
switch to the WIND position.
Place the switch in the NORMAL
position for normal use.
31
Editing
Features
The CC285 incorporates a package of
advanced editing features to make it
easy and fun to edit your home videos
like a professional. The major editing
features are described here and on the
next three pages.
- Flying Erase Head
A separate erase head is mounted
on the spinning headwheel (hence
the term "flying"). This allows you
to make clean edits without
"glitches" or the "rainbow noise"
that occurs on VCR's and
camcorders without flying erase
heads.
• Flying Erase Head
• Edit Search
• Synchro
Edit
• Audio Dubbing
• Video Dubbing
Edit Search
Edit Search means that you can use
the F.FWD (fast-forward), REW
(rewind), and PLAr buttons to
precisely position the tape even
while the CAMERA/PLAYBACK
switch is in the CAMERA position.
Since you can do this while the
camcorder is in the camera mode,
without the tape unloading, it is
possible to precisely position the
tape for the next scene-eliminating
the "between-scene glitches" that
are common on camcorders
without this feature.
To permit smooth editing while
recording, the F.FWD, REW, and
PLAY buttons can be pressed while
the CAMERA/PLA YBACK switch is in
CAMERA mode.
32
REW
PLAY
FFWD
• Holding REW lets you quickly
reverse scan recorded material.
• Holding F.FWD lets you quickly
forward scan recorded material.
• Holding PLAY lets you view
recorded material at normal
speed. When you release the
PLAY button, the camcorder will
stop playing and prepare to
record at that spot.
- Synchro
Edit
Cl+llonxl
,_
Avsolo
Cable
(not lupplled)
"_
Synchro edit allows your camcorder
to control a compatible VCR (one
that has a camera pause jack) while
tapes are being copied from the
camcorder to the VCR.
AV OUT
Jack
The PAUSE button on the
camcorder causes the VCR to start
and stop recording. This is
especially convenient when you
want to record only selected
segments from a previously
recorded tape.
To Synchro
Edit
I. Connect your camcorder to a
compatible VCR as shown
above. An optional AVS010
Synchro Edit Cable is
required. Optional accessories
are shown on pages 44 and 45.
2. Prepare the camcorder to play
back the tape you want to
copy.
• Slide POWER to turn on the
camcorder.
• Slide CAMERA/PLAyBACK
switch to PLAYBACK
position.
• Press EJECT and insert the
tape.
• Press PLAy, then PAUSE to
put the camcorder in the
Play/Pause mode. (The
AVS0t0 cable must be
connected to VCR before
camcorder will pause.)
Back ol VCR
Note: If your VCR has a single (mono) audio input, connect
either the left or fight audio plug to the audio input on the
VCR.
3. Prepare the VCR to record.
• Press POWER to turn on
VCR.
• Press EJECT and insert
blank tape in VCK.
• Press RECORD to put the
VCR in the Record/Pause
mode.
Note: If the VCR begins to
record instead of pausing,
you will need to change the
position of the switch on
the AVS010 cable. Stop the
VCR, change the switch,
and then press RECORD on
the VCR again.
4. Pressing the PAUSE button on
the camcorder will now start
the camcorder playing and
also start the VCR recording.
5. Pressing PEw, F.FWD, STOP, or
PAUSE on the camcorder
automatically puts the VCR
into Record/Pause
mode. This
allows you to search (forward
or backward), fast-forward, or
rewind the tape in the
camcorder without disturbing
the tape in the VCR.
• To search forward (or
backward), press and hold
F..FWD(or PEW). When you
release the button, the
camcorder will resume normal
playback. To begin dubbing
again, press PAUSE twice. (The
first press pauses the
camcorder, the second press
begins dubbing.)
• To fast-forward (or rewind)
the tape, press STOP then
F.FWD (or PEW). To begin
dubbing again, press STOP,
then PLAY, then PAUSE to
pause camcorder, and PAUSE
again to begin dubbing.
33
Audio
Dubbing
AUDIO
VIDEO
ODu%
The audio dubbing feature lets you
record new audio (sound) on a
previously recorded tape without
erasing the original video (picture).
When you audio dub a tape, the
previous audio is erased and replaced
with the new audio.
The audio dubbing feature also
increases your editing flexibility.
Video segments can first be
assembled, and then a single narration
or music background can be added to
the tape.
-To
The new audio you want to put on
the tape can be added one of three
different ways:
1. Side the POWER button to
turn on the camcorder.
2. Slide the CAMERA/PLAYBACK
switch to the PLAYBACK
position.
3. Insert the tape and press PLAY
and then REWIND to locate a
point on the tape a few
seconds before you want to
begin dubbing.
4. Press the PAUSE button
exactly where dubbing is to
begin. The camcorder will
enter the Play/Pause mode.
5. Press and hold AUDIO DUB
button. Then press PLAY.
Release both buttons.
• from speaking into the camcorder's
built-in microphone.
• from speaking into an external
microphone connected to the MIC
jack. (The built-in microphone is
inoperable when an external
microphone is attached.)
• from an external sound system
connected to the AV IN jack on the
camcorder by using the Audio/
Video Input Cable as shown below.
(Be sure to disconnect external
microphone, if connected, when
recording.)
• See pages 44 and 45 for optional
accessories.
R
L
IN
L
viewfinder to let you know
when the camcorder is audio
dubbing.
7. To end dubbing, press the
STOP button.
Note: You can also dub both the
video and audio simultaneously if
desired. To do so, press AUDIO DUB
and PLAY first, then press VIDEO
DUB and PLAY in step 5 above.
A.DUB
6. To begin dubbing, press the
PAUSE button. The word
A.DUB will appear in the
ROUTL
White Audio Plug
I"-- AUUIO
"-'1
Back of
Audio Dub
/
Audio/Video
Input Cable
(supplied)
"_ _
VCR, Tape Deck,
or CD Payer
AV IN
Jack
Yellow Video Plug
(No Connection)
Note: If the VCR, Tape Deck, or
CD Player has stereo audio outputs
(both R and L jacks) you may need
a Y-Adapter as shown here to
record both left and right channels.
34
I--"
R
IN
I®®
AUDIO "--1
L
R OUT L
_-_
('_
,
_
Y-Adapter
_
at electronic supply
\.to,..
available
Video Dubbing
AUDIO
The video dubbing feature lets you
record new video (picture) on a
previously recorded tape without
erasing the original audio (sound).
When you video dub a tape, the
previous video is erased and replaced
with the new video.
When video dubbing, the source for
the video dub is "whatever you are
seeing in the viewfinder".
The new video you want to put on the
tape can be added one of two
different ways:
• from whatever you focus the
camcorder on and see in the
viewfinder.
• from video coming in through the
camcorder's _v I_jack (using the
andio/video
below).
input cable shown
• See pages 44 and 45 for optional
accessories.
Note: You can also dub both the
video and audio simultaneously ff
desired. To do so, press AUDIO DUB
and PLAY, then VIDEODUB and
pLAy in step 6 at the right. Be sure
to connect both the Audio & Video
Plugs to the VCR, Tape Deck, or
CD Player.
-To Video Dub
1. • You can use the camera
section on your camcorder
for creating the new video
to dub. To do so, remove
the connector cable from
the AVIN jack on the
bottom of the camcorder, if
connected.
• Or, if desired, connect the
source VCR or other video
generating device to the AV
IN jack of the camcorder.
2. Slide the POWER switch to
tam on the camcorder.
3. Slide the CAMERA/pLAYBaCK
switch to the PLAYBACK
position.
4. Insert the tape and press PLAy
and then REWIND to locate a
point on the tape a few
seconds before you want to
6. Press and hold VIDEODUB
button. Then press PLAY.
Release both buttons.
7. To begin dubbing, press the
PAUSE button. The word
V.DUBwill appear in the
viewfinder to let you know
when the camcorder is video
dubbing.
8. To end dubbing, press the
STOP button.
Note: The word V.DUBwill appear
in the viewfinder to let you know
when the camcorder is video
dubbing.
V.DUB
begin dubbing.
5. Press the PAUSE button
exactly where dubbing is to
begin. The camcorder will
enter the Play/Pause mode.
Whirs Audio PlUg
(No ConneXion)
Audio/Vldeo
(_ktd)
/
AV/N
Jack
35
Your camcorder can be connected
several different ways to various
components for playback and
recording.
Vkleo Monitor
('fV wireaudlo/vkleo
outputla_)
When you have a specific application
in mind, use this diagram to quickly
find the page that shows detailed
connection information for that
application.
Reviewing this diagram may also help
you understand the difference between
the camcorder's Av OUTjack and
A v IN jack.
VCR
(oroh'wdevl_w#h
To Recoil
From
/
/
/
/
/
To ROCORI
From VCR
/
/
Gee Page 37
See Page 37
/
Page 38
///
See Psge 39
II
I I
I
Standard "iV
TV Monitor
03/wllh aucllo/v(deo
input I_ks)
• By connecting camcorder to TV
with RF Output Adapter and
watching TV screen.
• By playing the camcorder
watching the viewf'mder.
• By connecting camcorder to
monitor with Audio/Vidco Output
Cable and watching monitor screen.
• By taking tape out of camcorder
and playing it back on another
home VCR.
36
To Witch
Tapcle¢m
TVThm
VCR
VCR
(€onnectedto TV cr gorily)
The tapes you record on your
camcorder can be played back and
viewed in many different ways:
and
To..
Tapm on
TV
Moalter
To Watch
• By connecting camcorder to
another VCR that is already
connected to a TV and watching
the TV screen.
The following pages show you how to
connect your camcorder _ a TV,
monitor, or VCR and explain how to
play back the tapes.
Note: Although you can use the
battery to power the camcorder
during tape playback, you will
probably want to use the AC adapter/
charger if you intend to watch for an
extended period.
lledt ot Cameera_
White Audio
Back of
VCR or
TV Monitor
Plug
OUT
VIDEO
OUT
\
Y_low VideoPlug
/
VAA004
Audio/Video
input Cable
(supplied)
If your VCR (or TV monitor) has
OUT and VIDEO OUT jacks,
can record from the VCR (or TV
monitor) onto a tape in the
camcorder.
AUDIO
you
You will need the audio/video input
adapter cable to connect your
camcorder to the VCR (or TV
monitor).
1. Connect yellow and white plugs to
VCR (or TV).
• Connect yellow plug to TWs
VIDEO OUTjack.
• Connect white plug to TWs
AUDIO OUT jack.
2. Attach inlmt cable to eamcorder.
• Attach other end of cable to
the AV IN jack on the
camcorder.
Note: If you are recording from a
stereo VCR (or TV) with left and
fight AUDIO ouT jacks, you may
need a Y-Adapter in order to
record both left and right channels.
i
3. Attach a power supply to your
omcorder.
• If you plan to record for over
an hour or two, you will
probably want to use the AC
adapter/charger instead of the
battery.
4. Turn on your eam:urder.
• Slide the POWER switch to the
on position.
5. Insert Cassette Tape.
• Press the EJECT button on the
camcorder and insert a
cassette tape with its recordprotect tab intact.
• Details about the recordprotect tab are on page 17.
6. Prelmre eamcorder to record.
• Slide the CAMERA/PLAYBACK
switch to the CAMERA position.
AV_Jack
7. Prepare VCR (or TV).
• Turn on your VCR (or TV)
and tune it to the channel you
wish to record.
• If you are recording from a
tape in the VCR, press the
PLAY button on the VCR to
start the tape playing.
8. Start reoording.
• Press the Record Start/Stop
button (thumb trigger) on the
camcorder to start recording.
9. Stop recording.
• When you are finished
recording, press the thumb
trigger again (or press the
PAUSE button) to stop
recording.
Y-Adeptor
/(available
from _4mtront¢
/
AUDIO
f
_DEO _-_
OUT
___
_"Back of
Input Cable
Yellow Video Plug
AV lN Jack
VCR or
TV Monit_
37
- How to Connect
for Playback
Your Camcorder
to a Standard 'IV (without AUDIO/
Antenna
Back of TV
VIDEO
input jacks)
Back of Camcorder
®
AVOUTJ_k
Follow the steps below if you have a
standard 'IV that does not have
AUDIO/ VIDEO input jacks. Refer to
page 39 if you have a monitor/
receiver with input jacks.
You will need the RF output adapter
and coaxial RF cable that came
packed with your camcorder. If your
antenna cable is the flat twin-lead
type that is attached by two screws,
you will also need the 300/75-ohm
transformer.
Q
Disconnect the VHF antenna
from your TV set. (You can
leave the UHF wires alone.)
O
Connect your VHF antenna to
the RF input adapter. (This step
is not necessary unless you plan
to leave the RF adapter hooked
up to your TV set.)
Attach one end of the coaxial
RF cable to the TV connector on
the RF adapter.
[_)
Q
A. If your antenna cable is a
round 75-ohm cable, connect
it to the ANT connecter on
the RF adapter.
B. If your antenna cable is a flat
twin-lead, you will need the
300/75-ohm transformer that
was packed in your
camcorder. Connect the flatlead connectors to the screw
terminals on the 300/75-ohm
transformer. Then connect the
transformer to the ANT
connector on the RF adapter.
38
®
Connect the other end of the
coaxial RF cable to the VHF
terminal on the back of your TV.
(If your TV has VHF screw
terminals, connect the adapter's
flat-lead connectors to the screw
terminals.)
Plug the multi-pin connector
fitting on the RF adapter into
the AV OUT jack on the
camcorder. To aid connection,
match the tabs on the fitting
with the notches on the
camcorder jack. Don't force the
fitting. If it does not slide in
easily, check your marks and try
again. (If the camcorder is used
as a camera while connected to
the TV, be sure to turn the set's
volume down to prevent a highpitched squeal caused by
feedback.)
Set the switch on the RF adapter
to channel 3 or 4, whichever is
not used as a broadcast channel
in your area. Turn on the TV
and tune it to the channel you
have chosen.
Q_)
During playback, you may fine
tune the TV channel if necessary.
(For details of playback
operation, refer to page 40.)
For normal TV viewing, you may
leave the RF adapter hooked up
to the TV set. Just disconnect the
adapter from the camcorder or
turn off the camcorder's power.
-How to Connect Your Camcorder
Video Monitor for Playback
to a
Back of
Camcorder
Back of TV
Monitor
Here's what you can do when your
camcorder is connected as shown
here.
(1_
White Plug
AUDIO
IN
VIDEO
• When you play tapes in your
camcorder, you'll be able to
watch them on the monitor
screen as well as through the
viewfinder.
Audio/Video
Output Cable
Yellow Plug
• You'll also be able to monitor
what the camcorder lens sees
whenever the camcorder is
turned on-even when the
camcorder is not recording. This
connection could be used for a
surveillance system.
Note: If your TV Monitor has left
and right AUDIO 17/jacks, you may
need a Y-Adapter (shown on
page 37) to hear both channels.
®
CAUTION: Do not force the
connector. Match the tabs on the
connector to the notches on the
camcorder jack. If the connector
does not side in easily, check
your marks and try again.
Your camcorder is now connected
to the monitor for tape playback.
Connect the white audio plug to
the AUDIO IN jack on the back of
the monitor.
If you have a TV monitor that has
VIDEO IN jacks, you can
connect your camcorder using the
audio/video output cable as shown
here instead of the RF output
adapter (as shown on page 38).
AUDIO/
Connect the yellow video plug to
the VIDEOIN jack on the back of
the monitor.
Plug the multi-pin connector
the AV OUTjack on your
camcorder.
-How
to Connect
VCR for Playback
Your Camcorder
and Tape
Here's what you can do when your
camcorder is connected to a VCR
and the VCR is connected to a TV
or monitor.
• When you play tapes in your
camcorder, you'll be able to
watch them on the TV screen
through the VCR.
• You'll also be able to monitor
what the camcorder lens sees
whenever the camcorder is
turned on-even when the
camcorder is not recording. This
connection could be used for a
surveillance system.
• You'll also be able to copy a
tape with the VCR while it's
playing in the camcorder. And
you can monitor the recording
on the TV.
If you have a VCR that has
AUDIO/VIDEO IN jacks, you can
connect your camcorder using the
audio/video output cable as shown
here instead of the RF output
adapter (as shown on page 38).
AVOUTJ_k
into
For details of playback
refer to page 40.
operation,
to a
Copying
Back of
Camcorder
Back of VCR
White Plug
IN
VIDEO
Audio/Vldeo
Yellow Plug
Note: If your VCR has left and
right AUDIO IN jacks, you may need
a Y-Adapter (shown on page 37) to
hear both channels.
@ Connect
the white audio plug to
the AUDIO IN jack on the back of
the VCR.
@ Connect
the yellow video plug to
the VIDEOIN jack on the back of
the VCR.
®
G
A V OUT Jack
connector to the notches on the
camcorder jack. If the connector
does not slide in easily, check
your marks and try again.
Your camcorder is now connected
to the VCR for tape playback and
tape copying.
For details of playback operation
and tape copying, refer to page 41.
Plug the multi-pin connector into
the AV OUT jack on your
camcorder.
CAUTION: Do not force the
connector. Match the tabs on the
39
• Camcorder
Recording
Use your camcorder's zoom to help
you focus manually. Before you start
recording, zoom in on your subject,
adjust the Focus Ring until you see a
clearly focused image in the
viewfinder, then zoom back to the
desired angle of view. Provided the
subject-to-camcorder
distance does
not change, the subject will remain in
sharp focus over the entire zoom
range. REMEMBER:
It's easier to
make professional-looking
videos if
you check the focus before you start
recording.
Keep your auto focus window clean
and unobstructed to help assure
proper auto focus operation.
Don't
Lever
zoom
speed
more
- Traveling
Tips
move your camcorder's
Zoom
quickly when controlling the
lens manually. A slow, constant
gives your manual zooms a
professional look on tape.
Try to make sure indoor scenes you
record are well-hi. This improves
picture quality and color
reproduction.
Avoid tong "still" shots of landmarks
and scenic attractions. Your
recordings will be more interesting if
they include people and detail. "'Local
color" will give your travel videos
lasting appeal. Consider taping a
familiar or landmark scene from an
unfamiliar vantage point to give your
tape added interest. Remember to
check your lighting before recording.
Try to avoid taping backlit subjects
indoors. Bright light behind your
subject may cause it to appear very
dark and low in detail. Adjusting your
IRIS control can help overcome this
problem.
Include close-up shots of individuals
when taping a family outing or other
group functions. These close-ups make
your video memories special.
Be aware of video and audio
backgrounds. Background visual
details you barely notice while you're
taping may show up as visual
"'clutter" when you review your taped
scene. Background noises (especially
television sets and radios, household
appliances, traffic sounds) can detract
from the sounds you want to record.
And REMEMBER:
Don't bump or
tap your Camcorder's microphone
while you're taping, because this
sound will be recorded on your tape!
Don't move the camcorder rapidly
from side to side while you're
recording. A steady, gradual "pan"
avoids blurring and jitter in your
taped scene.
Keep your camcorder level while
taping. Otherwise, your scenes will
appear tilted. Keep a close eye on
this in your viewfinder!
Fading in and out between scenes can
make your videos appear more
professional.
Practice recording under a variety of
; lighting conditions. This will help
prepare you to respond whenever you
see a scene you want to tape.
. Shutter
Speed Tips
By increasing the shutter speed,
you'll be able to watch better stopaction and stow-motion pictures
when you play the tape back on a
good-quality home VCR that has
these special effects.
The higher the shutter speed, the
less blurring you'll see during stopaction, frame advance, and slowmotion. The faster your subject is
moving, the higher you'll want to
set the shutter speed.
42
The higher the shutter speed, the
more light is required to make a
good picture. So as you increase
the shutter speed, you may have to
increase the amount of light. You
will probably want to use the
highest shutter speed only in bright
outdoor light.
The shutter speed display in the
viewfinder will flash if you need to
reduce the shutter speed (or
increase the amount of light) while
recording.
Tips
CAUTION: If you wish to operate
the AC adapter/charger
on a power
source other than 120 volts, 50/60
Hz, use only a transformer-type
power converter. Do not use "solidstate" or "switching-type" power
converters. They will damage your
AC adapter/charger. An optional
CPS08 adapter/charger may be
purchased from your RCA dealer.
The CPS08 is designed for use on
100-240 volts, 50/60 Hz. See
pages 44-45 for optional
accessories.
Jot down your camcorder's serial
number and keep this note separate
from your equipment when
traveling. If your carncorder is lost
or stolen, you will be able to
identify it.
Use extra care and caution to avoid
damage to your camcorder and
accessories when operating them at
a beach or pool. Spray, sand, and
dust should be avoided. Clean your
lens gently and thoroughly if it has
been exposed to the elements.
Remember to use only proper lens
cleaning supplies available at
camera stores to protect your lens.
Carry your camcorder in a proper
case when traveling. (See page 44
for the specially designed soft and
hard carrying cases.) An ordinary
suitcase or carry bag doesn't offer
the protection and custom fit your
camcorder needs. For safety, treat
your camcorder as carry-on
baggage to protect it from rough
handling.
-Proper Care of Your Camcorder
• Be especially careful to keep dust
from entering the camcorder's
cassette door. Dust and grit are
abrasive and will cause excessive
wear both of tapes and of the
recording/playback
heads.
• We recommend that RCA video
cassettes be used with this unit.
These tapes have been
manufactured
to our critical
specifications. Use of tapes not
meeting these specifications
could considerably reduce the
performance of your camcorder.
rThings
• Use of poor quality tapes can
contaminate the video heads.
resulting in a snowy ptcture or
no picture at all during
playback.
• Using an RCA headcleaner
(.model AV009W) may
satisfactorily clean the heads and
improve the picture. If a snowy
picture or no-picture condition
persists, consult your authorized
RCA Servicenter.
• Never attempt to force open the
cassette door. If the battery
reaches its empty level during
recording, the camcorder will
shut off but the battery should
have enough reserve power to
eject the cassette when you press
the EJECT button. If the
camcorder does not eject the
cassette, do not attempt to force
open the cassette door. This will
damage your camcorder. To
remove the cassette, simply
power your camcorder with the
AC adapter/charger
or recharge
the battery before attempting to
eject the tape.
• Do not use the camcorder in
extremely humid environments,
• Do not use the camcorder for
extended periods in temperatures
below 40_F or above 95°F.
• Do not.expose the camcorder or
AC adapter/charger
to rain or
moisture. If either component
becomes wet, immediately turn
To clean the lens, always use
lens-cleaning tissues and a
commercially prepared cleaning
solution designed for use on
camera lenses. The RCA AC026
Lens Care Kit contains both of
these items. Improper cleaning
can scratch the lens. Do not
touch the lens with your fingers!
The oil from your skin can
damage the lens.
"Storing Your Camcorder--
to Avoid
• Do not attempt to disassemble
your camcorder. There are no
user-serviceable parts inside.
• Always replace the lens cap on
the lens when the camcorder is
not in use.
off power and take the unit to
an Authorized RCA Camcorder
Servicenter.
• CAUTION: If you wish to
operate the AC adapter/charger
on a power source other than
120 volts, 50/60 Hz, use only a
transformer-type power converter.
Do not use "solid-state" or
"switching-type" power
converters. They will damage
your AC adapter/charger. An
optional CPS08 adapter/charger
may be purchased from your
RCA dealer. The CPS08 is
designed for use on 100-240
volts, 50/60 Hz. See pages 44-45
for optional accessories.
• Avoid operating your camcorder
immediately after moving it from
a cold location to a warm
location. Give the camcorder
1-1/2 to 2 hours to reach a
stable temperature before
inserting a video cassette. When
moved from a cold area to a
warm location, moisture may
condense on the head drum
inside the machine, This
moisture could cause the tape to
I
• Store and handle your camcorder
so that it is not subjected to
swinging, shaking, or dropping.
The camcorder can be damaged
by improper storage or handling.
• Don't store the camcorder in
temperatures below - 22°F or
above 149°F.
• Always remove the cassette and
AC adapter/charger
or battery
from the camcorder when the
camcorder is not in use.
• Retain the original carton for
future storage or shipping
purposes.
stick to the headwheel and
damage the headwheel or tape.
• Only use 9.6 volt batteries and
accessories that are especially
designed for your cameorder,
Use of the wrong accessories
could cause damage to the
camcorder.
• Do not operate your camcorder
in a strong magnetic field.
Otherwise, you risk interference
to or erasure of recorded
information.
•Tape Tips
Don't try to use a tape if it has
been damaged or exposed to
moisture. The tape may jam or
damage your camcorder.
Remember to label your tapes
before storing them. Preparing your
label before you use your tape
helps assure that you will know
what it contains.
Remember to break off the recordprotect tab on your cassettes after
making an important recording.
This will help you safeguard crucial
tapes from accidental erasure.
Be careful not to misplace tape
boxes. These are essential for
proper tape storage. If a tape box
becomes wet, do not use it. It can
damage your tape and camcorder.
Don't leave your camcorder and
tapes in a car for more than a brief
period. Excessive heat or cold can
damage them.
43
A comprehensive
line of accessories
enables you to build the camcorder system
that meets your individual interests,
talents, and needs. Here are some of the
accessories that will help you achieve
professional results in your home video
productions. These and others are
available through your RCA camcorder
dealer.
VTU090
Titler
AC028 Soft Camcorder
Lets you quickly add titles to your video
tapes. Allows you to select each character
by rotating the dial to a desired position.
Adds titles up to 48 characters per page.
Includes memory to store up to l0 pages
and 50 frequently used words. Also
permits 2 character sizes, allowing you the
versatility to create professional titling
results.
Case
Designed especially to provide protection
and utility for camcorders and most
accessories. Rugged fabric lined with soft,
non-abrasive material and generous
padding. Has three outside pockets with
storage for lens fihers, adapters, batteries,
and tape.
KK050 Rugged
Hard Case
Sturdy case designed especially for safe
transport of camcorder with custominterior for holding numerous accessories.
AVS010
Synchro
Edit Cable
Can be used to copy tapes from
camcorder to compatible VCR (one with a
Camera Pause jack). With this cable, the
PAUSE button on the camcorder also starts
and stops the VCR during recording.
WM002
System
Character
Wireless
Record Start/
Allows you up to 15 feet of mobility from
your camcorder. Lets you control the
stop/start pause functions while appearing
in the recording at the same time. See
page 30 for connection diagram.
44
Microphone
A compact and lightweight system which
allows you to capture sounds up to 100
feet from your camcorder. Includes a highperformance
omni-directional
microphone
and transmitter. Microphone clips to your
subject's clothing while transmitter fits
into a pocket or onto a belt. A powerful
13" antenna on the receiver provides
maximum signal pickup within a lO0-foot
range.
WAL01A
Wide Angle Lens
Expands your camcorder's field of view by
a factor of .6 thus affording you wide
panoramas without panning. Comes in a
vinyl snap-closure case with a padded
interior. Includes three step rings so you
can also use it with other camcorders.
AC029 Special
Effects Lens Kit
Includes four filters and two step rings.
The Center-Focus Filter gives sharp focus
to center of picture and softness to edges
for a vignette effect. The Rainbow Filter
creates a multi-color halo around a bright
spot in the picture. The Four-Point
Starburst Filter adds bursts of hght to
bright spot in picture. The Polarizing
Filter reduces glare caused by reflections
and darkens and enriches blue sky while
producing spectacular cloud backgrounds.
The Step-Rings adapt the 52ram filters to
also fit camcorders with 46mm and 49ram
lenses.
LX152A Lens Extender
(Telephoto)
FSA036A
Increases your camcorder's lens
magnification power 1.5 times throughout
its zoom range. Comes in an attractive
snap-closure vinyl case with padded
interior. Includes three step rings so you
can also use it with other camcorders.
Enables you to transfer slides onto VCR
tape. Includes four step rings, three sizes
of frame holders, and one filter. You can
use the Slide Adapter on any model of
RCA camcorder or camera except CC004
and CC006.
Removing
CRM020 Remote
Stop Switch
Generator/
Slide Adapter
Lens Hood
The Lens Hood can be removed so
you can attach optional accessories
like the Wide-Angle Lens, Lens
Extender, Lens Filter Kit, and
Slide Adapter.
The correct way to remove the
Lens Hood is shown here. Do not
grasp the end of the Lens Hood.
To remove Lens Hood, put hand
flat against lens hood and turn it
counterclockwise.
Correct
Incorrect
To order the RCA video accessories described in
the Owner's Manual, contact your local RCA
Video Accessories Dealer: or you may use this
detachable order form tu order direct-by-mail
the
accessories listed here.
Accessory Order Form for
RCA Camcorder Model CC285
Model
Price
Nil.
Each*
Description
Total
Lens Care Kit
AC026
$
995
SoB Camcorder Case
AC028
$
8995
Special Effect Lens Kit
AC029
$ 5995
Deluxe Tripod
AC031
$ 99.95
VHS Head Cleaner
AV009W
$
Rechargeable Long@lay
Battery
AV046
$124,95
Synchro Edit Cable
AVS0 n)
$ 3995
Battery Connector
BCC030
$
Rechargeable Battery
BP96FS
$ 6995
Reehargeable Battery
BP96FL
$ 9999
Single-Well
AC Adapter/Charger
CPS08
$18995
RF Output Adapter
CRF030
$ 49.95
Remote Record Stop/Start
Switch (available 3/1/89)
CRM020
$ 34.95
I)12 (Banery)
Car Cord
I)CC09b
$ 69.95
Y-Adapter Power Cable
DCY010
$
Dual-Well AC Adapter/Charger
DWC010
$199.95
Slide Adapter
FSA036A
$119.95
Lens Extender (Telephoto)
LXI52A
$139.95
Audio/Video
VAAO04
$ 25.95
Portable DC Light
VDC050
$ 99.95
Character Generator/Titler
VTU090
$149.95
Wide Angle Lens
WAL01A
$139
Wireless Microphone System
WM002
$15995
Audio/Video
*Prices
Input Cable
Output Cable
are subject
to change
194128
without
Qty, Amounl
- UNITED
Detach and mail order form with credit card
information, money order, or check in U.S.
currency (made payable to Thomson Consumer
Electronics, Inc.) to this address:
1995
RCA Video Accessories
PO Box 8419
Ronks, PA 17573
For more information on these accessories (or
current prices), write to the following address:
Video Accessories Customer Service
Thomson Consumer Electronics, Inc.
Distributor & Special Products
2000 Clements Bridge Rd
Deptford, NJ 08096-2088
1495
-INTERNATIONAL
!
95
$ 3061)
notice
International
Customer Service
Thomson Consumer Electronics, Inc.
Distributor & Special Products
2000 Clements Bridge Rd
Deptford, NJ U.S.A. 08096-2088
We are required
by law to collect the appropriate
sales tax lot each individual
state, courtly, and
locality to which the merchandise
is being senl.
Insurance
and Handling
........
S
.95
8
3.00
Total Amount Enclosed
Use VISA or Master_'ard prel_rably.
Money older or
check must be in U S currency
only. No COD t,r
CASH
Allow 8 weeks tbr delivery
All accessories
are subject to availability
Where applicable,
we will ship a super,eding
Please complete
ORDERS
This offer is valid only in the 50 United States. For
international
orders, please send your request for
quotation (not an order) to:
Total Merchandise
Sales Tax ..............
Shipping
STATES ORDERS
14.95
nu_del
other side also
I
• Troubles sometimes are caused by simple "faults'"
that you can easily correct without the help of a
service technician by first checking a few basic
remedies.
• Before you call or take your camcorder to an
Authorized RCA Camcorder Servicenter, look below
for the type of trouble you are experiencing. Then
perform the simple checks and adjustments listed
for that trouble.
No power
(ON indicator
on)
will not come
• lfyour camcorder is still in warranty, these checks
and adjustments could save you time and the cost
of an unneeded trip to the servicer. They also could
save you the cost of a diagnosis not covered by your
warranty. (See "What does your warranty not cover"
on the back cover page.)
• If service should be necessary, the warranty
information on the back cover page lists what your
warranty covers and explains how to get service.
• If using battery, maybe it needs to be recharged.
• If using AC adapter/charger,
make sure it is plugged into a working outlet.
Won't record or playback
• If power ON indicator is blinking, there is moisture in camcorder.
and wait for light to stop blinking.
• Maybe there's no cassette in camcorder.
• Try ejecting and re-inserting cassette,
• Maybe the cassette tape is broken, try another cassette.
• Maybe you've reached the end of the cassette, try rewinding it.
Won't playback
• CAMERA/PLAYBACK switch must be in PLAYBACK position.
Won't record
• Maybe record-protect tab has been removed from cassette. (See page 17.)
• CAMERA/PLAYBACK switch must be in CAMERA position.
No picture in viewfinder
• Remove lens cap.
• Maybe AUTO IRIS control is closed. Rotate control to AUTO (center "click") position.
Tape stops during rewind or
fast forward
• Tape-counter memory may be on. Whenever an "M" appears behind the tapecounter display, the camcorder will stop rewinding (or fast forwarding) when counter
reads 0000. Press REW or F.FWD again to continue. Press DISPLAY button to turn off
memory.
Camcorder remains in stillframe mode
• Press PA USE to return to normal playback.
Poor picture quality during
recording
• Insufficient light. If picture looks too dark in the viewfinder
AUTO (center "click") position, add light to scene.
Poor auto-focus
• Make sure AUTOFOCUSswitch is in AUTO position.
• Make sure operator is not covering auto-focus window during recording.
• Maybe subject is dark or behind glass. Auto-focus may not work under these
conditions. Slide AUTOFOCUSswitch to MANUAL for manual focusing.
• Maybe lens is smudged and image appears unfocused.
• Maybe viewfinder eyepiece focus is misadjusted. (See page 20.)
• Maybe camcorder is in macro-focus mode. Press and hold zoom button "T" to
release macro-focus.
• Don't use auto-focus with wide-angle or telephoto adapters.
operation
Leave power on
with the 1RIs control in
Poor picture quality during
playback
• If picture contains black-and-white
streaks, adjust TRACKING control to correct. This
is common when tape was recorded on a different VCR.
Flashing shutter-speed
display in viewfinder
• There is not enough light to record at this shutter speed.
• Slide SHUTTER speed button to reduce speed.
46
Picture is too dark
Power ON indicator
flashing
Recorded
Viewfinder
of focus
For best results, only use higher shutter speeds for outdoor
intend to play back in slow motion.
is
audio is too low
displays are out
Excessive moisture in camcorder.
action you specifically
Leave power on until light stops flashing.
Maybe MIC WIND/NORMAL switch was not returned to NORMAL position after
outdoors recording.
Maybe subject was too far from camcorder. For long distances, try using a wireless
microphone.
Try adjusting eyepiece focus control.
Can't see shutter-speed or
index display in viewfinder
CAMERA/PLAYBACK switch must be in CAMERA position.
Press DISPLAY button to bring displays to viewfinder.
Date and/or time were
recorded on tape
Date and/or time will be recorded on tape whenever they appear in the viewfinder.
Press DATE/TIME button to remove them from viewfinder when recording.
47
AC Adapter/Charger
...........
Inside Front Cover,5,14
Accessories (Included)
................................
4
Accessories (Optional)
............................
44-45
Accessory Order Form ...............................
45
Accessory Shoe .......................................
6
Adapter/Charger
...............
Inside Front Cover,5,14
ADVANCE (Date and Clock Set) Button ...........
8,22
Animation Recording
................................
30
Attaching Adapter/Charger
..........................
14
Attaching Charged Battery ...........................
15
AUDIO DUB Button .............................
12,34
Audio Dubbing ......................................
34
Auto Focus .........................................
24
Auto Focus Window .................................
24
AUTO IRIS Control ..............................
5,8,25
A V IN (Audio/Video)
Jack ....................
13,36,37
A V OUT (Audio/Video)
Connector
..........
10,36,38,39
Battery (Clock) ....................................
4,22
BATTERY
Eject Lever ...............................
7
Battery Power ....................................
15-16
Battery Type (Clock)
..............................
4,22
Camcorder Care .....................................
43
CAMERA/PLAYBACK
Switch .................
5,13,19
Car Cord ............................................
16
Care and Storage (Cassettes)
.........................
17
Care of Camcorder
..................................
43
Cassettes
............................................
t7
Cassette (Care and Storage) ..........................
17
Cassette Door .......................................
10
Cassettes (Inserting/Removing)
.......................
17
Caution (Cold to Warm) .............
Inside Front Cover
CCD Image Sensor ...................................
6
Charging Your Battery ...............................
15
Checking Battery Power .............................
16
Clock Battery
.....................................
4,22
CLOCK BATTERY
Compartment
..............
4,10,22
Connections (Quick Reference) .......................
36
Contents
.............................................
1
Controls (Location and Use) .......................
6-13
Date (Setting)
.......................................
22
Date and CLOCK Set Buttons (SELECT and
ADVANCE)
.....................................
8,22
DA TE/TIME
Buttons .............................
8,22
DC Car Cord ....................................
10,16
DC IN (9.6V) Jack ...............................
10,16
Detailed Recording Steps .........................
18-19
Dew Indicator .......................................
12
DISPLAY
Button ..............................
8,29,30
Displays in Viewfinder ...............................
21
Dubbing (Audio and Video) .........................
35
Dubbing (Audio) ....................................
34
Dubbing (Video) ....................................
35
EAR (Earphone) Jack ................................
12
Edit Search ..........................................
32
Editing Features ..................................
32-35
EJECT Button ....................................
5,12
Electronic Indexing ..................................
31
Electronic Viewfinder ..............................
7,20
Erase Protection .....................................
17
EVF (Electronic Viewfinder)
.......................
7,20
48
Eyepiece Focus Control ...........................
5,6,20
F.FWD (Fast Forward) Button ....................
12,32
FADE Button ..................................
8,19,25
Fading in and Out of Scenes .........................
25
Features ............................................
2-3
Features (Recording) ..............................
20-3 I
Flying Erase Head ...................................
32
Focus Ring ........................................
6,24
Focusing Your Camcorder
...........................
24
Head Cleaner ........................................
17
Indexing
............................................
31
Inserting Cassettes ...................................
17
Installing Clock Battery ............................
4,22
Interval Recording ................................
29.30
Introduction
..........................................
1
Lens .................................................
6
Lens Cap .............................................
5
Lens Cap Snap .......................................
5
Lens Hood (Removing)
..............................
44
Limited Warranty
..........................
Back Cover
Location and Use of Controls ......................
6-13
Macro Button .....................................
6,24
Macro Focus ......................................
6,24
Making Better Videos ................................
42
Manual Focus .......................................
24
Memory Feature .....................................
27
M1C (External Microphone Jack) ....................
10
MIC (WIND/NORMAL)
Switch ..................
10,31
Moisture (Caution)
..................
Inside Front Cover
NORMAL/WIND
MIC Switch ...................
10,31
ON (Power) Indicator .............................
12,19
Operation Steps (Quick) ..............................
5
Optional Accessories ..............................
44-45
Order Form (Accessory)
.............................
45
Owner's Club .........................................
1
PAUSE Button ......................................
12
PLAY Button ..................................
5,12,32
PLA YBACK/CAMERA
Switch .................
5,13,19
Playback Connections .............................
38,39
Playback Connections to a VCR .....................
39
Playback Connections to a Monitor
..................
39
Playback Connections to a Standard TV ..............
38
Playing Tapes Through a TV or Monitor .............
40
Playing Tapes Through the Viewfinder
...............
40
Playing Tapes Through a VCR .......................
41
POWER Switch ................................
5,12,19
Power Zoom Buttons
...........................
6,10,23
Powering Your Camcorder
........................
14-16
PUSH/A UTO Focus Switch .......................
6,24
Quick Operation Steps ................................
5
Quick Review .......................................
23
RCA Owner's Club ...................................
1
Record-Protect
Tab ..................................
17
Record Start/Stop Button ..........................
5,10
Recording Features ...............................
20-31
Recording From a VCR .............................
37
Recording From a Monitor
..........................
37
Recording Steps (Detailed) ........................
18-19
Recording Times ....................................
17
Recording Tips ......................................
42
Remote Record Start/Stop Switch ....................
30
Removing Cassettes ...............................
10,17
Removing Lens Hood ................................
44
RESET/T-160
Button .............................
8,27
REVIEW Button ...............................
8,19,23
REW (Rewind) Button ............................
12,32
RF Adapter
.........................................
38
Safety Registration
..................
Inside Front Cover
SELECT (Date and Clock Set) Button .............
8,22
SELF TIMER Button .............................
8,29
SHUTTER Speed Switch ..........................
8,28
Shutter Speed Tips ..................................
42
Shutter Speeds .......................................
28
Specifications
...............................
Back Cover
STOP Button ....................................
12,19
Storing Your Camcorder
.............................
43
Synchro Edit ........................................
33
T and W (Power Zoom) Buttons ................
6,19,23
Table of Contents
....................................
1
Tally Light ...........................................
6
Tape Copying ....................................
39,41
Tape Counter
.......................................
27
Tape Counter Display
...............................
27
Things to Avoid .....................................
43
Thumb Trigger ....................................
5,10
Tilt Adjustment (EVF) ...............................
20
Time (Setting) .......................................
22
TIME LAPSE Button ..........................
8,29,30
Time Remaining Display .............................
27
TRACKING Control .................................
12
Traveling Tips .......................................
42
Trouble Checks ...................................
46-47
TV/Monitor
Playback
...............................
40
Unpacking Your Camcorder
..........................
4
Variable Shutter Speeds ..............................
28
Video Cassettes .......................
_..............
17
VIDEO DUB Button .............................
12,35
Video Dubbing
......................................
35
Viewfinder Displays
.................................
21
Viewfinder Playback .................................
40
W and T (Power Zoom) Buttons
................
6,19,23
Warranty ...................................
Back Cover
Warranty Registration
................................
1
What Your Camcorder Will Do .....................
2-3
WIND/NORMAL
M1C Switch ...................
10,31
Y-Adapter ........................................
34,37
Zoom King ........................................
6,23
Zoom King Lever ..................................
6,23
49
General
Camera
Power
requirement:
9.6VDC
Power consumption:
Weight:
026
9.6 watts (normal)
Image
5.3 Ibs. (2.4 kg)
Dimensions:
4-15/16"
state
(W) x 9-3/16"
(H) x 14-5/8"
Format:
(D)
Tripod
525
Sensor:
CCD
Mount:
Lens:
Section
Record/Playback
One
Flying
Headwheei
Video
solid-
lmager
One
1/4"
x 20 threaded
Erase
EIA
heads
Note: All teatures and specifications are
subject to change without notice.
Head
Diameter:
Standard
62ram
NTSC
This digital apparatus does not exceed
the class B limits for radio noise
emissions from digital apparatus set
out in the Radio Interference
Regulations of the Canadian
Department of Communications.
L'interfi_rence radio_lectrique g_ni:r_e
par cet appareil digital ne d6passe pus
les limites de la classe B _dict+es par le
R_glement sur les perturbations
radio_lectriques du Minist_re Canadien
des Communications.
46ram
System:
record/playback
Cylinder
Signal:
Frames
fl.2
Diameter:
video
Fields/30
1/2" high-resolution,
6:1 (9-54mm)
VHS
Two
Lines/60
hole
x 233 x 372 mm)
Video Recorder
Seclion
Scanning:
Color
What does your warranty cover:.
• Any defect in material or workmanship.
For how long after your purchase:
• Ninety days for labor charges.
• One year for parts.
The warranty period for rental eamcorders begins with the
first rental
What will we do:
• Pay any Authorized RCA Camcorder Servicenter the labor
charges to repair your Camcordar.
• Provide new or, at our option, rebuilt replacement parts
and pickup tube for the Authorized RCA Camcorder
Servioenter to make the repairs.
How do you get service:
• Take your eamcorder to any Authorized RCA Camcorder
Servicenter. For their names and locations, ask your dealer,
look in the Yellow Pages, or call 1-800-336-1900.
• Show the service technician your evidence of purchase
date.
• Pick up your camcorder when repairs are completed.
What does your warrantynot cover:.
• Customer instruction. Your Owner's Manual provides
information regarding operating instructions and user
controls. For additional information, ask your dealer.
• Cleaning of video/audio heads, which is normal
maintenance.
• Damage from misuse or neglect.
• Camcorders which have been modified or incorporated into
other products.
• Camcorders purchased or serviced outside the USA.
• Battery for clock.
How does state law relate to this warranty:
• This warranty gives you specific legal rights, and you may
also have other rights which vary from state to state.
What if you purchased your camcorder in Canada:
• Refer to the Canadian warranty.
nC ll
Si un livret d'instructions
en fcanqais n'est pa_ inclus
a'4ec votre appareil,
voug $3ouvez 6R obte_ir un
(INDIQUER
LE NUMERO
DE MODELE, VOTRE NOM,
MOTRE ADRESSE)
en vous adceSsant _:
Thomson _lectronique
Grand Public du Canada,
Service _
6onn_es teChnlque_
6540 Tcmken Rd.
MIMls_uga.
Ontario, Canada
L5T 2E9
For your nearest RCA dealer
or Authorized
RCA
Servicenter
call
toll free in U.S.A.
ET
Inc. nc
1 800 336 1900
©1989 Thomson Consumer Electronics. Inc.
Trademark(s) ® Registered
Marca(s) Registrada(s)
Printed in Japan
Job #A-70221
Part Number 89-CC285-1
RC_
600 N Sherman Dr, PO Box 1976
homson Consumer Electronics,
Inc.
Indianapolis,
IN 46206-1976
E72118/E97130
4632344