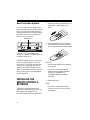
1
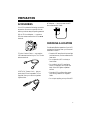
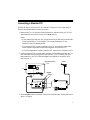
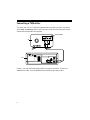
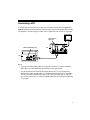
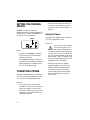
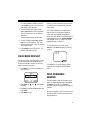
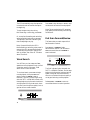
owner’s manual
AC/DC VIDEO
CASSETTE PLAYER
FEATURES
Your RCA Model 50 AC/DC Video Cassette
Player (VCP) is lightweight, easy to use, and
includes a remote control. Its dual power
options let you enjoy it almost anywhere —
at home or the office, or even in your
vehicle. The VCP’s compact size and
front-loading design are especially ideal for
vans, RVs, or campers.
Dew Protection System — prevents the
VCP from playing a tape when the system
senses moisture on the tape heads.
Soft-Touch Controls — let you easily
control the VCP’s functions.
Note: The remote control requires two AAA
batteries (not supplied) for power.
Its other features include:
Automatic Power-On — automatically
turns on the VCP’s power when you load a
video cassette.
Automatic Play Speed Selection — senses
the tape’s recording speed and automatically
adjusts the VCP for proper playback.
Automatic Rewind — rewinds the tape
when it reaches the end.
Automatic Repeat — lets you set the VCP
to automatically rewind and replay the video
tape when it reaches the end.
Quick Start Mechanism — automatically
starts playback when you load a prerecorded
video cassette.
We recommend that you carefully read this
owner’s manual. It was prepared to assist
you with the initial setup procedures and to
guide you in the everyday operation of the
VCP.
Copyright Information: Most material
performed in public, such as concerts, plays,
and movies, or distributed on prerecorded
video tapes is copyrighted. The
unauthorized recording or duplication of
copyrighted material is a violation of the
copyright laws of most countries and such
duplication may result in fines and/or
imprisonment. Note, however, that in the
United States, it is not a violation of U.S.
copyright laws for a consumer to record a
broadcast television program for private
(in-home) viewing.
Visual Search — lets you play a tape at a
faster speed to quickly locate a specific
portion of the tape.
Freeze-Frame — lets you pause the tape
during playback so you can view a single
frame.
Digital Auto Tracking — automatically
aligns the playback heads to the recorded
track.
©1999, 2002 RadioShack Corporation.
All Rights Reserved.
2
WARNING:
To reduce the risk of fire or
shock hazard, do not expose this product to rain
or moisture.
CAUTION
RISK OF ELECTRIC SHOCK.
DO NOT OPEN.
!
CAUTION: TO REDUCE THE RISK OF
ELECTRIC SHOCK, DO NOT REMOVE
COVER OR BACK. NO USER-SERVICEABLE PARTS INSIDE. REFER SERVICING
TO QUALIFIED PERSONNEL.
This symbol is intended to alert
you to the presence of uninsulated dangerous voltage within
the product’s enclosure that might
be of sufficient magnitude to constitute a risk of electric shock. Do
not open the product’s case.
!
This symbol is intended to inform
you that important operating and
maintenance instructions are
included in the literature accompanying this product.
3
CONTENTS
Preparation ............................................................................................................... 5
Accessories ................................................................................................................... 5
Choosing A Location .................................................................................................... 5
Making Connections .................................................................................................... 6
Connecting a Standard TV ..................................................................................... 7
Connecting a TV/Monitor ...................................................................................... 8
Connecting a VCR ................................................................................................. 9
Setting the Channel Switch ......................................................................................... 10
Connecting Power ...................................................................................................... 10
Using AC Power .................................................................................................. 10
Using Vehicle Battery Power ................................................................................ 11
Dew Protection System ........................................................................................ 12
Installing the Remote Control’s Batteries ..................................................................... 12
Operation ................................................................................................................
Using the Remote Control ..........................................................................................
Playing a Video Tape ..................................................................................................
On-screen Display ......................................................................................................
Fast-Forward/Rewind .................................................................................................
Visual Search .......................................................................................................
Fast Scan Forward/Review ...................................................................................
Freeze-Frame ..............................................................................................................
Auto Repeat Playback .................................................................................................
Adjusting Tracking .....................................................................................................
Watching Broadcast TV ..............................................................................................
Copying a Video Tape .........................................................................................
14
14
14
15
15
16
16
17
17
17
18
18
Troubleshooting ...................................................................................................... 19
Care and Maintenance ............................................................................................
Cleaning the Video Heads ..........................................................................................
Video Tape Tips .........................................................................................................
Replacing the Fuse .....................................................................................................
The FCC Wants You To Know ...................................................................................
20
21
21
22
22
Specifications .......................................................................................................... 23
4
PREPARATION
ACCESSORIES
AC Adapter — lets you power the VCP
from a standard AC outlet.
Your VCP includes the following connection
accessories. Be sure to unpack all of them
before you throw away the packing material.
300-to-75-ohm Adapter — connects a
300-ohm antenna wire to the VCP’s ANT.IN
terminal.
CHOOSING A LOCATION
For safe and effective operation of your VCP,
consider the following when you choose an
installation location.
75-ohm Coaxial Cable — connects the
VCP’s RF.OUT terminal to your TV’s 75-ohm
antenna terminal.
• Place the VCP away from direct sunlight
and heat sources, such as radiators and
heat vents.
• Do not place the VCP in a dusty or
humid area.
• Do not block the VCP’s ventilation
holes. For example, do not push the
back of the VCP against a padded
surface.
VCP/TV DC Power Cord — lets you
power the VCP and a portable TV (not
supplied) from your vehicle’s cigarette
lighter socket.
• Place the VCP on a flat surface, away
from strong vibrations or magnetic
fields.
• Do not put anything on top of the VCP.
5
MAKING CONNECTIONS
You can connect your VCP to a TV/monitor,
a VCR (video cassette recorder), or both. To
help you make the right connections:
• If connecting a TV, use the connections
described in “Connecting a Standard
TV” on Page 7.
A standard TV can receive broadcast TV
signals from an antenna or cable system,
and can be tuned to different channels
to view the broadcasts. It does not have
separate audio and video input jacks.
• If connecting a monitor or TV/monitor,
use the connections described in
“Connecting a TV/Monitor” on Page 8.
(You need an additional audio/video
cable to make this connection.)
A TV/monitor is like a standard TV, but
it also has separate audio and video
input jacks. Using the separate audio
and video input jacks results in a better
quality picture and sound.
• If you want to connect a VCR to the
VCP for copying tapes, use the
connections described in “Connecting a
VCR” on Page 9. (You need an
additional audio/video cable to make
this connection.)
6
Note to the CATV System Installer: This
reminder is provided to call the CATV
system installer’s attention to article 820-40
of the National Electrical Code that provides
guidelines for proper grounding and, in
particular, specifies that the cable ground
shall be connected to the grounding system
of the building, as close to the point of cable
entry as practical.
Connecting a Standard TV
Follow these steps to connect the VCP to a standard TV that has a 75-ohm cable jack (but
does not have separate audio and video input jacks).
1. Make sure the TV is off, then disconnect the antenna or cable wire from your TV’s VHF
antenna terminal and connect it to the VCP’s ANT.IN terminal.
Notes:
• If your antenna has a 300-ohm wire, connect the wire to the 300-ohm screw terminals
on the supplied 300-to-75-ohm adapter. Then connect the adapter’s 75-ohm
connector to the VCP’s ANT.IN terminal.
• If you have a VHF/UHF splitter connected to your TV, disconnect the antenna wire
from the splitter’s input terminal and leave the splitter connected to the TV.
• If you have a separate UHF antenna, leave the UHF antenna wire connected to the TV.
2. Using the supplied 75-ohm coaxial cable, connect the VCP’s RF.OUT terminal to the TV’s
VHF antenna terminal (or the splitter’s input terminal). If your TV has only 300-ohm
antenna terminal, use a 75-to-300-ohm adapter (not supplied) to connect the VCP’s
output to your TV.
VHF Antenna Terminal
UHF
Antenna
VHF
300-ohm 75-ohm
TV
CHANNEL
ANT.IN
ANT.IN
3
4
VCP
CHANNEL
Or
VIDEO
OUT
RF.OUT
AUDIO
OUT
DC IN 12V
RF.OUT
3. Set the CHANNEL switch on the back of the VCP as described under “Setting the Channel
Switch” on Page 10.
7
Connecting a TV/Monitor
To connect your VCP to a TV/monitor’s separate audio and video input jacks, connect the
VCP’s AUDIO and VIDEO OUT jacks to the TV/monitor’s audio and video input jacks using a
video-quality shielded cable (not supplied).
In from Antenna
UHF
VHF
300-ohm 75-ohm
TV
OUT
IN
AUDIO
VIDEO
ANT.IN
VCP
3
4
CHANNEL
VIDEO
OUT
RF.OUT
AUDIO
OUT
DC IN 12V
Caution: You must use a video-quality cable for this type of connection. Do not use a
standard audio cable. Your local RadioShack store sells the proper type of cable.
8
Connecting a VCR
To connect your VCP to a VCR so you can copy video tapes, connect the VCP’s AUDIO and
VIDEO OUT jacks to the VCR’s audio and video input jacks using a video-quality shielded cable
(not supplied). Then see “Copying a Video Tape” on Page 18 to find out how to copy a tape.
Audio and Video
Input Jacks
AUDIO VIDEO
OUT
AUDIO and VIDEO OUT Jacks
VCR
OUT TO TV
IN FROM ANT
IN
VHF
UHF
CH.4
CH.3
ANT.IN
3
4
VCP
CHANNEL
VIDEO
OUT
RF.OUT
AUDIO
OUT
DC IN 12V
Notes:
• You must use a video-quality cable for this type of connection. Do not use a standard
audio cable. Your local RadioShack store sells the correct type of cable.
• You can connect the VCR’s audio/video output jacks to your TV’s input jacks using
another video-quality shielded cable, or to the antenna output jack using 75-ohm cable.
This lets you watch a tape while you copy it (see “Copying a Video Tape” on Page 18).
You can also connect your TV to the VCP’s RF.OUT terminal. See “Connecting a Standard
TV” on Page 7.
9
SETTING THE CHANNEL
SWITCH
CHANNEL,
on the back of the VCP,
determines on which channel a standard TV
receives the VCP’s signal. Set CHANNEL to 3
for channel 3, or 4 for channel 4.
• If moisture has formed inside the VCP,
it might not operate after you connect
power (see “Dew Protection System” on
Page 12).
Using AC Power
The supplied AC adapter lets you power the
VCP from a standard AC outlet.
CHANNEL
ANT.IN
3
4
Cautions:
CHANNEL
VIDEO
OUT
RF.OUT
AUDIO
OUT
DC IN 12V
You must use a Class 2 power
source that supplies 14V DC
and delivers at least 850 mA.
Its center tip must be set to positive and
its plug must fit the VCP's DC IN 12V
jack. The supplied adapter meets these
specifications. Using an adapter that
does not meet these specifications could
damage the VCP or the adapter.
!
Notes:
• If possible, set CHANNEL to a channel
on which you do not receive regular
television broadcasts.
• The CHANNEL setting has no effect on
the audio and video outputs, nor does it
affect a standard TV’s operation when
the VCP is not playing a tape.
CONNECTING POWER
Using the supplied adapters, you can power
your VCP from either a standard AC outlet
or your vehicle’s cigarette-lighter socket.
Cautions:
• If you use the VCP in areas of high
humidity or move it from a cold area to
a warm one, allow it to warm up for
about 2 hours before you plug it in and
operate it, so any moisture inside can
completely evaporate.
10
• When you unplug the AC adapter,
grasp the adapter’s plug, not its cord.
• Always plug the AC adapter into the
VCP before you plug it into the AC
outlet. Always unplug the AC adapter
from the outlet before you unplug it
from the VCP.
To use AC power, connect the AC adapter’s
barrel plug to the VCP’s DC IN 12V jack, then
plug the AC adapter’s power cord into a
standard AC outlet.
ANT.IN
3
4
CHANNEL
VIDEO
OUT
• The VCP continues to draw a small
amount of current from the vehicle’s
battery even after you turn it off, so be
sure to disconnect the DC adapter from
the cigarette-lighter socket when you
are not using the VCP and TV, to
prevent your vehicle’s battery from
being drained.
RF.OUT
AUDIO
OUT
DC IN 12V
DC IN 12 V
Using Vehicle Battery
Power
The DC power cord has two barrel plugs on
one end and a cigarette-lighter plug on the
other end. To connect DC power, plug one
of the adapter’s barrel plugs into the VCP’s
DC IN 12V jack, and plug the other into the
TV’s DC 12-volt jack. Then connect the
cigarette-lighter plug into the vehicle’s
cigarette-lighter socket.
Cigarette
Lighter
Socket
The supplied DC adapter lets you power
your VCP and a portable TV (not supplied)
from your vehicle’s cigarette-lighter socket.
Cautions:
The TV you use must have a
DC 12-volt jack (with the
center tip set to positive) that
accepts the adapter’s 5.5 mm outer
diameter/2.1 inner diameter plug.
TV
To TV’s
12-Volt Jack
DC IN 12V
!
• Before plugging the power cord’s
cigarette-lighter plug into your vehicle’s
cigarette-lighter socket, be sure the
knurled ring at the plug’s tip is screwed
firmly onto the plug.
ANT.IN
3
4
CHANNEL
VCP
VIDEO
OUT
RF.OUT
AUDIO
OUT
DC IN 12V
Note: If the DC adapter does not provide
power, check the fuse. See “Replacing the
Fuse” on Page 22.
• Always plug the DC adapter into the
VCP and TV before you plug it into the
cigarette-lighter socket. Always unplug
the DC adapter from the
cigarette-lighter socket before you
unplug it from the VCP and TV.
11
Dew Protection System
Your VCP’s dew protection system helps
prevent damage caused by moisture that can
form on the VCP’s tape heads. When the
system senses moisture on the tape head(s),
the DEW indicator turns on and the VCP
does not let you play a tape.
1. Remove the battery compartment cover
by sliding it in the direction of the
arrow.
DEW Indicator
MODEL 50
VIDEO CASSETTE PLAYER
AC /DC 12V OPERATION DIGITAL AUTO TRACKING
POWER
PLAY
STOP
EJECT
REWIND
STILL
POWER REWIND
PLAY
TV/ VCP
TAPE
DEW
FAST-F
FAST-F
A-REPEAT
A-REPEAT
2. Place the batteries in the compartment
as indicated by the polarity symbols (+
and –) marked inside the compartment.
Caution: To avoid damaging the VCP
mechanism, do not try to load a tape while
the DEW indicator is on.
If the DEW indicator turns on, disconnect
the VCP’s power for about 2 hours, then
plug it back in. If the DEW indicator does
not light, you can proceed with normal
operation. If the DEW indicator turns on
again, try unplugging the VCP for another 2
hours, or take it to your local RadioShack
store for assistance.
INSTALLING THE
REMOTE CONTROL’S
BATTERIES
The remote control requires two AAA
batteries (not supplied) for power. For the
best operation and longest life, we
recommend RadioShack alkaline batteries.
12
Cautions:
• Use only fresh batteries of the required
size and type.
• Do not mix old and new batteries,
different types of batteries (standard,
alkaline, or rechargeable), or
rechargeable batteries of different
capacities.
3. Replace the cover.
Notes:
• If you will not be using the remote
control for a month or more, remove
the batteries.
• You can use the remote control up to a
distance of about 23 feet (7 meters) in
front of the VCP. If it does not operate
properly within this distance, replace
the batteries.
Warning: Always dispose of old batteries
promptly and properly.
13
OPERATION
MODEL 50
VIDEO CASSETTE PLAYER
AC /DC 12V OPERATION DIGITAL AUTO TRACKING
POWER
PLAY
STOP
EJECT
FAST-F
REWIND
STILL
POWER REWIND
PLAY
TV/ VCP
TAPE
DEW
USING THE REMOTE
CONTROL
PLAYING A VIDEO TAPE
1. Turn on the TV or TV/monitor.
The buttons on the remote control function
the same as those on the front of the VCP.
To use the remote control, be sure the front
end of it is pointing with a clear path toward
the middle of the VCP’s front panel, then
press the desired button(s).
MODEL 40
VIDEO CASSETTE PLAYER
AC /DC 12V OPERATION DIGITAL AUTO TRACKING
POWER
A-REPEAT
FAST-F
A-REPEAT
• If you connected a TV using the
VCP’s RF.OUT jack, tune the TV to
the same channel (3 or 4) to which
you set the VCP’s CHANNEL switch.
• If you connected a TV/monitor using
the VCP’s AUDIO and VIDEO OUT
jacks, switch the TV/monitor to the
video setting.
PLAY
STOP
EJECT
REWIND
STILL
POWER REWIND
TV/ VCP
A- REPEAT
FAST-F
PLAY
CST.IN A- REPEAT
DEW
POW
ER
EJEC
T
FAST-F
2. To load a prerecorded video cassette
tape, insert the tape halfway into the
VCP’s cassette door with the main label
facing up and the spine label facing out.
PLAY
REW
IND
STOP
A-RE
PEAT
TV/V
OK
FAST
MODEL 40
-F
VIDEO CASSETTE PLAYER
AC /DC 12V OPERATION DIGITAL AUTO TRACKING
CP
ME
DISPL
AY
TRAC
KING
SELE
CT
NU
POWER
PLAY
STOP
EJECT
REWIND
STILL
POWER REWIND
TV/ VCP
DEW
PLAY
FAST-F
FAST-F
A- REPEAT
CST.IN A- REPEAT
Then gently push on the center of the
tape’s spine until the VCP pulls the tape
all the way in. The POWER, TV/VCP,
and TAPE indicators light, then the
PLAY indicator lights and the tape
automatically begins to play.
14
If a video cassette is already in the VCP,
press POWER to turn on the VCP then
press PLAY to start playback.
3. To stop the tape during play, press
STOP (STOP/EJECT on the front panel).
The PLAY indicator turns off and the
tape stops.
To start playback again, press PLAY.
4. To eject the tape, press EJECT (STOP/
EJECT on the front panel). The TAPE
indicator flashes, then turns off and the
VCP ejects the tape.
5. Press POWER to turn off the VCP. The
POWER indicator turns off.
Note: If you do not press any key for a few
minutes, the VCP automatically exits the
menu mode.
The current operation mode appears on
display when you change the operation
mode, then automatically disappears in
about 3 seconds. When you activate the auto
repeat playback function, AUTO REPEAT
also appears on the TV screen. See “Auto
Repeat Playback” on Page 17.
To view the real time counter, press
DISPLAY. Press DISPLAY again to clear the
counter.
ON-SCREEN DISPLAY
You can make your VCP display the current
operating mode and tape speed when you
change the operation mode. Follow these
steps to activate this function.
1. Press MENU. The following appears on
the TV screen.
To disable the on-screen display, simply
repeat the above steps and select OFF at
Step 3.
FAST-FORWARD/
REWIND
2. Press SELECT
F.OSD.
or
to highlight
3. Repeatedly press OK so ON appears next
to F.OSD.
4. Press MENU to exit.
To fast-forward or rewind the tape at high
speed, with the tape stopped, press FAST-F
or REWIND. The FAST-F or REWIND
indicator lights and the tape fast-forwards or
rewinds.
No picture appears on the TV/monitor when
you fast-forward or rewind the tape from a
stopped position.
15
The VCP automatically stops the tape when
it reaches the end and rewinds the tape to
the beginning.
To stop the tape at any time during
fast- forwarding or rewinding, press STOP.
Or, to stop fast-forwarding and rewinding
and automatically begin play, press PLAY.
The tape stops, the PLAY indicator lights,
then the tape begins to play.
Note: If power fails while the VCP is
fast-forwarding or rewinding, when power is
restored, the VCP resumes fast-forwarding
or rewinding long enough to take up the
slack in the tape, then turns off. This takes
about 55 seconds.
Your VCP lets you view a tape at a faster
speed than normal playback to help you find
a particular section on the tape. Visual
search works in either direction.
To use visual search, press PLAY to begin
normal playback, then press FAST-F to
search forward or REWIND to search
backward. The PLAY indicator lights along
with the FAST-F or REWIND indicator, and
the tape begins to play forward or backward
at a high speed. During visual search, there
is no sound, and the picture quality is not as
good as during normal playback.
16
POWER REWIND
PLAY
TV/ VCP
TAPE
DEW
Note: Tapes recorded at the EP (extended
play) speed provide the best picture during
visual search.
Fast Scan Forward/Review
This feature lets you watch a tape while it
fast-forwards or rewinds.
Press FAST-F or REWIND to begin
fast-forward or rewind. Then hold down
FAST-F to search forward or REWIND to
search backward.
STILL
Visual Search
STILL
Press STOP to stop the tape, or PLAY to stop
visual search and resume normal playback.
FAST-F
A-REPEAT
POWER REWIND
PLAY
TV/ VCP
TAPE
DEW
FAST-F
A-REPEAT
The PLAY indicator lights, along with the
FAST-F or REWIND indicator, and the tape
begins to play forward or backward at high
speed. During fast scan forward/review,
there is no sound and the picture quality is
not as good as during normal playback.
Release FAST-F or REWIND to return to
normal fast-forward or rewind operation.
FREEZE-FRAME
The VCP lets you stop (“freeze”) the tape to
view a single frame. To use freeze-frame,
during normal play, press STILL on the front
panel. During freeze-frame, there is no
sound and the picture quality is not as good
as during normal playback.
After about 5 minutes, the VCP
automatically stops. To stop the tape sooner,
press STOP. To resume normal playback,
press PLAY.
Note: Tapes recorded at the EP speed
provide the best picture during freeze-frame.
Note: If you do not press any key for a few
minutes, the VCP automatically exits the
menu mode.
To disable the auto repeat playback, simply
repeat steps 1–4, selecting OFF at Step 3.
To set the VCP for auto repeat playback,
before or during normal playback, press
A-REPEAT so the A-REPEAT indicator lights.
The tape automatically rewinds when it
reaches the end, then begins to play again.
To end auto-repeat, press A-REPEAT so the
A-REPEAT indicator turns off.
ADJUSTING TRACKING
AUTO REPEAT
PLAYBACK
You can set the VCP to continuously play,
rewind, then repeat a tape. Follow these
steps to activate this function.
When tape playback begins on your VCP, its
built-in tracking control automatically aligns
the playback heads to the recorded track.
1. Press MENU. The following appears on
the TV screen.
A-REPEAT TV/VCP
2. Press SELECT
or
to highlight
AUTO REPEAT.
3. Repeatedly press OK so ON appears next
to AUTO REPEAT.
MENU
DISPLAY
TRACKING
OK
SELECT
For poor quality or worn tapes, you might
need to further adjust the VCP’s tracking. To
adjust the picture tracking manually, hold
down TRACKING
or
until the
picture improves.
4. Press MENU to exit.
17
WATCHING BROADCAST
TV
To watch broadcast TV (if you connected a
TV), press TV/VCP so the TV/VCP indicator
turns off. Or, you can press POWER to turn
off the VCP.
Copying a Video Tape
If you connected a VCR to the VCP (see
“Connecting a VCR” on Page 9), you can use
your VCP to play back a video cassette tape
while the VCR records (copies) it. Follow
these steps to copy a video cassette tape.
1. Load a prerecorded tape into the VCP
and press STOP to prevent playback
from starting automatically.
2. Load a blank video cassette, or one you
want to record over, into the VCR.
3. If the VCR has an input select switch or
other setting to receive signals from its
AUDIO/VIDEO input jacks, set it to the
audio/video source mode.
Note: If the VCR does not have an
input select switch and you later want
to record VHF/UHF/cable channels on
the VCR, you might need to disconnect
the VCP from the VCR’s audio/video
input jacks.
4. Select the desired recording speed on
the VCR.
5. Begin recording on the VCR.
6. Press PLAY on the VCP to begin tape
playback.
18
7. To watch the tape while you copy it,
turn on the TV or TV/monitor. If you
connected a TV using the VCP’s RF.OUT
jack, tune the TV to the channel (3 or 4)
to which you set the VCP’s CHANNEL
switch.
If you want to watch broadcast TV
while dubbing, press TV/VCP on the
remote control so the TV/VCP indicator
on the front panel turns off, then tune
to the desired station on the TV. If you
connected a TV/monitor, set the TV/
monitor to TV mode.
TROUBLESHOOTING
If your VCP is not performing as it should, these suggestions might help. If you still cannot
solve the problem, take the VCP to your local RadioShack store for assistance.
Symptom
No power.
Possible Causes
Remedy
Power is not
connected.
Plug the AC adapter into an AC outlet
or connect the DC adapter to your
vehicle’s cigarette-lighter socket.
Power is turned off.
Press POWER so its red indicator lights.
Fuse is blown.
See “Replacing the Fuse” on Page 22.
The TV is not set to
the proper channel.
Tune the TV to the same channel as the
VCP’s CHANNEL switch.
The TV’s fine tuning is
not set correctly.
Fine-tune your TV.
The VCP is not
tracking properly.
Manually adjust tracking.
Noise during playback.
Video heads are dirty.
See“Cleaning the Video Heads” on
Page 21.
No picture during
playback.
The TV is not tuned to
the proper channel.
Tune the TV to the same channel as the
VCP’s CHANNEL switch.
Interference in the
playback picture.
The VCP is not
tracking properly.
Manually adjust tracking.
Control buttons do not
work when the power
is on and a video
cassette is inserted.
Condensation on
video heads/dew
protection system is
active.
Unplug the VCP for about 2 hours, or
until the DEW indicator light does not
turn on when you plug it in, then
proceed.
Cannot see broadcast
TV programs.
Connections are
incorrect.
Recheck the connections.
The VCP is set to VCP
mode.
Press TV/VCP so the TV/VCP indicator
turns off.
The batteries in the
remote control are
weak or dead.
Replace the batteries.
Picture is poor during
playback.
The remote control
does not work.
19
CARE AND MAINTENANCE
Your RCA Model 50 AC/DC Video Cassette Player is an example of superior design and
craftsmanship. The following suggestions will help you care for your VCP so you can enjoy
it for years.
Keep the VCP dry. If it gets wet, wipe it dry immediately. Liquids might
contain minerals that can corrode the electronic circuits.
Use and store the VCP only in normal temperature environments. Temperature
extremes can shorten the life of electronic devices, damage batteries, and
distort or melt plastic parts.
Keep the VCP away from dust and dirt, which can cause premature wear of
parts.
Handle the VCP gently and carefully. Dropping it can damage circuit boards
and cases and can cause the VCP to work improperly.
Use only fresh batteries of the required size and recommended type. Batteries
can leak chemicals that damage your VCP’s electronic parts.
Wipe the VCP with a damp cloth occasionally to keep it looking new. Do not
use harsh chemicals, cleaning solvents, or strong detergents to clean the VCP.
Modifying or tampering with the VCP’s internal components can cause a malfunction and
might invalidate its warranty and void your FCC authorization to operate it.
This RCA Model 50 AC/DC Video Cassette Player (VCP) has been manufactured to the
specifications of RadioShack and is covered by a limited warranty from RadioShack. If your
VCP is not operating as it should, take it to your local RadioShack store or call 1-800-THESHACK for assistance.
20
CLEANING THE VIDEO
HEADS
Dirty video heads can cause the VCP’s
picture to be blurred during playback, even
when the video signal is clear. We
recommend that you clean the heads only
when such problems occur. For proper head
cleaning, follow the instructions in a headcleaning kit. Your local RadioShack store has
a complete line of head-cleaning kits or take
the VCP to your local RadioShack store for
regular servicing.
VIDEO TAPE TIPS
Although a video cassette tape is built for
durability, you should handle it with care.
• Do not store video cassettes in hightemperature, high-humidity locations.
Store them in a cool, dry, dust-free
environment.
• Store your video cassettes on their ends,
not on their sides. This prevents
improper settling of the cassette’s
spools.
• A video cassette’s tape can become
wound too tightly around the cassette’s
spools after numerous playing. This can
cause the cassette to improperly load
and automatically eject when you load
it. On most video cassettes, there is a
brake release plunger on the bottom
center of the cassette. Use the tip of a
pen or pencil to press the plunger. This
loosens the tape.
Brake Release Plunger
21
REPLACING THE FUSE
If the VCP does not operate when the DC
adapter is connected, the fuse inside the
adapter might be blown. Follow these steps
to replace it.
Fuse
Knurled Ring
THE FCC WANTS YOU TO
KNOW
Your VCP might cause TV or radio
interference even when it is operating
properly. To determine whether your VCP is
causing the interference, turn off your VCP.
If the interference goes away, your VCP is
causing it. Try to eliminate the interference
by:
• Moving your VCP away from the TV or
radio.
• Connecting your VCP to an outlet that
is on a different electrical circuit from
the TV or radio.
1. Unscrew the knurled ring at the plug’s
tip by turning it counterclockwise, then
turn over the adapter’s cigarette lighter
plug so the fuse falls out.
2. If the wire inside the fuse is broken,
replace the fuse with one of the same
type (11/4 × 1/4-inch 5-amp fuse,
available at your local RadioShack store.
When you screw on the tip, be sure the
knurled ring is screwed firmly onto the
plug.
22
• Contacting your local RadioShack store
for help.
SPECIFICATIONS
GENERAL
Television System ............................................................................. NTSC, US TV Standard
Tape Width ................................................................................................................ 1/2 Inch
Tape Speed:
SP ........................................................................................................... 1.31 Inches/Second
LP ........................................................................................................... 0.65 Inches/Second
EP ........................................................................................................... 0.43 Inches/Second
RF Converter .................................................................................... Built-In VHF Converter
Converter Output .......................................................................................... Channel 3 or 4
Antenna Input/Output Terminals ................................................................................ F-Type
Video/Audio Output .................................................................................. Phono Connector
Power Requirement ............................................................... AC 120 V ±10%, 60 Hz ±0.5%
DC 12 V
Power Consumption ..................................................................................... AC About 11 W
DC About 11 W
Dimensions (HWD) ....................................................................... 33/4 × 101/4 × 117/8 Inches
(94 × 270 × 325 mm)
Weight .................................................................................................................... 6 lbs 4 oz
(2.9 kg)
ELECTRICAL
Video Output Level .................................................................................................... 1 Vp–p
Video Output Impedance ........................................................................................ 75 Ohms
Audio Output Level ................................................................................................... –6 dBm
Video S/N Ratio:
SP ................................................................................................................ More than 43 dB
LP/EP ........................................................................................................... More than 42 dB
Audio S/N Ratio:
SP ................................................................................................................ More than 42 dB
LP/EP ........................................................................................................... More than 40 dB
Specifications are typical; individual units might vary. Specifications are subject to change and
improvement without notice.
23
Limited Ninety-Day Warranty
This product is warranted by RadioShack against manufacturing defects in material and workmanship under normal use for ninety (90) days from the date of purchase from RadioShack companyowned stores and authorized RadioShack franchisees and dealers. EXCEPT AS PROVIDED
HEREIN, RadioShack MAKES NO EXPRESS WARRANTIES AND ANY IMPLIED WARRANTIES,
INCLUDING THOSE OF MERCHANTABILITY AND FITNESS FOR A PARTICULAR PURPOSE,
ARE LIMITED IN DURATION TO THE DURATION OF THE WRITTEN LIMITED WARRANTIES
CONTAINED HEREIN. EXCEPT AS PROVIDED HEREIN, RadioShack SHALL HAVE NO LIABILITY OR RESPONSIBILITY TO CUSTOMER OR ANY OTHER PERSON OR ENTITY WITH RESPECT TO ANY LIABILITY, LOSS OR DAMAGE CAUSED DIRECTLY OR INDIRECTLY BY USE
OR PERFORMANCE OF THE PRODUCT OR ARISING OUT OF ANY BREACH OF THIS WARRANTY, INCLUDING, BUT NOT LIMITED TO, ANY DAMAGES RESULTING FROM INCONVENIENCE, LOSS OF TIME, DATA, PROPERTY, REVENUE, OR PROFIT OR ANY INDIRECT,
SPECIAL, INCIDENTAL, OR CONSEQUENTIAL DAMAGES, EVEN IF RadioShack HAS BEEN ADVISED OF THE POSSIBILITY OF SUCH DAMAGES.
Some states do not allow limitations on how long an implied warranty lasts or the exclusion or limitation of incidental or consequential damages, so the above limitations or exclusions may not apply to
you.
In the event of a product defect during the warranty period, take the product and the RadioShack
sales receipt as proof of purchase date to any RadioShack store. RadioShack will, at its option, unless otherwise provided by law: (a) correct the defect by product repair without charge for parts and
labor; (b) replace the product with one of the same or similar design; or (c) refund the purchase
price. All replaced parts and products, and products on which a refund is made, become the property of RadioShack. New or reconditioned parts and products may be used in the performance of
warranty service. Repaired or replaced parts and products are warranted for the remainder of the
original warranty period. You will be charged for repair or replacement of the product made after the
expiration of the warranty period.
This warranty does not cover: (a) damage or failure caused by or attributable to acts of God, abuse,
accident, misuse, improper or abnormal usage, failure to follow instructions, improper installation or
maintenance, alteration, lightning or other incidence of excess voltage or current; (b) any repairs
other than those provided by a RadioShack Authorized Service Facility; (c) consumables such as
fuses or batteries; (d) cosmetic damage; (e) transportation, shipping or insurance costs; or (f) costs
of product removal, installation, set-up service adjustment or reinstallation.
This warranty gives you specific legal rights, and you may also have other rights which vary from
state to state.
RadioShack Customer Relations, 200 Taylor Street, 6th Floor, Fort Worth, TX 76102
12/99
RadioShackCorporation
Fort Worth, Texas 76102
02A02
16-3200
Printed in Korea