1
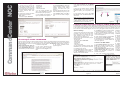
I. Planning and Preparation
®
CommandCenter NOC
Quick Installation and Setup Guide
Client PC Planning
- DNS Addresses: CC-NOC must know
the DNS servers used for host resolution.
- Timezone: Specify the correct time
zone for accurate reporting.
- Email Communication Requirements:
CC-NOC must be able to send SMTP traffic
to send notifications of events.
Secondary Information
You should also consider:
- ISP Gateway: Monitor your ISP connection, supply the ISP Gateway address.
- SNMP Community Strings: Receive
traps and gather performance information
from SNMP-enabled node, supply community strings for the systems you want to collect performance data for.
- NTP Server: Synchronize clocks over a
network using NTP protocol, install a NTP
server.
CommandCenter Secure Gateway
If you plan on using a CC-SG in conjunction
with a CC-NOC, you must know the IP
address of the CC-SG. If using a CC-NOC
5.2 with CC-SG, the time settings on both
Access CC-NOC through a serial port on a
PC with a terminal emulation program
(Hyper Terminal, Tera Term, etc.) for initial
setup. Additional configuration is carried out
through a web browser. The browser must
have Javascript enabled to function correctly. These browsers and operating systems
are supported on the client PC:
Thank you for purchasing Raritan’s CommandCenter NOC (CC-NOC). The primary function of a CC-NOC is to manage nodes in your network. Nodes are discovered automatically if their IP address is within the
managed range of addresses. In addition to network discovery, a CC-NOC also provides service management, a database of network information, a rules engine, a notification engine, and a web server. A CC-NOC can also be instructed
to collect statistics from your Windows systems, monitor network traffic for intrusion attempts and bandwidth performance, and scan your systems for vulnerabilities.
Identify Hardware and Software in Your Network
You may need to identify the software and hardware in your network for software auditing or compliance reporting. With
CC-NOC, you can. With a few clicks, you can find out the number of Microsoft Office XP Professional licenses that have
been installed or the manufacturer of all your equipment.
Monitor Outage and Network Availability
A CC-NOC continuously monitors your dynamic network and keeps the people (admins) who need to know informed of
important network changes and events. DBAs want to know if mission critical database servers go down. A notification
will go out only to the pertinent DBAs. Therefore, a network event is closely mapped to relevant IT expertise.
Identify Security “Hot Spots” and Improve Network Security
To help you plan for improved security or assist in compliance activities (for example, Sarbanes-Oxley), you can run
intrusion detection reports to identify potential “hot spots” in your network or to ensure that your most mission-critical or
key infrastructure machines (those with financial data) have not been attacked. Once identified, you can then increase
security by adding firewall rules to those machines or changing the settings to be more restrictive.
Identify Vulnerabilities on Your Systems
Once configured, a CC-NOC looks for vulnerabilities on specified nodes in the network and works in conjunction with
the authentication credentials used by Windows Management. Using the Vulnerability Browser, trends can be identified.
Links to the public Common Vulnerabilities and Exposure List database http://www.cve.mitre.org are provided to provide more information about the vulnerabilities. With a few clicks, you can install Microsoft patches on machines that
have vulnerabilities.
Browser
OS
IE 6.0
Win2K
Mozilla 1.7
Win 2K, Win XP, Solaris 10
Mozilla 1.7
RedHat9
Mozilla Firefox 1.0 Win 2K, Win XP, Solaris 10
Mozilla Firefox 1.0 RedHat9
Netscape 7.2
Win 2K, Win XP, Solaris 10
Netscape 7.2
RedHat9
Primary Information
Prior to setup, collect this information:
- IP address of CC-NOC: CC-NOC must
have a static IP.
- IP address of Discovered Devices:
Identify the addresses (or range) that
should be managed by a CC-NOC.
systems must be configured to use an NTP
server for synchronization.
Windows Proxy
You must have a proxy to collect Windows
Management Instrumentation (WMI) data.
Note: Both CC-NOC 100 and CC-NOC 250
require configuration of an external proxy,
but if you are using a CC NOC 2500M in a
distributed environment, you can use the
internal proxy of the CC-NOC 2500M.
Spanned/Mirrored Ports
Devices must be able to see packets passing on a network in order for intrusion detection and network performance to function
properly. They require configuration of a
spanned or mirrored port.
Ethernet TAP
Instead of using a spanned or mirrored port,
an Ethernet tap could be used that may be
considered a more secure method in which
to listen to network traffic than a spanned
port. Place the Ethernet tap on the Ethernet
cable in the same location where an
Ethernet hub would be used.
II. Physical Installation (all models)
CC-NOC ships with:
- (1) Appliance, 1U, rack-mountable
- (1) Standard US power cord
- (1) Null-modem cable
If any pieces are missing, please contact
Raritan Support.
1. Record the serial number for later use.
The number begins with CPP and can be
found on the bottom of the unit.
SERIAL:___________________________
Capacity Planning and Traffic Analysis
2. Mount the appliance safely in a rack or
place on a desktop/shelf.
3. Plug a Category 5 ethernet cable into
the Management port (labeled LAN 1). Plug
the other end of this cable into an ethernet
hub/switch that can communicate with the
network to be managed.
4. Plug a second ethernet cable into the
Monitor port (LAN 2). Plug the other end of
this cable into a “promiscuous port” (often
called “spanned” or “mirrored” port) on the
switch or any port on a shared-media hub.
Please see Raritan’s CC-NOC User Guide
8
10
for details on spanned ports.
Note: Step 4 applies only to CC-NOC
100/250 or CC-NOC 2500S.
5. Plug the power cord into the power inlet
on the CC-NOC unit. Plug the other end of
the power cord into a nearby power source.
6. Power ON the unit.
7. The system will boot and the power LED
on the front of the appliance will illuminate.
Wait approximately five minutes for the system to complete initial startup tasks before
proceeding.
9
With CC-NOC, you can analyze your traffic to help with capacity planning of your networks or to determine the reason
for spikes in your network. Using traffic analysis will help in identifying the source host if you are experiencing a slowdown in your network. Traffic summaries can be analyzed to identify potential problems in your network or to prevent
problems from ever occurring.
Access CommandCenter Secure Gateway (CC-SG)
Associating a CommandCenter Secure Gateway (CC-SG) with a CC-NOC allows your users more flexibility when solving issues by giving them direct KVM (Keyboard, Video, Mouse) access to problem devices. CC-NOC users can be
authenticated remotely by CC-SG to provide an enhanced seamless mode of operation and Single Sign-on (SSO)
access to CC-SG targets. With one-click access to CC-SG and SSO access to targets, a CC-NOC user can move easily between systems.
5
2
1
3
4
15
13
7
14
12
View Syslog Events on CC-NOC
A syslog receiver is registered on a CC-NOC. To forward syslog events to a CC-NOC appliance, enter the IP address
of the CC -on a wireless router (e.g., Netgear, Linksys) that is connected to your Unix, Linux machines. The syslog
severities are mapped to corresponding severities on the CC-NOC.
Questions? Contact Raritan Support: 1-800-724-8090, press 6, press 1.
FAX: 732-764-8887 email: [email protected]
http://www.raritan.com
Diagram Key
1. Serial Port
2. USB
3. LAN1
4. LAN2
5. Power Inlet
6. Power Button
7. Power LED
8. Printer Port
9. Monitor Port
10. Keyboard, Mouse Ports
11. Reset Button
12. Disk Access LED
11
6
13. LAN1 LED
14. LAN2 LED
15. CPU Overheat LED
For more detailed instructions, please consult the Administrator Guide found on the enclosed CD-ROM or on the web at www.raritan.com. Rev. B May 2006 255-80-5320
IV. Licensing for CC-NOC 100/250/2500N (cont)
1. Connect one end of the nullmodem cable (provided) to the serial configuration port and the other
end to a serial port on a system with
a terminal emulation program, such
as Hyper Terminal, Tera Term,
Minicom, etc.
4. To upload the license file, click Browse
and navigate to the license file provided by
Raritan.
2. Configure the terminal emulation
program settings as follows:
- Mode: VT11
- Connection Speed: 9600 Baud
-
Data Bits: 8
Parity: none
Stop bits: 1
Flow Control: none
3. In the terminal emulation program, press the Enter key several
times to display the login prompt.
4. Type config (case-sensitive) to
login. A password is not required.
5. Click Configuration to administer
network settings including TCP/IP
address, network mask, default
gateway, and DNS server (see
Figure 1).
6. Provide appropriate values for the
fields indicated (see Figure 2), then
click Continue, Done, and OK to
save and exit the serial configuration.
5. Once you have linked to the file, click load
this license file. If your current license is
invalid or expired, you must provide a new
file.
6. If the license file is correct, click install
this license under the New License information box.
4
5
Note: If a license is already installed and you
want to continue using it, an information box
labeled Current License appears (in place
of New Licence, shown here). Click keep
this license below the information box.
®
CommandCenter NOC
III. Network Configuration for CC-NOC 100/250/2500N
Figure 4
6
V. Network Configuration and Licensing for CC-NOC 2500M and CC-NOC 2500S
In a distributed environment, a CC-NOC 2500M and CC-NOC 2500S (remote appliances) report to a CC-NOC 2500N (central server). You
must configure the IP address of the CC-NOC 2500N on the remote appliance, configure a static IP address, generate an activation code
on the remote appliance, upload a license for the remote appliance, and enter the activation code on the CC-NOC 2500N. If you do not
have a license, contact Raritan Support. Be sure to have your appliance serial number (see Section II. Physical Installation).
Network Settings
Figure 1
Figure 2
IV. Licensing for CC-NOC 100/250/2500N
Each CC-NOC unit requires a device-specific license to operate. Your Raritan Regional Channel Manager will provide you with a license file. If you do not have a license, contact Raritan Support. Be sure to have your appliance
serial number (see Section II. Physical Installation) and the appliance identification code as shown in Figure 4.
1. Type the URL
http://<CommandCenter_NOC_IP>
in your Web browser’s address line
where CommandCenter_NOC_IP is the
TCP/IP address you used in Section
III. Network Configuration.
2. The License Agreement page
appears (see Figure 3). Read the
agreement and click I Agree to continue.
Figure 3
3. The license installation screen
appears (Figure 4).
1. Connect one end of the null-modem cable
(provided) to the serial port and the other
end to a serial port on a system with a terminal emulation program, such as Hyper
Terminal, Tera Term, Minicom, etc.
2. Configure the terminal emulation program
settings as follows:
- Mode: VT11
- Connection Speed: 9600 Baud
- Data Bits: 8
- Parity: none
- Stop bits: 1
- Flow Control: none
3. In the terminal emulation program, press
the Enter key on your keyboard a few times
to activate the login prompt.
4. Type config (all lower case) to login and
press Enter. A password is not required.
5. Click Configuration and type the IP
address of the CC-NOC 2500N.
Figure 5
6. Click Static to configure network settings
for the remote appliance (see Figure 5).
7. Type the TCP/IP address, network mask,
default gateway, and DNS server settings
for the remote appliance.
8. Verify network settings by clicking Done
and then clicking Commit Changes.
9. Click OK to set up and establish the connection between the CC-NOC 2500N and
the remote appliance.
Connect to CC NOC 2500N
1. Click Remote Appliance and press the
Enter key to generate an activation code.
2. Record the activation code, log into the
2500N, and type the URL
http://<CommandCenter_NOC_IP> where
CommandCenter_NOC_IP is the TCP/IP
address you specified in Section III.
Network Configuration.
3. Type your username and password
(default: admin, admin).
4. In the home page, click on the Admin tab
and then click Upload Appliance
Licenses.
5. Click load new appliance license.
6. Clicking Browse and navigate to the
licens file.
7. Click load this license.
8. Click new activation code and type the
code that you recorded in step 2 of this section. Click OK.
9. Toggle to the serial connection screen
(see Figure 6) and press Enter to finish.
10. Click Reboot Now to reboot the remote
appliance.
11. Exit the serial configuration and disconnect the null-modem cable. Wait approximately five minutes for the remote appliance
to initialize.
Figure 6