1
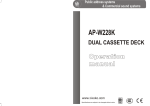
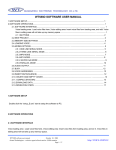
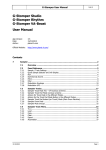
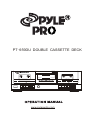
PT-659DU DOUBLE CASSETTE DECK
TAPE COUNTER
DOUBLE CASSETTE DECK PT-659DU
PEAK PROGRAM LEVEL METER
FULL AUTO STOP SYSTEM
HIGH SPEED DUBBING
PLAY CrO2
A
DUBBING
HI-SPEED
DUBBING
REC CrO2
B REC
PLAY
PLAY
REC LEVEL
POWER
MIN
MAX
www.pyleaudio.com
OPERATION INSTRUCTION
STEREO DOUBLE CASSETTE DECK
1
PRECAUTIONS
Thank you for purchasing this product. Taking time to
read these operating instructions carefully before use will
acquaint you fully with all its features and help ensure
Power plug
l When disconnecting the power cord from the power
optimum performance.
outlet, always take hold of the plug, and not the wire,
l The safety and operation instructions should be
and pull free.
l Never connect or disconnect the power plug with wet
retained for future reference.
l Heed warning—Comply with all the warnings on the
hands since you may receive an electric shock.
l Remember to disconnect the power plug from
product and in the operation instructions.
l In order to simplify the explanation, illustrations may
the power outlet when you do not intend to use
the unit for a prolonged period of time.
sometimes differ from the originals.
l Do not defeat the safety purpose of the polarized
or grounding-type plug.If the provided plug does
not fit into your outlet, consult an electrician for
RISK OF ELECTRIC SHOCK
DO NOT OPEN
replacement of the obsolete outlet.
CAUTION: T O REDUCE THE RISK OF ELECTRIC SHOCK ,
DO NOT REMOVE COVER(OR BACK)
NO USER-SERVICEABLE PAR TS INSIDE.
REFER SERVICI NG TO QUALIFIED SERVICE PERS ONNEL.
Do not remove the case and bottom panel
The lightning flash with arrowhead symbol,
Any inspections or adjustments inside the unit may
within an equilateral triangle, is intended to
lead to malfunctions and electric shocks. Do not
alert the user to the presence of un-insulated
touch any of the inside parts.
“dangerous voltage” within the product’s
enclosure that may be of sufficient magnitude to
constitute a risk of electric shock to persons.
Ventilation warning
Do not block any ventilation openings. Install in
accordance with the manufacturer’s instructions.
The normal ventilation of the product shall not be
The exclamation point within an equilateral
triangle is intended to alert the user to the
presence
of
important
operating
impeded for intended use.
and
maintenance (servicing) instructions in the
literature accompanying the appliance.
Installation precautions
WARNING: To prevent fire or shock hazard, do not
l
Do not use this apparatus near water.
l
Do not install near any heat sources such as
expose the unit to rain or moisture. Never place
radiators,
cans of beer, soda, glasses of water or anything
apparatus (including
wet near or on top of the unit!
heat.
l
heat
registers,
amplifiers)
that
or
other
produce
This product should be kept away from direct
contact with liquids.
2
stoves,
Servicing
Do not wipe with thinners
Wipe the panels and case from time to time with
Refer all servicing to qualified service personnel.
soft dry cloth. Using any kind of thinner, alcohol
Servicing is required when the apparatus has been
or volatile liquid will mar the surface, cause
damaged in any way, such as power-supply cord or
blotching on the exterior and erase the markings
plug is damaged, liquid has been spilled or objects
and should therefore be avoided. Do not use
have fallen into the apparatus, the apparatus has
insecticide sprays in the vicinity.
been exposed to rain or moisture, does not operate
normally, or has been dropped.
Dripping warning
SERVICE INSTRUCTIONS
The apparatus shall not be exposed to dripping or
splashing and that no objects filled with liquids,
•
Disconnect power cord before servicing
such as vases, shall be placed on the apparatus.
•
Replace critical components
only with
factory parts or recommended equivalents
Positioning
•
For AC line powered units - Before returning
Use only the cart, stand, tripod,
repaired unit to user, use an ohmmeter to
bracket or table specified by the
measure from both AC plug blades to all
manufacturer, or sold with the
exposed metal parts. The resistance should be
apparatus. When a cart is used, use
more than 100,000 ohms.
caution when the cart/apparatus
combination to avoid injury from tip-over.
DANGER:
INVISIBLE LASER RADIATION WHEN OPEN AND
Attachment/accessories
Only use attachment/accessories specified by the
manufacturer.
Protect the power cord from being walked on or
particularly
DIRECT EXPOSURE TO BEAM. USE OF CONTROLS
OR ADJUSTMENTS OTHER THAN THOSE
l Power cord protection
pinched
INTERLOCK FAILED OR DEFEATED. AVOID
at
plugs,
convenience
receptacles, and the point where they exit from the
apparatus.
l Power Sources
This product should be connected to a power
supply only of the type described in these
operating instructions, or as marked on the unit.
l Internal/External Voltage Selectors
Internal or external voltage selector switches, if
any, should only be reset and re-equipped with a
proper plug for alternative voltage by a qualified
service technician. Do not attempt to alter this
yourself.
3
SPECIFIED HEREIN MAY RESULT IN HAZARDOUS
RADIATION EXPOSURE
PANEL INFORMATION
2
10
4
3
11
12
13
14
5
1.
6
7
8
9
2
15
10
POWER BUTTON
Use this button to turn the unit on and off. If the unit is not being used for a prolonged period of time, please also
remove the AC plug from the power socket.
2. CASSETTE HOLDER
Insert your cassette into either of these two holders. The holders may be opened by pressing the corresponding
[STOP/EJECT] button (13). Please note that both decks can be used for playback but only deck B can be used for
recording/dubbing.
3. DISPLAY
The display will help you keep track of audio levels and the features which have been engaged.
* PEAK LEVEL INDICATOR – The meters indicate the audio level during recording and playback.
* REC – lights when deck B is recording or in record-pause mode
* HI SP DUB – lights when high-speed dubbing mode is engaged
* PLAY Cr02 – lights when Play Cr02 function is engaged
* REC Cr02 – lights when Rec Cr02 function is engaged
4. TAPE COUNTER AND [RESET] BUTTON
The tape counter indicates the tape position when playing or recording tapes (deck B only). To reset the counter, press
the [RESET] button.
5. REC LEVEL KNOB
Use this knob to adjust the recording level when recording external sources to deck B.
6. [PLAY Cr02] BUTTON
This feature should be set depending on the kind of tape you are playing. When using normal tapes, this feature should
be turned off (“PLAY Cr02” not lit on the display). When using Cr02 tapes, these features should be turned on (“PLAY
Cr02” is lit on the display).
7. [DUBBING] BUTTON
Press this button if you would like to dub a tape from deck A to a tape in deck B (“DUBBING” will light on the
display).
8. [HI SPEED DUBBING] BUTTON
Press this button to enable high-speed dubbing (“HIGH SPEED” will light on the display). Press again to disable
high-speed dubbing.
9. REC Cr02 BUTTON
Turn this feature on when recording to a Cr02 tape on deck B (“REC Cr02” is lit on the display).
10. [PLAY]
Press to play the tape on the corresponding deck.
11. [REWIND]
Press to rewind the tape on the corresponding deck.
12. [FAST FORWARD]
Press to fast forward the tape on the corresponding deck.
13. [STOP/EJECT]
Press to stop the tape on the corresponding deck. When stopped, press again to open the cassette holder.
14. [PAUSE]
Press to pause the tape on the corresponding deck. Press again to resume playback.
15. [RECORD]
Press this button in conjunction with the [PLAY] button to begin recording.
4
OPERATING PROCEDURES
2
3
4
POWER CORD
Plug this cord into a power socket before powering on
the unit. If not using the unit for prolonged periods of
time, please remember to turn it off and remove the
cord from the socket.
2. USB PORT
Use the included USB cable to connect this port to an
available USB port on your computer when
transferring tapes.
3. GAIN KNOB
This knob can be used to adjust the audio signal from
the unit to your computer. If you experience distortion
and clipping when recording to your computer, we
5
1
recommend turning down the Gain. If the audio level
from the unit is extremely low when recording to your
computer, we recommend turning up the Gain.
1.
4.
REC INPUT
Connect a stereo RCA cable from an external source to
this input. Please note that recording and dubbing only
works on deck B.
5.
PLAY OUTPUT
This is the combined audio output from deck A and
deck B. Connect a stereo RCA cable from this output
to the Line or Auxiliary input of a home stereo receiver
system.
PLAYBACK INSTRUCTIONS
PLAYING BACK A RECORDED TAPE:
1. Press the [STOP/EJECT] button to open the
cassette holder.
2. Insert the tape and close the holder. If playing a
Cr02 tape, press the Cr02 button.
3. If connected to an amplifier system, make sure the
amplifier is turned on and adjust its volume to a
suitable listening level.
4. Press the [PLAY] button to play the tape.
Please note: If you are transferring tapes to your
computer, it is possible to hear your tapes through your
computer’s soundcard or built-in speakers while
transferring.
5
FAST FORWARDING AND REWINDING:
1. While the deck is stopped, press the [FAST
FORWARD] or [REWIND] button.
2. When the tape reaches the desired location, press
[STOP/EJECT].
3. Press the [PLAY] button to play the tape from this
location.
PAUSING:
1. Press the [PAUSE] button to pause the tape.
2. Press [PAUSE] again to release and resume
playback.
STOPPING AND EJECTING:
1. Press the [STOP/EJECT] button while the tape is
playing to stop playback.
2. Press [STOP/EJECT] again to eject the tape.
RECORDING INSTRUCTIONS
Please use deck B for recording external sources or
dubbing tapes.
RECORDING EXTERNAL SOURCE TO TAPE:
1. Press [STOP/EJECT] on deck B to open the cassette
holder.
2. Insert a blank tape and close the cassette holder.
3. If recording to a Cr02 tape, press the [REC Cr02]
button.
4. Press the [PAUSE] button and then press
[RECORD].
5. Play your external source and check the levels on
the display. Use the REC LEVEL knob to adjust the
level of the incoming audio signal.
6. Press the [PAUSE] button to begin recording when
you are ready.
Tip: The REC LEVEL knob can be used to make
adjustments to the loudness of the incoming signal. If
the knob is in the center position, the incoming signal
will be recorded at its original volume. Ideally, the
recording signal should come close but never hit red in
the level indicator on the display. If the signal is in the
red, then turn down the REC LEVEL knob until it no
longer reaches the red. If the signal is too low and not
close to the red, turn up the REC LEVEL knob.
DUBBING OPERATION:
1. Insert the tape for playback in deck A.
2. Insert the tape you wish to record to in deck B.
3. Press the [DUBBING] button. “Dubbing” will be
illuminated on the display.
4. Select the dubbing speed with the [HI SP DUB]
button. If the “HI SP DUB” indicator is
illuminated on the display, you will be dubbing in
high-speed mode. If the indicator is not lit, then you
will be recording in normal-speed mode.
5. Press the [PAUSE] button on deck A, followed by
the [PLAY] button to cue the tape.
6. Press the [RECORD] button on deck B.
7. Press the [PAUSE] button on deck A to release pause
mode. The unit will automatically start the dubbing
operation.
8. To stop dubbing, press the [STOP/EJECT] button of
deck B.
Please note: Do not change dubbing speed while
dubbing is in progress.
TECHNICAL SPECIFICATIONS
Type
Track System
Tape speed
Frequency Response
(-20dB recording)
Stereo double cassette deck
4-track 2-channel
4.8 cm/sec
Chrome tape 40-15000Hz
(±3dB)
Normal tape 40-14000Hz
(±3dB)
Head
Motor
Fast forward/Rewind time
Input terminals
(0dB recording)
S/N ratio
Wow and flutter
Crosstalk
Harmonic distortion
Channel separation
Chrome tape 40-8000Hz
(±3dB)
Normal tape 40-8000Hz
(±3dB)
58dB
<0.2% (DIN45500)
40dB (1kHz)
less than 1% (at 1 kHz,
OVU 3rd H.D. normal tape)
40dB (1kHz)
Line In x 2 Min. input
level: 600mV (0dB)
Input impedance: 50k.
Output terminals
Power requirement
Power Consumption
Dimensions
Weight
6
Deck A Playback
Deck B
Recording/playback,
2-gap ferrite head for
erasure
DC servo motor x 2
~100 sec w. C-60 cassette
Line Out x 2 Output level:
600mV (0dB)
Output impedance: 5k.
AC 110V ~ 60Hz
6W Maximum
420mm x 135mm x
215mm (W x H x D)
/ 16.54” x 5.32” x 8.46”
inches)
4kg (8.5lbs)