1
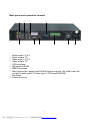
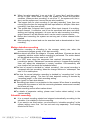
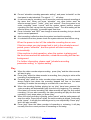
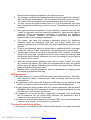
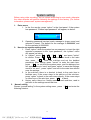
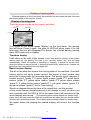
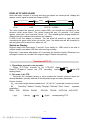
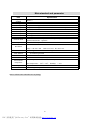
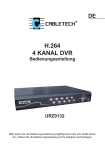
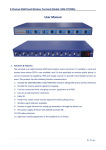
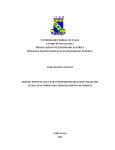
DVR2104
Network Hardware Compression
MPEG4 Stand Alone
Digital Video Recorder
User Guide
PDF 文件使用 "pdfFactory Pro" 试用版本创建 www.fineprint.cn
SAFETY PRECAUTIONS
Power
l This video recorder is used on 110V-240V AC and connected to the ground. Confirm
the voltage before using.
l
No using the machine for a long time, cut off the machine power supplies, and pulls
out the plug from the AC outlet.
Caution
l
There are two modes of video output: one is BNC, and the other is VGA. They can
be switched over via STEP key.The default output is BNC. Link the lines, power on
the Recorder, after the clock on VFD of the front block goes, press STEP key, then
VGA will have output. Do not power on the monitor before powering on the
recorder
Switch on and shut down
l
l
Check out the connection of system and power.
Normally stop recording and playing at first, then shut off the power.
Safety
l
l
l
l
This machine is an indoor equipment .In order to avoid the short circuit or
danger, don’t put it in rain or damp environment.
If any solid or liquid entered, please shut off the power immediately, and ask the
qualified person for technical check before restarting it.
It is a precise machine, so there is nothing inside user can mend himself.
Anything wrong, please ask the qualified person or contact with the seller.
Stop playing or recording while replacing it, otherwise HDD or parts will be
destroyed.
Install machine
l
l
Place the machine in a well-ventilated area. Make sure that there is enough
space around the machine so that the vents are not blocked.
Do not place the machine nearby the source of heat, or in direct sunlight and wet
environment.
Install HDD
Line jump: Before installing, find out the method of installation in HDD or the user guide,
check the way is right or not.
Data line: check
whether the link of date line is correct, the link of HD must be
inserted into the bottom parallel.
l
l
1HDD Installation: Jump HDD as the master, plug IDE line into the first IDE slot
near the front panel, connects the power cable and the data line with HDD then.
2 HDDs Installation: set one jump to the master and the other to the slave,
connect the same team connect power line and material line to each one.
CLEAR HDD
l
When you use new HD, you should format the HD before the operation of clearing.
i
PDF 文件使用 "pdfFactory Pro" 试用版本创建 www.fineprint.cn
The correct order is as follow: clear assistant disc→clear master disc→out setting
→save→turn off→restart→ other setting.
Advice
l
Record the television program or program of VCD/ DVDs, please remember
absolutely not to infringe on the right of work power and others of the third parties.
ii
PDF 文件使用 "pdfFactory Pro" 试用版本创建 www.fineprint.cn
ii
The characteristic and the function of this video recorder
Characteristic:
l
Use PHILIPS (PNX1500 CMOS DSP chip), offer more high compression and
definition.
l
The PSOS that separate from PC completely is used.
l
Start quickly, auto protects and auto resume.
l
The operation is in brief; use convenience, and the operation are similar with
VCR.
Function:
System mode
l
Professional operate system PSOS, escape from the PC completely, avoid
the calculator virus infection completely, good stability, no delay.
l
The independent module design, the system is more stable.
l
Operate the language can cut over, supporting various languages
Compression
l
Adopt the MPEG4/ H.264 operation method carries on the compression; the
solution presses the processing, higher definition.
l
The audio adopt the calculate way of G.729 compresses, having the higher
audio result.
l
Synchronous compression of the audio and video.
l
Fix code and variable code compression.
VISION
l
l
l
l
l
l
4-channel video inputs, 2-channel audio inputs, 1 BNC output.
100fps (PAL)/120fps (NTSC) (QUAD), full-time compression.
Support images display at the same time, or one by one.
Support the alert switch to single image function
Adjustable Live/Playback image contrast, brightness, and saturation.
Each image name can be selected.
RECORDING
l
l
l
l
l
4-channel video, 2-channel audio record.
High definition in image, also can be adjust from CIF to 1/2CIF,
fixation/variable code setting.
Video and audio record at the same time, the parameter of each channel can
be setting singly; a numeral from 0.1 pieces/ seconds-30 the pieces/ seconds
can adjust.
Recording Mode: Manual, Auto, Alert, and Motion detect.
8 menus in image also can set the code flow by operator.
Motion and detect
l
l
Each image can set 16 dynamic states to detect the district
Each image can set 1-7 the intelligent degree.
Saving
l
Install big capacity HDD, Unlimited capacity of HDD, unlimited rotate speed.
i
PDF 文件使用 "pdfFactory Pro" 试用版本创建 www.fineprint.cn
l
Overwrite
l
l
l
Auto alert setting for surplus content.
Record before alert function, store in EMS memory
Dormancy function is set to reduce the quantity of heat and prolong the use.
Search
l
l
l
l
Search on time/date/list/exact.
Search on 1 HD singly, also display the list corresponding.
Normal/alert record search.
Dairy
Replay
l
More images play at the same time, requesting no sound output while having
another image.
l
Single video and audio play at the same time.
l
PLAY function: forward, review, pause, single, upside, downside, head segment,
whist.
Edition information
l
l
l
Type, the edition number, date of edition
Host capacity, recording information (normal/alert), and recording time.
Work disc, way of cover and time
VFD vision
l
Time, record mark, image quality mark, guard mark, the scheduling
symbolize, HDD read and write mark, play, forward, network mark, alert and
channel mark, pause.
Water Mark (optional)
l
Alert
l
l
l
l
l
l
can increase the false defend mark according to the customer.
4 alert inputs/2 alert outputs
The time of alert output can be set.
The type of alert input NC/NO can be set.
Alert can be cleared in such way: manual, remote control and network.
Buzzer off/on can be set.
Video shade or lost alert function.
Network Function
l
l
l
l
l
Support 10/100M TCP/IP
The privileged person can change the parameter of video and control in
center through network control software.
IE browser (file name: IE Play)
Down cope certify through network control software.
Support WEB skim
SAVE PROTECT
l
l
Adopt 128 data encrypt
3 grade passwords protection, manager password, user password, and
operator password.
User interface ports
l
Graphic interface ports, the operation keeps simple, convenient
ii
PDF 文件使用 "pdfFactory Pro" 试用版本创建 www.fineprint.cn
ii
l
l
l
Front panel control
IR remote control.
Network control
Back up
l
l
Through network
Through USB2.0
Upgrade
l
l
Through USB………
Through network
iii
PDF 文件使用 "pdfFactory Pro" 试用版本创建 www.fineprint.cn
iii
TABLE OF CONTENTS
FEATURE AND FUNCTION. ……………………………………..……… …. 1
simple system operation
1.RECORD OPERATION
1-1.MANUAL……………………… ………………………………………… …3
1-2.ALERT..................................................................................................... 3
1-3.MOTION DETECT .................................................................................. 3
1-4.SCHEDULING......................................................................................... 3
1-5.COMBINATION RECORD ...................................................................... 4
User guide
1.switch on..................................................................................................... 5
2.shut down ................................................................................................... 5
3.Normal record............................................................................................. 5
4.Warning system.......................................................................................... 6
5.Motion detect .............................................................................................. 7
6.Schedule record ......................................................................................... 8
7.Play............................................................................................................. 8
8. Searching play........................................................................................... 9
9. Multi-Function System............................................................................... 9
10. Password............................................................................................... 10
11. HDD password....................................................................................... 10
12. The choice and format of disc ............................................................... 11
13. System setting....................................................................................... 11
14. Display................................................................................................... 11
15. Record searching .................................................................................. 12
16. Quality with memory space & HDD with recording time ....................... 12
system setting
1.enter menu list .......................................................................................... 13
2. system set list and operation method ..................................................... 13
iv
PDF 文件使用 "pdfFactory Pro" 试用版本创建 www.fineprint.cn
3. general setting......................................................................................... 13
4. record setting........................................................................................... 14
5.alert setting ............................................................................................... 16
6. schedule setting ...................................................................................... 18
7. record searching...................................................................................... 19
8. record copy.............................................................................................. 20
9.Motion detect ............................................................................................ 21
10. system management ............................................................................. 22
11. privilege (Option) setting ....................................................................... 24
12. supplement setting ................................................................................ 25
Display of running state
1. Display of running state........................................................................... 26
2 Time / date display ................................................................................... 26
3.basic function display ............................................................................... 26
4.vision of HDD running .............................................................................. 27
5.vision of switch on................................................................................... 27
Function of P.T. Z
27
standard and para
28
external dimension
29
Exterior
29
size
package contents
29
v
PDF 文件使用 "pdfFactory Pro" 试用版本创建 www.fineprint.cn
System connection
front of the panel map
VFD
USB
Remote
Video Out
Audio Out
VFD
1
○
2
○
3
○
4
○
5
○
6
○
7
○
Alert LED
Timming LED
Date
Time
P .T. Z
Alert
HDD
8 Network
○
9 Quality
○
10 Record
○
11 Play
○
12 Step
○
13 Review
○
14 Forward
○
1
PDF 文件使用 "pdfFactory Pro" 试用版本创建 www.fineprint.cn
Power
Menu
Back panel and connection terminal
①
②
①
②
③
④
⑤
⑥
⑦
⑧
⑨
⑩
③
④
⑦
⑤
⑧
⑥
⑨
⑩
Audio input 1,2,3,4
Audio output 1,2
Video input 1,2,3,4
Video output 1,2
VGA interface
Net connect RJ45
RS232 interface
Alert input/output signal and RS-485 signal terminal. the order from left
to right is: alert output 1,2;alert input 1,2,3,4;earth;RS-485
Fan base
Power line plug
2
PDF 文件使用 "pdfFactory Pro" 试用版本创建 www.fineprint.cn
System operation
1. Record operation
Record operation can be divided into Manual, Auto, Alert, Motion detect,
and the combination operation of above.
Manual
l
l
l
“ record setting”, Press button “quantity” .
press “=” start record, 4-channel start record at the same time,
the mark of record appear on the VFD and monitor.
manual belong to the normal record.
l
Press “=” stop manual record.
Alert Record
l
l
l
l
l
The parameter in" the alert records image the enactment".( the
related system setting chapter for details see)
Press "guard" make the system be placed in the warning.
The alert record can start with motion and detect. If you want to
use this function, please choose the window of “motion and detect”
on the list in advance, and setting “alert”.
.
The alert record can stop after press “record” button only.
The length of alert record is confirmed by “TIME BEFORE” “TIME
AFTER”.
l
While recording, there is a red signal on the left of VFD and
monitor. The buzzer won’t stop until press “clear”.
Motion Detect
l
l
Setting the parameter in” Motion Detect” column.
Starting the detect record must press the “guard” before, but there
is any other operation before the normal detect record.
The time of normal detect is decided by “record time” in motion
setting; the time of alert record is decided by “alert record setting” in
“before/after alert”.
Scheduling record
l
l
l
Setting the parameter of scheduling record in "the setting
scheduling" column.
Press" scheduling" on the front panel, the signal “¹ ” will show on
3
PDF 文件使用 "pdfFactory Pro" 试用版本创建 www.fineprint.cn
the left of the VFD display area and screens
Press" scheduling “and input manager's password to cancel the
scheduling of record.
Combination record
l
l
The combination record can be use according to need. Such as
the scheduling detects record, it needs to combine the scheduling
record setting and detect record setting.
2. Play/ search
You can use IE browser software or one to one specific software.
1. one-one specific display software:
l
Play, Press “4” on the front panel to play, the signal will show
on the left top corner of the VFD and screen. Press it again to stop
running, and the signal disappears.
l
The image played is always the one that stopped last time or
recorded recently.
l
It can play one by one. Press “play” again will play normally. The
forward/review button can turn the speed, press “play” will renew.
l
Press up and down can choose the segment of same type. A
head and a tail operation can repeat.
l
4 images can replay at the same time or either one image replays
in full screen. The up, down, left, right button can choose single
image, press menu will renew.
l
Searching play
4
PDF 文件使用 "pdfFactory Pro" 试用版本创建 www.fineprint.cn
User guide
Switch on
n Confirm the safety notice has already carried out before switching on.
n Check the conjunction of system, input, output and the power supply before
switching on.
n Confirm the image standard (NTSC/PAL) and monitors are met the request.
n If there is correct, start the exterior equipments first.
n If the DVR is shut down abnormally, no OSD mark will appear when switching on,
and the monitor image is black. The system will sort of HDD automatically,
after the sorting, it will continue to play the recording. The information in HDD
will affect the time of dislocation and arrangement, please wait patiently.
n If the system has already set the schedule recording and the system is just in the
schedule time, the system will start the schedule recording according to the
parameter automatically.
Shut down
n
n
n
Shutting down normally will make system stop no work, do not shut down the
DVR when it is recording or playing, especially when it is under recording.
(Otherwise the system will start the automatic renew next time.)
Press “=“ to stop recording or press “ 4” to stop playing before shutting
down, or return the system setting list and set the system in stopping alert,
then turn left the power control lock to shut off the machine. Do not shut off the
power supply when the system is under recording backup; otherwise the
finished records will be lose.
Pull out the power cable from the AC outlet if the DVR will not be used for a
long time.
Normal recording
n
n
n
n
n
n
Connect all power supplies of related equipments before recording,make
sure the system has video input.
Press “information” to look into the remaining space of HDD, if the space not
enough, please backup or overwrite.
Check "recording parameter” to set the image quality before recording. Also
you can press “quality” to select it. The image quality cannot be changed
when the system is recording.
Press “=” to start recording, the indicator will appear. Press “display”, red
indicators for quality, the current date and time will show on the monitor. Press
“display” again, the state of HDD will show on monitor.
Don’t start recording in the process of system setting. If the system is setting,
move the cursor to “back” in system setting window to withdraw from the
system-setting window, then press “record” to start recording.
If HDD is full when the system is recording, and the system has already set
auto overwritten, the record will run without break. The system will overwrite
from the beginning. If the system has set to be manual recording, and the
5
PDF 文件使用 "pdfFactory Pro" 试用版本创建 www.fineprint.cn
early alert has set not to be "0", there will be alert. The video recorder
continues to record after the alert is cleared. It will stop recording when HDD
is full and show a signal for advice.
n
In manual recording, schedule recording (auto recording) and alert recording,
the degree is increased. Therefore, the manual recording if useless when the
system has started the schedule recording, and the alert recording can
interrupt the other two. The manual and schedule recordings are normal ones.
The alert recording is decided by DVR, the manual recording is casual, and
the auto recording is scheduled.
n
Set “YES” in the “secret recording” in the “recording parameter setting” to start
secret recording.
n
Set “YES” in the “Audio” in the “recording parameter setting”, the audio and
video will record at the same time; set “NO”, the system will record without
video.
For details of parameter setting, please read “recording parameter setting” in
the “system setting”.
n
Alert recording
n
n
n
n
n
n
n
n
n
n
n
Alert recording cannot be started by pressing “(”. All the manual recordings
are plain recordings.
Alert recording can be touched off by alert input; therefore, user should check
the connection of alert inputting equipment before starting DVR.
Alert recording can be started by motion detect. Pre-set it in “motion-detect
setting” in the “system setting” menu, and set “detect recording” to be “alert”.
The system has to be pre-guard before the alert recording starts. Otherwise,
the system will not perform the alert recording. Alert or not is not set in the
“system setting” menu, but by pressing “alert” in the front panel.
When the system is in alert recording, the system has to release from alert
first before pressing “=” to stop recording. Right passport has to be input
before releasing from alert, for the system won’t perform alert recording after
release.
Check “alert recording setting” and set the quality before recording. The
quality can’t be changed when the system is recording.
When the system is in alert recording, a red signal will appear on the left top
corner of the monitor. The equipment connecting to the alert output will
decide the buzzer will ring or not. Press “clear” in the front panel can stop the
buzzer.
When the system is in alert recording, press “clear” is only to clear alert
output, not to stop alert recording.
The system can connect 4-channel input. The relative number signal on the
left top corner of the screen will turn red when the alert recording has been
started.
The system can separately set the 4-channel input to be “normal open” or
“normal close”.
Image 1 is the main one, which will be shown on the screen when the system
is in alert or when the alert has been cleared. So, when the 4 –channel input
is not full, the image can’t be vacant.
6
PDF 文件使用 "pdfFactory Pro" 试用版本创建 www.fineprint.cn
n
n
n
n
n
When “pre-alert recording” is no set to be “0”, press “alert” and the system
will be in alert. When there is alert, the system will record the pre-alert
condition. When pre-alert recording” is set to be “0”, the system won’t be in
alert, and the system won’t record the pre-alert condition.
The largest time for alert recording is “pre-alert recording” (less than one
minute) plus the time for keeping the alert input effective, and plus “after-alert
recording” (less than one minute).
The system has 2-channel alert outputs. When input channel 4 is working,
output channel 1 is effective, and it can be connected with siren and other
alerting and locking equipment. As soon as the alert recording is working,
output channel 2 will be effective and it can be used in remote monitor
Before alert recording, the system can set any part of either channel to be
masked.
Alert recording is saved and can be searched and re-broadcasted as “alert
recording”.
Motion detection recording
n Detection recording is according to the average variety rate, when the
environment changes greatly, it will start recording.
n Motion detect will divide the image to 16 areas, and these 16 areas can be set
separately whether motion detect recording is performed. The motion detect
will be started when either area is set “YES”.
n In a “YES” area, when the movement has reached “statoscope”, the alert
recording is started. “Statoscope” has seven options in “images detect setting”.
User can adjust the statoscope in certain condition. Over-sensitivity and
over-inaction will not reach the scheduled effect.
n The kind of record is decided by “detect recording”, the normal recording is
compared with last recording, when the change achieve to “statoscope” can
start .it fit to stable place.
n The time for normal detection recording is decided by “recording time” in the
“motion detect setting”. The time for alert detection setting is decided by
“recording length” in the “alert recording setting”.
n Press “guard” to start alert detects.
n Recording lose detect is a protection to the camera. When there is something
wrong with the camera or with the connecting between camera and recorder,
the buzzer will ring.
n Secret recording cannot affect motion detect.
n For details of parameter setting, please read “motion detect setting” in the
“system setting”.
Schedule recording
n
n
It is a normal recording started and stopped automatically according to the
schedule. It is suitable for fix time recording.
If you want to use this function, you should set in “schedule recording” in the
system setting menu first. You can set each day separately. Time setting
should be 24 hours.
7
PDF 文件使用 "pdfFactory Pro" 试用版本创建 www.fineprint.cn
n
n
n
n
n
Pre-set “schedule recording parameter setting”, and press “schedule” on the
front panel to start schedule. The signal“¹” will show.
It is an auto way for recording, and it cannot be used with manual recording at
the same time. When you press “schedule”, any other button won’t be
effective except “guard”, “vision”, “play” and “manual”. Even the system is not
under recording, press “record” and the system cannot perform manual
recording. But user can set time by pressing “menu”. The other setting will be
effective when “schedule” is pressed again next time.
Press “schedule” and “REC” can change to manual recording, but you should
input a correct password.
Alert recording is effective when the system is schedule recording.
It is related to the time; please check the system date and time before using.
When the power is shut off, the schedule recording has no use.
If the time when you start power lock is just in the schedule record
period, press “schedule”, and the system will start recording
automatically.
If the machine is dual-operation, when the system is playing and
the time has reached the schedule, schedule recording will start as
background.
For further information, please read “schedule recording
parameter setting” in “system setting”.
Play
n
n
n
n
n
n
When the video recorder stops recording,press “play” and the video recorder
will start to play.
Press “play” while the video recorder is recording, then, playing is active while
recording is as background.
Pressing “play” when the video recorder stops recording, the video recorder
always begins from where the recording stopped last time or the latest
recording, no matter the recording is a normal one or an alert one.
When the recording finishes playing but no “play” have been pressed, the
video recording will automatically play from the very beginning. For example,
if the latest is a normal recording, the video recorder will play the first normal
recording; if it is an alert recording, the video recording will play the first alert
recording. It only stops when you press “play”.
When the video recording is playing, press “pause” and the performance will
stop for a while. Press “pause” again, the next recording is played. Continually
press “pause”, it will play the recordings one by one sequentially. Press “play”
and it will play normally.
Press “play” when the video recorder is forwarding or reviewing, it will play
normally from the current position of forwarding or reviewing.
8
PDF 文件使用 "pdfFactory Pro" 试用版本创建 www.fineprint.cn
n
Continually press 8 or7, and the system will have 6 levels of forwarding and
5 levels of reviewing to shift the speed.
Searching play
Video recorder can perform searching play when it is playing. There are two kinds
of searching play: searching depends on time or on the paragraph. The former is
through window setting and pressing keys on the front panel performs the later.
How to use searching play depending on time: press “option”, enter “recording
searching setting”, choose from the normal recording and the alert recording, set
the searching time, move the cursor to “searching”, press the “option” again and it
starts searching. The video recorder will play from the exact time if it finds the
setting time; otherwise, it will play from the nearest time. A paragraph means a
recording from the beginning to the end. Searching depending on paragraph has
two kinds, normal recording and alert recording, which will search the last
paragraph or the next one. When “all” is chosen, it will search the forepart of the
current paragraph or the last one. To finish the performance, all the user has to do
is choose and press. Play, record and search can be done at the same time.
Multi-Function System
In system, playing and recording are independent. When recording and playing
are performing at one time, you can stop either one for totally independent.
When user starts to record as the video record is playing, nothing will appear on
the screen except the recording indicator. If system stops playing, the recording
will appear on the screen from the background. When the video recorder starts to
play as it is recording, the playing will appear on the screen, the recording as the
background.
Searching while the video recording is playing, whether it is recording or not.
When the screen quality of recording and playing is set “better” or above, the
system will guarantee the quality of recording (as the background). Then, the
picture appearing on the screen may be not quite clear. But this does not mean the
real quality of the playing recording. Stop recording on the background to get know
the quality of the playing recording.
Notes: Avoid operating multi-function system unless it is necessary; especially
avoid frequently searching and playing for a long time when it is recording, which
will harm HDD.
Password
Password is to protect the performance of “option”, thus to protect the setting and
the operation of video recorder. If inputting the wrong password for three times,
the system will alert for 3 minutes.
n Two kinds of password: manager’s (the default is 88888888) and operator’s (the
default is 66666666). The manager’s level is higher than the operator’s, so the
operator can change the operator’s password and decide (endow) what
settings and operations the operator can do. Through “authority”, the manager
n
9
PDF 文件使用 "pdfFactory Pro" 试用版本创建 www.fineprint.cn
n
n
n
n
n
n
n
n
decides what settings and operations the operator can do.
The manager’s and operator’s password can be set and modified in “authority”,
after inputting the old password. The new password should be input for twice.
The system will only accept the new password when they are the same.
You can choose any eight numbers from 0 to 9 as the password, and input
them through the number keys in the front panel. The password should have 8
numbers.
The system can have no password. In the “authority”, leave the “new key” and
“retype” to the blank, which will make the operation of video recorder open to
everyone. When the manager’s password is cancelled, the operator’s
password is useless. Therefore, the system cannot keep the operator’s
password without the manager’s password.
The system can keep the manager’s password without the operator’s
password. Keep the operator’s “new key” and “retype” blank, then, the
operator’s password is cancelled. But user cannot operate the system as an
operator.
To set a new password when the system has no password before, remember
to keep the “old key” blank, otherwise the new password won’t be accepted.
The manager endows all the rights to the operator in the “authority” and allows
the operator to set and manage all the items, which means the manager and
the operator have different passwords, but only the manager has the right to
set “system” in the “option”.
When the system has the password, each time you press “option”, the “input
key” window will appear. Only when the right password is input, the system
setting menu will appear. Different levels of menus will appear when different
levels of password have been input.
Besides system operating password, there are passwords for stopping guard
and stopping scheduled recording.
HDD password
The information in our system HDD has been protected by password. Therefore,
HDD cannot be read in computers and video recordings produced by other
manufactures.
n The password in HDD cannot be changed. A HDD has only one password, and
master and slave (or the backup disc) cannot use different passwords.
n You can choose any eight numbers from 0 to 9 as the passwords, with the default
88888888. Although HDD password is similar to operating password, the two
are different in their concept and function.
n The password can only be set when “format disc” is pressed. Only by inputting
the old password can you format HDD, therefore, the password is also a
protection to the operation of “format disk”.
n You can set a new password whenever you format HDD. You can leave blank the
“new key” and “retype”, so that there is no password.
n
The choice and format of disc
n
The memory in our system is HDD. Without HDD extender, the system can install
10
PDF 文件使用 "pdfFactory Pro" 试用版本创建 www.fineprint.cn
two HDDs (the capacity of HDD can be different.) When installing the second
HDD, please set it “slave” as the instruction of the manufacture. Otherwise, the
system won’t work.
n The second HDD can work as an “assistant disc” to store information and
operate. The choice of HDD is set through “choose working disc”. When the
slave is confirmed as the working disc, the playing and searching will be
operated in slave, but the recording is still on the master.
n
“Format disc” is similar to initial format, which means all the information in the
disc will be lost. After inputting the right old password, you can format HDD.
n
Before formatting master, you can change the password, which will be in effect
when you reuse HDD. The slave should use the same password.
System setting
n
n
n
n
System setting is through “option”. If the system has the password, when you
press “option”, “input password” will appear. Only after inputting the right
password will the system setting menu appear.
When the system has two levels of password, the manager and the operator
have different setting menus.
Every item in the system setting menu has its own setting window. Every item
is through “option” and the four direction keys below the “option” key. The up
and down keys are used to choose from different items; the left and right keys
are used to move in the chosen item. If the chosen item has several options,
the left and right keys are used to make different options. The number item is
set by the number keys in the front panel. After the setting, press “option” to
confirm it.
The system setting won’t be lost when the power is off.
Display
n
n
n
n
After power on, the symbol of the manufacturer will appear for about 5
seconds. If the power is abnormally off when the system is recording, put the
power on and no symbol will appear. HDD will work by itself and continue to
record.
Each key has its own indicators in the front panel to show the state.
Press” display”, signs to show different states (the normal recording, the
scheduled recording, the alert recording, play, pause, forward, review, etc.) will
appear in the top left corner of the monitor, and signs to show the time and
date in the top right corner of the screen (when the system is recording and
stopping, it is the current time; when playing, it is the then time.) Press
“display” again, a list about the space of HDD and the remaining space of HDD
will appear on the screen, all will disappear when pressing “display” again.
“Display” is independent from recording, playing and stopping, but it cannot be
used when the system is setting.
Press “information”, all information about the state of HDD will appear on the
screen, and disappear after 10seconds. Don’t press “information” when the
system is recording, playing or system setting.
11
PDF 文件使用 "pdfFactory Pro" 试用版本创建 www.fineprint.cn
Record searching
n
n
n
Press “searching”, and the list will appear.
Searching in the paragraph: move “ é ” or “ ê ” to choose certain
recording in the listed files, press “searching” again, the “searching in the
paragraph” dialogue box will appear, input the beginning time and press
“searching”, the system will begin to search in the paragraph
Repeatedly watching function: move “é ” or “ê ” to choose certain
recording in the listed files, press “option” and then “quality”, choose the
beginning of the paragraph that needs repeatedly watching, let it play for a
while, press ”quality” again, choose the end of the said paragraph, and enjoy
the chosen recording
Quality with memory space & HDD with recording time
n
n
n
n
The quality in our video recorder has eight levels: 1-7 levels and user-setting.
The user –setting quality will take 1MB/h (the lowest quality) to1600MB/h (the
highest quality) of the disc space.
Higher the quality, the more space it will take, and the video recording can
record for much less time, so the user should choose the appropriate quality
and quantity.
The quality should be set before the recording. No change of quality setting
during the system is recording!
The quality of the normal recording, scheduled recording and the alert
recording is set independently in different windows (Scheduled recording is set
every day.); or they are set by continually pressing “quality” when the system is
not recording.
12
PDF 文件使用 "pdfFactory Pro" 试用版本创建 www.fineprint.cn
System setting
Before using video recording, set the system according to own needs, otherwise
the video recorder will perform following the settings in the factory. (For further
information, please read “system management”)
1.
Enter menu
1. In the live monitor, press “option” in the front panel. If the system
has password, “Please Input password” will appear, as below:
Please Input Password:
2.
Operating password has two levels: manager’s (super users) and
operator’s (users). The default for the manager is 88888888, and
for the operator is 66666666.
2. How to use system setting menu
1. Press “option” when the system has no password, or input the right
operator’s password in the “input password”, the “system” menu
will appear, as below.
2. In “system”, move “é”“ê”“ç” “è” and press ”option”
to confirm. Press “é”“ê” to choose the items in the main
item, press “ è ” enter the sub-item and set the detailed
parameter. After setting, press ”cancel” to enter the main item.
press “ç” to exit from the system menu, and the dialogue box
will appear. Move to “save” and press ”option” to save the settings;
move to “no save” , press “option” and exit to the main item without
save the settings.
3. In the sub-item, there is a shortcut to back to the main item to
facilitate user. If the cursor stays in the edit box of the sub-item,
press “option” to back to the main menu directly. If the cursor stays
in either keys of the sub-item, press “ç” to back.
4. History menu: there is a “history menu” in each sub-item, used to
get back to the settings saved last time.
3. Normal setting
Choose “general setting” in the system setting menu , press “è”and enter the
following window:
13
PDF 文件使用 "pdfFactory Pro" 试用版本创建 www.fineprint.cn
1.
2.
3.
4.
5.
6.
General setting is mainly about time, date and network IP settings.
Time and date setting: set the recording time. Press the number keys
and input the year, month, date, hour, minute, and second to check
the time. After that, press ”setting” and the time setting gets into
effect at once.
Network setting: set the network identifier of the video recording.
Only when the setting is right can the user enter the video recording
through the user’s soft disc.
Video input setting: PAL and NTSC can be used.
Language: many languages can be used.
ID.: number the video recordings in order to facilitate the
management of several recordings.
4. Recording setting
choose “recording setting” in the system setting menu, press “è”and enter the
following window:
14
PDF 文件使用 "pdfFactory Pro" 试用版本创建 www.fineprint.cn
1.
Recording setting is used to set the baud rate, frame rate and working
mode of HDD when using manual recording.
2. Choose picture: choose from ”all”, “picture 1”, “picture 2”,“picture 3”and
“picture 4” to set the picture.
3. Setting effect: when the user has chosen either one from the four
pictures without pressing the “setting effect”, the system will play the four
pictures instead of one.
4. Quality: the quality of recording has eight levels: 1-7level and
user-setting.
5. Default-setting has two meanings here: one is to set the baud rate
according to user’s own need; the second meaning is to startup the
single picture which only gets into effect when “user-setting” is chosen.
6. User baud rate the range is from 1MB/H to 4000MB/H
7. User frame rate: the range is 0.1ps/second to 30ps/second
8. Audio: only when the “enable” is pressed, the audio can be recorded with
the video, otherwise, there is no sound.
9. Secret-record: when the secret-record is chosen, the screen will have a
certain picture, and the user cannot see the real live picture.
10. Overwrite: “overwrite” means how to deal with the information when HDD
is full. It has three options: “auto overwrite”,” manual overwrite”, and “no
overwrite”. If it is not “auto overwrite”, when HDD is full, the system will
stop recording, “HDD is full” appear with the buzzer ringing.
11. HDD full pre-alert: when “manual overwrite” or “no overwrite” is chosen,
the system can set HDD full pre-alert. The buzzer rings when the
remaining space matches the setting space.
15
PDF 文件使用 "pdfFactory Pro" 试用版本创建 www.fineprint.cn
Disk Full Information
The disk is full. If recording needed, choose one of the
following steps:
n Set auto overwriting mode
n Empty disk
n Change disk
Press“clear”to stop the buzzer ringing and exit
Status
5. Alert setting
Move the cursor to “alert setting”, and press è to enter the following window:
1.
2.
3.
4.
5.
6.
Alert setting is used to set the alert mechanism and the working
parameter of the alert.
Time before/after: it is to set the length of the recording before/after the
alert.
Beg. Switch delay: it is to set the period of time for switching when the
alert begins.
End. Switch delay: it is to set the period of time for switching after the
alert finishes.
Alert input delay: it is to set the period of time for alert output. The
window default is 99 minutes. The user has to clear the alert manually,
otherwise the buzzer will continually ring when there is something
special.
Alert delay: after pressing “guard”, the system will function only in the set
16
PDF 文件使用 "pdfFactory Pro" 试用版本创建 www.fineprint.cn
7.
8.
9.
1.
2.
3.
4.
5.
6.
7.
8.
9.
10.
11.
12.
13.
14.
period of time.
Alert upload: the system will automatically stop uploading when it
reaches the set time.
Auto-inspect the sentries time: after setting it, the video recording will
output an alert in the set time. It has to be cleared by hand. It is used to
check whether the guard is on duty and whether the video recording is
working well.
Alert linkage: it is to set the function parameter of the alert interface as
following:
Alert: (three options) alert input alert output, and alert number.
Interface: with two options, open and close. The default is open.
Alert linkage: to choose the alert input number.
Degree: to set the priority of alert (1 to10). No 1 is the lowest degree.
Recording picture: correspond to the picture of alert input.
Quality: quality of alert picture.
Output: it is alert output.
Buzzer: it is the switch of buzzer. The default is close, which means the
alert outputs without any sound.
Upload: to set whether the alert picture is upload or not. The default is
close. (Optional)
Pre-setting: to get the default back.
Save and back: press it after setting.
Back: back without save the setting.
After setting all the above parameters, presses “cancel” and “save” or
continue to set other parameters (by choosing “last page”/”next page”)
Attention: after save the setting and canceling the menu, the user has to
press “guard” in the front panel, so that the alert will function.
17
PDF 文件使用 "pdfFactory Pro" 试用版本创建 www.fineprint.cn
6. Schedule setting
Press ”option”, choose ”schedule setting” from the system setting menu, press è
and enter the following window:
1.
Circle: (eight options) workday, weekday, Monday, Tuesday, Wednesday,
Thursday, Friday, and Saturday. Workday, weekday, Monday and
Tuesday can be set between Monday to Sunday; Wednesday, Thursday,
Friday, and Saturday set as the date (month/date).
2. Period of time: it is to set the period of time for schedule recording. The
user can set eight calculate graph (eight periods of time), form A to H.
3. When setting the parameter, the user has to decide the effective time of
schedule recording by setting the circle and the period of time, and
decide the working method of recording according to the quality, mode
and picture.
4. Quality: quality of schedule recording, to separate the quality setting in
other recording. Eight options: Low,Medium,High level and user-setting.
5. Mode: to set the mode of schedule recording in the schedule.
6. Schedule: the video recording will recording when it is the schedule, and
stop when the time is up.
7. Detect: to startup MD recording in the schedule, which will function when
the “MD detect” parameter is set.
8. Stop: the schedule does not function when “stop” is pressed.
9. Picture: set picture to recording in the schedule.
10. Auto alert: three options: “within schedule”, “without timing” and “no”.
When “within schedule” is chosen, the auto alert will only function in the
schedule, while it will only function in the schedule when “without timing”
is chosen.
11. Attention: after setting the schedule, save and cancel, the schedule
setting will function when the “schedule” key in the front panel is pressed.
18
PDF 文件使用 "pdfFactory Pro" 试用版本创建 www.fineprint.cn
7. Record searching
Press “option”, choose “recording searching” in the system menu press è to enter
the following window:
1.
2.
3.
4.
5.
6.
7.
8.
Recording searching is used to search the recording information. The
user can choose the following options to search the information.
Input the time: input the beginning and end time of the recording.
Input the card NO.: input the bank card NO. of the recording.
Recording mode: choose the mode of recording information (normal or
alert)
Searching mode: two options: fast searching and full searching.
Fast searching: it can search very fast, but sometimes it cannot find the
information because of missing.
Full searching: it is slow, but it will find any information saved.
After finishing the above parameter, press “searching” and the video
recording will search for the information and play it.
8. Backup:
Press “option”, choose “recording backup” in the system menu press è to enter
the following window:
19
PDF 文件使用 "pdfFactory Pro" 试用版本创建 www.fineprint.cn
1.
2.
3.
4.
5.
6.
7.
8.
9.
The video recording provides several kinds of information backup. The
user can set the backup time, mode, category, facility and other
parameters.
Backup facility: USB, IDE, Network can be used as backup facilities.
Backup mode: it is used to deal with the backup facility with the
information on it. It has two options: overwrite and advanced. Overwrite
means to cover the old information; advanced means to add the new
information behind the old one.
Operation mode: three options: input the time, choose the list and mark
AB.
Input the time: backup the information according to the period of time,
from the beginning of inputting to the end.
Choose the list
Mark AB: When watching the recording, press “quality” to choose the
beginning of the information. After a time of playing, press “quality” again
and choose the beginning. When operating the backup, just choose
“mark AB” and the system will backup the chosen information.
Period of time: user can set several periods of time, number them and
backup information according to the chosen period of time.
Recording catalogue: it means the catalogue of information to be backup
in the video recording, normal or alert.
20
PDF 文件使用 "pdfFactory Pro" 试用版本创建 www.fineprint.cn
9.Detect
Press “detect”, menu press è to enter the following window:
1.
Choose picture: picture 1, picture 2, picture 3, and picture 4. The picture
can be set independently.
2. Setting effect: when the user has chosen either one from the four
pictures without pressing the “setting effect”, the system will play the four
pictures instead of one.
3. Detect recording: it is the detection recording catalogue with normal and
alert to choose from. The video recording has to be set in “guard” when
alert is chosen.
4. Detect sensitivity: seven levels (highest, higher, high, middle, low, lower
and lowest) to choose from according to different live environment.
5. Video lost detect: the default is close. If it is enable, when the image is
viciously covered, the video recording will alert according to the video
lost sensitivity.
6. Video lost sensitivity: seven levels to choose from according to different
live environment.
7. Recording time: to set the time of detect recording.
8. Area select: to divide the live picture to 16 areas. User can set the whole
16 areas to be “yes” or “no”, and also set some of them according to his
own need.
9. Lost detect: to startup/stop the lost picture. When “startup” is chosen, the
video recording will alert when the information is destroyed. User can
also set when MD detect to get into effect. (startup schedule detect/MD
detect)
10. Startup schedule detect: MD detect will only be effective in the scheduler
and only when the schedule setting is detect.
11. Startup MD detection: The video recording will detect all the time. The
schedule detect is not functioning now.
12. The video recording can do the select setting in each picture
21
PDF 文件使用 "pdfFactory Pro" 试用版本创建 www.fineprint.cn
independently. When setting, the picture and its number appear on the
screen. User can also press “next picture” to choose the picture that
needs setting.
13. Attention: The alert of information lost and screen cover will only be rang
in the alert state.
10.system management
Press “Manage”, choose “system management” in the system menu press è to
enter the following window:
1.
choose format disc: press “(” or “(” to choose “master” or “slave 1”,“slave 2”,
“slave 3” ( attention: take 4 HDD as an example, with two groups of a master and a slave,
and slave 2 is the second HDD in the physical position), input the “old key”, move the
cursor to “enforce”, press and confirm “option” and finish formatting the chosen HDD.
2.
3.
4.
Attention: the key is the information password, the manager should be
careful when change it.
New key, retype new key: the manager has the right to change it.
Diary list:
22
PDF 文件使用 "pdfFactory Pro" 试用版本创建 www.fineprint.cn
5.
Default: also called pre-setting, it is the standard setting when the video
recording is examined and left the factory, and it is used as the foundation
of changing other settings. User can set it according to his own need.
When the setting is in chaos or not up to the expectancy, press “get back
the default” and set it again.
6. Progressing setting:
7.
In senior setting, input the manager’s password to change the seven
levels of recording baud rate, or get back the information also.
23
PDF 文件使用 "pdfFactory Pro" 试用版本创建 www.fineprint.cn
8.
Get back the information: if user inadvertently formats HDD and loses the
information, he can get the information back.
Attention: be careful in this function. The company will not be responsible to
the information lost or destroyed because of wrong operation.
9.
11.Authority
Press “option”, choose “authority” in the system menu press è to enter the
following window:
1.
2.
3.
Password degree: “manager’s password” and “operator’s password” two
choices. The manager has the right to decide the operator’s system
operation password and operation.
Old key, new key and retype new key: the manager can change the old
key and reset the operator’s operation key.
Authority: it is used for the manager to set the rights of operator. In
24
PDF 文件使用 "pdfFactory Pro" 试用版本创建 www.fineprint.cn
4.
default, the operator only gets the right of “recording searching”.
Attention: be careful to authorize in order to keep the video recording
work well.
12.Notes:
Press “option”, choose “assistant setting” in the system menu press è to enter the
following window:
HDD:HDD information. For example:
Model:
Edition:5.034
Date of edition: 3/17/2005
HDD quantity:1
HDD capacity:41.2 Gs, surplus:40.5 Gs
From: 03/18/ 2005
20﹕43﹕43
TO:03/19/2005
08﹕19﹕20
The work dish: master HDD
Way of Overlay the: Overlay all to have already
time of overlay :00 times
25
PDF 文件使用 "pdfFactory Pro" 试用版本创建 www.fineprint.cn
Display of running state
Besides displays on the front panel, this machine can also show the date, time and
the running state on the monitor screen.
Display of running state
There are some signals on the screen, as below:
alram
quality
record
Date&time
state
If no signal on the screen,press “display” on the front panel, the running
line will show. Press it again, the state of HDD will show, press it for the
third time, the line will disappear.This button can change among running
state, HDD state and no display.
Time/date display
It will show on the right of the screen. (read “date and time setting” in the system
setting menu for the details).The time is set manually before use, and will keep
automatically. When the system is recording or stopping, it shows the current time;
when the system is playing record, it shows the record time; when pause, it shows the
time when you stop playing, the time keeps still.
Basic function display
The left of the state line means the running state of the machine. A red bell
means alert,a red circle means record, the signal of alert means alert
record,so it shows with the recording signal. The quality signal compose 3
parallel squar.1 “grade 1”,2 green squar means “grade 2”,3 green squar
means “grade 3”,1 yellow squar means “grade 4”,2 yellow squar means
“grade 5”,3 yellow squar means “grade 6”,1 red squar means “grade 7”,2
red squar means “grade 8” that is “user-setting”.
Shown as diagram below:the time is the record time ,not the present.
A blue squar means stop(play,record).it will change to red,if you don’t set
auto overwrite and the HDD is full at the same time.it will overwrite all the
record except alert record. (The related system setting chapter for details sees)
press” alert” will start schedule, a bell will show(shown as upper).but you should confirm
whether start scheduling record. (The related system setting chapter for details sees)
the upper shows the playing.the related display will show,if the function
start.
26
PDF 文件使用 "pdfFactory Pro" 试用版本创建 www.fineprint.cn
DISPLAY OF HDD USAGE
when the basic function of running and time has shown on screen,press “display”will
appear a color signal to show the usage of HDD.
Empty
Alert record used
Normal record used
13.62
9.34
15.95 G(1000M)
Overwrite
The color means the percent of the usage HDD; you should see according to the
direction which arrow direct. The yellow means the way of overwrite. If no yellow
appear ,means the “auto overwrite” set as “no”. (The related system setting chapter for
details sees).the numbers below means the capacity.
If HDD is full, the display is different. The red area will extend to right, and start
overwriting the green area, when you set as “auto ”;the white area will be overwrite by
red and green at the same time, when set “all”.
Switch on Display
Original image will show about 5 second. From switch on, HDD reset to the end of
original image need about 15S.then start running normally.
Especially, it can renew after power off. It can keep the condition before. Because it not
belongs to restart, do not show the original image. Please wait patiently.
Function of P.T. Z
1、Regardless recorder to be any state:
Press “P.T.Z”(the recorder to be PTZ),VFD display (open)
,
Press”P.T.Z”again,it cancel the PTZ controling, resume formerly estate.VFD
display(close)
2、Recorder to be PTZ:
First,enter the assistant setting in menu system,set relevant protocol about the
decode,baudrate, primary address of decode,step rauge and other parameter.
Clavier function:
A、 can control eight decodes,adddress is 1,2,3,4,5,6,7, press this numeric to choice.
B 、 ”Schedule”,”Search”,”Quality”,”Displayl”,”Release”,”Alert”,”munu” separate
parallelism
IRIS+ IRISZOOM+ ZOOMFOCUS+ FOCUS- AUTO ON AUTO OFF
△(up)
▽(down)
(left)
(right)
corresponding PTZ
27
PDF 文件使用 "pdfFactory Pro" 试用版本创建 www.fineprint.cn
Main standard and parameter
Item
Compression
standard
Video signal
Video input
Video output
Audio input
Audio output
Alarm input
Alarm output
Alarm mode
Network mode
Backup mode
Specification
MPEG-4
PAL/CCIR,625 lines,50 fields/second
Composite:1.0V p-p/75Ω,BNC linker×4
Composite:1.0V p-p/75Ω,BNC linker×2
VGA output
RCA linker×4
RCA linker×2
no voltage contact to close,always open or close,4channels input
no voltage contact to close,always open,2 channels output
Sensor Alarm; Motion Detect Alarm, Video loss alarm
10/100MMeet Ethernet port automatically , support LAN\WAN and ADSL
Dynamic IP networks(optional)
network,USB(optional)
vision:704×576
Resolution
Hard disk
Code function
Power source
Power
Environment
temperature
weight
Exterior size
Image:CIF 352×288 1/2D1 352×576 D1 704×576
2IDE;Support two 300G more than large hard disks
Set numeric password
DC12V 5.0A/50Hz
40W(not include the hard disk)
Work Temperature:+5℃~+50℃;humidity:< 90%
Store Temperature:-20℃~+70℃;humidity:< 95%
4kg
wide × high×deep:435×63×360mm
Notice: will not notice when there are any change.
28
PDF 文件使用 "pdfFactory Pro" 试用版本创建 www.fineprint.cn
Exterior
size
435mm
External dimension
Model.
(L)x(W)x(H) mm
435x360x63
Weight (kg)
4
Package contents
Description
Quantity
1
1
1
1
DVR
POWER CORE
ADAPTOR
USER GUIDE (CD)
29
PDF 文件使用 "pdfFactory Pro" 试用版本创建 www.fineprint.cn