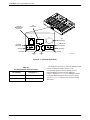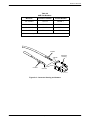
1
COMSPHERE
–48 Vdc CENTRAL OFFICE
POWER UNIT
INSTALLATION GUIDE
Document No. 3000-A2-GB41-40
May 1998
COMSPHERE –48 Vdc Central Office Power Unit
COMSPHERE
–48 Vdc Central Office Power Unit
Installation Guide
3000-A2-GB41-40
5th Edition (May 1998)
Changes and enhancements to the product and to the information herein will be documented and issued as a new release.
Warranty, Sales, and Service Information
Contact your local sales representative, service representative, or distributor directly for any help needed. For additional information
concerning warranty, sales, service, repair, installation, documentation, training, distributor locations, or Paradyne worldwide office
locations, use one of the following methods:
• Via the Internet: Visit the Paradyne World Wide Web site at http://www.paradyne.com
• Via Telephone: Call our automated call system to receive current information via fax or to speak with a company representative.
— Within the U.S.A., call 1-800-870-2221
— Outside the U.S.A., call 1-727-530-2340
Trademarks
All products and services mentioned herein are the trademarks, service marks, registered trademarks or registered service marks of their
respective owners.
Printed on recycled paper
COPYRIGHT 1998 Paradyne Corporation. All rights reserved.
This publication is protected by federal copyright law. No part of this publication may be copied or distributed, transmitted, transcribed, stored in a retrieval system,
or translated into any human or computer language in any form or by any means, electronic, mechanical, magnetic, manual or otherwise, or disclosed to third parties
without the express written permission of Paradyne Corporation, 8545 126th Avenue North, P.O. Box 2826, Largo, Florida 33779-2826.
Paradyne Corporation makes no representation or warranties with respect to the contents hereof and specifically disclaims any implied warranties of merchantability
or fitness for a particular purpose. Further, Paradyne Corporation reserves the right to revise this publication and to make changes from time to time in the contents
hereof without obligation of Paradyne Corporation to notify any person of such revision or changes.
A
May 1998
3000-A2-GB41-40
Safety Instructions
Important Safety Instructions
1.
Read and follow all warning notices and instructions marked on the product or
included in the manual.
2.
This product is intended to be used with a three-wire grounding type plug — a plug
which has a grounding pin. This is a safety feature. Equipment grounding is vital to
ensure safe operation. Do not defeat the purpose of the grounding type plug by
modifying the plug or using an adaptor.
Prior to installation, use an outlet tester or a voltmeter to check the ac receptacle for
the presence of earth ground. If the receptacle is not properly grounded, the
installation must not continue until a qualified electrician has corrected the problem.
If a three-wire grounding type power source is not available, consult a qualified
electrician to determine another method of grounding the equipment.
3.
Slots and openings in the cabinet are provided for ventilation. To ensure reliable
operation of the product and to protect it from overheating, these slots and openings
must not be blocked or covered.
4.
Do not allow anything to rest on the power cord and do not locate the product where
persons will walk on the power cord.
5.
Do not attempt to service this product yourself, as opening or removing covers may
expose you to dangerous high voltage points or other risks. Refer all servicing to
qualified service personnel.
6.
General purpose cables are provided with this product. Special cables, which may be
required by the regulatory inspection authority for the installation site, are the
responsibility of the customer.
7.
When installed in the final configuration, the product must comply with the applicable
Safety Standards and regulatory requirements of the country in which it is installed. If
necessary, consult with the appropriate regulatory agencies and inspection
authorities to ensure compliance.
8.
A rare phenomenon can create a voltage potential between the earth grounds of two
or more buildings. If products installed in separate buildings are interconnected, the
voltage potential may cause a hazardous condition. Consult a qualified electrical
consultant to determine whether or not this phenomenon exists and, if necessary,
implement corrective action prior to interconnecting the products.
9.
In addition, if the equipment is to be used with telecommunications circuits, take the
following precautions:
— Never install telephone wiring during a lightning storm.
— Never install telephone jacks in wet locations unless the jack is specifically
designed for wet locations.
— Never touch uninsulated telephone wires or terminals unless the telephone line
has been disconnected at the network interface
— Use caution when installing or modifying telephone lines.
— Avoid using a telephone (other than a cordless type) during an electrical storm.
There may be a remote risk of electric shock from lightning.
— Do not use the telephone to report a gas leak in the vicinity of the leak.
3000-A2-GB41-40
May 1998
B
COMSPHERE –48 Vdc Central Office Power Unit
Notices
! WARNING:
This equipment has been tested and found to comply with the limits for a Class A digital device,
pursuant to Part 15 of the FCC rules. These limits are designed to provide reasonable protection
against harmful interference when the equipment is operated in a commercial environment. This
equipment generates, uses, and can radiate radio frequency energy and, if not installed and used in
accordance with the instruction manual, may cause harmful interference to radio communications.
Operation of this equipment in a residential area is likely to cause harmful interference in which
case the user will be required to correct the interference at his own expense.
The authority to operate this equipment is conditioned by the requirements that no modifications
will be made to the equipment unless the changes or modifications are expressly approved by
Paradyne Corporation.
! WARNING:
To Users of Digital Apparatus in Canada:
This Class A digital apparatus meets all requirements of the Canadian interference-causing
equipment regulations.
Cet appareil numérique de la classe A respecte toutes les exigences du règlement sur le matérial
brouilleur du Canada.
C
May 1998
3000-A2-GB41-40
Table of Contents
Preface
Objectives and Reader Assumptions . . . . . . . . . . . . . . . . . . . . . . . . .
Abstract . . . . . . . . . . . . . . . . . . . . . . . . . . . . . . . . . . . . . . . . . . . . . . .
Related Documents . . . . . . . . . . . . . . . . . . . . . . . . . . . . . . . . . . . . . .
v
v
v
1. Introduction
Overview . . . . . . . . . . . . . . . . . . . . . . . . . . . . . . . . . . . . . . . . . . . . . .
Features . . . . . . . . . . . . . . . . . . . . . . . . . . . . . . . . . . . . . . . . . . . . . . .
Technical Specifications . . . . . . . . . . . . . . . . . . . . . . . . . . . . . . . . . .
Equipment Warranty and Support . . . . . . . . . . . . . . . . . . . . . . . . . . .
1-1
1-2
1-3
1-5
2. Installation
Overview . . . . . . . . . . . . . . . . . . . . . . . . . . . . . . . . . . . . . . . . . . . . . .
Installation Considerations . . . . . . . . . . . . . . . . . . . . . . . . . . . . . . . . .
CO Power Unit Installation . . . . . . . . . . . . . . . . . . . . . . . . . . . . . . . .
Air Filter and Brackets Installation (Optional) . . . . . . . . . . . . . . . . .
3000-A2-GB41-40
May 1998
2-1
2-1
2-4
2-20
i
COMSPHERE –48 Vdc Central Office Power Unit
3. Troubleshooting and Maintenance
Overview . . . . . . . . . . . . . . . . . . . . . . . . . . . . . . . . . . . . . . . . . . . . . .
Indicators and Controls . . . . . . . . . . . . . . . . . . . . . . . . . . . . . . . . . . .
Troubleshooting . . . . . . . . . . . . . . . . . . . . . . . . . . . . . . . . . . . . . . . . .
Power Module Replacement Instructions . . . . . . . . . . . . . . . . . . . . .
Preventive Maintenance . . . . . . . . . . . . . . . . . . . . . . . . . . . . . . . . . . .
3-1
3-1
3-2
3-3
3-4
A. Interface Connections
Glossary
Index
ii
May 1998
3000-A2-GB41-40
List of Figures
Figure
Page
1-1.
1-2.
2-1.
2-2.
2-3.
2-4.
2-5.
Central Office (CO) Power Unit with One Power Module . . . . . . . . . . . . . . . . . . . . 1-3
Central Office (CO) Power Unit with Two Power Modules . . . . . . . . . . . . . . . . . . . 1-3
Installing the Optional Second Power Module . . . . . . . . . . . . . . . . . . . . . . . . . . . . . 2-5
Option Straps (S1 through S5) on the CO Power Unit’s Backplane . . . . . . . . . . . . . 2-6
CO Power Unit Installation . . . . . . . . . . . . . . . . . . . . . . . . . . . . . . . . . . . . . . . . . . . . 2-9
COMSPHERE 3000 Series Carrier (Rear) . . . . . . . . . . . . . . . . . . . . . . . . . . . . . . . . 2-10
Using One Power Source and One Input Power Cable for Basic (shown) or
Redundant Mode . . . . . . . . . . . . . . . . . . . . . . . . . . . . . . . . . . . . . . . . . . . . . . . . . . . . 2-11
2-6. Using Two Separate Power Sources for Independent Mode or Redundant Mode . . 2-13
2-7. Using One Power Source and Two Input Power Cables for Independent Mode or
Redundant Mode . . . . . . . . . . . . . . . . . . . . . . . . . . . . . . . . . . . . . . . . . . . . . . . . . . . . 2-14
2-8. Installing the SDCP . . . . . . . . . . . . . . . . . . . . . . . . . . . . . . . . . . . . . . . . . . . . . . . . . . 2-15
2-9. Connecting an NMS Adapter Cable to a Modular 3611 DSU When the DTE Interface
is EIA-232 . . . . . . . . . . . . . . . . . . . . . . . . . . . . . . . . . . . . . . . . . . . . . . . . . . . . . . . . . 2-18
2-10. Connecting an NMS Adapter Cable to a Modular 3611 DSU When the DTE Interface
is V.35 . . . . . . . . . . . . . . . . . . . . . . . . . . . . . . . . . . . . . . . . . . . . . . . . . . . . . . . . . . . . . 2-19
2-11. Air Filter Brackets Installation . . . . . . . . . . . . . . . . . . . . . . . . . . . . . . . . . . . . . . . . . . 2-21
3-1. LED Status Indicators . . . . . . . . . . . . . . . . . . . . . . . . . . . . . . . . . . . . . . . . . . . . . . . . 3-1
3-2. Replacing a Power Module . . . . . . . . . . . . . . . . . . . . . . . . . . . . . . . . . . . . . . . . . . . . 3-3
A-1. CO Power Unit (Rear) . . . . . . . . . . . . . . . . . . . . . . . . . . . . . . . . . . . . . . . . . . . . . . . . A-2
A-2. Connector Housing and Contact . . . . . . . . . . . . . . . . . . . . . . . . . . . . . . . . . . . . . . . . A-3
A-3. NMS Adapter Cable (Feature Number 3000-F2-510) . . . . . . . . . . . . . . . . . . . . . . . . A-6
3000-A2-GB41-40
May 1998
iii
COMSPHERE –48 Vdc Central Office Power Unit
List of Tables
Table
1-1
2-1
2-2
2-3
2-4
2-5
2-6
A-1
A-2
A-3
A-4
iv
Page
Technical Specifications for Central Office (CO) Power Unit . . . . . . . . . . . . . . . . .
Maximum Ambient Temperatures Permitted . . . . . . . . . . . . . . . . . . . . . . . . . . . . . . .
Settings for Basic Mode . . . . . . . . . . . . . . . . . . . . . . . . . . . . . . . . . . . . . . . . . . . . . . .
Settings for Independent Mode . . . . . . . . . . . . . . . . . . . . . . . . . . . . . . . . . . . . . . . . .
Settings for Redundant Mode Using a Single – 48 Vdc Power Source and a Single
Input Power Cable . . . . . . . . . . . . . . . . . . . . . . . . . . . . . . . . . . . . . . . . . . . . . . . . . . .
Settings for Redundant Mode with Either a Single Power Source and Two Input
Power Cables, or Two Separate Power Sources and Two Input Power Cables . . . . .
Jumper Settings . . . . . . . . . . . . . . . . . . . . . . . . . . . . . . . . . . . . . . . . . . . . . . . . . . . . .
Pin Assignments of the DC Inputs . . . . . . . . . . . . . . . . . . . . . . . . . . . . . . . . . . . . . . .
AMP Part Numbers . . . . . . . . . . . . . . . . . . . . . . . . . . . . . . . . . . . . . . . . . . . . . . . . . .
Pin Assignments for the CO Alarm System Outputs . . . . . . . . . . . . . . . . . . . . . . . . .
Pin Assignments for the NMS Adapter Cable . . . . . . . . . . . . . . . . . . . . . . . . . . . . . .
May 1998
1-4
2-2
2-6
2-7
2-7
2-7
2-17
A-2
A-3
A-4
A-5
3000-A2-GB41-40
Preface
Objectives and Reader
Assumptions
This guide contains installation information for the
COMSPHERE – 48 Vdc Central Office (CO) Power Unit
which is designed to be used with COMSPHERE
3000 Series Carriers.
It is assumed that you are familiar with the functional
operation of data equipment, digital network services,
data service units (DSUs), dial/lease modems, T1 channel
service units (CSUs) and T1 data service units/channel
service units (DSU/CSUs).
Chapter 3 describes the status indicators on the
faceplate of the power module. It also provides
troubleshooting guidelines and replacement instructions
for the power module, and a preventive maintenance
schedule for the optional air filter.
Appendix A contains interface connector pin
assignment information.
The Glossary provides definitions for acronyms and
product-specific terms used in this guide.
The Index lists key terms, acronyms, concepts, and
sections in alphaorder.
Related Documents
Abstract
3000-A2-GA31
Chapter 1 provides descriptive information about the
– 48 Vdc CO Power Unit.
Chapter 2 provides installation consideration
information and procedures for installing an optional
second power module, setting the option straps, installing
the – 48 Vdc CO Power Unit, providing power to the
power unit, installing a Shared Diagnostic Control Panel
(SDCP), connecting to a CO Alarm System or a
COMSPHERE 6800 Series Network Management System
(NMS), and installing an optional air filter and brackets.
3000-A2-GB41–40
COMSPHERE 3000 Series
Carrier Installation Manual
Contact your sales or service representative to order
additional product documentation.
Paradyne documents are also available on the World Wide
Web at:
May 1998
http://www.paradyne.com
Select Service & Support –> Technical Manuals
v
COMSPHERE –48 Vdc Central Office Power Unit
vi
May 1998
3000-A2-GB41-40
Introduction
Overview . . . . . . . . . . . . . . . . . . . . . . . . . . . . . . . . . . . . . . . . . . . . . . . . . . . . . . . . . . . . . . . . . . . . . . . . .
Feature . . . . . . . . . . . . . . . . . . . . . . . . . . . . . . . . . . . . . . . . . . . . . . . . . . . . . . . . . . . . . . . . . . . . . . . . . . .
Technical Specifications. . . . . . . . . . . . . . . . . . . . . . . . . . . . . . . . . . . . . . . . . . . . . . . . . . . . . . . . . . . . . .
Equipment Warranty and Support . . . . . . . . . . . . . . . . . . . . . . . . . . . . . . . . . . . . . . . . . . . . . . . . . . . . . . .
Overview
The COMSPHERE – 48 Vdc Central Office (CO)
Power Unit is designed to provide low voltage dc power
to any data communication equipment (DCE) operating in
a COMSPHERE 3000 Series Carrier.
1-1
1-2
1-4
1-5
• Alarm cables and NMS adapter cable, if needed.
These components are used to connect the CO
Power Unit to a CO alarm system and/or a
COMSPHERE 6800 Series Network Management
System (NMS) through a Modular 3611 Data
Service Unit (DSU).
(A Modular 3611 DSU has a row of contacts on the
rear edge of the circuit card and is shipped with a
rear connector plate. The rear connector plate
allows the removal of a Modular 3611 DSU from
the front of the carrier without first disconnecting
the DTE cables at the rear of the carrier. The NMS
adapter cable is only compatible with the Modular
3611 DSU. For more information on the Modular
3611 DSU, see the COMSPHERE 3600 Series Data
Service Units, Models 3610 and 3611, Operator’s
Guide.)
The – 48 Vdc CO Power Unit (hereafter referred to as
the CO Power Unit) consists of the following
components:
• One CO power tray with mounted backplane
• One power module
• Two backplane connector cable assemblies
• Two air filter brackets
• One installation kit which includes the following:
The total number of components required depends
upon your configuration. The ACCULINK 3151
CSUs and 3161 DSU/CSUs do not support
forwarding of CO Power Unit alarms to a 6800
Series NMS.
— Two dc input connector housings and six
contacts for the customer-supplied dc input
cable
— Four air filter bracket screws
— Two nylon cable ties
You must supply the following related components:
• A second power module, if desired.
• One or two – 48V power input cables. The required
number of input cables depends upon your
configuration.
• One air filter, if needed.
3000-A2-GB41-40
1
May 1998
The CO Power Unit can send alarms to a CO alarm
system and a 6800 Series NMS simultaneously. To
connect to a CO alarm system, you need one
customer-supplied alarm cable for each power
module. To forward alarms to a 6800 Series NMS,
you need one Modular 3611 DSU (configured to
forward alarms to a 6800 Series NMS) and one
NMS adapter cable. You can also use a
non-modular Model 3611 DSU, but you must build
your own cable. This guide provides information on
forwarding alarms to a 6800 Series NMS via a
Modular 3611 DSU, but reminds you that a
non-modular Model 3611 DSU can also be used.
1-1
COMSPHERE –48 Vdc Central Office Power Unit
— Redundant mode – the mode in which two
power modules supply power to the entire
carrier. If one power module fails, the
remaining power module assumes the full load
of the carrier. To operate in this mode of
operation, you must install an optional second
power module in the CO Power Unit.
NOTE
Customer-supplied cable
assemblies must comply with
items 5 and 6 of the Important
Safety Instructions at the front of
this guide.
— Independent mode – the mode in which each
of the two power modules supplies power to
one-half of the carrier. To operate in this mode
of operation, you must install an optional
second power module in the CO Power Unit.
For more information on the alarm cables and NMS
adapter cable, see Appendix A of this guide.
Part numbers for the CO Power Unit and its related
components are listed in Appendix B of this guide.
• Provides forced air cooling for the carrier via a
– 48 Vdc fan in the power module.
• Provides an optional air filter which prevents dust
from entering the CO Power Unit and the
COMSPHERE 3000 Series Carrier.
Features
The CO Power Unit provides the following features:
• Detects power module and fan failures by
monitoring the power output levels and the fan’s
low-speed sensor for proper operation of the power
module. When a failure occurs, an alarm indication
light appears on the power module’s faceplate.
• Enables DCEs supported by the COMSPHERE
3000 Series Carrier to operate in a – 48 Vdc central
office environment.
• Provides the following three modes of operation:
— Basic mode – the mode in which the single
power module supplies power to the entire
carrier. This mode of operation is the only
mode available for the CO Power Unit with one
power module.
1-2
• Sends power failure and/or fan failure alarms to a
CO alarm system and/or a 6800 Series NMS via a
Modular 3611 DSU.
Figure 1-1 illustrates the CO Power Unit with one
power module in the left side of the CO power tray. In
Basic mode, the single power module can be installed in
either the left or right side of the CO power tray.
Figure 1-2 illustrates the CO Power Unit with two power
modules.
May 1998
3000-A2-GB41-40
Introduction
CO Power Unit
Backplane
Power
Module
Fan
Power
Module
Handle
300
0D
CP
ow
er
Mo
dule
Pow
er
Fan
Ala
rm
98-13758-01
Captive
Screws
Captive
Screws
CO Power
Tray
Figure 1-1. Central Office (CO) Power Unit with One Power Module
CO Power Unit
Backplane
Left
Power
Module
Fan
Power
Module
Handle
300
0D
CP
ow
er
Mo
300
dule
Right
Power
Module
0D
CP
ow
er
Mo
dule
Pow
er
Fan
Ala
Pow
er
rm
Fan
Fan
Ala
rm
Captive
Screws
Captive
Screws
Power
Module
Handle
CO Power
Tray
98-13694-01
Figure 1-2. Central Office (CO) Power Unit with Two Power Modules
3000-A2-GB41-40
May 1998
1-3
COMSPHERE –48 Vdc Central Office Power Unit
Technical Specifications
Technical specifications for the CO Power Unit (which
includes one power module) are listed in Table 1-1.
Table 1-1
(1 of 2)
Technical Specifications for Central Office (CO) Power Unit
Technical Specifications
ENVIRONMENT
Operating Temperature
Criteria
32°F (0°C) to 122°F (50°C) (See the Installation Considerations
section in Chapter 2 for additional operating temperature limits.)
Relative Humidity
5% to 95% (noncondensing)
Storage Temperature
– 4°F (– 20°C) to 158 5F (70°C)
Shock and Vibration
Withstands normal shipping and handling
POWER REQUIREMENTS
CO Power Unit (with 16 fully equipped
3611 DSUs in the carrier)
– 60 Vdc to – 40 Vdc (4.5 amps maximum)
CO Power Unit (with 16 fully equipped
3151 CSUs in the carrier)
– 60 Vdc to – 40 Vdc (2.3 amps maximum)
CO Power Unit (with 16 fully equipped
3161 DSU/CSUs in the carrier)
– 60 Vdc to – 40 Vdc (4.8 amps maximum)
HEAT DISSIPATION (MAX.) AT
– 48 Vdc
CO Power Unit (with 16 fully equipped
cards in the carrier)
160 watts (CO Power Unit efficiency is approximately 76%)
PHYSICAL DIMENSIONS
CO Power Unit
Height
2.4 inches ( 6.2 cm)
Height (including air filter brackets)
3.0 inches ( 7.7 cm)
Width
16.9 inches (43.3 cm)
Depth
13.5 inches (34.6 cm)
Power Module
Height
2.4 inches ( 6.2 cm)
Width
8.5 inches (21.8 cm)
Depth
11.7 inches (30.0 cm)
Air Filter
1-4
Height
0.5 inches ( 1.3 cm)
Width
14.2 inches (36.4 cm)
Depth
5.5 inches (14.1 cm)
May 1998
3000-A2-GB41-40
Introduction
Table 1-1
(2 of 2)
Technical Specifications for Central Office (CO) Power Unit
Technical Specifications
WEIGHT
CO Power Unit
(includes one power module)
CO Power Unit
(includes two power modules)
Criteria
10.6 pounds (4.8 kg)
15.8 pounds ( 7.2 kg)
Power Module
5.2 pounds ( 2.4 kg)
Air Filter
0.2 pounds ( 0.1 kg)
CENTRAL OFFICE (CO) ALARM
RELAY CONTACTS
0.1 amp maximum at 70 Vdc maximum
APPROVALS
Underwriters Laboratories, Inc. (UL)
Recognized Component
Recognized component as part of 3000 Series Carrier, UL 1950
Canadian Standards Association (CSA)
Certified Component
Certified Component as part of 3000 Series Carrier, CSA 22.2
No. 950
Equipment Warranty
and Support
If you experience trouble with this equipment, please
contact your sales or service representative (as
appropriate) for repair or warranty information. If the
product needs to be returned to the company service
center for repair, contact them directly for return
instructions using one of the following methods:
• Via the Internet: Visit the Paradyne World Wide
Web site at http://www.paradyne.com
• Via Telephone: Call our automated call system to
receive current information via fax or to speak with
a company representative.
— Within the U.S.A., call 1-800-870-2221
— Outside the U.S.A., call 727-530-2340
If the trouble is causing harm to the telephone
network, the telephone company may request that
you remove the equipment from the network until
the problem is resolved.
3000-A2-GB41-40
May 1998
1-5
COMSPHERE –48 Vdc Central Office Power Unit
This page intentionally left blank.
1-6
May 1998
3000-A2-GB41-40
Installation
Overview . . . . . . . . . . . . . . . . . . . . . . . . . . . . . . . . . . . . . . . . . . . . . . . . . . . . . . . . . . . . . . . . . . . . . . . . .
Installation Considerations . . . . . . . . . . . . . . . . . . . . . . . . . . . . . . . . . . . . . . . . . . . . . . . . . . . . . . . . . . . .
Basic Mode of Operation . . . . . . . . . . . . . . . . . . . . . . . . . . . . . . . . . . . . . . . . . . . . . . . . . . . . . . . . . . .
Independent Mode of Operation . . . . . . . . . . . . . . . . . . . . . . . . . . . . . . . . . . . . . . . . . . . . . . . . . . . . .
Redundant Mode of Operation . . . . . . . . . . . . . . . . . . . . . . . . . . . . . . . . . . . . . . . . . . . . . . . . . . . . . .
Alarm Forwarding to a 6800 Series NMS . . . . . . . . . . . . . . . . . . . . . . . . . . . . . . . . . . . . . . . . . . . . .
CO Power Unit Installation . . . . . . . . . . . . . . . . . . . . . . . . . . . . . . . . . . . . . . . . . . . . . . . . . . . . . . . . . . .
Installing the Optional Second Power Module . . . . . . . . . . . . . . . . . . . . . . . . . . . . . . . . . . . . . . . . . .
Setting the Option Straps . . . . . . . . . . . . . . . . . . . . . . . . . . . . . . . . . . . . . . . . . . . . . . . . . . . . . . . . . .
Installing the CO Power Unit . . . . . . . . . . . . . . . . . . . . . . . . . . . . . . . . . . . . . . . . . . . . . . . . . . . . . . .
Providing Power to a CO Power Unit . . . . . . . . . . . . . . . . . . . . . . . . . . . . . . . . . . . . . . . . . . . . . . . . .
Installing an SDCP . . . . . . . . . . . . . . . . . . . . . . . . . . . . . . . . . . . . . . . . . . . . . . . . . . . . . . . . . . . . . . .
Connecting the Alarm Contacts to a CO Alarm System . . . . . . . . . . . . . . . . . . . . . . . . . . . . . . . . . .
Connecting the Alarm Contacts to a 6800 Series NMS Via a Modular 3611 DSU . . . . . . . . . . . . . . .
Air Filter and Brackets Installation (Optional) . . . . . . . . . . . . . . . . . . . . . . . . . . . . . . . . . . . . . . . . . . . .
Overview
The CO Power Unit consists of one power module in a
CO power tray. When installed, the CO Power Unit
provides low voltage dc power to the DCEs in the carrier.
This chapter provides information on how to install the
CO Power Unit into a COMSPHERE 3000 Series Carrier.
The CO Power Unit is shipped with one power module
and operates in Basic mode. With an optional second
power module the CO Power Unit can be configured to
operate in either Independent mode or Redundant mode.
If you order a second power module for your CO Power
Unit, you must determine the mode in which you wish to
operate before installing the CO Power Unit.
The CO Power Unit installation
procedure must be performed
by a qualified service personnel.
3000-A2-GB41-40
2-1
2-1
2-1
2-2
2-3
2-3
2-4
2-4
2-6
2-9
2-11
2-16
2-17
2-18
2-21
In addition, if you want to forward alarms to a
6800 Series Network Management System (NMS), you
must connect the CO Power Unit to the external leads of a
Modular 3611 DSU. Model 3151 CSUs and Model 3161
DSU/CSUs do not support forwarding of CO Power Unit
alarms to a 6800 Series NMS. To access these external
leads, use an NMS adapter cable to connect the external
leads of a Modular 3611 DSU to the CO Power Unit.
This section describes the three modes of operation and
provides information you need to know in order to send
alarms to a 6800 Series NMS.
Installation Considerations
NOTE
2
Basic Mode of Operation
The CO Power Unit with one power module operates
in Basic mode. In this mode of operation, the single power
module supplies power to the entire carrier.
When stacking multiple carriers equipped with CO
Power Units with single power modules, you must install
the power module in each of the CO Power Units in
alternating sequence (that is, left side, right side, left side,
right side, etc.) for proper cooling. For example, if the CO
Power Unit in the bottom carrier has its power module
installed in the left side of the CO power tray, the carrier
May 1998
2-1
COMSPHERE –48 Vdc Central Office Power Unit
directly above the bottom carrier should have its power
module installed in the right side of its CO power tray.
Then, the next carrier directly above should have its
power module installed in the left side of its CO power
tray, and so on for the remainder of the carriers in the
cabinet. For information on removing and installing a
power module, see the Power Module Replacement
Instructions section in Chapter 3.
failed power module until a replacement is available. To
replace a power module, see the Power Module
Replacement Instructions section in Chapter 3 of this
guide.
When the power modules are configured for
Independent mode of operation, up to six carriers can be
mounted in a cabinet. The maximum ambient temperature
is 50°C.
With the power modules placed in alternating
sequence, the maximum operating ambient temperatures
listed in Table 2-1 are permitted.
The – 48 Vdc input can be provided in one of two
powering options:
• Using two separate – 48 Vdc power sources and two
input power cables.
Independent Mode of Operation
In the Independent mode of operation, the left power
module (as viewed from the front of the carrier) powers
Slots 1 through 8 of the carrier and the right power
module powers Slots 9 through 16 of the carrier. The
Shared Diagnostic Unit (SDU), contained in Slot 0, is
powered by both power modules. If a power module fails,
only the service to that side of the carrier is disrupted. The
other side of the carrier is unaffected. Do not remove a
• Using one – 48 Vdc power source and two input
power cables.
For maximum reliability, use the first option. For more
information on these powering options, see the Providing
Power to a CO Power Unit section.
To change the mode of operation, see the Setting the
Option Straps section.
Table 2-1
Maximum Ambient Temperatures Permitted
Maximum
Ambient
Temperature
Allowable Number of Stacked COMSPHERE 3000 Series
Carriers in a Cabinet
3551 and 3611 DSUs
without DBMs, 3511
DSUs, 3151 and CSUs 2
3551, 3611, and 3616
DSUs with DBMs and
3811 Modems 2
3161 DSU/CSUs 1
122°F (50°C)
4
2
See Note 4
113°F (45°C)
5
3
13, 2
104°F (40°C)
6
4
3
95°F (35°C)
6
5
4
86°F (30°C)
6
5
5
77°F (25°C)
6
6
6
NOTES:
1
2
These operating ambient temperatures can be increased by 5°C by placing 3161 DSU/CSUs in cooler
slots (2, 3, 4, 5, 10, 11, 12, 13), or by leaving a slot empty next to each 3161 DSU/CSU.
Use the strictest cooling requirements when there is a mixture of units installed.
3
Requires a power module on each side, otherwise the ambient temperature must be restricted to 35°C.
4
A single carrier, equipped with two power modules, can operate at 50°C provided the cooler slots (2, 3, 4,
5, 10, 11, 12, 13) are used.
2-2
May 1998
3000-A2-GB41-40
Installation
Redundant Mode of Operation
Alarm Forwarding to a 6800 Series NMS
In the Redundant mode of operation, both power
modules share the load (that is, both modules supply
power to all slots in the carrier). If one power module
fails, the remaining power module assumes the full load
of the carrier. Operation of the CO Power Unit continues,
but it is recommended that you replace the failed power
module as soon as possible. Do not remove a failed power
module until a replacement is available. For instructions
on how to replace a power module, see the Power Module
Replacement Instructions section in Chapter 3 of this
guide.
In order to send power module failure and fan failure
alarm signals to a 6800 Series NMS, you must have a
Modular 3611 DSU (configured to forward alarms to a
6800 Series NMS) and an NMS adapter cable.
(Model 3151 CSUs and Model 3161 DSU/CSUs do not
support this feature.) When these components are properly
configured and alarm conditions occur, alarm signals are
sent to the 3611 DSU and then routed to the 6800 Series
NMS where an alarm event is reported to the NMS
operator. (Remember, you can also use a nonmodular
Model 3611 DSU, but you must build your own adapter
cable to connect Pin 9 of the EIA 25-pin male connector
to Pin 6 of the modular plug for the +12 Vdc source,
Pin 19 of the EIA 25-pin male connector to Pin 2 of the
modular plug for the fan alarm, and Pin 23 of the EIA
25-pin male connector to Pin 1 of the modular plug for the
power alarm).
When the power modules are configured for
Redundant mode of operation, up to four carriers can be
mounted in a cabinet and meet the stated maximum
temperature operating limits of 50°C. The reduction of
carriers per cabinet is necessary to compensate for the loss
of cooling capability if one of the power modules fails. If
the operating temperature limit in the room is less than
45°C, then up to five carriers can be mounted in a cabinet.
If the operating temperature limit in the room is less than
40°C, then up to six carriers can be mounted in a cabinet.
The – 48 Vdc input can be provided in one of three
power options:
• Using one – 48 Vdc power source and one fused
input power cable.
• Using one – 48 Vdc power source and two fused
input power cables.
• Using two separate – 48 Vdc power sources and two
fused input power cables.
For the Basic or Independent mode of operation, the
Modular 3611 DSU (configured for alarm forwarding)
must be installed in a different carrier in the cabinet (that
is, a carrier in the cabinet other than the one you want to
manage). This arrangement enables you to send alarms to
the 6800 Series NMS even if one of the CO Power Unit’s
power modules fails. If the Modular 3611 DSU is installed
in the same carrier, a power module failure will disrupt
alarm forwarding to the 6800 Series NMS. In the
Independent mode of operation, a power module failure
disrupts service to one-half of the carrier. If that half of
the carrier contains the Modular 3611 DSU (configured
for alarm forwarding), then the DSU is inoperable and is
unable to forward alarms.
The second power option is more reliable than the first
power option because it protects the CO Power Unit
against a short circuit failure in the input circuit of one
power module from interrupting the power source to the
other power module. However, the third power option is
the most reliable for the Redundant mode of operation
because it protects against short circuit and input power
failures. For more information on these powering options,
see the Providing Power to a CO Power Unit section. To
change the mode of operation, see the Setting the Option
Straps section.
NOTE
In the Redundant mode of
operation, you may want to
install the Modular 3611 DSU
(configured for alarm forwarding)
in a different carrier in the cabinet
in the unlikely event of a double
power module failure.
For information on connecting the CO Power Unit to a
6800 Series NMS, see the Connecting the Alarm Contacts
to a 6800 Series NMS section.
3000-A2-GB41-40
May 1998
2-3
COMSPHERE –48 Vdc Central Office Power Unit
CO Power Unit Installation
4. Install the Shared Diagnostic Control Panel
(SDCP) on the carrier in which you installed the
CO Power Unit, if desired. (See the Installing an
SDCP section.)
The CO Power Unit is installed at the bottom of the
carrier. You will need a large, flat-blade screwdriver to
install the CO Power Unit and a medium, flat-blade
screwdriver to set the option straps.
5. Connect the alarm contacts for the CO Power Unit
to a CO alarm system and/or a Modular 3611
DSU, if desired. (See the Connecting the Alarm
Contacts to a CO Alarm System section or the
Connecting the Alarm Contacts to a 6800 Series
NMS Via a Modular 3611 DSU section.)
NOTE
If you plan to use two power
modules in your CO Power Unit,
you must install the second
power module before proceeding
to Step 1. (See the Installing the
Optional Second Power Module
section.)
Steps 4 and 5 are optional.
Installing the Optional Second Power
Module
You can order a second power module for your CO
Power Unit. This additional power module allows you to
choose between two modes of operation: Redundant or
Independent. You must install the optional second power
module into the CO power tray before installing the CO
Power Unit into the carrier.
The following is an overview of the CO Power Unit
installation procedure:
" Procedure
To install the optional second power module:
1. Set the option straps on the CO Power Unit’s
backplane to the desired mode of operation. (See
the Setting the Option Straps section.)
" Procedure
If your CO Power Unit has a single power
module, you do not need to set the option straps.
The option straps are factory set for the Basic
mode of operation. However, you should compare
the option strap setting on backplane to the strap
settings listed in Table 2-2 in the Setting the
Option Straps section to ensure correct settings.
2. Install the CO Power Unit into the carrier. (See the
Installing the CO Power Unit section.)
1. Remove the coverplate by loosening the two
captive screws on the bottom of the coverplate.
2. Place the second power module in the card guides
on the right side of the CO power tray (as viewed
from the front of the tray) and then slide power
module to the rear of tray. See Figure 2-1.
3. Tighten the two captive screws on the bottom of
the power module’s faceplate.
3. Provide power to the CO Power Unit. (See the
Providing Power to a CO Power Unit section.)
2-4
May 1998
3000-A2-GB41-40
Installation
Power Module
Provided With
CO Power
Unit
300
0D
CP
ow
er
Mo
dule
Po
we
r
Fan
Ala
rm
300
0D
CP
ow
er
Mo
dule
Po
we
r
Fan
Ala
Optional
Second Power
Module
rm
98-13751-02
Figure 2-1. Installing the Optional Second Power Module
3000-A2-GB41-40
May 1998
2-5
COMSPHERE –48 Vdc Central Office Power Unit
Setting the Option Straps
Table 2-2
Settings for Basic Mode
S1 Lowered
The option straps are screw switches that are set by
raising (loosening) or lowering (tightening) the screw to
break or make the contact. There are five option straps, S1
through S5, on the CO Power Unit’s backplane (see
Figure 2-2).
S2 Lowered
S3 Lowered
S4 Lowered
S5 Lowered
NOTE
Older power modules have
straps labeled S1 and S2. These
should always be in the raised
position.
To set the option straps for Basic mode of operation:
" Procedure
1. Tighten the screws on all five straps (S1 through
S5) on the CO Power Unit’s backplane. Make sure
that the screws are securely touching the contacts,
but do not screw the straps too tight because doing
so can damage the equipment.
Basic Mode
If you want to operate in the Basic mode, you must use
one – 48 Vdc power source and configure the option straps
as shown in Table 2-2.
S1
CO Power Tray
S3
CO Power Unit
Backplane
S5
S2
S4
496-13695-01
Figure 2-2. Option Straps (S1 through S5) on the CO Power Unit’s Backplane
2-6
May 1998
3000-A2-GB41-40
Installation
Independent Mode
that the screws are securely touching the contacts,
but do not screw the straps too tight because doing
so can damage the equipment.
If you want to operate in Independent mode and you
plan to use either one or two – 48 Vdc power sources,
configure the option straps as shown in Table 2-3.
Redundant Mode — Two Cables
Table 2-3
Settings for Independent Mode
S1 Raised
If you want to operate in Redundant mode and you
plan to use either a single – 48 Vdc power source and two
input power cables or two separate – 48 Vdc power
sources and two input power cables, configure the option
straps as shown in Table 2-5.
S2 Raised
S3 Raised
S4 Raised
Table 2-5
Settings for Redundant Mode with Either
a Single Power Source and Two Input
Power Cables, or Two Separate
Power Sources and Two Input Power Cables
S5 Raised
To set the option straps for Independent mode of
operation:
S1 Lowered
S2 Lowered
" Procedure
S3 Lowered
1. Loosen the screws on all five straps (S1 through
S5) on the CO Power Unit’s backplane so that the
screws are not touching the contacts. (Two
complete turns will suffice.)
Redundant Mode — One Source, One Cable
If you want to operate in Redundant mode and you
plan to use a single – 48 Vdc power source and a single
input power cable, configure the option straps as shown in
Table 2-4.
S4 Raised
S5 Raised
To set the option straps for Redundant mode of
operation with either a single power source and two input
power cables, or two separate power sources and two
input power cables:
" Procedure
1. Tighten the screws on the S1, S2, and S3 straps on
the CO Power Unit’s backplane. Do not screw the
straps too tight because doing so can damage the
equipment. Make sure that the screws are securely
touching the contacts. Then loosen the screws on
the S4 and S5 straps. (Two complete turns will
suffice.)
Table 2-4
Settings for Redundant Mode
Using a Single – 48 Vdc Power Source
and a Single Input Power Cable
S1 Lowered
S2 Lowered
S3 Lowered
NOTE
S4 Lowered
In either Independent or
Redundant mode of operation,
the S4 and S5 straps on the
backplane must be raised
(loosened) when two separate
– 48 Vdc power sources are
used to prevent operational
problems and voltage
incompatibilities.
S5 Lowered
To set the option straps for Redundant mode of
operation using a single – 48 Vdc power source and a
single input power cable:
" Procedure
1. Tighten the screws on all five straps (S1 through
S5) on the CO Power Unit’s backplane. Make sure
3000-A2-GB41-40
May 1998
2-7
COMSPHERE –48 Vdc Central Office Power Unit
Installing the CO Power Unit
To install the CO Power Unit:
If installing an SDCP in the carrier in which you plan
to install a CO Power Unit, be sure to install the SDCP
ribbon cable that provides power to the SDCP before
installing the CO Power Unit. (For instructions on how to
install the SDCP ribbon cable, see the SDCP Ribbon
Cable Installation section in the COMSPHERE
3000 Series Carrier Installation Manual.)
After installing the CO Power Unit, you can then
install the SDCP. (For instructions on how to install the
SDCP, see Installing the SDCP section later in this
chapter.)
1. If an air filter is desired, follow the procedure in
the Air Filter and Brackets Installation section
later in this chapter. Then, return to this procedure
and proceed to the next step.
2. At the front of the carrier, place the CO Power
Unit on the flanges at the bottom of the carrier
(see Figure 2-3). Slide the CO Power Unit into
place against the rear rail of the enclosure, guiding
the ground strap through the opening in the
carrier’s backplane.
If an SDCP ribbon cable has been installed, hold
the ribbon cable to the left of the CO Power Unit
when sliding the power unit into place against the
rear rail of the enclosure. Place the ribbon cable
between the power module and the side of the CO
power tray (see Figure 2-3). The SDCP ribbon
cable is connected to the back of the SDCP after
the CO Power Unit is installed.
NOTE
Make a ground connection
before installing the CO Power
Unit. Locate the ground
symbol label at the rear of the
CO Power Unit. Remove the
ground screw next to the label.
Attach one end of a ground
strap (minimum 18 AWG) and
securely fasten the ground
screw. Secure the other end of
the ground strap to the nearest
solid frame ground point (see
Step 2).
2-8
" Procedure
Connect the ground strap to the nearest solid
frame ground point (e.g., the rails on which the
carrier is mounted). Do not connect the ground
strap to the carrier.
May 1998
3000-A2-GB41-40
Installation
Built-in
Retainer
Clips
SDCP
Ribbon
Cabll
Space
Between
CO Power
Tray and
Power Module
CO
Power
Tray
Flanges
300
0D
CP
ow
SDCP
Ribbon
Cabll
er
Mo
dule
3000
DC
Po
wer
Mod
ule
Left
Power
Module
Po
we
r
Fa
n Ala
rm
3000
DC
Po
wer
Mod
ule
Po
we
r
Fa
n Ala
rm
Ground
Strap
496-13681-02
Figure 2-3. CO Power Unit Installation
3. At the rear of the carrier, use a large flat-blade
screwdriver to engage and tighten the two captive
screws that fasten the CO Power Unit to the
carrier.
3000-A2-GB41-40
May 1998
4. Plug one backplane connector cable assembly
from the P20 connector on the carrier’s backplane
to the P6 connector on the CO Power Unit’s
backplane. Then, plug the second backplane
connector cable assembly from the P19 connector
on the carrier’s backplane to the P3 connector on
the CO Power Unit’s backplane. The backplane
connector cable assemblies enable a
backplane-to-backplane connection which
provides low voltage dc power to the carrier (see
Figure 2-4).
2-9
COMSPHERE –48 Vdc Central Office Power Unit
BACKPLANE
CONNECTOR
CABLE
ASSEMBLIES
NETWORK
MANAGEMENT
CONNECTOR
P20
CAPTIVE
SCREW
P6
(OUTPUT)
–48VDC B
(INPUT)
ALARM B
P19
–48VDC A
(INPUT)
P3
(OUTPUT)
ALARM A
CAPTIVE
SCREW
497-13673-01
Figure 2-4. COMSPHERE 3000 Series Carrier (Rear)
Providing Power to a CO Power Unit
(AMP part number 350550-1) to attach the
connector to your – 48 Vdc power input cable.
After the CO Power Unit installation procedure is
completed, you must provide power to the unit. There are
a number of powering options available depending upon
your configuration.
(The contacts are crimp type and are intended for
use with 20 AWG through 14 AWG wire with a
maximum insulation diameter of .130 inches. For
additional information, see Appendix A of this
guide.)
NOTE
The option strap settings are
factory set for the Basic mode of
operation.
2. Provide external fusing, if desired. (The fuse
shown in Figure 2-5 is optional as per your
requirements.) The optional fuse should have a
rating of 6 amperes, 250 volts, and be a fast-acting
type. Use a fuse similar to Littlefuse #312006.
To provide power to the CO Power Unit operating in
Basic mode:
" Procedure
1. Use one connector housing (AMP part
number 1-480698-0) and two crimp-type contacts
2-10
Note that you need a hand crimping tool (AMP
part number 90296-2 or equivalent) to build the
connector.
May 1998
3. Plug the input power cable to either the
– 48VDC A connector or the – 48VDC B
connector. See Figure 2-5. (The option strap
settings for this power option are listed in
Table 2-2.)
3000-A2-GB41-40
Installation
AMP
Connectors
–48 Vdc A
–48 Vdc B
Ground Return
Optional
Fuse
–48V GRD
–48 Vdc Power
Source A
496-13755-01
Figure 2-5. Using One Power Source and One Input Power Cable for Basic (shown) or Redundant Mode
3000-A2-GB41-40
May 1998
2-11
COMSPHERE –48 Vdc Central Office Power Unit
If you have two input power cables and one
– 48 Vdc power source, plug one input power
cable into the – 48VDC A connector and the
second input power cable into the – 48VDC B
connector. Then, connect both power cables into
the same – 48 Vdc power source. See Figure 2-7.
(The option strap settings for this power option are
listed in Table 2-3.)
NOTE
The option straps must be set
for the Independent mode of
operation. For the correct
settings, see the Setting the
Option Straps section earlier in
this guide.
To provide power to the CO Power Unit operating in
Independent mode:
NOTE
The appropriate option strap
settings must be set. For the
correct settings, see the Setting
the Option Straps section earlier
in this guide.
" Procedure
1. Use the two connector housings (AMP part
number 1-480698-0) and four crimp-type contacts
(AMP part number 350550-1) to attach the
connector(s) to your – 48 Vdc power input
cable(s). Note that you need a hand crimping tool
(AMP part number 90296-2 or equivalent) to
build the connector(s).
To provide power to the CO Power Unit operating in
the Redundant mode:
(The contacts are crimp type and are intended for
use with 20 AWG through 14 AWG wire with a
maximum insulation diameter of .130 inches. For
additional information, see Appendix A of this
guide.)
" Procedure
1. Use the two connector housings (AMP part
number 1-480698-0) and four crimp-type contacts
(AMP part number 350550-1) to attach the
connector(s) to your – 48 Vdc power input
cable(s). Note that you need a hand crimping tool
(AMP part number 90296-2 or equivalent) to
build the connector(s).
2. Provide external fusing, if desired. (The fuses
shown in Figures 2-6 and 2-7 are optional as per
your requirements.) An optional external fuse
should have a rating of 6 amperes, 250 volts and
be a fast-acting type. Use a fuse similar to
Littlefuse #312006.
3. If you have two input power cables and two
separate – 48 Vdc power sources (e.g., Source A
and Source B), plug one input power cable from
one of your – 48 Vdc power sources (e.g.,
Source A) to the – 48VDC A connector to provide
power to the left side of the carrier. Plug the other
input power cable from a different – 48 Vdc power
source (e.g., Source B) to the – 48VDC B
connector to provide power to the right side of the
carrier. See Figure 2-6. (The option strap settings
for this power option are listed in Table 2-3.)
2-12
May 1998
(The contacts are crimp type and are intended for
use with 20 AWG through 14 AWG wire with a
maximum insulation diameter of .130 inches. For
additional information, see Appendix A of this
guide.)
2. Provide external fusing, if desired. (The fuses
shown in Figures 2-5, 2-6, and 2-7 are optional as
per your requirements.) An optional fuse should
have a rating of 6 amperes, 250 volts and be a
fast-acting type. Use a fuse similar to Littlefuse
#312006.
3000-A2-GB41-40
Installation
3. If you have one input power cable and one
– 48 Vdc power source, plug the input power cable
to either the – 48VDC A connector or the
– 48VDC B connector. See Figure 2-5. (The
option strap settings for this power option are
listed in Table 2-4.)
If you have two input power cables and one
– 48 Vdc power source, plug one input power
cable to the – 48VDC A connector and the second
input power cable to the – 48VDC B connector.
Then, connect both input power cables to your
single – 48 Vdc power source. See Figure 2-7.
(The option strap settings for this power option are
listed in Table 2-5.)
If you have two power cables and two separate
– 48 Vdc power sources (e.g., Source A and
Source B), plug one input cable from a – 48 Vdc
power source (e.g., Source A) to the – 48VDC A
connector. Plug an input power cable from a
different – 48 Vdc power source (e.g., Source B)
to the – 48VDC B connector. See Figure 2-6. (The
option strap settings for this power option are
listed in Table 2-5.)
AMP
Connectors
Optional
Fuse
–48V
–48 Vdc A
–48 Vdc B
Ground Return
Ground Return
–48V
Optional
Fuse
–48V GRD
–48 Vdc Power
Source B
–48V GRD
–48 Vdc Power
Source A
496-13675-01
Figure 2-6. Using Two Separate Power Sources for Independent Mode or Redundant Mode
3000-A2-GB41-40
May 1998
2-13
COMSPHERE –48 Vdc Central Office Power Unit
AMP
Connectors
–48 Vdc A
–48 Vdc B
Ground Returns
Optional Fuses
–48V GRD
–48 Vdc Power
Source A
496-13676-01
Figure 2-7. Using One Power Source and Two Input Power Cables for
Independent Mode or Redundant Mode
2-14
May 1998
3000-A2-GB41-40
Installation
Installing an SDCP
If you want to mount an SDCP and the SDCP ribbon
cable is not installed, remove the CO Power Unit from the
carrier and follow the instructions in the SDCP Ribbon
Cable Installation section in the COMSPHERE
3000 Series Carrier Installation Manual.
If you want to mount a shared Diagnostic Control
Panel (SDCP) on the carrier and the SDCP ribbon cable is
installed (refer to Figure 2-8):
Procedure
1. Raise the carrier 1.5 inches above the carrier
below it.
(In a Paradyne COMSPHERE 72-inch cabinet
(4000-B2-201), if you mount an SDCP onto a
carrier operating with a CO Power Unit, then only
five carriers can be installed in the cabinet instead
of the usual six.)
NOTE
This procedure is only used
when installing an SDCP onto a
carrier operating with a CO
Power Unit. All other carriers
use the standard SDCP
installation procedure as
described in the Shared
Diagnostic Control Panel
(SDCP) Installation section in
the COMSPHERE 3000 Series
Carrier Installation Manual.
2. Remove the power module (the left power module
if there are two power modules in the CO Power
Unit) by loosening the two captive screws on the
front of the power module. Hold onto the power
module handle and slide the power module out.
Then, remove the handle on the power module by
using a small Phillips-head screwdriver to loosen
the screws behind the power module’s faceplate.
SDCP
RIBBON
CABLE
NYLON
CABLE
TIE
BOTTOM
SCREW HOLE
SHARED DIAGNOSTIC
CONTROL PANEL
(SDCP)
TOP
CAPTIVE
SCREW
497-13757-02
Figure 2-8. Installing the SDCP
3000-A2-GB41-40
May 1998
2-15
COMSPHERE –48 Vdc Central Office Power Unit
3. Secure a nylon cable tie in the handle mounting
holes.
NOTE
The CO alarm cables and
mating connectors are
customer-supplied components.
4. Place the power module in the card guides and
slide the power module to the rear of the carrier.
When sliding the left power module into the CO
Power Unit, hold the SDCP ribbon cable to the
left of the power module. Then, tighten the two
captive screws on the front of the power module
(see Figure 2-3).
To connect the CO Power Unit to a CO alarm system:
Procedure
5. If the CO Power Unit has an optional second
power module, repeat Steps 2 through 4 for the
right power module and proceed to the next step.
1. At the rear of the carrier, locate the cable
connectors labeled Alarm A and Alarm B (see
Figure 2-4).
6. Attach the SDCP ribbon cable to the back of the
SDCP as shown in Figure 2-8.
2. To send alarm signals from the left power module
to a CO alarm system, plug a customer-supplied
mating connector (AMP part number 103957-4)
and cable into the Alarm A connector. To send
alarm signals from the right power module, if the
CO Power Unit has two power modules, to a CO
alarm system, plug a customer-supplied mating
connector (AMP part number 103957-4) and cable
into the Alarm B connector.
7. Mount the SDCP to the front of the carrier by
securing the two top captive screws of the SDCP
into the two bottom screw holes of the carrier.
Connecting the Alarm Contacts to a CO
Alarm System
The CO Power Unit monitors the power output levels
and the fan’s low-speed sensor for proper operation of the
power module. Both major (power failure) and minor (fan
failure) alarms can be sent to a CO alarm system. A major
alarm is sent to a CO alarm system if a power failure
occurs in either the – 48V input or low voltage output. A
minor alarm is sent to a CO alarm system if a fan failure
occurs or if the fan speed drops below 1900 rpm. After the
CO Power unit is installed, you can connect the power
unit to a CO alarm system.
2-16
May 1998
For pin assignments of the Alarm A and Alarm B
connectors, see Appendix A of this guide.
3000-A2-GB41-40
Installation
Connecting the Alarm Contacts to a
6800 Series NMS Via a Modular 3611 DSU
The CO Power Unit can also send alarms to a
6800 Series NMS using the external alarm functions of a
Modular 3611 DSU. After the CO Power Unit is installed,
connect the power unit to the external leads of a Modular
3611 DSU by using an NMS adapter cable.
After setting the jumpers, reinstall the Modular 3611
DSU in the carrier. Then, set the firmware configuration
External Leads (Ext Leads, in the General branch)
parameter as shown:
Ext Leads: RPowr
NOTE
Before you can forward CO alarms to the 6800 Series
NMS via the external leads, you must configure the
Modular 3611 DSU for alarm forwarding by setting the
appropriate jumpers. To do this, remove the Modular 3611
DSU from the carrier and set Jumpers J20 and J21 (for
Model 3611-B3) or Jumper E5 and Switch S1-2 (for
Model 3611-B4) as shown in Table 2-6.
Table 2-6
Jumper Settings
Jumper or
Switch
Model
Setting to Enable
–48 Vdc Alarm
Monitoring
3611-B3
Jumper J20
Left
3611-B3
Jumper J21
Left
3611-B4
Jumper E5
Left
3611-B4
Switch S1-2
On
3000-A2-GB41-40
May 1998
Remember, for Basic or
Independent mode of
operation, the Modular 3611
DSU (configured for alarm
forwarding) must be installed in a
different carrier (that is, a carrier
in the cabinet other than the one
you want to manage). This
arrangement ensures that all
alarm signals are forwarded even
if power has disrupted service to
the carrier.
For Redundant mode of
operation, you may want to
install the Modular 3611 DSU in
a different carrier in the unlikely
event of a double power module
failure.
2-17
COMSPHERE –48 Vdc Central Office Power Unit
To connect the alarm contacts to the external leads of a
Modular 3611 DSU (configured for alarm forwarding):
" Procedure
1. At the rear of the carrier, plug the 6-wire modular
plug end of the NMS adapter cable into the J1
connector (a 6-position modular jack) on the CO
Power Unit’s backplane (see Figure 2-9).
rear connector plate, remove the ferrite choke and
the EIA-232 cable. Plug the DB25 male end of the
NMS adapter cable into the top connector of the
rear connector plate. Tighten the screws to hold
the cable in place. Then, attach the ferrite choke to
the NMS adapter cable. Plug the EIA-232 cable
into the DB25 female end of the NMS adapter
cable. Tighten the screws to hold the cable in
place. See Figure 2-9.
2. If there is an EIA-232 cable on the top connector
(labeled EIA232/V.24) of a Modular 3611 DSU’s
Figure 2-9. Connecting an NMS Adapter Cable to a Modular 3611 DSU
When the DTE Interface is EIA-232
2-18
May 1998
3000-A2-GB41-40
Installation
3. If there is a V.35 cable on the bottom connector,
labeled V.35 (3600/3500), of a Modular 3611
DSU’s rear connector plate, then plug the DB25
male end of the NMS adapter cable into the top
connector of the rear connector plate. Note that the
DB25 female end of the NMS adapter cable has
no connection. See Figure 2-10.
Figure 2-10. Connecting an NMS Adapter Cable to a Modular 3611 DSU
When the DTE Interface is V.35
3000-A2-GB41-40
May 1998
2-19
COMSPHERE –48 Vdc Central Office Power Unit
Air Filter and Brackets
Installation (Optional)
The air filter (part number 3000-F1-020) prevents dust
from entering the carrier. It is an optional component and
must be ordered separately. However, the air filter
brackets and screws are supplied with the CO Power Unit.
Keep in mind that the air filter brackets take up an
additional 0.6 inches (1.5 cm) in height and if mounted on
one of the carriers in the COMSPHERE 72-inch cabinet
(4000-B2-201), then only five carriers can be installed in
the cabinet instead of the usual six.
To install the air filter and brackets:
" Procedure
Only the 3000-F1-020 air filter may be used. Under
normal environmental conditions, you should inspect
and/or replace the 3000-F1-020 air filter every three
months.
1. Raise the carrier 0.6 inches from the bottom of the
cabinet (or above the carrier below it).
2. Fasten the two identical brackets to the bottom of
the CO power tray using the four # 6 Phillips-head
screws provided. See Figure 2-11.
This section describes the procedure for installing the
air filter and brackets. This procedure must be performed
before installing the carrier into the cabinet.
3. Place the air filter with the grill-side face up on
the guides of the brackets and slide the air filter in
place.
NOTE
If the carriers in the cabinet are
stacked directly on top of each
other, then only the bottom
carrier in the cabinet needs an
air filter.
2-20
If you were directed to this section during the CO
Power Unit Installation procedure, then return to that
procedure now.
May 1998
3000-A2-GB41-40
Installation
#6
PHILLIPS-HEAD
SCREWS
AIR
FILTER
BRACKET
#6
PHILLIPS-HEAD
SCREWS
AIR
FILTER
BRACKET
GRILL ON
CO POWER
TRAY
491-13697
BOTTOM VIEW OF
CO POWER TRAY
Figure 2-11. Air Filter Brackets Installation
3000-A2-GB41-40
May 1998
2-21
COMSPHERE –48 Vdc Central Office Power Unit
This page intentionally left blank.
2-22
May 1998
3000-A2-GB41-40
Troubleshooting and Maintenance
Overview . . . . . . . . . . . . . . . . . . . . . . . . . . . . . . . . . . . . . . . . . . . . . . . . . . . . . . . . . . . . . . . . . . . . . . . . . .
Indicators and Controls . . . . . . . . . . . . . . . . . . . . . . . . . . . . . . . . . . . . . . . . . . . . . . . . . . . . . . . . . . . . . .
Troubleshooting . . . . . . . . . . . . . . . . . . . . . . . . . . . . . . . . . . . . . . . . . . . . . . . . . . . . . . . . . . . . . . . . . . . .
Power Module Replacement Instructions . . . . . . . . . . . . . . . . . . . . . . . . . . . . . . . . . . . . . . . . . . . . . . . . .
Preventive Maintenance . . . . . . . . . . . . . . . . . . . . . . . . . . . . . . . . . . . . . . . . . . . . . . . . . . . . . . . . . . . . . .
Overview
This chapter describes the status indicators on the
power module’s faceplate, provides troubleshooting
guidelines and replacement instructions for the power
module, and a preventive maintenance schedule for the
optional air filter.
Indicators and Controls
The CO Power Unit detects power module and/or fan
failures by monitoring the power output levels and the
fan’s low-speed sensor for proper operation of the power
module. When a failure occurs, an alarm indication light
appears on the faceplate of the affected power module.
3
3-1
3-1
3-2
3-3
3-4
There are two LED status indicators (Figure 3-1) on
the power module’s faceplate: the Power LED and the Fan
Alarm LED. The Power LED provides the status of the
power module. A green light indicates that the power
module is operating properly. A red light indicates a
power module failure. No light indicates that the CO
Power Unit is not receiving input power. The Fan Alarm
LED provides the status of the fan in the power module. If
the Fan Alarm LED is not lit and the Power LED is green,
the fan is operating properly. If the LED is yellow, it
indicates either a fan failure or a fan speed below
1900 rpm.
Power
3000 DC Power Module
Fan Alarm
491-13698
Figure 3-1. LED Status Indicators
3000-A2-GB41-40
May 1998
3-1
COMSPHERE –48 Vdc Central Office Power Unit
Troubleshooting
If operating in the Basic mode and the power module’s
Power LED is red, check the DCEs in the carrier. If the
LEDs on the DCEs are not lit, try resetting the power
module. (Reset the power module by removing the power
module and then reinstalling it.) If the Power LED
remains red after resetting the power module, you should
replace the power module. Do not remove the failed
power module until a replacement power module is
available. If the power LED is red and the DCEs appear to
be working, schedule maintenance for the power module
after peak hours at which time you can try resetting the
power power module and/or replacing it. If the Fan Alarm
LED is yellow and the DCEs in the carrier appear to be
working, you may want to schedule maintenance after
peak hours.
Also in Independent mode, if the Fan Alarm LED is
yellow and the DCEs in the carrier appear to be working,
you may want to schedule maintenance after peak hours.
If operating in the Redundant mode and one of the
power module’s Power LED is red, try resetting the power
module by removing the power module and then
reinstalling it. If the Power LED remains red, you should
replace the power module.
In addition, if the Fan Alarm LED is yellow, try
resetting the power module. If the Fan Alarm LED
remains yellow, you should replace the power module.
In all modes of operation, if the Power LED is not lit,
check the input power source and external fuses before
replacing the power module. If – 48V is present at the
input connector, replace the power module. If – 48V is not
present, check your distribution system.
If operating in the Independent mode and one of the
power module’s Power LED is red, check the DCEs in the
carrier.
• If the LEDs on the DCEs above the power modules
are not lit, try resetting the power module. (Reset
the power module by removing the power module
and then reinstalling it.) If the Power LED remains
red after resetting the power module, you should
replace the power module. Do not remove the failed
power module until a replacement power module is
available.
• If the DCEs appear to be working, schedule
maintenance for the power module after peak hours
at which time you can try resetting the power
module and/or replacing it.
3-2
May 1998
3000-A2-GB41-40
Troubleshooting and Maintenance
Power Module Replacement
Instructions
To replace a power module (refer to Figure 3-2):
NOTE
If the power module fails, you should replace it
immediately. In the Redundant mode of operation, you
can replace a failed power module without disrupting
service to the carrier. In the Independent mode of
operation, you will only disrupt service to one-half of the
carrier (the affected half).
The power module replacement
procedure contained in this
section must be performed by a
qualified service person.
" Procedure
CAUTION
1. Make sure the new power module is configured
with the same option settings as the failed power
module. To set the option straps, see the Setting
the Option Straps section in Chapter 2.
In any mode of operation
(Basic, Independent, or
Redundant), you must have
either one power module and
cover plate, or two power
modules in the CO Power Unit
at all times. Do not remove a
defective power module until
a replacement is available.
Leaving half of the CO Power
Unit exposed is a safety
hazard.
3000
DC
2. If an SDCP is not associated with this carrier and
the power modules’ faceplates are visible, loosen
the two captive screws on the front of the failed
power module. Remove the failed power module
from the CO power tray by holding onto the
power module handle and sliding the power
module out.
3000
Pow
er M
odul
e
DC
Pow
er M
odul
e
Powe
r
Fan
Powe
r
Alar
Fan
m
Alar
m
Power Module Handle
or Nylon Cable Tie
98-13683-01
Figure 3-2. Replacing a Power Module
3000-A2-GB41-40
May 1998
3-3
COMSPHERE –48 Vdc Central Office Power Unit
If an SDCP is mounted on this carrier, remove the
SDCP by loosening the two captive screws and
disconnecting the SDCP cable. Set the SDCP
aside for mounting later on. Loosen the two
captive screws on the failed power module. Then,
remove the failed power module from the CO
power tray by holding onto the nylon cable tie and
sliding the power module out.
3. When the failed power module is removed, place
the new power module in the card guides and slide
the power module to the rear of the carrier. Then,
tighten the two captive screws on the bottom of
the power module’s faceplate.
Remember, if an SDCP needs to be remounted on
this carrier, you must remove the handle on the
new power module and install a nylon cable tie
prior to installing the power module. Also, if
installing a new power module into the left side of
the power unit, hold the SDCP ribbon cable to the
left of the power module when sliding the power
module into the CO Power Unit. Once the power
module is installed and proper operation is
verified, then the SDCP can be mounted.
Preventive Maintenance
In normal environments, you should inspect and/or
replace the optional air filter (part number 3000-F1-020)
every three months.
3-4
May 1998
3000-A2-GB41-40
Interface Connections
Overview . . . . . . . . . . . . . . . . . . . . . . . . . . . . . . . . . . . . . . . . . . . . . . . . . . . . . . . . . . . . . . . . . . . . . . . . . .
DC Inputs . . . . . . . . . . . . . . . . . . . . . . . . . . . . . . . . . . . . . . . . . . . . . . . . . . . . . . . . . . . . . . . . . . . . . . . . .
CO Alarm System Outputs . . . . . . . . . . . . . . . . . . . . . . . . . . . . . . . . . . . . . . . . . . . . . . . . . . . . . . . . . . .
NMS Alarm Outputs . . . . . . . . . . . . . . . . . . . . . . . . . . . . . . . . . . . . . . . . . . . . . . . . . . . . . . . . . . . . . . . . .
A
A-1
A-1
A-4
A-5
Overview
DC Inputs
This appendix provides pin assignments for the dc
input connectors and alarm output connectors. It also
provides illustrations of the connectors on the rear of the
CO Power Unit and an NMS alarm adapter cable.
A pair of 2-pin AMP connectors on the CO Power
Unit’s backplane provides an interface between the dc
power input cable and the CO Power Unit (see
Figure A-1). Table A-1 lists the pin assignments for the dc
inputs.
3000-A2-GB41–40
May 1998
A-1
COMSPHERE –48 Vdc Central Office Power Unit
P6
Connector
Network
Management
Connector
J1
P6
P3
1
8
8
ALARM A
P2
1
P5
–48VDC B
–48 Vdc A
Connector
1
1
1
P4
–48 Vdc
1
ALARM B
–48 Vdc B
Connector
P3
Connector
1
Common
P1
–48VDC A
Common
–48 Vdc
Alarm
B
Alarm
A
496-13699-01
Figure A-1. CO Power Unit (Rear)
Table A-1
Pin Assignments of the DC Inputs
Pin Number
A-2
Assigned To ...
1
– 48V
2
– 48V CO ground return
The backplane connector is a Universal MATE-N-LOK
connector (AMP part number 350428-1). The
corresponding supplied connector housing is also a
Universal MATE-N-LOK connector (AMP part
number 1-480698-0). Table A-2 lists AMP part numbers
for the individual contacts that can be used for various
wire sizes. Figure A-2 illustrates the connector housing
and contact.
May 1998
3000-A2-GB41-40
Interface Connections
Table A-2
AMP Part Numbers
1
Wire Size
Insulation Diameter
Contact Number
24 –18 AWG
04″–10″
350689-1
20 –14 AWG
06″–13″
350550-1 1
20 –14 AWG
13″–20″
350551-1
12 –10 AWG
20″ max.
640310-3
Six contacts are provided in the installation kit.
Contact
–48 Vdc
Contact
Connector
Housing
Common
496-13674-01
Figure A-2. Connector Housing and Contact
3000-A2-GB41–40
May 1998
A-3
COMSPHERE –48 Vdc Central Office Power Unit
CO Alarm System Outputs
Both major (power) and minor (fan) alarms can be sent
to the CO alarm system via the Alarm A and Alarm B
output connectors. Figure A-1 illustrates these connectors.
The connector on the CO Power Unit’s backplane is an
AMP 5-position single row header. The mating connector
is an AMP MTE-type connector (part number 103957-4).
A contact closure is provided between Pin Numbers 1
and 2 to indicate a power failure. A contact closure is
provided between Pin Numbers 4 and 5 to indicate a fan
failure. Note that a major alarm signal is sent to a CO
alarm system upon a failure in either the – 48V input or
low voltage output circuits, and that a minor alarm signal
is sent if the fan speed falls below 1900 rpm.
The CO alarm system outputs are relay contact
closures. Table A-3 lists the pin assignments for the CO
alarm system outputs.
CAUTION
The relay contacts on the CO
Power Unit for the CO alarm
system have a rating of
0.1 amp maximum at 70 Vdc
maximum.
Table A-3
Pin Assignments for the
CO Alarm System Outputs
Pin Number
A-4
Assigned To ...
1
Major Alarm (power failure)
2
Major Alarm (power failure)
3
No Connection
4
Minor Alarm (fan failure)
5
Minor Alarm (fan failure)
May 1998
3000-A2-GB41-40
Interface Connections
NMS Alarm Outputs
voltage output circuits, and that a fan failure alarm signal
is sent if the fan speed falls below 1900 rpm.
CO alarms can be sent to a Modular 3611 DSU (which
will then notify a 6800 Series NMS) via a 6-wire modular
jack on the CO Power Unit’s backplane (see Figure A-1).
(The Modular 3611 DSU must be configured to forward
alarms to a 6800 Series NMS.) Table A-4 lists the pin
assignments for the NMS adapter cable. Figure A-3
illustrates the NMS adapter cable.
NOTE
To avoid potential problems
caused by incorrect connections
(e.g., grounding the +12 Vdc
source), do not set Jumper J21
as shown in Figure 2-10 of
Chapter 2 if you are not using
an NMS adapter cable.
Note that a power failure alarm signal is sent to an
NMS upon a failure in either the – 48V input or low
Table A-4
Pin Assignments for the NMS Adapter Cable
EIA 25-Pin
Male End 1
1
2
3000-A2-GB41–40
Modular
Plug End
NMS Alarm Function
12
6
+12 Vdc Source
11
4
None
14
3
None
16
5
None
19
2
Fan Status Alarm
23
1
Power Status Alarm
All other pins on the 25-pin male connector are wired straight through
to the 25-pin female connector.
This pin only functions as a +12 Vdc source when Jumper J21 is set
as shown in Figure 2-10 of Chapter 2.
May 1998
A-5
COMSPHERE –48 Vdc Central Office Power Unit
Figure A-3. NMS Adapter Cable (Feature Number 3000-F2-510)
A-6
May 1998
3000-A2-GB41-40
Glossary
Basic mode
A mode of operation in which the single power module in the CO Power Unit
supplies power to the entire carrier.
carrier
The rack mounting that contains 17 slots: 1 control slot and 16 DSU or modem
slots.
data communication
equipment (DCE)
A device, such as a DSU, that provides an interface between a DTE device and a
digital or analog network. (Also called data circuit-terminating equipment.)
data service unit
(DSU)
A DCE device that interprets, interfaces, and provides timing and signal control
between a DTE device and a digital network.
data terminal equipment
(DTE)
A computer or peripheral device, such as a terminal or printer; a data source or sink.
Independent mode
A mode of operation in which each power module in the CO Power Unit supplies
power to one-half of the carrier.
LED
Light-emitting diode. A light or status indicator on the front panel that glows in
response to the presence of a certain condition (e.g., Fan Alarm).
Modular 3611 DSU
A circuit card that contains ‘‘gold finger’’ contacts on its rear edge. A modular
DSU can be removed from the front of the carrier without disturbing the DTE
cables at the rear of the carrier.
rear connector plate
Used with a modular DSU, such as the Modular 3611 DSU. The rear connector
plate is a panel that is attached to the rear of the 3000 Series Carrier. It contains two
DTE connectors and functions as an interface between the Modular 3611 DSU and
the DTE.
Redundant mode
A mode of operation in which both power modules in the CO Power Unit supply
power to all the slots in the carrier.
shared diagnostic
control panel
(SDCP)
A feature that allows carrier-mounted DSUs and modems to share the same
diagnostic control panel. Installed at eye-level into one COMSPHERE 3000 Series
Carrier, it controls and monitors the DSUs and modems in all the carriers in the
cabinet. A single SDCP can control up to 8 carriers, with a total of 128 DSUs (and
if present, 128 DBMs) and modems.
3000-A2-GB41-40
May 1998
Glossary-1
COMSPHERE –48 Vdc Central Office Power Unit
shared diagnostic unit
(SDU)
A circuit card that plugs into a dedicated slot in the COMSPHERE 3000 Series
Carrier to provide the shared diagnostic control panel and network management
interfaces to the DSUs in the carrier. It translates the network management protocol
to the devices in the carrier and routes incoming messages to the appropriate slots.
6800 Series Network
Management System
(NMS)
A Paradyne automated network management system that supports the CO Power
Unit and other devices. It allows an operator to monitor network conditions,
analyze problems, and take restorative measures.
Glossary-2
May 1998
3000-A2-GB41-40
Index
A
C
adapter cable, NMS, A-6
pin assignments, A-5
air filter, 1-4
brackets installation, 2-22
installation, 2-21
physical dimensions, 1-4
weight, 1-5
alarm
contacts, connecting to
alarm system, 2-17
NMS, 2-18
forwarding, 2-3
outputs, NMS, A-5
relay contacts, 1-5
system
connecting, 2-17
outputs, A-4
ambient temperatures, 2-2
AMP part numbers, A-3
approvals, 1-5
carrier, rear, 2-11
CO power, unit
with one power module, 1-3
with two power modules, 1-3
CO power unit
installation, 2-4, 2-9, 2-10
physical dimensions, 1-4
providing power, 2-11
rear, A-2
weight
with one power module, 1-5
with two power modules, 1-5
connecting
alarm contacts to
alarm system, 2-17
NMS, 2-18
NMS adapter cable
EIA-232, 2-19
V.35, 2-20
connecting alarm contacts, to NMS, 2-18
connector, housing and contact, A-3
controls, 3-1
CSA, 1-5
B
backplane, 2-6
Basic mode, 1-2, 2-1
strap setting, 2-6
using one power source, one cable, 2-12
brackets, installation, 2-21, 2-22
3000-A2-GB41-40
D
dc
inputs, A-1
pin assignments, A-2
depth
air filter, 1-4
CO power unit, 1-4
power module, 1-4
May 1998
Index-1
COMSPHERE –48 Vdc Central Office Power Unit
E
J
EIA-232 interface, connecting NMS adapter cable, 2-19
enhanced support services, 1-6
environment, 1-4
equipment
service, 1-5
support, 1-5
warranty, 1-5
jumpers, 2-18
L
LED status indicators, 3-1
M
F
maintenance, 3-1
preventative, 3-4
mode
Basic, 1-2
Independent, 1-2
Redundant, 1-2
features, 1-2
H
heat dissipation, 1-4
height
air filter, 1-4
CO power unit, 1-4
power module, 1-4
humidity, 1-4
N
NMS
adapter cable, A-6
connecting, 2-19, 2-20
pin assignments, A-5
alarm outputs, A-5
I
Independent mode, 1-2, 2-2
strap settings, 2-7
using one power source, two cables, 2-15
using two power sources, 2-14
indicators, 3-1
LED status, 3-1
inputs, dc, A-1
installation, 2-1
air filter
and brackets, 2-21
brackets, 2-22
CO power unit, 2-4, 2-9, 2-10
considerations, 2-1
Basic mode, 2-1
Independent mode, 2-2
Redundant mode, 2-3
SDCP, 2-16
second power module, 2-4, 2-5
instructions, power module replacement, 3-3
Index-2
O
one power source, 2-12
operating temperature, 1-4
option straps
location
on backplane, 2-6
on power module, 2-7
setting, 2-6
out of warranty, 1-6
outputs
alarm system, A-4
pin assignments, A-4
NMS alarm, A-5
May 1998
3000-A2-GB41-40
Index
P
T
part numbers, AMP, A-3
physical dimensions, 1-4
pin assignments
alarm system outputs, A-4
dc inputs, A-2
NMS adapter cable, A-5
power
module, 1-4
physical dimensions, 1-4
replacement, 3-3
replacing, 3-3
weight, 1-5
requirements, 1-4
to CO power unit, 2-11
preventative maintenance, 3-4
providing power, 2-11
R
Redundant mode, 1-2, 2-3
strap settings, 2-8
using one power source, one cable, 2-12
using one power source, two cables, 2-15
using two power sources, 2-14
relative humidity, 1-4
replacement, power module, 3-3
replacing power module, 3-3
requirements, power, 1-4
technical specifications, 1-4
temperature, 1-4
ambient, 2-2
troubleshooting, 3-1, 3-2
two power sources, 2-14
U
UL, 1-5
V
V.35 interface, connecting NMS adapter cable, 2-20
vibration, 1-4
W
warranty, 1-5, 1-6
weight
air filter, 1-5
CO power unit, 1-5
power module, 1-5
width
air filter, 1-4
CO power unit, 1-4
power module, 1-4
S
SDCP, installation, 2-16
second power module, installation, 2-4, 2-5
service, 1-5
setting option straps, 2-6
shock, 1-4
status indicators, LED, 3-1
storage temperature, 1-4
strap settings
Basic mode, 2-6
Independent mode, 2-7
Redundant mode, 2-8
straps, setting, 2-6
support, services, 1-6
system outputs, alarm, A-4
3000-A2-GB41-40
May 1998
Index-3