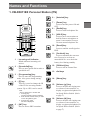
1
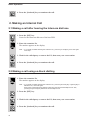
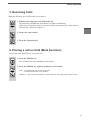
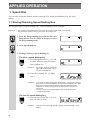
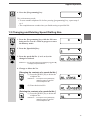
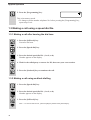
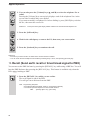
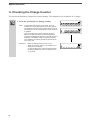
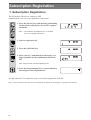
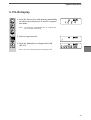
Panasonic
DECT
Digital Cordless Telephone System
Operating
Instructions
Before operating this system, please read
these instructions completely.
THIS EQUIPMENT IS NOT DESIGNED FOR MAKING
EMERGENCY TELEPHONY CALLS WHEN THE POWER FAILS.
ALTERNATIVE ARRANGEMENTS SHOULD BE MADE FOR
ACCESS TO EMERGENCY SERVICES.
CONTENTS
CHAPTER 1. Introduction .............................................................. 3
1. Overview ........................................................................... 3
2. Safety Information ............................................................ 4
CHAPTER 2. Getting Started ......................................................... 5
1. Installing the battery pack ............................................... 5
2. Charging the PS ............................................................... 6
3. Turning the power ON/OFF .............................................. 8
3.1 Turning the power ON .................................................................. 8
3.2 Turning the power OFF ................................................................ 8
4. Adjusting the Volume ....................................................... 8
4.1 Adjusting the volume of the ringing tone ...................................... 8
4.2 Adjusting the volume of conversations ......................................... 9
4.3 Changing the Ringing Tone ......................................................... 9
CHAPTER 3. Names and Functions ........................................... 11
1. VB-D3811EX Personal Station (PS) .............................. 11
2. Display ............................................................................. 12
2.1 1st line ........................................................................................ 12
2.2 2nd line ....................................................................................... 12
CHAPTER 4. Basic Operation ..................................................... 13
1. Making an Exchange Line Call ...................................... 13
1.1 Making a call after hearing the outside dial tone ........................ 13
1.2 Making a call using en-block dialling .......................................... 13
2. Making an Internal Call .................................................. 14
2.1 Making a call after hearing the Intercom dial tone ..................... 14
2.2 Making a call using en-block dialling .......................................... 14
3. Receiving Calls ............................................................... 15
4. Plasing a call on hold (Mute Function) ......................... 15
CHAPTER 5. Applied Operation .................................................. 16
1. Speed Dial ....................................................................... 16
1.1 Storing/Checking Speed Dialling Nos. ....................................... 16
1.2 Changing and Deleting Speed Dialling Nos. .............................. 17
1.3 Making a call using a speed dial No. .......................................... 18
2. Redial ............................................................................... 19
2.1 Last Number Redial. .................................................................. 19
2.2 Selection dialling. ....................................................................... 19
1
3. Recall (Send earth recall or timed break signal
to PBX) ............................................................................ 20
4. Changing from Pulse to Tone........................................ 21
5. Any Key Answer ............................................................. 21
6. Checking the Charge counter ....................................... 22
CHAPTER 6. Alarm Function....................................................... 23
1. Error Alarm Function ..................................................... 23
CHAPTER 7. Subscription Registration ..................................... 24
1. Subscription Registration ............................................. 24
2. PS-ID display .................................................................. 25
CHAPTER 8. Other Information .................................................. 26
1. Care and Maintenance ................................................... 26
2. Trouble Shooting ............................................................ 27
2
Introduction
1. Overview
Panasonic’s modern technology produced a digital cordless telephone system using the DECT
technology. This system is either installed behind an existing customer’s PBX/Key system or installed directly to public telephone lines. It provides a cordless communication facility to the
users. Extension telephones of customer may be replaced by a cordless handset, or user may have a
cordless handset in addition to an existing wired telephone.
The Panasonic Cordless System consists of a Radio Exchange (RE), a Cell Station (CS), and a
personal handy terminal (PS).
Up to 24 telephone lines or PBX/Key system extensions can be connected to the radio Exchange
(RE) and up to 24 portable handsets are used in the system. Each portable handset have own telephone number or extension number in the PBX/Key system, and can receive and originate a
call.
Thanks to the digital technology, a user of this cordless telephone system enjoys a clear speech with
lesser noise as well as a protection from tapping.
Note:
To assure the safe use of your telephone, please observe the following guidelines for installation and use.
1) Do not use the telephone near sources of electric ‘noise’ such as fluorescent lamps, air conditioner, washing
machine, TV sets or radios.
2) The telephone should not be exposed to heat sources, direct sunlight, extreme temperatures, moisture, strong
vibrations, greasy or dusty environments.
Operating temperature: 0°C to 40°C
Operating humidity: 0% to 60%
3) Never attempt to insert wires, pins, or similar objects in the vents or openings of the telephone set.
4) Never clean the telephone with benzene, paint thinner or other solvent materials. Wipe with a soft cloth.
5) Do not change the unit installation location without consulting your dealer/installer.
6) Installation of telephone system close to welding equipment, or broadcasting aerial may cause radio interference to
speech.
IMPORTANT
1) This apparatus must be installed in accordance with BS6701 and general approval NS/G/
23/L/100005. This is a condition of the approval and any installation which does not
comply with the above will invalidate the approval status of that particular installation.
2) This equipment requires a maintenance contract issued by a maintainer holding BSI
approval. This is a statutory requirement.
IMPORTANT NOTICE FOR U.K.
1) Please ensure that the apparatus is not connected in parallel to any other equipment that is
intended for connection to the PSTN.
2) Although Radio Exchange can use either loop disconnect or DTMF signalling. Only the
performance of the DTMF signalling is subject to regulatory requirements for correct
operation. It is therefore strongly recommended that the equipment is set to use DTMF
signalling for access to public or private emergency services. DTMF signalling also
provides faster call set up.
3
2. Safety Information
This equipment is intended for use when supplied with power from the charger through
the AC Adaptor.
Other usage will invalidate any approval given to this apparatus and may be dangerous.
Switch off your DECT telephone when in an aircraft. The use of telephones in an
aircraft may be dangerous to the operation of the aircraft.
You are advised not to use the equipment at a refuelling point. You are reminded of the
need to observe restrictions on the use of radio equipment in fuel depots, chemical
plants or where blasting operations are in progress.
You MUST exercise proper control of your vehicle at all times. Do not use a hand-held
telephone or microphone while you are driving. Find a safe place to stop first. Do not
speak into a hands-free microphone if it will take your mind off the road. You MUST
NOT stop on the hard shoulder of a motorway to answer or make a call, except in an
emergency.
Care must be taken when using the telephone in close proximity to personal medical
devices, such as pacemakers and hearing aids.
Avoid contact between the antenna and face (especially eyes) during a call.
Take care when using a telephone in crowded places.
4
Getting Started
This chapter describes preparations and other items you must be aware of before starting operation.
Prepare your PS for use as follows:
• Install the battery pack.
• Charge your PS.
These preparations are described in detail below.
1. Installing the battery pack
The PS is operated by voltage supplied from the battery pack. Follow the procedure below to install
the battery pack.
(1)
Slide the battery cover in the direction of the arrow to remove it.
(2)
Securely insert the battery pack connector into the connector in the PS.
(3)
Install the battery pack.
Notes:
Press the battery pack cord into the slot in the side of the battery pack. If you do not do so, you
may not be able to replace the cover.
IMPORTANT
• If the PS is not used more than two weeks, please put off the battery pack
to keep the battery life and recharge it before using the PS again.
5
Getting Started
(4)
Slide the battery cover in the direction of the arrow until you hear it click into
position.
2. Charging the PS
(1)
Plug the AC adaptor into the charger.
(2)
Plug the AC adaptor into a power outlet.
,
,
Power
Outlet
6
Getting Started
(3)
Place the PS with its battery pack in the charger.
The charge lamp on the charger lights. While the PS is placed on.
Notes:
• The first time you charge your battery pack, charge it for more than 15 hours.
• If you replace the battery pack, or it has not been used for a long time, or if it goes flat while you are
using the PS, charge the battery pack for more than 15 hours.
• If the “Low Voltage” icon is displayed even after charging the battery pack for at least 10 hours and
the charge counter shows fully charged, please install a new battery pack because of the battery's
life.
• Once the battery pack is charged, you can make calls lasting about 4.5 hours in total or keep the PS
in a standby state for about 40 hours.
7
Getting Started
3. Turning the power ON/OFF
3.1 Turning the power ON
When the power is turned ON, the PS can be operated.
1. Hold the [Power] key down for at least one second.
All icons are displayed on the display for about one second. Then, the display
changes as follows depending on the state of the PS.
When the RSSI icon is displayed
The PS is in range and can receive
signals.
When the Out of range icon is displayed
The PS is out of range and cannot
receive signals. Bring the PS near to
the CS until the Out of range icon
disappears. You can hold a conversation
when this icon disappears.
When Error is displayed
Either the battery is low, or something
else is preventing the PS from being
used.
Remedy this error referring to Chapter
6, 1. Error Alarm Function.
3.2 Turning the power OFF
When the power is turned OFF, the PS can no longer be operated.
1. Hold the [Power] key down for at least one second.
All icons disappear from the display.
4. Adjusting the volume
You can adjust the volume of the ringing tone and conversations.
4.1 Adjusting the volume of the ringing tone
The volume of ringing tones can be adjusted in four stages (No Ringing Tone→Low→Middle→
High).
8
Getting Started
Press the [volume(▲)] key or [volume(▼)] key while the PS is standing by or while
it is ringing.
Pressing the [volume(▲)] key increases the volume, and pressing the [volume(▼)]
key decreases the volume.
4.2 Adjusting the volume of conversations
The volume of conversations can be adjusted in three stages (Low→Middle1→Middle2→High).
Press the [volume(▲)] key or [volume(▼)] key during a conversation.
Pressing the [volume(▲)] key increases the volume, and pressing the [volume(▼)]
key decreases the volume.
4.3 Changing the Ringing Tone [Programming Required]
At default, an exchange line incoming, internal incoming and hold recall used the same ring pattern.
Although one of three ring interval can be chosen by RE programming.
(Refer programming manual page 25.)
By the combination of this ring interval specified by RE programming and Tone modulation
specified by PS programming, you can distinguish Exchange line incoming call and internal
incoming call.
At purchase, the tone on your PS is set to 16Hz.
RE Programming
PS Programming
Ring Interval
Default
Alternative
0.8sec.
Exchange line
1 incoming tone
Internal
2
incoming tone
Modulated
by
0.8sec.
16Hz
0.2sec.
0.8sec.
0.8sec.
0.2sec.
1.2sec.
1.0sec.
1.2sec.
2670Hz/
2300Hz
2.0sec.
0.8sec.
3 Hold Recall Tone
Tone
0.8sec.
24Hz
0.8sec.
8Hz
0.2sec.
0.2sec.
0.2sec.
9
Getting Started
1. Press the [Programming] key.
The PS enters the Programming mode.
2
1
or
2
or
2. Press the [2] dial key.
3. Set the tone pattern.
To set the tone pattern 1:
To set the tone pattern 2:
To set the tone pattern 3:
Press the [1] dial key.
Press the [2] dial key.
Press the [3] dial key.
Note: • To cancel setting midway, press the [On-hook] key.
3
4. Press the [Programming] key.
The Programming mode is canceled, and the PS returns to the previous mode.
10
Names and Functions
1. VB-D3811EX Personal Station (PS)
6 : [Asterisk] key
7 : [Power] key
Press to turn the power ON and
OFF.
8 : [Redial] key
Press to redial a telephone No.
1
HOLD
2
6
7
R
10
11
12
INT
1
2
3
4
5
6
7
8
9
0
R
14
15
16
2 : [Speed dial] key
Press to store speed dial or make a
speed dial call.
3 : [Programming] key
Press to enter the Programming
mode. Also, press during storing.
4 : [F] key
This key is used to change the ID
of the PS for accessing another
system. Up to 4 ID’s can be stored.
Note:
• How to switchover to another RE.
1. Press [F] key.
Current used RE number is blinking.
2. Enter the RE number which you want
to use using dial key pad.
3. Press [F] key again.
No SVC is displayed.
INT
9 : [HOLD] key
Press to put a conversation on
hold by mute a microphone or
pause a conversation. Press to
clear an entered telephone No.
13
1 : Incoming call indicator
Blinks when an incoming call
arrives.
F
HOLD
9
F
3
4
5
8
5 : [INT] key
Press to access PBX extention.
10 : [Recall] key
Press to send the recall signal to
PBX.
11 : [On-Hook] key
Press to terminate the conversa
tion. Press twice to clear an
entered dial No. or to check the
battery level during standby.
12 : [Off-Hook] key
Press to call an external line.
13 : dial keys
14 : [Sharp] key
15 : [Volume (▲)] key
Press to increase the ringing tone
or volume of conversations, or
display a registered telephone No.
for Speed Dial or Redial. (Refer
to page 7)
16 : [Volume (▼)] key
Press to decrease the ringing tone
or volume of conversations, or
display a registered telephone No.
for Speed Dial or Redial. (Refer
to page 7)
11
Names And Functions
2. Display
1
2
3
4
5
1st line
2nd line
2.1 1st line
1 : Off-Hook icon
This icon is displayed when you press the [Off-hook] and [Intercom] keys to call an
external line or intercom. It is also displayed blinking when you press the [Hold] key
to put the conversation on hold. It disappears when you press the [On-hook] key to
terminate the conversation.
2 : Programming Mode icon
This is displayed when you press the [Programming] key to enter the Programming
mode. It disappears when you press the [Programming] key to cancel the Programming mode.
3 : Low Voltage icon
This icon is displayed when the battery voltage falls low (approx. 3.45 V).
It starts blinking when the voltage falls below low (approx. 3.3V).
Immediately recharge the battery when this icon is displayed.
4 : Out of range icon
This icon is displayed when the PS is outside the call range. When this icon is displayed, you can no longer talk on the PS.
This icon disappears when the PS is inside the call range. You can talk on the PS
when this disappears.
5 : RSSI (Radio Signal Strength Indicator) icon
This icon is displayed when the PS is inside the call range. You can talk on the PS
when this icon is displayed. The number of bars decreases proportionally to signal
strength.
This icon disappears when the PS is outside the call range. When this icon is not
displayed, you can no longer talk on the PS.
2.2 2nd line
Entered Nos. are displayed when you are entering a telephone No. The remaining battery power is
also displayed here.
12
BASIC OPERATION
1. Making an Exchange Line Call
1.1 Making a call after hearing the outside dial tone
The telephone No. is sent after an exchange line has been secured.
An outside call can be placed with a minimum number of operations.
1. Press the [Off-hook] key.
Listen for an outside dial tone.
2. Enter the telephone No.
The number appears on the display.
Note: • If you make a mistake entering the telephone No., press the [on-hook] key, then start again
from step 1.
• Though you can make an exchange line call by manually entering the telephone No. on the dial
after speed dial, you cannot make an exchange line call by speed dial after dialing manually.
3. Wait for the called party to answer the PS, then start your conversation.
4. Press the [On-hook] key to terminate the call.
1.2 Making a call using en-block dialling
Instead of placing your PS off-hook before dialling the destination telephone number, you can enter
the full telephone No., then press “Off-hook” to dial it.
This allows you to check the No. on the display before it is dialled.
1. Enter the telephone No.
The number appears on the display.
Note: • If you make a mistake entering the extension No., press the [On-hook] key or [HOLD] key to
delete the No., then start again.
Each press of the [HOLD] key deletes a letter from the last entered telephone No. Also,
pressing the [On-hook] key deletes the entire telephone No.
2. Press the [Off-hook] key.
3. Wait for the called party to answer the PS, then start your conversation.
13
Basic Operation
4. Press the [On-hook] key to terminate the call.
2. Making an Internal Call
2.1 Making a call after hearing the Intercom dial tone
INT
1. Press the [INT] key.
Listen for the Intercom dial tone of the host PBX.
2. Enter the extension No.
The number appears on the display.
Note: • If you make a mistake entering the extension No., press the [no-hook] key, then start again
from step 1.
3. Wait for the called party to answer the PS, then start your conversation.
4. Press the [On-hook] key to terminate the call.
2.2 Making a call using en-block dialling
1. Enter the extension No.
The number appears on the display.
Note: • If you make a mistake entering the extension No., press the [On-hook] key or [HOLD] key to
delete the No., then start again.
Each press of the [HOLD] key deletes a letter from the last entered telephone No. Also,
pressing the [On-hook] key deletes the entire telephone No.
INT
2. Press the [INT] key.
3. Wait for the called party to answer the PS, then start your conversation.
4. Press the [On-hook] key to terminate the call.
14
Basic Operation
3. Receiving Calls
When the PS rings, press [Off-hook] key to answer.
1. When the PS rings, press the [Off-hook] key.
The Incoming call indicator lamp blinks (or lights continuously).
When you set Any Key Answer, you can reply by pressing any key other than the
[Power] Key. (Refer to Chapter 5.)
2. Start your conversation.
3. Press the [On-hook] key
4. Placing a call on hold (Mute Function)
You can press the [HOLD] key to stop the call.
HOLD
HOLD
1. Press the [HOLD] key.
The off-hook icon starts blinking on the display.
2. Press the [HOLD] key again to resume the conversation.
Note: • The wireless link with CS remains on hold.
• The hold recall function is not provided.
Reference: • The call is not terminated if you place the PS on the charger while a call is on hold.
15
APPLIED OPERATION
1. Speed Dial
You can store frequently-dialled outside or internal Nos. under speed dialling Nos. for quick
calling.
1.1 Storing/Checking Speed Dialling Nos.
You can store up to 10 speed dialling Nos., each consisting of up to 32 digits.
Reference:
• You can store speed dialling Nos. even when out of range or while making another call.
• The stored Nos. remain in memory even when the power is OFF.
1. Press the [Programming] key while the PS is not
being used or even if a call is in progress to enter
the programming mode.
2. Press [Speed dial] key.
3. Storing/Checking a Speed Dialling No.
[To store a speed dialling No.]
(1) Press the Speed dial No. (1 to 9 and
0) under which to store the destination telephone No.
Reference: • You can also press the volume keys
(▲ and ▼) to go forward or to go
previous speed dial Nos.
(2) Enter the telephone No. (32 digits
max.).
Reference: • If you make a mistake entering the telephone No., press the [On-Hook] or
[HOLD] key to erase the telephone No. and enter the telephone No. again.
Each press of the [HOLD] key deletes a letter from the last entered
telephone No. Also, pressing the [On-hook] key deletes the entire telephone No.
• To enter a pause, press the [Redial] key. Set the pause time in the
“Programming Manual.”
[To check a speed dialling No.]
(1) Press the Speed Dial No. (1 to 9, 0)
that you want to check.
Reference: • Press the [Volume] key (▲ and ▼) to display the Speed Dial No. on the
display.
16
Applied Operation
4. Press the [Programming] key.
This exits memory mode.
• To store another telephone No. before pressing [programming] key, repeat steps 2
to 4.
• The completion tone sounds when you finish storing a speed dial No.
1.2 Changing and Deleting Speed Dialling Nos.
1. Press the [Programming] key while the PS is not
being used or even if a call is in progress to enter
the memory mode.
2. Press the [Speed dial] key.
3. Press the speed dial No. (1 to 9, or 0) to be
changed or deleted.
Reference: • You can also press the [Volume] keys (▲ and ▼)
to display the speed dial Nos.
4. Change or delete the No.
[Changing the contents of a speed dial No.]
HOLD
(1) Press the [HOLD] key to delete the
telephone No.
Reference: • Each press of the [HOLD] key
deletes a letter from the last
entered telephone No.
(2) Enter the desired No.
[Deleting the contents of a speed dial No.]
(1) Press the [HOLD] key to delete the
HOLD
telephone No.
Reference: • Each press of the [HOLD] key
deletes a letter from the last
entered telephone No.
17
Applied Operation
5. Press the [Programming] key.
This exits memory mode.
• To change or delete another telephone No. before pressing the [Programming] key,
repeat steps 2 to 4.
1.3 Making a call using a speed dial No.
1.3.1 Making a call after hearing the dial tone
1. Press the [Off-hook] key.
Listen for dial tone.
2. Press the [Speed dial] key.
3. Press the desired speed dial No. (1 to 9, or 0).
Number appears on the display.
4. Wait for the called party to answer the PS, then start your conversation.
5. Press the [On-hook] key to terminate the call.
1.3.2 Making a call using en-block dialling
1. Press the [Speed dial] key.
2. Press the desired speed dial No. (1 to 9, or 0).
Number appears on the display.
3. Press the [Off-hook] key.
Note: • To store an intercom No., press the [INT] key instead of the [Off-hook] key.
18
Applied Operation
4. Wait for the called party to answer the PS, then start your conversation.
5. Press the [On-hook] key to terminate the call.
2. Redial
2.1 Last Number Redial
You can redial the last number that you called.
Reference:
• The last-called number is lost when you turn off the power.
• Your PS stores telephone Nos. of up to 32 digits.
1. Press the [Off-hook] key.
Listen for an outside dial tone or intercom dial tone.
2. Press the [Redial] key.
3. Wait for the called party to answer the PS, then start your conversation.
4. Press the [On-hook] key to terminate the call.
2.2 Selection dialling
You can select any of the five last-dialled numbers to redial. You can also modify the selected No.
before it is dialled.
Reference:
• The last called numbers are lost when you turn off the power.
• Your PS stores telephone Nos. of up to 32 digits.
• A pause also counts as 1 digit.
1. Press the [Redial] key.
The last-dialled telephone No. appears on the display.
19
Applied Operation
2. You can also press the [Volume] keys (▲ and ▼) to select the telephone No. to
redial.
Pressing the [Volume] keys successively displays each of the telephone Nos. in the
reverse order in which they were dialled.
If you want to modify a telephone No. before dialling it, press [HOLD] key to delete
the No., then enter the correct No.
Reference: • Each press of the [HOLD] key deletes a letter from the last entered telephone No.
3. Press the [Off-hook] key.
4. Wait for the called party to answer the PS, then start your conversation.
5. Press the [On-hook] key to terminate the call.
Reference:
• Each time you dial a new No. the oldest of the stored numbers is deleted.
• You can check the last 5 telephone Nos. dialled by following steps 1 and 2, then pressing [On-hook] key.
3. Recall (Send earth recall or timed break signal to PBX)
You can access the PBX dial tone by pressing the [RECALL] key while using a PBX line. You will
hear the PBX dial tone after pressing the [RECALL] key. This feature is available only when the
RE is piggy-backing to PBX.
R
1. Press the [RECALL] key while you are on line.
The recall signal is sent to the PBX.
You will get a new dial tone from the PBX.
Note: Programming Required.
• Set Earth Recall/Timed Break. (Refer to “Programming Manual”)
• The transfer operation depends on the host PBX function.
DBS
:[Recall]→[EXT. No.]→[On-Hook]
20
Applied Operation
4. Changing from Pulse to Tone [Programming required]
To change from dial pulse to tone signals during a call or while you are dialling is possible even if
the exchange line you are using is pulse signalling.
1. Press the [Programming] key.
2. Press the [Asterisk] key.
3. Press the [Programming] key.
5. Any Key Answer [Programming Required]
When you set Any Key Answer, you can reply to incoming calls from an exchange line or extension
line by pressing any key other than the [Power] Key.
1. Press the [Programming] key.
The PS enters the Programming mode.
1
0
or
1
2. Press the [1] dial key.
3. Set Any Key Answer.
To set any key answer OFF : Press the [0] dail key.
To set any key answer ON : Press the [1] dail key.
Note: • To cancel setting midway, press the [On-hook] key.
4. Press the [Programming] key.
The Programming mode is canceled, and the PS
returns to the previous mode.
21
Applied Operation
6. Checking the Charge Counter
You can check the battery charged level on the display. The charged level is displayed in 10 stages.
1. Press the [On-Hook] key during standby.
Note: • The charged level counter is inaccurate. The Low
Voltage Icon may be displayed to inform the operator
of low battery level even if the charged level counter is
still displayed. Use the charged level counter merely as
a guideline.
• The Low Voltage icon may be displayed when the
battery level becomes low even if the charged level
counter is still displayed. When the Low Voltage Icon is
displayed, immediately charge or replace the battery.
As a guidelines, the battery should be replaced about
once every year.
Reference: • When the battery level becomes low, an
alarm tone sounds, and the Low Voltage icon is
displayed on the display.
To stop the alarm tone, press the [On-Hook] key.
Recharge the battery before it completely runs
out of power.
22
ALARM FUNCTION
1. Error Alarm Function
When you turn the power ON, the PS carries out self-diagnostics to check for any hardware errors.
If an error is found, an error number is displayed accompanied by an alarm to inform the operator.
The following three error numbers are displayed to indicate the error type:
Display Indication
PS Status
A fatal error has occurred. Replace the PS.
Same as above
The battery is at the end of its life. Replace the battery.
23
Subscription Registration
1. Subscription Registration
The PS can store IDs for use with up to 4 RE.
Authentication Code (AC) are required for each system.
INT
1. Press the [Power] key while pressing and holding
the [Intercom] and [#] keys to select PS registration mode.
Note: • The mode Nos. are displayed. Nos. in use blink.
Nos. not in use light continuously.
2. Select a registration No.
3. Press the [Off-hook] key.
4. Enter your AC Authentication code from 1 to 4
digits (specified for the combination of RE and
PS).
Note : Enter the same code that registered to RE.
5. Press the [Programming] key to start authentication using the entered parameters.
The RE sends the PS a completion tone on successful registration of the ID.
Note: • How to switchover from the current connected RE to another RE, refer page11- 4: [F] key on this manual.
24
Applied Operation
2. PS-ID display
INT
1. Press the [Power] key while pressing and holding
the [Intercom] and [#] keys to select CS registration mode.
Note: • The mode Nos. are displayed. Nos. in use blink. Nos.
not in use light continuously.
2. Select a registration No.
3. Press the [Redial] key to display the PS-ID
(IPUI-N).
Note: Be sure to note down this ID and register to RE.
25
Other Information
1. Care and Maintenance
• Pressing any of the keys may produce a loud tone. Avoid holding the telephone close to the ear
while pressing the keys.
• Extreme temperatures may have a temporary effect on the operation of your telephone.
This is normal and does not indicate a fault.
• Do not disassemble the equipment. There are no user-serviceable parts.
• Do not subject the equipment to excessive vibration or shock.
• Avoid contact with liquids. If the equipment becomes wet immediately remove the power and
contact your dealer.
• Always use approved accessories in order to maintain optimum performance and avoid damage.
• The equipment may be cleaned with a soft cloth dampened with a mild detergent and water.
Petroleum based cleaners may damage the equipment.
• Do not leave the equipment in direct sunlight or a humid, dusty or hot area.
• Keep metallic items that may accidentally touch the terminals away from the equipment.
• Always charge the PS in a well ventilated area, not in direct sunlight, between 0°C and +40°C. It
is not possible to recharge the PS if it is outside this temperature range.
• Do not incinerate or dispose of the battery packs as ordinary rubbish. The battery
packs must be disposed of in accordance with local legislation and may be
recycled.
• When disposing of any packing materials or old equipment check with your local
authorities for information on recycling.
26
Cd
Other Information
2. Trouble Shooting
Should any problem persist contact your dealer.
Problem
Causes and Solutions
Telephone will not
switch on
Check that the battery pack is fully charged and correctly
connected to the telephone.
Short battery life
Battery life is affected by the network you are using and the condition of
the battery pack.
The life of the battery pack is affected by improper charging, this is
inherent in all Ni-Cd batteries. To maintain maximum performance always
use until the low battery warning and then fully recharge the battery pack.
To revive the battery pack use the telephone until it switches off and then
fully recharge three times. However, the battery pack will eventually wear
out and must be replaced with a new one.
Calls cannot be made when the outgoing calls are barred.
Calls cannot be made Check that the telephone is registered to a network. Move to a coverage
area and operate your telephone after it has registered with a network.
Turn off the power once and turn it an again.
Calls cannot be made Check the telephone number is stored in Fixed Dial Memory.
from Fixed Dial
Memory
Calls cannot be
received
To receive a call the telephone must be switched on.
Calls cannot be received when incoming calls are barred. Turn off the
power once and turn it an again.
27
7L1028AZAJ