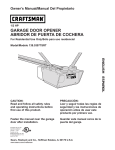
1
www.nokia.com
www.nokia.com/latinoamerica
Copyright © 2005 Nokia. All rights reserved.
Copyright © 2005 Nokia. Todos los derechos reservados.
Printed in Mexico / Impreso en México
XXXXXXX
NOKIA 0000
User Guide
Manual del Usuario
Nokia 6305i User Guide
Nota: La traducción en español de este manual inicia en la Página 63.
1
LEGAL INFORMATION
PART NO. 9242631, ISSUE NO. 1a
Printed in Korea 02/2006
Copyright © 2006 Nokia. All rights reserved.
Nokia, Nokia Connecting People, and the Nokia Original Enhancements logos are trademarks
or registered trademarks of Nokia Corporation. Other company and product names mentioned
herein may be trademarks or trade names of their respective owners.
US Patent No. 5818437 and other pending patents. T9 text input software
Copyright ©1999-2006. Tegic Communications, Inc. All rights reserved.
cdma2000 is a registered certification mark of the Telecommunications Industry Association.
Includes RSA BSAFE cryptographic or security protocol software from RSA Security.
The information contained in this user guide was written for the Nokia 6305i products.
Nokia operates a policy of ongoing development. Nokia reserves the right to make changes
to any of the products described in this document without prior notice.
UNDER NO CIRCUMSTANCES SHALL NOKIA BE RESPONSIBLE FOR ANY LOSS OF DATA OR
INCOME OR ANY SPECIAL, INCIDENTAL, AND CONSEQUENTIAL OR INDIRECT DAMAGES
HOWSOEVER CAUSED. THE CONTENTS OF THIS DOCUMENT ARE PROVIDED “AS IS.” EXCEPT AS
REQUIRED BY APPLICABLE LAW, NO WARRANTIES OF ANY KIND, EITHER EXPRESS OR IMPLIED,
INCLUDING, BUT NOT LIMITED TO, THE IMPLIED WARRANTIES OF MERCHANTABILITY AND
FITNESS FOR A PARTICULAR PURPOSE, ARE MADE IN RELATION TO THE ACCURACY AND
RELIABILITY OR CONTENTS OF THIS DOCUMENT. NOKIA RESERVES THE RIGHT TO REVISE THIS
DOCUMENT OR WITHDRAW IT AT ANY TIME WITHOUT PRIOR NOTICE.
Export Controls
This device may contain commodities, technology, or software subject to export laws and
regulations from the U.S. and other countries. Diversion contrary to law is prohibited.
FCC/Industry Canada Notice
Your device may cause TV or radio interference (for example, when using a telephone in close
proximity to receiving equipment). The FCC or Industry Canada can require you to stop using
your telephone if such interference cannot be eliminated. If you require assistance, contact
your local service facility. This device complies with part 15 of the FCC rules. Operation is
subject to the condition that this device does not cause harmful interference. Any changes
or modifications not expressly approved by Nokia could void the user’s authority to operate
this equipment.
2
Contents
Contents
For your safety..................................................................................... 4
Welcome ............................................................................................... 6
1. Phone at a glance.......................................................................... 7
2. Set up your phone....................................................................... 11
3. Text entry..................................................................................... 17
4. Get It Now ................................................................................... 19
5. Messaging .................................................................................... 24
6. Contacts ....................................................................................... 35
7. Recent calls.................................................................................. 39
8. Settings and tools ....................................................................... 41
9. Enhancements.............................................................................. 51
10. Reference information ................................................................ 52
Care and maintenance....................................................................... 53
Additional safety information .......................................................... 54
Index ................................................................................................... 59
3
For your safety
For your safety
Read these simple guidelines. Not following them may be dangerous or illegal.
Read the complete user guide for further information.
SWITCH ON SAFELY
Do not switch the device on when wireless phone use is prohibited or
when it may cause interference or danger.
ROAD SAFETY COMES FIRST
Obey all local laws. Always keep your hands free to operate the vehicle
while driving. Your first consideration while driving should be road safety.
INTERFERENCE
Do not switch the device on when wireless phone use is prohibited or
when it may cause interference or danger.
SWITCH OFF IN HOSPITALS
Follow any restrictions. Switch the device off near medical equipment.
SWITCH OFF IN AIRCRAFT
Follow any restrictions. Wireless devices can cause interference
in aircraft.
SWITCH OFF WHEN REFUELING
Don't use the device at a refueling point. Don't use near fuel or chemicals.
SWITCH OFF NEAR BLASTING
Follow any restrictions. Don't use the device where blasting is in progress.
USE SENSIBLY
Use only in the normal position as explained in the product
documentation. Don't touch the antenna unnecessarily.
QUALIFIED SERVICE
Only qualified personnel may install or repair this product.
ENHANCEMENTS AND BATTERIES
Use only approved enhancements and batteries. Do not connect
incompatible products.
4
For your safety
WATER-RESISTANCE
Your phone is not water-resistant. Keep it dry.
BACK-UP COPIES
Remember to make back-up copies or keep a written record of all
important information.
CONNECTING TO OTHER DEVICES
When connecting to any other device, read its user guide for detailed
safety instructions. Do not connect incompatible products.
EMERGENCY CALLS
Ensure the device is switched on and in service. Press the end key as
many times as needed to clear the display and return to the main
screen. Enter the emergency number, then press the send key. Give
your location. Do not end the call until given permission to do so.
■ About your phone
The wireless device described in this guide is approved for use on the following
Verizon networks: CDMA 800 MHz; CDMA 1900 MHz; CDMA2000 1xRTT; and
1xEV-DO. Contact Verizon for more information about networks.
When using the features in this device, obey all laws and respect privacy and the
legitimate rights of others.
Warning: To use any features in this phone the phone must be switched
on. Do not switch the phone on when wireless phone use may cause
interference or danger.
■ Network services
To use the phone you must have service from a wireless service provider. Many of
the features in this phone depend on features in the wireless network to function.
These network services may not be available on all networks or you may have to
make specific arrangements with your service provider before you can utilize
them. Your service provider may need to give you additional instructions for their
use and explain what charges will apply. Some networks may have limitations
that affect how you can use network services. For instance, some networks may
not support all language-dependent characters and services.
Your service provider may have requested that certain features be disabled or not
activated in your phone. If so, they will not appear on your phone menu. Contact
your service provider for more information.
5
Welcome
Welcome
Congratulations on your purchase of the Nokia 6305i mobile phone. Your phone
provides many functions that are practical for daily use, such as a hands-free
loudspeaker, alarm clock, calculator, calendar, camera, video and data downloads,
and more. Your device can also connect to a PC, laptop, or other device using a
data cable. To personalize your device you can set your favorite ringtones.
■ Getting help
If you need help, the Nokia Care Contact Center is available for assistance. Before
calling, we recommend that you write down the electronic serial number (ESN)
and your zip code (only in the US) and have it available.
Find your device label
The ESN is found on the type
label, which is located beneath
the battery on the back of the
device. See "Remove the back
cover," p. 12.
Accessibility solutions
Nokia is committed to making mobile phones easy to use for all individuals,
including those with disabilities. For more information visit the Web site at
www.nokiaaccessibility.com.
Nokia support and contact information
Check www.nokiausa.com/support or your local Nokia Web site for the latest
version of this guide, additional information, downloads and services related to
your Nokia product.
On the Web site, you can get information on the use of Nokia products and
services. If you need to contact customer service, check the list of local Nokia
Care Contact Centers at www.nokia.com/customerservice.
For maintenance services, check your nearest Nokia Care Contact Center location
at www.nokia.com/repair.
Billing and customer service
To reach Verizon’s billing and customer service support, dial 1-800-256-4646.
6
Phone at a glance
1. Phone at a glance
Earpiece (1)
Display screen (2)
Left selection (soft) key (3)
Call and send key (4)
Viewfinder key (5)
Clear key (6)
Keypad (7)
Microphone (8)
Center selection (soft) key (9)
Camera button (10)
Power and end key (11)
Right selection (soft) key (12)
Navigation key (13)
Antenna (1)
2.5 mm headset port (2)
Volume keys (3)
Voice recognition and
speaker phone key (4)
Camera lens (5)
Camera flash
and flashlight (6)
Stereo speakers (7)
Self-portrait mirror (8)
7
Phone at a glance
■ The start screen
The start screen is home base and indicates your device is in standby mode.
Signal strength (1)—The strength of the
signal received by the phone is indicated
by the number of bars displayed.
(Not shown in Standalone Mode.)
Message (2)—Press the left selection key
to select this option.
Menu (3)—Press the center selection key
to select this option.
Contacts (4)—Press the right selection key
to select this option.
Battery level (5)—Four bars indicate a fully
charged battery.
Location (6)—Location information
sharing mode.
■ Navigation key
Depending on how you configure your phone, some or all of the following key
shortcuts may be available in the standby mode.
Scroll up—Launch browser.
Scroll right—View Get It Now menu.
Scroll down—Go to calendar if phone is in default setting.
Scroll left—Get PIX & FLIX.
Press OK—Select highlighted menus and submenus.
Press CLR—Return to the previous screen except when in a voice call, creating a
TXT message, or in a wireless or Get It Now application. Press and hold the CLR
key to turn the flashlight on and off.
8
Phone at a glance
■ Indicators and icons
Depending on the model number of your device, some or all of the following
indicators and icons may appear in the standby mode. See "Device information,"
p. 45, to display the Icon Glossary.
Signal strength indicator.
No service indicator: the phone is not in service.
Battery strength indicator.
Call state indicator: a call is in progress. No icon indicates the
phone is in standby mode.
Data session: a wireless data communication is in progress.
You are roaming outside your home network.
High-speed, or wireless browser download is activated.
You are in a digital network. See "Network services," p. 5.
SSL security feature is on.
TTY is enabled.
Location information sharing is set to E911 Only.
See "Location," p. 45.
Location information sharing is set to Location On.
See "Location," p. 45.
Voice privacy is activated.
You are in a 1XRTT network. See "Network services," p. 5.
Sounds are set to off.
Alarm only is on.
Alarm is set to on.
Standalone mode is on.
Speaker phone is set to on.
Vibrate mode is set to on.
A schedule entry is set.
9
Phone at a glance
There are new voice mails.
There are new messages in your inbox.
You have missed calls.
■ Phone menus
Phone features are grouped according to function and are accessed through the
main menus (Get It Now, Messaging, Contacts, Recent Calls, Settings & Tools). Each
main menu contains submenus and lists from which you can select or view items
and customize your device features. To access these menus and submenus, enter
the number associated with that option. You may also use the scroll method.
The left, right and center selection keys are also called soft keys. The function
associated with the soft keys can change for each phone menu and depends on
each selected feature.
Some features may not be available, depending on your network. For more
information, contact your wireless service provider.
■ Scroll method
You can use the navigation key to move up, down, left, and right through the
options. Press the center selection key to select an item.
1. In the standby mode, use the right and left soft keys to select
Message or Contacts. To access the main menus. select Menu
with the center selection key, then use the navigation left or
right key.
To provide a visual representation of your current position in
the menu structure, a scroll bar is displayed on the right side
of the screen.
2. Press the clear (CLR) key to return to the previous menu. Press the end key to
return to the standby mode from any menu or submenu.
10
Set up your phone
2. Set up your phone
■ Antenna
In the Nokia 6305i phone, the external antenna is located toward the top of the
device. To improve the signal strength on your phone, extend the antenna. An
internal GPS antenna is activated when you place an emergency call or when you
select the Location mode from the Menu > Setting & Tools > System menu. See
"Location," p. 45.
Hold the device as you would any other telephone with
the antenna area pointed up and over your shoulder.
Note: As with any other radio transmitting
device, do not touch the antenna unnecessarily
when the device is switched on. Contact with
the antenna affects call quality and may cause
the device to operate at a higher power level
than otherwise needed. Avoiding contact with
the antenna while operating the device
optimizes antenna performance and battery life.
■ Change battery
The battery is built into the back cover. Before removing the cover, always switch
off the power and disconnect the charger and any other device. Avoid touching
electronic components while changing the cover. Always store and use the
device with the cover attached.
11
Set up your phone
Remove the back cover
1. With the back of the device
facing you, slide the release
button up (1).
2. Use the side grips (circled) to
lift the back cover from the
device (2).
Replace the back cover
1. Set the back cover on the
device so that the metal tabs
on the battery align with the
tabs in the device.
2. Lower the base of the back
cover onto the device (1) and
press the top down (2) until it
snaps securely in place.
Important: Do not remove the front cover of this device. Attempts to
remove the front cover may damage the device. If your device requires
service, contact the Nokia Care Contact Center.
Charge the battery
1. Plug the AC-1004U charger transformer into a standard ac outlet.
12
Set up your phone
2. Open the charger slot cover
at the bottom end of the
phone (1).
3. Insert the charger output
plug into the charger slot (2).
Your phone will notify you
when the charge is complete.
The charge time varies
depending on the battery
level. The maximum charge
time for a fully discharged,
standard battery is
approximately 3.5 hours.
■ Turn your phone on or off
To turn your phone on or off, press and hold
the power key. The cover does not have to be
open to turn on your phone.
■ Connect the headset
You can plug a compatible headset, such as a standard 2.5 mm plug headset, into
your device to allow hands-free operation.
Warning: When you use the headset, your ability to hear outside sounds
may be affected. Do not use the headset where it can endanger your safety.
1. Open the headset connector port (1).
13
Set up your phone
2. Plug the headset connector into the 2.5 mm
headset jack on the side of your device (2).
3. Position the headset on your ear.
With the headset connected, you can make,
answer, and end calls as usual.
• Use the keypad to enter numbers.
• Press the send key to place a call.
See "Phone at a glance," p. 7.
• Press the end key to end a call.
■ Make a call
To make a call, make sure the phone is turned on. From the standby mode, enter
the number you want to call, and press the send key. See "Contacts," p. 35, to use
the contacts menu and to enter contact numbers. This is a network feature.
Use the keypad
Enter the phone number (including the area code if necessary), and press the
send key. To delete a character to the left of the cursor, press the clear (CLR) key.
Press the end key to end the call. This is a network feature.
Use recently dialed numbers
In the standby mode, press the send key once to display the latest numbers
dialed, received, or missed. Press the send key again to dial the last number you
dialed, or scroll to select the number (or name) you wish to redial, and press the
send key. This is a network feature.
Speaker phone
To use the speaker phone when in a call, press and hold the voice recognition key
located on the left side of the phone. The
icon is displayed. To turn the speaker
phone off, press and hold the voice recognition key again. This is a network feature.
Voice recognition
You can use voice commands to make calls, look up contact information, address
messages, open applications, and check the phone status. This is a network feature.
Note: Using voice recognition may be difficult in a noisy environment or
during an emergency, so you should not rely solely upon voice commands
in all circumstances.
14
Set up your phone
1. Press the voice recognition key. Say a command is announced.
2. Say one of the following commands:
Call followed by the contact name, location, or number with area code—
To dial a contact or number.
Send text followed by the contact name or number with area code—To open
the TXT message screen.
Lookup followed by the contact name—To open a contact file.
Go to followed by an application name—To open an application.
Check [status]—To display phone coverage, signal strength, and battery level.
To adjust voice recognition settings, press the voice recognition key and select
Settings. See "Voice services," p. 48.
Headset calls
To answer a call when a headset is connected, use the send key on your phone.
■ Answer calls
The following options are available to manage incoming calls. This is a
network feature.
Answer or silence an incoming call
• To answer a call, open the slide; or, if the slide is already open, press the send key.
• To silence an incoming call, select Quiet.
• To forward an incoming call to voice mail, select Ignore.
• To end a call, press the end key.
Adjust the earpiece volume
The volume keys are located on the left side of your device. To adjust the volume
when in a call, press the volume up key or volume down key. When you adjust the
volume, a bar chart is displayed to indicate volume level.
Caller ID
To display both the name and number of the person calling you, the caller’s identity
must be stored in Contacts. If the caller is not in the contact list, the number is
displayed, or it is shown as RESTRICTED or UNAVAILABLE. The date and time when
the incoming call arrives is always displayed.
15
Set up your phone
Picture ID
You can assign a picture to display with incoming calls from your contacts.
See "Assign picture ID," p. 21.
Silent mode
To turn sounds off, press and hold the volume down key until -SOUNDS OFFACTIVATED is displayed. To turn sounds back on, press and hold the volume up key
until -NORMAL MODE - ACTIVATED is displayed.
Vibrate mode
To turn vibrate only mode on and silence all other sounds, or to turn the vibrate
mode on with the ringtone, perform one of the following:
• Press the volume down key to reduce the volume until Vibrate Only is displayed
and select SET, or press and hold 0 until VIBRATE MODE ACTIVATED is displayed.
The
icon is displayed.
• From the standby mode, select Menu > Settings & Tools > Sounds > Call
Sounds > Call Vibrate > On > OK. The
icon is not displayed.
Other options during a call
The following additional options are available when you make a call:
Send TXT Msg—To send or retrieve messages.
Contacts—To search your contact list.
Recent Calls—To check recent calls.
Voice Privacy—To protect the privacy of your current phone conversation from
other callers placing phone calls on your same network. Check with your wireless
service provider on the availability of Voice Privacy in your area.
Mute function
When in a call, select Mute to prevent the other party from hearing your voice,
but allow you to hear the other party. Select UnMute to turn off this feature.
16
Text entry
3. Text entry
The Nokia 6305i phone offers several methods for entering text and numbers:
T9Word (sentence, all caps, and lowercase), Abc, ABC, 123, and Symbols.
• Press the clear key to backspace the cursor and delete a character.
• Press and hold the clear key to backspace continuously and delete all characters.
• Press # to enter a space, thereby accepting a completed word, when in the
subject or text area of a message, or entering a contact or group name.
• Press 1 to enter the symbol mode, when in the subject or text area of a message.
• Press * to switch between sentence case, upper case and lower case when in
T9Word or Abc mode when in the text area of a message, or entering a contact
or group name. Press and hold * each time to switch between T9Word, Abc,
and 123 modes when in the text area of a message, or entering a contact or
group name.
• Press the entry mode soft key, and select Symbols to insert special characters
into your message. Depending on which screen you are viewing, this may be
either the left or right selection key. The entry mode soft key will display the
currently selected entry mode (T9Word, Abc, ABC, 123, or Symbols). Symbols
are not allowed in contact or group names.
■ T9Word (T9) mode
T9 mode allows you to write messages quickly using your keypad and the built-in
dictionary. T9 mode is much faster than the standard mode method because you
only press the corresponding key on your keypad once for each letter.
Activate or deactivate
To activate or deactivate T9, at any text entry screen press the entry mode soft
key, and scroll through the options.
17
Text entry
T9 text entry
The illustration below simulates your display each time a key is pressed. For example,
to write Verizon with T9 text on and the English dictionary selected, press each of
the following keys once:
8
3
7
4
9
6
6
• If a displayed word is not correct, press 0 to scroll through other word options.
• If your word does not appear, delete your entry and press the entry mode soft
key to change the mode to Abc. Re-enter your word using the multi-tap mode.
■ Abc (multi-tap) mode
Press the entry mode soft key, and select Abc for sentence case or ABC for upper case.
Press a key once to insert the first letter on the key, twice for the second letter,
etc. If you pause briefly, the last letter in the display is accepted and your device
awaits the next entry.
■ Numbers (123)
To switch to number mode from any other mode, press the entry mode soft key,
and select 123.
18
Get It Now
4. Get It Now
Get It Now allows you to download tunes, ringtones, pictures, videos, news,
information, and games. You can also find location information for restaurants,
ATMs, etc. With Get It Now you can personalize your phone to your own lifestyle
and tastes. This is a network feature.
Get It Now can be used anywhere on the Verizon Wireless network, as long as
your phone has a digital signal available. Most applications do not use a network
connection while in use. Visit verizonwireless.com/getitnow for additional
information on Get It Now services.
Your phone must be switched on to use Get It Now. Do not switch the phone on
when wireless phone use is prohibited or when it may cause interference or danger.
This feature shares memory space with other features.
■ V CAST
V CAST is a multimedia service available through Get It Now that delivers a
streaming mobile video experience with increased download speeds, higher
quality pictures, better sound, and longer clips. With V CAST you can stream
video clips (up to 5 minutes long) of the hottest entertainment, sports highlights,
news and breaking weather to your Nokia 6305i phone. For fun and games,
access V CAST to download a wide range of 3-D games with increased graphics,
sound, and depth. Contact Verizon for the availability of these services, pricing,
and tariffs. This is a network feature.
V CAST coverage and services are not available in all areas. A V CAST VPak
subscription is required. Visit getitnow.vzwshop.com/vcast.home.do for
additional information.
■ Get Tunes and Tones
You can personalize your phone with ringtones. A large variety of music styles
are available to choose from, such as current hits, pop, and hip–hop. This is a
network feature.
Select Menu > Get It Now, then select Get Tunes and Tones and one of the
following options:
Get New Ringtones—Select Get New to download new ringtone applications or
use one of the applications to download ringtones from the Internet. A ringtone
can be set as a Call Ringtone for a particular contact or as an Alert Tone for
calendar entries. New ringtones are stored in the My Ringtones folder.
19
Get It Now
My Ringtones—Select Get New to download a new ringtone or use one of the
tones stored in this folder.
My Sounds—Select Record New to record sounds such as music or spoken words or
to select prerecorded sounds such as Happy Birthday and crowd roar. These recorded
sounds can be played back at a later date and can be attached to a TXT message.
■ PIX and FLIX
Get PIX & FLIX allows you to view, take, and send your digital pictures and videos
right from your wireless phone, and access V CAST streaming multimedia service.
This is a network feature.
You can take photos and record video clips with the built-in 1.3 megapixel
camera and flash. The camera produces photos in JPEG format and video clips in
H.263 format.
After you take a picture or video, you can attach it to a TXT message, save it as a
wallpaper, and store it in the PIX Place folder. When you attach a picture to an
entry in your list of contacts, the picture is displayed when the contact calls you.
See "PIX and FLIX messaging," p. 24.
The Nokia 6305i device supports an image capture resolution from 160x120
pixels to 1280x960 pixels.
If there is not enough memory to take a new photo, delete old photos or other
files in the PIX and FLIX galleries.
Take a picture
To open the PIX Viewfinder and take a picture, press the viewfinder key or select
Menu > Get It Now > Get PIX & FLIX > Take PIX. Select Take to take a picture or
Options to adjust picture Resolution, Self Timer, Flash, Brightness, White Balance,
Shutter Sound, Color Effects, and Slider Setting.
Keep a safe distance when using the flash. Do not use the flash on people or
animals at close range. Do not cover the flash while taking a picture.
Record a video
To open the FLIX Viewfinder, in the standby mode, do one of the following:
• Press and hold the viewfinder key.
• Press the viewfinder key to open the viewfinder in PIX Viewfinder mode, then
press the viewfinder key again to switch to FLIX Viewfinder mode.
• Select Menu > Get It Now > Get PIX & FLIX > Record FLIX.
20
Get It Now
To record a video, select REC.
To adjust video settings before taking your video, select Options > Brightness,
White Balance, Slider Setting, or FLIX Light.
Assign picture ID
To assign a picture ID to a contact:
• Select Menu > Get It Now, then select Get PIX & FLIX > My PIX or Get New PIX >
Get New.
• Get or highlight a picture and select Options > Set As > Picture ID.
•
Highlight a contact and select OK.
Other options
The following Get PIX & FLIX options allow you to download and manage your
pictures and videos.
Get V CAST Video—Connect to the Internet and access the V CAST video content
catalog. You can toggle through four content categories: News; Entertainment;
Sports; and Weather. Select the type of content you want from the list of providers.
Select the clip you want to watch. A message regarding pricing options will be
displayed. The download fees for basic video clips are included in your VPak
subscription. Select Yes to watch the selected video clip.
Get New PIX—Select Get New to download PIX applications or use one of the
applications to download images from the Internet.
My PIX or My FLIX—Select pictures or videos from your PIX or FLIX gallery to send,
download, lock, erase, modify, or view. Select Options > Set As to use a picture as
a Wallpaper, Screensaver, or Picture ID. The Lock or Unlock option protects files
from Erase and Erase All functions.
PIX Place—Access the online picture album to upload pictures. For more information,
please visit www.verizonwireless.com/getitnow/pixmessaging.
■ Fun and games
To open games from the games gallery or download a new game, select Menu >
Get It Now > Get Fun & Games > Get New and select a game option. Navigate to
and select V CAST Games to view all available 3-D V CAST titles. Select the game
you want, select a payment option and download the title. You can start using
the application as soon as the download is complete. This is a network feature.
21
Get It Now
■ News and info
To connect to the Internet and browse for the latest news, stock quotes and movie
listings, select Menu > Get it Now > Get News & Info. This is a network feature.
■ Get going
To browse for everything you need to know while on the go, such as finding the
location of a restaurant or the nearest ATM, select Menu > Get It Now > Get
Going > Get New. This is a network feature.
■ Memory and help
To check memory status or find information on how to download applications,
select Menu > Get It Now > Info to view the Get It Now Info screen. This screen
enables you to check the Application Memory, Content Memory, and View Log.
Select Help to find, for example, information on how to add, delete, disable, or
restore applications, determine airtime charges, or cancel subscriptions.
Notifications are displayed on the standby screen when memory is 80% full and
100% full. Select OK to clear these messages. If your phone displays a message that
the memory is full when you try to use a feature, delete some of the information or
entries stored in memory before continuing.
■ Incoming calls
While downloading an application, calls will automatically be sent to your voice
mail, if available. If you do not have voice mail, downloading will not be interrupted
by an incoming call, and the caller will receive a busy signal.
When using an application, an incoming call will automatically pause the
application and allow you to answer the call. When you complete your call, you
can resume using the application.
If your wireless service provider does not support incoming calls while browsing,
the incoming calls are automatically forwarded to voice mail.
Make an emergency call while online
You can end your data connection, then make an emergency call.
1. To close your connection, press the end key. Press the end key as many times
as needed to clear the display and ready the device for calls.
2. Enter the emergency number for your present location (for example, 911).
Emergency numbers vary by location.
3. Press the send key.
22
Get It Now
■ Security and functionality
Your device supports a digital rights management system to protect content that
you have acquired. Content such as ringtones can be protected and associated
with certain usage rules.
Usage rules are defined in the content activation key that may be delivered with
the content or delivered separately, depending on the wireless service provider. You
may be able to update the activation key. Always check the delivery terms of any
content and activation key before acquiring them, as they may be subject to a fee.
Copyright protections may prevent some images, music (including ringing tones),
and other content from being copied, modified, transferred, or forwarded.
Mobile Web 2.0 is a digital network service and is not available everywhere. Mobile
Web text messages and alerts fees apply for messages both sent and received.
Airtime charges apply. See "Network services," p. 5.
Your device may have some bookmarks loaded for sites not affiliated with Nokia.
Nokia does not warrant or endorse these sites. If you choose to access them, you
should take the same precautions, for security or content, as you would with any
Internet site.
The security icon (
) does not indicate that the data transmission between the
gateway and the content server (or place where the requested resource is stored)
is secure. The wireless service provider secures the data transmission between the
gateway and the content server.
23
Messaging
5. Messaging
If you have subscribed to a message network service, you can send
and receive messages to compatible phones that also subscribe to a message
service. You can also send and receive multimedia messages and e-mail.
Messaging features are network services.
Important: Exercise caution opening messages. Messages may contain
malicious software or otherwise be harmful to your device or PC.
Note: When sending messages, your device will display Message Sent.
This is an indication that the message has been sent by your device to
the message center number programmed into your device. For messages
that fail, the network will create a new error message, explaining why
the message was not delivered. Contact Verizon for more details about
messaging services.
■ TXT messaging
When composing TXT or enhanced (EMS) messages, the number of characters
used (out of a maximum of 160 per message) appears in the top right corner of
the message screen. Segments are created when the message length exceeds
160 characters. The number of segments used (out of a maximum of 7) appears
in the top left corner of the message screen. No additional text can be entered
when all segments and characters have been used. Segments are delivered as
individual messages.
The use of special characters takes up more space than standard characters.
E-mail addresses are counted as characters. EMS messages cannot be sent to
e-mail addresses.
For information on entering text into messages, see "Text entry," p. 17.
■ PIX and FLIX messaging
PIX and FLIX messages are multimedia (MMS) messages that can contain text,
sound, a picture, and a video clip. Your device supports PIX messages that are up
to 300 KB and FLIX messages that are up to 200 KB. If the maximum size is
exceeded, your device may not be able to receive the message. Depending upon
your network, you may receive a message that includes an Internet address
where you can go to view the PIX and FLIX messages.
24
Messaging
Pictures are scaled to fit the display area of the device. Your device has a PIX and
FLIX message viewer for playing messages. Incoming messages reside in the Inbox
until the user deletes or saves them. Once you save the PIX and FLIX message, you
can use the image as a screen saver or wallpaper, or use the sound as a ringtone,
unless protected by copyright. See "PIX and FLIX," p. 20.
Only compatible devices that offer picture or video message features can receive
and display PIX and FLIX messages. The appearance of PIX and FLIX messages may
vary depending on the receiving device.
Copyright protections may prevent some images, ringing tones, and other content
from being copied, modified, transferred, or forwarded. Contact Verizon for the
availability of and a subscription to the multimedia messaging service.
PIX and FLIX messaging supports the following formats:
• Picture: JPEG, GIF, animated GIF, BMP, and PNG
• Sound: AAC/AAC, MIDI, iMelody, QCELP, EVRC, AMR, ADPCM
• Video: clips in MPEG4, H263
If a received message contains unsupported elements, these elements may be
replaced with Object format not supported.
You can receive multimedia message notification, but cannot receive multimedia
messages if you have a call in progress or other applications running, or you are in
an active browsing session. Because delivery of multimedia messages can fail for a
variety of reasons, do not rely solely upon them for essential communications.
■ New messages
To compose a new message, in the standby mode press the left soft key or select
Menu > Messaging, then select New Msg > TXT Msg, PIX Msg, or FLIX Msg.
TXT Message
To write and send a TXT message, after selecting TXT Msg:
1. Select a recipient.
1. To add recipients from your contact list, at the Create TXT Msg screen,
select Add > Contacts, Groups, or Recent Calls, highlight and select OK for
each recipient, and select Done.
You may also use the keypad to manually enter a phone number or e-mail
address into each address area. The default entry mode for the Create TXT
Msg screen is 123 (number). To switch to multi-tap mode for e-mail address
entry, select 123 > Abc or ABC. See "Text entry," p. 17.
2. Select OK or scroll down to open the text entry area.
25
Messaging
2. Compose a message using the keypad. See "T9 text entry," p. 18.
3. To send the message, select SEND or press the send key.
4. To save the message as a draft, press the end key and select Yes > OK.
Your message will be saved in the Drafts folder.
TXT message options
To customize a new TXT message, select Options when the cursor is in the text
entry area. Select one of the following:
Add—Add a Graphic, Animation, Sound, Quick Text, or Signature to your message.
Format Text—Change the Alignment, Font Size, Font Style, Text Color, or
Background of your message. Formatting affects new text entered only after
selecting this option.
Save As Draft—Save your message into the Drafts folder.
Priority Level—Set the priority level as Normal or Urgent.
Callback #—Turn callback number display On or Off, or Edit the callback number.
Add to Contacts—Add the new contact name or number to the contact list.
Save Quick Text—Save the message into the Quick Text gallery. See "All Msg
settings," p. 32.
PIX message
To compose and send a PIX message, after selecting PIX Msg:
1. Select a recipient.
1. To add recipients from your contact list, at the Create PIX Msg screen,
select Add > Contacts, Groups, or Recent Calls, highlight and select OK for
each recipient, and select Done. Select Add > To PIX Place > OK to upload
to the online picture album.
You may also use the keypad to manually enter a phone number or e-mail
address into each address area. The default entry mode for the address screen
is 123 (number). To switch to multi-tap mode for e-mail address entry,
select 123 > Abc or ABC. See "Text entry," p. 17.
2. Select OK or scroll down to open the text entry area.
2. Enter text into the Text area of the PIX message using the keypad. See "T9 text
entry," p. 18. When composing PIX messages, the number of characters used
in the text area (out of a maximum of 1000 per message) appears in the top
right corner of the message screen. No additional text can be entered when
all characters have been used.
26
Messaging
3. Scroll down until the PIX area is highlighted. To add a picture, select My PIX,
scroll to highlight the desired picture, and select OK.
4. Scroll down until the Sound area is highlighted. To add a picture, select Sounds
to enter the My Sounds gallery, scroll to highlight a recorded sound, and select
OK. To record a new sound, select Record New while in the My Sounds gallery.
The new sound is added to the top of the gallery list. Select Play to preview a
recorded sound.
5. Scroll down until the Subject area is highlighted. Enter text (up to 100
characters) into the Subject area of the PIX message using the keypad.
6. To send the message, select SEND or press the send key.
7. To save the message as a draft, press the end key and select Yes > OK.
Your message will be saved in the Drafts folder.
PIX message options
The following Options are available in the Create PIX Msg screen when the Text,
PIX, Sound, and Subject areas are highlighted:
Preview—View your message.
Add Quick Text—Insert text from the Quick Text gallery (Text and Subject areas only).
Save As Draft—Save your message into the Drafts folder.
Priority Level—Set the priority level to Normal or High.
Remove PIX—Remove picture from message (if previously added).
Remove Sound—Remove sound file from message (if previously added).
Add to Contacts—Add the message recipient to your contact list.
FLIX message
To compose and send a FLIX message, after selecting FLIX Msg:
1. Select a recipient.
1. To add recipients from your contact list, at the Create FLIX Msg screen,
select Add > Contacts, Groups, or Recent Calls, highlight and select OK for
each recipient, and select Done. Select Add > To PIX Place > OK to upload
to the online picture album.
You may also use the keypad to manually enter a phone number or e-mail
address into each address area. The default entry mode for the address
screen is 123 (number). To switch to multi-tap mode for e-mail address
entry, select 123 > Abc or ABC. See "Text entry," p. 17.
2. Select OK or scroll down to open the text entry area.
27
Messaging
2. Enter text into the Text area of the FLIX message using the keypad. See "T9
text entry," p. 18. When composing FLIX messages, the number of characters
used in the text area (out of a maximum of 1000 per message) appears in the
top right corner of the message screen. No additional text can be entered
when all characters have been used.
3. Scroll down until the FLIX area is highlighted. To add a FLIX file, select My FLIX,
scroll to highlight the desired file, and select OK. To record a new FLIX, select
Rec New while in the My FLIX gallery. See "Record a video," p. 20. Select Play to
preview a FLIX file.
4. Scroll down until the Subject area is highlighted. Enter text (up to 100 characters)
into the Subject area of the PIX message using the keypad.
5. To send the message, select SEND or press the send key.
6. To save the message as a draft, press the end key and select Yes > OK.
Your message will be saved in the Drafts folder.
FLIX message options
The following Options are available in the Create FLIX Msg screen when the Text,
FLIX, and Subject areas are highlighted:
Preview—View your message.
Add Quick Text—Insert text from the Quick Text gallery (Text and Subject areas only).
Save As Draft—Save your message into the Drafts folder.
Priority Level—Set the priority level to Normal or High.
Remove FLIX—Remove FLIX file from message (if previously added).
Add to Contacts—Add the message recipient to your contact list.
■ Inbox
Your phone can receive text messages (SMS), enhanced messages (EMS), PIX/FLIX
messages (MMS), e-mails via SMS, WAP Push messages, and alerts in the Inbox.
This is a network service.
Upon receiving an incoming message, an alert is shown on the standby screen
and you have the option to View now or View later. Select View now to open the
new message in the Inbox. If you select View later, the new message notification
icon ( ) is displayed and you must open the Inbox to view new messages.
To open the Inbox and view or edit messages, in the standby mode press the left
soft key or select Menu > Messaging, then select Inbox.
If Auto view or Auto Receive are enabled for incoming messages, the View now
and View later options are not displayed on the standby screen. See "Message
settings," p. 32.
28
Messaging
View the Inbox
The number of messages in the Inbox is shown in parentheses on the Messaging
screen. When you open the Inbox, the list of messages is displayed. The newest
messages are displayed first. Scroll up and down to highlight a message. At the
Inbox screen, select Erase > OK to delete the highlighted message, or Options and
select from the following:
Reply—Send a TXT Msg, PIX Msg, or FLIX Msg reply.
Forward—Forward the message to another phone number or e-mail address, or to
upload to your PIX Place.
Lock or Unlock—Protect the message from Erase and Erase All commands.
Add to Contacts—Save the contact information to the contact list.
Message Info—Display sender information and timestamp.
View or play messages
To view or play a message in the Inbox, highlight the message, and select Open. If
necessary, scroll up or down to view the whole message. You can scroll left or
right to view the content of the other messages in the Inbox.
With the message open, you can select from the following:
Erase—Delete the message (messages without sound or FLIX files attached only).
Mute or Unmute—Turn on or off the sound of a sound object (messages with
sound and FLIX files attached only).
PLAY or PAUSE—Start or halt the FLIX playback (FLIX message with FLIX file
attached only).
REPLY—Send a TXT Msg, PIX Msg, or FLIX Msg reply (except FLIX message with
FLIX file attached).
Options—Select from the following:
• Forward—Forward the message to another phone number or e-mail address,
or to upload to your PIX Place.
• Save Quick Text—Save the message into the Quick Text gallery.
• Lock or Unlock—Protect the message from Erase and Erase All commands.
• Add to Contacts—Save the contact information to the contact list.
• Message Info—Display sender information and timestamp.
The following Options are displayed for specific message types:
• Play Again—Replay the attached sound (PIX message with sound only).
• Reply—Send a TXT Msg, PIX Msg, or FLIX Msg reply (FLIX message with FLIX
file attached only).
29
Messaging
• Erase—Delete the message (messages with sound or FLIX files attached only).
• Save Graphic—Save a graphic object attached to a message (TXT message only).
• Save PIX—Save the attached PIX file (PIX message only).
• Save FLIX—Save the attached FLIX file (FLIX message only).
• Save Sound—Save a sound attached to a message (messages with sound only).
■ Sent messages
The Sent folder is used to store TXT, PIX and FLIX messages that have been delivered
to their recipients. The number of messages stored in the Sent folder is shown in
parentheses on the Messaging screen. To open the Sent folder, in the standby mode
press the left soft key or select Menu > Messaging, then select Sent.
The list of sent messages is displayed. The newest messages are displayed first. Scroll
up and down to highlight a message. On the Sent screen, select from the following:
• Erase—Select Yes > OK to delete the sent message.
• Options—Select from the following:
• Forward—Forward the message to another phone number or e-mail
address, or to upload to your PIX Place.
• Resend—Resend a TXT, PIX or FLIX message.
• Lock or Unlock—Protect the message from Erase and Erase All commands.
• Add to Contacts—Save the contact information to the contact list.
• Message Info—Display sender information and timestamp.
• OPEN—View or play message. With the message open, you can select from
the following:
Erase—Delete the message (messages without sound or FLIX files attached only).
Mute or Unmute—Turn on or off the sound of a sound object (messages with
sound and FLIX files attached only).
PLAY or PAUSE—Start or halt the FLIX playback (FLIX message with FLIX file
attached only).
SEND—Resend a TXT Msg, PIX Msg, or FLIX Msg (except FLIX message with
FLIX file attached).
Options and one of the following:
• Forward—Forward the message to another phone number or e-mail
address, or to upload to your PIX Place.
• Lock or Unlock—Protect the message from Erase and Erase All commands.
• Save Quick Text—Save the message into the Quick Text gallery.
30
Messaging
• Add to Contacts—Save the contact information to the contact list.
• Message Info—Display sender information and timestamp.
The following Options are displayed for specific message types:
• Play Again—Replay the attached sound (PIX message with sound only).
• Resend—Resend a TXT Msg, PIX Msg, or FLIX Msg (FLIX message with FLIX
file attached only).
• Erase—Delete the message (messages with sound or FLIX files attached only).
■ Draft messages
The Drafts folder is used to store drafts of TXT, PIX and FLIX messages. The number
of messages stored in the Drafts folder is shown in parentheses on the Messaging
screen. To open the Drafts folder, in the standby mode press the left soft key or
select Menu > Messaging, then select Drafts. The list of draft messages is displayed.
The newest messages are displayed first. Scroll up and down to highlight a message.
Select from the following on the Drafts screen:
• Erase—Select Yes > OK to delete the draft message.
• EDIT—Update the draft message. See "New messages," p. 25.
• Options—Customize the draft message. Select from the following:
Send—Deliver the draft message to the recipient(s).
Lock or Unlock—Turn protection on or off for Erase or Erase All commands for
this message.
Add to Contacts—Save the contact information to the contact list.
■ Voice mail messages
Voice mail is a network service that allows you to listen to voice messages recorded
in the voice mailbox. When you have a new voice message, your phone will alert you
and you will be prompted to Listen now or Listen later. If you select Listen later,
the new voice mail icon (
) is displayed on the standby screen.
Listen to voice mail messages
When you have a new voice message alert, select Listen now > OK to access your
voice mailbox. You can also reach the voice mail screen to play back existing
voice messages from the standby mode by pressing the left soft key or selecting
Menu > Messaging, then selecting Voicemail. To access voice mail from the
standby mode using speed dial, press and hold 1.
31
Messaging
The voice mail screen displays the number of new messages and the date and time
of the last message received. To access your voice mailbox, select OPEN or press the
send key.
To reset the voice mail counter, select Clear > Yes > OK. The new voice mail icon
will no longer appear on the screen.
The clear voice mail icon option does not delete voice mail from your voice
mailbox. To delete messages, you must access your voice mailbox and use the
voice mail system commands. If you exceed the storage limit for your voice
mailbox, old messages may be overwritten.
■ E-mail messages
From the standby mode press the left soft key or select Menu > Messaging, then
select Email to launch a browser and access the e-mail messaging screen. This is
a network service.
■ Mobile IM messages
From the standby mode press the left soft key or select Menu > Messaging, then
select Mobile IM to access the Get It Now instant messaging screen. This is a
network service.
■ Chat
From the standby mode press the left soft key or select Menu > Messaging, then
select Chat to launch a browser and chat with Internet Messenger users. This is a
network service.
■ Message settings
To configure settings for TXT, PIX, or FLIX messages, use the Settings menu. In the
standby mode press the left soft key or select Menu > Messaging, then select
Settings. Select All Msg, TXT Msg, PIX Msg, or FLIX Msg > OK.
All Msg settings
Select from the following options to apply to all messages:
Auto save—Automatically save all sent messages to the Sent folder. Select On or
Off to enable or disable Auto save. Select Prompt > OK to receive a prompt to
save after each message is sent.
Auto erase—Automatically erase the oldest (unlocked) message from your inbox
if it is full. Select On or Off > OK. If Auto erase is set to Off, a message is displayed
when memory is full prompting you to manually delete unwanted messages from
your inbox.
32
Messaging
Quick-text—View and edit Quick Text entries, which are short, prewritten
messages that can be recalled and inserted into a TXT message. The gallery of
pre-loaded and user-defined Quick Text entries is displayed. To add an entry,
select New, enter the text, and select OK. To erase a user-defined entry, highlight
the entry and select Erase > Yes > OK.
Voicemail #—Change the default voice mail number. Enter the new number and
select OK.
Entry mode—Change the default entry mode for the text entry area in a TXT
message and the text and subject entry areas in PIX and FLIX messages. Select
T9Word, Abc, ABC, or 123 > OK.
Callback #—Change the default callback number that is sent. Enter the new
number and select OK.
Signature—Create or edit text that will automatically append to each outgoing
TXT, PIX, and FLIX message. Enter the signature text and select OK.
TXT Msg settings
Select Auto view > On to directly view the content when receiving a TXT message.
The content of incoming TXT messages is displayed when the phone is in the
standby mode.
Select Signature to create or edit text that will automatically append to each
outgoing TXT message. Enter the signature text and select OK. This option is not
displayed if a signature has been created using the All Msg > Signature menu.
PIX Msg settings
Select Auto Receive > On to directly download the content when receiving a
PIX message.
Select Signature to create or edit text that will automatically append to each
outgoing PIX message. Enter the signature text and select OK. This option is not
displayed if a signature has been created using the All Msg > Signature menu.
FLIX Msg settings
Select Auto Receive > On to directly download the content when receiving a
FLIX message.
Select Signature to create or edit text that will automatically append to each
outgoing FLIX message. Enter the signature text and select OK. This option is not
displayed if a signature has been created using the All Msg > Signature menu.
33
Messaging
■ Message options
To erase TXT, PIX or FLIX messages, use the Options menu. In the standby mode
press the left soft key or select Menu > Messaging, then select Options. Select
from the following:
• Erase Inbox—Delete all messages in your Inbox.
• Erase Drafts—Delete all messages in your Drafts folder.
• Erase Sent—Delete all messages in your Sent folder.
• Erase All—Delete all messages.
To erase the selected messages, select Yes > OK. Messages will be
permanently deleted.
34
Contacts
6. Contacts
The contact list can hold up to 500 contacts with multiple numbers
and text notes for each contact. The amount of numbers and text entries that you
can save may vary, depending on length and the total number of entries in the
contact list.
■ New contacts
You can access the contact list in the standby mode. Select Contacts or Menu >
Contacts > Contact List. To quickly find a contact in your contact list, enter the
first letter of the contact name, and that portion of the list is displayed.
Use the contact list
To create or update your contact list, do the following:
1. In the standby mode, enter the contact number.
2. Select Save > Create New to save a new number to your contact list. To update
an existing contact number, select Save > Update Existing Contact, and select
the contact from the contact list.
3. Select Mobile (1 or 2), Home, Work, or Fax > OK. When updating an existing
contact number, highlight the number you wish to change and select OK. To
overwrite the new number, select Yes > OK.
4. If this is a new entry, enter a contact name, and select SAVE.
Save multiple numbers
You can save different types of phone numbers and short text items per entry to
the contact list. The first phone number entry for a contact is automatically set as
the default (primary) number but can be changed at any time. See "Change the
default number," p. 36.
1. In the standby mode, select Contacts, scroll to the entry to which you wish to
add an additional number, and select Edit.
2. Enter the new number or detail in the Mobile (1 or 2), Home, Work, Email (1 or 2),
Group, Picture, Ringtone, or Fax fields of the Edit Contact screen.
3. Select SAVE.
Set up voice dial
The Nokia 6305i uses voice recognition to access entries in your contact list.
See "Voice recognition," p. 14.
35
Contacts
Change the default number
To change the default number when multiple numbers are assigned to a single
contact, do the following:
1. In the standby mode, select Contacts, highlight the contact, and select Edit.
2. Scroll to the new default number, and select Options > Set As Default > OK > Yes.
Set up phone numbers with pauses
Pause codes instruct the receiving system to pause or wait before entering the
numbers that follow them in the dialing string.
1. From the standby mode, enter the number, select Options, and select one of
the following:
2-sec Pause—To dial the contact number, pause for 2 seconds and dial a
secondary number or extension. P appears in the dialing string. You can
enter as many pauses as you need to accommodate the timing on automated
answering services.
Wait—To dial the contact number and wait for you to press Release before
sending a secondary number. The secondary number can be entered as part of
the dial string or it can be entered manually. W appears in the dialing string.
2. Select Save.
3. Enter a contact name, and select Save.
To add pause codes to phone numbers in contact entries, do the following:
1. In the standby mode, select Contacts, highlight the contact, and select Edit.
2. Scroll to the number you wish to modify, and select Options > Add Pause >
Wait or 2-sec Pause > OK.
■ Contact list
To view the contact list, from the standby mode, select Contacts or Menu >
Contacts > Contact List. You can select Edit to edit the contact entry or Options
and one of the following:
New Contact—Create a new contact entry.
Erase—Remove an existing contact.
Send TXT Msg—Send the contact a TXT message. This is a network service.
Send PIX Msg—Send the contact a picture message. This is a network service.
Send FLIX Msg—Send the contact a video message. This is a network service.
Call—Dial the contact. This is a network service.
36
Contacts
■ Caller groups
You can add contact list entries to caller groups. A contact can only be assigned
to one caller group at a time. The default caller groups are Family, VIP, Friends,
and Business, but new caller groups can be created.
Assign or create new caller groups
Caller groups can be created or modified in multiple ways. You can create or
update caller groups and assign contact list entries to the groups. You can also
add or modify individual contact list entries by adding them to caller groups.
Create or modify caller groups
1. Select Menu > Contacts > Group.
2. To create a new group, select New, enter the new group name and select SAVE.
3. Highlight the new group or an existing group from the list of group names
and select VIEW > ADD or Options > Add to add contacts to the group.
4. Highlight and select OK for each contact, and select Done.
Assign contacts to caller groups
1. In the standby mode, select Contacts, highlight the contact, and select Edit.
2. Scroll to the Group field, and select Set.
3. To create a new group, select New, enter the new group name and select
SAVE. Highlight the group from the list of group names and select OK to add
the contact to the group.
A contact can only be associated with one caller group at a time. If you add a
contact from an existing group to another group, that contact is removed from
the existing group.
Send a group message
To send a message to a group, select Menu > Contacts > Groups, the group name,
and Options > Send Txt Msg, Send PIX Msg, or Send FLIX Msg. Create the message
you want to send to the group and select Send. See "New messages," p. 25. This is
a network service.
Assign picture ID to group
See "Assign picture ID," p. 21, for instructions on how to assign picture IDs.
37
Contacts
■ Speed Dials
Set up speed dialing
You can associate any mobile, home or work entry in the contact list with a speed
dial key from 2–99. Speed dial key 1 is used to access voice mail. This is a
network service.
To dial a single-digit speed dial number, press and hold the number of the
assigned key. To dial a two-digit speed dial number, use a short press on the first
number, and press and hold the second number.
1. In the standby mode, select Menu > Contacts > Speed Dials.
2. Select an Unassigned speed dialing slot and select Set.
3. Highlight the contact you want assigned to that number, then select OK, and the
mobile, home, or work number to which you want to assign a speed dial number.
4. Select OK and confirm with Yes > OK.
Delete speed dialing numbers
In the standby mode, select Menu > Contacts > Speed Dials. Scroll to an assigned
speed dialing slot, and select Remove > Yes > OK.
38
Recent calls
7. Recent calls
Information about calls missed, received, or dialed is stored in the
Recent Calls menu. When the number of calls exceeds the maximum, the most
recent call replaces the oldest.
■ View calls
To view calls, select Menu > Recent Calls > Missed, Received, or Dialed. Select All to
view all missed, received, and dialed calls. The calls are listed by most recent first.
Missed calls are calls that are not answered. The missed calls feature does not
function when your device is switched off.
When viewing the call lists, the following options are available:
Message—Send the selected number a TXT Msg, PIX Msg, or FLIX Msg. See "New
messages," p. 25.
OPEN—View call details.
Options—Select from the following:
• Save—Add the caller or called party to the contact list. See "Use the contact
list," p. 35.
• Details—View call details.
• Erase—Delete the selected call from the recent call list.
• Lock or Unlock—Protect the call from Erase and Erase All commands.
• Erase All—Delete all calls from the recent call list.
• View Timers—Display the total number of calls, duration of calls, and the data
transfer information.
■ View duration of calls
You can view the total number of calls, duration (hh.mm.ss) of calls, and the data
transfer information with the View Timers option.
Note: Some timers, including the lifetime call timer, may be reset during
service or software upgrades. The actual time invoiced for calls and services
by your wireless service provider may vary, depending on network features,
rounding off for billing, taxes, and so forth.
In the standby mode, select Menu > Recent Calls > View Timers, and scroll to view
the call duration data for Last Call, All Calls, Received Calls, Dialed Calls, Roam Call,
Received, Transmitted, Total, Last Reset, Lifetime Calls, and Lifetime Data Counter.
39
Recent calls
Reset call timers
To reset a selected call timer or to reset all timers to zero (except Lifetime Calls
and Lifetime Data Counter), do the following:
In the standby mode, select Menu > Recent Calls > View Timers, and highlight the
timer you wish to modify. Select Reset > Yes > OK to reset the selected call timer
to zero. To reset all call timers (except Lifetime Calls and Lifetime Data Counter),
select Reset All > Yes > OK.
40
Settings and tools
8. Settings and tools
Use the Settings & Tools menu to customize your phone.
■ My account
The Verizon My Account Web portal allows you to access your account information.
Select Menu > Settings & Tools > My Account. This is a network service.
■ Tools
To access the calendar, alarm and world clocks, notepad, calculators, and shortcut
key options, select Menu > Settings & Tools > Tools.
Calendar
The Calendar allows you to document your agenda and keep it convenient and
easy to access. You can enter your appointments into the calendar and set your
phone to alert you with a reminder. Select Menu > Settings & Tools > Tools >
Calendar and one of the following:
Add—Update or create new schedule information.
VIEW—Open the calendar entry.
Options—Go To Today, Go To Date, Search, Erase Old, or Erase All.
Schedule or update an event
To enter a new event or update an existing event in your calendar, select Menu >
Settings & Tools > Tools > Calendar.
1. Scroll to the event date, and select Add to add a new event entry, or View >
Add to update an existing entry.
2. Select the event entry field you wish to complete or update and Set.
3. Select SAVE when all entries and updates are complete.
To manage your calendar entries, select Settings & Tools > Tools > Calendar >
Options and one of the following:
Go To Today—Highlight today’s date for entries.
Go To Date—Select a date on the calendar. Use the navigation left and right key
to switch between month, day, and year mode, and use the navigation up and
down key to increase and decrease in each mode.
41
Settings and tools
Search—View all existing events on your calendar.
Erase Old—Erase past entries that are older than One Week, One Month, One Year,
or One Day.
Erase All—Erase all calendar entries.
Alarm clock
To set one of three alarms, select Menu > Settings & Tools > Tools > Alarm Clock >
Alarm 1, Alarm 2, or Alarm 3 > OK. Set the time, frequency, ringtone, and cycles for an
alarm, and select SAVE. When an alarm is set,
is displayed on the standby screen.
To delete a saved alarm, select Menu > Settings & Tools > Tools > Alarm Clock and
highlight the alarm you wish to modify. Select Options > Reset > Yes > OK to
delete the selected alarm, or select Options > Reset > Yes > OK to delete all alarms.
World clock
To determine the current time in another time zone or country, select Menu >
Settings & Tools > Tools > World Clock. Use the navigation left and right key to
move the indicators over the world map. Select Set DST to turn Daylight Savings
Time on or off for the selected city. Select Cities to select a city by name.
Notepad
To create a note, select Menu > Settings & Tools > Tools > Notepad > Add and
enter your note text. To view or edit a note, highlight the note and select View >
Edit, or Erase. To delete one or all notes, open Notepad and select Options > Erase
or Erase All.
Calculator
To perform simple mathematical calculations using the navigation key and left and
right selection keys, select Menu > Settings & Tools > Tools > Calculator. Select
Operator to use parentheses in your equation or to enter an Exponent. Press the
center selection key (equals) to solve your equation. Press the CLR key to delete a
keystroke, or select the Clear soft key to cancel your calculation and clear the
screen. Use the # key to switch a value to positive or negative, and the * key to
enter a decimal point. You can enter numbers up to the sixth decimal place.
Note: This calculator has limited accuracy and is designed for
simple calculations.
42
Settings and tools
Shortcut key
You can assign a shortcut to one of your favorite or most frequently used functions.
The shortcut is activated when you press the scroll down key, in the standby mode.
1. Select Menu > Settings & Tools > Tools > ShortCut Key.
2. Scroll through the list of options, and select Set to assign one of the following
to the scroll down key: Tunes & Tones, Gallery, Fun & Games, News & Info,
Inbox, Sent, Email, Chat, IM, Settings & Tools, or Tools. If Tools is selected, a
new list of options is shown: Calendar, Alarm Clock, World Clock, Notepad,
Calculator, and Tip Calculator.
Tip calculator
To calculate a tip, select Menu > Settings & Tools > Tools > Tip Calculator. Enter the
total bill and the desired percentage for the tip. The tip calculator will automatically
calculate the tip. You can also split the total bill to determine the amount each
should pay. Scroll left or right to increase or decrease the desired tip percentage
or the number of splits. Press the CLR key to delete a keystroke. Select Reset to
clear all entries. Select Close to exit.
■ Sounds
To adjust volumes and assign sounds to phone calls and alarms, select Menu >
Settings & Tools > Sounds and select from the following options:
Master Volume—Use the volume or navigation key to change the ringtone volume
from High to Low, or to Alarm Only or Vibrate Only. To select the Sounds Off mode,
scroll down until Sounds Off displays or press and hold the volume down key. To
switch back to Normal Mode, press and hold the volume up key. Press Play to
preview the sound.
Call Sounds—Set ringtones for incoming calls. You can also use this option to set
the phone to vibrate when a call is received.
Alert sounds—Select the alert type for an incoming Txt Message, PIX-FLIX Message,
or Voicemail Message.
Slider Sound—Activate a sound when the slider is opened or closed. Select On or Off.
Keypad Volume—Set the keypad volume from Off to High.
Earpiece Volume—Set the earpiece volume from Low to High.
Service Alerts—Set any of the alert options to On or Off:
• ERI—Enhanced roaming indicator (ERI) alerts you to the status of cellular service.
This is a network service.
• Minute Beep—Alerts you every minute during a call.
• Call Connect—Alerts you when the call is connected.
43
Settings and tools
■ Display
Use the Display option to change the display settings on your phone.
Banner
To display text on the screen in the standby mode, select Menu > Settings & Tools >
Display > Banner. Select from the following:
Personal Banner—Enter your own banner text of up to 16 characters.
ERI Banner—Set to On or Off to allow ERI text to be displayed under your personal
banner. This is a network service.
Backlight
To set the backlight duration, select Menu > Settings & Tools > Display > Backlight.
Select from the following:
Display—Set how long the backlight will display in the following modes:
• Slide Opened—Timed options are 5 Sec, 15 Sec, 30 Sec, Always On, or Always Off.
• Slide Closed—Timed options are LCD Off, Off in 1 sec, Off in 3 sec, or Off in 10 sec.
Select Off by Stage to slowly dim and then turn the backlight off.
Keypad—Set how long the keypad will be backlit. Timed options are 5 Sec, 15 Sec,
30 Sec, Always On, or Always Off.
Wallpaper
To set your phone to display a background picture (wallpaper) in the standby mode,
select Menu > Settings & Tools > Display > Wallpaper. Scroll through the thumbnail
views to highlight the background picture to be displayed on the phone. Select View
to preview a picture as wallpaper and to return to thumbnail view. Select OK to
set the selected image as your wallpaper. Wallpaper designs can be used from
your PIX folder, or select Get New to browse for a new wallpaper design.
Screensaver
To choose a picture as a screensaver, select Menu > Settings & Tools > Display >
Screensaver. Select a picture stored in your PIX folder and OK. Select Get New to
purchase or download new pictures or graphics. Select View to preview a
screensaver and to return to thumbnail view.
Display themes
To choose the color of the background screen, select Menu > Settings & Tools >
Display > Display Themes > Default, Blue, Business, Green, Red, or Tropical.
44
Settings and tools
Fonts
To set the font size, select Menu > Settings & Tools > Display > Fonts >
Normal or Large.
■ System
The System menu allows you to designate specific network settings.
Standalone mode
To turn off radio frequencies, as in airplane mode, select Menu > Settings & Tools >
System > Standalone Mode. Select On or Off.
System select
To set your phone to roam or search for another network when you are not in
your home area, select Menu > Settings & Tools > System > System Select and
one of the following:
Home Only—Make and receive calls in your home area only.
Automatic A or Automatic B—Search for service in another network. The roaming
rate applies when you are not in the home service area.
NAM selection
If your phone is registered with two phone numbers (NAMs), for example, work and
personal numbers, you can choose which number to use as your origination number.
Select Menu > Settings & Tools > System > NAM Selection > NAM 1 or NAM 2.
Device information
To view information about your phone, select Menu > Settings & Tools > System >
Device Info > My Number, SW Version, or Icon Glossary.
Location
To share position information over the network, select Menu > Settings & Tools >
System > Location. For calls to emergency numbers, location information may be
used by the emergency operator to determine the position of the device. The
functionality and accuracy of this feature are dependent on the network, satellite
systems, and the agency receiving the information. This feature may not function
in all areas or at all times. Select Location On to make position information
continually available or select E911 Only to make this information available for
emergency services only.
45
Settings and tools
Security
To secure the phone electronically, select Menu > Settings & Tools > System >
Security. This feature protects your phone from unauthorized outgoing calls or
unauthorized access to information stored in the phone.
Enter your lock code (0000 or the last four digits of your phone number) and
select from the following:
• Common Code > On or Off—To set all lock codes the same as the device code.
Editing a device or location code via the Edit Code option automatically resets
the Common Code to Off.
• Lock Mode—To prevent others from using your phone or changing location
settings. Select Device > Lock, Unlock, or On Power Up > OK to turn the device
lock on, off, or on when the phone is first switched on. When Lock Mode is on
for the device, you must input your device lock code to use the phone. Press
and hold # for quick Lock Mode device activation. To cancel Lock Mode, press
any non-keypad key except the end key, and input your lock code.
Select Location (and enter the location lock code if Common Code mode is set
to Off) > Lock or Unlock > OK to turn the location lock on or off. When Lock
Mode is on for the location, you must input your location lock code before
accessing the Menu > Settings & Tools > System > Location menu to change
the phone’s position information. See "Location," p. 45.
• Edit Code > Device or Location—To change the lock code for the device or
location. If Common Code mode is set to Off, you will be prompted to enter
your location lock code. Enter matching lock codes in the New Code and
Confirm Code entry areas and select OK. Editing a device or location code
automatically resets the Common Code to Off.
• Erase Contacts > Yes or No—To erase all contacts.
• Reset Default > Yes or No—To reset all settings to factory defaults.
When Security lock is on, the only outgoing calls that can be made are to the
emergency number programmed into your device (for example, 911).
Slider keys lock
To activate or deactivate keys when the slider is closed, select Menu > Settings &
Tools > System > Slider Keys Lock > On or Off. To reactivate the external keys after
Slider Keys Lock is turned back on, you must press and hold the left selection key.
Language
To set the default language of your phone menu and displays, select Menu >
Settings & Tools > System > Language > English or Spanish.
46
Settings and tools
■ Call settings
Answer options
To determine how calls may be answered on your phone, select Menu > Settings
& Tools > Call Settings > Answer Options > Slider Open, Slider Open & Any Key,
Slider Open & Send Key, Send Key, or Auto Answer.
Auto retry
To set the length of time the phone waits before automatically redialing a number
when the attempted call fails, select Menu > Settings & Tools > Call Settings >
Auto Retry > Off, Every 10 seconds, Every 30 seconds, or Every 60 seconds.
Occasionally, your network may experience heavy traffic, resulting in a fast busy
signal when you dial. With automatic redial activated, your device redials the
number (the number of times is specified by the network), and notifies you once
the network is available.
TTY/TDD mode
A phone with TTY/TDD (teletype/telecommunication device for the Deaf) support
is able to translate typed characters to voice. Voice can also be translated into
characters and then displayed on the TTY/TDD. To attach a TTY/TDD device
enabling you to communicate with parties also using a TTY device, select Menu >
Settings & Tools > Call Settings > TTY Mode > OK and one of the following:
TTY Full—Turn on full TTY capability.
TTY + TALK—Turn on TTY in voice carry-over (VCO) mode.
TTY + HEAR—Turn on TTY in hearing carry-over (HCO) mode.
TTY Off—Turn off TTY mode.
One-touch dial
To initiate a speed dial call by pressing and holding the speed dial digit, select
Menu > Settings & Tools > Call Settings > One-Touch Dial > On or Off. If set to
Off, speed dial numbers designated in your Contacts will not function. See "Speed
Dials," p. 38.
Voice privacy
To set the voice privacy feature for CDMA calls, select Menu > Settings & Tools >
Call Settings > Voice Privacy > On or Off. The voice privacy feature protects the
privacy of your current phone conversation from other callers placing phone calls
on your same network. CDMA offers inherent voice privacy that protects the
identity of users and makes interception very difficult. This is a network service.
47
Settings and tools
Call restrictions
To restrict the calls your device makes and receives, select Menu > Settings & Tools >
Call Settings > Call Restrictions, enter your lock code and select one of the following:
Outgoing Call > On or Off to restrict or allow all outgoing calls.
Incoming Call > On or Off to restrict or allow all incoming calls. Callers are
forwarded to voice mail.
Phonebook > On or Off to restrict or allow incoming or outgoing calls to contacts
listed in your phonebook.
When calls are restricted, calls may still be possible to the official emergency number
programmed into your device. Contact your service provider for the restriction
password. Call restriction is a network service. See "Network services," p. 5.
Data settings
To use wireless data communication services, select Menu > Settings & Tools > Call
Settings > Data Settings > Data/Fax, Select Port. Wireless data communication
services refer to the utilization of subscriber terminals for access to the Internet
with personal computers or laptops at 19.2 kb/s or at a maximum of 153.6 kb/s.
The connection speed depends on your carrier’s network and other variables.
Check that your communications information specifications match the network.
This is a network service.
Voice services
To access the voice services available with your phone, select Menu > Settings &
Tools > Call Settings > Voice Services and one of the following:
Voice Settings—Adjust sensitivity to your voice and settings for playback sounds.
Select from the following:
• Choice Lists—Control when choice lists appear. When voice recognition is not
confident it has recognized a name or number correctly, it will show you a list
of up to three choices. Select from Automatic, Always On, or Always Off, and
press OK.
• Sensitivity—Control how the voice recognition software determines when a
spoken word is a match. If you frequently experience the messages "Please
repeat..." or "No match found," adjust the sensitivity toward Reject Less. If
you frequently experience false activations (when the phone recognizes a
name you didn’t say), adjust the sensitivity toward Reject More.
48
Settings and tools
• Digit Dialing—Adapt digit dialing to your voice. Select Adapt Digits to improve
voice recognition of phone numbers. Adaptation takes about 60 seconds.
Select Reset Digits to erase any digit adaptation you have done and reset digit
dialing to the factory default. If you have not adapted digits, this option is
grayed out.
• Sound—Customize the settings for playback of names, name settings, and
numbers. Select Prompts, Digits, or Names to turn their associated playback
on or off. Select Name Settings > Speed > Faster or Slower to change the
speed of name playback. Select Name Settings > Volume > Louder or Softer to
change the volume of name playback.
• About—View information about the voice services software. Go to
www.voicesignal.com for more information.
Adapt Digits—Use your voice to enable voice services to recognize how you
pronounce numbers. At the prompt, repeat the series of numbers displayed. This
process takes approximately 60 seconds. You should be in a quiet room when you
set this option. See "Speaker phone," p. 14.
This option is also available in Voice Services through the Voice Services > Digit
Dialing > Adapt Digits menu.
Voice Memo—Create a recorded memo. The recorded memo can be inserted as
sound in a message, or used as a ringtone or alert. See "Sounds," p. 43.
Touch tones
Touch tones, or DTMF tones, are the tones that sound when you press the keys on your
device keypad. You can use touch tones for many automated dial-up services such as
banking and airlines, or for entering your voice mailbox number and password.
To set the key tone length and touch tone playback speed, select Menu > Settings
& Tools > Call Settings > DTMF Tones. Select Normal to send out a tone for a fixed
period of time no matter how long you press the key or Long to send out a
continuous tone for as long as you keep the key pressed.
■ Clock format
To choose the type of clock to display on the standby screen, select Menu >
Settings & Tools > Clock Format > Digital or Analog. Select Off if you want the
clock display feature turned off.
49
Settings and tools
■ Ringer ID
To activate ringer ID and set the phone to display the number of a caller from your
contact list when your phone rings, select Menu > Settings & Tools > Ringer ID >
On or Off.
■ Picture ID
To set the designated picture ID to display the picture of a caller set up in your
contact list when the phone rings, select Menu > Settings & Tools > Picture ID >
On or Off.
50
Enhancements
9. Enhancements
Check the model number of any charger before use
with this device. This device is intended for use when
supplied with power from charger AC-1004U for the
BL-6000C battery.
Warning: Use only batteries, chargers and enhancements approved by
Nokia for use with this particular model. The use of any other types may
invalidate any approval or warranty, and may be dangerous. For availability
of approved enhancements, please check with your dealer.
A few practical rules about accessories and enhancements:
• Keep all accessories and enhancements out of the reach of small children.
• When you disconnect the power cord of any accessory or enhancement, grasp
and pull the plug, not the cord.
• Check regularly that enhancements installed in a vehicle are mounted and
are operating properly.
• Installation of any complex car enhancements must be made by qualified
personnel only.
Power
• 1100 mAh Li-Ion Battery (BL-6000C)
• Travel Charger (AC-1004U)
51
Reference information
10. Reference information
This chapter contains safety and maintenance information and specifications for
your product.
■ Battery information
For battery installation and replacement, see "Charge the battery," p. 12.
Your device is powered by a rechargeable battery. The full performance of a new
battery is achieved only after two or three complete charge and discharge cycles.
The battery can be charged and discharged hundreds of times but it will eventually
wear out. When the talk and standby times are noticeably shorter than normal,
buy a new battery. Use only Nokia approved batteries, and recharge your battery
only with Nokia approved chargers designated for this device.
If a replacement battery is being used for the first time or if the battery has not
been used for a prolonged period, it may be necessary to connect the charger
then disconnect and reconnect it to begin charging the battery.
Unplug the charger from the electrical plug and the device when not in use. Do not
leave the battery connected to a charger. Overcharging may shorten its lifetime.
If left unused, a fully charged battery will lose its charge over time. Temperature
extremes can affect the ability of your battery to charge.
Use the battery only for its intended purpose. Never use any charger or battery
that is damaged.
Do not short-circuit the battery. Accidental short-circuiting can occur when a
metallic object such as a coin, clip, or pen causes direct connection of the
positive (+) and negative (-) terminals of the battery. (These look like metal strips
on the battery.) This might happen, for example, when you carry a spare battery
in your pocket or purse. Short-circuiting the terminals may damage the battery
or the connecting object.
Leaving the battery in hot or cold places, such as in a closed car in summer or
winter conditions, will reduce the capacity and lifetime of the battery. Always try
to keep the battery between 59°F and 77°F (15°C and 25°C). A device with a hot
or cold battery may not work temporarily, even when the battery is fully charged.
Battery performance is particularly limited in temperatures well below freezing.
Do not dispose of batteries in a fire as they may explode. Batteries may also explode
if damaged. Dispose of batteries according to local regulations. Please recycle
when possible. Do not dispose as household waste.
52
Care and maintenance
Care and maintenance
Your device is a product of superior design and craftsmanship and should be
treated with care. The suggestions below will help you protect your warranty
coverage and enjoy your device for many years.
• Keep the device and all of its parts and accessories out of the reach of
small children.
• Keep the device dry. Precipitation, humidity and all types of liquids or moisture
can contain minerals that will corrode electronic circuits. If your device does
get wet, remove the battery and allow the device to dry completely before
replacing it.
• Do not use or store the device in dusty, dirty areas. Its moving parts and
electronic components can be damaged.
• Do not store the device in hot areas. High temperatures can shorten the life of
electronic devices, damage batteries, and warp or melt certain plastics.
• Do not store the device in cold areas. When the device returns to its normal
temperature, moisture can form inside the device and damage electronic
circuit boards.
• Do not attempt to open the device other than as instructed in this guide.
• Do not drop, knock, or shake the device. Rough handling can break internal
circuit boards and fine mechanics.
• Do not use harsh chemicals, cleaning solvents, or strong detergents to clean
the device.
• Do not paint the device. Paint can clog the moving parts and prevent
proper operation.
• Use a soft, clean, dry cloth to clean any lenses (such as camera, proximity
sensor, and light sensor lenses).
• Use only the supplied or an approved replacement antenna. Unauthorized
antennas, modifications, or attachments could damage the device and may
violate regulations governing radio devices.
• Use chargers indoors.
All of the above suggestions apply equally to your device, battery, charger, or any
enhancement. If any device is not working properly, take it to the nearest authorized
service facility for service.
53
Additional safety information
Additional safety information
■ Operating environment
Your device and its enhancements may contain small parts. Keep them out of the
reach of small children.
Remember to follow any special regulations in force in any area and always switch
off your device when its use is prohibited or when it may cause interference or
danger. Use the device only in its normal operating positions. This device meets
RF exposure guidelines when used either in the normal use position against the
ear or when positioned at least 2.2 centimeters (7/8 inch) away from the body.
When a carry case, belt clip, or holder is used for body-worn operation, it should
not contain metal and should position the device the above-stated distance from
your body.
In order to transmit data files or messages, this device requires a good quality
connection to the network. In some cases, transmission of data files or messages
may be delayed until such a connection is available. Ensure the above separation
distance instructions are followed until the transmission is completed.
■ Medical devices
Operation of any radio transmitting equipment, including wireless phones, may
interfere with the functionality of inadequately protected medical devices. Consult
a physician or the manufacturer of the medical device to determine if they are
adequately shielded from external RF energy or if you have any questions. Switch
off your device in health care facilities when any regulations posted in these areas
instruct you to do so. Hospitals or health care facilities may be using equipment
that could be sensitive to external RF energy.
Pacemakers
Pacemaker manufacturers recommend that a minimum separation of
15.3 centimeters (6 inches) be maintained between a wireless device or
phone and a pacemaker to avoid potential interference with the pacemaker.
These recommendations are consistent with the independent research by and
recommendations of Wireless Technology Research. To minimize the potential
for interference, persons with pacemakers should:
• Always keep the device more than 15.3 centimeters (6 inches) from
their pacemaker.
• Not carry the device in a breast pocket.
54
Additional safety information
• Hold the device to the ear opposite the pacemaker to minimize the potential
for interference.
If you suspect interference, switch off your device and move the device away.
Hearing aids
Some digital wireless devices may interfere with some hearing aids.
If interference occurs, consult your service provider.
■ Vehicles
RF signals may affect improperly installed or inadequately shielded electronic
systems in motor vehicles such as electronic fuel injection systems, electronic
antiskid (antilock) braking systems, electronic speed control systems, air bag
systems. For more information, check with the manufacturer or its representative
of your vehicle or any equipment that has been added.
Only qualified personnel should service the device, or install the device in a
vehicle. Faulty installation or service may be dangerous and may invalidate any
warranty that may apply to the device. Check regularly that all wireless device
equipment in your vehicle is mounted and operating properly. Do not store or
carry flammable liquids, gases, or explosive materials in the same compartment
as the device, its parts, or enhancements. For vehicles equipped with an air bag,
remember that air bags inflate with great force. Do not place objects, including
installed or portable wireless equipment in the area over the air bag or in the air
bag deployment area. If in-vehicle wireless equipment is improperly installed and
the air bag inflates, serious injury could result.
FCC regulations prohibit using your wireless device while in the air. The use of
wireless telephones in an aircraft may be dangerous to the operation of the
aircraft, disrupt the wireless telephone network, and may be illegal.
■ Potentially explosive environments
Switch off your device when in any area with a potentially explosive atmosphere and
obey all signs and instructions. Potentially explosive atmospheres include areas
where you would normally be advised to turn off your vehicle engine. Sparks in
such areas could cause an explosion or fire resulting in bodily injury or even death.
Switch off the device at refueling points such as near gas pumps at service stations.
Observe restrictions on the use of radio equipment in fuel depots, storage, and
distribution areas, chemical plants or where blasting operations are in progress.
Areas with a potentially explosive atmosphere are often but not always clearly
marked. They include below deck on boats, chemical transfer or storage facilities,
vehicles using liquefied petroleum gas (such as propane or butane), and areas where
the air contains chemicals or particles such as grain, dust or metal powders.
55
Additional safety information
Failure to observe these instructions may lead to suspension or denial of telephone
services to the offender, legal action, or both.
■ Emergency calls
Important: Wireless phones, including this device, operate using radio
signals, wireless networks, landline networks, and user-programmed
functions. Because of this, connections in all conditions cannot be
guaranteed. You should never rely solely on any wireless device for
essential communications like medical emergencies.
To make an emergency call, make sure your device is properly charged before
attempting any emergency calls. If your battery becomes empty, you cannot
receive or make calls, including emergency calls and must wait a few minutes
after the charging begins to place your call.
1. Press the end key as many times as needed to clear the display and ready the
device for calls.
2. Enter the official emergency number for your present location and press the
send key. Emergency numbers vary by location.
If certain features are in use, you may first need to turn those features off before
you can make an emergency call. Consult this guide or your service provider for
more information.
When making an emergency call, give all the necessary information as accurately
as possible. Your wireless device may be the only means of communication at the
scene of an accident. Do not end the call until given permission to do so.
56
Additional safety information
■ Certification information (SAR)
THIS MOBILE DEVICE MEETS GUIDELINES FOR EXPOSURE TO RADIO WAVES.
Your mobile device is a radio transmitter and receiver. It is designed not to exceed
the limits for exposure to radio waves recommended by international guidelines.
These guidelines were developed by the independent scientific organization ICNIRP
and include safety margins designed to assure the protection of all persons,
regardless of age and health.
The exposure guidelines for mobile devices employ a unit of measurement known
as the Specific Absorption Rate, or SAR. The SAR limit stated in the ICNIRP
guidelines is 2.0 watts/kilogram (W/kg) averaged over 10 grams of tissue. Tests for
SAR are conducted using standard operating positions with the device transmitting
at its highest certified power level in all tested frequency bands. The actual SAR
level of an operating device can be below the maximum value because the device
is designed to use only the power required to reach the network. That amount
changes depending on a number of factors such as how close you are to a network
base station. The highest SAR value under the ICNIRP guidelines for use of the
device at the ear is 0.79 W/kg.
Use of device accessories and enhancements may result in different SAR values.
SAR values may vary depending on national reporting and testing requirements
and the network band. Additional SAR information may be provided under product
information at www.nokia.com.
Your mobile device is also designed to meet the requirements for exposure to
radio waves established by the Federal Communications Commission (USA) and
Industry Canada. These requirements set a SAR limit of 1.6 W/kg averaged over
one gram of tissue. The highest SAR value reported under this standard during
product certification for use at the ear is 1.27 W/kg and when properly worn on
the body is 0.80 W/kg. Information about this device model can be found at
http://www.fcc.gov/oet/fccid by searching the equipment authorization system
using FCC ID QMNRM-142.
57
Additional safety information
■ Technical information
Type designation—RM-142
Dimensions—Width 48.0 mm; length 101.0 mm; depth 25.4 mm
Weight—133g with 1100 mAh Li-Ion Battery (BL-6000C)
Display—176x220 pixels, 262K colors
Camera—Integrated 1.3 megapixel with digital zoom and flash
Wireless networks—CDMA 800 MHz and CDMA 1900 MHz, CDMA2000 1xRTT,
1xEV-DO
Frequency range (Tx)—PCS: 1851.25–1908.75 MHz, Cellular: 824.70-848.37 MHz
Frequency range (Rx)—PCS: 1931.25–1988.75 MHz, Cellular: 869.70–893.37 MHz
GPS frequency—1575.42 MHz
■ Battery information
This section provides information about battery charging times with the travel
charger, talk-times, and standby times. Be aware that the information in this
section is subject to change. For more information, contact your service provider.
Charging times
The following charging times are approximate with the BL-6000C 1100mAh
Li-Ion battery:
Travel Charger: Up to 3.5 hours
Talk and standby times
Operation times are estimates only and depend on signal strength, phone use,
network conditions, features used, battery age and condition (including charging
habits), temperatures to which the battery is exposed, and many other factors.
Talk time: Up to 3.5 hours (digital)
Standby time: Up to 10 days
58
Index
Index
A
Abc mode 18
about your phone 5
accessibility 6
account information 41
alarm clock 42
alerts 28
answer options 47
antenna 11
B
back cover, removing 12
backlight 44
banner 44
battery
and chargers 52
changing 11
charging 12
charging times 58
information 58
removing 12
talk and standby times 58
billing 6, 39
C
calculator 42
calendar 41
call log 39
call restrictions 48
call settings
answer options 47
auto retry 47
call restrictions 48
data settings 48
DTMF tones 49
one-touch dial 47
TTY mode 47
voice privacy 47
voice services 48
call timers 39
callback number 33, 45
caller group 37
caller ID 15
calls
answering 15
duration of 39
headphone 15
in-call options 16
making 14
muting 16
pauses when making 36
recent 39
silencing 15
vibrate mode 16
camera 20
care and maintenance 53
certification information (SAR) 57
charger
connecting 12
information 52
times 58
chat messages 32
clock format 49
contact information 6
contact list 36
contacts 35
default number 36
multiple numbers 35
new 35
numbers with pauses 36
voice dial 35
copyright protection 23
customer service 6
D
data settings 48
default number
callback 33
contacts 36
59
Index
device information 45
dimensions 58
display
backlight 44
banner 44
font size 45
screensaver 44
themes 44
wallpaper 44
downloading
games 21
information 22
pictures 21
videos 21
drafts 31
erase all 34
DTMF tones 49
duration of calls 39
E
edit message 26
e-mail 32
emergency calls 56
while using wireless Internet 22
EMS 28
enhanced roaming indicator 43
enhancements 51
entry mode 17, 33
erase messages 34
ERI 43
ESN 6
event scheduler 41
F
FCC information 57
flashlight 8
FLIX messages 27
settings 33
font size 45
G
games 21
Get Fun & Games 21
60
Get Going 22
Get It Now 19
Get News & Info 22
Get News and Info 22
Get PIX & FLIX 20
Get Tunes & Tones 19
groups 37
H
headphone 15
headset 13
hearing aids 55
help 6, 22
I
Inbox 28, 29
erase messages 34
indicators and icons 9, 45
instant messages 32
L
language 46
location sharing 45
lock code 46
loudspeaker 14
M
master volume 43
medical devices
hearing aids 55
pacemakers 54
memory information 22
message
options 27, 28, 29, 31, 34
reply 29
segments 24
settings 32
size 24
messages
characters in 26, 28
chat 32
composing 25, 26
draft 31
Index
e-mail 32
EMS 24, 28
erasing 34
FLIX 27
Inbox 28
MMS 24, 28
mobile IM 32
options for 30
Quick Text 33
sent 30
SMS 28
text 24
voice mail 31
MMS 28
mobile IM 32
multi-tap mode 18
mute function 16, 30
my account 41
P
pacemakers 54
pauses 36
phone setup 11
picture gallery 21
picture ID 21, 50
picture taking 20
pictures
camera 20
download 20
PIX & FLIX messages 24
formats 25
PIX messages
settings 33
Q
Quick Text 33
N
R
NAM selection 45
navigation key 8
network services 5
network settings 45
news & info 22
Nokia support 6
notepad 42
number mode 18
recent calls 39
recordings 19
redialing 47
reference information 52
reply to messages 29
ringer ID 50
ringtones 19
Ö
one-touch dial settings 47
options
contact list 36
draft message 31
FLIX message 28
Inbox 29
message 34
PIX message 20
recent calls 39
sent message 30
TXT message 26
S
safety 4
important safety information 54
screensaver 44
scrolling 10
security 46
web 23
sent messages 30, 34
settings 32
settings & tools 41
shortcut key 43
shortcuts 8
signature 33
61
Index
silent mode 16
SMS 28
soft keys 10
software version 45
sounds
alert 43
call 43
formats for PIX & FLIX messages 25
PIX message 27
playback 49
slider 43
speaker phone 14
speakers 7
speed dialing 38
standalone mode 45
standard mode 18
standby mode 8
start screen 8
system 45
device information 45
language 46
location 45
NAM selection 45
security 46
select 45
standalone mode 45
T
T9Word 17
T9Word mode 18
talk and standby times 58
technical information 58
text entry 17, 33
Abc mode 18
entry mode 17
number mode 18
T9 mode 17
text messages 24, 25
themes 44
timers 39
tip calculator 43
tools & settings 41
touch tones 49
TTY mode 47
62
turn phone off/on 13
TXT messages
characters 24
edit 26
write and send 25
type designation 58
U
usage rules 23
V
V CAST 19
vibrate mode 16
video
download 20
formats for PIX & FLIX message 25
gallery 21
new messages 28
recording 20
view calls 39
view Inbox 29
view missed calls 39
voice dial 14, 35
voice mail 31
voice privacy 47
voice recognition 14
voice services 14, 48
volume
adjusting 15, 43
earpiece 43
W
wallpaper 44
WAP 28
wireless Internet
make an emergency call 22
wireless networks 58
world clock 42
write and send messages 25
Nokia 6305i Manual del Usuario
Importante: Para prevenir cualquier malfuncionamiento y evitar daños, lea
detalladamente este manual de instrucciones antes de conectar y operar
este aparato. Conserve el manual para referencias futuras.
63
INFORMACIÓN LEGAL
PARTE Nº 9242631, EDICIÓN Nº 1a
Impreso en Corea 02/2006
Copyright © 2006 Nokia. Todos los derechos reservados.
Nokia, Nokia Connecting People, Nokia 6305i y los logos Nokia Original Enhancements son
marcas, registradas o no, de Nokia Corporation. Otros nombres de productos y compañías aquí
mencionados podrían ser marcas o nombres, registrados o no, de sus respectivos propietarios.
Nº de Patente EE.UU. 5818437 y otras patentes pendientes. Software Ingreso Intuitivo de Texto T9
Copyright ©1999-2006. Tegic Communications, Inc. Todos los derechos reservados.
cdma2000 es una marca de certificación registrada de la Asociación de la Industria de
Telecomunicaciones.
Se incluye el software de protocolo de seguridad o criptográfico RSA BSAFE de
RSA Security.
La información en este manual del usuario fue escrita para el producto Nokia 6305i. Nokia
opera bajo un sistema de desarrollo continuo. Nokia se reserva el derecho de hacer cambios y
mejoras en cualquier producto descrito en este manual sin previo aviso.
BAJO NINGÚN CONCEPTO NOKIA SERÁ RESPONSABLE POR CUALQUIER PÉRDIDA DE DATOS O
GANANCIAS O POR CUALQUIER OTRO DAÑO ESPECIAL O INCIDENTAL, POR CUALQUIER CAUSA
DIRECTA O INDIRECTA. EL CONTENIDO DE ESTE DOCUMENTO ESTÁ PROVISTO "TAL CUAL".
ADEMÁS DE LAS EXIGIDAS POR LAS LEYES, NO SE EMITE NINGUNA OTRA GARANTÍA DE
NINGÚN TIPO, SEA EXPRESA O IMPLÍCITA, INCLUYENDO, PERO SIN LIMITARSE A, GARANTÍAS
IMPLÍCITAS DE MERCADEO Y DE CAPACIDAD PARA UN PROPÓSITO PARTICULAR, EN CUANTO
A LA PRECISIÓN Y FIABILIDAD O CONTENIDO DE ESTE DOCUMENTO. NOKIA SE RESERVA EL
DERECHO DE REVISAR ESTE DOCUMENTO O DESCONTINUAR SU USO EN CUALQUIER MOMENTO
SIN PREVIO AVISO.
Control de Exportaciones
Este dispositivo puede contener bienes, tecnología o software sujeto a leyes y regulaciones
de exportación de los Estados Unidos y otros países. Se prohíbe su desvío contraviniendo
las leyes.
Aviso FCC/Industria Canadiense
Su dispositivo puede causar interferencias radioeléctricas y televisivas (por ejemplo: cuando
usted usa su teléfono muy próximo a equipos receptores electrónicos). La FCC/Industria
Canadiense puede exigirle que deje de usar su teléfono si tales interferencias no se pueden
eliminar. Si necesita ayuda, póngase en contacto con su centro de servicio local. Este aparato
cumple con la sección 15 de los reglamentos de la FCC. El funcionamiento de este aparato está
sujeto a la condición de que no cause interferencia perjudicial. Cualquier cambio o modificación
no aprobada por Nokia puede invalidar el derecho del usuario de operar este equipo.
64
Contenido
Contenido
Para su seguridad............................................................................... 66
Bienvenido .......................................................................................... 68
1. Su teléfono .................................................................................. 69
2. Programar su teléfono ................................................................ 73
3. Ingreso de texto .......................................................................... 80
4. Get It Now ................................................................................... 82
5. Mensajes móviles......................................................................... 87
6. Contactos ..................................................................................... 99
7. Llamadas recientes .................................................................... 103
8. Configuraciones y herramientas............................................... 105
9. Accesorios .................................................................................. 116
10. Información de referencia ........................................................ 117
Cuidado y mantenimiento............................................................... 119
Información adicional de seguridad ............................................... 120
Índice ................................................................................................ 125
65
Para su seguridad
Para su seguridad
Lea estas sencillas normas. El incumplimiento de ellas puede ser peligroso o ilegal.
Lea el manual del usuario completo para obtener más información.
ENCIENDA EL TELÉFONO EN FORMA SEGURA
No encienda el dispositivo cuando el uso de teléfonos celulares esté
prohibido o cuando pueda causar interferencia o peligro.
LA SEGURIDAD VIAL ANTE TODO
Obedezca todas las leyes locales. Mantenga siempre las manos libres
para maniobrar el vehículo mientras conduce. Su prioridad cuando
conduce debe ser la seguridad vial.
INTERFERENCIAS
No encienda el dispositivo cuando el uso de teléfonos celulares esté
prohibido o cuando pueda causar interferencia o peligro.
APAGUE EL TELÉFONO EN LOS HOSPITALES
Respete todas las restricciones existentes. Apague el teléfono cuando
se encuentre cerca de equipo médico.
APAGUE EL TELÉFONO EN LOS AVIONES
Respete todas las restricciones existentes. Los dispositivos celulares
pueden causar interferencias en los aviones.
APAGUE EL TELÉFONO CUANDO CARGUE COMBUSTIBLE
No utilice el dispositivo en estaciones de servicio. Tampoco cerca de
combustibles ni elementos químicos.
APAGUE EL TELÉFONO CERCA DE DONDE SE REALIZAN EXPLOSIONES
Respete todas las restricciones existentes. No utilice el dispositivo
donde se estén realizando explosiones.
ÚSELO CORRECTAMENTE
Use el dispositivo sólo en la posición normal como se explica en
la documentación del producto. No toque la antena a no ser que
sea necesario.
SERVICIO TÉCNICO CALIFICADO
Sólo personal de servicio técnico calificado puede instalar o reparar
este producto.
ACCESORIOS Y BATERÍAS
Utilice sólo baterías y accesorios aprobados. No conecte
productos incompatibles.
66
Para su seguridad
NO MOJE EL TELÉFONO
Su teléfono no es resistente al agua. Manténgalo seco.
COPIAS DE SEGURIDAD
Recuerde hacer copias de seguridad o llevar un registro por escrito de
toda la información importante.
CONEXIÓN CON OTROS DISPOSITIVOS
Antes de conectar el teléfono con otro dispositivo, lea el manual del
usuario para obtener instrucciones detalladas de seguridad. No conecte
productos incompatibles.
LLAMADAS DE EMERGENCIA
Asegúrese de que el dispositivo se encuentre encendido y funcionando.
Pulse la tecla Finalizar tantas veces como sea necesario para borrar lo que
aparece en pantalla y regresar a la pantalla de inicio. Ingrese el número de
emergencia y luego pulse la tecla Llamar. Indique su ubicación.
No finalice la llamada hasta que reciba instrucciones de hacerlo.
■ Acerca de su teléfono
El dispositivo inalámbrico descrito en este manual está aprobado para ser usado en
las siguientes redes Verizon: CDMA 800 MHz, CDMA 1900 MHz, CDMA2000 1xRTT y
1xEV-DO. Comuníquese con Verizon para obtener más información sobre las redes.
Cuando use las funciones de este dispositivo, obedezca todas las leyes y respete
la privacidad y los derechos legítimos de los demás.
Advertencia: Para poder utilizar cualquiera de las funciones en este
dispositivo, el teléfono debe estar encendido. No encienda el teléfono
donde el uso de aparatos celulares pueda causar interferencias o peligros.
■ Servicios de red
Para utilizar el teléfono, debe estar suscrito con un proveedor de servicios móviles.
Muchas de las funciones de este teléfono dependen de las opciones de la red móvil
para su funcionamiento. Es posible que estos servicios de red no estén disponibles
en todas las redes o deberá hacer arreglos específicos con su proveedor de servicios
antes de utilizarlos. Su proveedor de servicios puede darle instrucciones adicionales
para su uso y explicarle los cargos que aplican. Algunas redes pueden tener
limitaciones que inciden en el uso de los servicios de red. Por ejemplo, es posible
que algunas redes no admitan todos los servicios y caracteres de idiomas.
Su proveedor de servicios puede haber pedido que ciertas funciones en su teléfono
sean inhabilitadas o no activadas. De ser así, no aparecerán en el menú del teléfono.
Comuníquese con su proveedor de servicios para obtener más información.
67
Bienvenido
Bienvenido
Felicitaciones por la compra de su teléfono móvil Nokia 6305i. Su teléfono provee
muchas funciones prácticas para el uso diario, como un altavoz manos libres, alarma,
calculadora, agenda, cámara y descargas de videos y datos y más. Su dispositivo
también puede conectarse a una PC, laptop u otro dispositivo usando un cable de
datos. Puede programar su tono de timbre favorito para personalizar su dispositivo.
■ Ayuda
Si necesita ayuda, el centro de servicio Nokia Care está disponible para ayudarle.
Antes de llamar, recomendamos que anote el número de serie electrónico (ESN) y
su código postal (sólo en EE.UU.) y tenerlos a la mano.
Encontrar la etiqueta
del dispositivo
El ESN está en la etiqueta que se
halla debajo de la batería en la
parte posterior del dispositivo.
Consulte "Retirar la cubierta
posterior", pág. 74.
Soluciones de acceso
Nokia tiene el compromiso de crear teléfonos celulares más manejables y amigables,
incluso para los usuarios con discapacidades. Para obtener más información,
consulte el sitio Web www.nokiaaccessibility.com (en inglés).
Información de contacto y soporte Nokia
Consulte www.nokiausa.com/support o su sitio Web local de Nokia para obtener la
versión más reciente de este manual, más datos, descargas y servicios relacionados a
su producto Nokia.
En el sitio Web se puede obtener información sobre el uso de productos y servicios
Nokia. Si necesita comunicarse al centro de servicio al cliente, consulte la lista de
centros de servicio al cliente Nokia Care locales en www.nokia.com/customerservice.
Para servicios de mantenimiento, verifique el centro de servicio local Nokia Care
más cercano en www.nokia.com/repair.
Facturación y servicio al cliente
Para comunicarse con el departamento de servicio al cliente de Verizon, marque
el 1-800-256-4646.
68
Su teléfono
1. Su teléfono
Audífono (1)
Pantalla (2)
Tecla de selección izquierda (3)
Tecla Llamar y Enviar (4)
Tecla visor (5)
Tecla Borrar (6)
Teclado (7)
Micrófono (8)
Tecla de selección intermedia (9)
Botón de la cámara (10)
Tecla Encender/Apagar y Finalizar (11)
Tecla de selección derecha (12)
Tecla de desplazamiento (13)
Antena (1)
Puerto del auricular
de 2,5 mm (2)
Teclas de volumen (3)
Tecla de reconocimiento de
voz y manos libres (4)
Lente de la cámara (5)
Flash de la
cámara y linterna (6)
Altavoces estéreo (7)
Espejo de retrato (8)
69
Su teléfono
■ La pantalla de inicio
La pantalla de inicio es el punto inicial e indica que su dispositivo está en el
modo standby.
Intensidad de la señal (1): la intensidad de
la señal recibida por su teléfono se indica
con las barras en la pantalla. (No aparece
en el modo Standalone.)
Mensaje (2): pulse la tecla de selección
izquierda para seleccionar esta opción.
MENÚ (3): pulse la tecla de selección
central para seleccionar esta opción.
Contactos (4): pulse la tecla de selección
derecha para seleccionar esta opción.
Carga de la batería (5): cuatro barras indican
una batería completamente cargada.
Ubicación (6): información de ubicación
del modo compartir.
■ Tecla de desplazamiento
Dependiendo de la manera en que configure su teléfono, algunas o todas las
teclas de accesos directos pueden estar disponibles en el modo standby.
Tecla de desplazamiento hacia arriba: iniciar el navegador.
Tecla de desplazamiento hacia la derecha: ver el menú Get It Now.
Tecla de desplazamiento hacia abajo: ir a la agenda si el teléfono está en la
configuración predeterminada.
Tecla de desplazamiento hacia la izquierda: Get PIX & FLIX.
Pulsar OK: seleccione los menús y submenús.
Pulsar CLR: regresar a la pantalla anterior, excepto durante una llamada de voz, crear
un mensaje TXT o en una aplicación inalámbrica o Get It Now. Mantener pulsada la
tecla CLR para encender y apagar la linterna.
70
Su teléfono
■ Indicadores e iconos
Dependiendo del número de modelo de su dispositivo, algunos o todos los
indicadores e iconos siguientes pueden aparecer en el modo standby. Consulte
"Información de dispositivo", pág. 110, para acceder al glosario de iconos.
Indicador de la intensidad de la señal.
Indicador de servicio: el teléfono no cuenta con servicio.
Indicador de la carga de la batería.
Indicador del estado de la llamada: una llamada en progreso. El
teléfono está en el modo standby cuando no aparece el indicador.
Sesión de datos: una comunicación de datos de red en progreso.
Está en roaming fuera de su red doméstica.
Alta velocidad o descarga de navegador móvil está activada.
Está dentro de una red digital. Consulte "Servicios de red," pág. 67.
Función de seguridad SSL activada.
TTY activado.
Compartir información de ubicación está configurada en Sólo
E911. Consulte "Ubicación," pág. 110.
Compartir información de ubicación está configurada en
Ubicación Activado. Consulte "Ubicación," pág. 110.
Privacidad de voz activada.
Está dentro de una red 1XRTT. Consulte "Servicios de red," pág. 67.
Los sonidos están configurados en desactivar.
Sólo la alarma está activada.
La alarma esta configurada en activar.
El modo Standalone está activado.
El altavoz está configurado en activar.
El modo de vibración está configurado en activar.
Hay un ingreso de agenda configurado.
71
Su teléfono
Tiene nuevos mensajes de voz.
Tiene nuevos mensajes en su buzón de entrada.
Tiene llamadas perdidas.
■ Los menús del teléfono
Las funciones del teléfono están agrupadas según las funciones y se pueden
acceder a éstas por los menús principales (Get It Now, Mensajería, Contactos,
Llamadas Recientes, Config. y Herram.).). Cada menú principal tiene submenús y
listas de las cuales puede seleccionar o ver elementos y personalizar las funciones
de su dispositivo. Para acceder a estos menús y submenús, ingrese el nombre
asociado a la opción. También puede usar el método de desplazamiento.
Las teclas de selección izquierda, derecha e intermedia también se conocen como
teclas de desplazamiento. La función asociada con las teclas de selección puede
cambiar en cada menú del teléfono y depende de cada función seleccionada.
Algunas funciones pueden no estar disponibles, dependiendo de la red. Para obtener
más información, comuníquese con su proveedor de servicios de red.
■ Método de desplazamiento
Puede usar la tecla de desplazamiento para desplazarse hacia arriba, abajo,
izquierda y derecha por las opciones. Pulse la tecla de selección central para
seleccionar un elemento.
1. En el modo standby, use las teclas de selección derecha e
izquierda para seleccionar Mensaje o Contact.. Para acceder a
los menús principales, seleccione MENÚ con la tecla de
selección central, luego use la tecla de desplazamiento
izquierda o derecha.
Para proveer una representación visual de su ubicación
actual en la estructura del menú, una barra de desplazamiento aparece en el
lado derecho de la pantalla.
2. Pulse la tecla Borrar (CLR) para regresar al menú anterior. Pulse la tecla
Finalizar para regresar al modo standby desde cualquier menú o submenú.
72
Programar su teléfono
2. Programar su teléfono
■ Antena
En el teléfono Nokia 6305i, la antena externa está localizada en la parte superior
del dispositivo. Para mejorar la intensidad de la señal en su teléfono, extienda la
antena. Una antena interna GPS es activada cuando realiza una llamada de
emergencia o cuando selecciona el modo Ubicación del menú Menú > Config. y
Herram. > Sistema. Consulte "Ubicación", pág. 110.
Sujete el dispositivo como lo haría con cualquier otro
teléfono, sobre su hombro y con la antena hacia arriba.
Nota: Igual como sucede con cualquier
dispositivo de radio transmisión, no deberá
tocarse sin necesidad la antena cuando el
dispositivo esté encendido. El contacto del
cuerpo con la antena afecta la calidad de la
llamada y puede aumentar innecesariamente el
nivel de potencia que necesita el dispositivo para
su funcionamiento. No tocar la antena durante
el uso del dispositivo optimiza el rendimiento de
la antena y la duración de la batería.
■ Cambiar la batería
La batería está incorporada en la cubierta posterior. Antes de retirar la cubierta,
siempre apague el dispositivo y desconecte el cargador y cualquier otro dispositivo.
No toque los componentes electrónicos mientras cambia las cubiertas. Utilice y
guarde siempre el dispositivo con la cubierta instalada.
73
Programar su teléfono
Retirar la
cubierta posterior
1. Con la parte posterior del
dispositivo hacia usted, deslice el
botón liberador hacia arriba (1).
2. Use los agarres laterales
(indicados por el círculo) para
levantar la cubierta posterior
del dispositivo (2).
Cambiar la
cubierta posterior
1. Coloque la cubierta posterior
en el dispositivo de modo que
las lengüetas de metal en la
batería queden alineadas con
las lengüetas del dispositivo.
2. Baje la base de la cubierta
posterior hacia el dispositivo
(1) y pulse la parte superior hacia abajo (2) hasta que caiga en su sitio.
Importante: No retire la cubierta frontal de este dispositivo. El intentarlo
puede dañar el dispositivo. Si su dispositivo necesita reparación,
comuníquese al centro Nokia Care.
74
Programar su teléfono
Cargar la batería
1. Enchufe el transformador del cargador AC-1004U en un tomacorriente
CA estándar.
2. Abra la cubierta para la
ranura del cargador en la
parte inferior del teléfono (1).
3. Inserte el conector del
cargador en la ranura (2).
Su teléfono le notificará
cuando termine el proceso
de carga. El tiempo de carga
varía dependiendo del nivel de
carga de la batería. El tiempo
máximo de carga para una
batería estándar descargada
es aproximadamente
de 3,5 horas.
■ Apagar o encender
su teléfono
Para apagar o encender el teléfono, mantenga
pulsada la tecla Encender/Apagar. La cubierta
no tiene que estar abierta para encender
el teléfono.
■ Conectar el auricular
Puede conectar un auricular compatible, como un auricular estándar de 2,5 mm a
su dispositivo para habilitar la operación manos libres.
Advertencia: Es posible que se le dificulte el escuchar sonidos exteriores
al utilizar el auricular. No utilice el auricular cuando pueda poner en
peligro su seguridad.
75
Programar su teléfono
1. Abra el puerto de conexión del auricular (1).
2. Conecte el conector del auricular al puerto
del auricular de 2,5 mm en el lado de su
dispositivo (2).
3. Coloque el auricular en el oído.
Con el auricular conectado, podrá
realizar, contestar y finalizar llamadas
como de costumbre.
• Utilice el teclado para ingresar números.
• Pulse la tecla Enviar para realizar una
llamada. Consulte "Su teléfono", pág.
69.
• Pulse la tecla Finalizar para terminar una llamada.
■ Realizar una llamada
Para realizar una llamada, asegúrese que el teléfono está encendido. Desde el modo
standby, ingrese el número al que desea llamar y pulse la tecla Enviar. Consulte
"Contactos", pág. 99, para usar el menú contactos y para ingresar números de
contactos. Esta es una función de red.
Usar el teclado
Ingrese el número telefónico (incluso el código de área si es necesario) y pulse la
tecla Enviar. Para borrar un carácter a la izquierda del cursor, pulse la tecla Borrar
(CLR). Pulse la tecla Finalizar para terminar una llamada. Esta es una función de red.
Usar los últimos números marcados
En el modo standby, pulse la tecla Enviar una vez par mostrar los últimos números
marcados, recibidos o perdidos. Pulse la tecla Enviar otra vez para marcar el último
76
Programar su teléfono
número marcado o desplácese para seleccionar el número (o nombre) que desea
remarcar y pulse la tecla Enviar. Esta es una función de red.
Altavoz
Para usar el altavoz durante una llamada, mantenga pulsada la tecla de
reconocimiento de voz en el lado izquierdo del teléfono. El icono
aparece en la pantalla. Para desactivar el altavoz, mantenga pulsada la
tecla de reconocimiento de voz otra vez. Esta es una función de red.
Reconocimiento de voz
Puede usar los comandos de voz para realizar llamadas, buscar información de
contactos, mensajes, abrir aplicaciones y verificar el estado del teléfono. Esta es
una función de red.
Nota: El uso de etiquetas de voz podría resultar difícil, en un lugar
ruidoso o durante una emergencia, así que no debería depender sólo de
la marcación por voz.
1. Pulse la tecla de reconocimiento de voz. Diga un comando se anuncia.
2. Diga uno de los siguientes comandos:
Llamar seguido por el nombre del contacto, ubicación o número con el código
de área: para marcar un contacto o número.
Enviar SMSt seguido por el nombre del contacto o número con el código de
área: para abrir la pantalla de mensaje TXT.
Buscar seguido por el nombre del contacto: para abrir un archivo de contacto.
Iniciar seguido por un nombre de aplicación: para abrir una aplicación.
Verificar [estado]: para mostrar la cobertura del teléfono, intensidad de la
señal y nivel de carga de la batería.
Para ajustar las configuraciones de reconocimiento de voz, pulse la tecla de
reconocimiento de voz y seleccione Config.. Consulte "Servicios de voz," p. 113.
Llamadas con el auricular
Para contestar una llamada cuando un auricular está conectado, utilice la tecla
Enviar en su teléfono.
■ Contestar llamadas
Las siguientes opciones están disponibles para administrar las llamadas
entrantes. Esta es una función de red.
77
Programar su teléfono
Contestar o silenciar una llamada entrante
• Para contestar una llamada, abra la tapa o si la tapa ya está abierta, pulse la
tecla Enviar.
• Para silenciar una llamada entrante, seleccione Silenc..
• Para desviar una llamada al correo de voz, seleccione Ignorar.
• Para finalizar una llamada, pulse la tecla Finalizar.
Ajustar el volumen del auricular
Las teclas de volumen están ubicadas en el lado izquierdo de su dispositivo.
Para ajustar el volumen durante una llamada, pulse la tecla de volumen superior
o inferior. Cuando ajusta el volumen, un gráfico de barras indica el nivel del volumen.
ID de llamadas
Para mostrar el nombre y número de la persona que le está llamando, la identidad
del llamante deberá estar guardada en Contact.. Si el llamante no está en la lista de
contactos, aparece el número o aparece como RESTRINGIDO o NO DISPONIBLE.
Siempre se muestra la fecha y hora en que se recibió la llamada.
ID de imagen
Puede asignar una foto para que aparezca con las llamadas entrantes de sus
contactos. Consulte "Asignar ID de imagen", pág. 84.
Modo silencio
Para apagar los sonidos, mantenga pulsada la tecla de disminución de volumen
hasta que aparezca -Todo Apagado- ACTIVADO. Para volver a activar los sonidos,
mantenga pulsada la tecla de aumento de volumen hasta que aparezca -MODO
NORMAL - ACTIVADO.
Modo de vibración
Para activar el modo de vibración y silenciar los demás sonidos o para apagar el
modo de vibración con el tono de timbre, haga uno de los siguientes pasos:
• Pulse la tecla de disminución de volumen para disminuir el volumen hasta
que aparezca Sólo vibrar y seleccione Conf. o mantenga pulsada 0 hasta que
aparezca MODO VIBRAR ACTIVADO. El icono
aparece en la pantalla.
• Desde el modo standby, seleccione MENÚ > Config. y Herram. > Sonidos >
Sonidos de llamada > Vibración de llamada > Activado > OK. El icono
no aparece.
78
Programar su teléfono
Otras opciones durante una llamada
Las siguientes opciones adicionales están disponibles cuando realiza una llamada:
Enviar mens. TXTO.: para enviar o recuperar mensajes.
Contactos: para buscar en su lista de contactos.
Llamadas recientes: para verificar las llamadas recientes.
Privacidad de voz: para proteger la privacidad de su llamada telefónica actual de
otros llamantes que realizan llamadas en su misma red. Comuníquese con su
proveedor de servicios de red para obtener más información sobre la disponibilidad
de voz confidencial en su área.
Función silenciar
Durante una llamada, seleccione Silenc. para evitar que la otra persona lo escuche,
pero usted podrá escuchar a la otra persona. Seleccione Sin sil. para desactivar
esta función.
79
Ingreso de texto
3. Ingreso de texto
El teléfono Nokia 6305i ofrece varios métodos para ingresar texto y números:
Word (oración, mayúsculas y minúsculas), Abc, ABC, 123 y Símbolos.
• Pulse la tecla Borrar para retroceder con el cursor y borrar un carácter.
• Mantenga pulsada la tecla Borrar para retroceder continuamente y borrar
todos los caracteres.
• Pulse # para ingresar un espacio y aceptar la palabra completa, cuando está
en el área del asunto o texto del mensaje o al ingresar un nombre de contacto
o grupo.
• Pulse 1 para ingresar el modo de símbolo, cuando está en el área del asunto o
texto del mensaje.
• Pulse * para intercambiar entre oración, mayúsculas y minúsculas cuando está
en el modo Word o Abc cuando está en el área del asunto o texto del mensaje o
al ingresar un nombre de contacto o grupo. Mantenga pulsada la tecla * cada
vez para intercambiar entre los modos Word, Abc y 123 cuando está en el área
del texto del mensaje o al ingresar un nombre de contacto o grupo.
• Pulse la tecla de selección del modo de ingreso de texto y seleccione Símbolos
para ingresar caracteres especiales en su mensaje. Dependiendo en la
pantalla que esté viendo, ésta puede ser la tecla de selección izquierda o
derecha. La tecla de selección de ingreso de texto muestra el modo de ingreso
seleccionado (Word, Abc, ABC, 123 o Símbolos). No se permite el uso de
símbolos para los nombres de contactos o grupos.
■ Modo T9Word (T9)
El modo T9 le permite escribir mensajes rápidamente utilizando su teclado y el
diccionario integrado. El modo T9 es más rápido que el modo estándar dado a que
sólo pulsa la tecla correspondiente en su teclado una sola vez por cada letra.
Activar o desactivar
Para activar o desactivar T9, en cualquier pantalla para el ingreso de texto, pulse
la tecla de selección del modo de ingreso y desplácese por las opciones.
80
Ingreso de texto
Ingreso de texto T9
La ilustración a continuación simula su pantalla al pulsar una tecla. Por ejemplo,
para escribir Verizon usando el texto T9 y el diccionario español seleccionado,
pulse cada tecla una vez:
8
3
7
4
9
6
6
• Si la palabra en pantalla no está correcta, pulse 0 para desplazarse por las
otras opciones de palabras.
• Si no aparece la palabra, borre su ingreso y pulse la tecla de selección del
modo de ingreso para cambiar el modo a Abc. Reingrese su palabra usando el
modo de tecleos múltiples.
■ Modo Abc (tecleos múltiples)
Pulse la tecla de selección del modo de ingreso y seleccione Abc para oración o
ABC para mayúsculas.
Pulse una tecla una vez para insertar la primera letra en la tecla, dos veces para la
segunda letra, etc. Al hacer una pausa, la última letra en la pantalla es aceptada y
su dispositivo espera el próximo ingreso.
■ Números (123)
Para cambiar al modo numérico desde cualquier otro modo, pulse la tecla de
selección del modo de ingreso y seleccione 123.
81
Get It Now
4. Get It Now
Get It Now le permite descargar canciones, tonos de timbres, fotos, videos, noticias,
información y juegos. También puede encontrar información sobre direcciones a
restaurantes, cajeros automáticos, etc. Con Get It Now puede personalizar su
teléfono para que refleje su estilo de vida y gustos. Esta es una función de red.
Get It Now puede usarse en cualquier lugar en la red Verizon Wireless,
siempre y cuando su teléfono tenga disponible señal digital. La mayoría de las
aplicaciones no usan una conexión de red mientras están en uso. Consulte
verizonwireless.com/getitnow para información adicional sobre los servicios
Get It Now.
Su teléfono deberá estar encendido para usar Get It Now. No encienda el
teléfono donde el uso de teléfonos móviles esté prohibido o pueda causar
interferencias o peligros.
Esta función comparte el espacio de memoria con otras funciones.
■ V CAST
V CAST es un servicio multimedia disponible por medio de Get It Now que entrega
una experiencia de streaming de video móvil con mayores velocidades de descarga,
mayor calidad de imagen, mejor sonido y clips de mayor duración. Con V CAST puede
hacer stream de videoclips (hasta cinco minutos de duración) de entretenimiento,
deportes, noticias y clima en su teléfono 6305i. Para diversión y juegos, acceda a
V CAST para descargar una amplia gama de juegos 3-D con gráficas, sonido y
profundidad mejoradas. Comuníquese con Verizon para obtener más información
sobre la disponibilidad de estos servicios, precios y tarifas. Esta es una función de red.
La cobertura y servicios de V CAST no estan disponible en todas las áreas. Se requiere
de una suscripciónA V CAST VPak . Consulte getitnow.vzwshop.com/vcast.home.do
para obtener más información.
■ Get Tunes and Tones
Puede personalizar su teléfono con tonos de timbre. Una gran variedad de estilos
de música están disponibles, puede seleccionar entre éxitos del momento, pop y
hip–hop. Esta es una función de red.
Seleccione MENÚ > Get It Now, luego seleccione Get Tunes and Tones y una de las
siguientes opciones:
82
Get It Now
Nuevos tonos: seleccione Obtener nuevo para descargar aplicaciones nuevas para la
descarga de tonos de timbre o use una de las aplicaciones para la descarga de tonos
de timbre de Internet. Un tono de timbre puede configurarse en Tono de llamada
para un contacto en específico o en Tono de alerta para ingresos de la agenda. Los
tonos de timbre nuevos son guardados en la carpeta Mis tonos de timbre.
Mis tonos de timbre: seleccione Obtener Nuevo para descargar un tono de timbre
nuevo o usar uno de los tonos guardados en esta carpeta.
Mis sonidos: seleccione Grabar Nuevo para grabar sonidos como música o discurso
o para seleccionar sonidos pregrabados como Feliz cumpleaños o el clamor de una
multitud. Estos sonidos grabados pueden reproducirse en otra fecha y pueden
adjuntarse a un mensaje TXT.
■ PIX and FLIX
Get PIX & FLIX le permite ver, tomar y enviar sus fotos digitales y videos con su
teléfono móvil y acceder al servicio streaming multimedia V Cast. Esta es una
función de red.
Puede tomar fotos y grabar videoclips con la cámara integrada de 1,3 megapíxeles y
flash. La cámara produce fotos en el formato JPEG y videoclips en el formato H.263.
Tras tomar una foto o video, puede adjuntarlo a un mensaje TXT, guardarlo como
imagen de fondo y guardarlo en la carpeta PIX Place. Cuando adjunta una foto a
un ingreso en su lista de contactos, la fotografía aparece cuando su contacto le
llama. Consulte "Mensajería PIX and FLIX", pág. 87.
El dispositivo Nokia 6305i admite una resolución de captura de imagen de
160x120 píxeles a 1280x960 píxeles.
Si no cuenta con suficiente memoria para tomar una foto nueva, borre fotos
antiguas u otros archivos en las galerías PIX and FLIX.
Tomar una foto
Para abrir PIX Viewfinder y tomar una foto, pulse la tecla del visor o seleccione
MENÚ > Get It Now > Get PIX & FLIX > Tomar FOTO. Seleccione TOMA para tomar
una foto u Opc. para ajustar la Resolución de imagen, Temporizador, Flash, Brillo,
Balance de blancos, Sonido de obturador, Efecto de color y Config. de la tapa.
Mantenga una distancia adecuada al usar el flash. No use el flash al tomar fotos
de personas o animales de cerca. No cubra el flash al tomar una foto.
Grabar un video
Para abrir Visor de película, en el modo standby, realice uno de los siguientes pasos:
• Mantenga pulsada la tecla del visor.
83
Get It Now
• Pulse la tecla del visor para abrir el visor en el modo Visor de Foto, luego pulse
la tecla del visor otra vez para cambiar al modo FLIX Viewfinder.
• Seleccione MENÚ > Get It Now > Get PIX & FLIX > Grabar VIDEO.
Para grabar video, seleccione REC.
Para ajustar las configuraciones de video antes de tomar el video, seleccione Opc. >
Brillo, Balance de blancos, Config. de la tapa o Luz de video.
Asignar ID de imagen
Para asignar una ID de imagen a un contacto:
• Seleccione MENÚ > Get It Now, luego seleccione Get PIX & FLIX > Mis FOTO o
Tomar FOTO > TOMA.
• Obtenga o resalte una foto y seleccione Opc. > Establecer como > ID de imagen.
•
Resalte un contacto y seleccione OK.
Otras opciones
Las siguientes opciones Get PIX & FLIX le permiten descargar y manejar sus
fotos y videos.
Get V CAST Vídeo: para conectarse al Internet y tener acceso al catálogo de contenido
de video V CAST. Puede recorrer a través de cuatro categorías: News; Entertainment;
Sports y Weather. Seleccione el tipo de contenido que desea de la lista de
proveedores. Seleccione el clip que desea ver. Un mensaje sobre las opciones de
costo aparecerá en la pantalla. Las tarifas para descargar videoclips básicos están
incluídos en su suscripción VPak. SeleccioneYes para ver el videoclip seleccionado.
Obtener nueva imagen: seleccione Obtener Nuevo para descargar aplicaciones
PIX o use una de las aplicaciones de descarga de imágenes de Internet.
Mis FOTO o Mis VIDEO: seleccione fotos o videos de su galería PIX o FLIX para enviar,
descargar, bloquear, borrar, modificar o ver. Seleccione Opc. > Establecer como para
usar una foto como Tapiz de fondo, Salvapantallas o ID de imagen.. Las opciones
Bloquear o Desbloquear protegen los archivos de las funciones Borrar y Borrar Todos.
PIX Place: acceda al álbum de imágenes en línea para cargar fotos. Para obtener
más información, consulte www.verizonwireless.com/getitnow/pixmessaging.
■ Diversión y juegos
Para abrir juegos de la galería de juegos o descargar un juego nuevo, seleccione
MENÚ > Get It Now > Get Fun & Games > Obtener nuevo y seleccione una opción
de juego. Navegue y seleccione V CAST Games para ver todos los títulos 3-D
disponibles. Seleccione el juego que desee, seleccione una opción de pago y
descargue el título. Podrá usar la aplicación tan pronto como se complete la
descarga. Esta es una función de red.
84
Get It Now
■ Noticias e información
Para conectarse a Internet y navegar para ver lo último en noticias, información
de la Bolsa y películas, selecciones MENÚ > Get it Now > Get News & Info. Esta es
una función de red.
■ Get going
Para navegar en búsqueda de información, como direcciones a un restaurante o
el cajero automático más cercano, seleccione MENÚ > Get It Now > Get Going >
Obtener Nuevo. Esta es una función de red.
■ Memoria y ayuda
Para verificar el estado de memoria o encontrar información sobre la descarga de
aplicaciones, seleccione MENÚ > Get It Now > Inform para ver la pantalla Inform Get
It Now. Esta pantalla le permite verificar Memoria de la aplic., Memoria de contenido y
Ver registro. Seleccione Ayuda para encontrar, por ejemplo, información sobre cómo
agregar, borrar, desactivar o restaurar aplicaciones, determinar cambios de vuelos o
cancelar suscripciones.
Las notificaciones aparecen en la pantalla standby cuando la memoria está 80%
llena y 100% llena. Seleccione OK para borrar estos mensajes Si su teléfono muestra
un mensaje que la memoria está llena cuando trata de usar una función, borre parte
de la información o ingresos guardados en la memoria antes de continuar.
■ Llamadas entrantes
Mientras descarga una aplicación, las llamadas son enviadas automáticamente a
su correo de voz, si está disponible. Si no tiene correo de voz, no se interrumpirá la
descarga por una llamada entrante y el llamante recibirá una señal de ocupado.
Cuando usa una aplicación, una llamante entrante pausará la aplicación
automáticamente y le permitirá contestar la llamada. Cuando complete su
llamada, podrá volver a usar la aplicación.
Si su proveedor de servicios de red no respalda las llamadas entrantes durante la
navegación, las llamadas entrantes son trasladadas automáticamente al correo de voz.
Realizar una llamada de emergencia mientras está en línea
Puede finalizar su conexión de datos, luego realizar una llamada de emergencia.
1. Para cerrar la conexión, pulse la tecla Finalizar. Pulse la tecla Finalizar tantas
veces como sea necesario para borrar la pantalla y preparar el dispositivo para
las llamadas.
85
Get It Now
2. Marque el número de emergencia de la localidad en que se encuentre.
Los números de emergencia pueden variar en cada localidad.
3. Pulse la tecla Enviar.
■ Seguridad y funcionalidad
Su teléfono admite el sistema de derechos digitales para proteger el contenido
que haya adquirido. Contenido como tonos de timbre pueden ser protegidos y
asociados a ciertas reglas de uso.
El uso de las normas está definida en la clave de activación del contenido que
puede ser entregada con el contenido o por separado, dependiendo del proveedor
de servicios de red. Es posible que pueda actualizar la clave de activación. Siempre
revise los datos de entrega de cualquier contenido y clave de activación antes de
adquirirlos, puede que no sean gratis.
Las restricciones de copyright pueden impedir la copia, modificación, transferencia
o desvío de imágenes, música (incluyendo tonos de timbre) y otro contenido.
Web móvil 2.0 es un servicio de red digital y no está disponible en todos los
lugares. Se cargan las tarifas para avisos y mensajes de texto Web móvil para
mensajes enviados y recibidos. Se carga el tiempo de uso (airtime). Consulte
"Servicios de red", pág. 67.
El dispositivo puede tener cargadas las direcciones de algunos sitios que no están
asociados con Nokia. Nokia no garantiza ni respalda estos sitios. Si accede a ellos,
tome las mismas precauciones en cuanto a seguridad y contenido, como haría
con cualquier otro sitio de Internet.
El icono de seguridad (
) no indica que la transmisión de datos establecida
entre el puerto y el servidor de contenido (o el lugar donde se almacena el recurso
solicitado) sea segura. El proveedor de servicios de red asegura la transmisión de
datos entre el puerto y el servidor de contenido.
86
Mensajes móviles
5. Mensajes móviles
Si se ha suscrito a un servicio de red de mensajes, podrá enviar y
recibir mensajes a teléfonos compatibles que también estén suscritos a un
servicio de mensajes. Puede también enviar y recibir mensajes multimedia y de email. Las funciones de mensajería son servicios de red.
Importante: Tenga precaución al abrir mensajes. Los mensajes pueden
contener software perjudicial o bien estropear su dispositivo o PC.
Nota: Al enviar mensajes, su dispositivo muestra Enviando mensaje. Esto
significa que el mensaje ha sido enviado por su dispositivo al número del
centro de mensajes programado en él. Para mensajes que fallan, la red
creará un mensaje de error nuevo, para explicar la razón por la cual no se
entregó el mensaje. Comuníquese a Verizon para obtener más detalles
acerca de los servicios de mensajería.
■ Mensajería TXT
Al componer mensajes TXT o realzados (EMS), la cantidad de caracteres usados
(máximo de 160 por mensaje) aparece en la esquina superior derecha de la
pantalla de mensajes. Los segmentos son creados cuando la longitud del mensaje
excede los 160 caracteres. La cantidad de segmentos usados (de un máximo de 7)
aparece en la esquina superior izquierda de la pantalla de mensajes. No se puede
ingresar más texto cuando todos los segmentos y caracteres han sido usados. Los
segmentos son entregados como mensajes por separado.
El uso de caracteres especiales puede utilizar más espacio que los
caracteres normales.
Las direcciones de e-mail cuentan como caracteres. Los mensajes EMS no pueden
enviarse a direcciones de e-mail.
Para obtener más información sobre el ingreso de texto en mensajes, consulte
"Ingreso de texto," p. 80.
■ Mensajería PIX and FLIX
Los mensajes PIX and FLIX son mensajes multimedia (MMS) que pueden contener
texto, sonido, una foto y un videoclip. Su dispositivo admite mensajes PIX de
hasta 300 KB y mensajes FLIX de hasta 200 KB. Si se excede el tamaño máximo,
su dispositivo no podrá recibir el mensaje. Dependiendo de la red, puede recibir
un mensaje que incluye una dirección de Internet a la cual podrá ir para ver los
mensajes PIX and FLIX.
87
Mensajes móviles
Las imágenes son reducidas para poder mostrarlas en la pantalla del dispositivo.
Su dispositivo tiene un visor de mensajes PIX and FLIX para reproducir los mensajes.
Los mensajes entrantes permanecen en Entrada hasta que el usuario los borre o
los guarde. Cuando guarda el mensaje PIX and FLIX, puede usar la imagen como
protector de pantalla o imagen de fondo o usar el sonido como tono de timbre, a no
ser que esté restringido por copyright. Consulte "PIX and FLIX," p. 83.
Sólo los dispositivos compatibles con funciones de foto o video pueden recibir y
mostrar mensajes PIX and FLIX. La apariencia de los mensajes PIX and FLIX puede
variar dependiendo del dispositivo que recibe el mensaje.
Las protecciones de copyright podrían prevenir la copia, modificación, transferencia o
desvío de ciertas imágenes, música (incluyendo tonos de timbre) y otros contenidos.
Comuniquese a Verizon para obtener más información sobre disponibilidad y una
suscripción al servicio de mensajería multimedia.
La mensajería PIX and FLIX admite los siguientes formatos:
• Imagen: JPEG, GIF, GIF animado, BMP y PNG
• Sonido: AAC/AAC, MIDI, iMelody, QCELP, EVRC, AMR, ADPCM
• Video: clips en MPEG4, H263
Si un mensaje recibido contiene elementos no admitidos, estos elementos pueden
ser reemplazados con Imposible mostrar objeto o Formato de archivo no admitido.
Puede recibir una notificación de mensaje multimedia, pero no puede recibir
mensajes multimedia si tiene una llamada en curso u otra aplicación funcionando o
si está en una sesión de navegación activa. Puesto que la entrega de mensajes
multimedia puede fracasar por varias razones, no dependa solamente en dicha
función para comunicaciones importantes.
■ Mensajes nuevos
Para componer un mensaje nuevo, en el modo standby, pulse la tecla de selección
izquierda o seleccione MENÚ > Mensajería, luego seleccione Nuevo mensaje >
Mensaje de texto, Mensaje de imagen o Mensaje de video.
Mensaje TXT
Para escribir o enviar un mensaje TXT, tras seleccionar Mensaje de texto:
1. Seleccione un destinatario.
1. Para agregar destinatarios de su lista de contactos, en la pantalla Crear
mensaje de texto, seleccione Agregar > Contactos, Grupos o Llamadas
Recientes, resalte y seleccione OK para cada destinatario y seleccione Listo.
88
Mensajes móviles
También puede usar el teclado para ingresar manualmente un número
telefónico o dirección de e-mail en cada área para direcciones. El modo de
ingreso predeterminado para la pantalla Crear mensaje de texto es 123
(modo numérico). Para cambiar al modo de tecleos múltiples para el
ingreso de direcciones de e-mail, seleccione 123 > Abc o ABC. Consulte
"Ingreso de texto," p. 80.
2. Seleccione OK o desplácese hacia abajo para abrir el área de ingreso de texto.
2. Escriba un mensaje usando el teclado. Consulte "Ingreso de texto T9", pág. 81.
3. Para enviar el mensaje, seleccione ENV. o pulse la tecla Llamar.
4. Para guardar el mensaje como borrador, pulse la tecla Finalizar y seleccione Sí >
OK. Su mensaje será guardado en la carpeta Borradores.
Opciones de mensajes TXT
Para personalizar un mensaje TXT nuevo, seleccione Opc. cuando el cursor está en
el área de ingreso de texto. Seleccione una de las siguientes opciones:
Agregar: para agregar Gráfico, Animación, Sonido, Texto rápido o Firma a su mensaje.
Formatear texto: para cambiar Alineación, Tamaño de fuente, Estilo de fuente,
Color de texto o Fondo de su mensaje. Formatear afecta el texto ingresado tras
seleccionar esta opción.
Guardar como borr.: para guardar su mensaje en la carpeta Borradores.
Nivel de Prioridad: para configurar el nivel de prioridad en Normal o Alta.
Número devol. de llam.: para configurar la pantalla de número de devolución de
llamadas en Activado o Desactivado o Editar el número de devolución de llamadas.
Agregar a contactos: para agregar el nombre o número del contacto nuevo a la
lista de contactos.
Guard. tex. rápido: guarde el mensaje en la galería Quick Text.
Consulte "Configuraciones para todos los mensajes," p. 96.
Mensaje PIX
Para componer y enviar un mensaje, tras seleccionar Mensaje de imagen:
1. Seleccione un destinatario.
1. Para agregar destinatarios de su lista de contactos, en la pantalla Crear
Mens. Imag., seleccione Agregar > Contactos, Grupo o Llamadas Recientes,
resalte y seleccione OK para cada destinatario y seleccione Listo. Seleccione
Agregar > A PIX Place > OK para cargar la foto en el álbum de fotos en línea.
89
Mensajes móviles
También puede usar el teclado para ingresar manualmente un número
telefónico o dirección de e-mail en cada área para direcciones. El modo de
ingreso predeterminado para la pantalla de direcciones es 123 (modo
numérico). Para cambiar al modo de tecleos múltiples para el ingreso de
direcciones de e-mail, seleccione 123 > Abc o ABC. Consulte "Ingreso de
texto," p. 80.
2. Seleccione OK o desplácese hacia abajo para abrir el área de ingreso de texto.
2. Ingrese el texto en el área Texto del mensaje PIX usando el teclado. Consulte
"Ingreso de texto T9", pág. 81. Al componer mensajes PIX, la cantidad de
caracteres usados en el área de texto (máximo de 1000 por mensaje) aparece
en la esquina superior derecha de la pantalla de mensajes. No se puede
ingresar más texto cuando todos los caracteres han sido usados.
3. Desplácese hacia abajo hasta resaltar el área Imagen. Para agregar una foto,
seleccione Mi Foto, desplácese para resaltar la foto deseada y seleccione OK.
4. Desplácese hacia abajo hasta resaltar el área Sonido. Para agregar una foto,
seleccione Sonidos para abrir la galería Mis sonidos, desplácese para resaltar
un sonido grabado y seleccione OK. Para grabar una imagen nueva, seleccione
Grabar Nuevo mientras está en la galería Galeria Mis Sonidos. El sonido nuevo
es agregado en la parte superior de la lista de la galería. Seleccione Repr. para
escuchar parte del sonido grabado.
5. Desplácese hacia abajo hasta resaltar el área Asunto. Ingrese texto (hasta 100
caracteres) en el área Asunto del mensaje PIX usando el teclado.
6. Para enviar el mensaje, seleccione ENV. o pulse la tecla Llamar.
7. Para guardar el mensaje como borrador, pulse la tecla Finalizar y seleccione Sí >
OK. Su mensaje será guardado en la carpeta Borradores.
Opciones de mensajes PIX
Las siguientes Opc. están disponibles en la pantalla Crear Mens. Imag. cuando las
áreas Texto, Imagen, Sonido y Asunto están resaltadas:
Vista previa: ver su mensaje.
Agreg. text. rápid.: insertar texto de la galería Quick Text (sólo áreas Texto y Asunto).
Guardar como borrador: guarde su mensaje en la carpeta Borradores.
Nivel de Prioridad: configure el nivel de prioridad en Normal o Alta.
Quitar imagen: retirar la foto del mensaje (si había una agregada).
Quitar sonido: retirar el archivo de sonido de su mensaje (si había uno agregado).
Agregar a contactos: agregar el destinatario del mensaje a su lista de contactos.
90
Mensajes móviles
Mensaje FLIX
Para componer y enviar un mensaje FLIX, tras seleccionar Mensaje de Video:
1. Seleccione un destinatario.
1. Para agregar destinatarios de su lista de contactos, en la pantalla Crear
Mens. Vid., seleccione Agregar > Contactos, Grupos o Llamadas recientes,
resalte y seleccione OK para cada destinatario y seleccione Listo. Seleccione
Agregar > A PIX Place > OK para cargar la foto en el álbum de fotos en línea.
También puede usar el teclado para ingresar manualmente un número
telefónico o dirección de e-mail en cada área para direcciones. El modo de
ingreso predeterminado para la pantalla de direcciones es 123 (modo
numérico). Para cambiar al modo de tecleos múltiples para el ingreso de
direcciones de e-mail, seleccione 123 > Abc o ABC. Consulte "Ingreso de
texto," p. 80.
2. Seleccione OK o desplácese hacia abajo para abrir el área de ingreso de texto.
2. Ingrese el texto en el área Texto del mensaje FLIX usando el teclado.
Consulte "Ingreso de texto T9", pág. 81. Al componer mensajes FLIX, la
cantidad de caracteres usados en el área de texto (máximo de 1000 por
mensaje) aparece en la esquina superior derecha de la pantalla de mensajes.
No se puede ingresar más texto cuando todos los caracteres han sido usados.
3. Desplácese hacia abajo hasta que el área Video esté resaltado. Para agregar un
archivo FLIX, seleccione Mi Pel., desplácese para resaltar el archivo deseado y
seleccione OK. Para grabar un FLIX nuevo, seleccione Grabar mientras está en la
galería Mi video. Consulte "Grabar un video," p. 83. Seleccione Repr. para una
vista previa del archivo FLIX.
4. Desplácese hacia abajo hasta resaltar el área Asunto. Ingrese texto (hasta 100
caracteres) en el área Asunto del mensaje PIX usando el teclado.
5. Para enviar el mensaje, seleccione ENV. o pulse la tecla Enviar.
6. Para guardar el mensaje como borrador, pulse la tecla Finalizar y seleccione
Sí > OK. Su mensaje será guardado en la carpeta Borradores.
Opciones de mensajes FLIX
Las siguientes Opc. están disponibles en la pantalla Crear Mens. Vid cuando las
áreas Texto, Video y Asunto están resaltadas:
Vista Previa: ver su mensaje.
Agreg. text. rápid.: insertar texto de la galería Agregar texto rápido (sólo áreas
Texto y Asunto).
Guardar como borrador: guardar su mensaje en la carpeta Borradores.
91
Mensajes móviles
Nivel de Prioridad: configurar el nivel de prioridad en Normal o Alta.
Quitar video: retirar el archivo FLIX de su mensaje (si había uno agregado).
Agregar a contactos: agregar el destinatario del mensaje a su lista de contactos.
■ Buzón de entrada
Su teléfono puede recibir mensajes de texto (SMS), mensajes mejorados (EMS),
mensajes PIX/FLIX (MMS), e-mail vía SMS, mensajes WAP Push y avisos en Entrada.
Esta es una función de red.
Al recibir un mensaje entrante, aparece un aviso en la pantalla standby y tiene
la opción Ver ahora o Ver más tarde. Seleccione Ver ahora para abrir el mensaje
nuevo en Entrada. Si selecciona Ver más tarde, aparece el icono de notificación
de mensaje nuevo ( ) y deberá abrir Entrada para ver los mensajes nuevos.
Para abrir Entrada y ver o editar mensajes, en el modo standby pulse la tecla de
selección izquierda o seleccione MENÚ > Mensajería, luego seleccione Entrada.
Si Vista automática o Recepc. autom. están activados para los mensajes
entrantes, las opciones Ver ahora y Ver más tarde no aparecen en la pantalla.
Consulte "Configuraciones de mensajes," p. 96.
Ver el buzón de entrada
La cantidad de mensajes en Entrada aparece entre paréntesis en la pantalla
Mensajería. Cuando abre Entrada, aparece la lista de mensajes. Los mensajes
más nuevos aparecen primero. Desplácese hacia arriba y abajo para resaltar un
mensaje. En la pantalla Entrada, seleccione Borrar > OK para borrar el mensaje
resaltado u Opc. y seleccione de las siguientes opciones:
Responder: enviar una respuesta a un Mensaje de texto, Mensaje de imagen o
Mensaje de video.
Delantero: desviar el mensaje a otro número telefónico o dirección de e-mail o
cargar en PIX Place.
Bloquer o Desbloquear: proteger el mensaje de los comandos Borrar y Borrar todos.
Agregar a contactos: guardar la información de contacto en la lista de contactos.
Info del mensaje: mostrar la información del remitente y hora de llegada.
Ver o reproducir mensajes
Para ver o reproducir un mensaje en Entrada, resalte el mensaje y seleccione
Abrir. Si es necesario, desplácese hacia arriba o abajo para ver todo el mensaje.
Puede desplazarse a la izquierda o derecha para ver el contenido de otros
mensajes en Entrada.
92
Mensajes móviles
Con el mensaje abierto, puede seleccionar de las siguientes opciones:
Borrar: borrar el mensaje (sólo mensajes sin archivos de sonido o FLIX adjuntos).
Silenc. o Sin sil.: activar o desactivar el sonido de un objeto de sonido (sólo mensajes
con archivos de sonido o FLIX adjuntos).
REPR. o PAUSA: iniciar o detener la reproducción FLIX (sólo mensaje FLIX con
archivo FLIX adjunto).
RESP.: enviar un Mensaje de texto, Mensaje de imagen o Mensaje de video
(con la excepción de mensaje FLIX con archivo FLIX adjunto).
Opc.: seleccione de las siguientes opciones:
• Delantero: desviar el mensaje a otro número telefónico o dirección de e-mail
o para cargar en PIX Place.
• Guardar texto rápido: guardar el mensaje en la galería Texto rápido.
• Bloquear o Desbloquear: proteger el mensaje de los comandos Borrar y
Borrar todos.
• Agregar a contactos: guardar la información de contacto en la lista de contactos.
• Info de mens.: mostrar la información del remitente y hora de llegada.
Las siguientes Opc. aparecen para tipos específicos de mensajes:
• Reproducir de nuevo: reproducir el sonido adjunto (sólo mensaje PIX con sonido).
• Responder: enviar una respuesta a un Mensaje de texto, Mensaje de imagen o
Mensaje de video (con la excepción de mensaje FLIX con archivo FLIX adjunto).
• Borrar: borrar el mensaje (sólo mensajes con archivos de sonido o FLIX adjuntos).
• Guardar gráfico: guardar un objeto gráfico adjunto a un mensaje (sólo
mensajes TXT).
• Guardar imagen: guardar el archivo PIX adjunto (sólo mensajes PIX).
• Guardar videos: guardar el archivo FLIX adjunto (sólo mensajes FLIX).
• Guardar sonido: guardar un sonido adjunto al mensaje (sólo mensajes
con sonido).
■ Mensajes enviados
La carpeta Enviado se usa para guardar mensajes TXT, PIX y FLIX que han sido
entregados a los destinatarios. La cantidad de mensajes guardados en la carpeta
Enviado aparece entre paréntesis en la pantalla Mensajeria. Para abrir la carpeta
Enviado, en el modo standby, pulse la tecla de selección izquierda o seleccione
MENÚ > Mensajería, luego seleccione Enviado.
93
Mensajes móviles
Aparece la lista de mensajes enviados. Los mensajes más nuevos aparecen primero.
Desplácese hacia arriba y abajo para resaltar un mensaje. En la pantalla Enviado,
seleccione de la siguientes opciones:
• Borrar: seleccione Sí > OK para borrar el mensaje enviado.
• Opc.: seleccione de las siguientes opciones:
• Delantero: desviar el mensaje a otro número telefónico o dirección de
e-mail o cargar en PIX Place.
• Reenviar: reenviar un mensaje TXT, PIX o FLIX.
• Bloquear o Desbloquear: proteger el mensaje de los comandos Borrar
y Borrar todos.
• Agregar a contactos: guardar la información de contacto en la lista
de contactos.
• Info de mens.: mostrar la información del remitente y hora de llegada.
• ABRIR: ver o reproducir el mensaje. Con el mensaje abierto, puede seleccionar
de las siguientes opciones:
Borrar: borrar el mensaje (sólo mensajes sin archivos de sonido o FLIX adjuntos).
Silenc. o Sin sil.: activar o desactivar el sonido de un objeto de sonido
(sólo mensajes con archivos de sonido o FLIX adjuntos).
REPR. o PAUSA: iniciar o detener la reproducción FLIX (sólo mensaje FLIX con
archivo FLIX adjunto).
ENV: volver a enviar un Mensaje de texto, Mensaje de imagen o Mensaje de
video (con la excepción de mensaje FLIX con archivo FLIX adjunto).
Opc. y seleccione una de las siguientes opciones:
• Delantero: desviar el mensaje a otro número telefónico o dirección de
e-mail o cargar en PIX Place.
• Bloquear o Desbloquear: proteger el mensaje de los comandos Borrar
y Borrar todos.
• Guardar texto rápido: guardar el mensaje en la galería Texto rápido.
• Agregar a contactos: guardar la información de contacto en la lista
de contactos.
• Info de mens.: mostrar la información del remitente y hora de llegada.
Las siguientes Opc. aparecen para tipos específicos de mensajes:
• Reproducir de nuevo: reproducir el sonido adjunto (sólo mensaje PIX
con sonido).
94
Mensajes móviles
• Reenviar: volver a enviar un Mensaje de texto, Mensaje de imagen o Mensaje
de video (con la excepción de mensaje FLIX con archivo FLIX adjunto).
• Borrar: borrar el mensaje (sólo mensajes con archivos de sonido o
FLIX adjuntos).
■ Borradores
La carpeta Borradores se usa para guardar borradores de mensajes TXT, PIX y FLIX.
La cantidad de mensajes guardados en la carpeta Borradores aparece entre
paréntesis en la pantalla Mensajería. Para abrir la carpeta Borradores, en el modo
standby, pulse la tecla de selección izquierda o seleccione MENÚ > Mensajería,
luego seleccione Borradores. Aparece la lista de borradores. Los mensajes más
nuevos aparecen primero. Desplácese hacia arriba y abajo para resaltar un
mensaje. Seleccione de las siguientes opciones en la pantalla Borradores:
• Borrar: seleccionar Sí > OK para borrar el borrador.
• EDIT: actualizar el borrador. Consulte "Mensajes nuevos," p. 88.
• Opc.: personalizar el borrador. Seleccione una de estas opciones:
Enviar: entregar el borrador a los destinatarios.
Bloquear o Desbloquear: activar o desactivar la protección contra los
comandos Borrar o Borrar todos para este mensaje.
Agregar a contactos: guardar la información de contacto en la lista de contactos.
■ Mensajes de correo de voz
El correo de voz es un servicio de red que le permite ver los mensajes de voz nuevos
grabados en su buzón de voz. Cuando tiene un mensaje de voz nuevo, su teléfono
le avisa y se le pregunta Escuchar ahora o Escuchar más tarde. Si selecciona
Escuchar más tarde, el icono de correo de voz nuevo (
) aparece en la
pantalla standby.
Escuchar mensajes de voz
Cuando tiene un aviso de mensaje de voz nuevo, seleccione Escuchar ahora > OK
para acceder a su buzón de voz. También puede ir a la pantalla del correo de voz
para escuchar los mensajes de voz existentes desde el modo standby por medio
de pulsar la tecla de selección izquierda o seleccionar MENÚ > Mensajería, luego
seleccionar Correo de voz. Para acceder a su correo de voz desde el modo standby
usando la marcación rápida, mantenga pulsada 1.
La pantalla de correo de voz muestra la cantidad de mensajes nuevos y la fecha y
hora del último mensaje recibido. Para acceder a su correo de voz, seleccione OK o
pulse la tecla Llamar.
95
Mensajes móviles
Para reconfigurar el contador del correo de voz, seleccione Borrar > Sí > OK.
El icono de correo de voz nuevo ya no aparecerá en la pantalla.
La opción para borrar el icono de correo de voz no borra el correo de voz de su buzón
de voz. Para borrar mensajes, deberá acceder a su buzón de voz y usar los comandos
del sistema de correo de voz. Si excede el límite de almacenamiento para su buzón
de voz, se borrarán los mensajes más antiguos.
■ Mensajes de e-mail
Desde el modo standby pulse la tecla de selección izquierda o seleccione MENÚ >
Mensajería, luego seleccione Correo electrónico para lanzar un navegador y
acceder a la pantalla de mensajería de e-mail. Esta es una función de red.
■ Mensajes MI móviles
Desde el modo standby pulse la tecla de selección izquierda o seleccione MENÚ >
Mensajería, luego seleccione Mobile IM para acceder la pantalla de mensajería
instantánea Get It Now. Esta es una función de red.
■ Chat
Desde el modo standby pulse la tecla de selección izquierda o seleccione MENÚ >
Mensajería, luego seleccione Chatear para iniciar un navegador y chat para
usuarios de Internet Messenger. Esta es una función de red.
■ Configuraciones de mensajes
Para programar las configuraciones para los mensajes TXT, PIX o FLIX, use el menú
Conf.. Desde el modo standby pulse la tecla de selección izquierda o seleccione
MENÚ > Mensajería, luego seleccione Conf.. Seleccione Todos los mensajes,
Mensaje de texto, Mensaje de imagen o Mensaje de video > OK.
Configuraciones para todos los mensajes
Seleccione de las siguientes opciones para aplicarlas a todos los mensajes:
Guardado automático: guarda automáticamente todos los mensajes enviados en
la carpeta Enviado. Seleccione Activado o Desactivado para activar o desactivar
Guardado automático. Seleccione Preguntar > OK para recibir un aviso para que
guarde tras enviar cada mensaje.
Borrado automático: borra automáticamente el mensaje más antiguo (no bloqueado)
de su buzón de entrada si está lleno. Seleccione Activado o Desactivado > OK. Si
Borrado activado está configurado en Desactivado, aparece un mensaje cuando
la memoria está llena indicándole que borre manualmente los mensajes que ya
no desea guardar en su buzón de entrada.
96
Mensajes móviles
Texto rápido: ver y editar los ingresos Quick Text, los cuales son mensajes cortos
preelaborados que pueden ser recuperados e insertados en un mensaje TXT.
Aparece la galería de ingresos Quick Text precargados y definidos por el usuario.
Para agregar un ingreso, seleccione Nuevo, ingrese el texto y seleccione OK.
Para borrar un ingreso definido por el usuario, resalte el ingreso y seleccione
Borrar > Sí > OK.
Núm. correo de voz: para cambiar el número de correo de voz predeterminado.
Ingrese el número nuevo y seleccione OK.
Modo de entrada: para cambiar el modo de ingreso predeterminado para el área
de ingreso de texto de un mensaje TXT y en las áreas de ingreso de texto y asunto
de los mensajes PIX and FLIX. Seleccione Word, Abc, ABC o 123 > OK.
Núm. devol. llamada: para cambiar el número de devolución de llamadas
predeterminado que es enviado. Ingrese el número nuevo y seleccione OK.
Firma: para crear o editar texto que será adjuntado automáticamente a cada mensaje
TXT, PIX y FLIX saliente. Ingrese el texto de firma y seleccione OK.
Configuraciones de mensajes TXT
Seleccione Vista automática > Activado para ver el contenido directamente al
recibir un mensaje TXT. El contenido de mensajes TXT entrantes aparece cuando
el teléfono está en el modo standby.
Seleccione Firma para crear o editar el texto que será adjuntado automáticamente
a cada mensaje TXT saliente. Ingrese el texto de firma y seleccione OK. Esta opción
no aparece si se ha creado una firma usando el menú Todos los mensajes > Firma.
Configuraciones de mensajes PIX
Seleccione Recepc. Autom. > Activado para descargar el contenido directamente
al recibir un mensaje PIX.
Seleccione Firma para crear o editar texto que será adjuntado automáticamente a
cada mensaje PIX saliente. Ingrese el texto de firma y seleccione OK. Esta opción no
aparece si se ha creado una firma usando el menú Todos los mensajes > Firma.
Configuraciones de mensajes FLIX
Seleccione Recepc. Autom. > Activado para descargar el contenido directamente
al recibir un mensaje FLIX.
Seleccione Firma para crear o editar el texto que será adjuntado automáticamente
a cada mensaje FLIX saliente. Ingrese el texto de firma y seleccione OK. Esta opción
no aparece si se ha creado una firma usando el menú Todos los mensajes > Firma.
97
Mensajes móviles
■ Opciones de mensajes
Para borrar los mensajes TXT, PIX o FLIX, use el menú Opc.. Desde el modo standby
pulse la tecla de selección izquierda o seleccione MENÚ > Mensajería, luego
seleccione Opc.. Seleccione una de estas opciones:
• Borrar entrada: borrar todos los mensajes en su Entrada.
• Borrar enviados: borrar todos los mensajes en su carpeta Enviado.
• Borrar enviados: borrar todos los mensajes en su carpeta Borradores.
• Borrar todos: borrar todos los mensajes.
Para borrar los mensajes seleccionados, seleccione Sí > OK. Los mensajes serán
borrados permanentemente.
98
Contactos
6. Contactos
La lista de contactos puede guardar hasta 500 contactos con múltiples números y
notas de texto para cada contacto. La cantidad de números e ingresos de texto que
puede guardar puede variar, dependiendo de su longitud y la cantidad total de
ingresos en la lista de contactos.
■ Contactos nuevos
Puede acceder a la lista de contactos en el modo standby. Seleccione Contact. o
MENÚ > Contactos > Lista de contacto. Para buscar rápidamente un contacto en
su lista de contactos, ingrese la primera letra del nombre del contacto y aparecerá
esa sección de la lista.
Usar la lista de contactos
Para crear o actualizar su lista de contactos, haga lo siguiente:
1. En el modo standby, ingrese el número del contacto.
2. Seleccione Guard. > Crear nuevo para guardar un número nuevo en su lista de
contactos. Para actualizar un número de un contacto existente, seleccione
Guard. > Actualizar existente y seleccione el contacto de la lista de contactos.
3. Seleccione Celular (1 ó 2), Casa, Trabajo o Fax > OK. Al actualizar un número
de contacto existente, resalte el número que desea cambiar y seleccione OK.
Para sobrescribir el número nuevo, seleccione Sí > OK.
4. Si es un ingreso nuevo, ingrese un nombre para el contacto y seleccione GUARD..
Guardar números múltiples
Puede guardar distintos tipos de números telefónicos y elementos cortos de texto
para cada contacto en su directorio. El primer ingreso de número telefónico para
un contacto es programado automáticamente como el número predeterminado
(primario), pero lo puede cambiar en cualquier momento. Consulte "Cambiar el
número predeterminado", pág. 100.
1. En el modo standby, seleccione Contact., desplácese al ingreso al cual desea
agregar un número adicional y seleccione Edit.
2. Ingrese el número nuevo o detalle en el recuadro Mobile (1 o 2 ), Casa, Trabajo,
Correo electrónico (1 o 2 ), Grupo, Imagen, Tono de timbre o Fax de la pantalla
EDITAR Contacto.
3. Seleccione GUARD..
99
Contactos
Configurar marcación por voz
El Nokia 6305i usa el reconocimiento de voz para acceder a ingresos en su lista de
contactos. Consulte "Reconocimiento de voz", pág. 77.
Cambiar el número predeterminado
Para cambiar el número predeterminado cuando hay números múltiples asignados
a un solo contacto, haga lo siguiente:
1. En el modo standby, seleccione Contact., resalte el contacto y seleccione Edit.
2. Desplácese al número predeterminado nuevo y seleccione Opc. > Config.
como predet. > OK > Sí.
Configurar números telefónicos con pausas
Los códigos con pausa instruyen al sistema receptor a hacer una pausa o esperar
antes de ingresar los números que los siguen en la secuencia de marcación.
1. Desde el modo standby, ingrese el número, seleccione Opc. y seleccione una
de las siguientes opciones:
Pausa de 2 seg.: para marcar el número de contacto, haga una pausa de dos
segundos y marque el número secundario o extensión. P aparece en la secuencia
de marcación. Puede ingresar las pausas que necesite para ajustarse al sistema
de llamadas automatizado.
Espera: para marcar el número de contacto y esperar a que usted pulse Liberar
antes de enviar un número secundario. Puede ingresar el número secundario
como parte de la secuencia de marcación o lo puede ingresar manualmente.
W aparece en la secuencia de marcación.
2. Seleccione Guard..
3. Ingrese un nombre de contacto y seleccione Guard..
Para agregar códigos de pausas a números telefónicos en los contactos, haga
lo siguiente:
1. En el modo standby, seleccione Contact., resalte el contacto y seleccione Edit.
2. Desplácese al número que desea modificar y seleccione Opc. > Agregar pausa >
Espera o Pausa de 2 seg. > OK.
■ Lista de contacto
Para ver la lista de contacto, desde el modo standby, seleccione Contact. o MENÚ >
Contacts > Lista de contacto. Puede seleccionar Edit para editar el ingreso de
contacto u Opc. y una de las siguientes opciones:
Nuevo contacto: crear un nuevo ingreso de contacto.
100
Contactos
Borrar: retirar el contacto existente.
Env. mens. texto: enviar un mensaje TXT al contacto. Esta es una función de red.
Env. mens. imagen: enviar un mensaje de imagen al contacto. Esta es una
función de red.
Enviar mens. video: enviar un mensaje de video al contacto. Esta es una
función de red.
Llamada: marcar el número del contacto. Esta es una función de red.
■ Grupos de llamantes
Puede agregar ingresos de contactos a los grupos de llamantes. Un contacto sólo
puede asignarse a un grupo de llamantes a la vez. Los grupos de llamantes
predeterminados son Familia, VIP, Amigos y Negocios, pero puede crear grupos de
llamantes nuevos.
Asignar o crear grupos de llamantes nuevos
Puede crear y modificar los grupos de llamantes de varias maneras. Puede crear o
actualizar los grupos de llamantes y asignar ingresos de contactos a los grupos.
También puede agregar o modificar ingresos individuales de contactos por medio
de agregarlos a grupos de llamantes.
Crear o modificar grupos de llamantes
1. Seleccione MENÚ > Contact. > Grupos.
2. Para crear un grupo nuevo, seleccione Nuevo, ingrese el nombre del grupo
nuevo y seleccione Guard..
3. Resalte el grupo nuevo o un grupo existente de la lista de nombres de grupos y
seleccione VER > AGREGAR u Opc. > Agregar para agregar contactos al grupo.
4. Resalte y seleccione OK para cada contacto y seleccione Listo.
Asignar contactos a grupos de llamantes
1. En el modo standby, seleccione Contact., resalte el contacto y seleccione Edit.
2. Desplácese al recuadro Grupo y seleccione Config..
3. Para crear un grupo nuevo, seleccione Nuevo, ingrese el nombre del grupo
nuevo y seleccione GUARD. Resalte el grupo de la lista de grupos de nombres y
seleccione OK para agregar el contacto al grupo.
Un contacto sólo puede asociarse a un grupo de llamantes a la vez. Si agrega
un contacto de un grupo existente a otro grupo, dicho contacto es retirado del
grupo existente.
101
Contactos
Enviar un mensaje de grupo
Para enviar un mensaje a un grupo, seleccione MENÚ > Contact. > Grupos, el
nombre del grupo y Opc. > Env. mens. texto, Env. mens. imagen o Env. mens. video.
Escriba el mensaje que desea enviar al grupo y seleccione ENV.. Consulte "Mensajes
nuevos," p. 88. Esta es una función de red.
Asignar una ID de imagen al grupo
Consulte "Asignar ID de imagen", pág. 84, para instrucciones sobre cómo asignar
ID de imagen.
■ Marcación rápida
Configurar la marcación rápida
Puede asociar cualquier ingreso de móvil, casa, trabajo en la lista de contacto a
una tecla de marcación rápida de la 2 a la 99. La tecla de marcación rápida 1, se
usa para acceder al correo de voz. Esta es una función de red.
Para marcar un número de marcación rápida de un solo dígito, mantenga pulsado
el número de la tecla asignada. Para marcar un número de marcación rápida de
dos dígitos, haga una pulsación breve del primer número y mantenga pulsado el
segundo número.
1. En el modo standby, seleccione MENÚ > Contact. > Marcaciones rápidas.
2. Seleccione una posición de marcación rápida No asignado y seleccione CONF..
3. Resalte el contacto que desea asignar al número, luego seleccione OK y el número
móvil, de casa o trabajo al cual desea asignar un número de marcación rápida.
4. Seleccione OK y confirme con Sí > OK.
Borrar números de marcación rápida
En el modo standby, seleccione MENÚ > Contact. > Marcaciones rápidas. Desplácese
a una posición de marcación rápida ya asignada y seleccione Eliminar > Sí > OK.
102
Llamadas recientes
7. Llamadas recientes
La información sobre las llamadas perdidas, recibidas o marcadas se guarda en el
menú Llamadas Recientes.. Cuando la cantidad de llamadas excede el máximo, la
llamada más reciente reemplaza la más antigua.
■ Ver las llamadas
Para ver las llamadas, seleccione MENÚ > Llamadas Recientes > Perdida,
Recibida o Realizada. Seleccione Todas para ver todas las llamadas perdidas,
recibidas y marcadas. Las llamadas más recientes aparecen primero en la lista.
Las llamadas perdidas son aquellas que no fueron contestadas. La función
llamadas perdidas no funciona si el dispositivo está apagado.
Al ver las listas de llamadas, las siguientes opciones están disponibles:
Mensaje: enviar el número seleccionado a Mensaje de texto, Mensaje de imagen o
Mensaje de video. Consulte "Mensajes nuevos," p. 88.
ABRIR: ver detalles de la llamada.
Opc.: seleccionar de las siguientes opciones:
• Guardar: agregar al llamante o número al que se llamó a la lista de contactos.
Consulte "Usar la lista de contactos," p. 99.
• Detalles: ver detalles de la llamada.
• Borrar: borrar la llamada seleccionada de la lista de llamadas recientes.
• Bloquear o Desbloquear: proteger la llamada de los comandos Borrar y
Borrar todos.
• Borrar todos: borrar las llamadas de la lista de llamadas recientes.
• Ver cronómetro: borrar el todas las llamadas, la duración de las llamadas y la
información de transferencia de datos.
■ Ver la duración de las llamadas
Puede ver la cantidad total de llamadas, duración (hh.mm.ss) de las llamadas y la
información de transferencia de datos con la opción Ver cronómetro..
Nota: Ciertos cronómetros, incluso el cronómetro general, pueden ser
reprogramados cuando se actualicen los servicios o software. El tiempo
actual facturado por su proveedor de servicios para las llamadas y servicios
puede variar, dependiendo de las funciones de red, redondeo de la
facturación, impuestos, etc. .
103
Llamadas recientes
En el modo standby, seleccione MENÚ > Llamadas Recientes > Ver cronómetro y
desplácese para ver los datos de duración de llamadas para Última Llamada, Todas
Llamadas, Recibidas Llamadas, Realizadas Llamadas, Roaming Llamadas, Recibidos,
Transmitidos, Total, Última restauración, Llamadas totales y Cont. datos totales..
Reprogramar los contadores de llamadas
Para reprogramar un contador de llamadas seleccionado o reprogramar todos los
contadores a cero (con la excepción de Llamadas totales y Cont. datos totales),
haga lo siguiente:
En el modo standby, seleccione MENÚ > Llamadas Recientes > Ver Cronómetro
y resalte el contador que desea modificar. Seleccione Restau > Sí > OK para
reprogramar el contador seleccionado a cero. Para reprogramar todos los
contadores de llamadas (con la excepción de Llamadas totales y Cont. datos
totales), seleccione Res. tod. > Sí > OK.
104
Configuraciones y herramientas
8. Configuraciones y herramientas
Use el menú Config. y Herram. para personalizar su teléfono.
■ Mi cuenta
El portal Web Mi Cuenta de Verizon le permite acceder a su información de cuenta.
Seleccione MENÚ > Config. y Herram. > Mi Cuenta.. Esta es una función de red.
■ Herramientas
Para acceder a la agenda, alarma y relojes mundiales, notas, calculadoras y opciones
de teclas de accesos directos, seleccione MENÚ > Config. y Herram. > Herramientas.
Agenda
La función Calendario le permite hacer anotaciones en su agenda para tener acceso
conveniente a ésta. Puede ingresar citas en la agenda y configurar su teléfono para
emitir una alarma con un recordatorio. Seleccione MENÚ > Config. y Herram. >
Herramientas > Calendario y una de las siguientes opciones:
Agregar: actualizar o crear nueva información de horario.
VER: abrir el ingreso de agenda.
Opc.: Ir a hoy, Ir a fecha, Buscar, Borrar antiguos o Borrar todos.
Programar o actualizar un evento
Para ingresar un evento o actualizar un evento existente en su agenda, seleccione
MENÚ > Config. y Herram. > Herramientas > Calendario.
1. Desplácese a la fecha del evento y seleccione Agregar para agregar un ingreso
nuevo de evento o Ver > Agregar para actualizar un ingreso existente.
2. Seleccione el recuadro de ingreso de evento que desea rellenar o actualizar
y Config..
3. Seleccione GUARD. cuando complete todos los ingresos y actualizaciones.
Para administrar sus ingresos de agenda, seleccione Config. y Herram >
Herramientas > Calendario > Opc. y una de las siguientes opciones:
Ir a hoy: resalte la fecha de hoy para los ingresos.
Ir a fecha: seleccione una fecha en la agenda. Use las teclas de desplazamiento
izquierda y derecha para intercambiar entre los modos de mes, día y año y use las
teclas de desplazamiento superior e inferior para aumentar y disminuir en cada modo.
105
Configuraciones y herramientas
Buscar: ver todos los eventos existentes en su agenda.
Borrar antiguos: borrar todos los ingresos que llevan más de Una semana, Un mes,
Un año o Un día..
Borrar todos: borrar todos los ingresos de la agenda.
Alarma
Para configurar una de las tres alarmas, seleccione MENÚ > Config. y Herram. >
Herramientas > Reloj despertador > Alarma 1, Alarma 2 o Alarma 3 > OK.
Configure la hora, frecuencia, tono de timbre y ciclos para la alarma y seleccione
GUARD.. Cuando se configura una alarma,
aparece en la pantalla standby.
Para borrar una alarma guardada, seleccione MENÚ > Config. y Herram. >
Herramientas > Reloj despertador y resalte la alarma que desea modificar.
Seleccione Opc. > Restaurar > Sí > OK para borrar la alarma seleccionada o
seleccione Opc. > Restaurar a todos > Sí > OK para borrar todas las alarmas.
Reloj mundial
Para determinar la hora actual en otra zona horaria o país, seleccione MENÚ >
Config. y Herram. > Herramientas > Reloj mundial. Use las teclas de desplazamiento
izquierda y derecha para mover los indicadores sobre el mapamundi. Seleccione
H. Veran para activar o desactivar el Horario de verano para la ciudad seleccionada.
Seleccione Ciud. para seleccionar una ciudad por su nombre.
Notas
Para crear una nota, seleccione MENÚ > Config. y Herram > Herramientas > Bloc
de notas > Agregar eingrese el texto de la nota. Para ver o editar una nota, resalte
la nota y seleccione Ver > Edit o Borrar. Para borrar una o todas las notas, abra
Bloc de notas y seleccione Opc. > Borrar o Borrar todos.
Calculadora
Para efectuar cálculos matemáticos sencillos usando las teclas de desplazamiento
izquierda y derecha, seleccione MENÚ > Config. y Herram. > Herramientas >
Calculadora. Seleccione Operador para usar paréntesis en su ecuación o para
ingresar un Exponente. Pulse la tecla de selección central (resultado) para
resolver la ecuación. Pulse la tecla CLR para borrar un ingreso o seleccione la
tecla de selección Borrar para cancelar la operación y borrar la pantalla. Use la
tecla # para cambiar el valor a positivo o negativo y la tecla * para ingresar un
punto decimal. Puede ingresar números hasta la sexta posición decimal.
Nota: Esta calculadora tiene un límite de precisión y está diseñada para
cálculos simples.
106
Configuraciones y herramientas
Tecla de acceso directo
Puede asignar un acceso directo a una de sus funciones favoritas o de uso frecuente.
El acceso directo se activa cuando pulsa la tecla de desplazamiento inferior, en el
modo standby.
1. Seleccione MENÚ > Config. y Herram. > Herramientas > Tecla acc. dir..
2. Desplácese por la lista de opciones y seleccione Conf. para asignar una de las
siguientes opciones a la tecla de desplazamiento inferior: Melodías y tonos,
Galería, Diversión y Juegos, Noticias e información, Bandeja de entrada,
Enviado, Correo electrónico, Chat, IM, Config. y Herram. o Herramientas. Si
seleccionó Herramientas, aparece una nueva lista de opciones: Calendario,
Reloj despertador,Reloj mundia, Bloc de notas,Calculadora y Calc. de propinas..
Calculadora de propina
Para calcular una propina, seleccione MENÚ > Config. y Herram. > Herramientas >
Calc. de propinas. Ingrese la cantidad total de la cuenta y el porcentaje deseado
para la propina. La calculadora de propina calcula la propina automáticamente.
También puede dividir la cuenta para calcular la cantidad que cada persona debe
pagar. Desplácese a la izquierda o derecha para aumentar o reducir el porcentaje
deseado de propina o el número de veces que se dividirá la cuenta. Pulse la tecla
CLR para borrar el ingreso. Seleccione Restau. para borrar todos los ingresos.
Seleccione Cerrar para salir.
■ Sonidos
Para ajustar el volumen y asignar sonidos a llamadas y alarmas, seleccione MENÚ >
Config. y Herram. > Sonidos y seleccione de las siguientes opciones:
Volumen maestro: use la tecla de volumen o navegación para cambiar el volumen
del tono de timbre de Alto a Bajo o Sólo alarma o Sólo vibrar.. Para seleccionar el
modo Todo apagado, desplácese hasta que aparezca Todo apagado o mantenga
pulsada la tecla de disminución de volumen. Para volver a Modo Normal, mantenga
pulsada la tecla de aumento de volumen. Pulse Repr. para escuchar parte del sonido.
Sonidos de llamada: configurar los tonos de timbre para las llamadas entrantes.
También puede usar esta opción para configurar el teléfono para vibrar cuando
recibe una llamada.
Sonidos de alerta: seleccione los tipos de alerta para un Mensaje de texto,
Mensaje PIX-FLIX o Mensaje de voz entrante.
Sonido de tapa: activar un sonido cuando abre o cierra la tapa.
Seleccione Activado o Desactivado.
107
Configuraciones y herramientas
Keypad Volume: configurar el volumen del teclado de Apagado a Alto.
Volumen auricular: configurar el volumen del auricular de Bajo a Alto.
Alertas de servicio: configurar cualquier opción de alerta a Activado o Desactivado:
• ERI: indicador mejorado de roaming (ERI) le avisa del estado del servicio
celular. Esta es una función de red.
• Pitido de minutos: le avisa cada minuto durante una llamada.
• Llamada conectada: le avisa cuando se conecta la llamada.
■ Pantalla
Use la opción Pantalla para cambiar las configuraciones de pantalla de su teléfono.
Título
Para mostrar texto en la pantalla en el modo standby, seleccione MENÚ > Config. y
Herram > Pantalla > Banderín. Seleccione una de estas opciones:
Banderín persona: ingrese su propio título de hasta 16 caracteres.
Banderín ERI: configurar en Activado o Desactivado para permitir que aparezca el
texto ERI debajo de su título personalizado. Esta es una función de red.
Luz de fondo
Para configurar la duración de la luz de fondo, seleccione MENÚ > Config. y
Herram > Pantalla > Luz trasera. Seleccione una de estas opciones:
Pantalla: configure la duración de la luz de fondo en los siguientes modos:
• Tapa abierta: las opciones programadas son 5 Seg., 15 Seg., 30 Seg, Siempre
activado o Siempre desactivado.
• Tapa cerrada: las opciones programadas son LCD desactivado, Apagar en 1 seg.,
Apagar en 3 seg. o Apagar en 10 seg.. Seleccione Apagar por etapa para disminuir
la luz lentamente y luego apagarla.
Teclado: configure cuánto tiempo el teclado está iluminado. Las opciones
programadas son 5 Sec, 15 Seg., 30 Seg., Siempre activado o Siempre desactivado..
Imagen de fondo
Para configurar su teléfono para mostrar una imagen de fondo en el modo standby,
seleccione MENÚ > Config. y Herram > Pantalla > Tapiz de fondo.. Desplácese por las
vistas en miniaturas para destacar la imagen de fondo que aparecerá en el teléfono.
Seleccione Ver para una vista previa de la imagen de fondo y para volver a la vista
en miniatura. Seleccione OK para configurar la imagen seleccionada como su imagen
de fondo. Puede usar los diseños de imagen de fondo de su carpeta PIX o seleccionar
Ob. nvo para ver diseños nuevos de imágenes de fondo.
108
Configuraciones y herramientas
Protector de pantalla
Para seleccionar una imagen como protector de pantalla, seleccione MENÚ >
Config. y Herram. > Pantalla > Salvapantallas. Seleccione una imagen guardada
en la carpeta PIX y OK. Seleccione Obt. nvo. para comprar o descargar imágenes o
gráficos nuevos. Seleccione Ver para una vista previa del protector de pantalla y
para regresar a la vista en miniatura.
Esquemas de colores
Para seleccionar el color de la pantalla de fondo, seleccione MENÚ > Config. y
Herram. > Pantalla > Temas de pantalla > Predeterminado, Azul, Negocios, Verde,
Rojo o Tropical.
Tipos de letras
Para configurar el tamaño de letra, seleccione MENÚ > Config. y Herram >
Pantalla > Fuentes > Normal o Grande.
■ Sistema
El menú Sistema le permite programar configuraciones de red específicas.
Modo Standalone
Para desactivar las frecuencias de radio, por ejemplo, el modo de avión, seleccione
MENÚ > Config. y Herram> Sistema > Modo Independiente. Seleccione Activado
o Desactivado.
Seleccionar sistema
Para configurar su teléfono para hacer roaming o buscar otra red cuando no está
en su área doméstica, seleccione MENÚ > Config. y Herram. > Sistema > Selección
de sistema y una de las siguientes opciones:
Sólo de origen: realizar y recibir llamadas sólo en su área doméstica.
Automático A o Automático B: buscar servicio en otra red. La tarifa de roaming
aplica estando fuera del área doméstica.
Selección NAM
Si su teléfono está registrado con dos números telefónicos (NAMs), por ejemplo,
trabajo y números personales, puede seleccionar el número que usará como
número de origen. Seleccione MENÚ > Config. y Herram. > Sistema > Selección
de NAM > NAM 1 o NAM 2.
109
Configuraciones y herramientas
Información de dispositivo
Para ver información sobre su teléfono, seleccione MENÚ > Config. y Herram. >
Sistema > Info. del dispos > Mi número, Versión de SW o Glosario de icono..
Ubicación
Para compartir información de ubicación sobre la red, seleccione MENÚ > Config.
y Herram. > Sistema > Ubicación. Para llamadas a números de emergencia, la
información de ubicación puede ser usada por la operadora de emergencia para
localizar el dispositivo. La funcionalidad y precisión de esta función dependen de la
red, sistemas de satélite y la agencia recibidora de la información. Es posible que no
funcione en todas las zonas todo el tiempo. Seleccione Ubicación Activado para
que la información de posición esté disponible siempre o seleccione Sólo E911 para
que esta información esté disponible sólo para servicios de emergencia.
Seguridad
Para asegurar el teléfono electrónicamente, seleccione MENÚ > Config. y Herram. >
Sistema > Seguridad. Esta función protege su teléfono de las llamadas salientes
desautorizadas o acceso ajeno a los datos guardados en su teléfono.
Ingrese su código de bloqueo (0000 o los últimos cuatro dígitos de su número
telefónico) y seleccione de las siguientes opciones:
• Código común > Activado o Desactivado: para programar todos los códigos
de bloqueo iguales al código del dispositivo. Editar un código de dispositivo o
ubicación vía la opción Editar código reprograma automáticamente el Código
común a Desactivado.
• Modo de bloqueo: para evitar que otros usen su teléfono o cambien las
configuraciones de ubicación. Seleccione Dispositivo > Bloquear, Desbloquear o
Al encender > OK para activar o desactivar el bloqueo del dispositivo o activarlo
cuando enciende el teléfono. Cuando Modo de bloqueo está activado en el
dispositivo, deberá ingresar el código de bloqueo para usar el teléfono.
Mantenga pulsada # para activar rápidamente Modo de bloqueo en el dispositivo.
Para cancelar Modo de bloqueo, pulse cualquier tecla que no esté en el teclado,
con la excepción de la tecla Finalizar, e ingrese el código de bloqueo.
Seleccione Ubicación (e ingrese el código de bloqueo de ubicación si el modo
Código común está configurado en Desactivado) > Bloquear o Desbloquear >
OK para activar o desactivar el bloqueo de ubicación. Cuando Modo de bloqueo
está activado para la ubicación, deberá ingresar su código de bloqueo de
ubicación antes de acceder al menú MENÚ > Config. y Herram > Sistema >
Ubicación para cambiar la información de posición del teléfono. Consulte
"Ubicación," p. 110.
110
Configuraciones y herramientas
• Editar código > Dispositivo o Ubicación: para cambiar el código de bloqueo
para el dispositivo o ubicación. Si el modo Código común está configurado en
Desactivado, se le pide que ingrese su código de bloqueo de ubicación.
Ingrese códigos iguales en las áreas de ingreso Nuevo código y Confirmar
Código y seleccione OK. Editar un código de dispositivo o ubicación
reprograma automáticamente Código común en Desactivado.
• Borrar contactos > Sí o No: para borrar todos los contactos.
• Restaurar predetermin. > Sí o No: para reprogramar todas las configuraciones
a las configuraciones de fábrica.
Cuando el bloqueo Seguridad está activado, las únicas llamadas salientes
permitidas son al número de emergencia programado en su dispositivo.
Bloquear las teclas de la tapa
Para activar o desactivar las teclas cuando la tapa está cerrada, seleccione MENÚ >
Config. y Herram > Sistema > Bloqueo teclas tapa > Activado o Desactivado. Para
reactivar las teclas exteriores tras volver a activar Bloqueo teclas tapa, debe mantener
pulsada la tecla de selección izquierda.
Idioma
Para configurar el idioma predeterminado del menú de su teléfono y pantalla,
seleccione MENÚ > Config. y Herram. > Sistema > Idioma > Inglés o Español.
■ Configuraciones de llamadas
Opciones de respuesta
Para determinar cuántas llamadas contestará con su teléfono, seleccione MENÚ >
Config. y Herram. > Config. de llamadas > Opc. de respuesta > Tapa abierta, Tapa
ab. y cualq. tecl., Tapa ab. y tecl. send, Tecla Send o Respuesta automática.
Reintento automático
Para configurar cuánto tiempo el teléfono espera para remarcar automáticamente
un número tras un intento fallido, seleccione MENÚ > Config. y Herram. > Config.
de llamadas > Reintento automático > Desactivado, Cada 10 segundos, Cada 30
segundos o Cada 60 segundos. A veces hay un alto volumen de llamadas en la red
celular, lo cual resulta en una señal rápida de ocupado al marcar. Con remarcado
automático activado, su dispositivo remarca el número (las veces fijadas por la
red) y le avisa cuando la red está disponible.
111
Configuraciones y herramientas
Modo TTY/TDD
Un teléfono que admite TTY/TDD (dispositivo teletipo/de telecomunicación para
personas con limitaciones auditivas) puede traducir los caracteres escritos a voz.
La voz también puede traducirse en caracteres y aparecer en el TTY/TDD. Para
conectar un dispositivo TTY/TDD para comunicarse con personas que también
usan un dispositivo TTY, seleccione MENÚ > Config. y Herram. > Config. de
llamadas > Modo TTY > OK y una de las siguientes opciones:
TTY completo: activar la funcionalidad completa de TTY.
TTY + HABLAR: activar el TTY en el modo de transmisión a voz (VCO).
TTY + ESCUCHAR: activar el TTY en el modo de transmisión auditiva (HCO).
TTY desactivado: desactivar el modo TTY.
Marcación rápida
Para iniciar una llamada de marcación rápida por medio de mantener pulsado el
dígito de marcación rápida, seleccione MENÚ > Config. y Herram > Config. de
llamadas > Marcado de una tecla > Activado o Desactivado. Si está configurado
en Desactivado, los números de marcación rápida designados en Contacts no
funcionarán. Consulte "Marcación rápida," p. 102.
Voz confidencial
Para configurar la función voz confidencial para llamadas CDMA, seleccione MENÚ >
Config. y Herram. > Config. de llamadas > Privacidad de voz > Activado o Desactivado.
La función voz confidencial protege la privacidad de su conversación telefónica
actual de otras personas que realizan llamadas en su misma red. CDMA ofrece
confidencialidad de voz inherente que protege la identidad de los usuarios y dificulta
interceptar llamadas. Esta es una función de red.
Restricción de llamadas
Para restringir las llamadas que su dispositivo realiza y recibe, seleccione MENÚ >
Config. y Herram. > Config. de llamadas > Restricc. de llamada, ingrese su código
de bloqueo y seleccione una de las siguientes opciones:
Llam. saliente > Activado o Desactivado para restringir o permitir todas las
llamadas salientes.
Llam. entrante > Activado o Desactivado para restringir o permitir todas las
llamadas entrantes. Las llamadas son desviadas al correo de voz.
Libreta telefónica > Activado o Desactivado para restringir o permitir todas las
llamadas entrantes o salientes de los contactos en su directorio.
112
Configuraciones y herramientas
Cuando las llamadas están restringidas, aún es posible llamar al número de
emergencia oficial programado en su dispositivo. Solicite a su proveedor de
servicios la contraseña de restricción. Restricciones de llamadas es un servicio
de red. Consulte "Servicios de red", pág. 67.
Configuraciones de datos
Para usar los servicios de comunicaciones de datos de red, seleccione MENÚ >
Config. de llamadas > Config. de llamadas > Config. de datos > Datos/Fax,
Seleccionar puerto. Los servicios de comunicaciones de datos de red son los servicios
de suscripción a terminales para acceder a Internet usando computadoras personales
o laptops a 19,2 kb/s o a un máximo de 153,6 kb/s. Las velocidades de conexión
dependen de la red de su operador y otros factores. Verifique que sus especificaciones
de información para las comunicaciones sean las mismas de la red. Esta es una
función de red.
Servicios de voz
Para acceder a los servicios de voz disponibles con su teléfono, seleccione
MENÚ > Config. y Herram > Config. de llamadas > Servicios de voz y una de
las siguientes opciones:
Configuración de voz: ajuste la sensibilidad a su voz y las configuraciones para la
reproducción de sonidos. Seleccione una de estas opciones:
• Lista de resultados: controlar cuando aparecen las listas de opciones.
Cuando el reconocimiento de voz no está seguro de haber identificado un
nombre o número correctamente, aparecerá una lista con hasta tres opciones.
Seleccione de Automático, Mostrar siempre o No mostrar y pulse OK.
• Sensibilidad: controlar cómo el software de reconocimiento de voz determina
cuando una palabra coincide. Si recibe frecuentemente mensajes como "Favor
repetir..." o "No se encontró coincidencia," ajuste la sensitividad a Rechazar
Menos. Si recibe activaciones erróneas con frecuencia (cuando el teléfono
reconoce un nombre que no dijo), ajuste la sensitividad a Rechazar Más.
• Llamar número: adaptar la marcación de dígitos a su voz. Seleccione Adaptar
dígitos para mejorar el reconocimiento de voz de números telefónicos.
La adaptación toma unos sesenta segundos. Seleccione Restablecer dígitos
para borrar cualquier adaptación de dígitos hecha a las configuraciones de
fábrica. Si no ha adaptado dígitos, esta opción aparece sombreada.
113
Configuraciones y herramientas
• Audio: personalizar las configuraciones para reproducir nombres, configuraciones
de nombres y números. Seleccione Mensajes del sist., Números o Nombres para
activar o desactivar la reproducción asociada. Seleccione Config. de nombres>
Velocidad > Más rápido o Más despacio para cambiar la velocidad de la
reproducción de nombre. Seleccione Config. de nombres > Volumen > Más
alto o Más bajo para cambiar el volumen de la reproducción de nombre.
• Acerca de: ver información sobre el software de servicios de voz.
Consulte www.voicesignal.com para obtener más información.
Adaptar dígitos: usar su voz para activar los servicios de voz para reconocer
cómo usted pronuncia los números. Cuando se le indique, repita la serie de
números que aparece en la pantalla. Este proceso toma unos sesenta segundos
aproximadamente. Deberá estar en una habitación en silencio cuando configure
esta opción. Consulte "Altavoz", pág. 77.
Esta opción también está disponible en Servicios de voz a través del menú
Configuración de voz > Llamar número > Adaptar dígito .
Memorandum de voz: crear un memorándum grabado. Puede insertar el
memorándum grabado como un sonido en un mensaje o usarlo como tono
de timbre o alerta. Consulte "Sonidos," p. 107.
Tonos al tacto
Los tonos al tacto o tonos DTMF, son emitidos al pulsar las teclas de su dispositivo.
Puede usar los tonos al tacto para muchos servicios telefónicos y automatizados,
como comprobar las cuentas bancarias y verificar los horarios de vuelos o para
ingresar su número del buzón de voz y contraseña.
Para configurar la duración del tono de las teclas y velocidad de reproducción de
los tonos al tacto, seleccione MENÚ > Config. y Herram > Config. de llamadas >
Tonos DTMF. Seleccione Normal para enviar un tono por un período fijo sin importar
por cuánto tiempo pulsa la tecla o Largo para enviar un tono continuo por el
tiempo que mantenga pulsada la tecla.
■ Formato de reloj
Para seleccionar el tipo de reloj que aparece en la pantalla standby, seleccione
MENÚ > Config. y Herram > Formato de reloj > Digital o Análogo. Seleccione
Desactivado si desea desactivar la función para mostrar el reloj.
114
Configuraciones y herramientas
■ ID de timbre
Para activar la ID de timbre y configurar el teléfono para mostrar el número del
contacto en su directorio que lo está llamando, seleccione MENÚ > Config. y
Herram. > ID de timbre > Activado o Desactivado.
■ ID de imagen
Para configurar la ID de imagen para aparecer cuando lo llama un contacto en
su directorio, seleccione MENÚ > Config. y Herram. > ID de imagen > Activado
o Desactivado.
115
Accesorios
9. Accesorios
Verifique el modelo del cargador antes de usarlo
con este dispositivo. Este dispositivo está diseñado
para su uso con el cargador AC-1004U para la
batería BL-6000C.
Advertencia: Utilice sólo baterías, cargadores y accesorios aprobados
por Nokia para este modelo particular. El uso de cualquier otro tipo de
batería, cargador o accesorio puede anular cualquier aprobación o
garantía y puede ser peligroso. Para obtener más información sobre la
disponibilidad de accesorios aprobados, comuníquese con su proveedor.
Algunas normas prácticas sobre los accesorios:
• Mantenga todos los accesorios fuera del alcance de los niños.
• Cuando desconecte el cordón eléctrico de cualquier accesorio, sujete el
enchufe, no el cordón.
• Verifique con regularidad que los accesorios instalados en un vehículo estén
bien montados y funcionen correctamente.
• Sólo personal calificado debe instalar accesorios complejos para automóvil.
Batería y Cargadores
• Batería 1100 mAh Li-Ion (BL-6000C)
• Cargador rápido (AC-1004U)
116
Información de referencia
10. Información de referencia
Este capítulo contiene información de seguridad y mantenimiento y especificaciones
para su producto.
■ Información sobre las baterías
Para instalar y reemplazar la batería, consulte "Cargar la batería," p. 75.
Su dispositivo recibe alimentación eléctrica a través de una batería recargable.
El rendimiento óptimo de una batería nueva se obtiene solamente después de dos
o tres ciclos completos de carga y descarga. La batería se puede cargar y descargar
centenares de veces pero con el tiempo se gastará. Cuando los tiempos de
conversación y de reserva son mucho más cortos que los normales, ya es momento
de adquirir una batería nueva. Utilice únicamente las baterías aprobadas por Nokia
y recárguelas sólo con los cargadores aprobados por Nokia para este dispositivo.
Si está usando una batería de repuesto por primera vez o si la batería no ha sido
usada por un tiempo prolongado, podría ser necesario conectar el cargador y
luego desconectar y reconectarlo para iniciar la carga de la batería.
Desconecte el cargador del enchufe eléctrico y del dispositivo cuando no esté en
uso. No deje la batería conectada al cargador por demasiado tiempo. La sobrecarga
puede acortar la vida útil de la batería. Si una batería completamente cargada no
se utiliza por un tiempo, se descargará paulatinamente. Las temperaturas extremas
afectan la habilidad de carga de su batería.
Utilice la batería solamente para el propósito para el que fue diseñada. No utilice
nunca el cargador o la batería si están dañados.
No cause cortocircuito en la batería. Puede producirse un cortocircuito accidental
si un objeto metálico como una moneda, clip o bolígrafo ocasiona la conexión
directa de los terminales positivos (+) y negativos (-) de la batería. (Éstas parecen
tiras metálicas en la batería). Puede ocurrir, por ejemplo, cuando lleva una batería
de repuesto en su bolsillo o cartera. El cortocircuito de las terminales puede
dañar la batería o el objeto que esté conectado a ella.
117
Información de referencia
Dejar la batería en lugares calurosos o fríos, como dentro de un automóvil cerrado y
expuesto a la intemperie veraniega o invernal reducirá su capacidad, vida útil y su
rendimiento de carga. Intente mantener la batería siempre entre los 15 °C y 25 °C
(59 °F y 77 °F). Un dispositivo con la batería demasiado caliente o fría puede dejar
de funcionar temporalmente, aun cuando la batería se encuentre completamente
cargada. El rendimiento de la batería se ve particularmente limitado en temperaturas
inferiores al punto de congelación.
No arroje las baterías al fuego, puesto que pueden explotar. También pueden
explotar si están dañadas. Elimine las baterías conforme a las normativas
locales. Recíclelas siempre que sea posible. No las deseche junto con los
desperdicios domésticos.
118
Cuidado y mantenimiento
Cuidado y mantenimiento
Su dispositivo es un producto de diseño y fabricación excelentes y debe tratarse con
cuidado. Las sugerencias que se incluyen a continuación le ayudarán a proteger la
cobertura de su garantía y disfrutar de este dispositivo por muchos años.
• Mantenga el dispositivo, así como sus piezas y accesorios, fuera del alcance
de los niños.
• Mantenga el dispositivo seco. La lluvia, la humedad y los líquidos contienen
minerales que pueden oxidar los circuitos electrónicos. Si su dispositivo se
moja, extraiga la batería y espere que el dispositivo se seque por completo
para volver a colocarla.
• No utilice ni guarde el dispositivo en lugares sucios o polvorientos. Las piezas
movibles y los componentes electrónicos podrían dañarse.
• No guarde el dispositivo en lugares calurosos. Las altas temperaturas pueden
reducir la vida útil de los dispositivos electrónicos, dañar las baterías y
deformar o derretir algunos tipos de plástico.
• No guarde el dispositivo en lugares fríos. Cuando el dispositivo recupera su
temperatura normal puede formarse humedad en su interior, la que puede
dañar las placas de los circuitos electrónicos.
• Abra siempre el dispositivo de acuerdo con las instrucciones que figuran en
este manual.
• No deje caer, golpee ni mueva bruscamente el dispositivo. Los manejos bruscos
pueden dañar las tarjetas interiores de circuitos y mecanismos delicados.
• No utilice productos químicos abrasivos, solventes de limpieza ni detergentes
para limpiarlo.
• No pinte el dispositivo. La pintura puede obstruir las piezas movibles e
impedir un funcionamiento apropiado.
• Use sólo un paño suave, limpio y seco para limpiar cualquier lente (como el
lente de la cámara y de los detectores de proximidad y de luz).
• Utilice sólo la antena suministrada o una de repuesto aprobada. El uso de
antenas, modificaciones o accesorios no aprobados podrían dañar el
dispositivo e infringir los reglamentos sobre el uso de dispositivos de radio.
• No use los cargadores a la intemperie.
Todas estas recomendaciones se aplican de igual manera para su dispositivo,
batería, cargador o cualquier accesorio. Si algún dispositivo no funciona, llévelo a
su centro de servicio especializado más cercano.
119
Información adicional de seguridad
Información adicional de seguridad
■ Entorno operativo
Su dispositivo y accesorios pueden contener partes pequeñas. Manténgalos fuera
del alcance de los niños.
Respete la normativa especial vigente en la zona donde se encuentra y siempre
apague su dispositivo cuando esté prohibido utilizarlo o cuando su uso pueda
causar interferencia o peligro. Use el dispositivo en su posición normal de
funcionamiento. Este dispositivo reúne las normas de exposición RF cuando es
usado en su posición normal de funcionamiento cerca del oído o portado a una
distancia mínima de 2,2 centímetros (7/8 de pulgadas) del cuerpo. Al portar el
teléfono en accesorios como un estuche, clip de cinturón o soporte, utilice sólo
accesorios que no contengan metal y que coloquen el dispositivo a la distancia
arriba indicada del cuerpo.
Para transmitir mensajes o archivos de datos, este dispositivo requiere una
conexión de calidad a la red. En algunos casos, la transmisión de archivos de
datos o mensajes puede demorarse hasta que esté disponible la conexión
adecuada. Asegúrese de seguir las instrucciones anteriores sobre las distancias
de separación hasta que la transmisión haya finalizado.
■ Dispositivos médicos
Los aparatos de transmisión de radio, incluso los teléfonos móviles, pueden
interferir con el funcionamiento de dispositivos médicos que no estén protegidos
adecuadamente. Consulte con un médico o con el fabricante del dispositivo
médico si tiene alguna pregunta o para determinar si esta correctamente
protegido contra las señales externas de radiofrecuencia. Apague el dispositivo
en los lugares específicos de los centros de salud donde se le indique. Es probable
que en los hospitales y centros de salud se utilicen equipos sensibles a las señales
externas de radiofrecuencia.
Marcapasos
Los fabricantes de marcapasos recomiendan que se mantenga una separación
mínima de 15,3 centímetros (6 pulgadas) entre un dispositivo o teléfono móvil y
el marcapasos a fin de minimizar la potencia para interferencias. Estos consejos
provienen de la investigación independiente y recomendaciones de la Investigación
tecnológica en telefonía móvil (Wireless Technology Research). Para minimizar la
potencia para interferencias, las personas que llevan marcapasos:
• Deben mantener siempre una distancia de más de 15,3 centímetros
(6 pulgadas) del marcapasos.
120
Información adicional de seguridad
• No deben llevar el dispositivo en el bolsillo superior de la camisa.
• Deben utilizar el dispositivo en el oído contrario al marcapasos para reducir
las posibles interferencias.
Si tiene alguna razón para sospechar que existen interferencias, debería apagar
inmediatamente su dispositivo.
Aparatos auditivos
Algunos dispositivos móviles digitales pueden interferir con determinados
aparatos auditivos. En ese caso, comuníquese con su proveedor de servicios.
■ Vehículos
Las señales de RF pueden afectar los sistemas electrónicos de vehículos de motor que
no estén bien instalados o protegidos, como los sistemas electrónicos de inyección
directa, sistemas electrónicos de frenos antirresbalantes (antibloqueo), sistemas
electrónicos de control de velocidad o sistemas de bolsas de aire. Para obtener más
información, verifique estos aspectos con el fabricante o el representante de su
vehículo o de los equipos que haya incorporado posteriormente.
Sólo personal especializado debe reparar el dispositivo o instalarlo en un vehículo.
Si la instalación o reparación no es correcta puede resultar peligrosa y anular
cualquier garantía aplicable al dispositivo. Compruebe con regularidad que el
equipo completo del dispositivo móvil de su vehículo esté correctamente montado
y funcionando debidamente. No almacene ni transporte líquidos inflamables,
gases o materiales explosivos en el mismo compartimiento destinado al dispositivo,
sus piezas o accesorios. Para los automóviles con bolsas de aire, recuerde que
éstas se inflan con mucha fuerza. No coloque objetos, incluso equipos instalados
o celulares en el área encima de la bolsa de aire o en la zona donde éste pueda
desplegarse. Si el equipo de telefonía móvil no está bien instalado y las bolsas de
aire se despliegan, puede ocasionar lesiones graves.
Las regulaciones de la FCC prohíben el uso de su dispositivo en un avión. El uso de
teledispositivos en un avión puede resultar peligroso para el funcionamiento del
avión, interrumpir la red del teléfono móvil y puede ser ilegal.
■ Entornos potencialmente explosivos
Apague el dispositivo en áreas donde puedan producirse explosiones y obedezca
todas las señales e instrucciones. Las zonas con potencial explosivo incluyen las
zonas donde existan avisos reglamentarios requiriéndole que apague el motor de
su vehículo. Las chispas en tales zonas pueden producir explosiones o incendios
que pueden resultar en daño corporal o incluso la muerte. Apague el dispositivo
en lugares de abastecimiento de combustible como cerca de estaciones de
121
Información adicional de seguridad
servicio o gasolineras. Respete las restricciones de uso de equipos de radio en los
depósitos de combustible, áreas de almacenamiento y distribución de combustible,
plantas químicas o lugares donde se realicen explosiones. Las zonas en entornos
donde pueden suceder explosiones suelen estar marcadas, pero no siempre con
claridad. Estas incluyen zonas bajo cubierta de los barcos, instalaciones de
transferencia o almacenamiento de productos químicos, vehículos que usan gas
de petróleo licuado (como propano o butano) y áreas donde el aire contiene
elementos químicos o partículas como grano, polvo o partículas metálicas.
El incumplimiento de estas instrucciones puede resultar en la suspensión o
denegación de los servicios de teléfonos celulares al infractor y/o iniciar acción
legal en su contra o ambas medidas.
■ Llamadas de emergencia
Importante: Los teléfonos móviles, incluso este dispositivo, funcionan
usando señales de radio, redes inalámbricas, redes terrestres y funciones
programadas por el usuario. Por lo tanto, no se puede garantizar que la
conexión funcione en todas las condiciones. Nunca dependa solamente
de cualquier dispositivo celular para comunicaciones esenciales, por
ejemplo, emergencias médicas.
Para realizar una llamada, asegúrese que su dispositivo tenga la suficiente carga
antes de intentar hacer cualquier llamada de emergencia. Si su batería se descarga,
no podrá recibir o realizar llamadas, incluso llamadas de emergencia y deberá
esperar unos minutos tras comenzar el proceso de carga para realizar su llamada.
1. Pulse la tecla Finalizar tantas veces como sea necesario para borrar la
pantalla y preparar el dispositivo para las llamadas.
2. Ingrese el número de emergencia oficial de su ubicación actual y pulse la
tecla Enviar. Los números de emergencia pueden variar en cada localidad.
Si algunas funciones están activas, puede que necesite desactivarlas antes de
poder efectuar una llamada de emergencia. Para obtener más información,
consulte este manual o a su proveedor de servicios.
Cuando realice una llamada de emergencia, recuerde dar toda la información
necesaria de la forma más exacta posible. Su dispositivo móvil puede ser el único
medio de comunicación en un accidente. No finalice la llamada hasta que reciba
instrucciones de hacerlo.
122
Información adicional de seguridad
■ Información de certificación (SAR)
ESTE DISPOSITIVO MÓVIL CUMPLE CON LAS NORMAS PARA EXPOSICIÓN A
ONDAS DE RADIO.
Su dispositivo móvil es radiotransmisor y receptor. Está diseñado y fabricado para
no sobrepasar los límites de exposición a ondas de radio recomendados por las
normas internacionales. Las normas fueron desarrolladas por organizaciones
científicas independientes ICNIRP e incluyen un margen de seguridad considerable,
establecido para garantizar la seguridad de todas las personas, independientemente
de su edad o estado de salud.
La norma de exposición para dispositivos móviles emplea una unidad de medida
denominada Specific Absorption Rate o SAR (Tasa de Absorbencia Específica - TAE).
El límite SAR estipulado en las normas internacionales ICNIRP es de 2,0 vatios/
kilogramo (V/kg) promediado sobre 10 gramos de tejido corporal. Las pruebas
SAR son efectuadas mediante su uso en posiciones estándar, con el dispositivo
transmitiendo al nivel más alto de potencia certificado en todas las bandas de
frecuencia comprobadas. El nivel SAR actual de un dispositivo en funcionamiento
puede estar muy debajo del valor máximo puesto que el dispositivo es diseñado
para usar sólo la potencia requerida para alcanzar la red. La cantidad cambia
dependiendo de un número de factores como su proximidad a una estación base
de red. El valor SAR máximo bajo las normas ICNIRP para uso de este dispositivo
junto al oído es de 0,79 V/kg.
El uso de accesorios puede resultar en diferentes valores SAR. Los valores SAR
pueden variar según los requisitos de información y evaluación nacionales y de la
banda de red. Puede obtener información adicional sobre el SAR en la sección de
información de productos en www.nokia.com.
Su dispositivo móvil también esta diseñado para reunir los requisitos establecidos
por la Comisión Federal de Comunicaciones (EE.UU.) y la Industria Canadiense.
Estos requerimientos establecen un límite SAR de 1,6 V/kg promediado sobre
un gramo de tejido corporal. El valor SAR máximo informado bajo este estándar
durante la certificación de producto para uso junto al oído es de 1,27 V/kg y cuando
está debidamente en contacto con el cuerpo es de 0,80 V/kg. Puede obtener
información acerca de este modelo de dispositivo en http://www.fcc.gov/oet/fccid
al buscar en el sistema de autorización del equipo FCC ID: QMNRM-142.
123
Información adicional de seguridad
■ Información técnica
Designación de tipo: RM-142
Dimensiones: ancho 48,0 mm; longitud 101,0 mm; espesor 25,4 mm
Peso: 133g con batería 1100 mAh Li-Ion (BL-6000C)
Pantalla: 176x220 píxeles, 262K colores
Cámara: 1,3 megapíxeles integrados con zoom digital y flash
Redes móviles: CDMA 800 MHz y CDMA 1900 MHz, CDMA2000 1xRTT, 1xEV-DO
Rango de frecuencia (Tx): PCS: 1851.25–1908.75 MHz,
Celular: 824.70-848.37 MHz
Rango de frecuencia (Rx): PCS: 1931.25–1988.75 MHz,
Celular: 869.70–893.37 MHz
Frecuencia GPS: 1575.42 MHz
■ Información sobre las baterías
Esta sección provee información acerca de los tiempos de carga de la batería con
el cargador rápido, tiempos de conversación y tiempos de reserva. Dicha información
está sujeta a cambios. Para obtener más información, comuníquese con su
proveedor de servicios.
Tiempos de carga
Los siguientes tiempos de carga son estimaciones con la batería
BL-6000C de Li-Ion 1100 mAh:
Cargador rápido: hasta 3,5 horas
Tiempos de conversación y de reserva
Los tiempos de funcionamiento son sólo aproximados y dependen de varios
factores, como: intensidad de la señal, uso del teléfono, condiciones de la red,
funciones usadas, la condición y vida útil de la batería (incluso el procedimiento
de carga), temperaturas a las cuales se expone la batería y muchos otros factores.
Tiempo de conversación: hasta 3,5 horas (digital)
Tiempo de reserva: hasta 10 días
124
Índice
Índice
A
C
acceso
soluciones 68
web 68
accesorios 116
accesos directos 70
acerca de su teléfono 67
agenda 105
alarma 106
altavoces 69
altavoz 77
antena 73
aparatos auditivos 121
auricular 75, 77
avisos 92
ayuda 68, 85
calculadora 106
propina 107
calendario 105
cámara 83
caracteres 87
cargador
conectar 75
tiempos 124
cargadores
información 117
certificación (SAR) 123
chat, mensajes 96
código de bloqueo 110
configuraciones 96
configuraciones de datos 113
configuraciones de llamadas
marcación rápida 112
modo TTY 112
opciones de respuesta 111
reintento automático 111
restricciones 112
servicios de voz 113
tonos DTMF 114
voz confidencial 112
configuraciones de red 109
configuraciones y herramientas 105
contactos 99
marcación por voz 100
nuevos 99
número predeterminado 100
números con pausas 100
números múltiples 99
B
batería
cambiar 73
cargar 75
información 124
retirar 74
tiempos de carga 124
tiempos de conversación 124
tiempos de reserva 124
baterías y cargadores 117
bloc de notas 106
borradores 95
borrar todos 98
opciones 95
buzón de entrada 92
borrar mensajes 98
125
Índice
correo de voz 95
cronómetro 103
cubierta posterior, retirar 74
cuidado y mantenimiento 119
D
datos
configuraciones 113
descargar
fotos 84
información 85
juegos 84
videos 84
designación de tipo 124
desplazamiento 72
devolución de llamadas 97
dimensiones 124
dispositivo, información 110
dispositivos médicos
aparatos auditivos 121
marcapasos 120
DTMF, tonos 114
duración de las llamadas 103
E
editar mensajes 89
e-mail 96
EMS 92
enviados, mensajes 98
enviar mensajes 93
ERI 108
escribir y enviar mensajes 88
ESN 68
esquemas de colores 109
eventos, programar 105
F
facturación 68, 103
firma 97
126
FLIX, mensajes 91
formato de reloj 114
fotos
cámara 83
descargar 83
función silenciador 94
función silenciar 79
G
galeria de fotos 84
Get Fun & Games 84
Get Going 85
Get It Now 82
Get News & Info 85
Get News and Info 85
Get PIX & FLIX 83
Get Tunes & Tones 82
grabaciones 82
grupos de llamantes 101
H
herramientas y configuraciones 105
I
ID de imagen 84, 115
ID de llamadas 78
ID de timbre 115
idioma 111
IM móvil 96
imagen de fondo 108
indicador mejorado de roaming
(ERI) 108
indicadores e iconos 71, 110
información de certificación 123
información de contacto 68
información de cuenta 105
información de memoria 85
información de referencia 117
información técnica 124
Índice
ingreso de texto 80, 97
modo de ingreso 80
modo numérico 81
modo T9Word 80
Internet inalámbrica
hacer llamada de emergencia 85
J
juegos 84
L
linterna 70
lista de contactos 100
llamada
auricular 77
contestar 77
cronómetro 103
duración 103
emergencia mientras está
en línea 85
modo de vibración 78
número devolución 97
opciones durante una llamada 79
pausas 100
realizar 76
silenciar 78, 79
llamadas de emergencia 122
llamadas recientes 103
llamantes, grupos 101
luz de fondo 108
M
maestro, volumen 107
marcación por voz 77, 100
marcación rápida 102, 112
marcapasos 120
mensaje
configuraciones 96
opciones 98
responder 92
mensajería instantánea 96
mensajes
borradores 95
borrar 98
buzón de entrada 92
caracteres 90, 91
chat 96
componer 88, 89
correo de voz 95
de video 91
e-mail 96
EMS 87, 92
enviados 93
IM móvil 96
MMS 87, 92
opciones 90, 91, 92
opciones para 94
segmentos 87
SMS 92
tamaño 87
texto 87
texto rápido 97
mensajes de texto 88
editar 89
escribir y enviar 88
mensajes de video 91
mensajes FLIX
configuraciones 97
mensajes PIX
configuraciones 97
mensajes PIX & FLIX
formatos 88
mensajes TXT 87
mi cuenta 105
MMS 92
modo Abc 81
modo de entrada 97
modo de ingreso 80, 81
modo de vibración 78
modo estándar 81
127
Índice
modo numérico 81
modo silencio 78
modo standalone 109
modo standby 70
modo T9Word 81
modo TTY 112
N
NAM, seleccionar 109
normas de uso 86
notas 106
noticias e información 85
número predeterminado
contactos 100
O
opciones
borradores 95
buzón de entrada 92
lista de contactos 100
llamadas recientes 103
mensaje 98
mensaje de imagen 83
mensajes de texto 89
mensajes de video 91
mensajes enviados 94
P
pantalla
esquemas de colores 109
imagen de fondo 108
luz de fondo 108
protector de 109
tipos de letras 109
título 108
pantalla de inicio 70
pausas na llamada 100
PIX & FLIX, mensajes 87
PIX, mensaje 90
propina, calculadora 107
128
protección de copyright 86
protector de pantalla 109
R
recientes, llamadas 103
reconocimiento de voz 77
redes móviles 124
reloj despertador 106
reloj mundial 106
remarcación 111
responder mensaje 92
respuesta, opciones 111
restricción de llamadas 112
S
SAR, certificación 123
seguridad 66, 110
información importante 120
web 86
servicio al cliente 68
servicios de red 67
servicios de voz 77, 113
sistema 109
idioma 111
información de dispositivo 110
modo standalone 109
seguridad 110
seleccionar 109
seleccionar NAM 109
ubicación 110
SMS 92
sonidos
alerta 107
formatos para PIX & FLIX 88
llamada 107
mensajes de imagen 90
reprodución 114
tapa 107
soporte Nokia 68
Índice
T
V
T9Word 80
tecla de acceso directo 107
tecla de desplazamiento 70
teclas de selección 72
tecleos múltiples 81
teléfono
encender o apagar 75
programar 73
texto rápido 97
texto, mensajes 87
tiempos de conversación
y de reserva 124
tipos de letras 109
título 108
tomar fotos 83
tonos al tacto 114
tonos de timbre 82
TTY, modo 112
V CAST 82
ver
buzón de entrada 92
llamadas perdidas 103
llamadas recientes 103
versión de software 110
video
descargar 83
formatos para PIX & FLIX 88
galeria 84
grabar 83
nuevo mensaje 91
volumen
ajustar 78, 107
auricular 107
maestro 107
voz confidencial 112
U
W
WAP 92
ubicación
información 110
129
Notas
130
Notas
131
Notas
132
Notas
133
Notas
134
Notas
135
Nokia 6305i User Guide
9242631
136