1
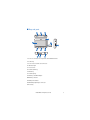
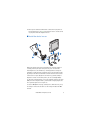
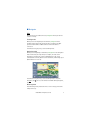
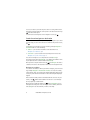
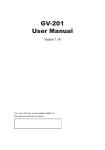
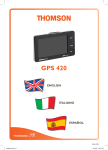
Nokia 500 Auto Navigation
Getting Started Guide
Issue 1 EN
DECLARATION OF CONFORMITY
Hereby, NOKIA CORPORATION declares that this PD-14 product is in compliance
with the essential requirements and other relevant provisions of Directive 1999/
5/EC.
The product is in conformity with the limits defined in Directive 2004/104/EC
(amending Directive 72/245/EEC), Annex I, paragraph 6.5, 6.6, 6.8 and 6.9.
A copy of the Declaration of Conformity can be found at http://www.nokia.com/
phones/declaration_of_conformity/.
At the time of production of this document, the FM transmitter part of this
product is intended for use in the following countries: Belgium, Czech Republic,
Denmark, Estonia, Finland, Germany, Iceland, Liechtenstein, Luxembourg,
Norway, Portugal, Spain, Switzerland, Sweden, Turkey, United Kingdom. For the
latest information, refer to http://www.nokia.com.
© 2008 Nokia. All rights reserved.
Nokia and Nokia Connecting People are registered trademarks of Nokia Corporation. Other
product and company names mentioned herein may be trademarks or tradenames of their
respective owners.
Reproduction, transfer, distribution, or storage of part or all of the contents in this document
in any form without the prior written permission of Nokia is prohibited.
Issue 1 EN
■ Introduction
You can use the Nokia 500 Auto Navigation device for GPS navigation in
a car and outdoors. You can also make calls, view photos, watch videos,
and listen to music.
This guide briefly describes the setup and basic features of the
navigation device. Before using the device, carefully read the user guide
on the DVD that is supplied with the device. The user guide provides
important safety and maintenance information.
2
© 2008 Nokia. All rights reserved.
■ Keys and parts
1
2
3
4
5
9
10
6
7
11 12
8
13
1. Cover of connector for an optional external GPS antenna
2. Power key
3. Cover of stereo audio-out connector
4. Indicator light
5. Touch screen
6. Volume down key
7. Menu key
8. Volume up key
9. Memory card with adapter
10.Memory card slot
11.Main power switch
12.Mini USB port/charger connector
13.Reset key
© 2008 Nokia. All rights reserved.
3
■ First use
1. To switch on the device, slide the main power switch to the right.
In daily use, use the standby mode instead of switching the device
off. This way the device starts up faster. To set the device to (or to
exit) the standby mode, press and hold the power key for about 3
seconds.
2. When you are asked to calibrate the screen, tap and briefly press the
displayed crosshair with your finger. Repeat this as the crosshair
moves around the screen.
3. When you are asked to select the language, tap the desired language
and . The language is used for display texts and spoken navigation
instructions.
4. Carefully read and accept the displayed safety notice, and tap the
right arrow. The Navigator application starts and the map view is
displayed. Now you can start to use the device.
5. To set the date and time (including time zone and daylight saving),
press the menu key, and tap Setup.
■ Set up Bluetooth connection
1. Switch on the navigation device and your compatible mobile phone.
2. Activate the Bluetooth feature on your phone. See the user guide of
your phone for instructions.
3. On the navigation device, press the menu key, and tap Phone.
4. When the device asks you to start pairing from your phone, set your
phone to search for Bluetooth devices, and select the navigation
device (Nokia PND) from the list of found devices on your phone.
5. Enter the passcode 0000 on your phone to pair and connect the
navigation device to it.
In some phones you may need to make the connection separately
after pairing. See the user guide of your phone for details.
4
© 2008 Nokia. All rights reserved.
6. When you are asked to download the contacts from your phone to
the navigation device, tap Yes if you want to use the contacts saved
in your phone with the navigation device.
■ Install the device in a car
2
3
5
4
1
6
Attach the mobile holder to the mounting device using the supplied
screw (1), and snap the protection plate into place. To attach the
mounting device to the windscreen, carefully push the locking lever
toward the cup (2). Insert the navigation device into the mobile holder
(3), and press the device backwards so that the two arms of the holder
lock the device in place (4). (To release the device, push the arms.) To
adjust the vertical or horizontal position, use the screws (5) and (6).
To charge the internal battery, connect the supplied charger to the mini
USB port on the navigation device, and insert the charger plug into the
12 V cigarette lighter socket of your car.
To use the TMC (traffic message channel) service with the device, keep
the charger connected to the device as the charger includes the TMC
antenna.
© 2008 Nokia. All rights reserved.
5
■ Basic operation
Touch screen
To use most features of the device, tap the screen with your finger.
Important: Avoid scratching the touch screen. Never use a pen
or pencil or other sharp objects to write on the touch screen.
Open applications from map screen
When you switch on the device, the map screen is displayed. This screen
shows the map view of the Navigator application.
To show or hide the application menu, press the menu key. To open an
application from the menu, tap its icon. The device includes the
following applications:
• Navigator (
) for GPS navigation
• Phone ( ) to make and answer calls using the mobile phone
connected to the device
• Music (
) to play songs saved on the memory card
• Gallery ( ) to view photos and watch video clips saved on the
memory card
• Setup (
) to adjust settings and view information about the device
To return to Navigator from other applications, press the menu key.
To return to the previous screen in any application, tap
.
To adjust the volume for the current application, press (or press and
hold) the volume up (+) or down (-) key.
The status indicators displayed in the upper right corner of the map
screen show the status of the GPS, Bluetooth, and TMC connection, and
the charge level of the internal battery.
6
© 2008 Nokia. All rights reserved.
■ Navigator
Map
When the device has a GPS connection, Navigator shows your current
location on a map.
Tracking mode
When you are not navigating to a destination, Navigator is in the
tracking mode. In this mode, the map shows, for example, your GPS
position and the number of GPS satellites to which the device is
connected.
To browse the map, tap it to go to the browsing mode.
Navigation mode
When you are navigating to a destination, Navigator is in the navigation
mode. In this mode, the map shows, for example, the route to the
destination, current street, next street (and distance to it), speed,
estimated time of arrival, distance to the destination, and average speed
(if this function is set to on).
To browse the map, tap it to go to the browsing mode. To stop the
navigation, tap . To access the functions available during navigation,
tap
.
Browsing mode
In the browsing mode, the bottom of the screen is orange, and north is
always on the top.
© 2008 Nokia. All rights reserved.
7
To select a location, zoom the map in or out if necessary, and move the
map with your finger until the cursor points to the desired location. Tap
and the desired option.
To return to the tracking mode or the navigation screen, tap
.
Search for and navigate to a destination
You can search for a destination, for example, to navigate to it, to show
it on the map, or to save it for later use. To return to the previous screen,
tap .
To navigate to a destination, press the menu key, and tap Navigator >
Destination and one of the following:
• Address — you can enter the address of the destination. See
“Navigate to an address,” p. 8.
• POI search — you can search for the desired point of interest. See
“Navigate to a point of interest,” p. 9.
You can also navigate to a recently visited location (Recent), a
previously saved location (Favourites), or an address saved with a name
in your phonebook if it contains addresses (Contacts).
After you have set up the destination, tap
and Navigate. The device
calculates the route to the destination and enters the navigation mode.
Navigate to an address
To search for an address to which you want to navigate, press the menu
key, and tap Navigator > Destination > Address. To select the country,
city (or postal code), street, and house number (optional), tap the fields
one by one, and enter the information in this order using the displayed
keypad.
Enter characters until you have narrowed down the search to only one
result, or tap
and the desired address on the list. To scroll through
the list, tap the up or down arrow.
When you have found the address, tap
in the Find address screen,
and tap the desired option. You can navigate to the address, add it to a
route (Via), save it as a bookmark, or view it on the map.
8
© 2008 Nokia. All rights reserved.
Navigate to a point of interest
You can search for a point of interest located near the desired location.
To navigate to a point of interest, press the menu key, and tap
Navigator > Destination > POI search. The starting point (usually your
current location) of the search is shown at the top of the screen. To
change the starting point, tap Where? and then Address to enter the
address, Favourites to select a previously saved address, or GPS position
to set your current location as the starting point.
Tap the category and subcategory for the point of interest. Alternatively,
tap , enter the name of the point of interest, and tap .
A list of found points of interest is displayed. The list is sorted by the
distance to the starting point. Tap the desired point of interest and the
option that you want to use.
Plan a route
You can plan your route in advance, also without GPS connection.
To plan a route, press the menu key, and tap Navigator > Destination.
Select the start point for the route in the same way as a destination, and
add it to the route (Via). When you tap Via, Destination list is displayed.
To add a waypoint to the route, tap +, and select the location in the
same way as a destination. To delete a stopover from the trip, tap the
stopover on the list and .
After you have set up the route, tap
and Routing. After the route has
been calculated, a route summary is displayed. To view a detailed
waylist, tap the right arrow. To view the waypoints on the map, tap the
right arrow again. To move to the previous or next waypoint, tap the
arrow at the left or right side of the waypoint name. To return to the
previous screen, tap the left arrow.
Navigation settings
Press the menu key, and tap Navigator > Settings and one of the
following:
© 2008 Nokia. All rights reserved.
9
• General settings — You can select, for example, a voice for
navigation instructions (VoiceSkin), the distance unit, and how the
device reacts to TMC messages (Automatic, Manual, or Off).
• Map settings — You can select, for example, the 2D or 3D view and
toggle between the night and day modes.
• Route settings — You can select, for example, the desired mode of
transportation and define the routing settings, such as allow or avoid
motorways.
■ Call handling
To connect the device to your phone using Bluetooth wireless
technology, press the menu key, and tap Phone >
.
Call a saved contact
To call a contact that you have downloaded from your mobile phone,
press the menu key, and tap Phone > Contacts.
Enter the desired name using the displayed keypad. Tap
or the name
list. To view the phone numbers saved with a name, tap the name. To call
a phone number, tap it.
To change the way contacts are sorted, or to download contacts from
the currently connected mobile phone, press the menu key, and tap
Phone > Settings > Sort order of contacts or Contacts download.
Other calling methods
To make a call, you can also use other dialling methods. Press the menu
key, tap Phone, and proceed in one of the following ways:
• To enter the phone number, tap Dial pad, and key in the number. To
call the number, tap
. To end the call, tap
.
• To call the last dialled number, tap Dial pad >
register > Redial.
, or tap Call
• If your phone supports voice dialling with the navigation device, tap
Voice dial to call a phone number saved in your phone using voice
dialling.
10
© 2008 Nokia. All rights reserved.
• To speed dial a phone number, tap Favourites to access the speed dial
list. To make a call, tap the desired contact. To assign a new contact,
tap <assign>. To change a contact, tap .
Answer a call
To answer an incoming call, tap
. To reject the call, tap
.
To view the map and minimise the in-call options screen during a call,
press the menu key. is displayed in the top right corner of the screen.
To open the in-call options screen, tap .
■ Music player and FM transmitter
To play songs that you have saved on the memory card, press the menu
key, and tap Music.
To play a song, tap
, the desired folder and song, and
.
The device has an FM transmitter that you can use to listen to music
from the Music application through your FM car radio system. The FM
transmitter can also be used for phone calls. Tap
to activate the
transmitter, and select the desired frequency. Select the same frequency
on your car radio.
© 2008 Nokia. All rights reserved.
11