1
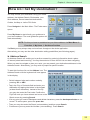
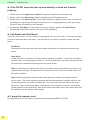
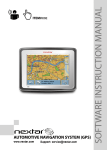
GV-201 User Manual Version 1.1A You can stick the serial number label of Navigation software in below: Table of Content Chapter 1 Features and Specification�����������������������������������������������������������1 Features����������������������������������������������������������������������������������������������������������������������������2 Specification����������������������������������������������������������������������������������������������������������������������3 Overview���������������������������������������������������������������������������������������������������������������������������5 Detailed Hardware Functions��������������������������������������������������������������������������������������������6 Chapter 2 Getting Started�����������������������������������������������������������������������������7 Download Application Software to memory card���������������������������������������������������������������8 Attach GV-201 to Car Holder������������������������������������������������������������������������������������������ 11 Connecting the Car charger��������������������������������������������������������������������������������������������12 Chapter 3 Software Application�������������������������������������������������������������������13 System menu������������������������������������������������������������������������������������������������������������������14 Photo View����������������������������������������������������������������������������������������������������������������������14 Movie Playback���������������������������������������������������������������������������������������������������������������15 MP3 Player����������������������������������������������������������������������������������������������������������������������15 Setup�������������������������������������������������������������������������������������������������������������������������������17 Chapter 4 Navigation Application����������������������������������������������������������������19 Quick Start����������������������������������������������������������������������������������������������������������������������20 Navigate to an address���������������������������������������������������������������������������������������������������20 Navigation Screen�����������������������������������������������������������������������������������������������������������21 Rich Guidance Options���������������������������������������������������������������������������������������������������22 First Settings�������������������������������������������������������������������������������������������������������������������22 Advanced Settings����������������������������������������������������������������������������������������������������������23 Main Menu Contents�������������������������������������������������������������������������������������������������������23 How Do I Set My Destination?����������������������������������������������������������������������������������������25 How Can I Plan My Route?���������������������������������������������������������������������������������������������28 How Do I Select Addresses on the Map?������������������������������������������������������������������������29 Chapter 5 Troubleshooting��������������������������������������������������������������������������31 Chapter 1 Features and Specification 1 Chapter 1 : Features and Specification Features • • • • • • • • Complete car navigation solution in one box including car mount Simple touch-screen operation 4.0” screen, 65536 colors, bright TFT LCD Smart and easy: - Attach, switch it on and go - Large Function icons design for easy touched - User-Friendly keypad - Clear, high quality voice-guided instruction - Powered by cigarette lighter or long-life rechargeable battery - Easy to be mounted and removed Built-in antenna; MMCX-type connector for optional external antenna SD storage card expansion slot Supports MP3 and Movie file (dat and mpg format) Playback Function Supports Photo View Chapter 1 : Features and Specification Specification ► Hardware Processor: Samsung S3C2410 266Mhz 32 bits RISC Mobile Application Processor Screen: 4.0”, 320×240 pixel, 65536 colors TFT LCD System Memory: 64 MB SDRAM, 64MB Flash Memory Battery: Rechargeable 1300 mAh Li-ion battery One DC-IN jack: DC 4.6V~5.4V , 2A, Charging Time: 3hrs GPS Receiver: SiRF Star III High sensitivity chipset 20 channels “All-in-view” tracking Built-in active antenna MMCX-type connector for optional external antenna Hot start, 1 sec average Warm start, 38 sec average Cold start, 42 sec average Reacquisition, 100 ms Display Interface: 4.0 Diagonal - 320x240 pixel, color TFT LCD Touch Screen Support Back light specification: 250 cd/m² Audio Interface: Audio Codec: 24 bit codec Sound: Internal mono loud speaker 3.5mm DIA stereo earphone jack output 1W speaker amplify SD Expansion Slot: SD card for maps/application storage External power: Cigarette plug or universal adapter USB Port: USB 1.1 Physical Size: 90mm (H) * 135 mm (W) * 29.4 mm (D) Buttons: Power Key, System Menu, Mute, Zoom In, Zoom Out, Volume +, Volume –, Reset Key (S/W reset) ; [Power Key + Reset Key] (H/W reset) 1 ► Software Microsoft Windows CE.Net 4.2 Core version Application Software, Navigation Software and Map data (Europe or North America map) SD card download the maps data from PC (DVD-ROM) via the card reader Solutions: Car Navigation, MP3 Player, Movie Playback (.mpg, .dat) Function, Photo View Chapter 1 : Features and Specification System UI language Navigation software UI and voice command English, German, French, Italian, Spanish, Dutch English, German, Italian, Portuguese, Danish, Norwegian, Turkish, French, Spanish, Dutch, Swedish, Finnish, Accessories • GV-201 (including a stylus) • Car holder • USB cable • AC adapter • Car charger Chapter 1 : Features and Specification Overview 1 system menu button mute button volume up zoom in status indicator volume down RESET button zoom out stylus SD card slot external antenna connector speaker power button earphone jack USB connector AC adapter jack Chapter 1 : Features and Specification Detailed Hardware Functions Power button Press the power button to turn on the GV-201, press it again to close any open windows and turn it off (enter a standby mode). NOTE: The GV-201 device needs about 2 seconds to enter the standby mode or come back to normal operating state. Thus, the power button may not function well if you continue to press it again within 2 seconds. Main Control Buttons System Menu Mute Zoom Out (Car Navigation Only) Zoom In (Car Navigation Only) Volume Down Volume Up Status Indicator charging: yellow blinking. charging completed: yellow. battery low: red. SD card slot The PC applications and map data can be stored in the SD card. RESET button Use the stylus tip to press down the reset button through the hole to reset the system. Earphone jack Plug the earphone or headset to the socket, you can listen to the navigation voice guide and enjoy your favorite MP3 music. USB Connector Connect the GV-201 to PC via a USB cable for data transfer. AC adapter jack Connect the external power connector by using car charger or AC Adaptor. External antenna connector For you to connect an optional MMCX-type external antenna. Speaker Allow the MP3 and Voice Navigation to played through the built-in speaker in the back side of the device. Stylus You can use the stylus pen instead of your finger to tap or input on the screen. Chapter 2 Getting Started 2 Before you start to use the GV-201, please connect it with the AC adapter and plug to power socket for battery charging. When it is in charging, the status indicator will be blinking. If the battery is fully charged, the status indicator will be lit on yellow. Chapter 2 : Getting Started Download Application Software to memory card ► You have 2 options to download the application software and map data to your SD card. Option 1 (card reader): Insert the SD card into your card reader which is connected to your PC. (If you have a card reader, we suggest that you use it for a better data tranfer rate.) Option 2 (ActiveSync): Insert the SD card into the GV-201 and use the provided USB cable to connect GV-201 with your PC. (Before you can use this method, you have to install the USB driver for GV-201 and the Microsoft ActiveSync. Please see the following note for details.) Note: Install the USB driver and Microsoft ActiveSync Turn on the GV-201. Insert the application DVD into the DVD-ROM drive. Use the provided USB cable to connect the GV-201 and PC. Windows will detect a New Hardware and pops up a dialog box for you to install the driver. Check the “Install from a list or specific location” item and click on Next button. Click on “Browse” button and locate the “USB_Driver” folder in the DVD. That’s where the USB driver files stored. Please follow the instruction to complete the driver installation. Chapter 2 : Getting Started If you do not have Microsoft ActiveSync installed in your PC, please do so by double click on the “MSASYNC.EXE” from the DVD. And follow the instruction to install Microsoft ActiveSync. 2 After the USB driver and ActiveSync are installed, please open a windows explorer and you will find a “SDMMC” folder under the Mobile Device icon. The SDMMC is the SD card drive on your GV-201. Hint: Follow this sequence will make your Windows to detect the GV-201 more easily: 1. Connect one end of USB cable to PC’s USB port first. 2. Turn on the GV-201. 3. Connect the other end of USB cable to GV-201. ► Insert the DVD into the DVDROM, the installation program will automatically start as shown on the right figure. (If your autorun feature is disabled, please manually execute this program by double click the "auto.exe" from the root directory of DVD.) Click on "Make System Disk" button to load the application software and default map file to the SD card. installation program ► If you use the Option 1 (card reader), just click on the drive letter of your SD card and click on "Start" button. ► If you use the Option 2 (ActiveSync), please select "Mobile Device", click on the "SDMMC" icon on the right, and click on "Start" button to begin to copy. ► When the copying process is finished, the SD memory card is ready for use. Chapter 2 : Getting Started ► If sometimes later you want to load the map of different area, you can click on the "Install MapMaker" button for this purpose. ► Select the area and the voicefile which you want to install, click "Next" button to continue. ► It will show a message box to ask if you are using the Card reader or Navigator (by ActiveSync). Click on the way you want and it will continue to complete the insatllation. 10 Chapter 2 : Getting Started Attach GV-201 to Car Holder release 2 lock 1. 2. 3. Put the GV-201 downward to the holder. Push the top of GV-201 inward to lock it in the clip. Attach the suction mount to the windshield and have the base of the device stabilized on the dashboard of your car. Attach the suction mount to the windshield. Let the base of the device stabilized on the dashboard of your car. ● It is suggested that you attach the car holder in the appropriate place in your car. Do not mount in front of an airbag panel or block the driver's vision. 11 Chapter 2 : Getting Started Connecting the Car charger 1. Connect one end of the car charger to the AC adapter jack of the device. 2. Connect the other end of the car charger to the cigarette lighter in the car. The green LED power indicator on the car charger will be on which indicates the power is supplied. 12 Chapter 3 Software Application 3 13 Chapter 3 : Software Application System menu The system menu screen controls the GV-201. All the main features can be accessed from the system menu with five icons. For these 5 programs on system menu, you can only run one of them at a time. When you switch to another program or press the “system menu button” on the device, the current program will be closed automatically. Photo View Navigation application Setup mode MP3 Player Movie Playback Photo View Click on the Photo icon in system menu to enter the Photo View program. All the image files on the GV-201’s memory cards will be searched for displaying. Any pictures found will be displayed as thumbnails as shown below. On the image window, tap the up button to display previous page, or down button to display next page. Tap the close button to exit the Photo View. To show an image in full screen mode simply select the picture by tapping on it, and then tap on the full screen button. In the full screen mode, it will automatically play each picture every 5 seconds. You can also manually tap the up and down buttons to view previous and next picture or tap close button on the left upper corner to exit the full screen mode. previous page full screen 14 close next page close previous picture next picture Chapter 3 : Software Application Movie Playback You can store your movie files in the memory card and play them on GV-201. The supported movie files must be encoded in mpg and dat format. The GV-201 has a full function media player, which has play, stop, pause, forward and rewind functions in the movie player control. To enter the Movie Playback function, just click on the Movie icon in system menu. Play / Pause Rewind Stop Full Screen Select movie file 3 Close Forward Page up Page down Select movie file by tapping on it. OK Cancel MP3 Player From the system menu, click on Music icon to enter the MP3 Player program. The GV-201 will scan the memory card for all the MP3 audio file. Play lists can be created from the audio files. All the songs are played sequentially from a play list. 15 Chapter 3 : Software Application ► Playback screen Previous song Create a Playlist Next song Play / Pause Random mode: Randomly playing the songs from the playlist. Stop Equalizer Sequential mode: Play the songs from the playlist sequentially. Normal mode: It stops playing at the end of the playlist. Repeat mode: Continue to play from the beginning of playlist. ► Create a Playlist Previous page Go back to Playback screen Add the highlighted song to playlist, the name of the song will be red. Highlight a song by tapping on it. Next page Remove the highlighted song from playlist, the name of the song will be black. Add all songs to playlist ► Equalizer The MP3 Player has 4 equalizer settings to suit the style of the music. To select the style, simply click the up or down arrow button to switch between Default, Classical, Rock and Metal mode. 16 Close Remove all songs from playlist Chapter 3 : Software Application Setup Click on the Setup icon from system menu, you can enter the setup mode to configure your GV-201. 3 Power setting Display the system information Backlight adjustment Set the language and time zone Screen correction Display the program version information ► About Display the program version information. ► Power From here you can see the remaining capacity of the battery. The auto shut down function is only valid when GV-201 is not connected to external power. If it is connecting to the AC adapter, the system will not be shut down even if you have checked this setting. Confirm the change Cancel 17 Chapter 3 : Software Application ► System Information Display the free memory card capacities and the firmware version information. ► Brightness You can change the backlight brightness by tapping on the two bulb icons. Tap the left bulb to make the screen darker, or the right bulb to make the screen brighter. Note: The backlight has 1~6 levels from left to right. For battery saving purpose, the brightness of level 4, 5 and 6 will be same if there is no external power connected. Confirm the change Cancel Confirm the change Cancel ► Regional Setting Set the User Interface language and the time zone. ► Screen If you perform a hard reset, a new calibration setting of the screen is required. Tap on the center of the cross mark, repeat the action when it appears on the four corners of the screen. 18 Chapter 4 Navigation Application 4 19 Chapter 4 : Navigation Application Quick Start This section will walk you through using your navigation unit for the first time, acquainting you with the basic operation of the navigation system. The functions and buttons not mentioned will be described later in this chapter. Switch the unit on and tap Navigation in the start screen. After the application loads the Main Menu (Home) will appear. Select Navigate to set your destination. The Finder menu opens. You have various ways to select your destination. The following section describes how to navigate to a specific address. Navigate to an address If you have the city and street address for your destination, simply enter it and the application will guide you directly there. Tap the Address icon. The Address Search screen with the keypad will now appear in the display. Switch between letter and number mode by pressing 123 or ABC. Tap in the City or Postcode field and enter your destination by tapping the letters in the keypad (at least three characters). Instead of the city you may also enter the Post code. Confirm the City/ Post code you have entered and move to the Street screen by pressing Search. If at any point you want to Backspace and delete characters, press the backspace button <- on screen. To add a space, press the space bar. Click on a city to go on. 20 Chapter 4 : Navigation Application Next, you may enter the Street and Number. Confirm and move to a list of matching address by pressing the Search button. NOTE: If you have an imprecise address, such as “Trafalgar Square, Lodon”, you can enter that as well, the only requirement is to enter some letters of the city name to begin your search. After a few seconds you will be presented with a Hit List of locations that match the address entered. Select the required address from the Hit List by tapping it. Once the system receives a GPS signal the guidance will commence automatically. The display will show the direction you need to travel and you will be given clear voice commands. 4 Navigation Screen The Navigation Map will now appear and will show the route in blue. The red arrow will indicate the direction of your next manoeuvre. A white arrow will identify your current position. When you come up to a turn or other manoeuvre, you will hear a voice command at the appropriate time. Distance to next turn Target Street Distance Bar Next turn Zoom out Zoom in Current Street Direction Current Position Number of Satellites Estimated Arrival Time Distance to Destination Car Speed Optical Distance Bar 21 Chapter 4 : Navigation Application Rich Guidance Options Touch the screen during the guidance to view the Navigation Options. NOTE: Guidance, including voice commands, will continue even as you are in the Options screen. You may save your GPS position as bookmark, record your route, look for latest traffic information, change your destination to a Point of Interest, etc. go to Settings Cancel and Go back to Navigation Screen Save Current GPS Position as Bookmark Show Guidance Option Alternate route Main Menu Point of Interest First Settings Switch the unit on and tap Navigation in the start screen. After a short period of time the Main Menu (Home) will appear. Choose Settings and then Guidance. The Route Settings window will be displayed. You can choose among the following options: Fastest or shortest route, pedestrian or car mode (and more), setting distance unit, allowance or avoidance of toll roads, highways, ferries and tunnels. To switch between the modes just touch the icons. These will toggle so you can quickly see the activated settings. With Back you go back to the Main Menu. 22 Chapter 4 : Navigation Application Advanced Settings From main menu, tap on Favorites, you can do the following advanced settings: • Tap on My Home, you can set, chane or delete your home address. • Tap on My Work, you can set, chane or delete your work address. • Via Bookmarks you can rename, delete or navigate to the favorite location in the bookmark list. 4 NOTE: All information like Settings, Bookmarks and also the Recent items will be stored on the memory card and not on the device. Main Menu Contents The interface of the Main Menu is coherent throughout the whole navigation system. Via the Main Menu you may access all functions. Start the navigation system by pressing Navigation in the start screen. After a short period of time the Main Menu will appear. ► If you want to start your route guidance straight away to the home address you have previously configured in the Settings menu (see section “Advanced Settings”), press My Home. 23 Chapter 4 : Navigation Application ► To choose another destination, select Navigate. You may then select your destination point from a Guide, by consulting a Map or Address Search, or via your personal bookmarks like Home or Work addresses. ► By selecting Plan route you switch to the advanced route planning options. There you may plan your route by choosing multiple stopovers. ► Via Settings you may determine following options: • Guidance Options: Fastest or shortest route and car or pedestrian mode. Furthermore you can allow or avoid toll roads, highways, ferries and tunnels. • Language Settings: Here you may select other languages. • Map Options: The currently used map data will be announced. If you have more countries on your memory card, you may switch to another country. ► Press Track to show your current GPS position. ► You may also explore a town/city or its surroundings on a Map (General Map) and select places or points of interest by tapping the map. You may also use these for navigation and for planning your route. ► With the POI finder you can quickly find Points of Interest nearby like gas stations and restaurants that are chosen from a database of millions of POI. ► In Favorites, you can store your favorite location as a list of bookmark, and also set your Home and Work location. At the bottom of the screen, your GPS status will be displayed all the time, showing the current street you are on and the number of satellites the GPS system is currently tracking. 24 Chapter 4 : Navigation Application How Do I Set My Destination? You may choose your destination using your Home address, the Address Search, Bookmarks, your Work address, Recent searched destinations, Guides, the Map or via the POI finder. Press Navigate in the Main Menu. The Finder menu opens. 4 Press My Home to start directly your guidance to your home address. The route guidance system will start automatically. NOTE: For this you have to predetermine your Home address via Main Menu Favorites My Home Set Home Position. Via Back you may always step one level back throughout the whole application. Alternatively you may use the other destination setting possibilities (see following pages): ► Address Search An Address Search will enable you to perform a search by entering information about a place of interest (street and town/city). You may then select a hit from the Hit List and start navigating. When you want to navigate or plan your route, you may search your destination addresses in the Address Search. Alternatively, you may wish to pinpoint a specific location. To start this function click on the Address icon. The Address Search with the keyboard will now appear in the display. • Switch between letter and number mode by pressing 123 or ABC. • Tap in the City or Postcode field and enter your destination by tapping the letters in the keypad (at least three characters). Instead of the city you may also enter the Post code. Confirm the City/Post code you have entered and move to the Street screen by pressing Search. • If at any point you want to Backspace and delete characters, press the backspace button <- on screen. To add a space, press the space bar. • Then you may also enter the Street (not mandatory) and then press Search. • Furthermore you may enter the Number (not mandatory). Press Search. 25 Chapter 4 : Navigation Application The Hit List will be displayed. • Select the desired address from the Hit List. If you reached the Address Search function via the Finder tab, Navigation will start automatically after selection. Clear visual and voice commands will guide you along the route. (The Navigation Map and Guidance Options are described in “Navigation Screen”.) ► Bookmarks The Bookmarks list contains the destinations you have saved as favorites (from the Guides, from your Address Search, etc.). There is no need to perform repeated searches for those destinations. • Press on the Bookmarks icon. • Use the Up and Down arrows to scroll up and down in the list. Select an item by clicking on it. • With the Trashcan icon you may delete a marked entry. • Select an item and tap on the Edit icon (bottom right) to edit the entry. • Touch an entry to start the navigation. ► My Work By pressing on My Work you will be guided directly to your workplace or another frequently visited location. NOTE: For this you have to predetermine you workplace via Main Menu Favorites My Work Set Work Position. ► Recent By pressing Recent a list with the recent visited and searched destinations will be opened. (See also instructions in section “Bookmarks”.) ► Map Via Map you can move on the map of the surrounding area and select items for guidance. (See also “How do I select addresses on the map?”.) 26 Chapter 4 : Navigation Application ► POI You may also select a destination via the POI (Points of Interest) finder. Here you may choose among frequently used categories such as Gas Station, Restaurant, Parking, Car Park, Hotel, Sights and Airports. By pressing More you will switch to the full POI list. 4 ► Guides Press on Guide and the guide list for the current region you are in will be opened. You may choose a guide item as destination, save it as bookmark or pinpoint the location. (See also section “How do I use guides?”.) NOTE: Guides are an optional feature and may be purchased at: www.gate5-guides.com 27 Chapter 4 : Navigation Application How Can I Plan My Route? Using the Advanced Route Planning Options you may plan your route with multiple stopovers along your journey. • To start this function select Plan Route in the Main Menu. The Destination List will be displayed. • By pressing the + icon you can add a stopover. You will switch to the Choose stopover screen, which looks the same like the Destination Finder screen and is exactly the same to use. You may choose stopovers via your Home Address, the Address search, Bookmarks, your workplace, Recent locations, Map and POIs. Once you have added stopovers (with the Add Icon) and returned to the Destination List, you have several options: • With the + icon you can add more stopovers. • Select a Stopover and then use the Up and Down arrows to change the order of the stopovers. • With the Trashcan icon you can delete a selected stopover. • Via Menu you may start following functions: • With Simulate you can simulate the forthcoming route. • By pressing Start Navi the guidance will start automatically and the display will switch to the navigation map. • With Routing the system will calculate your route and the Summary will be displayed. • Press again on Waylist to display the Waypoints or the Map View. 28 Chapter 4 : Navigation Application How Do I Select Addresses on the Map? The Map (General Map) not only shows roads and squares, but also Points of Interest such as restaurants, cultural attractions, parking garages, etc. To start this function press the Map icon in the Main Menu. The General Map will now appear in the display. 4 POI Information Selected POI Zoom In (down) and Out (up) Adjust Orientation Toggle between 2D and 3D Mode ► Functions of buttons • Discover your surroundings by dragging the map with your finger (or with the pen). • Point at the symbol of a location to display its name. • Use the Scroll Bar on the right to zoom in (down) or out (up) on the Map. • Use the symbol in the bottom right-hand corner to toggle between 2D and 3D view. • With the Compass icon (in the bottom left hand corner) you may adjust you orientation. ► Further functions If you tap on the menu, there are more functions. • Tap on Save can save the current location to Bookmark. • Tap on Settings, you can toggle between 2D and 3D display mode, view the Info Layers, and toggle between Day and Night mode. • Tap on Go to GPS can show your current lcoation on the map. • Tap on Navigate can start to guide you to the selected location. • You can use the address searching function by tap on Address. • Tap on Bookmarks and Nearby, you can see a list of bookmarks and search a nearby POI. 29 Chapter 4 : Navigation Application 30 Chapter 5 Troubleshooting 5 31 Chapter 5 : Troubleshooting ► If the GV-201 does not boot up successfully or does not function properly: 1. Please check if the Application software is properly installed in the memory card. 2. Please check if the SD memory card is inserted into the SD expansion slot. 3. Please check if the battery power. (A red light indicates the battery power is low and needs to be charged. An yellow light will start to blink when it is in charging status, and the yellow light will be on when the battery is fully charged.) 4. Perform the “Soft Reset”. If this doesn't solve your problem, perform the “Hard Reset”. (Performing a Hard Reset should solve most of the problems.) ► Soft Reset and Hard Reset: If your GV-201 is down or it encounters an unexpected error, you can reset it. There are two types of reset: a hard reset and a soft reset. You will need to use a stylus or pencil to press the reset button. Soft Reset Pressing the reset button will restart the system retaining all the information stored on the device. Hard Reset A hard reset will re-initialize the GV-201 back to the factory settings. You should not need to use this under normal operating conditions. To start a hard reset, you need to press and hold the reset button meanwhile pressing down the power button. Note 1: A hard reset will delete some of the information stored on the device and revert to its original factory settings. All data stored on the memory card, such as music files and movie files will be retained. Note 2: When the system has been hard reset, the screen needs to be aligned before it can be used. The screen correction program will start automatically. Using the stylus to tap on the cross mark in the middle of the screen. The cross mark will now move to the upper left corner. Tap it in the center again. Repeat this for the remaining 3 corners. If this failed, please repeat from the beginning. After all the steps are finished, touch the screen again and the system menu will appear on the display. ► Format the memory card It is important that your SD memory card must be formatted as FAT (not FAT32). 32 Chapter 5 : Troubleshooting ► Safely Remove Hardware Before you remove the memory card from the card reader, or before you unplug the USB cable from the device or USB port, please safely remove the hardware by the following processes: 1. Double click the "Safely Remove Hardware" icon from the task bar. (the right bottom corner of desktop) 2. Select the hardware device and then click the "Stop" button. 3. Confirm by selecting the device again and click "OK" button. 4. When you see a message showing "Safe To Remove Hardware" on desktop, then you can remove the memory card or unplug the USB cable. 5 If your car windows equipped with Window Films for reducing heat and blocking the harmful UV rays, it may also slightly affect the receiving of GPS signal. Thus, the cold start time will take longer then usual. If the car is moving, it may also affect the time for GPS fix. We suggest that you stop the car while you turn on the GV-201 for a quicker GPS fix time. Please avoid excessive heat and humidity. Please do not leave the GV-201 in your car under the direct sunshine with windows closed. Place it in a high temperature environment may damage its LCD display or the device. 33 Chapter 5 : Troubleshooting FCC Notices This device complies with part 15 of the FCC rules. Operation is subject to the following two conditions: (1) This device may not cause harmful interference, and (2) This device must accept any interference received, including interference that may cause undesired operation. FCC RF Exposure requirements: This device and its antenna(s) must not be co-located or operation in conjunction with any other antenna or transmitter. N O T E : T H E M A N U FA C T U R E R I S N O T R E S P O N S I B L E F O R A N Y R A D I O O R T V INTERFERENCE CAUSED BY UNAUTHORIZED MODIFICATIONS TO THIS EQUIPMENT. SUCH MODIFICATIONS COULD VOID THE USER’S AUTHORITY TO OPERATE THE EQUIPMENT. 34