1
Nintendo of America Inc.
P.O. Box 957, Redmond, WA 98073-0957 U.S.A.
www.nintendo.com
60460A
PRINTED IN USA
INSTRUCTION BOOKLET
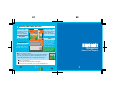
PLEASE CAREFULLY READ THE SEPARATE HEALTH AND SAFETY
PRECAUTIONS BOOKLET INCLUDED WITH THIS PRODUCT BEFORE
USING YOUR NINTENDO ® HARDWARE SYSTEM, GAME CARD OR
ACCESSORY. THIS BOOKLET CONTAINS IMPORTANT HEALTH AND
SAFETY INFORMATION.
IMPORTANT SAFETY INFORMATION: READ THE FOLLOWING
WARNINGS BEFORE YOU OR YOUR CHILD PLAY VIDEO GAMES.
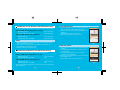
WARNING - Seizures
•
•
•
•
Some people (about 1 in 4000) may have seizures or blackouts triggered by light flashes or patterns,
such as while watching TV or playing video games, even if they have never had a seizure before.
Anyone who has had a seizure, loss of awareness, or other symptom linked to an epileptic condition
should consult a doctor before playing a video game.
Parents should watch when their children play video games. Stop playing and consult a doctor if you or
your child have any of the following symptoms:
Convulsions
Eye or muscle twitching
Loss of awareness
Altered vision
Involuntary movements
Disorientation
To reduce the likelihood of a seizure when playing video games:
1. Sit or stand as far from the screen as possible.
2. Play video games on the smallest available television screen.
3. Do not play if you are tired or need sleep.
4. Play in a well-lit room.
5. Take a 10 to 15 minute break every hour.
WARNING - Radio Frequency Interference
The Nintendo DS can emit radio waves that can affect the operation of nearby electronics, including
cardiac pacemakers.
• Do not operate the Nintendo DS within 9 inches of a pacemaker while using the wireless feature.
• If you have a pacemaker or other implanted medical device, do not use the wireless feature of the
Nintendo DS without first consulting your doctor or the manufacturer of your medical device.
• Observe and follow all regulations and rules regarding use of wireless devices in locations such as
hospitals, airports, and on board aircraft. Operation in those locations may interfere with or cause
malfunctions of equipment, with resulting injuries to persons or damage to property.
WARNING - Repetitive Motion Injuries and Eyestrain
Playing video games can make your muscles, joints, skin or eyes hurt after a few hours. Follow these
instructions to avoid problems such as tendinitis, carpal tunnel syndrome, skin irritation or eyestrain:
• Avoid excessive play. It is recommended that parents monitor their children for appropriate play.
• Take a 10 to 15 minute break every hour, even if you don't think you need it.
• When using the stylus, you do not need to grip it tightly or press it hard against the screen. Doing so
may cause fatigue or discomfort.
• If your hands, wrists, arms or eyes become tired or sore while playing, stop and rest them for several
hours before playing again.
• If you continue to have sore hands, wrists, arms or eyes during or after play, stop playing and see a doctor.
WARNING - Battery Leakage
The Nintendo DS contains a rechargeable lithium ion battery pack. Leakage of ingredients contained within the
battery pack, or the combustion products of the ingredients, can cause personal injury as well as damage to your
Nintendo DS.
If battery leakage occurs, avoid contact with skin. If contact occurs, immediately wash thoroughly with soap and
water. If liquid leaking from a battery pack comes into contact with your eyes, immediately flush thoroughly with
water and see a doctor.
To avoid battery leakage:
• Do not expose battery to excessive physical shock, vibration, or liquids.
• Do not disassemble, attempt to repair or deform the battery.
• Do not dispose of battery pack in a fire.
• Do not touch the terminals of the battery, or cause a short between the terminals with a metal object.
• Do not peel or damage the battery label.
THIS GAME CARD WILL WORK
ONLY WITH THE NINTENDO DS
VIDEO GAME SYSTEM.
Minigames (One to Four Players)
TM
2-4
Wireless DS
Single-Card
Download Play
THIS GAME ALLOWS WIRELESS MULTIPLAYER
GAMES DOWNLOADED FROM ONE GAME CARD.
2-4
Nintendo does not license the sale or use of products
without the Official Nintendo Seal.
Wireless DS
Multi-Card
Play
THIS GAME ALLOWS WIRELESS MULTIPLAYER
GAMES WITH EACH DS SYSTEM CONTAINING
A SEPARATE GAME CARD.
Nintendo's game pages, at www.nintendo.com/games, feature
walkthroughs, frequently-asked questions, and codes for many of our
games. If your answer isn't there, check out our forums where you can
exchange tips with other gamers online.
For more information about our forums, visit
www.nintendo.com/community.
If you don't have access to the website, recorded tips for many titles are
available on Nintendo's Power Line at (425) 885-7529. This may be a longdistance call, so please ask permission from whoever pays the phone bill.
Minigames: Getting Started
Vs. Battle
1 Player
Controls
Getting Started
Selecting a Game
Options
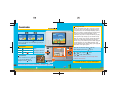
Screen shots in this instruction booklet
show both the top screen and the bottom
screen (Touch Screen). You can tell which
screen is which by looking at the frame
around the screen shot.
Mario Game (Single Player)
Peach’s Peril
Mario Game: Getting Started
Viewing the Game Screens
Map Screen
Action Screen
Midway Points and Goals
Blunders and Game Over
Pause Menu
Saving and Sleep Mode
Items and Gimmicks
Action Intros
Mario’s Basic Actions
Mario’s Power-ups
Mega Mario
Mini Mario
Shell Mario
Top Screen
Bottom Screen
Mario Vs. Luigi (Two Players)
© 2006 NINTENDO. ALL RIGHTS, INCLUDING THE COPYRIGHTS OF GAME, SCENARIO, MUISIC AND
PROGRAM, RESERVED BY NINTENDO. TM, ® AND THE NINTENDO DS LOGO ARE TRADEMARKS OF
NINTENDO. © 2006 NINTENDO. ALL RIGHTS RESERVED.
This product uses the LC Font by Sharp Corporation, except some characters. LCFONT, LC Font and the LC logo
mark are trademarks of Sharp Corporation.
2
Mario Vs. Luigi: Getting Started
Connecting
Setting Game Rules
Viewing the Game Screens
3
Controls
Stopping Your Game
Activate Sleep Mode (page 16) by closing your system
at any time when you’re playing in single-player mode.
(Sleep Mode does not work during multiplayer games.)
Open your system to continue playing your game. If the
system loses power during Sleep Mode, you’ll be
returned to your previous save point next time you play.
If the system is fully charged, you can remain in Sleep
Mode for roughly one week. If the charge light changes
from green to red during Sleep Mode, the system is
almost out of power, and the system should be plugged
in and charged at once. Sleep Mode’s duration may
change depending on the battery charge, game play, and
temperature of the game system.
You can move the map screen ( page 12) and the
action screen ( page 14) left and right by pressing the
L and R Buttons.
Menu Controls
Select
or use Touch Screen
Move
Confirm
or use Touch Screen
Enter pipes and doors
Cancel
or tap
Climb ropes and vines
Touch Controls
Choose a world to move to ( page 12)
Use stored items ( page 14)
Minigame controls ( page 30)
Open and close the pause menu ( page 16)
Open minigame pause menu ( page 31)
: Dash
or
+ left or right on
or
: Jump / Swim (in water)
See page 8 for information on how to change which
buttons do which actions.
Microphone
Touch Screen and mic controls are mainly used in minigames. ( Page 30)
For details on actions, see pages 18 through 24.
Getting Started
Selecting a Game
Choose the game mode you want to play by selecting
one of the four modes shown on the menu screen.
Press up or down on
to select a mode and press
to confirm. You can also make selections by
tapping the Touch Screen. Press
to return to the
previous screen.
Make sure your Nintendo DS is off, and then insert the New Super Mario Bros.
Game Card into the DS Game Card slot until it clicks into place and turn the
power on.
Read the information on the start-up screen and
then tap the screen to move to the DS menu
screen.
Mario Game (Single Player)
A single-player game where you control Mario and clear courses to
rescue Princess Peach. ( Page 11)
Mario Vs. Luigi (Two Players)
A two-player game in which you and a friend control Mario and Luigi and
compete to collect Big Stars. ( Page 26)
On the DS menu screen, tap the New Super Mario
Bros. panel.
Minigames (One to Four Players)
A multitude of minigames for up to four players. (
If you have your Nintendo DS start-up mode
set to Auto, the DS menu screen will not
appear. See your Nintendo DS instruction
booklet for more details.
Options
Sound and control settings. (
Page 8)
Page 30)
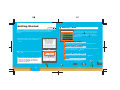
Options
On this screen, you can change your sound and control settings. Use your stylus or
to select menu items and make changes. Press
to confirm your changes and
return to the main menu.
Sound
Controls
Tap OK or press
to save your settings
and return to the
main menu.
Select the sound setting you prefer.
Choose the control setup that
works for you.
When the manual refers to jump and dash buttons,
it will be referring to the buttons designated in the
Controls option.
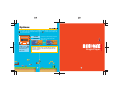
Single Player
Peach’s Peril
Mario Game: Getting Started
EMERGENCY NEWS FLASH!
Select a File
Princess Peach has been kidnapped! While
enjoying a nice walk with Mario, the beloved ruler
of the Mushroom Kingdom was whisked away by
an unknown assailant. How could this happen
Mario
with Mario around?
According to eyewitnesses, the
Princess walk was going swimmingly when
Mario and the princess spotted smoke billowing out of
Peach
Peach’s Castle. The mustachioed marvel immediately
jumped into action and sped off toward the fire. The
moment he left her side, the princess vanished!
Who’s behind Princess Peach’s disappearance?
Who’s behind the attack on Peach’s Castle?
Are the two incidents related?
Didn’t Bowser Jr. once think Princess Peach might be
his mother?
Looks like Mario’s going to need all the
Mega Mushrooms he can find to get to the
bottom of this mess!
To start a new game, use
to select a file marked New
and press
to confirm. To continue a previous game,
select a file containing saved data. ( Page 16)
Copy
Select a file to copy,
and then select a
destination file to
copy to.
Press , , , ,
, and
saved data on the Game Card.
Erase
Select a file to erase.
at the same time to erase all
CAUTION! Saved data that is erased or copied over is gone forever
and cannot be restored.
Bowser
Jr.
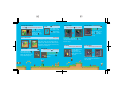
Viewing the Game
Towers / Castles
Map Screen
Use
to move Mario across the map. Press
to begin the course Mario is standing on.
Clear a course to move on to the next one, and clear the castle at the end of a world to go to the
next world.
Course Name and
Star Coins
The course name and the
number of Star Coins
collected on the course.
Flashing numbers indicate
that Mario has collected the
coins but not yet reached the
course goal. ( Page 15)
Pay the number of Star Coins
shown on these signs, and they’ll
vanish from the board to open new
paths. Once you spend the Star
Coins, you can save your progress.
( Page 16)
Flying ? Blocks / Hammer Bros.
Courses
Open Courses
Cleared Courses
Unopened Courses
Stored Item (
Page 14)
Remaining Lives ( Page 14)
The total number of Star
Coins ( page 17) Mario’s
collected on all courses.
Mario battles Bowser Jr. at the end
of each tower course, and he fights
different bosses at the end of each
castle course. You’ll be able to save
( page 16) once you complete a
tower or castle course.
Star Coin Signs
Progress bar (
Page 14)
World Map
You can move to a different
world by tapping one from
this map. You cannot move
to courses marked in black.
If you see the Flying ? Block
or a Hammer Bro. on a course
marker on the map screen, then
you’ll know the block or bro will
appear somewhere on that course.
Check your progress bar for the
mark to see where they might be.
Toad House
Along the way, you’ll see different Toad Houses where
you can get items. Hit blocks or panels on-screen to
get items. In the green Toad House, you can earn a lot
of 1-Ups, but be careful: if you hit the block with the
Bowser card, the minigame will end. You’ll get to keep
your 1-Ups, but you won’t get to hit any more blocks.
14
15
Action Screen
Midway Points and Goals
Time Remaining
Coins Collected
( Page 17)
Midway Points
If you don't reach the
course goal before
time runs out, you'll
lose a life. ( Page 15)
Remaining Lives
Progress bar
If Mario falls in a pit,
gets hit by an enemy,
etc, he’ll lose a life. If he
loses all of his lives, it’s
game over. ( Page 15)
Mario’s head shows
where you are on the
current course. The
farther you go to the
right, the closer you are
to the course goal.
Score
Not all courses have midway points
When you reach a midway point on a course, a flag will appear on the
action screen, and the midway point will appear on your progress bar.
If you replay the course, you’ll start from the midway point. However,
if you play another course and then return to this course, you’ll have
to start from the beginning.
Course Name
This is how many points
you’ve earned so far.
You gain points by
breaking blocks and
defeating enemies.
*
Star Coins
This shows how many
Star Coins you’ve
collected on the current
course. All courses have
three Star Coins.
Goals
Every course has a goal at the end. When you reach the end of a course,
face the pole and jump as high as you can. The higher Mario grabs on to
the pole, the more points you’ll earn.
Items
If Mario picks up an item
when he’s powered up
( Page 22), the item goes
into your reserve spot on
the Touch Screen. To use
the item, simply tap it to
make it drop onto
the action screen.
Blunders and Game Over
Getting whacked by enemies and falling in pits
makes Mario lose a life. If Mario loses all his lives,
your game ends, and you’ll have to start from your
last saved point. If this happens, choose either
Continue or Quit.
Items and Gimmicks
Pause Menu
Press
on the map or action screen to halt the game and open the pause
menu. Select menu items with
and confirm with
.
Continue
Each course is crammed full of items and gimmicks. Here’s a small list of some
you’ll run across:
? Block
Hit ? Blocks to find coins
or items.
Brick
Break bricks, and you might
find coins.
Close the pause menu and return to the game.
Return to map
Leave the action screen and return to the map screen.
This option appears only in the pause menu on the
action screen.
Options
Adjust sound and control settings. ( page 8)
Quit
Quit without saving and return to the title screen.
Saving and Sleep Mode
You’ll see a screen like the one shown here when you clear
tower and castle courses. ( Page 13) Choose Yes to save
your game progress. If you’re not able to save, you can
halt your game by using Sleep Mode. ( Page 5)
Coin
Gather 100 coins to gain an
extra life.
Starman
Snag this to gain temporary
invincibility. You’ll also be
able to dash and jump
much farther.
1-Up Mushroom
Grab one of these to gain an
extra life.
Spin Blocks
Stand on these blocks and jump
to perform a spin jump. Press
down on
to drop back down
in a spinning drill stomp!
Star Coin
Earn enough Star Coins, and
you’ll be able to open up new
courses. ( page 13)
Red Ring & Coin
Pass through a red ring to make
red coins appear for a brief time.
If you collect all eight red coins,
an item will appear on screen.
Switch Block
/
/
Jump on P Switch blocks to turn
bricks into coins and vice versa.
! Switch blocks turn outlined
bricks solid, and ? Switch blocks
have different effects on
different courses.
Action Intros
Hit Blocks from Below
Press left or right on
to make Mario walk.
Duck
Down on
Press and hold down on
to duck. Do this while
dashing to make Mario
slide for a bit while
ducking.
Dash
Left or right on
+ Dash Button
Press and hold the dash button while pressing left or
right on
to move from a walk to a dash. Mario can
dash over one-block-wide gaps without falling into them.
Jump and Stomp
Ground Pound
Press down on
Wall Jump
Jump while dashing, then
press the jump button again
just as Mario touches down
to perform high double and
triple jumps.
while jumping
Press down on
while
jumping to perform a
ground pound. Use this to
attack enemies below you
as well as break bricks.
Jump Button
Press the jump button to jump: press and release for
short jumps, and press and hold for longer jumps.
Jumping on top of enemies is the most basic way to
attack them. If you press the jump button right when
you land on an enemy, you’ll be able to jump higher
than usual.
Double Jumps
+ Dash Button then Jump Button
Jump while standing
beneath blocks to hit (and
sometimes break) them.
Hitting blocks from
underneath allows you to
attack any enemies
standing on them.
Mario’s Basic Actions
Walk Left or right on
Jump Button
Slide
Down on
on slopes
Press down on
at the
top of slopes to go slipsliding away. Mario will
topple any enemies he hits
while sliding.
While Sliding:
+ Jump Button
While sliding down walls, press in the
direction of the wall and press the jump
button to kick off the wall and jump upwards.
Entering Pipes and Doors
Press in the direction of pipe entrance
Press
in the
direction of a pipe
entrance to enter it.
Press up on
to go
through doors.
+ Jump Button
Swim
Dash Button
Hit shelled enemies to make them hide inside
their shells. Then, press the dash button to
pick them up, and release the dash button to
throw them. Shelled enemies aren’t the only
enemies you can pick up.
Left or right on
Press left or right on
to
sidle slowly along cliffs.
Mario can still make short
jumps while doing this.
Climb on Fences
Hang and Go
Left or right on
while hanging
Press left or right on
to
move while hanging from
edges. Press up on
to
climb up.
While Hanging:
while grabbing
In the water, press
and hold left or right
on
and press the
jump button to swim.
Grab & Throw Items
Sidle on Walls
Swing on Ropes
Left or right on
Press up on
to grab
on to fences. Then
press up, down, left, or
right on
to move.
Press the jump button
to let go.
Press up on
to grab ropes and vines.
Then, press left and right on
to
swing back and forth. Press the jump
button to let go.
Hit Fences
While hanging: Dash Button
Turn Flip Panels
While hanging: Dash Button
Press the dash button
while climbing to
bang on a fence and
attack enemies on the
other side.
Press the dash button on flip
panels to spin them and move to
the other side.
Mega Mario
Mario’s Power-ups
You can find Mega Mushrooms in ? Blocks
and Flying ? Blocks. You can also get them
from certain Toad Houses. Grab a Mega
Mushroom to make Mario grow to colossal
size for a short time. Mega Mario can
smash enemies, blocks, and even pipes
simply by running into them.
Mario
Mario in his standard form. Get hit by
an enemy or fall into a pit, and he’ll
lose a life.
DAMAGE!
Mega Meter
This meter keeps track of the damage Mega Mario causes to blocks, bricks, etc.
If the Mega Meter is above a certain level when the Mega Mushroom wears off,
that many 1-Up Mushrooms will appear.
DAMAGE!
Fire Mario
Press the dash button to hurl
fireballs.
Super Mario
Mario grows bigger and stronger when he
gets a Super Mushroom. If he’s hit by an
enemy, he’ll shrink back to standard Mario.
Mini Mario
Snag a Mini Mushroom to shrink Mario
down to micro size. In this teeny form,
Mario can go into small pipes and travel
down tiny paths. Plus, he’s so light that
he can perform floating jumps and run
on water! If he gets hit by enemies,
though, Mini Mario’s done for.
Shell Mario
When Mario picks up a special blue koopa shell, he’ll transform into Shell
Mario. Press left or right on
while holding the dash button to perform a
shell dash and go crashing into enemies. If Mario gets hit by an enemy
when he’s not shell dashing, he’ll lose his shell and become Super Mario.
Shell Dash
Hit enemies while shell-dashing to send
them flying. If you hit walls or blocks,
Mario will go careening off in the opposite
direction. To stop shell-dashing, simply
release the dash button.
Two Players
Mario Vs. Luigi: Getting Started
Setting Game Rules
Big Stars appear randomly all over the course. Move quickly and grab the stars
before your opponent does.
Connecting
Before beginning a wireless game, see page 32–34.
Players with DS Game Cards
Playing with someone who has a
New Super Mario Bros. Game
Card. (DS Wireless Play: P1, P2)
Select the top
panel by
tapping it or
pressing the
correct button.
If you select
Mario, you’re
Player 1. If
you select
Luigi, you’re
Player 2.
Both players cannot
choose to play the
same bro.
Playing with someone who
doesn’t have a New Super
Mario Bros. Game Card (DS
Download Play: P1)
Select the
bottom panel
by tapping it
or pressing
the correct
button.
No matter
which
character you
choose, you’ll
be Player 1.
When communications
are successfully
established and an
opponent has been
detected, select Yes.
Personalize the rules of your versus game. Use either the stylus or
to make
menu selections and confirm your choices.
Choose the number of matches
Wins
needed to win the competition.
Players without
DS Game Cards
DS Download Play:
P2
Tap OK when you’ve finished
setting up your rules.
Big Star
Set the number of Big Stars
( page 28) needed for victory.
Lives
Select the number of lives Mario
and Luigi have during the game.
Course
Set the course selection to
Choose Each Time or Random.
Choose a course before each match or set the
selection to Random.
On the DS menu
screen, select DS
Download Play
and then tap the
New Super Mario
Bros. panel.
Go to the next page. (From this point until the game begins, Player 1 will be in charge.)
Let the Bros.
Battle Begin!
Viewing the Game Screens
The number of Big
Stars Mario’s collected
and the number of
lives he has remaining.
The number of Big
Stars Luigi’s collected
and the number of
lives he has remaining.
Big Stars
Collect Big Stars to win.
Coins
Progress bar
This shows how many
coins you’ve collected.
Once you collect eight
coins, an item will
appear, and this number
will drop back to zero.
This shows the location
of Mario, Luigi, and the
Big Stars on the course.
Basic controls are the
same as in the singleplayer Mario game.
How to Nab Big Stars
Here are some ways you can make your opponent drop Big Stars.
Of course your opponent can do the same things to you, so be
careful! Dropped Big Stars can be collected by either player.
Jump on your opponent.
Hit your opponent with a fireball or a shell dash.
Get hit by enemies, fall off the course, get crushed by walls, etc.
Minigames
(One to Four Players)
Minigames
Shuffle will choose a random
assortment of games from
the genre you have selected.
Points are awarded to players
at the end of each game. Once the set
number of games is finished, the
player with the highest point total wins.
There are two types of minigames in New Super Mario Bros.:
Vs. Battle and 1 Player. Tap
to proceed. Minigames use
the stylus and the mic. For information on wireless
communications, see page 32–34.
Vs. Battle
Players with DS Game Cards
Player who sets up vs. rules
(DS Wireless Play: P1)
If you
choose
Create
Group
Free Play
Shuffle
Player who does not set up
rules (DS Wireless Play: P2–P4)
Players Without
DS Game Cards
DS Download Play:
P2–P4
If you
choose
Join
Group
In Free Play, games are
played one at a time, and
the loser of each game
selects the next game.
Points are awarded at the end of
each game, and the first player to
reach 200 points wins.
Set the number of
games and the game
genre to be played.
Press
to open
the setup menu.
Select genre and
minigames to be
played.
Some games have
adjustable difficulty
settings. Adjust
settings here.
Tap here to start playing!
This is where you
can adjust the
number of Star
Points awarded and,
with certain games,
the game difficulty.
1 Player
When players 2 through 4
appear, select Start Game
Select the group you want
to join (Player 1’s name)
Proceed to the next page. (Player 1 will set up the game rules.)
On the DS menu
screen, select DS
Download Play.
Then tap the New
Super Mario Bros.
Minigame panel.
Tap a minigame’s icon to see how to play
that game and to see the game’s top scores.
(Top scores are saved automatically.) Tap
the icon again to begin playing.
Press
to adjust settings.
G
A
M
E
S
T
A
R
T
Establishing the DS Wireless Link (DS Wireless Play)
This section explains how to establish your DS wireless link for DS Wireless Play.
What You Will Need to Play Mario Vs. Luigi:
Nintendo DS systems
One for each player
New Super Mario Bros. Game Card
One for each player
What You Will Need to Play Minigames:
Nintendo DS systems
New Super Mario Bros. Game Card
Steps for the host
1. Make sure that all DS systems are turned off, then insert a
New Super Mario Bros. Game Card into the system.
2. Turn on the power of all the systems. The DS Menu Screen
will appear.
3. Touch the New Super Mario Bros. panel.
4. Now follow the instructions on page 26 or 30.
One for each player
One for each player
Steps
1. Make sure that all DS systems are turned off, then insert a New Super Mario
Bros. Game Card into each system.
2. Turn on the power of all the systems. The DS Menu Screen will appear.
3. Touch the “New Super Mario Bros.” panel.
4. Follow the instructions on page 26 or 30.
Establishing DS Wireless Link (DS Download Play)
This section explains how to establish the link for DS Download Play.
What You Will Need to Play Mario vs. Luigi:
Nintendo DS systems
One for each player
New Super Mario Bros. Game Cards
One
What You Will Need to Play Minigames:
Nintendo DS systems
One for each player
New Super Mario Bros. Game Cards
One
You can all play New Super Mario Bros. even if you do not have enough DS Game
Cards for all players.
Game-Selection
Screen
Steps for guests
1. Turn on the power of all the systems. The DS Menu Screen
will appear.
2. Touch the DS Download Play panel. The game-selection
screen will appear.
3. Touch the New Super Mario Bros. panel. The gameconfirmation screen will appear.
4. When the correct software appears, touch Yes. P1 will start
the download process.
5. Please follow the instructions on page 26 or 30.
Game-Confirmation
Screen
Important Wireless Communication Guidelines
Please be aware of the following concerning wireless communication:
Do not operate the Nintendo DS within 9 inches of a pacemaker while using the
wireless feature.
Observe and follow all regulations and rules regarding use of wireless devices in
locations such as hospitals, airports, and onboard air craft. Operation in those
locations may interfere with or cause malfunctions of equipment, with resulting
injuries to persons or damage to property. During wireless game play, an icon will
appear on either the upper or lower display
showing the signal strength of the wireless
signal. The icon has four modes depending on
the signal strength, as shown below.
Begin with the distance between systems at
about 30 feet or less and move closer or
farther apart as desired, keeping the signal
strength at two or more bars for best results.
Keep the maximum distance between systems at 65 feet or less.
The systems should face each other as directly as possible.
Avoid having people or other obstructions between the DS systems.
Avoid interference from other devices. If communication seems to be affected by
other devices (wireless LAN, microwave ovens, cordless devices, computers),
move to another location or turn off the interfering device.
Notes
Important Legal Information
REV–D
Copying of any video game for any Nintendo system is illegal and is strictly prohibited by domestic
and international intellectual property laws. “Back-up” or “archival” copies are not authorized and
are not necessary to protect your software. Violators will be prosecuted.
This video game is not designed for use with any unauthorized copying device or any unlicensed
accessory. Use of any such device will invalidate your Nintendo product warranty. Nintendo (and/or
any Nintendo licensee or distributor) is not responsible for any damage or loss caused by the use of
any such device. If use of such device causes your game to stop operating, disconnect the device
carefully to avoid damage and resume normal game play.
If your game ceases to operate and you have no device attached to it, please contact Nintendo
Customer Service (see below).
The contents of this notice do not interfere with your statutory rights.
This booklet and other printed materials accompanying this game are protected by domestic and
international intellectual property laws.
For further information or assistance, please contact:
Nintendo Consumer Service
www.nintendo.com
or call 1-800-255-3700
(U.S. and Canada)
Warranty & Service Information
REV–P
You may need only simple instructions to correct a problem with your product. Try our website at www.nintendo.com or call
our Consumer Assistance Hotline at 1-800-255-3700, rather than going to your retailer. Hours of operation are 6 a.m. to 7 p.m.,
Pacific Time, Monday - Sunday (times subject to change). If the problem cannot be solved with the troubleshooting information available online or
over the telephone, you will be offered express factory service through Nintendo. Please do not send any products to Nintendo without contacting
us first.
HARDWARE WARRANTY
Nintendo of America Inc. ("Nintendo") warrants to the original purchaser that the hardware product shall be free from defects in material and
workmanship for twelve (12) months from the date of purchase. If a defect covered by this warranty occurs during this warranty period, Nintendo
will repair or replace the defective hardware product or component, free of charge. The original purchaser is entitled to this warranty only if the date
of purchase is registered at point of sale or the consumer can demonstrate, to Nintendo's satisfaction, that the product was purchased within the last
12 months.
GAME & ACCESSORY WARRANTY
Nintendo warrants to the original purchaser that the product (games and accessories) shall be free from defects in material and workmanship for a
period of three (3) months from the date of purchase. If a defect covered by this warranty occurs during this three (3) month warranty period,
Nintendo will repair or replace the defective product, free of charge.
SERVICE AFTER EXPIRATION OF WARRANTY
Please try our website at www.nintendo.com or call the Consumer Assistance Hotline at 1-800-255-3700 for troubleshooting information and repair or
replacement options and pricing. In some instances, it may be necessary for you to ship the complete product, FREIGHT PREPAID AND INSURED FOR
LOSS OR DAMAGE, to Nintendo. Please do not send any products to Nintendo without contacting us first.
WARRANTY LIMITATIONS
THIS WARRANTY SHALL NOT APPLY IF THIS PRODUCT: (a) IS USED WITH PRODUCTS NOT SOLD OR LICENSED BY NINTENDO (INCLUDING, BUT NOT
LIMITED TO, NON-LICENSED GAME ENHANCEMENT AND COPIER DEVICES, ADAPTERS, AND POWER SUPPLIES); (b) IS USED FOR COMMERCIAL PURPOSES
(INCLUDING RENTAL); (c) IS MODIFIED OR TAMPERED WITH; (d) IS DAMAGED BY NEGLIGENCE, ACCIDENT, UNREASONABLE USE, OR BY OTHER CAUSES
UNRELATED TO DEFECTIVE MATERIALS OR WORKMANSHIP; OR (e) HAS HAD THE SERIAL NUMBER ALTERED, DEFACED OR REMOVED.
ANY APPLICABLE IMPLIED WARRANTIES, INCLUDING WARRANTIES OF MERCHANTABILITY AND FITNESS FOR A PARTICULAR PURPOSE, ARE
HEREBY LIMITED IN DURATION TO THE WARRANTY PERIODS DESCRIBED ABOVE (12 MONTHS OR 3 MONTHS, AS APPLICABLE). IN NO EVENT SHALL
NINTENDO BE LIABLE FOR CONSEQUENTIAL OR INCIDENTAL DAMAGES RESULTING FROM THE BREACH OF ANY IMPLIED OR EXPRESS WARRANTIES.
SOME STATES DO NOT ALLOW LIMITATIONS ON HOW LONG AN IMPLIED WARRANTY LASTS OR EXCLUSION OF CONSEQUENTIAL OR INCIDENTAL
DAMAGES, SO THE ABOVE LIMITATIONS MAY NOT APPLY TO YOU.
This warranty gives you specific legal rights. You may also have other rights which vary from state to state or province to province.
Nintendo's address is: Nintendo of America Inc., P.O. Box 957, Redmond, WA 98073-0957 U.S.A.
This warranty is only valid in the United States and Canada.